Starting the system in Safe Mode
Often spyware and other parasites change default system behavior in order to obstruct their manual removal or make it virtually impossible. Even if the user knows what files or registry entries must be removed, what processes should be terminated or what dynamic libraries need to be unregistered, he can be unable to manually remove the threat. The system may show various error messages, report that the user doesn’t have necessary rights, etc. In such cases automatic spyware removers would be useful. But sometimes even advanced tools fail. Then the only way to get rid of the parasite is to start the system in Safe Mode and try once again.
Safe Mode is a special way of booting up Windows operating system (i.e. 95, 98, ME, 2000 and XP versions). It is used to run troubleshooting, diagnostics, administrative and other similar tasks when the system doesn’t normally start or doesn’t work as intended. Safe Mode allows the user to modify practically every system aspect. However, its functionality is heavily limited, so it is very difficult to work in it. When in Safe Mode, Windows loads only basic drivers, many system functions are disabled, some installed application and even hardware devices do not work.
Windows 95
1. Reboot your computer.
2. Press the F8 key immediately after seeing Starting Windows 95 line at the top of the screen.
3. From the appeared startup menu select the Safe Mode option. Press enter. This will start Windows in Safe Mode.
Windows 98 and Windows ME
1. Reboot your computer.
2. Press the F8 key immediately after seeing Starting Windows 98 or Starting Windows Millenium at the top of the screen.
3. From the appeared startup menu select the Safe Mode option. Press enter. This will start Windows in Safe Mode.
If the startup menu doesn’t show, enable it from within standard mode:
1. Click the Start button and select the Run option.
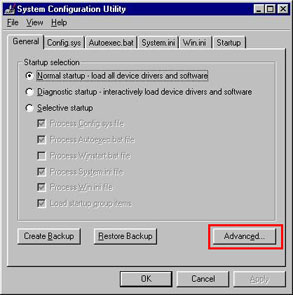
2. In the appeared field type msconfig. Press the OK button. This will launch System Configuration Utility.

Image 1. Start System Configuration Utility
3. Within it press the Advanced… button.

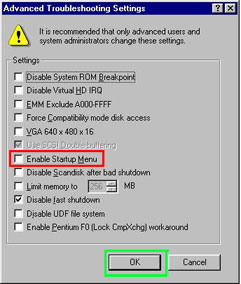
Image 2. Open the Advanced Troubleshooting Settings window
4. The “Advanced Troubleshooting Settings” window will appear. Check Enable Startup Menu. Press the OK button.

Image 3. Check the option designated by the red box
5. Windows will display a message asking you to restart your computer now. Answer Yes.

Image 4. Restart a computer
6. On next startup you will see a menu.
Windows 2000
1. Reboot your computer.
2. When the black-and-white Starting Windows bar will appear at the bottom of the screen, press the F8 key repeatedly.
3. From the appeared Advanced Options Menu select the Safe Mode. Press enter. Windows will start in Safe Mode.
Windows XP
1. Reboot your computer.
2. When the black-and-white progress Starting Windows bar will appear at the bottom of the screen, press the F8 key repeatedly.
3. From the appeared Advanced Options Menu select the Safe Mode. Press enter. Windows will start in Safe Mode.
If the startup menu doesn’t show, enable it from within standard mode:
1. Click the Start button and select the Run… option.
2. In the appeared field type msconfig. Press the OK button. This will launch System Configuration Utility.

Image 5. Launch System Configuration Utility
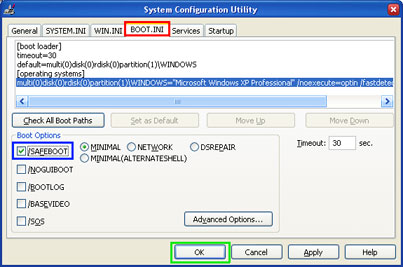
3. Select the BOOT.INI tab.
4. Within it in the “Boot Options” check /SAFEBOOT. Press the OK button.

Image 6. Enable the /SAFEBOOT option
5. Windows will display a message asking you to restart you computer now. Answer Restart.

Image 7. Restart your computer
6. On next startup you will see a menu.
Starting the system in Safe Mode is not the uncommon practice. Do not be scared of it. However, you should be very careful. Think twice before changing certain system settings or removing a particular object while in Safe Mode.
If you do not know how to perform described actions, are not sure why you have to do a certain task or above guide is too difficult for you, feel free to try our recommended automatic spyware removers.
