Secure Net ads (Improved Guide)
Secure Net ads Removal Guide
What is Secure Net ads?
Everything you need to know about Secure Net virus
If you happen to notice redirects to www.destructsrv.com, it is a sign that your computer has been infected with Secure Net virus. This potentially unwanted program, alternatively known as Media Hubs, acts as a hybrid which possesses the qualities characteristic both, to a browser hijacker and adware. Once it slithers into a PC, it starts generating advertisements, banners, and other commercial offers. Following this, you will be not only bombarded with a diverse kind of ads, but the adware will also redirect you to potentially malignant websites. Thus, if your cyber security is of concern for you, remove Secure Net virus before it is too late. For that purpose, FortectIntego comes in handy.
Comparing it with other adware-type programs, this one functions quite aggressively. It injects a specific code into every visited website. They either come in the form of ordinary daily deals, pop-ups offering to install new software or even tech support scams. In addition, deleting the hijackers might also cause some difficulties since it employs additional files which prevent you from easily getting rid of the hijacker and adware. The longer you keep the adware on the system the more Secure Net ads will cram your computer. They might become unbearable to handle since they not only cover the online screen but they also highly deteriorate overall surfing.

Furthermore, Secure Net redirect is another major problem of this adware-hijacker hybrid. As you already noticed, it misleads you to its primary hijacker’s web page. Additionally, the Secure Net also tends to direct you to the domains of highly disturbing content. They might be either gaming, advertising or pornographic websites. Keep in mind that they often shelter highly dangerous viruses. In addition, the quality of search results generated by this hijacker is far from proper in comparison with the ones delivered by a legitimate search engine. Thus, you should make Secure Net removal your top priority.
How did I come across this unwanted application?
It is not surprising why this PUP infected so many computers if we take into account how the majority of users install new programs. Unfortunately, it is a common vice to hop through the installation stages by clicking “Next” button. Thus, the hidden attachments often escape the attention of users. You might admit to committing the same mistake. Consequently, Secure Net slithered past your security programs. We offer you another sequence of actions how you can install your wanted applications without installing additional PUPs. First of all, select “Advanced” settings. Only after you checked all stages for possibly malicious add-ons and unmarked them, finish the installation guide. Such cautiousness will help you to avoid Secure Net hijack in the future.
How can I remove Secure Net?
Install an anti-spyware program to delete Secure Net virus completely. If you update the program daily, it will ensure that no adware, browser hijacker or another malware sneaks past it. It is also programmed to detect any malignant files on the system better than a human eye. However, if you think that Secure Net removal will work out without the assistance of a digital tool, use the manual instructions to deal with the adware. If you want to eliminate it permanently, do not miss any detail while following the removal guide.
You may remove virus damage with a help of FortectIntego. SpyHunter 5Combo Cleaner and Malwarebytes are recommended to detect potentially unwanted programs and viruses with all their files and registry entries that are related to them.
Getting rid of Secure Net ads. Follow these steps
Uninstall from Windows
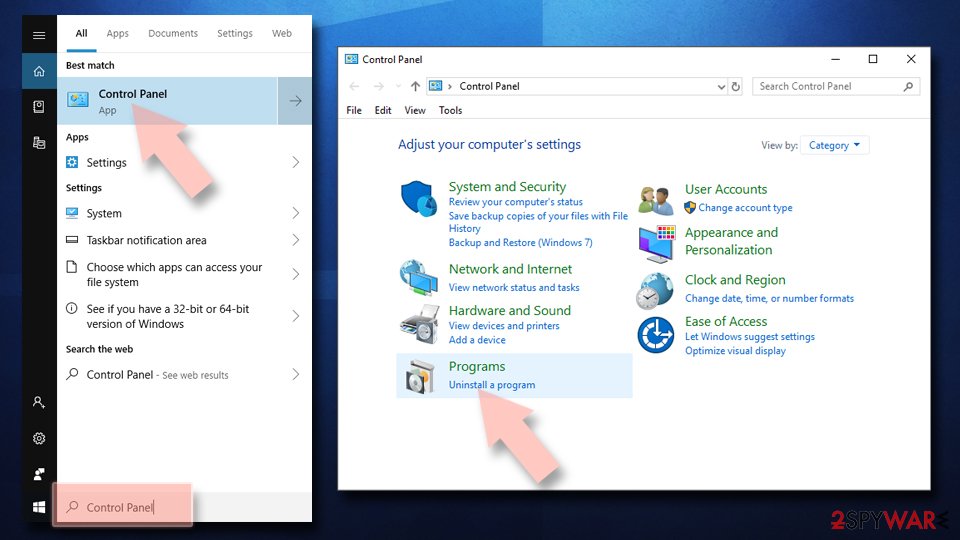
Instructions for Windows 10/8 machines:
- Enter Control Panel into Windows search box and hit Enter or click on the search result.
- Under Programs, select Uninstall a program.

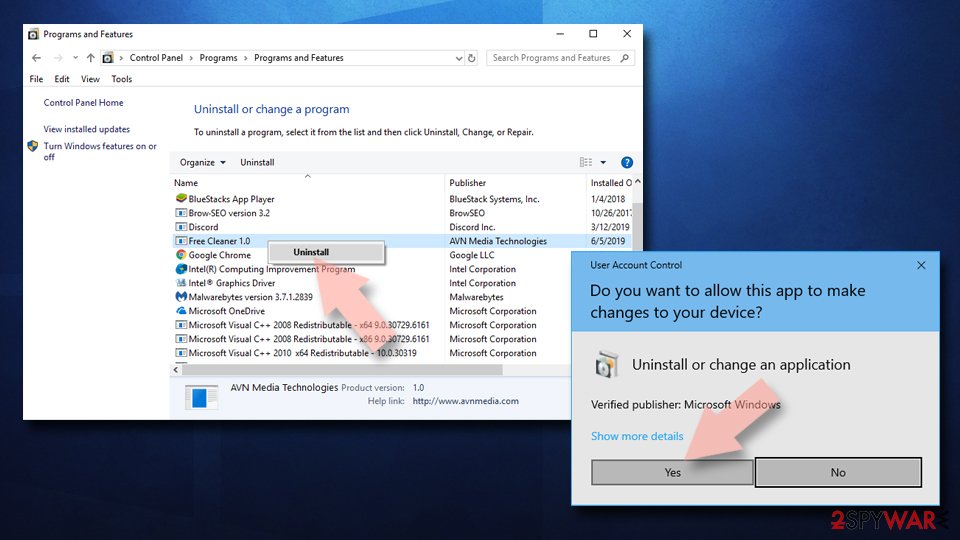
- From the list, find the entry of the suspicious program.
- Right-click on the application and select Uninstall.
- If User Account Control shows up, click Yes.
- Wait till uninstallation process is complete and click OK.

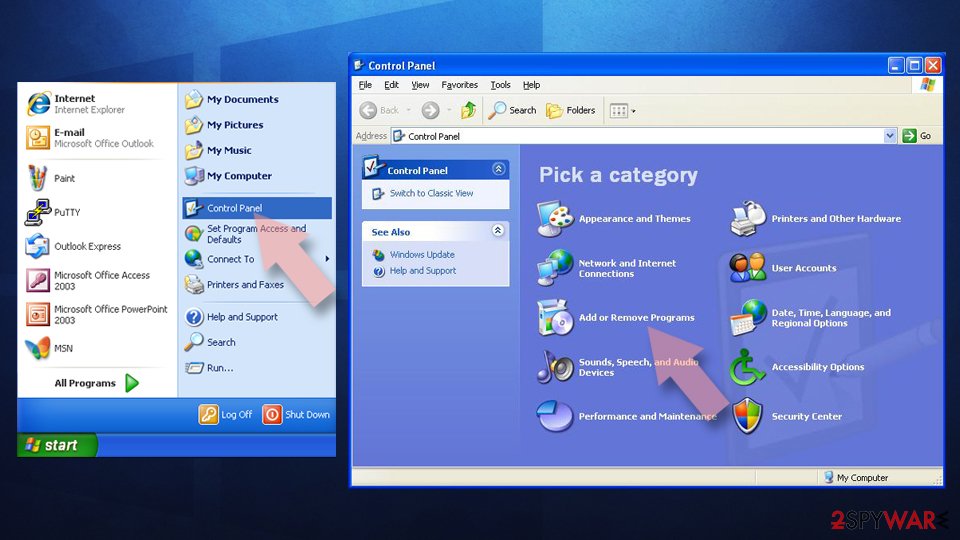
If you are Windows 7/XP user, proceed with the following instructions:
- Click on Windows Start > Control Panel located on the right pane (if you are Windows XP user, click on Add/Remove Programs).
- In Control Panel, select Programs > Uninstall a program.

- Pick the unwanted application by clicking on it once.
- At the top, click Uninstall/Change.
- In the confirmation prompt, pick Yes.
- Click OK once the removal process is finished.
Delete from macOS
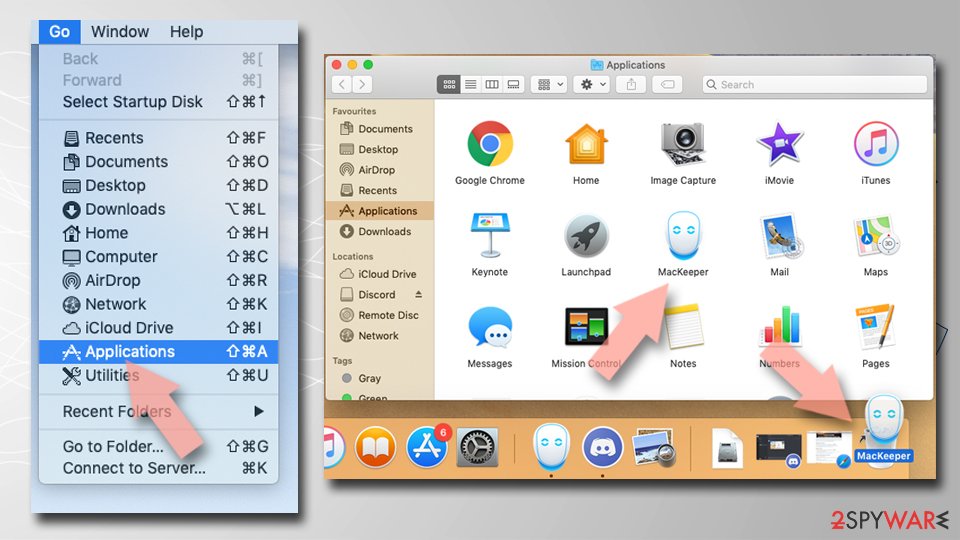
Remove items from Applications folder:
- From the menu bar, select Go > Applications.
- In the Applications folder, look for all related entries.
- Click on the app and drag it to Trash (or right-click and pick Move to Trash)

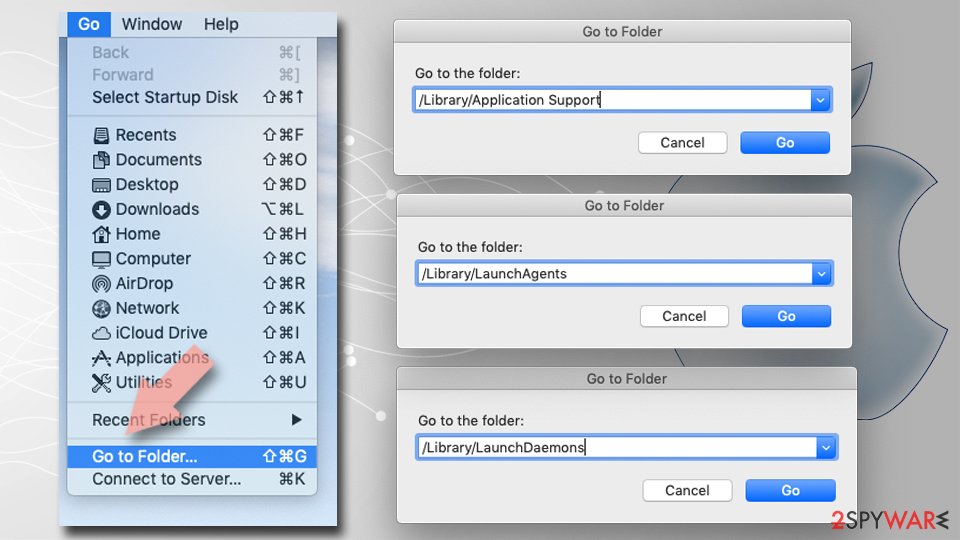
To fully remove an unwanted app, you need to access Application Support, LaunchAgents, and LaunchDaemons folders and delete relevant files:
- Select Go > Go to Folder.
- Enter /Library/Application Support and click Go or press Enter.
- In the Application Support folder, look for any dubious entries and then delete them.
- Now enter /Library/LaunchAgents and /Library/LaunchDaemons folders the same way and terminate all the related .plist files.

Remove from Microsoft Edge
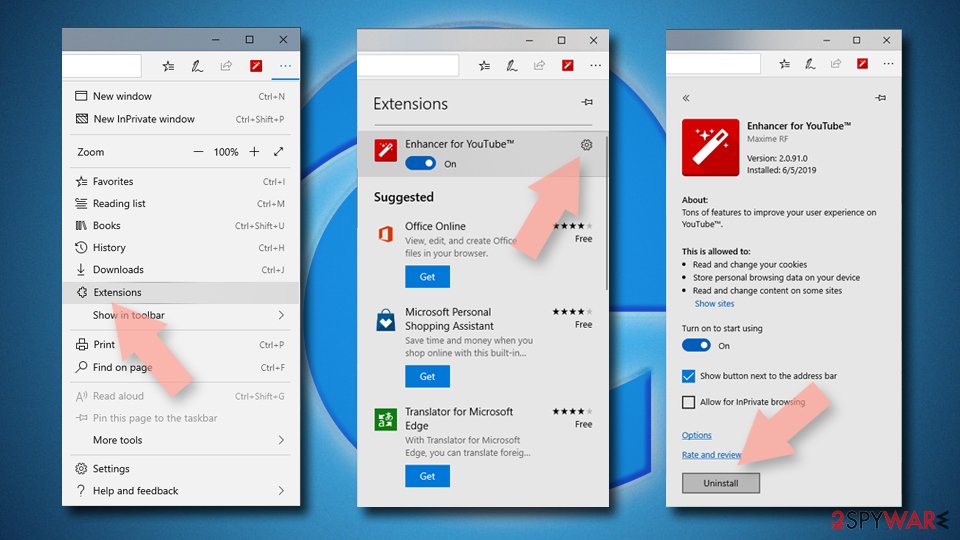
Delete unwanted extensions from MS Edge:
- Select Menu (three horizontal dots at the top-right of the browser window) and pick Extensions.
- From the list, pick the extension and click on the Gear icon.
- Click on Uninstall at the bottom.

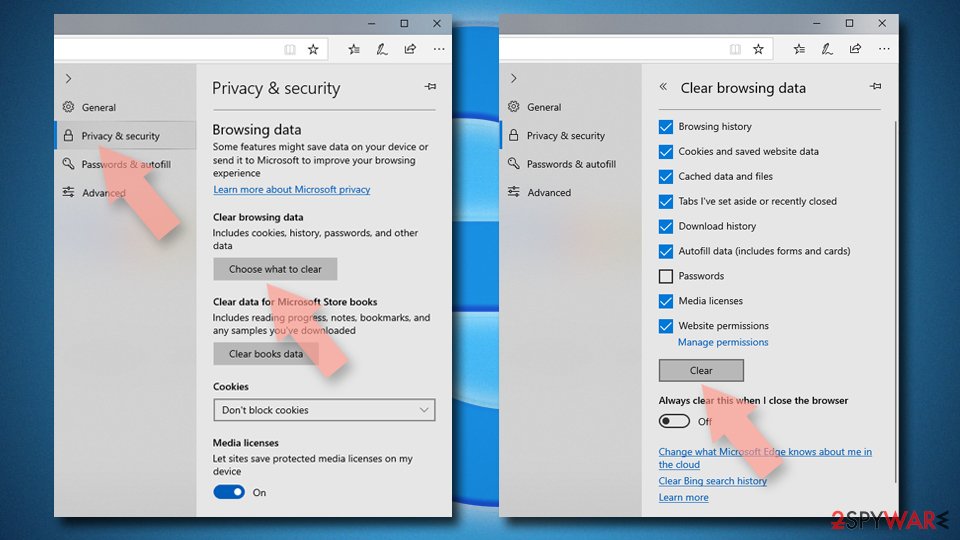
Clear cookies and other browser data:
- Click on the Menu (three horizontal dots at the top-right of the browser window) and select Privacy & security.
- Under Clear browsing data, pick Choose what to clear.
- Select everything (apart from passwords, although you might want to include Media licenses as well, if applicable) and click on Clear.

Restore new tab and homepage settings:
- Click the menu icon and choose Settings.
- Then find On startup section.
- Click Disable if you found any suspicious domain.
Reset MS Edge if the above steps did not work:
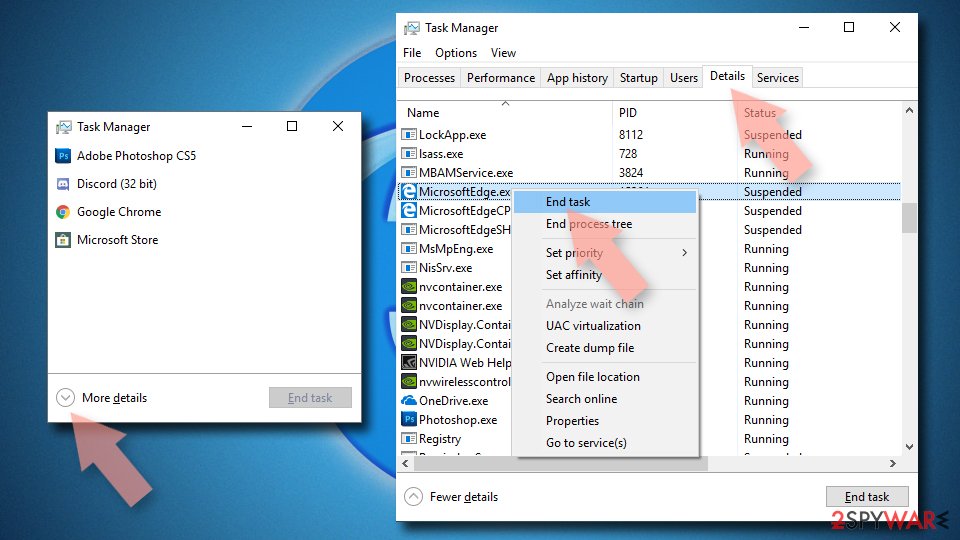
- Press on Ctrl + Shift + Esc to open Task Manager.
- Click on More details arrow at the bottom of the window.
- Select Details tab.
- Now scroll down and locate every entry with Microsoft Edge name in it. Right-click on each of them and select End Task to stop MS Edge from running.

If this solution failed to help you, you need to use an advanced Edge reset method. Note that you need to backup your data before proceeding.
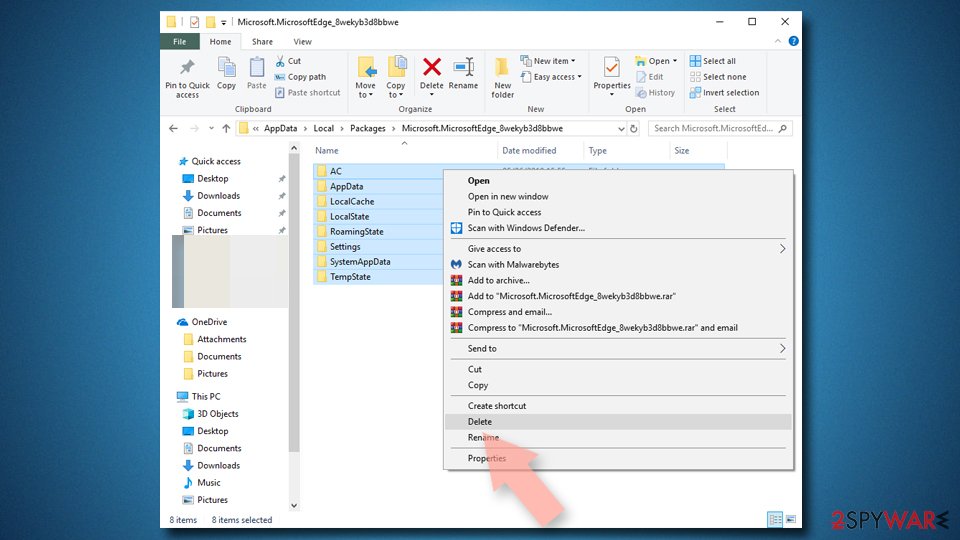
- Find the following folder on your computer: C:\\Users\\%username%\\AppData\\Local\\Packages\\Microsoft.MicrosoftEdge_8wekyb3d8bbwe.
- Press Ctrl + A on your keyboard to select all folders.
- Right-click on them and pick Delete

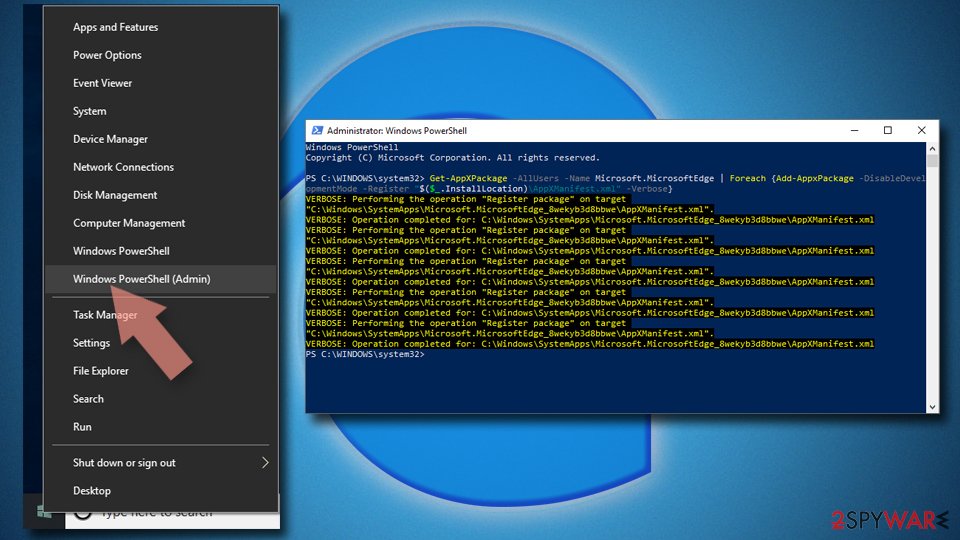
- Now right-click on the Start button and pick Windows PowerShell (Admin).
- When the new window opens, copy and paste the following command, and then press Enter:
Get-AppXPackage -AllUsers -Name Microsoft.MicrosoftEdge | Foreach {Add-AppxPackage -DisableDevelopmentMode -Register “$($_.InstallLocation)\\AppXManifest.xml” -Verbose

Instructions for Chromium-based Edge
Delete extensions from MS Edge (Chromium):
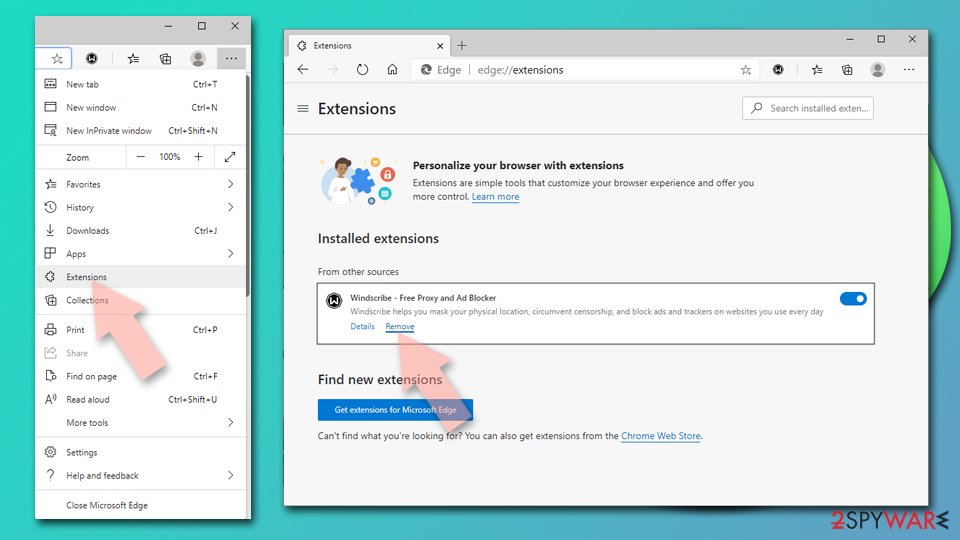
- Open Edge and click select Settings > Extensions.
- Delete unwanted extensions by clicking Remove.

Clear cache and site data:
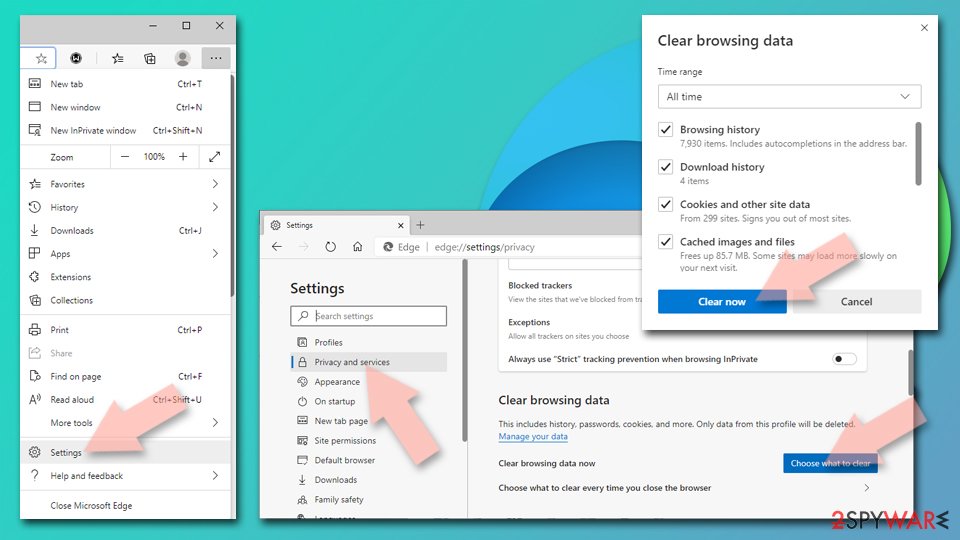
- Click on Menu and go to Settings.
- Select Privacy, search and services.
- Under Clear browsing data, pick Choose what to clear.
- Under Time range, pick All time.
- Select Clear now.

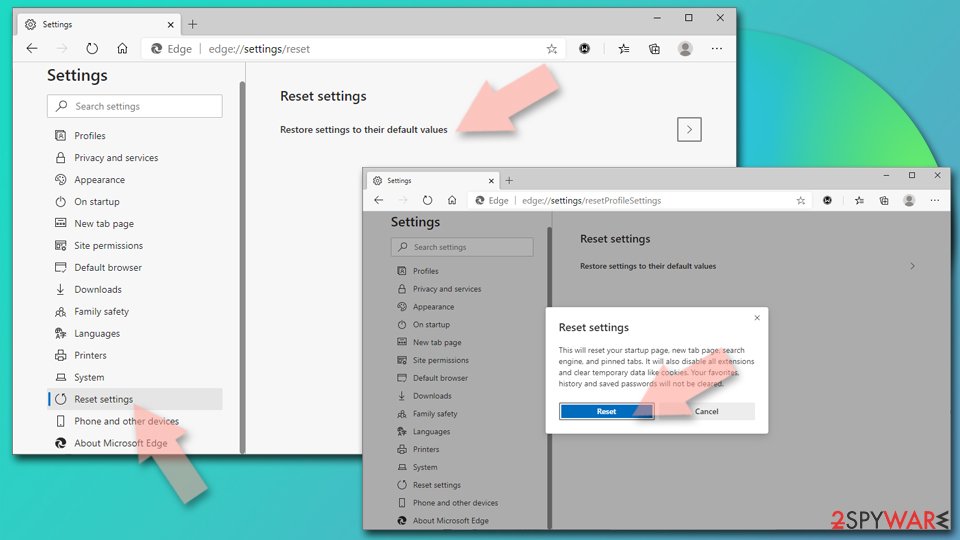
Reset Chromium-based MS Edge:
- Click on Menu and select Settings.
- On the left side, pick Reset settings.
- Select Restore settings to their default values.
- Confirm with Reset.

Remove from Mozilla Firefox (FF)
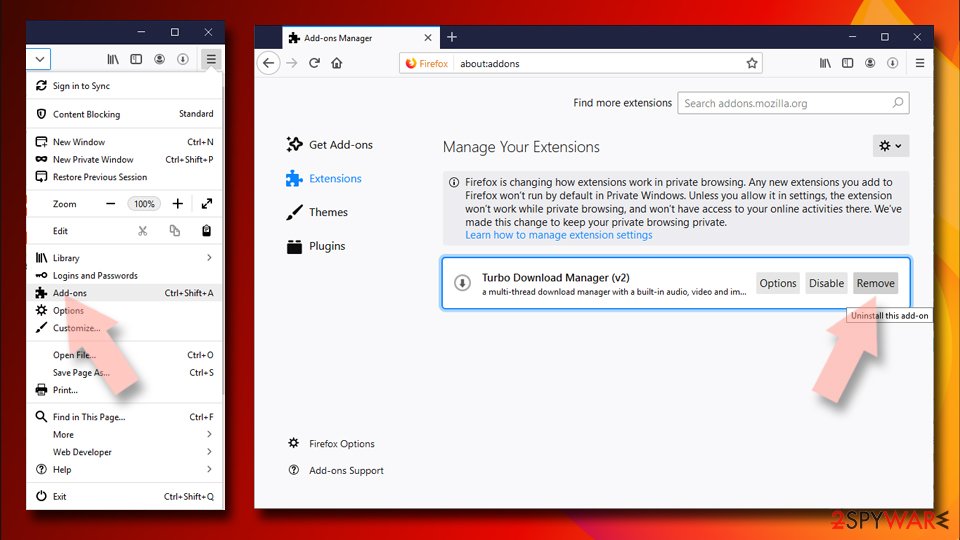
Remove dangerous extensions:
- Open Mozilla Firefox browser and click on the Menu (three horizontal lines at the top-right of the window).
- Select Add-ons.
- In here, select unwanted plugin and click Remove.

Reset the homepage:
- Click three horizontal lines at the top right corner to open the menu.
- Choose Options.
- Under Home options, enter your preferred site that will open every time you newly open the Mozilla Firefox.
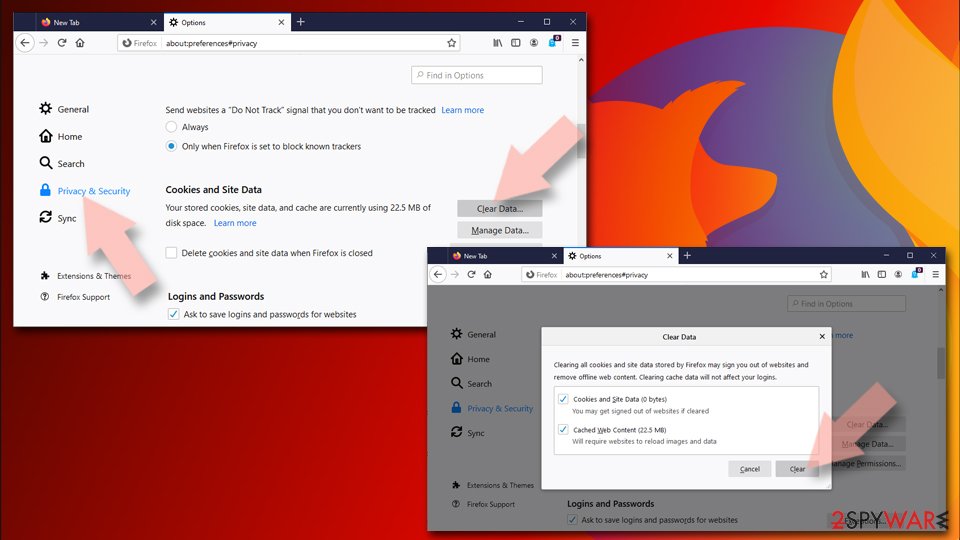
Clear cookies and site data:
- Click Menu and pick Settings.
- Go to Privacy & Security section.
- Scroll down to locate Cookies and Site Data.
- Click on Clear Data…
- Select Cookies and Site Data, as well as Cached Web Content and press Clear.

Reset Mozilla Firefox
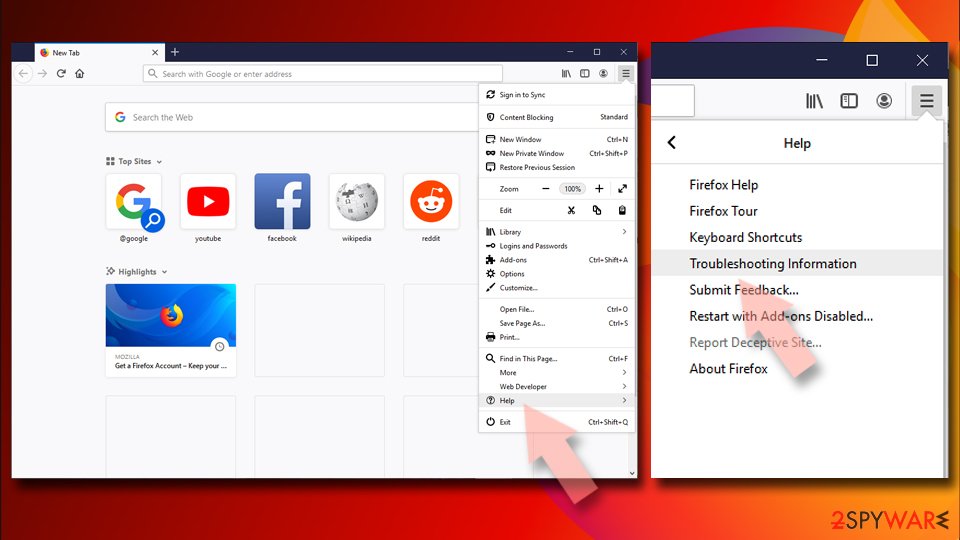
If clearing the browser as explained above did not help, reset Mozilla Firefox:
- Open Mozilla Firefox browser and click the Menu.
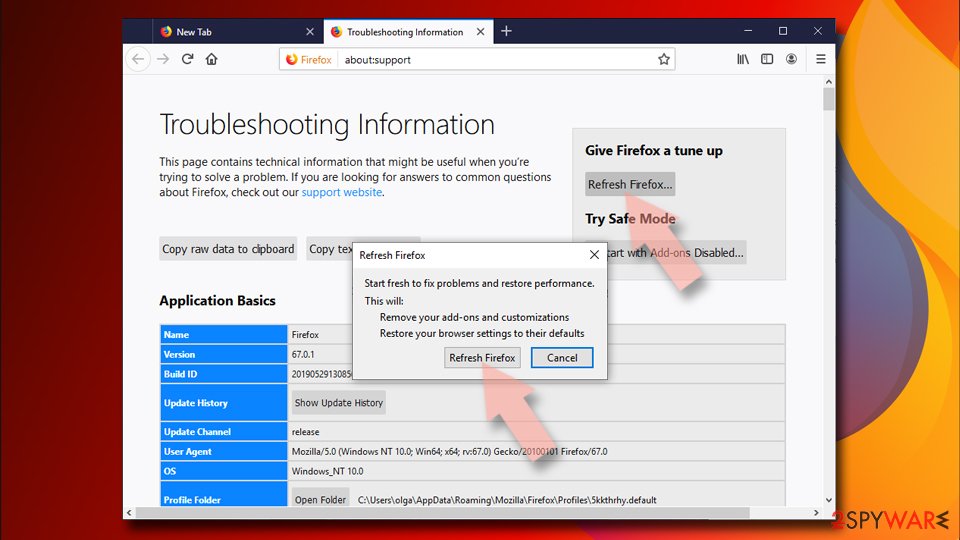
- Go to Help and then choose Troubleshooting Information.

- Under Give Firefox a tune up section, click on Refresh Firefox…
- Once the pop-up shows up, confirm the action by pressing on Refresh Firefox.

Remove from Google Chrome
Delete malicious extensions from Google Chrome:
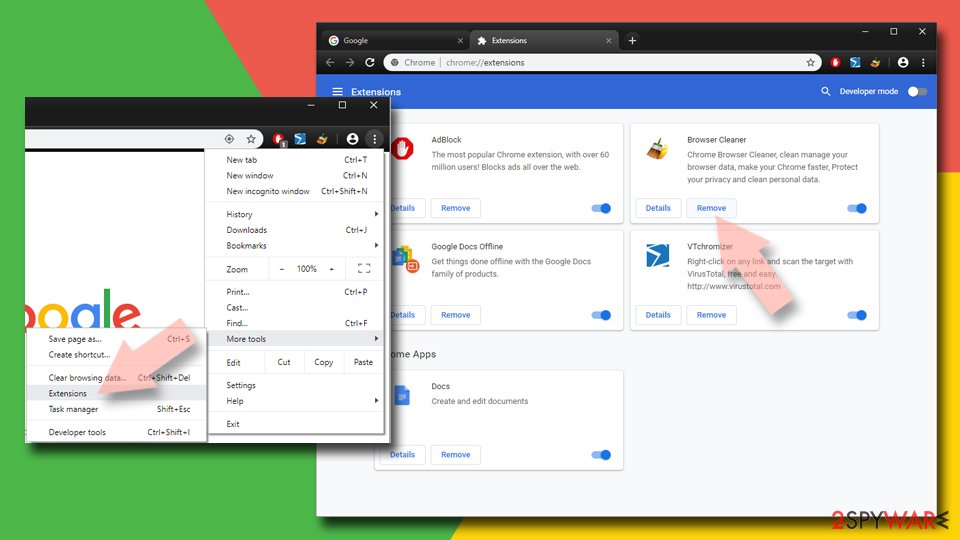
- Open Google Chrome, click on the Menu (three vertical dots at the top-right corner) and select More tools > Extensions.
- In the newly opened window, you will see all the installed extensions. Uninstall all the suspicious plugins that might be related to the unwanted program by clicking Remove.

Clear cache and web data from Chrome:
- Click on Menu and pick Settings.
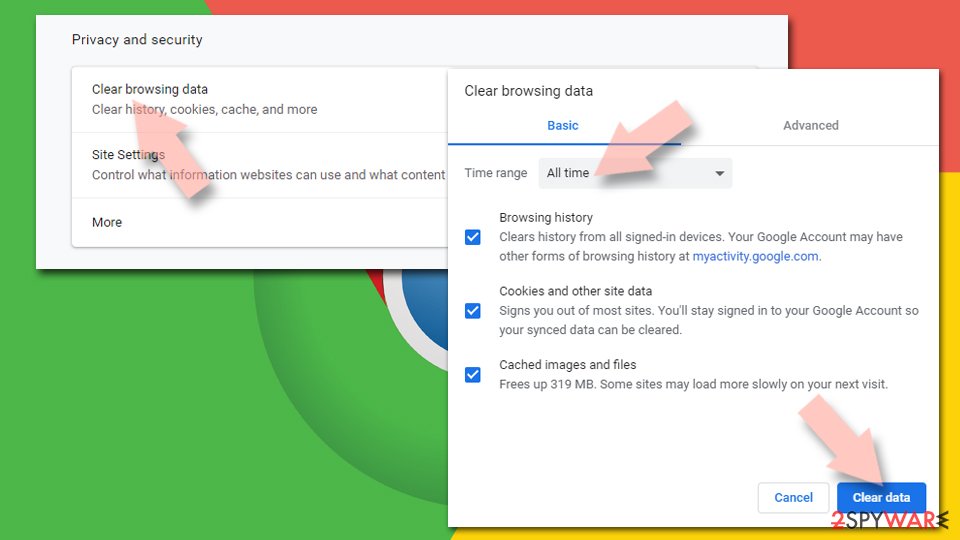
- Under Privacy and security, select Clear browsing data.
- Select Browsing history, Cookies and other site data, as well as Cached images and files.
- Click Clear data.

Change your homepage:
- Click menu and choose Settings.
- Look for a suspicious site in the On startup section.
- Click on Open a specific or set of pages and click on three dots to find the Remove option.
Reset Google Chrome:
If the previous methods did not help you, reset Google Chrome to eliminate all the unwanted components:
- Click on Menu and select Settings.
- In the Settings, scroll down and click Advanced.
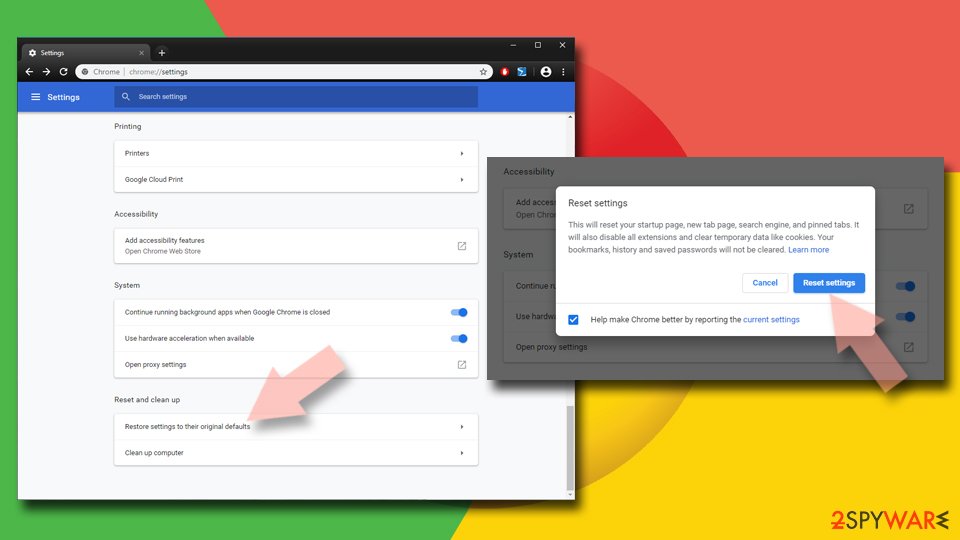
- Scroll down and locate Reset and clean up section.
- Now click Restore settings to their original defaults.
- Confirm with Reset settings.

Delete from Safari
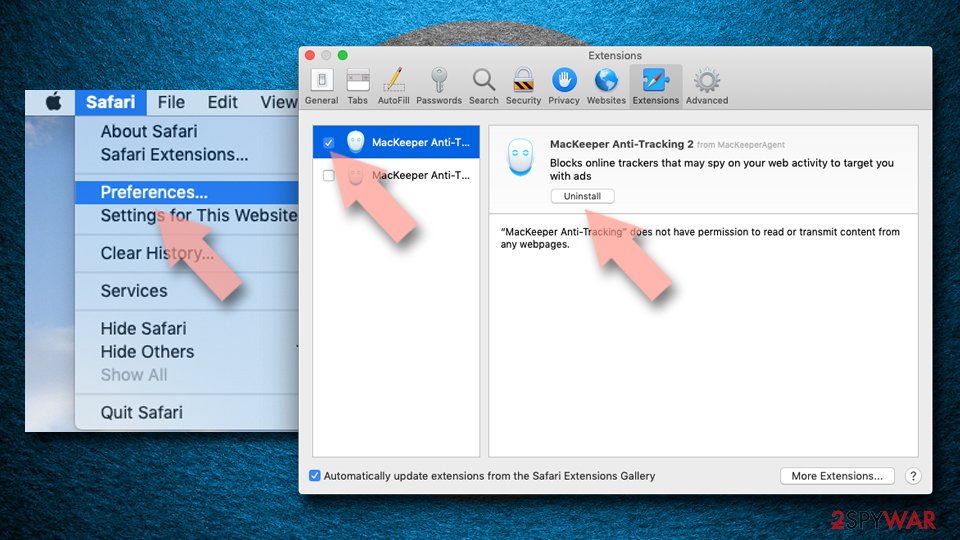
Remove unwanted extensions from Safari:
- Click Safari > Preferences…
- In the new window, pick Extensions.
- Select the unwanted extension and select Uninstall.

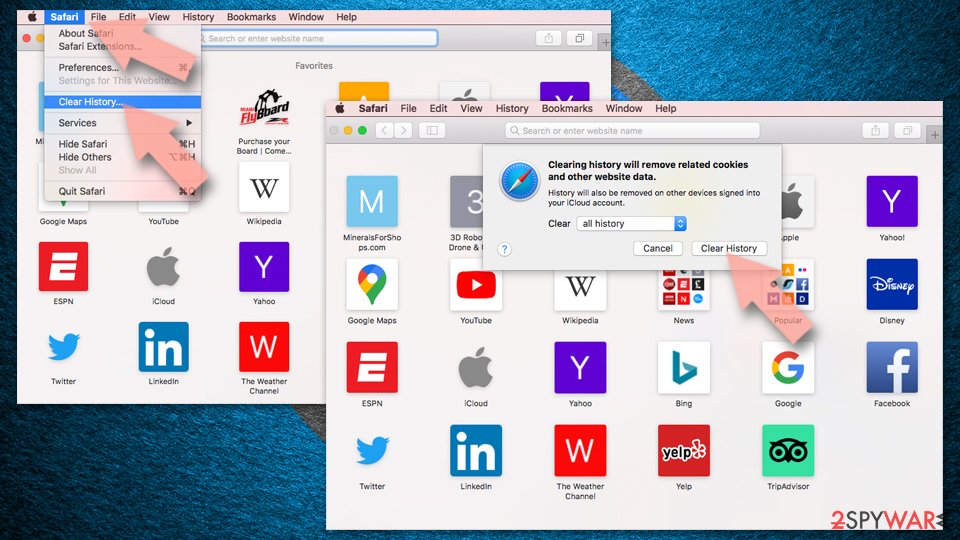
Clear cookies and other website data from Safari:
- Click Safari > Clear History…
- From the drop-down menu under Clear, pick all history.
- Confirm with Clear History.

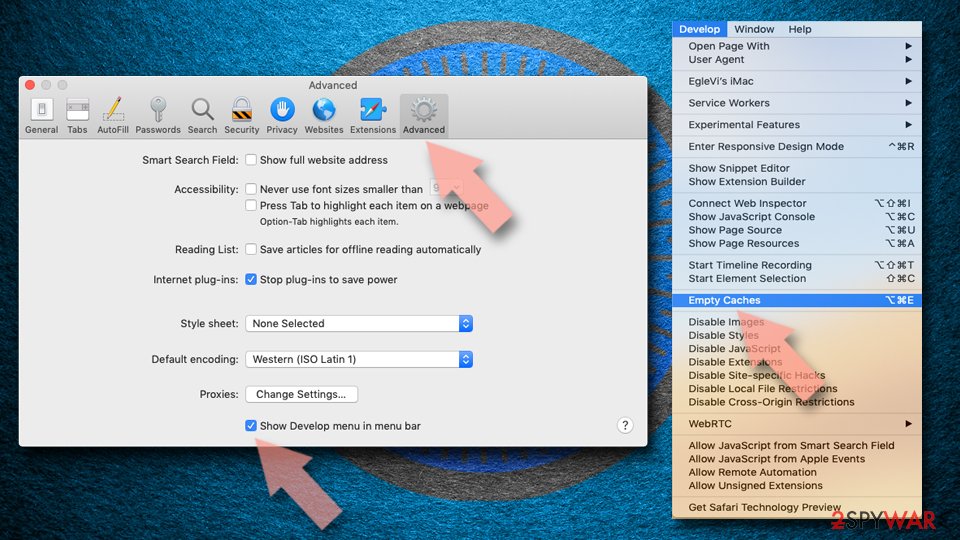
Reset Safari if the above-mentioned steps did not help you:
- Click Safari > Preferences…
- Go to Advanced tab.
- Tick the Show Develop menu in menu bar.
- From the menu bar, click Develop, and then select Empty Caches.

After uninstalling this potentially unwanted program (PUP) and fixing each of your web browsers, we recommend you to scan your PC system with a reputable anti-spyware. This will help you to get rid of Secure Net registry traces and will also identify related parasites or possible malware infections on your computer. For that you can use our top-rated malware remover: FortectIntego, SpyHunter 5Combo Cleaner or Malwarebytes.
How to prevent from getting adware
Do not let government spy on you
The government has many issues in regards to tracking users' data and spying on citizens, so you should take this into consideration and learn more about shady information gathering practices. Avoid any unwanted government tracking or spying by going totally anonymous on the internet.
You can choose a different location when you go online and access any material you want without particular content restrictions. You can easily enjoy internet connection without any risks of being hacked by using Private Internet Access VPN.
Control the information that can be accessed by government any other unwanted party and surf online without being spied on. Even if you are not involved in illegal activities or trust your selection of services, platforms, be suspicious for your own security and take precautionary measures by using the VPN service.
Backup files for the later use, in case of the malware attack
Computer users can suffer from data losses due to cyber infections or their own faulty doings. Ransomware can encrypt and hold files hostage, while unforeseen power cuts might cause a loss of important documents. If you have proper up-to-date backups, you can easily recover after such an incident and get back to work. It is also equally important to update backups on a regular basis so that the newest information remains intact – you can set this process to be performed automatically.
When you have the previous version of every important document or project you can avoid frustration and breakdowns. It comes in handy when malware strikes out of nowhere. Use Data Recovery Pro for the data restoration process.
