DNS Keeper is an adware that shows annoying advertisements and can hardly be useful
DNS Keeper is a free browser add-on for Google Chrome, Mozilla Firefox, and Internet Explorer. It's quite easy to get intrigued by this tool because it promises to allow users to unlock blocked websites and digital media. Nevertheless, you should never fall for believing that. In reality, this add-on belongs to the 'adware' and 'potentially unwanted program' (PUP) which means that its main task is to generate advertising revenue with the help of gullible people.
While DNS Keeper is not a virus, it cannot harm your PC's operating system or steal sensitive data. Nevertheless, it may cause serious havoc during your web browsing and absolutely ruin your web browsing experience.
Usually, it infiltrated computers via other freeware, such as popular download managers, media players, PDF creators, and so on. It may be stated that it infiltrated computers without the user's authorization, which is why it has been categorized as a PUP.
Once DNS Keeper installs on the system, it installs a Windows startup key, runs several processes within Task Manager and thereby slows down the machine. Moreover, it usually starts displaying an excessive amount of commercial advertisements:
- pop-ups,
- pop-unders,
- banners,
- in-text links, etc.
Most of the 'Ads by DNS Keeper' inform about commercial deals, discounts, coupons, and similar things. However, despite their appealing look, most of them disguise links to third-party websites which means that once you click on any of them, you may experience redirection to unchecked and not monitored sites.
In the worst-case scenario, you may even get tricked into visiting potentially dangerous domains. That's why you should remove DNS Keeper and fix your system using FortectIntego or another reputable tool.

Moreover, this doubtful application may interfere with your privacy by installing tracking cookies on each of your web browsers. This way, it may monitor your online activities on a daily basis and collect personally non-identifiable information, including your search terms, websites visited, data entered in them, clicks, IP address, PC's location, email address, and so on.
All in all, this add-on can hardly be useful.; therefore, do not waste your time and get rid of DNS Keeper virus without any delay. The easiest way to do so is to check your computer with a reputable anti-spyware like, for example, SpyHunterCombo Cleaner or MalwarebytesMalwarebytes.
To avoid PUPs, keep a close eye on what you are installing
DNS Keeper ads may show up within Google Chrome, Mozilla Firefox, Internet Explorer, and sometimes Safari web browsers unexpectedly. A massive flow of pop-ups and banners nay not only annoy you to death but may also lead to further computer infections as they may cause redirects to unsafe websites.
In order to prevent this from happening, avoid adware instantiation. As we have already mentioned, usually it spreads by 'bundling', i.e. via other freeware and shareware. So, in order to prevent its entrance, you should carefully monitor freeware's installation process.
Make sure that you opt for Advanced/Custom installation (NOT Quick/Basic) and follow each installation step. Finally, make sure that you detect the list of 'optional downloads' and unmark each of its constituents.
You can remove DNS Keeper adware quite easily
Although some users call this adware DNS Keeper virus because of the many ads that are constantly displayed, technically it is not a virus. This browser add-on will not harm your computer or steal critical information, but it is still not advisable to keep it on your computer.
You should remove DNS Keeper because it can slow down your computer. In addition, various suspicious ads can also be dangerous because you do not know where you will be redirected if you click on the link.
DNS Keeper removal guide is given down below. Select either manual or automatic removal option. However, any way you are strongly advised to check your computer with a reliable anti-spyware.
Uninstall from Windows
Uninstall from Windows 10/8:
- Type Control Panel into the Windows search box and open the result.
- Under Programs, select Uninstall a program.


Uninstall from Windows 7/XP:
- Click on Windows Start > Control Panel (Windows XP users should click on Add/Remove Programs).
- In Control Panel, select Programs > Uninstall a program.


Remove the unwanted program:
- In the Programs and Features window, look for any recently installed suspicious entries, select them, and click Uninstall.
- If User Account Control appears, click Yes to confirm, then complete the removal.


Delete from macOS
Remove the unwanted application:
- From the menu bar, select Go > Applications.
- In the Applications folder, look for any suspicious entries, then drag them to Trash (or right-click and pick Move to Trash).


Delete leftover files and folders:
- Select Go > Go to Folder.
- Enter /Library/Application Support and remove any suspicious folders related to the unwanted program.
- Repeat the same check in the /Library/LaunchAgents and /Library/LaunchDaemons folders, deleting any suspicious entries.

- Finally, empty the Trash to permanently remove the leftovers.

Reset Internet Explorer
Remove dangerous add-ons:
- Open Internet Explorer, click on the Gear icon (IE menu) on the top-right corner of the browser
- Pick Manage Add-ons.
- You will see a Manage Add-ons window. Here, look for suspicious plugins. Click on these entries and select Disable.


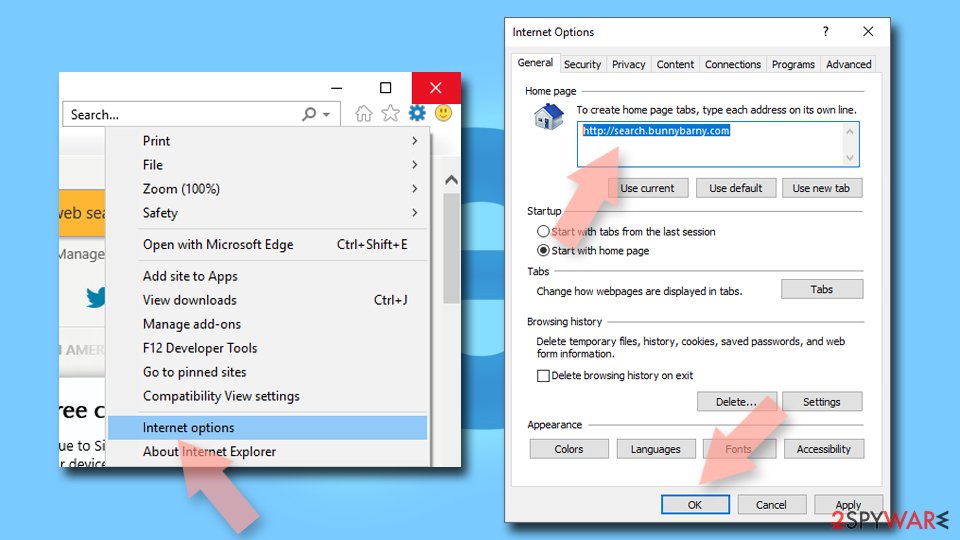
Change your homepage if it was altered:
- Open IE and click on the Gear icon.
- Select Internet Options.
- In the General tab, delete the Home page address and replace it by your preferred one (for example, Google.com).
- Click Apply and then select OK.

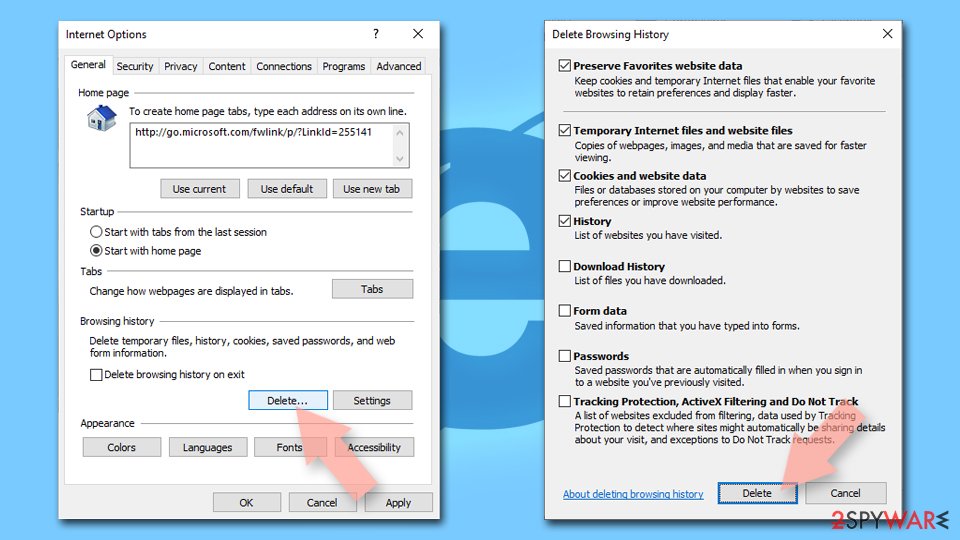
Delete temporary files:
- Press on the Gear icon and select Internet Options.
- Under Browsing history, click Delete...
- Select relevant fields and press Delete.

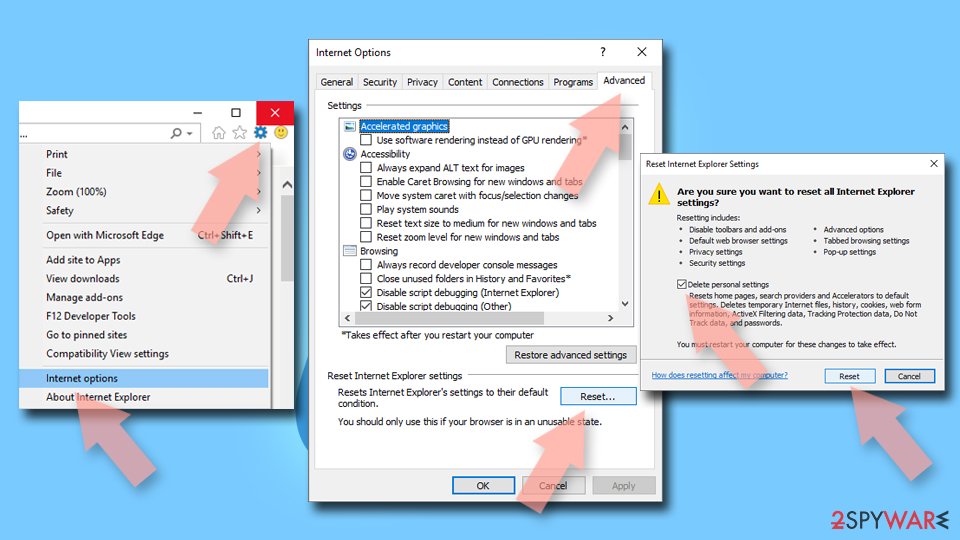
Reset Internet Explorer:
- Click on Gear icon > Internet options and select Advanced tab.
- Select Reset.
- In the new window, check Delete personal settings and select Reset.

Remove from Microsoft Edge
Delete unwanted extensions from MS Edge:
- Select Menu (three horizontal dots at the top-right of the browser window) and pick Extensions.
- From the list, pick the extension and click on the Gear icon.
- Click Remove.


Clear cookies and other browser data:
- Click on the Menu (three horizontal dots at the top-right of the browser window) and select Settings > Privacy, search, and services..
- Under Clear browsing data, pick Choose what to clear.
- Select Cookies and other site data and Cached images and files. (apart from passwords, although you might want to include Media licenses as well, if applicable) and click on Clear.


Restore new tab and homepage settings:
- Click the menu icon and choose Settings.
- Then find On startup section.
- Click Remove next to any suspicious startup page.
Reset MS Edge if the above steps did not work:
- Press on Ctrl + Shift + Esc to open Task Manager.
- Click on More details arrow at the bottom of the window.
- Select Details tab.
- Now scroll down and locate every entry with Microsoft Edge name in it. Right-click on each of them and select End Task to stop MS Edge from running.


Instructions for Chromium-based Edge
Delete extensions from MS Edge (Chromium):
- Open Edge and click select Settings > Extensions.
- Delete unwanted extensions by clicking Remove.


Clear cache and site data:
- Click on Menu and go to Settings.
- Select Privacy, search and services.
- Under Clear browsing data, pick Choose what to clear.
- Under Time range, pick All time.
- Select Clear now.


Reset Chromium-based MS Edge:
- Click on Menu and select Settings.
- On the left side, pick Reset settings.
- Select Restore settings to their default values.
- Confirm with Reset.
- This will disable extensions and reset startup pages but will not delete bookmarks, saved passwords, or browsing history.


Remove from Mozilla Firefox (FF)
Remove dangerous extensions:
- Open Mozilla Firefox browser and click on the Menu (three horizontal lines at the top-right of the window).
- Select Add-ons.
- In here, select the unwanted extension and click Remove.


Reset the homepage:
- Click three horizontal lines at the top right corner to open the menu.
- Choose Settings.
- Under Home, set your preferred homepage and new tab settings.
Clear cookies and site data:
- Click Menu and pick Settings.
- Go to Privacy & Security section.
- Scroll down to locate Cookies and Site Data.
- Click on Clear Data...
- Select Cookies and Site Data and Temporary cached files and pages, then click Clear.


Reset Mozilla Firefox
If clearing the browser as explained above did not help, reset Mozilla Firefox:
- Open Mozilla Firefox browser and click the Menu.
- Go to Help and then choose Troubleshooting Information.

- Under Give Firefox a tune up section, click on Refresh Firefox...
- Once the pop-up shows up, confirm the action by pressing on Refresh Firefox.


Remove from Google Chrome
Delete malicious extensions from Google Chrome:
- Open Google Chrome, click on the Menu (three vertical dots at the top-right corner) and select More tools > Extensions.
- In the newly opened window, you will see all the installed extensions. Uninstall all suspicious extensions related to the unwanted program by clicking Remove.


Clear cache and web data from Chrome:
- Click on Menu and pick Settings.
- Under Privacy and security, select Clear browsing data.
- Select Browsing history, Cookies and other site data, as well as Cached images and files.
- Click Clear data.


Change your homepage:
- Click menu and choose Settings.
- Look for a suspicious site in the On startup section.
- Click on Open a specific or set of pages and click on three dots to find the Remove option.
Reset Google Chrome:
If the previous methods did not help you, reset Google Chrome to eliminate all the unwanted components:
- Click on Menu and select Settings.
- In the Settings, scroll down and click Advanced.
- Scroll down and locate Reset and clean up section.
- Now click Restore settings to their original defaults.
- Confirm with Reset settings.


Delete from Safari
Remove dangerous extensions:
- Open Safari, click Safari in the menu at the top-left of the screen, and select Preferences.
- Go to the Extensions tab, look for any suspicious entries, and click Uninstall to remove them.


Clear history and website data:
- Click Safari in the menu and pick Clear History.
- Set Clear to all history and confirm with Clear History.


Reset Safari:
- Click Safari in the menu and select Preferences > Advanced.
- Enable Show Develop menu in menu bar.
- From the menu bar, click Develop and select Empty Caches.


Was this guide helpful?
Be the first to comment