

News-wevude.com is a bogus page created to trick people into accepting spam

News-wevude.com is a fraudulent website created by crooks seeking to generate revenue through pay-per-click advertising. The website uses social engineering[1] techniques to trick visitors into signing up for push notifications by asking them to click the “Allow” button to confirm that they are not robots.
But rather than what was expected, people are bombarded with invasive pop-up advertisements that continue to show up long after they close their browsers. Fraudsters may also use rogue ad networks[2] to show advertisements that direct users to risky websites. These included links may take users to phishing websites when clicked.
The methods used by crooks might vary, including trying to obtain personal data or tricking people into downloading malware and potentially unwanted programs (PUPs).[3] Ads for adult websites, phony antivirus software, enticing software bargains, surveys, and fake giveaways have reportedly been seen by some people.
| NAME | News-wevude.com |
| TYPE | Push notification spam; adware |
| SYMPTOMS | Annoying pop-up ads start appearing in the corner of the screen, sometimes even when the browser is closed |
| DISTRIBUTION | Shady websites, deceptive ads, freeware bundling |
| DANGERS | Links embedded in the pop-ups may lead to dangerous pages where people can get tricked into providing their personal information or downloading PUPs and malware |
| ELIMINATION | Disable push notifications via browser settings |
| FURTHER STEPS | Use a maintenance tool like FortectIntego to clear your browsers from cookies and cache |
Distribution methods
Websites like News-wevude.com rarely show up in search results; instead, they usually hide on unofficial and questionable websites. For example, illegal streaming websites are full of deceptive ads and clever redirects, frequently with fake “Download” and “Play” buttons that open tabs.
Restricting your online visits to well-known and reliable websites is advised. Avoid clicking on random links and ads, even if they seem to recommend legitimate goods and services. Choose trustworthy streaming services like Hulu or Netflix, which only need a small monthly membership cost and give users unrestricted access to a vast library of content.

Protect your privacy
Almost all websites that you visit ask for permission to “Allow” cookies, which are small data files that can collect information about you like your IP address, location, websites you visit, links you click, and online purchases. In general, this approach improves user personalization on websites.
Crooks may profit from this information despite its intended use. Advertising networks and other third parties may purchase cookies. In cases where the visited pages lack robust security measures, cookies can be hijacked and utilized for nefarious purposes. This emphasizes how crucial it is to periodically clear your browser.
A maintenance tool such as FortectIntego can automate this process by quickly erasing all cookies and cache with a single click. Moreover, it can help with registry difficulties, corrupted files, BSODs, failures, and other system issues. It is particularly helpful after a virus infection.
How to disable pop-ups?
The first thing you should do is go to your browser settings and see if you can disable the push notifications from there:
Google Chrome (desktop):
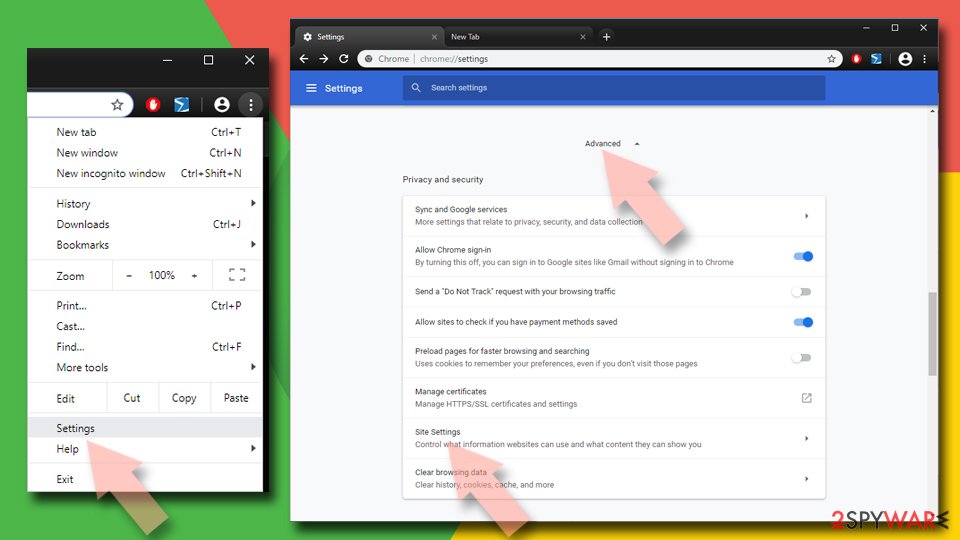
- Open Google Chrome browser and go to Menu > Settings.
- Scroll down and click on Advanced.
- Locate Privacy and security section and pick Site Settings > Notifications.
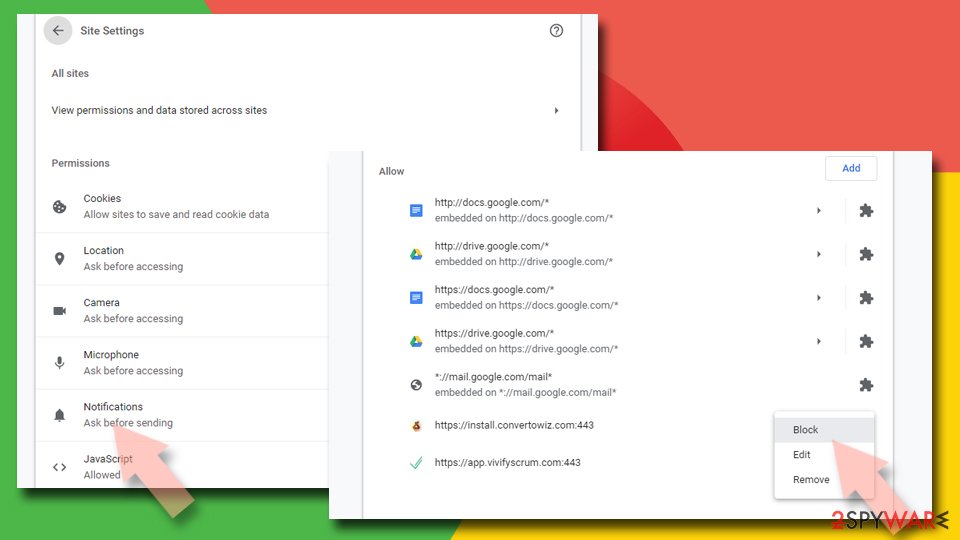
- Look at the Allow section and look for a suspicious URL.
- Click the three vertical dots next to it and pick Block. This should remove unwanted notifications from Google Chrome.


Google Chrome (Android):
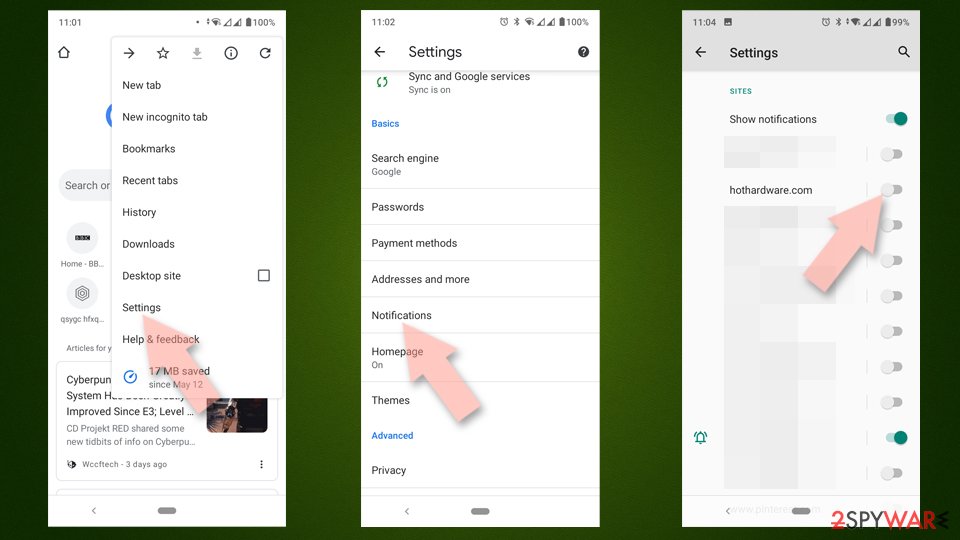
- Open Google Chrome and tap on Settings (three vertical dots).
- Select Notifications.
- Scroll down to the Sites section.
- Locate the unwanted URL and toggle the button to the left (Off setting).

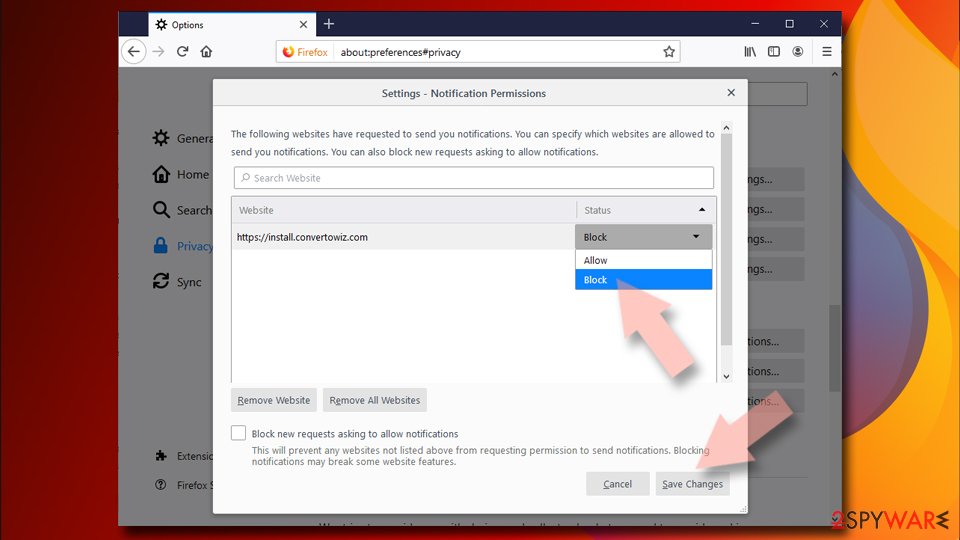
Mozilla Firefox:
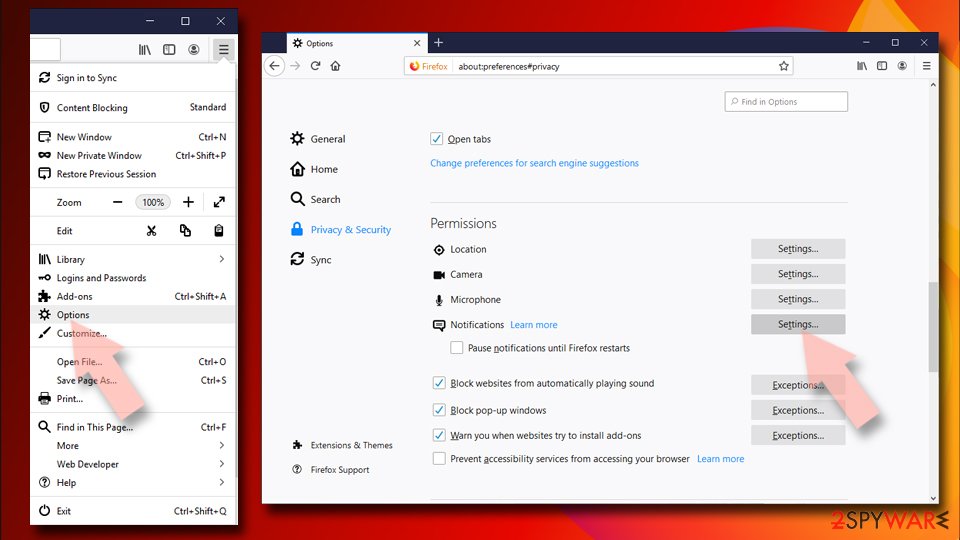
- Open Mozilla Firefox and go to Menu > Options.
- Click on Privacy & Security section.
- Under Permissions, you should be able to see Notifications. Click the Settings button next to it.
- In the Settings – Notification Permissions window, click on the drop-down menu by the URL in question.
- Select Block and then click on Save Changes. This should remove unwanted notifications from Mozilla Firefox.


Safari:
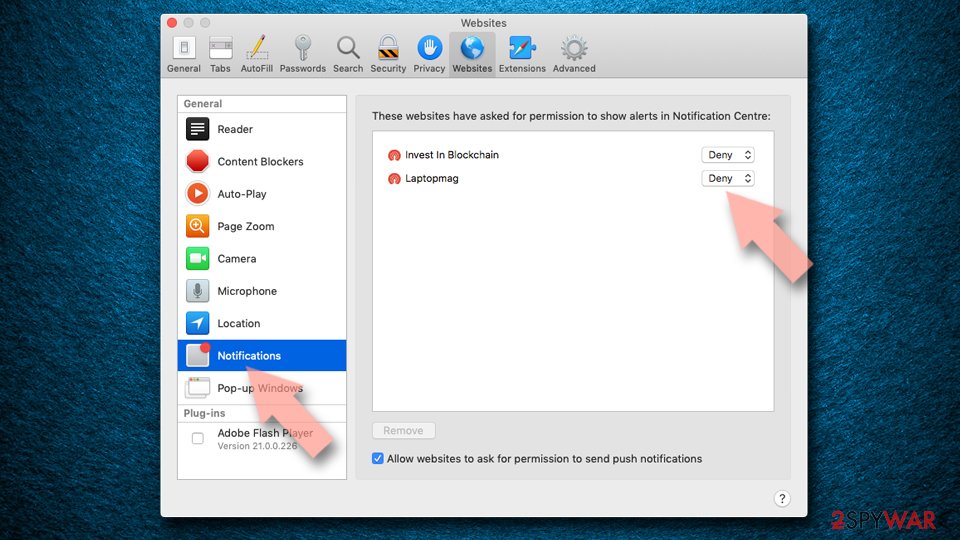
- Click on Safari > Preferences…
- Go to the Websites tab and, under General, select Notifications.
- Select the web address in question, click the drop-down menu and select Deny.

MS Edge:
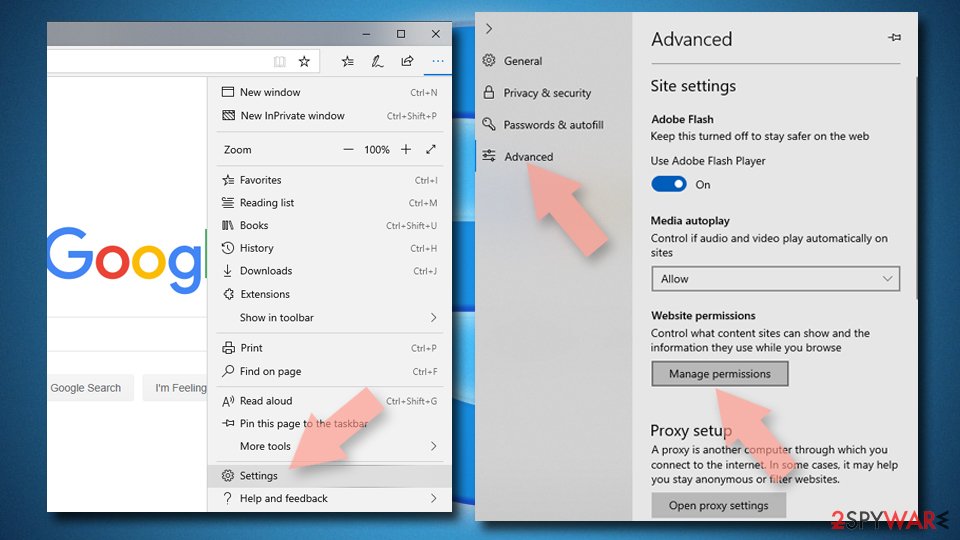
- Open Microsoft Edge, and click the Settings and more button (three horizontal dots) at the top-right of the window.
- Select Settings and then go to Advanced.
- Under Website permissions, pick Manage permissions and select the URL in question.
- Toggle the switch to the left to turn notifications off on Microsoft Edge.

MS Edge (Chromium):
- Open Microsoft Edge, and go to Settings.
- Select Site permissions.
- Go to Notifications on the right.
- Under Allow, you will find the unwanted entry.
- Click on More actions and select Block.
Adware removal
Adware might still be present in your system even after you've blocked notifications; it could appear as a barrage of commercial content including pop-ups, ads, surveys, and redirects. We strongly advise using specialized security tools like SpyHunterCombo Cleaner or MalwarebytesMalwarebytes for a thorough system scan to address these issues.
Antivirus software is skilled at locating and eliminating dubious processes that are active on your computer, along with any related files. Moreover, it serves as a safeguard by warning you about possible dangers during questionable downloads. Manual removal is still a possibility, but it can be difficult to find potentially unwanted programs (PUPs) because they frequently pose as media players, antivirus software, or system optimizers.
Manual removal, if chosen, may lead to a resurgence of the infection if all related files and entries aren't eliminated. However, for those opting for manual removal, detailed instructions are provided below for both Windows and Mac systems:
Windows 10/8:
- Enter Control Panel into Windows search box and hit Enter or click on the search result.
- Under Programs, select Uninstall a program.

- From the list, find the entry of the suspicious program.
- Right-click on the application and select Uninstall.
- If User Account Control shows up, click Yes.
- Wait till uninstallation process is complete and click OK.



Windows 7/XP:
- Click on Windows Start > Control Panel located on the right pane (if you are Windows XP user, click on Add/Remove Programs).
- In Control Panel, select Programs > Uninstall a program.

- Pick the unwanted application by clicking on it once.
- At the top, click Uninstall/Change.
- In the confirmation prompt, pick Yes.
- Click OK once the removal process is finished.

Mac:
- From the menu bar, select Go > Applications.
- In the Applications folder, look for all related entries.
- Click on the app and drag it to Trash (or right-click and pick Move to Trash)


To fully remove an unwanted app, you need to access Application Support, LaunchAgents, and LaunchDaemons folders and delete relevant files:
- Select Go > Go to Folder.
- Enter /Library/Application Support and click Go or press Enter.
- In the Application Support folder, look for any dubious entries and then delete them.
- Now enter /Library/LaunchAgents and /Library/LaunchDaemons folders the same way and terminate all the related .plist files.


Did this guide help?
Be the first to comment