UnTabs extension virus (Removal Guide) - Easy Removal Guide
unTabs extension virus Removal Guide
What is unTabs extension virus?
Hundreds of user complaints about unTabs extension disclose the real functionality of it
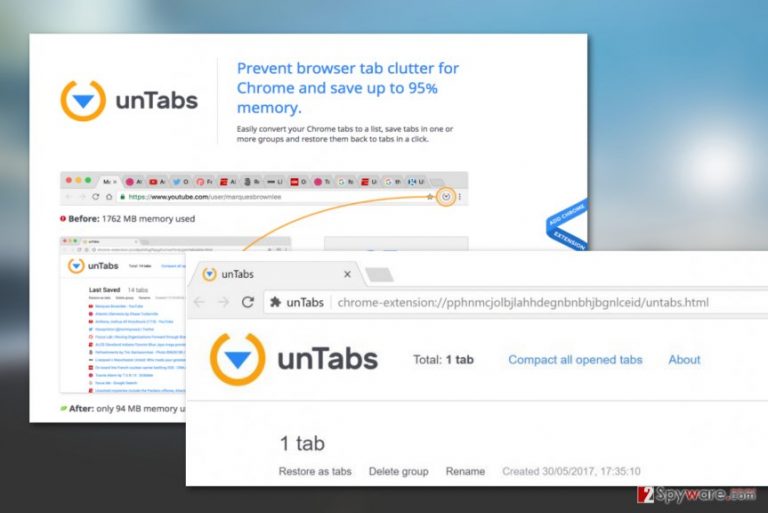
UnTabs extension is a malicious browser hijacker[1] which is far more dangerous than typical programs of the same kind. This suspicious browser redirect virus targets Google Chrome browser and hijacks them without user's permission.
It typically changes user's default search engine to cleanserp.net or another suspicious one and also starts delivering various ads in pop-up windows or banners.
The malicious extension shows up in Chrome Extensions list, but what confuses the victims the most is that they're marked as “Installed by enterprise policy,” and there is also a suspicious line next to them, saying that the extension is managed and cannot be removed and disabled.
Such signs can make the victim fall into despair and panic, however, it IS possible to remove UnTabs redirect virus, although the removal process requires some time and patience. To find out whether's you're infected with the described browser extension, please see a list of common signs of infection below.
- UnTabs virus changes homepage and new tab address to hxxp://cleanserp.net or another bogus search site that serves corrupted search results;
- The malicious extension acts like malware and slows down the computer, making the compromised web browser lag or crash from time to time;
- It seems to be very hard or nearly impossible to remove it;
- The browser suddenly starts opening new tabs or windows[2] and loading third-party advertisements in them. The victim might also notice underlined text spots in websites he visits, that display advertisements as soon as he hovers the mouse over them;
- The infected browser can also unexpectedly redirect the user to shady websites without victim's permission to do so.
The malicious extension is advertised as a cool tool that helps to convert Chrome tabs to a list, save them in one or more groups and restore them in one click. Unfortunately, instead of providing useful features this extension has numerous malware traits. We must warn you that the extension is currently available on Google Web Store, so you should be very careful until Google suspends its distribution. And there are plenty of reasons why this application deserves that.
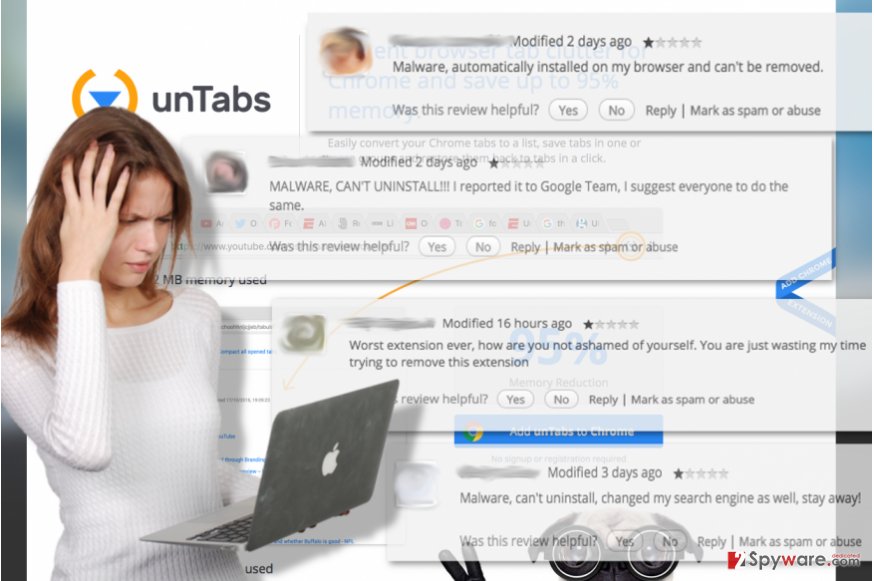
You don’t even have to download the program to notice the negative reviews it has already received from the users. At the moment of writing this article, there were over 600 negative 1 star reviews[3] about the extension and even more complaints about issues when trying to remove it.
This clearly creates an image of an untrustworthy piece of software that does everything to prevent users from removing it from their computers. It goes without saying that it is a typical malware behaviour.
Nevertheless, this rogue extension does not rely on the legitimate means of distribution alone to enter computers. In fact, it belongs to the group of malware which use “Add Extension to Leave” pop-ups[4] to force users into installing it on their computers.
It also infiltrates PCs via indecent marketing methods, such as bundling [5]. We’ll elaborate on the virus distribution strategies later, but first, let’s learn about what this virus does, what is the purpose of its hijack and what technique should be used for a complete unTabs removal.
UnTabs has been categorized as a potentially unwanted program, more specifically, a rogue forced extension which infiltrates computers in order to generate profit for its developers.
Once the extension is installed, it starts to inject ads, banners, interstitial advertisements, pop-ups and other commercially-based components on websites and pages that the user visits, hoping that some people would feel tempted and click on them. Unfortunately, it is hard to understand that these ads do not originate from sites the victim visits and that poses even a bigger threat to victim's privacy and security.
The developer of this shady extension will make sure the advertising is as intense as possible because it receives commissions for the traffic it manages to redirect to its promoted websites. In other words, the users engage in this so-called pay-per-click advertising strategy unknowingly.
To achieve even better results, the malware may also start tracking your browsing habits, keeping records of your search queries, visited websites, time spent there, etc. For this purpose, the extension employs tracking technologies such as cookies and web beacons.
This way, the advertiser picks ads according to victim's interests, making them harder to ignore. Over time, you may start getting the feeling that your every step online is being watched and monetized. Thus, we highly suggest performing unTabs virus removal before your browser is turned into a full-blown billboard for ads. You will get rid of the virus quickly with professionals malware-fighting software such as FortectIntego.
Deceptive sites using “Add Extension to Leave” pop-ups to push malicious extensions to people
unTabs virus typically reaches Chrome browsers as a result of a forced installation. The users who regularly browse through illegal or adult content websites may be redirected to unTabs.com directly or be prompted to install the extensions via JavaScript-based “Add Extension to Leave” dialog box. Beware that you might receive a suggestion to install it after being redirected to scam sites such takeitnow.club or carrerafun.club.
Users often try canceling the installation by marking the “Prevent this page from creating additional dialogs” checkbox. But this won’t work.
To exit such malicious pages and prevent unTabs installation the browser tab or the browser must be terminated via Task Manager. We’ll explain the technique in more detail later on.
As we already mentioned, the malware can be installed directly from its official website, other sites that push various malicious extensions, however, it is also possible to install it along with another free program that is bundled with it. For this reason, we suggest you check software installation settings very carefully whenever you are about to install new software on your PC.
If it urges you to choose Standard or Default installation option, disobey such instruction and switch the selection to Custom or Default option instead. One or another choice gives you a possibility to review all programs and tools bundled with your chosen software and refuse to install them.
Typically, all that it takes to drop off the additional software is just to remove marks from check boxes next to permissions to install suggested additions.
Prepare yourself to remove unTabs virus
UnTabs removal requires patience. This malicious extension roots into the system and unlike typical browser hijackers, it doesn't simply drop the extension to the browser. In order to remove unTabs virus, the victim has to follow strict instructions and eliminate dangerous components both from web browsers and the system.
There are a few ways to uninstall the malware manually, although you will achieve best results if you finish the manual removal by performing a system scan with anti-malware software as well. This way, you will detect all remaining elements of the malware that you may have overlooked.
The method of elimination should be selected according to your computing skills and your system’s performance capacities. You should not try to remove the malware from your computer manually if you have no such practice from before. It is enough to scan your device with some trusted antivirus utility, and it will carry out the virus elimination for you. The user friendly-guide below will help you with this procedure.
You may remove virus damage with a help of FortectIntego. SpyHunter 5Combo Cleaner and Malwarebytes are recommended to detect potentially unwanted programs and viruses with all their files and registry entries that are related to them.
Getting rid of unTabs extension virus. Follow these steps
Uninstall from Windows
If you find that unTabs is trying to install on your browser, you should close the Chrome browser by pressing the quick key combination ALT+CTRL+DEL to launch Windows Task Manager. Once on the manager window, select all running Chrome processes and click End Task to quit them.
In case the virus managed to slip through into your system, you will have to remove it manually following the guidelines below. There are two manual removal methods that can help you to delete it for good.
Method 1. Fix the problem via CMD
- Press down Windows Key + R to open RUN window. Type cmd into it, and then press down Control + Shift + Enter keys at the same time.
- Copy and paste the following commands, one line at a time, and click Enter after pasting each of them into the Command Prompt:
- rd /S /Q “%WinDir%\System32\GroupPolicyUsers”
- rd /S /Q “%WinDir%\System32\GroupPolicy”
- gpupdate /force
- The problem should be fixed now.
Method 2. Delete the folder of the malicious extension
- First of all, go to Chrome Extensions tab (use instructions for Google Chrome users provided on this page ) and take a photo of the malicious extension's ID. You can copy it or write it down.
- Search the Windows for Control Panel and open it. Then go to Appearance and Personalization, then to Folder Options, and finally to View tab. Select Show hidden files, folders and drives and hit OK.
- Now go to My Computer, then to C:/ disk, then to Users > [your computer name] > Appdata > Local > Google > Chrome > User Data > Default > Extensions.
- Here, find the folder that is entitled with the same ID as the malicious extension. Right-click on it, select Delete, agree. Then right-click on the Recycle bin on your desktop and select Empty Recycle bin.
- Now you will have to use the instructions given below to uninstall suspicious programs from your computer. After removing it via Programs and Features panel, do not forget to delete their folders hiding in C://Program Files (x86). The dangerous programs you might find on your system are called:
- Media PlayerV1;
- LyricsFan;
- LyricsWoofer;
- LyricXeeker;
- LyricsViewer;
- Media Player 1.1;
- BetterSurf;
- Allyrics;
- Feven 1.7;
- DownloadTerms 1.0;
- Browse2Save;
- SimpleLyrics;
- WebCake 3.00;
- Webexp Enhanced;
- Plus-HD 1.3;
- Video Player.
Instructions for Windows 10/8 machines:
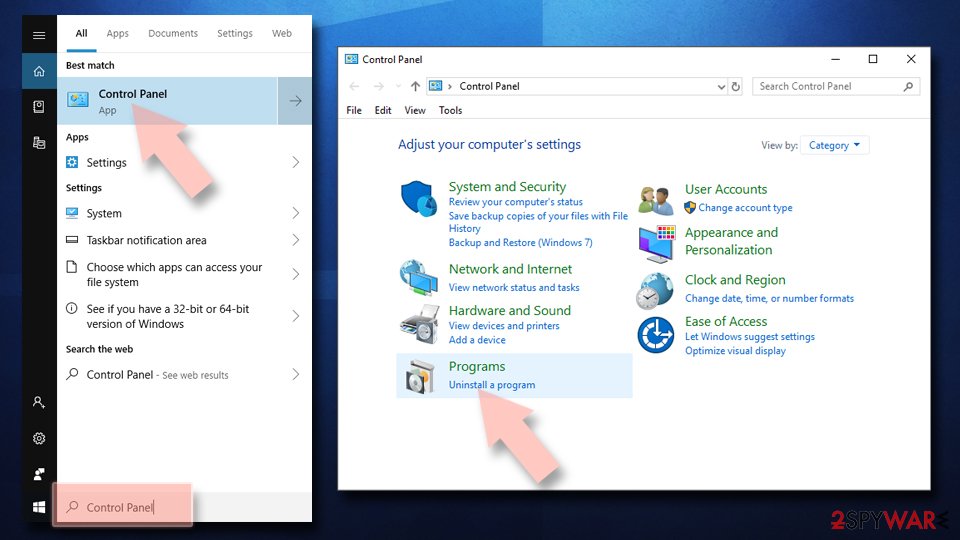
- Enter Control Panel into Windows search box and hit Enter or click on the search result.
- Under Programs, select Uninstall a program.
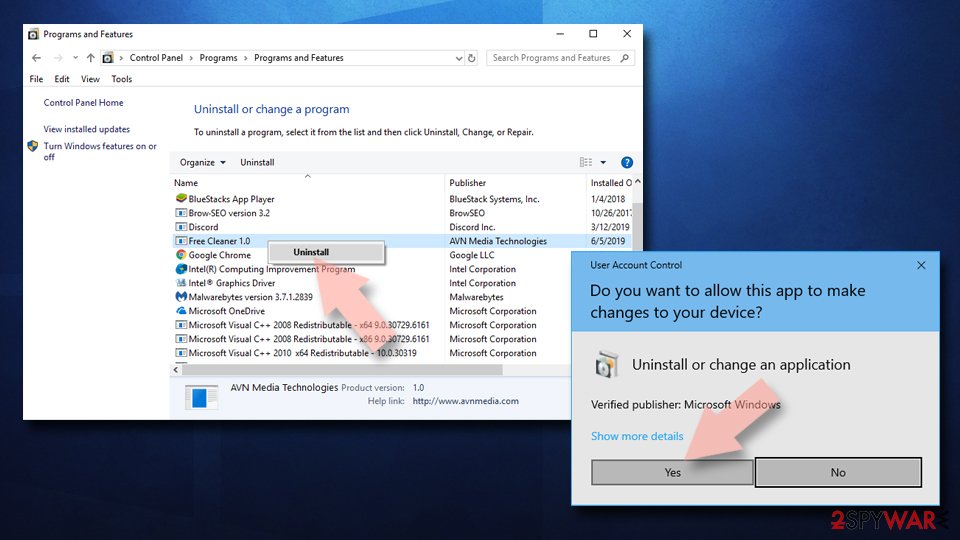
- From the list, find the entry of the suspicious program.
- Right-click on the application and select Uninstall.
- If User Account Control shows up, click Yes.
- Wait till uninstallation process is complete and click OK.
If you are Windows 7/XP user, proceed with the following instructions:
- Click on Windows Start > Control Panel located on the right pane (if you are Windows XP user, click on Add/Remove Programs).
- In Control Panel, select Programs > Uninstall a program.
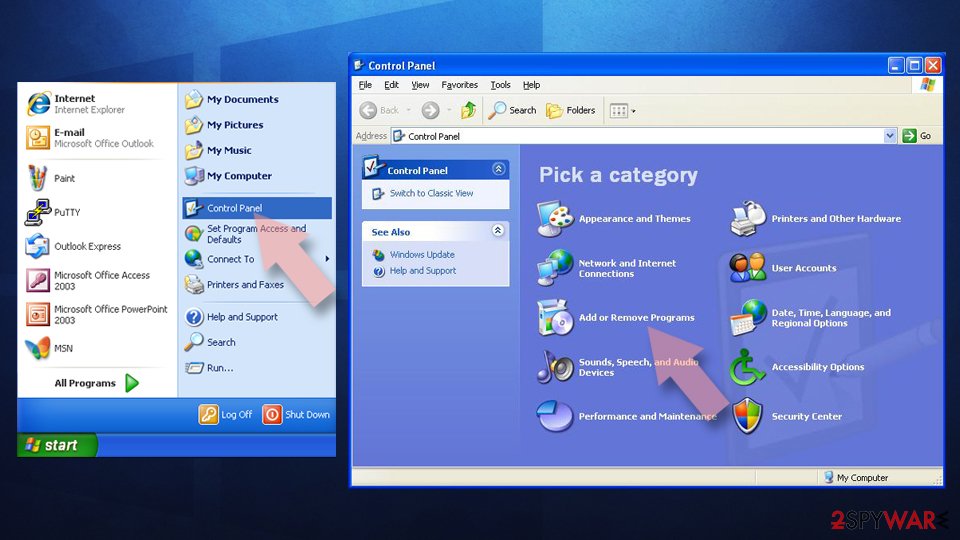
- Pick the unwanted application by clicking on it once.
- At the top, click Uninstall/Change.
- In the confirmation prompt, pick Yes.
- Click OK once the removal process is finished.
Delete from macOS
Remove items from Applications folder:
- From the menu bar, select Go > Applications.
- In the Applications folder, look for all related entries.
- Click on the app and drag it to Trash (or right-click and pick Move to Trash)
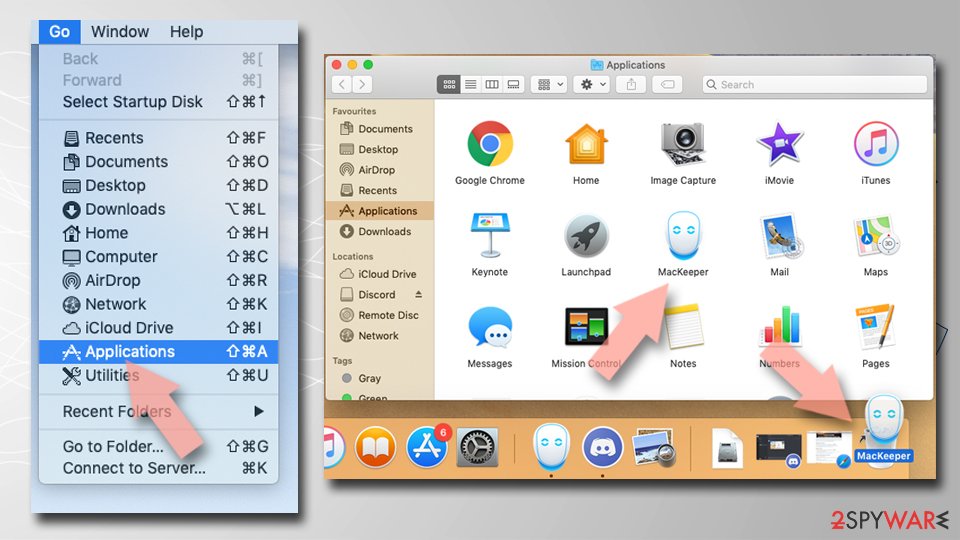
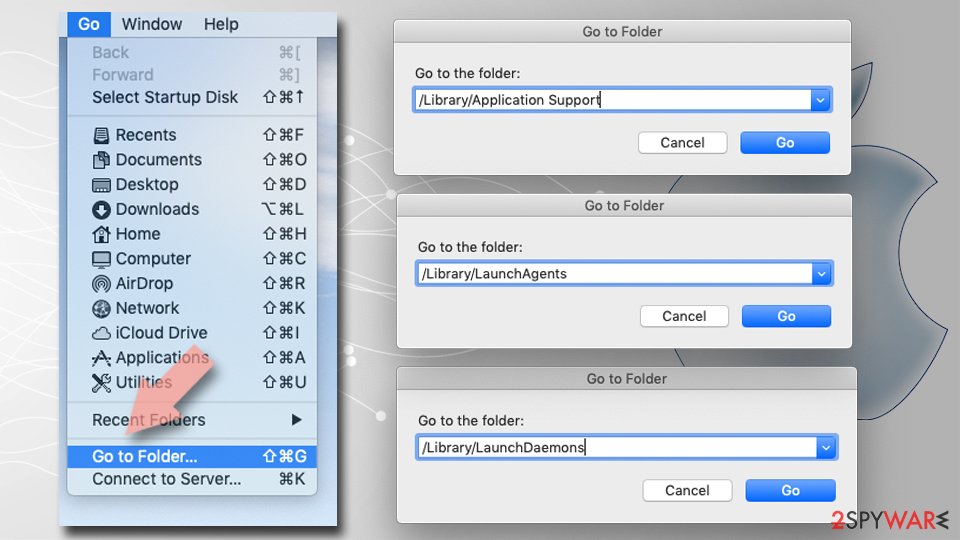
To fully remove an unwanted app, you need to access Application Support, LaunchAgents, and LaunchDaemons folders and delete relevant files:
- Select Go > Go to Folder.
- Enter /Library/Application Support and click Go or press Enter.
- In the Application Support folder, look for any dubious entries and then delete them.
- Now enter /Library/LaunchAgents and /Library/LaunchDaemons folders the same way and terminate all the related .plist files.
Remove from Microsoft Edge
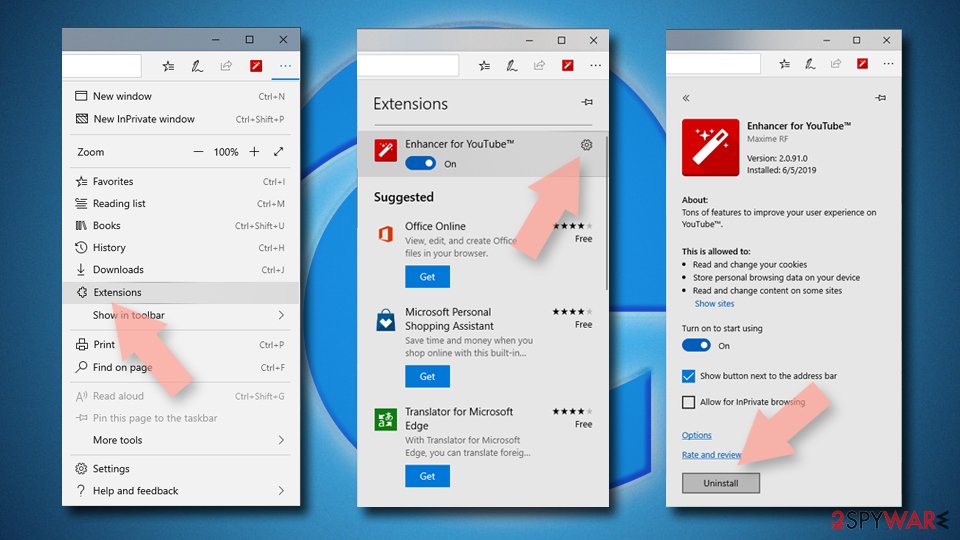
Delete unwanted extensions from MS Edge:
- Select Menu (three horizontal dots at the top-right of the browser window) and pick Extensions.
- From the list, pick the extension and click on the Gear icon.
- Click on Uninstall at the bottom.
Clear cookies and other browser data:
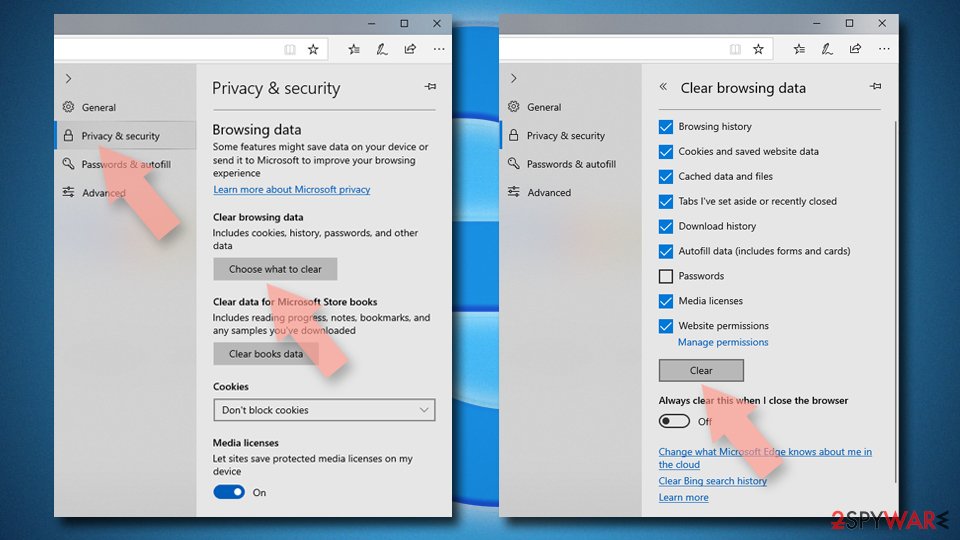
- Click on the Menu (three horizontal dots at the top-right of the browser window) and select Privacy & security.
- Under Clear browsing data, pick Choose what to clear.
- Select everything (apart from passwords, although you might want to include Media licenses as well, if applicable) and click on Clear.
Restore new tab and homepage settings:
- Click the menu icon and choose Settings.
- Then find On startup section.
- Click Disable if you found any suspicious domain.
Reset MS Edge if the above steps did not work:
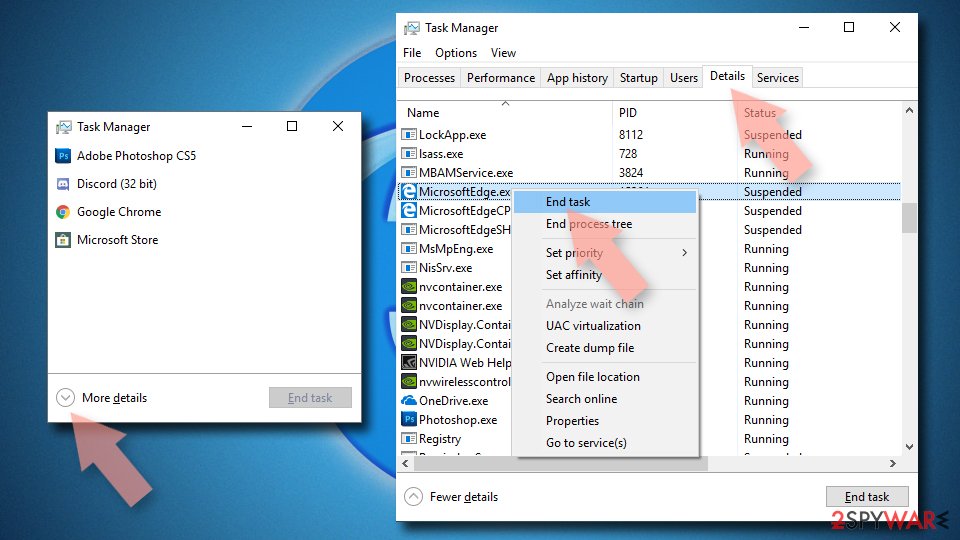
- Press on Ctrl + Shift + Esc to open Task Manager.
- Click on More details arrow at the bottom of the window.
- Select Details tab.
- Now scroll down and locate every entry with Microsoft Edge name in it. Right-click on each of them and select End Task to stop MS Edge from running.
If this solution failed to help you, you need to use an advanced Edge reset method. Note that you need to backup your data before proceeding.
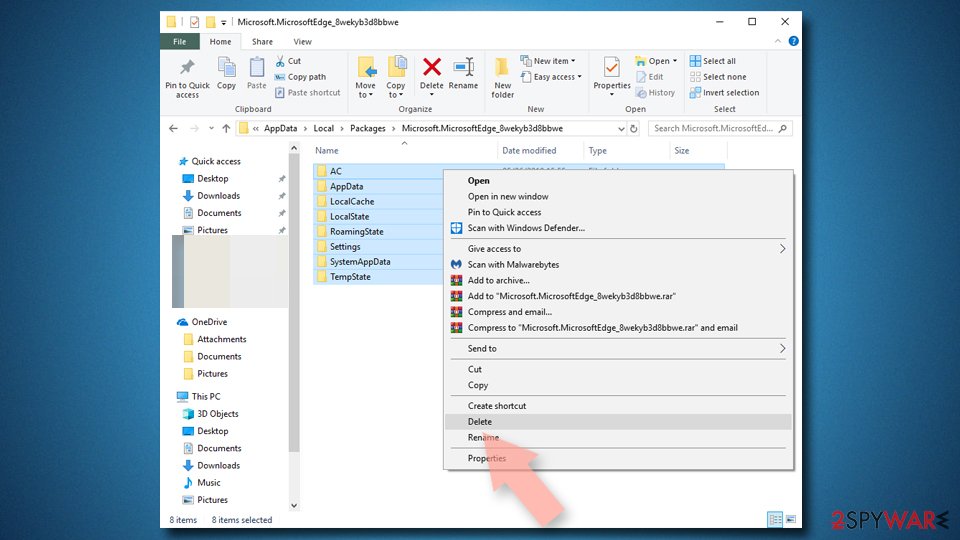
- Find the following folder on your computer: C:\\Users\\%username%\\AppData\\Local\\Packages\\Microsoft.MicrosoftEdge_8wekyb3d8bbwe.
- Press Ctrl + A on your keyboard to select all folders.
- Right-click on them and pick Delete
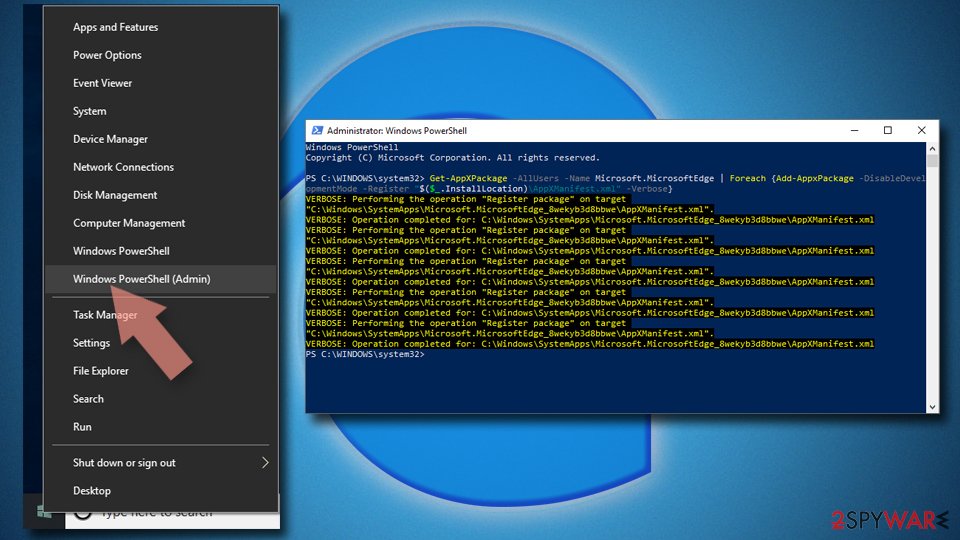
- Now right-click on the Start button and pick Windows PowerShell (Admin).
- When the new window opens, copy and paste the following command, and then press Enter:
Get-AppXPackage -AllUsers -Name Microsoft.MicrosoftEdge | Foreach {Add-AppxPackage -DisableDevelopmentMode -Register “$($_.InstallLocation)\\AppXManifest.xml” -Verbose
Instructions for Chromium-based Edge
Delete extensions from MS Edge (Chromium):
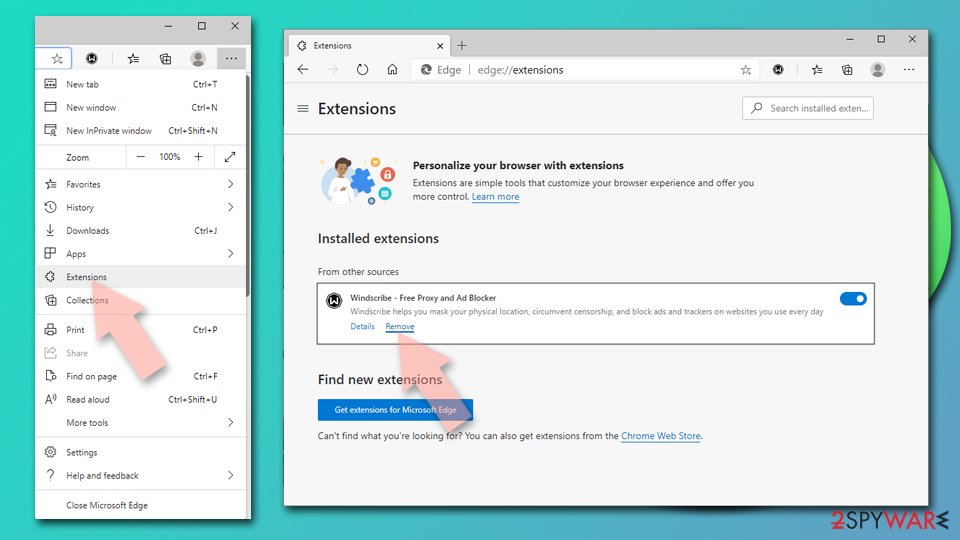
- Open Edge and click select Settings > Extensions.
- Delete unwanted extensions by clicking Remove.
Clear cache and site data:
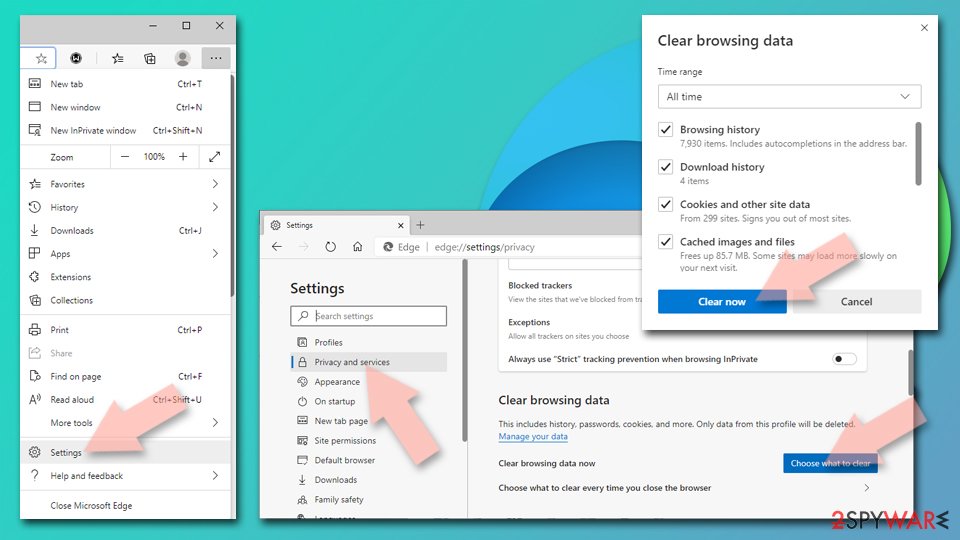
- Click on Menu and go to Settings.
- Select Privacy, search and services.
- Under Clear browsing data, pick Choose what to clear.
- Under Time range, pick All time.
- Select Clear now.
Reset Chromium-based MS Edge:
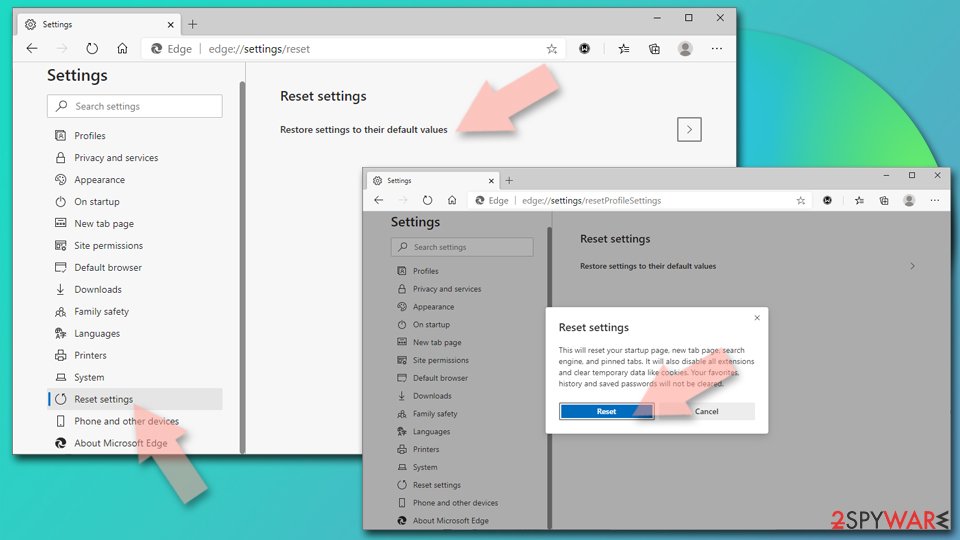
- Click on Menu and select Settings.
- On the left side, pick Reset settings.
- Select Restore settings to their default values.
- Confirm with Reset.
Remove from Mozilla Firefox (FF)
Remove dangerous extensions:
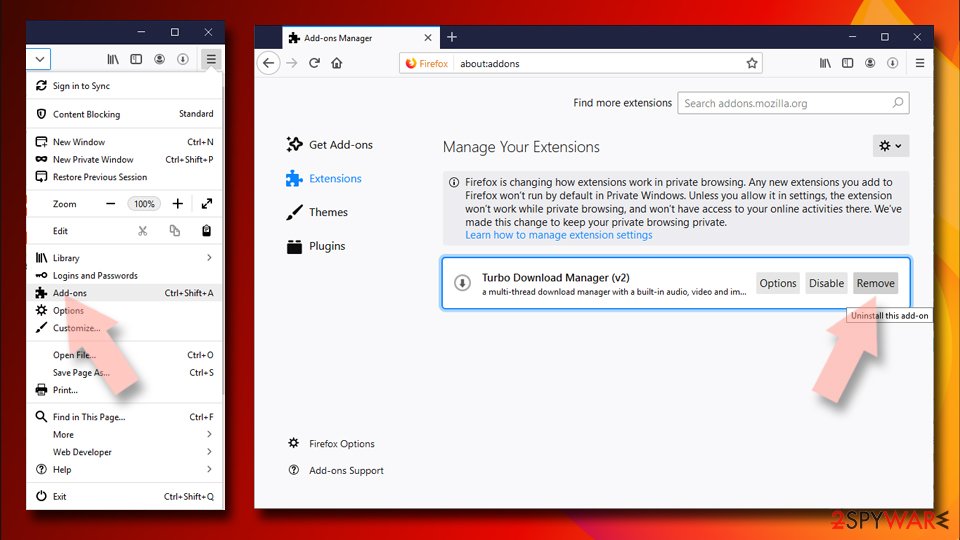
- Open Mozilla Firefox browser and click on the Menu (three horizontal lines at the top-right of the window).
- Select Add-ons.
- In here, select unwanted plugin and click Remove.
Reset the homepage:
- Click three horizontal lines at the top right corner to open the menu.
- Choose Options.
- Under Home options, enter your preferred site that will open every time you newly open the Mozilla Firefox.
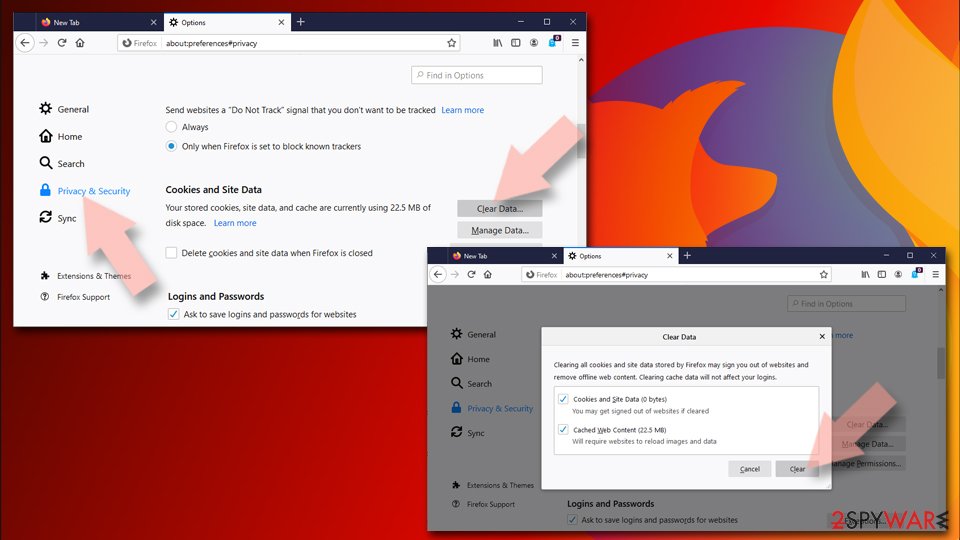
Clear cookies and site data:
- Click Menu and pick Settings.
- Go to Privacy & Security section.
- Scroll down to locate Cookies and Site Data.
- Click on Clear Data…
- Select Cookies and Site Data, as well as Cached Web Content and press Clear.
Reset Mozilla Firefox
If clearing the browser as explained above did not help, reset Mozilla Firefox:
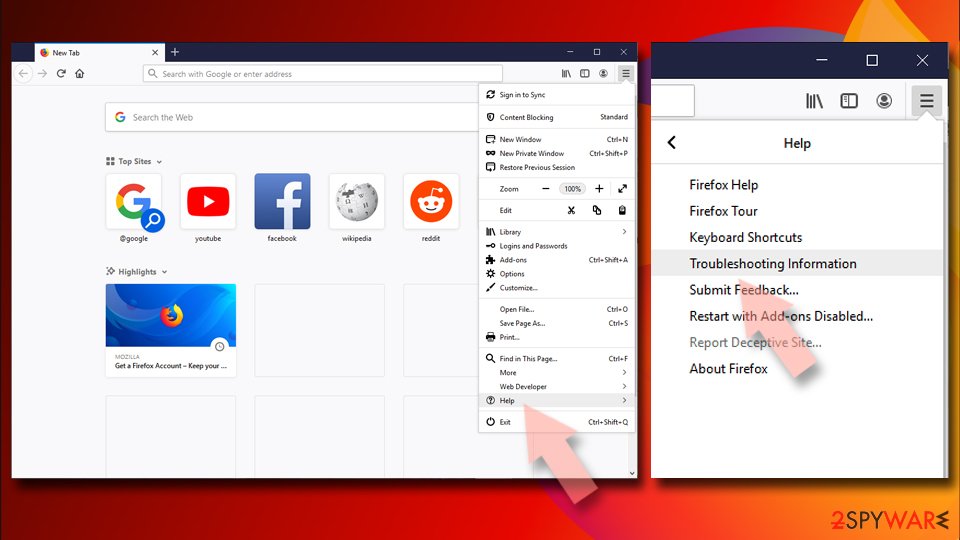
- Open Mozilla Firefox browser and click the Menu.
- Go to Help and then choose Troubleshooting Information.
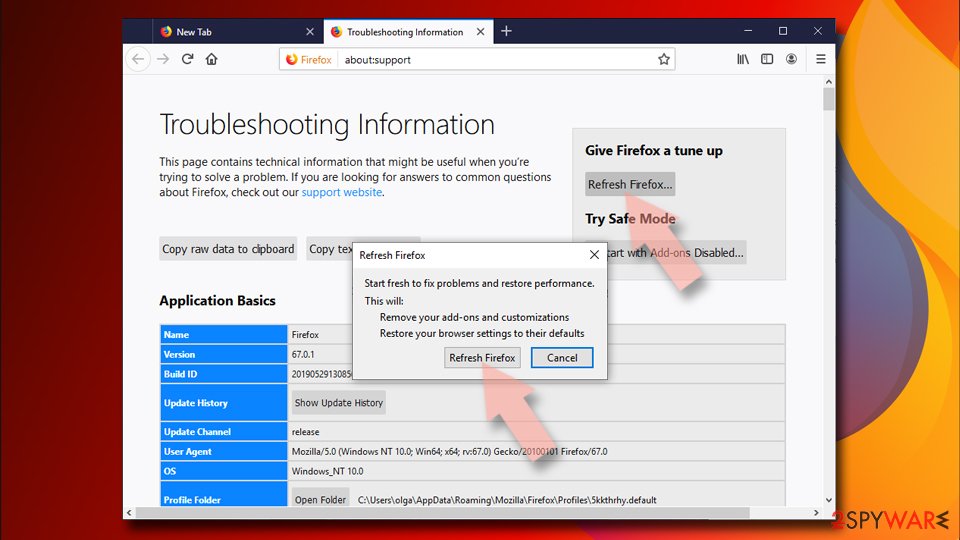
- Under Give Firefox a tune up section, click on Refresh Firefox…
- Once the pop-up shows up, confirm the action by pressing on Refresh Firefox.
Remove from Google Chrome
You will banish this malware from your Google Chrome browse by following the tutorial below, so make sure you complete all the steps properly:
Delete malicious extensions from Google Chrome:
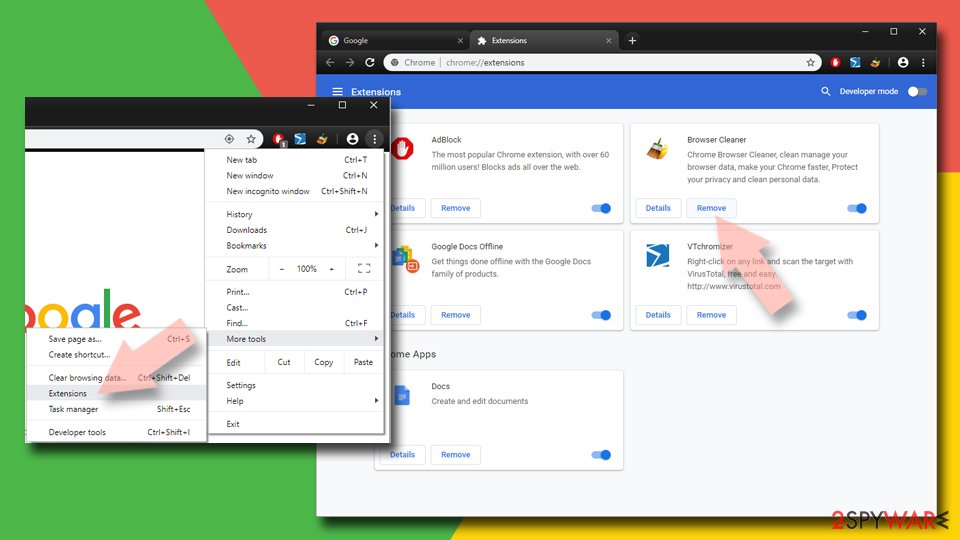
- Open Google Chrome, click on the Menu (three vertical dots at the top-right corner) and select More tools > Extensions.
- In the newly opened window, you will see all the installed extensions. Uninstall all the suspicious plugins that might be related to the unwanted program by clicking Remove.
Clear cache and web data from Chrome:
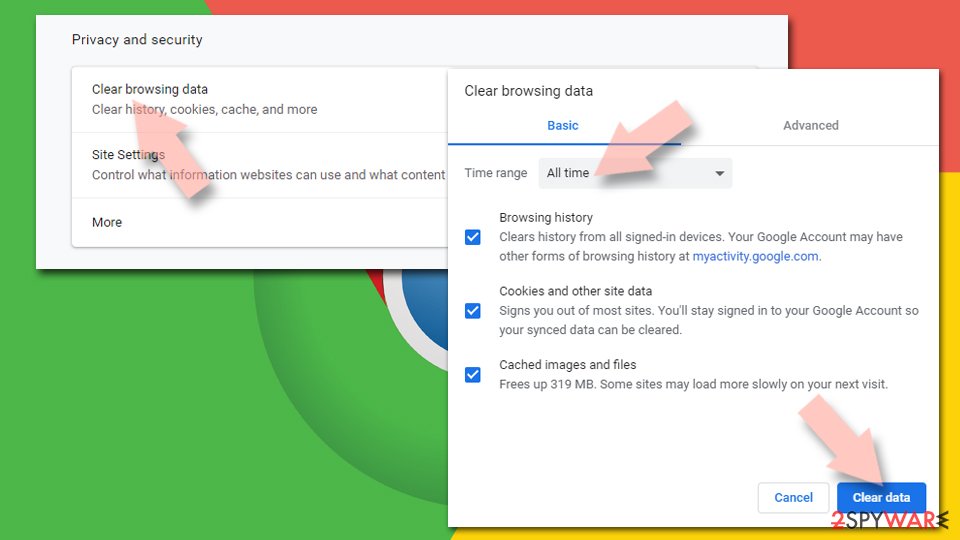
- Click on Menu and pick Settings.
- Under Privacy and security, select Clear browsing data.
- Select Browsing history, Cookies and other site data, as well as Cached images and files.
- Click Clear data.
Change your homepage:
- Click menu and choose Settings.
- Look for a suspicious site in the On startup section.
- Click on Open a specific or set of pages and click on three dots to find the Remove option.
Reset Google Chrome:
If the previous methods did not help you, reset Google Chrome to eliminate all the unwanted components:
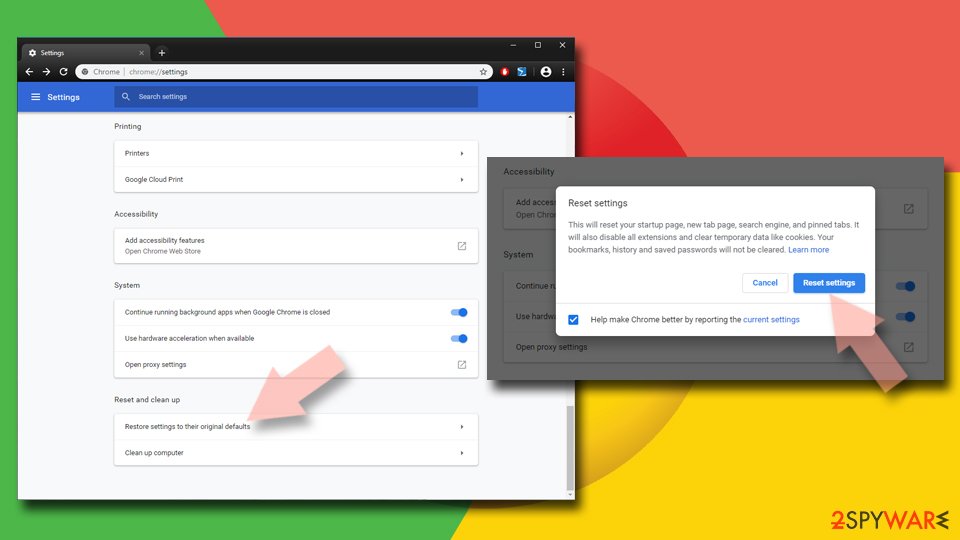
- Click on Menu and select Settings.
- In the Settings, scroll down and click Advanced.
- Scroll down and locate Reset and clean up section.
- Now click Restore settings to their original defaults.
- Confirm with Reset settings.
Delete from Safari
Remove unwanted extensions from Safari:
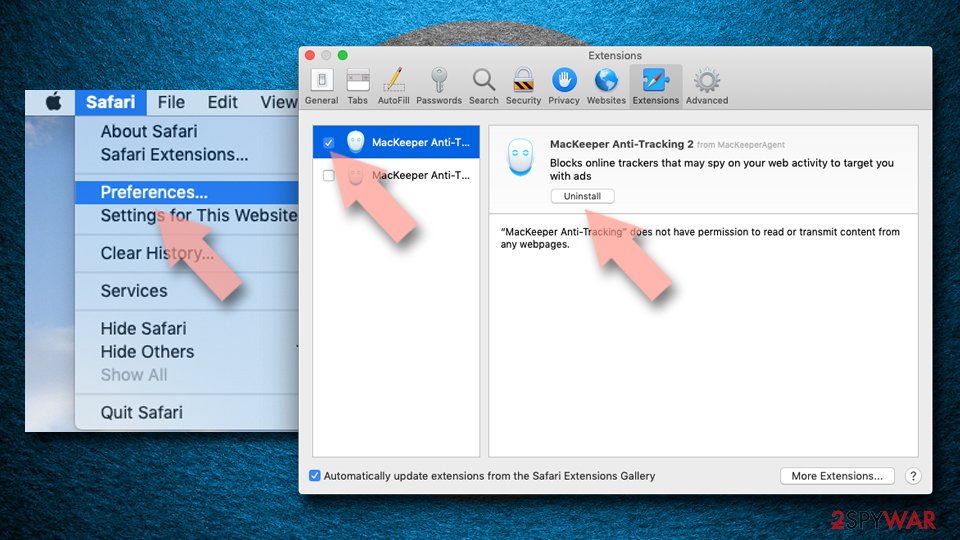
- Click Safari > Preferences…
- In the new window, pick Extensions.
- Select the unwanted extension and select Uninstall.
Clear cookies and other website data from Safari:
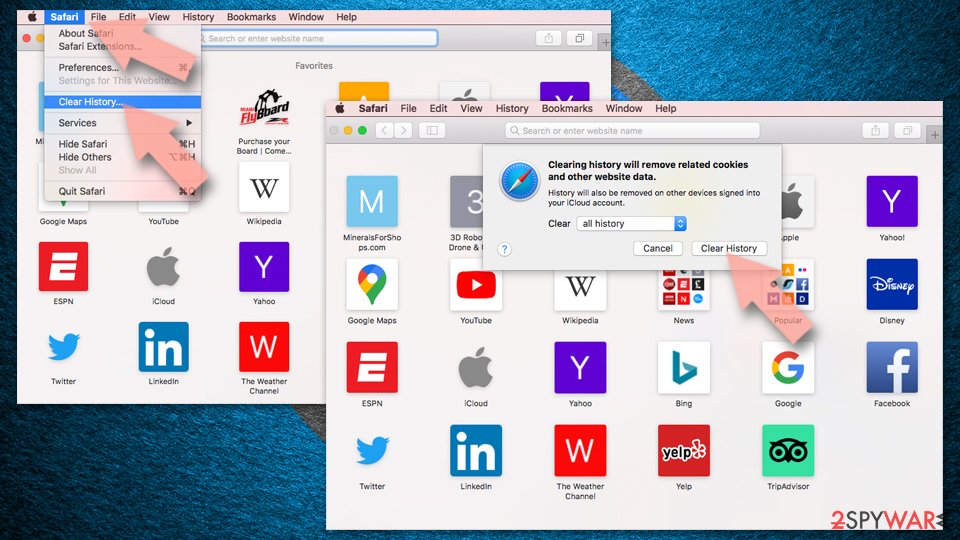
- Click Safari > Clear History…
- From the drop-down menu under Clear, pick all history.
- Confirm with Clear History.
Reset Safari if the above-mentioned steps did not help you:
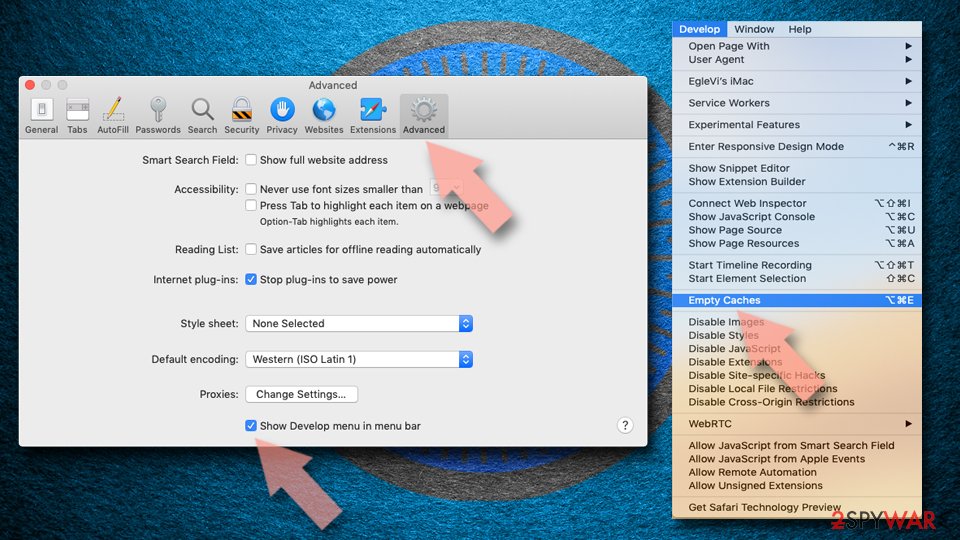
- Click Safari > Preferences…
- Go to Advanced tab.
- Tick the Show Develop menu in menu bar.
- From the menu bar, click Develop, and then select Empty Caches.
After uninstalling this potentially unwanted program (PUP) and fixing each of your web browsers, we recommend you to scan your PC system with a reputable anti-spyware. This will help you to get rid of unTabs extension registry traces and will also identify related parasites or possible malware infections on your computer. For that you can use our top-rated malware remover: FortectIntego, SpyHunter 5Combo Cleaner or Malwarebytes.
How to prevent from getting malware
Protect your privacy – employ a VPN
There are several ways how to make your online time more private – you can access an incognito tab. However, there is no secret that even in this mode, you are tracked for advertising purposes. There is a way to add an extra layer of protection and create a completely anonymous web browsing practice with the help of Private Internet Access VPN. This software reroutes traffic through different servers, thus leaving your IP address and geolocation in disguise. Besides, it is based on a strict no-log policy, meaning that no data will be recorded, leaked, and available for both first and third parties. The combination of a secure web browser and Private Internet Access VPN will let you browse the Internet without a feeling of being spied or targeted by criminals.
No backups? No problem. Use a data recovery tool
If you wonder how data loss can occur, you should not look any further for answers – human errors, malware attacks, hardware failures, power cuts, natural disasters, or even simple negligence. In some cases, lost files are extremely important, and many straight out panic when such an unfortunate course of events happen. Due to this, you should always ensure that you prepare proper data backups on a regular basis.
If you were caught by surprise and did not have any backups to restore your files from, not everything is lost. Data Recovery Pro is one of the leading file recovery solutions you can find on the market – it is likely to restore even lost emails or data located on an external device.
- ^ Stefan Heule. The Most Dangerous Code in the Web Browser. Stefan Heule Blog. Blog Posts by a Computer Science PhD Student at Stanford.
- ^ Jay McGregor. The Man Who Invented Pop-Up Ads Says 'I'm Sorry'. Forbes. Covers Business, Investing, Technology, Entrepreneurship, Leadership, and Lifestyle Topics.
- ^ UnTabs reviews. Google Chrome Store - Extensions. Small Programs That Add New Features to Your Browser.
- ^ Website uses “Add Extension To Leave” popups to infect Chrome users. Information Security Newspaper. IT Security - Related Posts and News.
- ^ Product bundling. Wikipedia. The free encyclopedia.
