BrainFinds.com virus (Quick Decryption Solution) - Free Guide
BrainFinds.com virus Removal Guide
What is BrainFinds.com virus?
Brainfinds.com is a web address promoted by a browser-hijacking app

Brainfinds.com is categorized as a browser hijacker[1]. It pledges to improve your browsing experience, although, in reality, it stealthily modifies your browser settings in order to generate revenue for the developers. This fake search engine alters the homepage, new tab URL, and default search engine by assigning hxxps://www.brainfinds.com to these settings.
| Name | Brainfinds.com |
| Type | Browser hijacker |
| Distribution | Third-party websites, software bundle packages, ads |
| Operation | Changes the operation of the homepage and the new tab address of the web browser; shows sponsored links at the top of search results; redirects to a different provider |
| Uninstall | Perform a full system scan with anti-malware or follow the guide provided at the bottom of this post |
| Browser fix | If you want to remediate your browsers quickly and protect your privacy, use FortectIntego |
It also offers to install supposedly handy “helper objects”[2] that are designed to reassign pre-defined values mentioned above as soon as the user attempts to replace them with different ones. This way, users trying to remove brainfinds.com can get stuck with the virus coming back problem.
Usually, users are attracted by this fake engine because it looks similar to other popular search engines such as Yahoo, Bing, or Google. However, we want to assure you that you do not benefit from using it. According to the developers, they
specialize in online advertising, web traffic generation, online search syndication and Search Engine Marketing, helping owners of websites and web networks to generate revenue.
Even though this app is not a virus, IT specialists tend to call it that way because it may promote other potentially unwanted programs (PUPs) or plug-ins that cause redirects to suspicious websites and intrusive ads.
The developers explicitly state that they are not responsible neither for the harms your computer might face due to their services nor for the content displayed in the sponsored advertisements. Thus, if cybercriminals promote websites that are distributing malicious programs, you risk getting infected.
If you saw that you are continuously redirected to suspicious pages, our IT professionals recommend scanning your computer with SpyHunter 5Combo Cleaner or any other powerful security software. It will quickly detect the infected files and maintain your system’s security in the future. Zondervirus.nl team also says that the quickest removal option (the automatic one) is also the most secure one to choose.[3]

Browser hijackers spread within software bundles
The developers of potentially unwanted programs (PUPs) are usually not completely honest and hide the information about installing the hijacker among the “recommended downloads” added to the main program that the user downloads.
Users who rush through the steps of the download/installation process can get tricked and do not notice the hidden PUP. Thus, we strongly recommend avoiding Quick/Recommended settings while installing applications. You should choose Custom/Advanced options instead and be aware of the possible threats.
Also, hijackers may spread through intrusive ads as well. The genuine appearance of the advertisement might lure you into clicking it, but that is precisely what the developers aim for. We suggest avoiding clicking those ads to protect your system from spyware attacks.
Brainfinds.com removal directions
It is important to understand that a browser hijacker mainly affects your web browser, be it Google Chrome, Mozilla Firefox, MS Edge, or Safari. In fact, most of the hijackers typically come as extensions rather than standalone applications installed on the system. Therefore, you should be extra thorough when you are dealing with this type of threat. This is why you will find the instructions on how to clean your web browser appropriately below.
It goes without saying that automatic tools can also be used for this purpose – maintenance and optimization utilities can take care of cleaning your web browsers carefully. Meanwhile, anti-malware software can check whether there are malicious processes or files hidden on your system that you would otherwise never know about.
You may remove virus damage with a help of FortectIntego. SpyHunter 5Combo Cleaner and Malwarebytes are recommended to detect potentially unwanted programs and viruses with all their files and registry entries that are related to them.
Getting rid of BrainFinds.com virus. Follow these steps
Uninstall from Windows
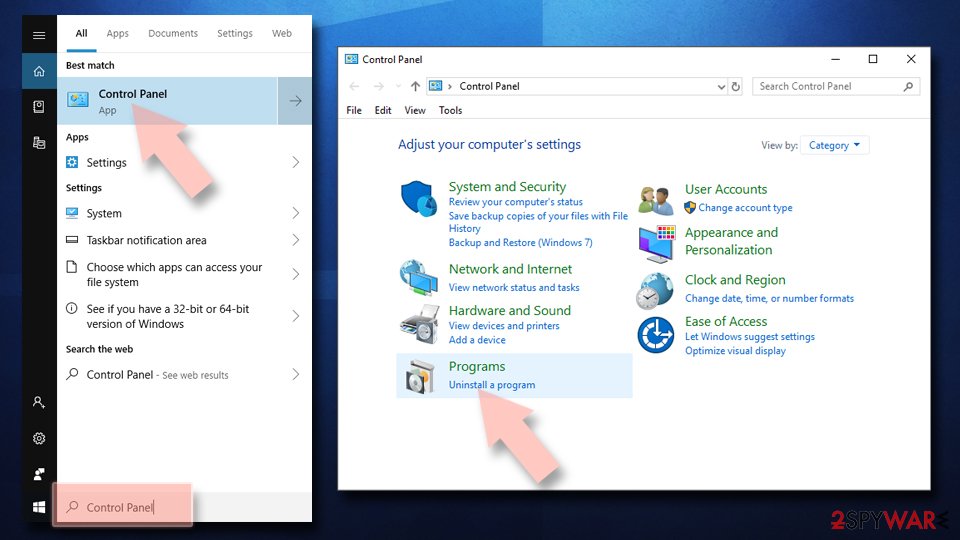
You can check Control Panel in order to see if there are unwanted apps installed on your device.
Instructions for Windows 10/8 machines:
- Enter Control Panel into Windows search box and hit Enter or click on the search result.
- Under Programs, select Uninstall a program.

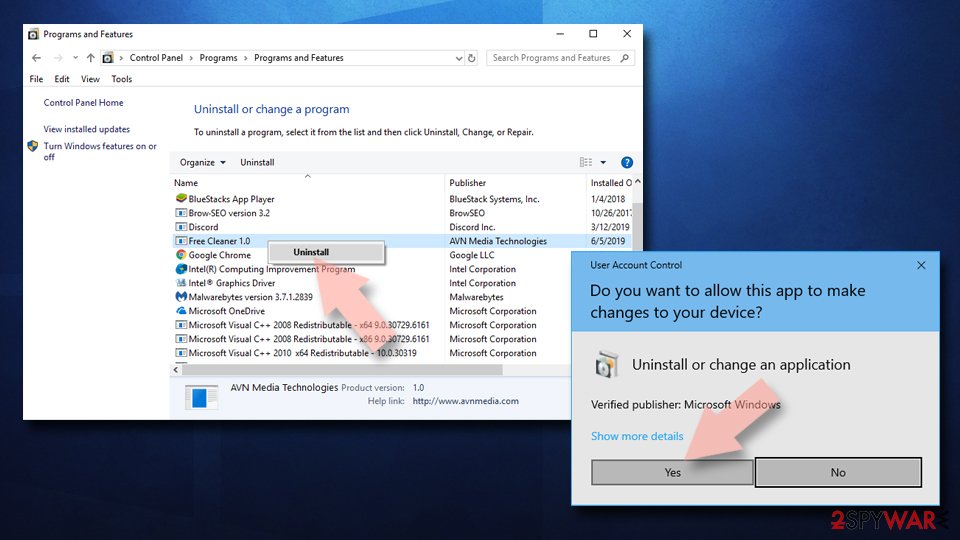
- From the list, find the entry of the suspicious program.
- Right-click on the application and select Uninstall.
- If User Account Control shows up, click Yes.
- Wait till uninstallation process is complete and click OK.

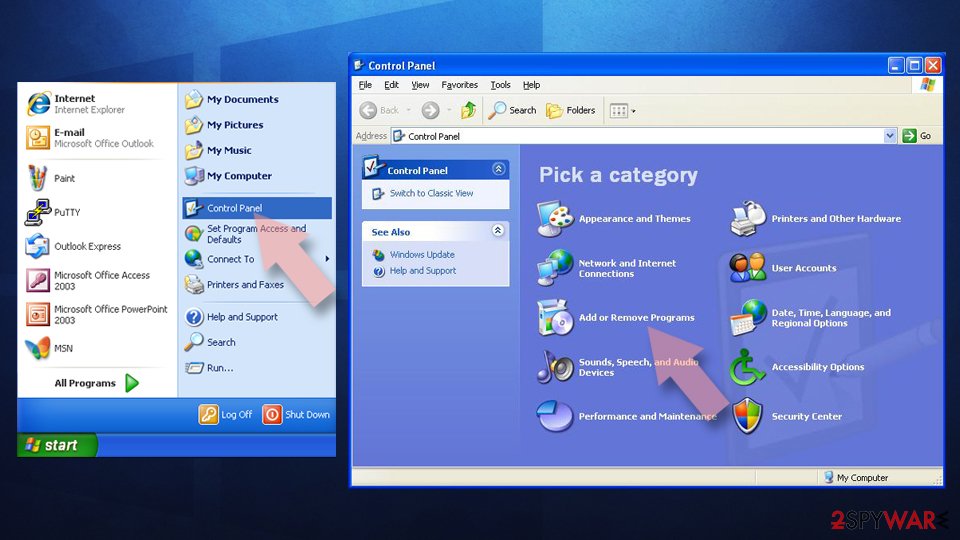
If you are Windows 7/XP user, proceed with the following instructions:
- Click on Windows Start > Control Panel located on the right pane (if you are Windows XP user, click on Add/Remove Programs).
- In Control Panel, select Programs > Uninstall a program.

- Pick the unwanted application by clicking on it once.
- At the top, click Uninstall/Change.
- In the confirmation prompt, pick Yes.
- Click OK once the removal process is finished.
Delete from macOS
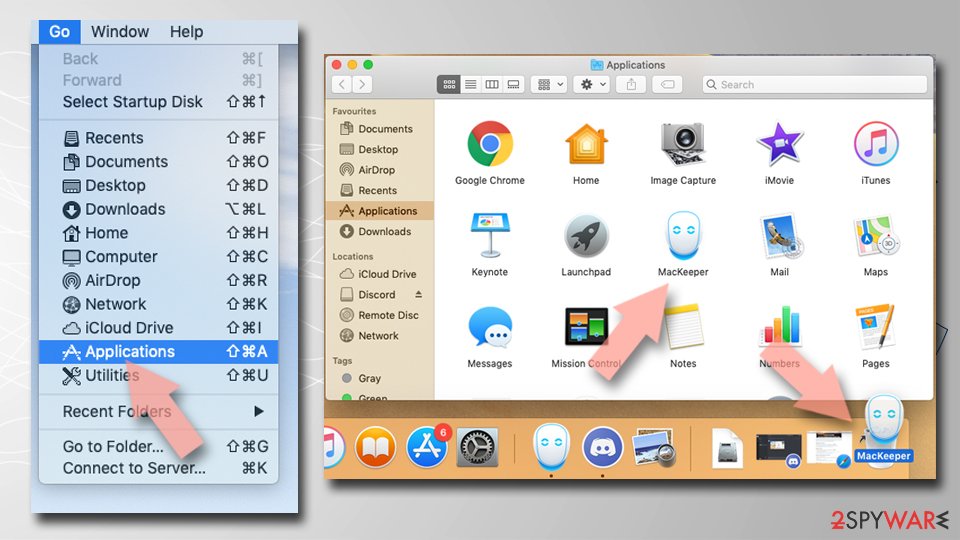
Remove items from Applications folder:
- From the menu bar, select Go > Applications.
- In the Applications folder, look for all related entries.
- Click on the app and drag it to Trash (or right-click and pick Move to Trash)

To fully remove an unwanted app, you need to access Application Support, LaunchAgents, and LaunchDaemons folders and delete relevant files:
- Select Go > Go to Folder.
- Enter /Library/Application Support and click Go or press Enter.
- In the Application Support folder, look for any dubious entries and then delete them.
- Now enter /Library/LaunchAgents and /Library/LaunchDaemons folders the same way and terminate all the related .plist files.

Remove from Microsoft Edge
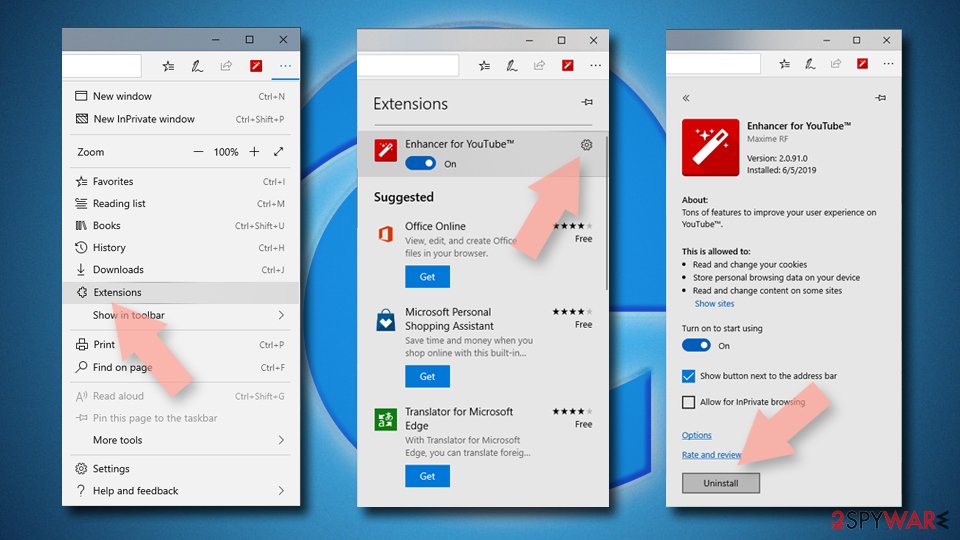
Delete unwanted extensions from MS Edge:
- Select Menu (three horizontal dots at the top-right of the browser window) and pick Extensions.
- From the list, pick the extension and click on the Gear icon.
- Click on Uninstall at the bottom.

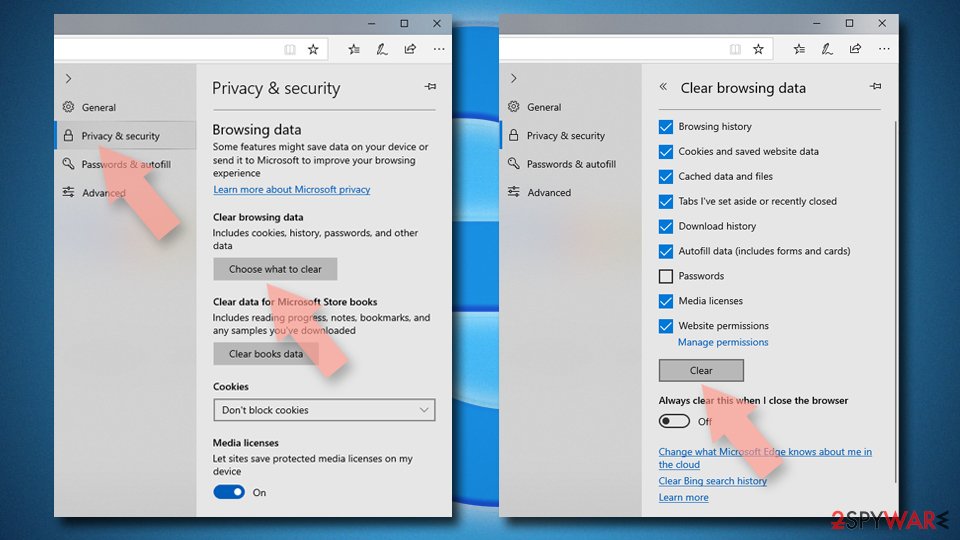
Clear cookies and other browser data:
- Click on the Menu (three horizontal dots at the top-right of the browser window) and select Privacy & security.
- Under Clear browsing data, pick Choose what to clear.
- Select everything (apart from passwords, although you might want to include Media licenses as well, if applicable) and click on Clear.

Restore new tab and homepage settings:
- Click the menu icon and choose Settings.
- Then find On startup section.
- Click Disable if you found any suspicious domain.
Reset MS Edge if the above steps did not work:
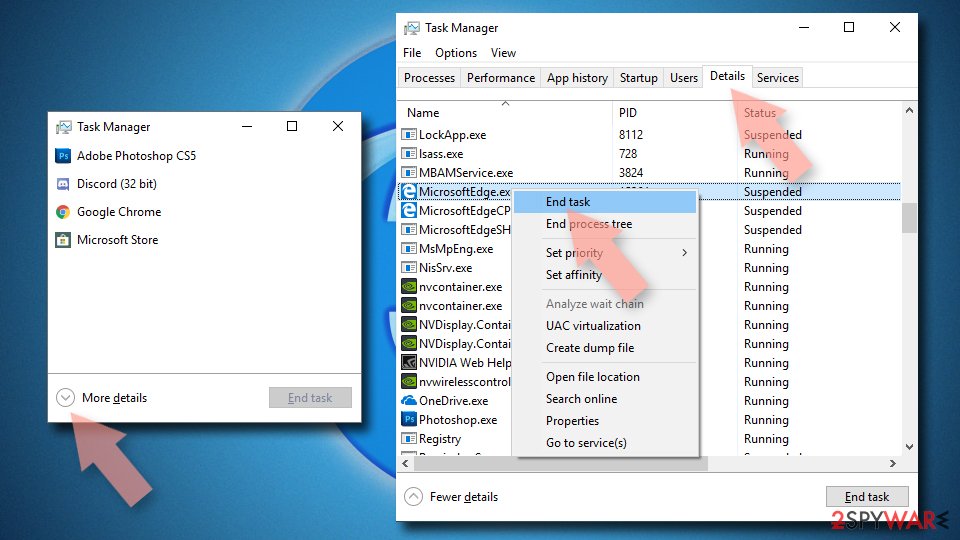
- Press on Ctrl + Shift + Esc to open Task Manager.
- Click on More details arrow at the bottom of the window.
- Select Details tab.
- Now scroll down and locate every entry with Microsoft Edge name in it. Right-click on each of them and select End Task to stop MS Edge from running.

If this solution failed to help you, you need to use an advanced Edge reset method. Note that you need to backup your data before proceeding.
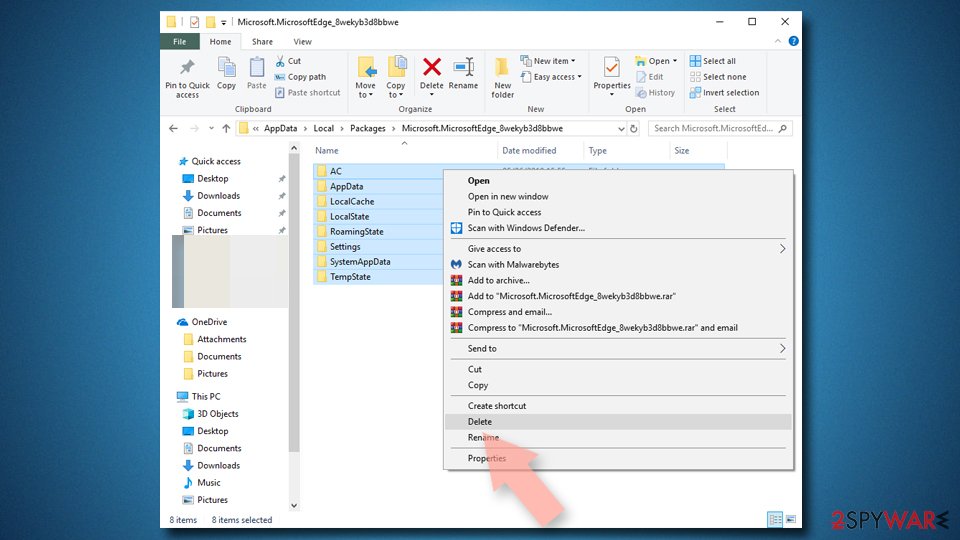
- Find the following folder on your computer: C:\\Users\\%username%\\AppData\\Local\\Packages\\Microsoft.MicrosoftEdge_8wekyb3d8bbwe.
- Press Ctrl + A on your keyboard to select all folders.
- Right-click on them and pick Delete

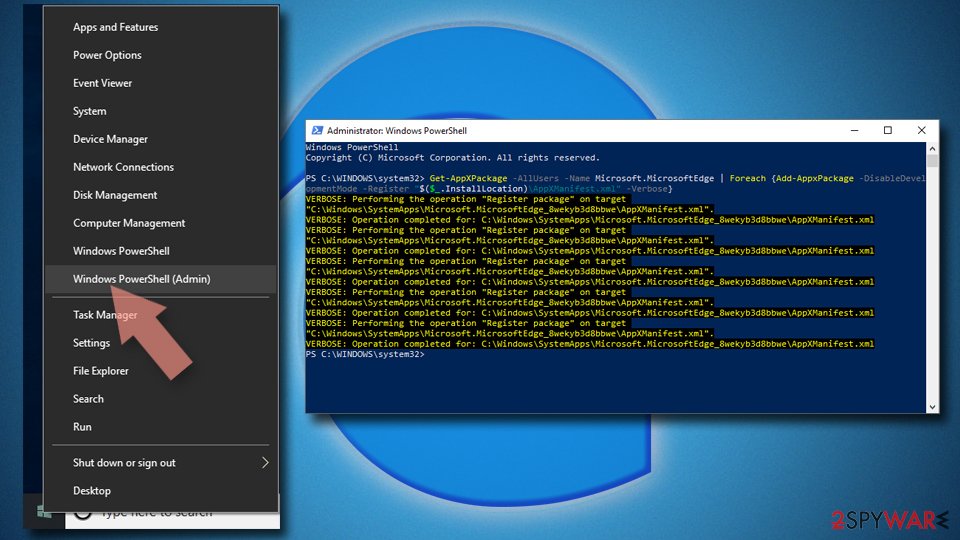
- Now right-click on the Start button and pick Windows PowerShell (Admin).
- When the new window opens, copy and paste the following command, and then press Enter:
Get-AppXPackage -AllUsers -Name Microsoft.MicrosoftEdge | Foreach {Add-AppxPackage -DisableDevelopmentMode -Register “$($_.InstallLocation)\\AppXManifest.xml” -Verbose

Instructions for Chromium-based Edge
Delete extensions from MS Edge (Chromium):
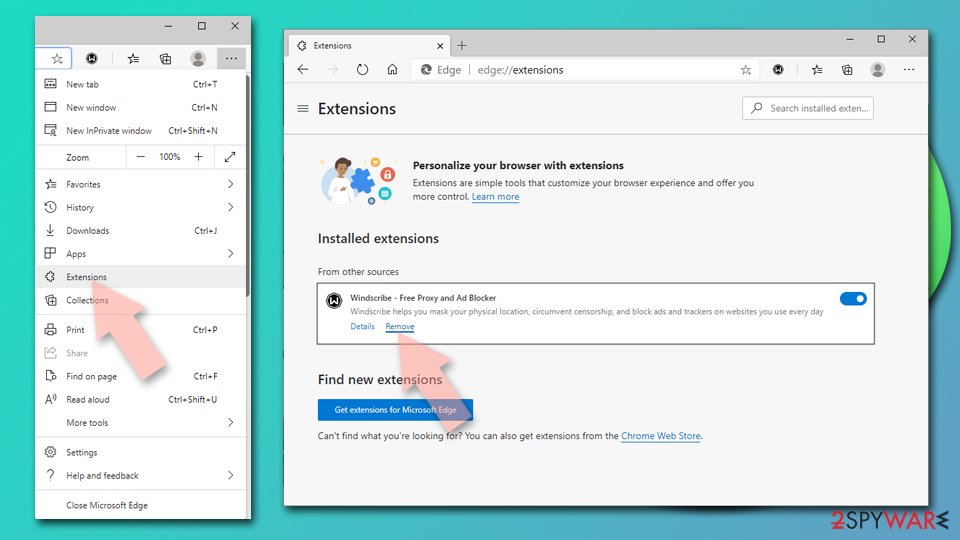
- Open Edge and click select Settings > Extensions.
- Delete unwanted extensions by clicking Remove.

Clear cache and site data:
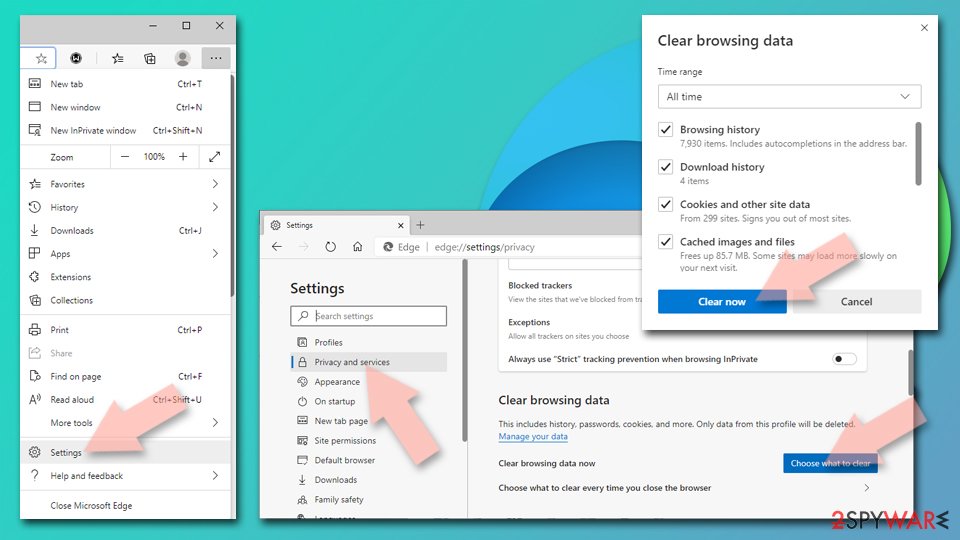
- Click on Menu and go to Settings.
- Select Privacy, search and services.
- Under Clear browsing data, pick Choose what to clear.
- Under Time range, pick All time.
- Select Clear now.

Reset Chromium-based MS Edge:
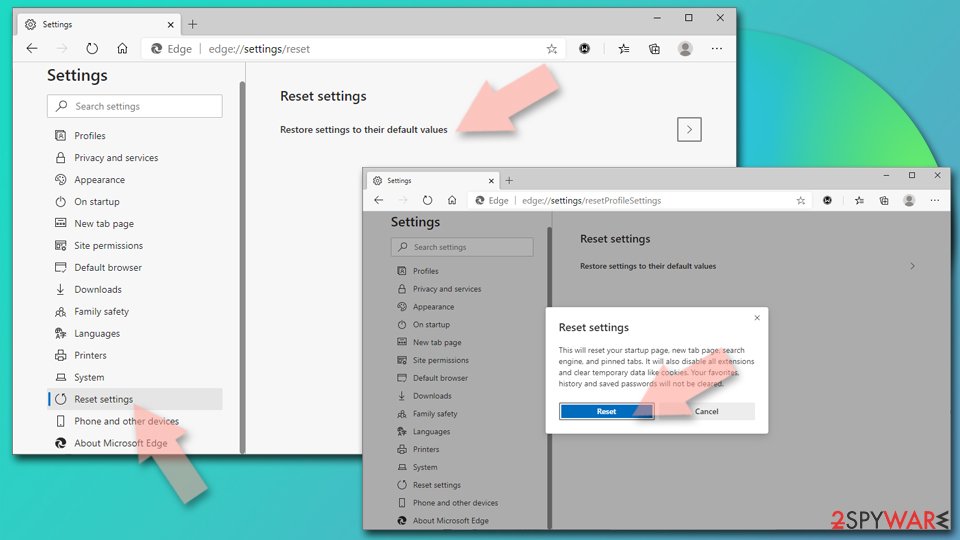
- Click on Menu and select Settings.
- On the left side, pick Reset settings.
- Select Restore settings to their default values.
- Confirm with Reset.

Remove from Mozilla Firefox (FF)
Try to find all suspicious Firefox add-ons using the provided guide. Remove them all in accordance with provided instructions.
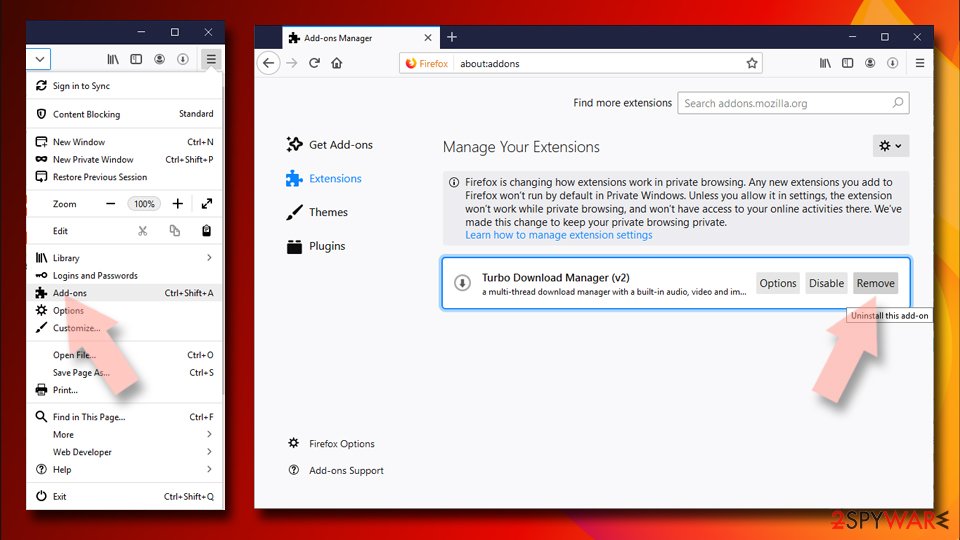
Remove dangerous extensions:
- Open Mozilla Firefox browser and click on the Menu (three horizontal lines at the top-right of the window).
- Select Add-ons.
- In here, select unwanted plugin and click Remove.

Reset the homepage:
- Click three horizontal lines at the top right corner to open the menu.
- Choose Options.
- Under Home options, enter your preferred site that will open every time you newly open the Mozilla Firefox.
Clear cookies and site data:
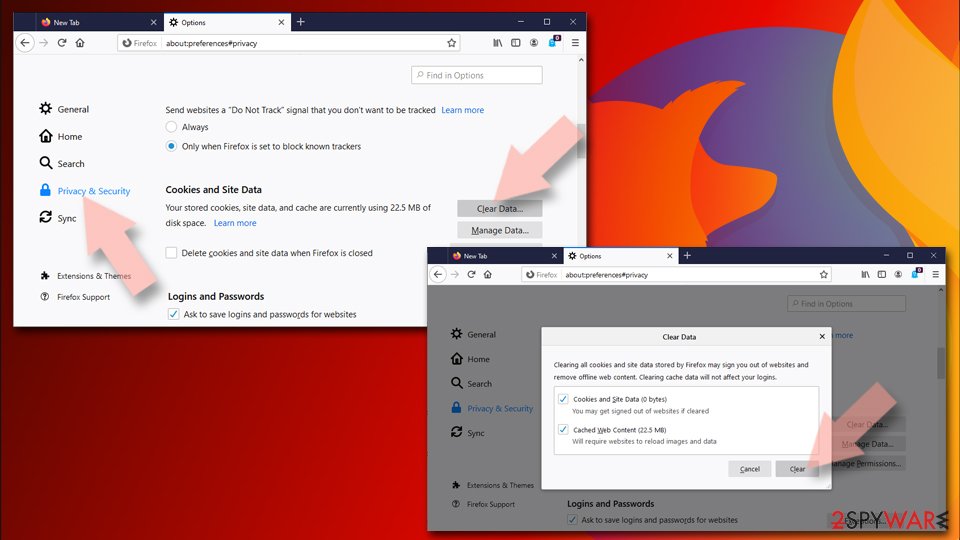
- Click Menu and pick Settings.
- Go to Privacy & Security section.
- Scroll down to locate Cookies and Site Data.
- Click on Clear Data…
- Select Cookies and Site Data, as well as Cached Web Content and press Clear.

Reset Mozilla Firefox
If clearing the browser as explained above did not help, reset Mozilla Firefox:
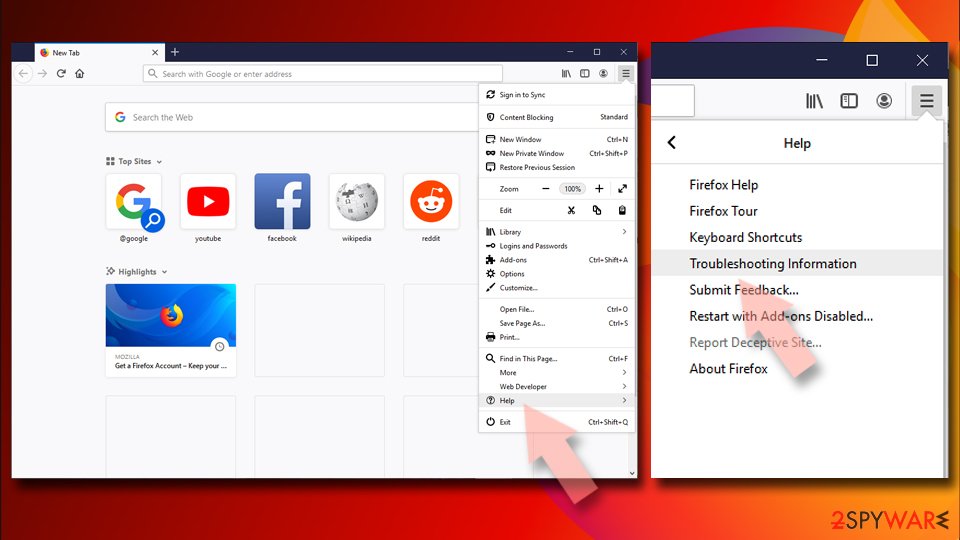
- Open Mozilla Firefox browser and click the Menu.
- Go to Help and then choose Troubleshooting Information.

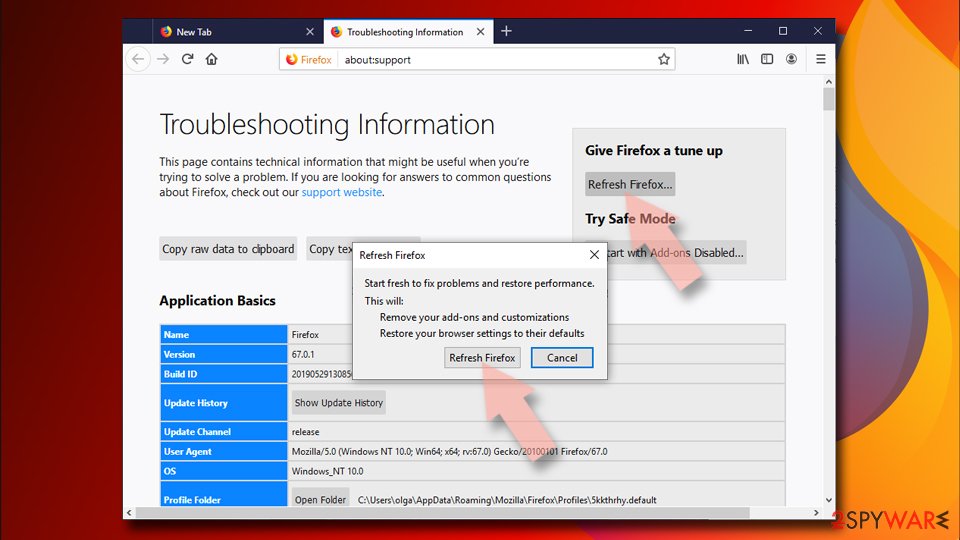
- Under Give Firefox a tune up section, click on Refresh Firefox…
- Once the pop-up shows up, confirm the action by pressing on Refresh Firefox.

Remove from Google Chrome
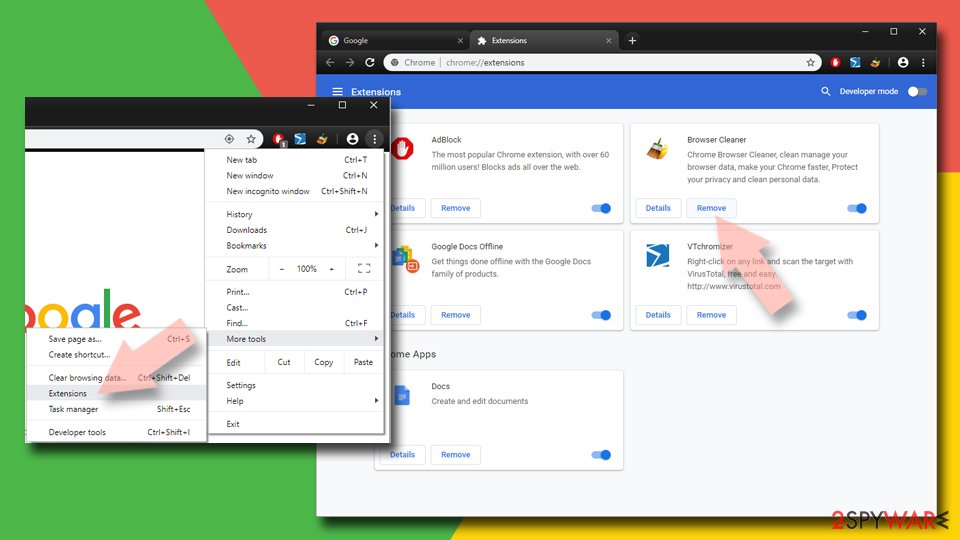
Go to chrome://extensions page and delete the unwanted app from Chrome.
Delete malicious extensions from Google Chrome:
- Open Google Chrome, click on the Menu (three vertical dots at the top-right corner) and select More tools > Extensions.
- In the newly opened window, you will see all the installed extensions. Uninstall all the suspicious plugins that might be related to the unwanted program by clicking Remove.

Clear cache and web data from Chrome:
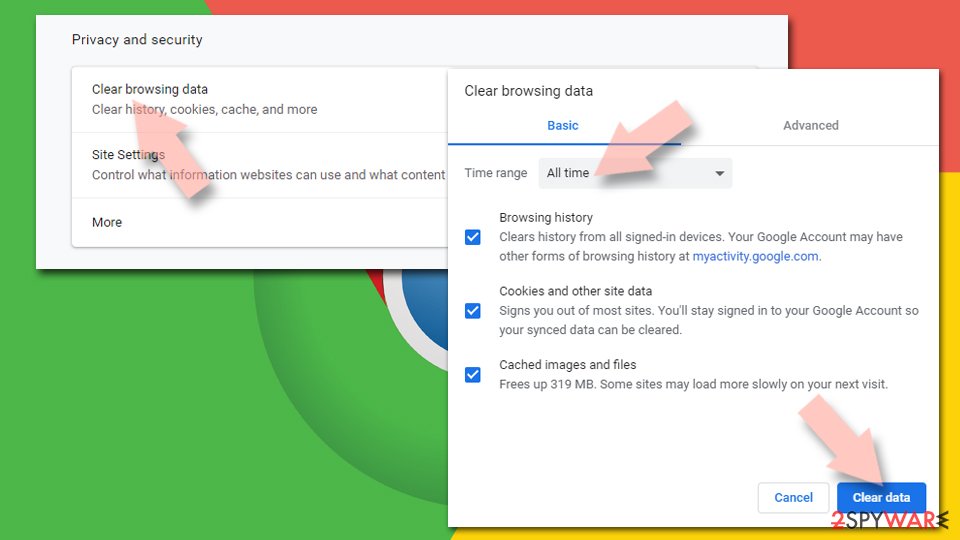
- Click on Menu and pick Settings.
- Under Privacy and security, select Clear browsing data.
- Select Browsing history, Cookies and other site data, as well as Cached images and files.
- Click Clear data.

Change your homepage:
- Click menu and choose Settings.
- Look for a suspicious site in the On startup section.
- Click on Open a specific or set of pages and click on three dots to find the Remove option.
Reset Google Chrome:
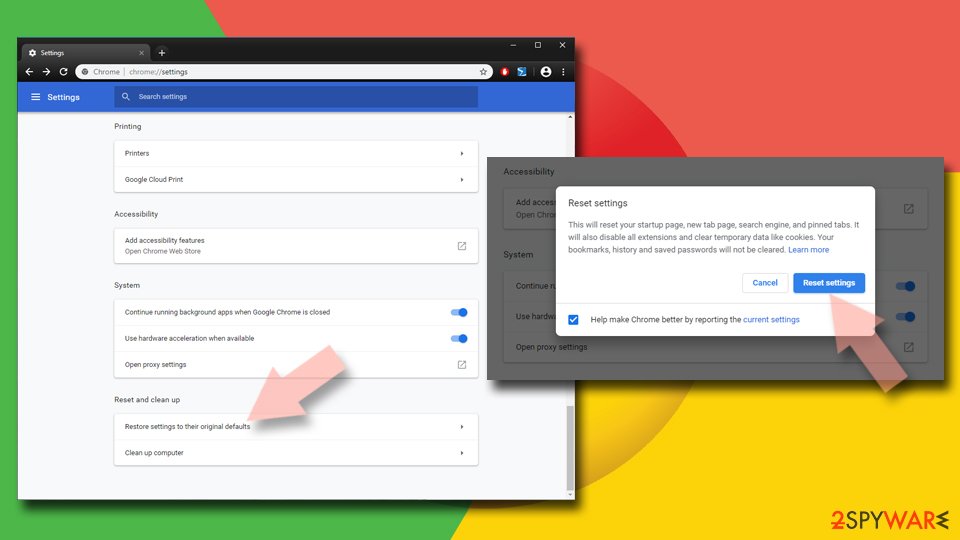
If the previous methods did not help you, reset Google Chrome to eliminate all the unwanted components:
- Click on Menu and select Settings.
- In the Settings, scroll down and click Advanced.
- Scroll down and locate Reset and clean up section.
- Now click Restore settings to their original defaults.
- Confirm with Reset settings.

Delete from Safari
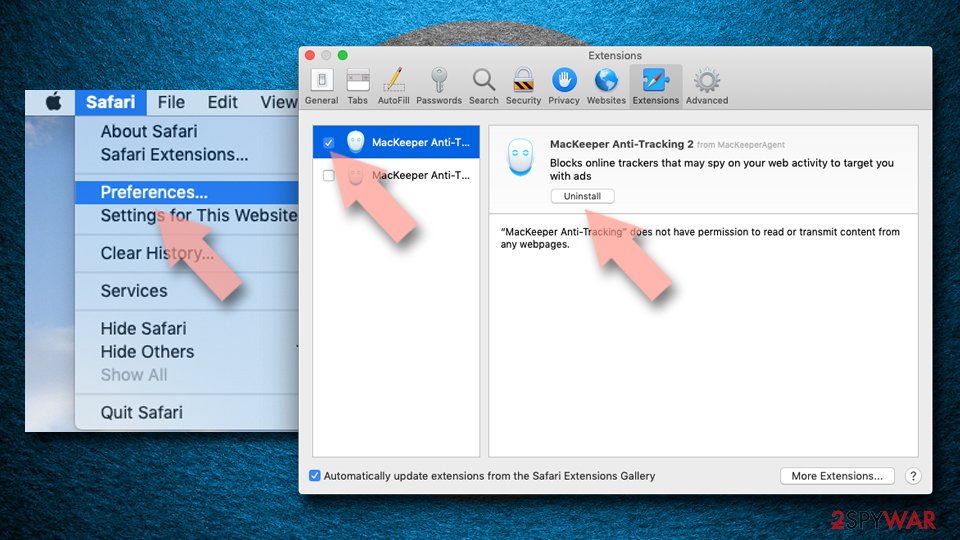
Remove unwanted extensions from Safari:
- Click Safari > Preferences…
- In the new window, pick Extensions.
- Select the unwanted extension and select Uninstall.

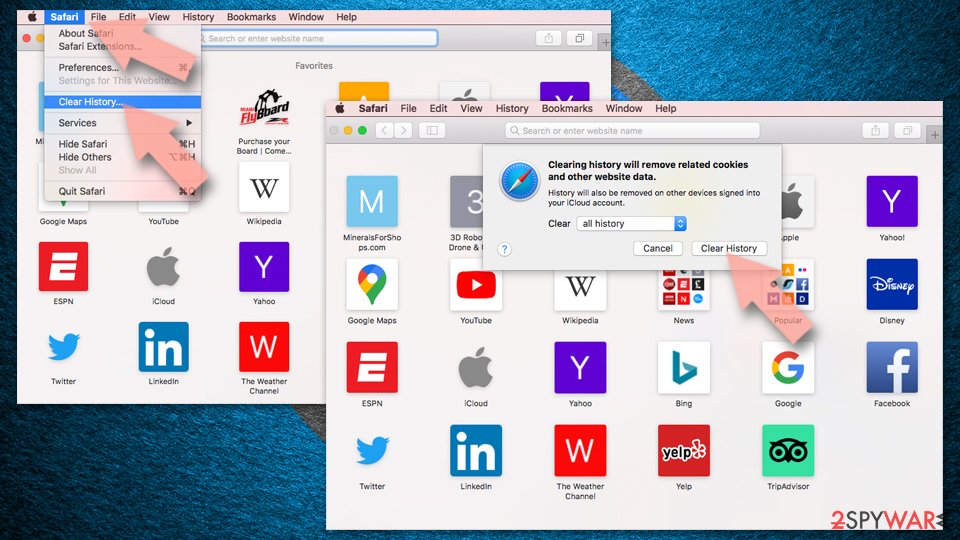
Clear cookies and other website data from Safari:
- Click Safari > Clear History…
- From the drop-down menu under Clear, pick all history.
- Confirm with Clear History.

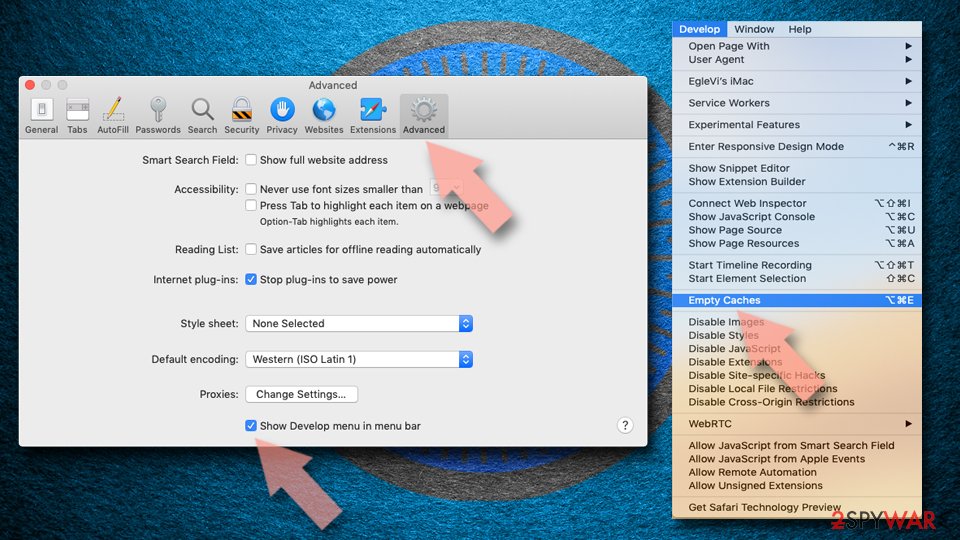
Reset Safari if the above-mentioned steps did not help you:
- Click Safari > Preferences…
- Go to Advanced tab.
- Tick the Show Develop menu in menu bar.
- From the menu bar, click Develop, and then select Empty Caches.

After uninstalling this potentially unwanted program (PUP) and fixing each of your web browsers, we recommend you to scan your PC system with a reputable anti-spyware. This will help you to get rid of BrainFinds.com registry traces and will also identify related parasites or possible malware infections on your computer. For that you can use our top-rated malware remover: FortectIntego, SpyHunter 5Combo Cleaner or Malwarebytes.
How to prevent from getting browser hijacker
Protect your privacy – employ a VPN
There are several ways how to make your online time more private – you can access an incognito tab. However, there is no secret that even in this mode, you are tracked for advertising purposes. There is a way to add an extra layer of protection and create a completely anonymous web browsing practice with the help of Private Internet Access VPN. This software reroutes traffic through different servers, thus leaving your IP address and geolocation in disguise. Besides, it is based on a strict no-log policy, meaning that no data will be recorded, leaked, and available for both first and third parties. The combination of a secure web browser and Private Internet Access VPN will let you browse the Internet without a feeling of being spied or targeted by criminals.
No backups? No problem. Use a data recovery tool
If you wonder how data loss can occur, you should not look any further for answers – human errors, malware attacks, hardware failures, power cuts, natural disasters, or even simple negligence. In some cases, lost files are extremely important, and many straight out panic when such an unfortunate course of events happen. Due to this, you should always ensure that you prepare proper data backups on a regular basis.
If you were caught by surprise and did not have any backups to restore your files from, not everything is lost. Data Recovery Pro is one of the leading file recovery solutions you can find on the market – it is likely to restore even lost emails or data located on an external device.
- ^ Gabriel E. Hall. What are browser hijackers and how to remove them. 2-Spyware. Security and Spyware News.
- ^ Browser Hijack Objects (BHOs). Malwarebytes Labs. Security News, Threat Research.
- ^ ZonderVirus. ZonderVirus. Malware Removal Guidance, Security News.
