Districtbaloneywhiskers.com – a site that tricks users to enable push notifications

Districtbaloneywhiskers.com is a website that urges users to subscribe to its notifications enabling it to display deceptive ads even when browsers aren't opened. The desktop notification comes straight to the corner of the screen. If users press the Allow button, their devices (Windows, Mac, Android, etc.) are immediately starting to show suspicious content. If that happens consistently your device can be infected with adware.[1]
These intrusive Districtbaloneywhiskers.com ads will start popping up at the right corner of computers or be sent as notifications to cell phone screens. Their contents might be inappropriate or reroute to commercial sites. Furthermore, the displayed ads might redirect to websites other than the advertised content and might lead to high-risk portals.
If users are redirected to Districtbaloneywhiskers.com site, that means they have adware or other potentially unwanted programs (PUPs) installed on their devices. This website isn't malicious, but its ads might be, so we glad you came to us to find out how to get rid of it. This article covers functions, delivery methods, and of course, provides removal instructions for this adware.
| name | Districtbaloneywhiskers.com |
|---|---|
| type | Redirect, adware |
| IP address | 192.243.59.13 |
| Symptoms | Pop-ups, banners, surveys, and other kinds of ads covering the entire page, popping up directly on the screen. Redirects to high-risk sites. Slower device performance |
| Risks | Installation of PUPs or even malware, privacy issues |
| Distribution | Deceptive ads, fake software updaters, freeware bundles |
| Elimination | Automatic removal with anti-malware software is suggested. Manual removal options are displayed at the bottom of the article |
| System fix | Clean and optimize your device with powerful system repair tools such as the FortectIntego app |
Districtbaloneywhiskers.com push notification virus might jeopardize the device's privacy and security as its ads might lead to hazardous sites that have nothing to do with the advertised content. Redirects might happen to adult sites, online gambling, or gaming portals. Also, to websites that would push users into downloading and installing fake updates, which would result in additional PUP infections or, even worse – malware infections.[2]
Since people don't visit portals like Districtbaloneywhiskers.com of their own volition, PUP operators redirect to these types of sites using adware, browser hijackers, and junkware alike. So if you're redirected to this site, you have some sort of computer infection.
Once the Districtbaloneywhiskers.com notifications are enabled, the device in use is immediately infected with adware that will result in an abundance of ads. If any of the displayed ads get clicked, either intentionally or accidentally, more PUPs are more likely to be installed.

We recommend scanning devices with professional anti-malware tools like SpyHunterCombo Cleaner or MalwarebytesMalwarebytes to determine whether adware or malware is installed on devices and remove Districtbaloneywhiskers.com virus along with any other suspicious files that the software detects. A proper system scan can show if the PUP managed to find the way on the machine with other applications at the same time.
To restore your system files and settings and get the best available performance from your machine, experts[3] recommend using the FortectIntego or a different optimization, system repair tool. Users are advised to do that only after a successful Districtbaloneywhiskers.com removal. If ads are still popping up, refer to our manual removal guides below.
Identify push notification websites to evade adware and other PUP infections
Operators of websites where users could be infected with push notification viruses use various sneaky techniques to try and fool them. The main goal is to trick users into pressing the Allow button, which automatically subscribes to these portals' alerts. This results in excessive ad placement, generating revenue for the operators.

One of the tricks that push notification websites to use is by claiming that a visitor must allow notifications to see some hidden content, imaginary breaking news, secret video, and alike. No legitimate site would ever push its visitors to view some content.
Legit portals can sometimes ask users to prove that they're not robots by completing a captcha or something similar. Shady websites decided to exploit that by stating that users must press the Allow button to prove that they're human. If you ever encounter a website that forces you to subscribe to its alerts in any way – close the tab and never revisit the site again.
Districtbaloneywhiskers.com virus removal tutorial for affected devices
When either Districtbaloneywhiskers.com redirect or pop-up advertisements are happening on a device, that could mean only one thing – your device is infected with a potentially unwanted program. Junkware isn't as hazardous as malware, but nonetheless, it should be eliminated swiftly.
Districtbaloneywhiskers.com removal should be done in two ways. First of all, scan your device with reliable anti-malware software like SpyHunterCombo Cleaner or MalwarebytesMalwarebytes to remove any PUPs responsible. Then eliminate it from your affected Safari, Chrome, or other browsers. If you're not sure how to do that, please refer to our free instructions below.
After you successfully remove Districtbaloneywhiskers.com from your device and your browser, you should use powerful system repair tools. Try FortectIntego. That way, you'll make sure that the system irregularities are fixed, and the performance will be stable. If you have any further questions, please feel free to leave them at our Ask Us interface.
Uninstall from Windows
Uninstall from Windows 10/8:
- Type Control Panel into the Windows search box and open the result.
- Under Programs, select Uninstall a program.


Uninstall from Windows 7/XP:
- Click on Windows Start > Control Panel (Windows XP users should click on Add/Remove Programs).
- In Control Panel, select Programs > Uninstall a program.


Remove the unwanted program:
- In the Programs and Features window, look for any recently installed suspicious entries, select them, and click Uninstall.
- If User Account Control appears, click Yes to confirm, then complete the removal.


Delete from macOS
Remove the unwanted application:
- From the menu bar, select Go > Applications.
- In the Applications folder, look for any suspicious entries, then drag them to Trash (or right-click and pick Move to Trash).


Delete leftover files and folders:
- Select Go > Go to Folder.
- Enter /Library/Application Support and remove any suspicious folders related to the unwanted program.
- Repeat the same check in the /Library/LaunchAgents and /Library/LaunchDaemons folders, deleting any suspicious entries.

- Finally, empty the Trash to permanently remove the leftovers.

Reset Internet Explorer
Remove dangerous add-ons:
- Open Internet Explorer, click on the Gear icon (IE menu) on the top-right corner of the browser
- Pick Manage Add-ons.
- You will see a Manage Add-ons window. Here, look for suspicious plugins. Click on these entries and select Disable.


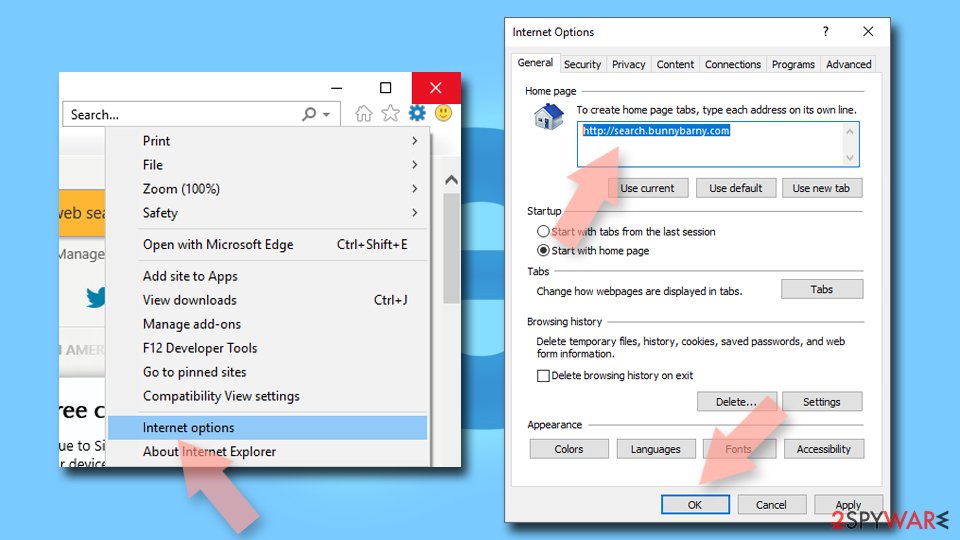
Change your homepage if it was altered:
- Open IE and click on the Gear icon.
- Select Internet Options.
- In the General tab, delete the Home page address and replace it by your preferred one (for example, Google.com).
- Click Apply and then select OK.

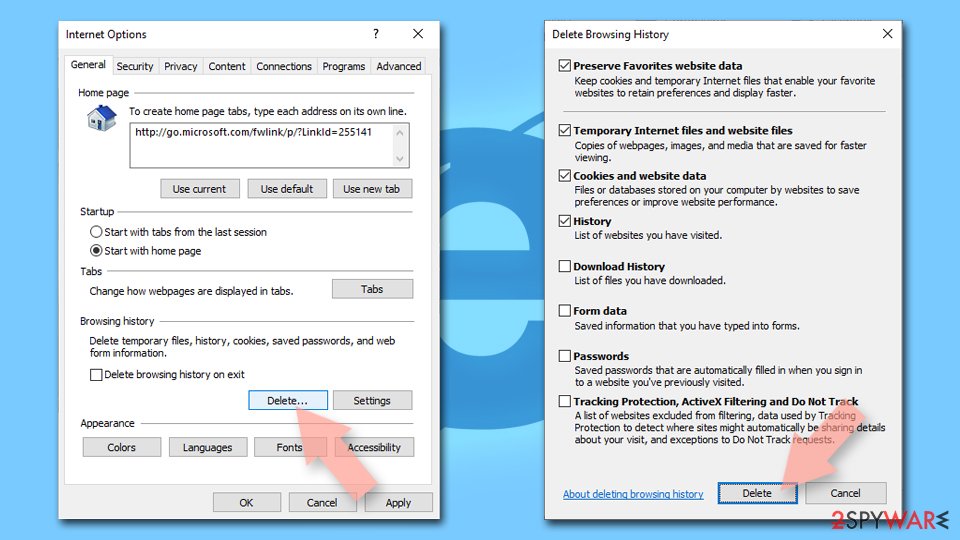
Delete temporary files:
- Press on the Gear icon and select Internet Options.
- Under Browsing history, click Delete...
- Select relevant fields and press Delete.

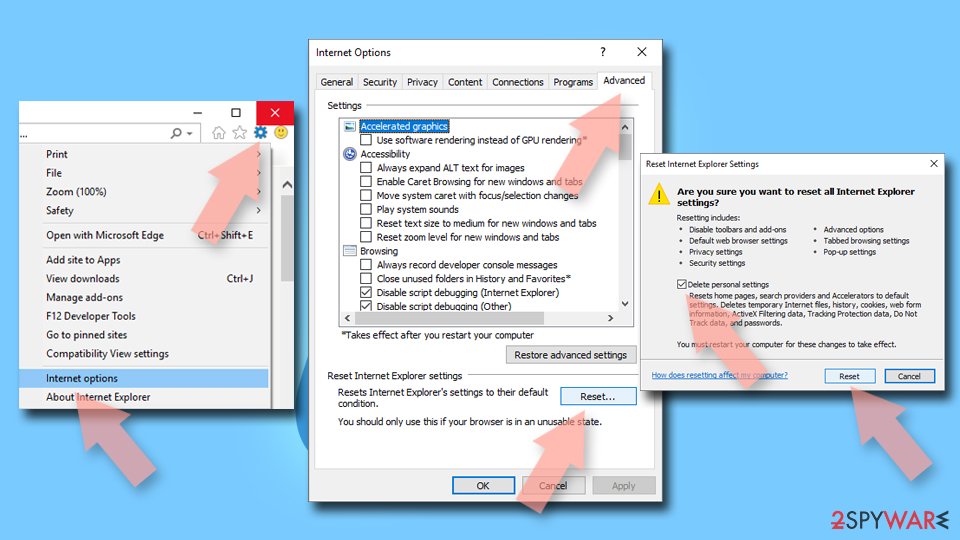
Reset Internet Explorer:
- Click on Gear icon > Internet options and select Advanced tab.
- Select Reset.
- In the new window, check Delete personal settings and select Reset.

Remove from Microsoft Edge
Delete unwanted extensions from MS Edge:
- Select Menu (three horizontal dots at the top-right of the browser window) and pick Extensions.
- From the list, pick the extension and click on the Gear icon.
- Click Remove.


Clear cookies and other browser data:
- Click on the Menu (three horizontal dots at the top-right of the browser window) and select Settings > Privacy, search, and services..
- Under Clear browsing data, pick Choose what to clear.
- Select Cookies and other site data and Cached images and files. (apart from passwords, although you might want to include Media licenses as well, if applicable) and click on Clear.


Restore new tab and homepage settings:
- Click the menu icon and choose Settings.
- Then find On startup section.
- Click Remove next to any suspicious startup page.
Reset MS Edge if the above steps did not work:
- Press on Ctrl + Shift + Esc to open Task Manager.
- Click on More details arrow at the bottom of the window.
- Select Details tab.
- Now scroll down and locate every entry with Microsoft Edge name in it. Right-click on each of them and select End Task to stop MS Edge from running.


Instructions for Chromium-based Edge
Delete extensions from MS Edge (Chromium):
- Open Edge and click select Settings > Extensions.
- Delete unwanted extensions by clicking Remove.


Clear cache and site data:
- Click on Menu and go to Settings.
- Select Privacy, search and services.
- Under Clear browsing data, pick Choose what to clear.
- Under Time range, pick All time.
- Select Clear now.


Reset Chromium-based MS Edge:
- Click on Menu and select Settings.
- On the left side, pick Reset settings.
- Select Restore settings to their default values.
- Confirm with Reset.
- This will disable extensions and reset startup pages but will not delete bookmarks, saved passwords, or browsing history.


Remove from Mozilla Firefox (FF)
Remove dangerous extensions:
- Open Mozilla Firefox browser and click on the Menu (three horizontal lines at the top-right of the window).
- Select Add-ons.
- In here, select the unwanted extension and click Remove.


Reset the homepage:
- Click three horizontal lines at the top right corner to open the menu.
- Choose Settings.
- Under Home, set your preferred homepage and new tab settings.
Clear cookies and site data:
- Click Menu and pick Settings.
- Go to Privacy & Security section.
- Scroll down to locate Cookies and Site Data.
- Click on Clear Data...
- Select Cookies and Site Data and Temporary cached files and pages, then click Clear.


Reset Mozilla Firefox
If clearing the browser as explained above did not help, reset Mozilla Firefox:
- Open Mozilla Firefox browser and click the Menu.
- Go to Help and then choose Troubleshooting Information.

- Under Give Firefox a tune up section, click on Refresh Firefox...
- Once the pop-up shows up, confirm the action by pressing on Refresh Firefox.


Remove from Google Chrome
Delete malicious extensions from Google Chrome:
- Open Google Chrome, click on the Menu (three vertical dots at the top-right corner) and select More tools > Extensions.
- In the newly opened window, you will see all the installed extensions. Uninstall all suspicious extensions related to the unwanted program by clicking Remove.


Clear cache and web data from Chrome:
- Click on Menu and pick Settings.
- Under Privacy and security, select Clear browsing data.
- Select Browsing history, Cookies and other site data, as well as Cached images and files.
- Click Clear data.


Change your homepage:
- Click menu and choose Settings.
- Look for a suspicious site in the On startup section.
- Click on Open a specific or set of pages and click on three dots to find the Remove option.
Reset Google Chrome:
If the previous methods did not help you, reset Google Chrome to eliminate all the unwanted components:
- Click on Menu and select Settings.
- In the Settings, scroll down and click Advanced.
- Scroll down and locate Reset and clean up section.
- Now click Restore settings to their original defaults.
- Confirm with Reset settings.


Delete from Safari
Remove dangerous extensions:
- Open Safari, click Safari in the menu at the top-left of the screen, and select Preferences.
- Go to the Extensions tab, look for any suspicious entries, and click Uninstall to remove them.


Clear history and website data:
- Click Safari in the menu and pick Clear History.
- Set Clear to all history and confirm with Clear History.


Reset Safari:
- Click Safari in the menu and select Preferences > Advanced.
- Enable Show Develop menu in menu bar.
- From the menu bar, click Develop and select Empty Caches.


Was this guide helpful?
Be the first to comment