
Edundedpra.club ads: what it is and how to remove it
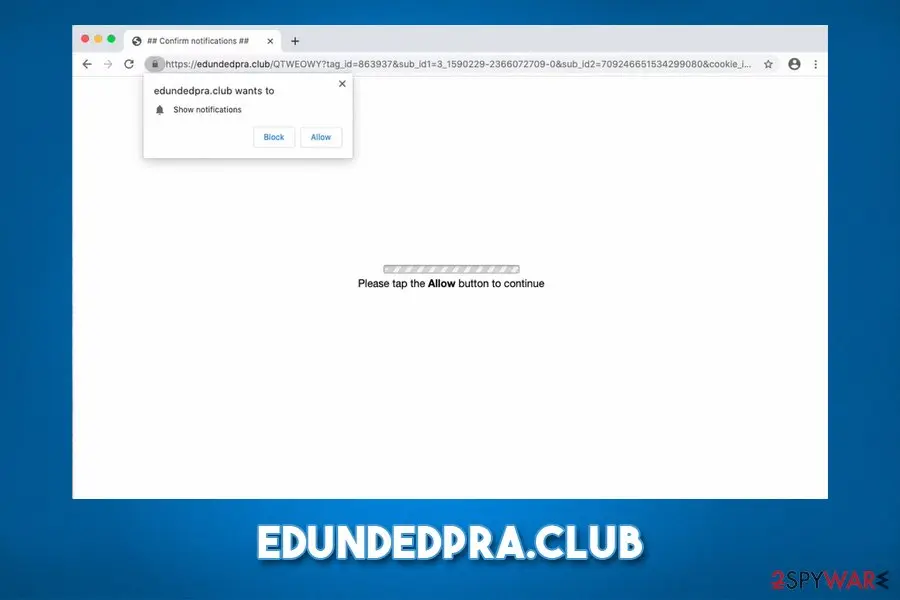
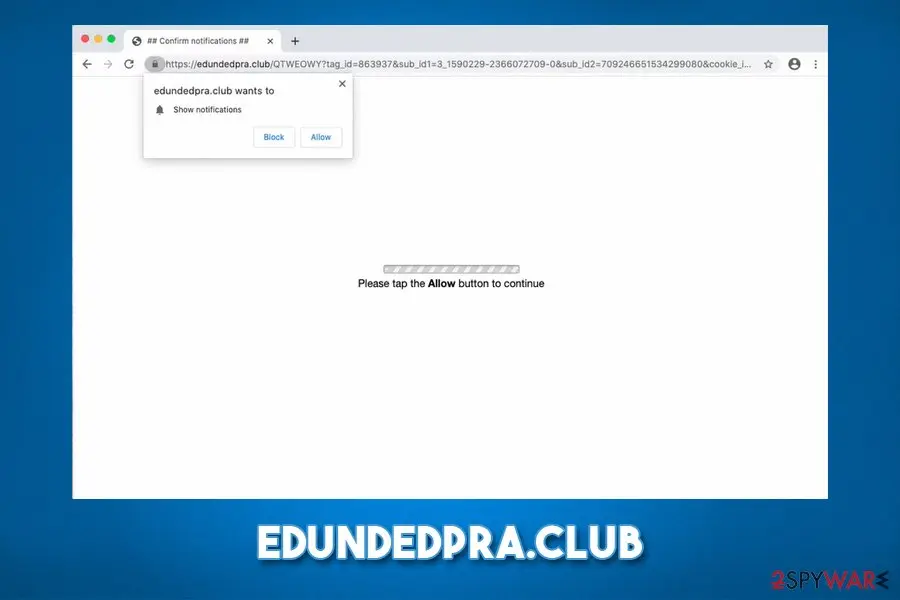
Edundedpra.club is a malicious website that tries to trick users into subscribing to notifications, which later cause ads to appear on their desktops. The social engineering technique revolves around making users think that once they click on the "Allow" button, they will be able to access the underlying content of the webpage.
Facts checked October 6, 2026. Removal steps tested on Windows 11 (26H2) and checked against Microsoft's and the browser makers' current documentation. Sections marked as our earlier report are the original text: they describe the threat as it was then and have not been reviewed since. The 2026 status, the removal steps and the questions are current.
Automatic
Get a free scan and check if your PC is infected.
Fortect finds malware, unwanted programs and the Windows damage they leave behind, and repairs it in one pass.
Clicked a notification from edundedpra.club and installed something? A free scan checks programs and browsers in one pass.
Do it yourself · free Remove Edundedpra.club ads yourself 2 steps, about 6 minutes, no software needed.
Edundedpra.club ads: summary
| Name | Edundedpra.club |
|---|---|
| Type | Push notification virus, adware |
| Infiltration | Pop-up ads are caused by accepting the push notification feature upon entering the site; frequent redirects to suspicious, scam, phishing, and similar sites are typically related to adware, which is distributed via software bundle packages, or fake update prompts/misleading advertisements on various websites |
| Symptoms | Pop-up ads appear at the bottom right corner of the screen even when the web browser is off. Adware infection can cause redirects, sponsored links in search results, unwanted browser changes, and an overall increased amount of advertisements on all visited sites |
| Detection names | No Microsoft detection name is known |
| Distribution | Not recorded in the old report |
| Removal | Scan the PC with security software to find and remove the malware and anything installed with it. Fortect scans Windows for malware and repairs the system files and settings it damaged. Remove it nowTo use the full-featured product, you have to purchase a license for Fortect. The scan is free. |
Show 8 more facts
| Damage | Not recorded in the old report |
|---|---|
| Evidence | 4 write-ups by security sites; details still limited |
| Domains | edundedpra.club |
| Ads shown as | Desktop notifications |
| Browsers | Chrome, Edge and Firefox |
| Installed on the PC | Nothing; a browser notification permission only |
| First seen | 22 June 2020 |
| Facts checked | 6 October 2026 |
What the Edundedpra.club ads ads look like
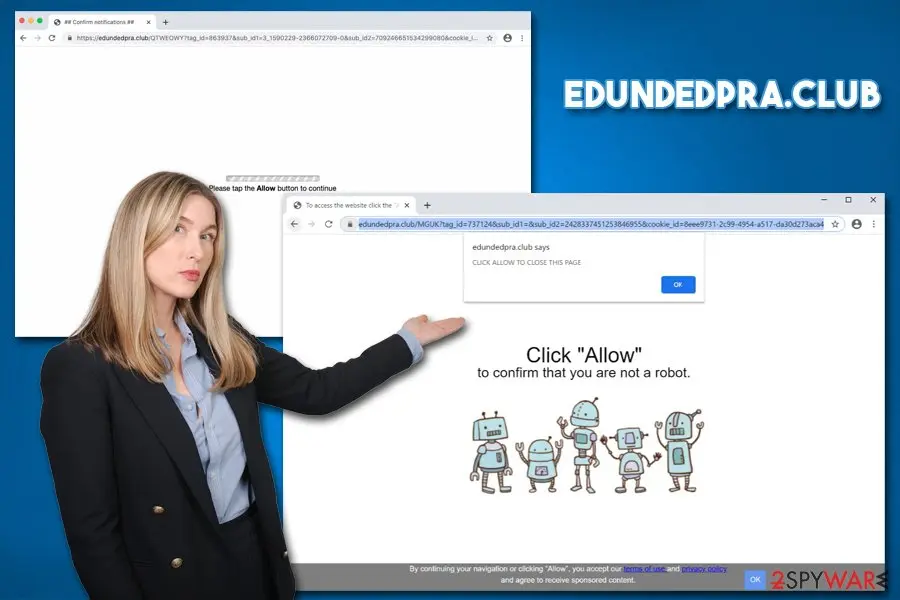
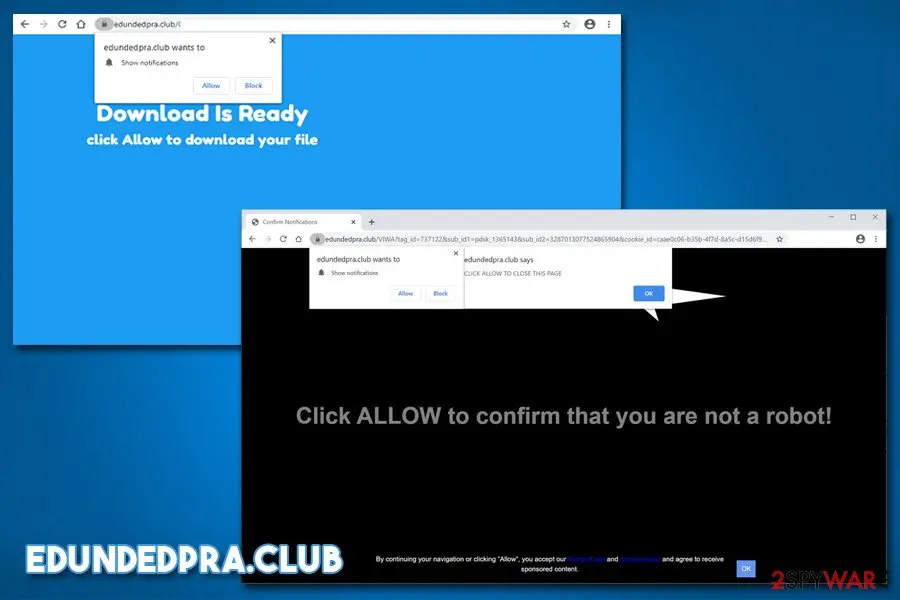
Click ALLOW to confirm that you are not a robot!
Is Edundedpra.club ads dangerous?
From our report of Jun 2020 · not reviewed since
Edundedpra.club is a browser scam that tries to make that uses social engineering for nefarious purposes
Edundedpra.club is a malicious website that tries to trick users into subscribing to notifications, which later cause ads to appear on their desktops.
The social engineering technique revolves around making users think that once they click on the "Allow" button, they will be able to access the underlying content of the webpage. This is the deceiving technique used to encourage people to interact with the pop-up and other content.
However, once they accept the notifications to be shown, they are not presented with anything, but instead, they are delivered the pop-up ads even when their Google Chrome, Mozilla Firefox, Safari, or MS Edge is turned off. These desktop notifications can lead to foreign sites and possibly malicious pages with commercial information.
While in most cases, the browser-based program can be avoided by simply leaving the site, frequent encounters with scam sites might indicate adware infection. In such a case, users will need to locate and eliminate the potentially unwanted program that is hiding within the web browser or Mac/Windows computer.
Potentially unwanted programs such as adware are typically distributed via software bundle packages - this happens when several applications are compiled into a single installer. By using deception, users are then forced to install apps that they did not intend to in the first place. Hence, bundling often is the main cause of unwanted adware infiltration and Edundedpra.club redirects.
However, it is important to differentiate between the adware infection and push notifications that are appearing on the screen for a completely different reason. Ads are very versatile, and they can come in many forms, including pop-ups, banners, deals, sponsored links, hyperlinks, offers, etc. These can be related to one of the following:
Such ads are typically related to the latter cause and do not immediately mean that some potentially unwanted program is installed on the system. Nonetheless, adware is the one that might bring users to this and many other malicious websites, causing even more commercial content. Keep in mind that you might also be redirected to Edundedpra.club after clicking a link on a random website.
Once users access the suspicious site like this, they are presented with the following message:
The "not a robot" check is a legitimate way of checking that the user is not a bot by many websites. This confuses users and makes them believe that this is just one of such checks.
Once they click on "Allow," they do not see any signs or symptoms immediately, but later might see malicious ads popping up at random times. Since the ads show up seemingly out of nowhere, users are unaware that they need to access their web browser settings to disable notifications.
Thus, if you see pop-up ads on your screen, even if the web browser is turned off, you should check the instructions we provide in the Edundedpra.club removal section below.
- Ads that are embedded on the site;
- Ads that are injected as a virtual layer within the web browser;
- Ads that are provided via legitimate features, such as browser notification prompts.
From our report of Jun 2020 · not reviewed since
Ways not to get tricked by malicious actors and keep your browser ad-free
There are several methods of how ads can reach your screen, and sometimes they are unavoidable.
The ads themselves are not the problem as long as they are not trying to mislead o trick users into installing something that they otherwise would not (e.g., scareware app or malware).
Nonetheless, the best way to avoid intrusive and malicious ads is by installing an ad-blocking browser extension (make sure you install a reputable one from official sources, as some ad-blockers from suspicious software were actually used to install malware on users' machines or cause more ads instead).
As previously mentioned, another cause of ads might be adware. These applications are usually of low value to the user and are also distributed in a way that would allow stealthy infiltration. Freeware developers often compile several apps into a single package, which tends to trick unsuspecting users into installing potentially unwanted programs unintentionally.
To stop such occurrences, you need to be always very aware of what you are doing when installing new programs, especially when they stem from third-party sites.
Dieviren.de security experts suggest that you would choose official sources for your downloads, employ reputable anti-malware with PUP detection feature, read user reviews/blog posts, and always pick Advanced/Custom settings during the installation. This way, you would be able to eliminate all the ticks by the pre-ticked boxes and avoid unwanted apps altogether.
From our report of Jun 2020 · not reviewed since
More from our earlier report on Edundedpra.club
- You can employ to optimize and improve the performance of your machine after you get rid of the infection
Check your browser and PC
- Address:
edundedpra.club
How to remove Edundedpra.club ads
How to stop Edundedpra.club notifications
Do this in every browser you use, and in every profile inside it: each keeps its own list of sites allowed to send notifications.
Nothing has to be uninstalled for the notifications themselves.
Which browser shows the ads?
Step 1: Remove edundedpra.club from Chrome's notification list
Chrome keeps a list of every site you once allowed to send notifications, and
edundedpra.clubis on it. Pastechrome://settings/content/notificationsinto the address bar, find edundedpra.club under Allowed to send notifications, open the three-dot menu next to it and pick Remove.Then click Add next to Not allowed to send notifications and type edundedpra.club, so the site cannot ask a second time. Repeat it in every Chrome profile you use on Windows 11 or Windows 10, since each profile has its own list.
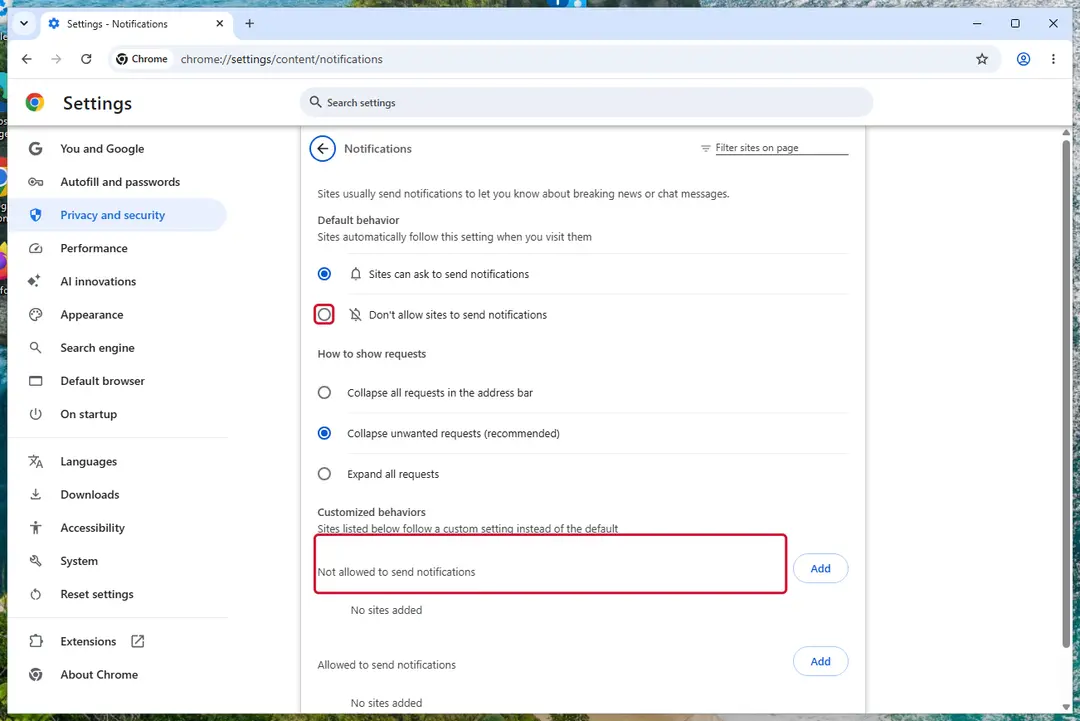
Chrome on Windows 11: Settings > Privacy and security > Site settings > Notifications. Full procedure with screenshots: Stop website notifications and pop-ups
Instructions for Google Chrome
Google Chrome
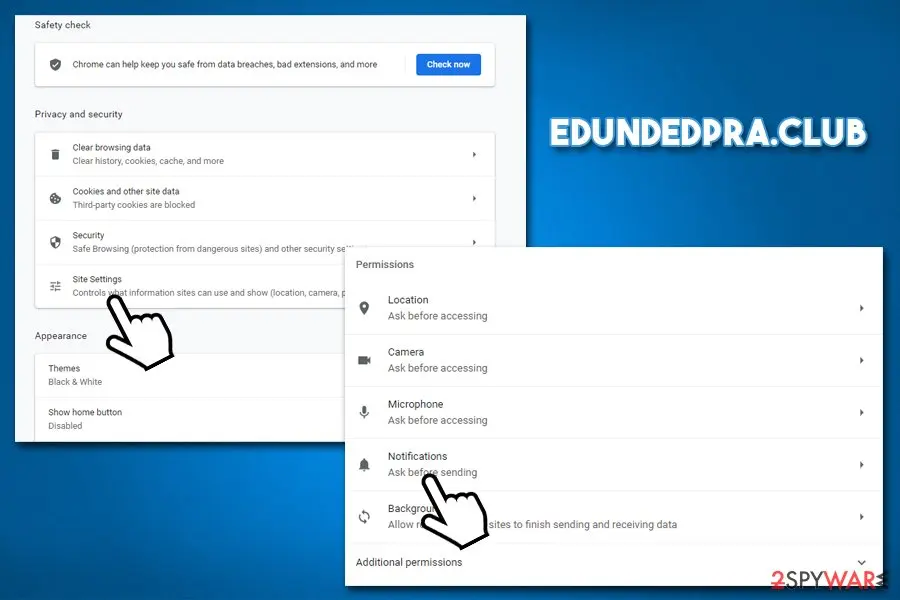
- Go to Menu > Settings
- Find Privacy and security section and click on Site Settings
- Under Allow section, you should see Edundedpra.club entry
- Click More Actions and then click on Block
Android (Google Chrome)
In case you are still suffering from ads and redirects after you remove Edundedpra.club from the allow list, you should also check your system for adware.
For that, scan the machine with reputable anti-malware software. If the program finds something, you should also reset all the installed web browsers, as explained below.
- Tap on Settings (three vertical dots) at the top-right of the Chrome web browser
- Pick Notifications
- Locate the unwanted site URL and toggle the button to the left (Off setting).
Remove from Google Chrome
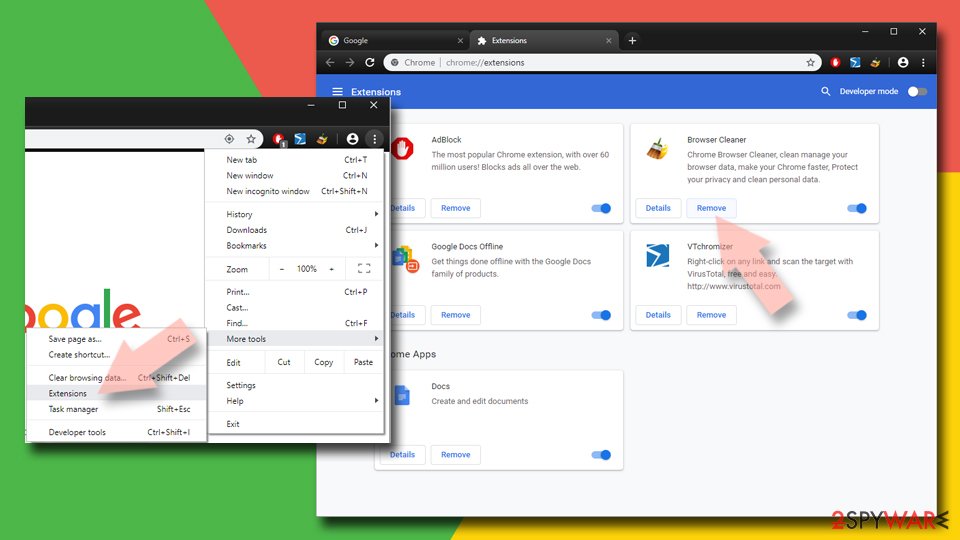
Delete malicious extensions from Google Chrome:
- Open Google Chrome, click on the Menu (three vertical dots at the top-right corner) and select More tools > Extensions.
- In the newly opened window, you will see all the installed extensions. Uninstall all suspicious extensions related to the unwanted program by clicking Remove.
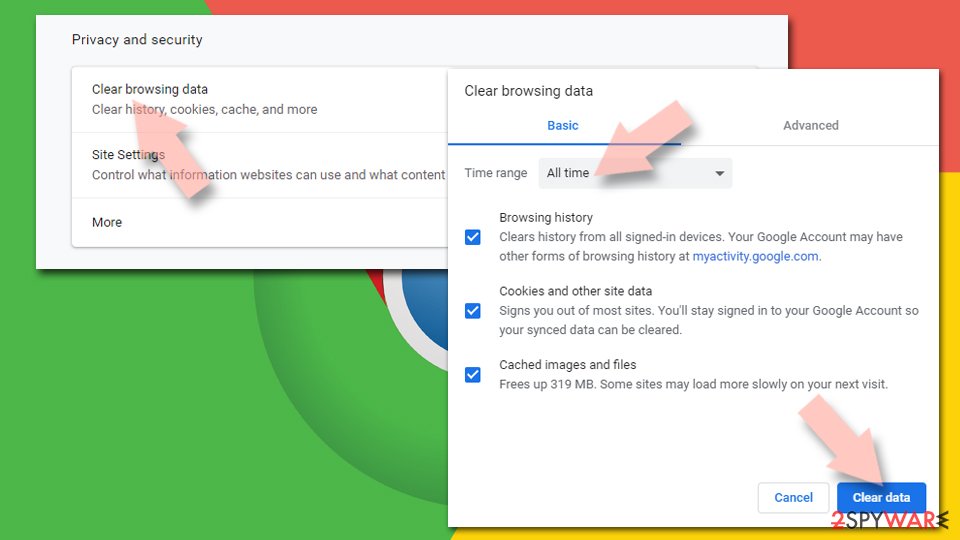
Clear cache and web data from Chrome:
- Click on Menu and pick Settings.
- Under Privacy and security, select Clear browsing data.
- Select Browsing history, Cookies and other site data, as well as Cached images and files.
- Click Clear data.
Change your homepage:
- Click menu and choose Settings.
- Look for a suspicious site in the On startup section.
- Click on Open a specific or set of pages and click on three dots to find the Remove option.
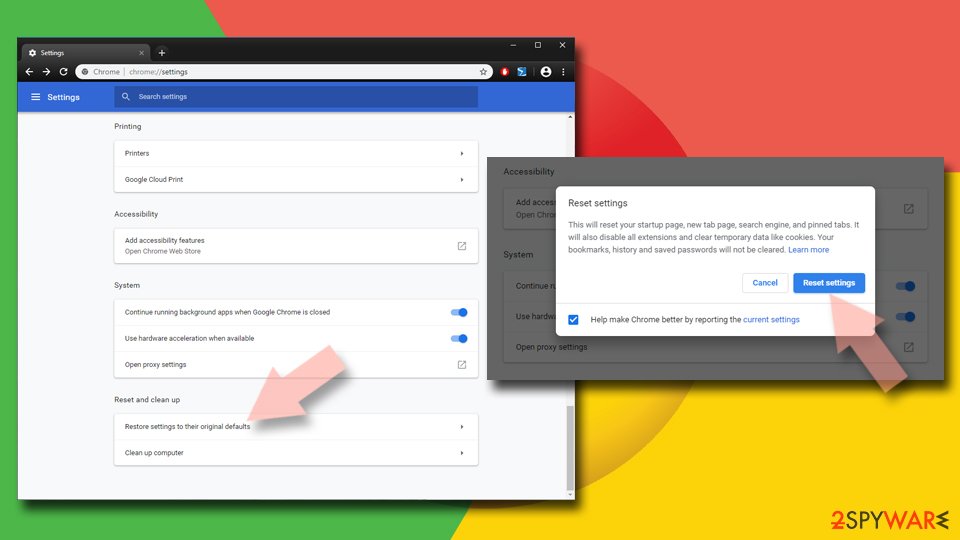
Reset Google Chrome:
If the previous methods did not help you, reset Google Chrome to eliminate all the unwanted components:
- Click on Menu and select Settings.
- In the Settings, scroll down and click Advanced.
- Scroll down and locate Reset and clean up section.
- Now click Restore settings to their original defaults.
- Confirm with Reset settings.
Step 1: Remove edundedpra.club from Edge's notification list
Open Settings and more (the three dots) > Settings > Privacy, search, and services > Site permissions > All permissions > Notifications. Remove
edundedpra.clubfrom the Allowed list, then click Add site next to Not allowed to send notifications and enter it there.Edge is built into both Windows 11 and Windows 10, so check it even if you normally use another browser. If the notifications came with the Edge logo, this is the browser that holds the permission.
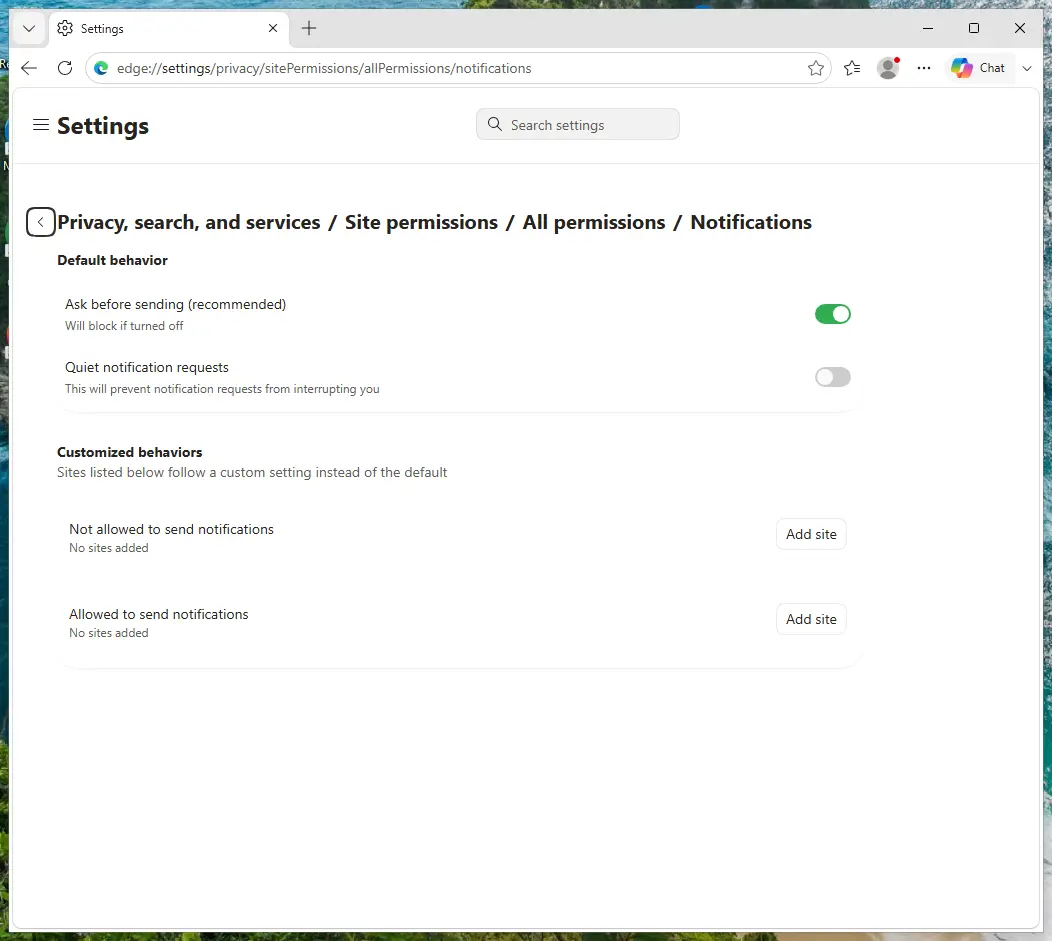
Edge on Windows 11: Site permissions > All permissions > Notifications. Full procedure with screenshots: Stop website notifications and pop-ups
Instructions for Microsoft Edge
Remove from Microsoft Edge
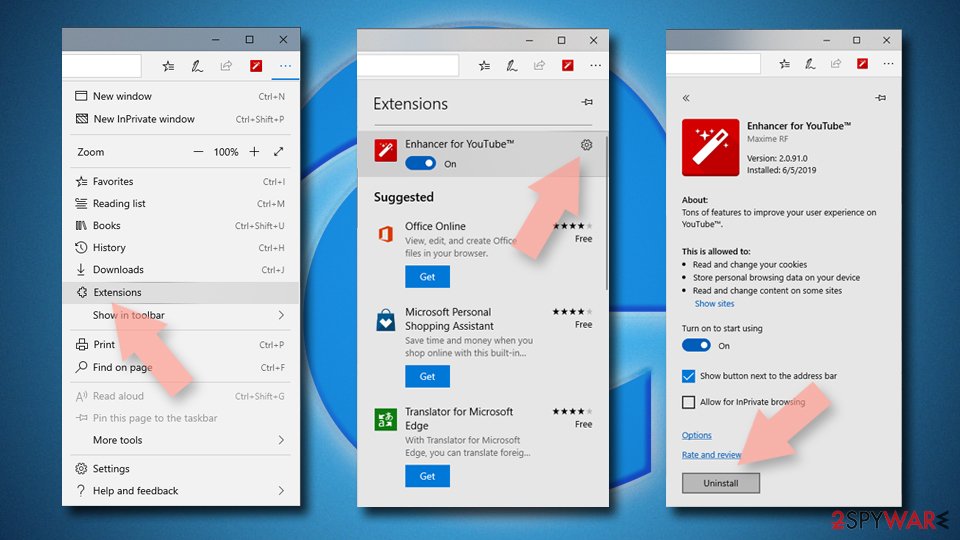
Delete unwanted extensions from MS Edge:
- Select Menu (three horizontal dots at the top-right of the browser window) and pick Extensions.
- From the list, pick the extension and click on the Gear icon.
- Click Remove.
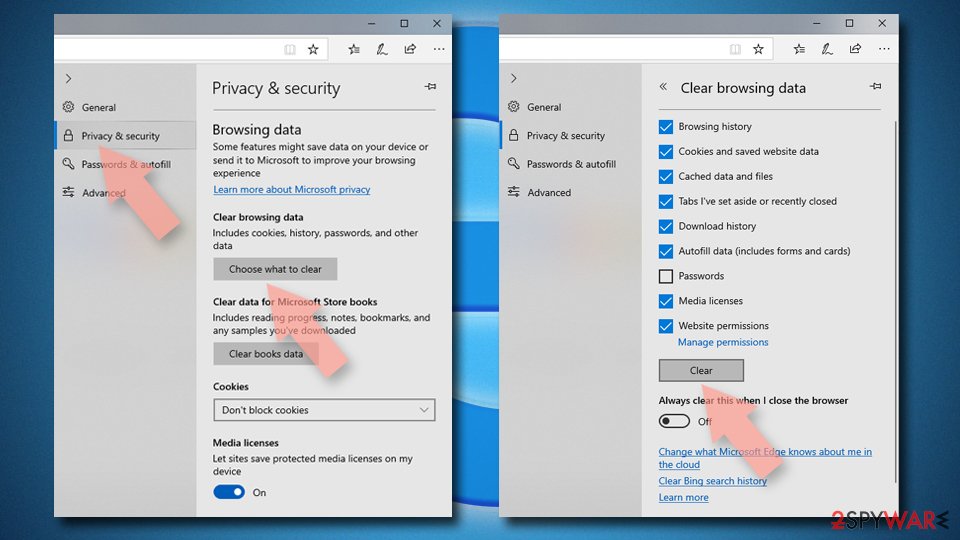
Clear cookies and other browser data:
- Click on the Menu (three horizontal dots at the top-right of the browser window) and select Settings > Privacy, search, and services..
- Under Clear browsing data, pick Choose what to clear.
- Select Cookies and other site data and Cached images and files. (apart from passwords, although you might want to include Media licenses as well, if applicable) and click on Clear.
Restore new tab and homepage settings:
- Click the menu icon and choose Settings.
- Then find On startup section.
- Click Remove next to any suspicious startup page.
Reset MS Edge if the above steps did not work:
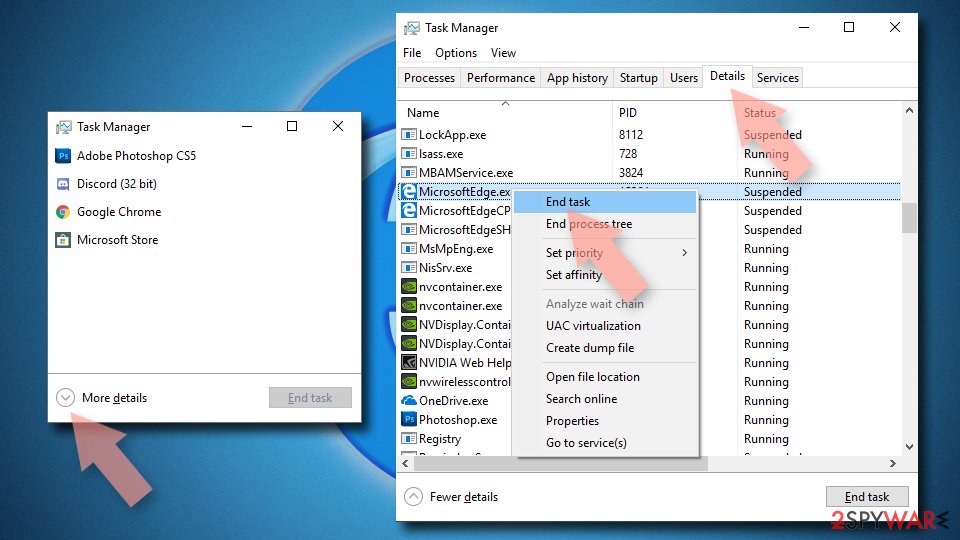
- Press on Ctrl + Shift + Esc to open Task Manager.
- Click on More details arrow at the bottom of the window.
- Select Details tab.
- Now scroll down and locate every entry with Microsoft Edge name in it. Right-click on each of them and select End Task to stop MS Edge from running.
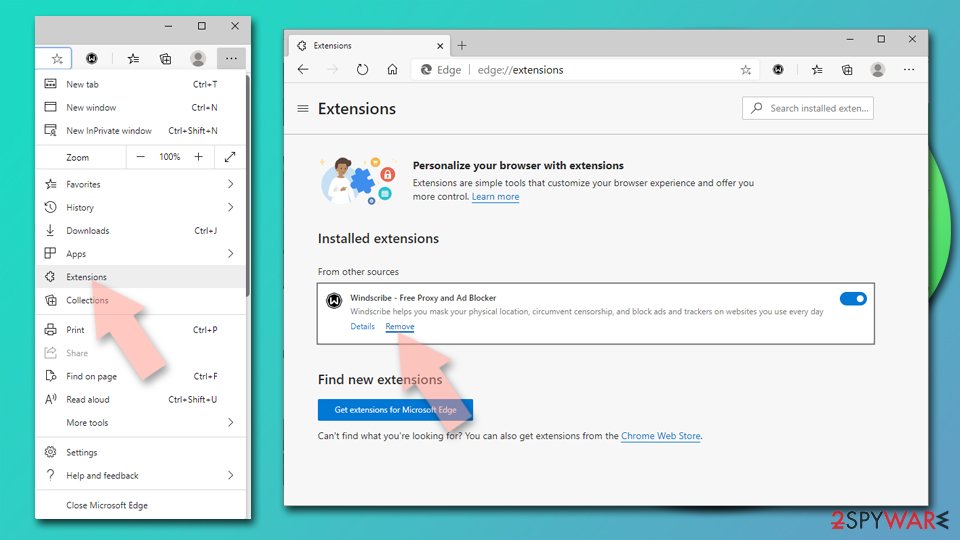
Delete extensions from MS Edge (Chromium):
- Open Edge and click select Settings > Extensions.
- Delete unwanted extensions by clicking Remove.
Clear cache and site data:
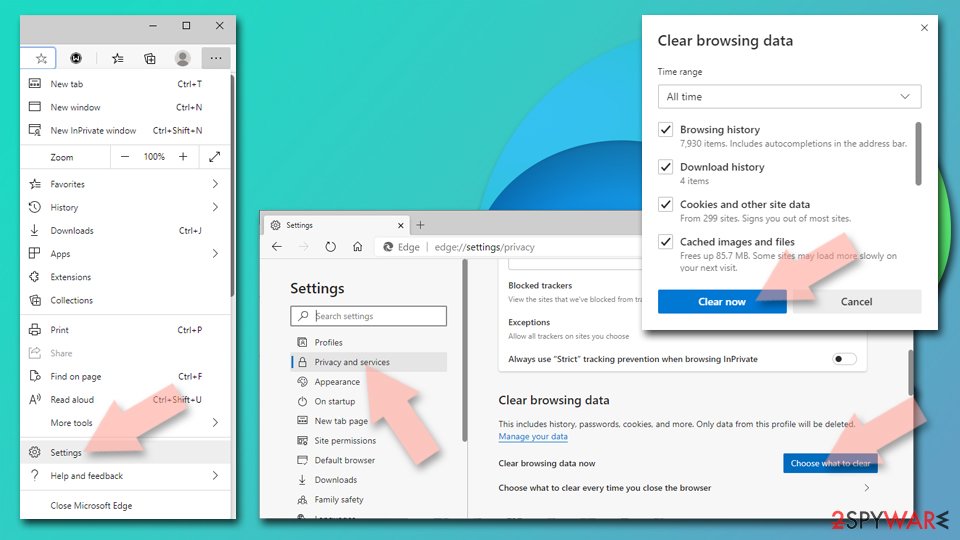
- Click on Menu and go to Settings.
- Select Privacy, search and services.
- Under Clear browsing data, pick Choose what to clear.
- Under Time range, pick All time.
- Select Clear now.
Reset Chromium-based MS Edge:
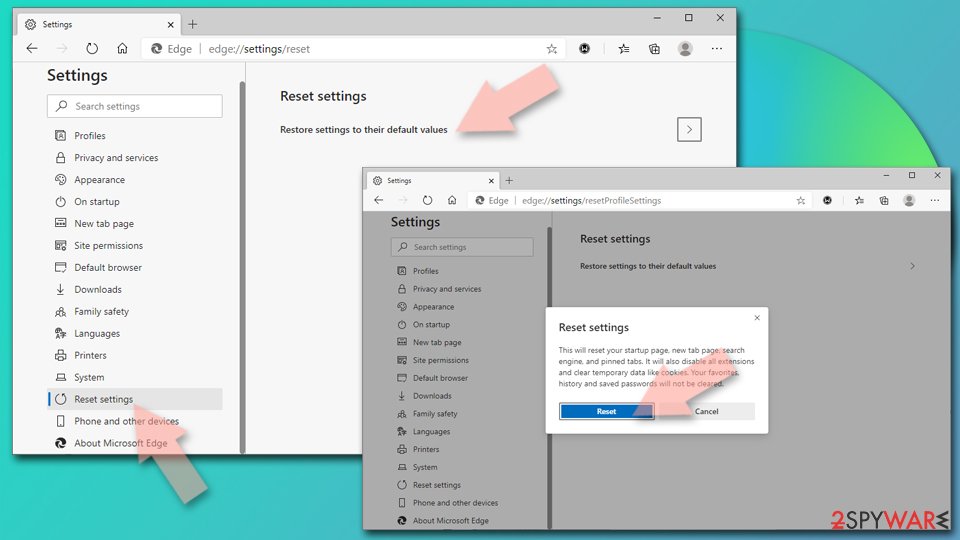
- Click on Menu and select Settings.
- On the left side, pick Reset settings.
- Select Restore settings to their default values.
- Confirm with Reset.
- This will disable extensions and reset startup pages but will not delete bookmarks, saved passwords, or browsing history.
Step 1: Remove edundedpra.club from Firefox's notification permissions
Open the menu (three lines) > Settings and click Permissions and data in the left list, then Notifications. Select
edundedpra.club, click Remove Website and confirm with Save Changes.In versions older than Firefox 152 the same list sits under Privacy & Security, behind a Settings button next to Notifications. Firefox shows these notifications only while it is running, on Windows 11 and Windows 10 alike.
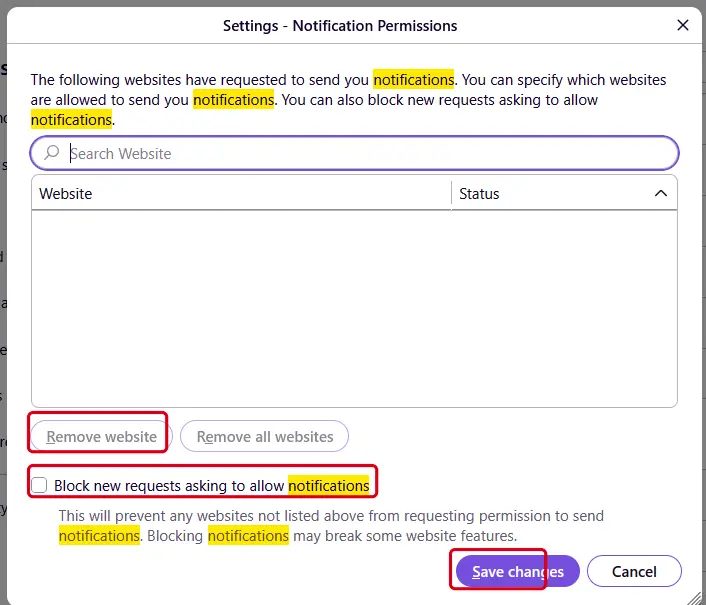
Firefox on Windows 11: the Notification Permissions window. Full procedure with screenshots: Stop website notifications and pop-ups
Instructions for Mozilla Firefox
Mozilla Firefox
- Select Menu > Options
- Pick Privacy & Security section
- Under Permissions, click Settings near Notifications section
- In the Settings - Notification Permissions window, click on the drop-down menu next to the site
- Pick Block and then Save Changes.
Remove from Mozilla Firefox (FF)
Remove dangerous extensions:
- Open Mozilla Firefox browser and click on the Menu (three horizontal lines at the top-right of the window).
- Select Add-ons.
- In here, select the unwanted extension and click Remove.
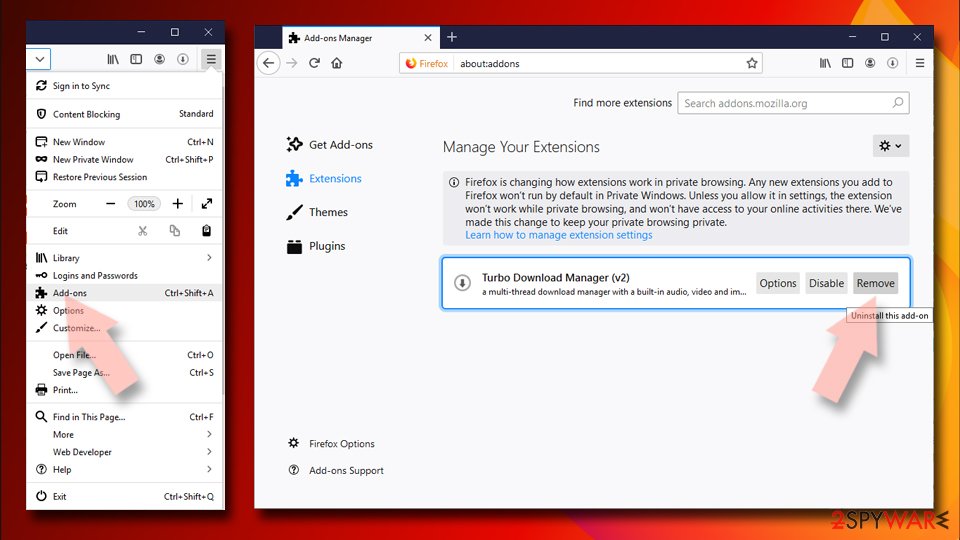
Reset the homepage:
- Click three horizontal lines at the top right corner to open the menu.
- Choose Settings.
- Under Home, set your preferred homepage and new tab settings.
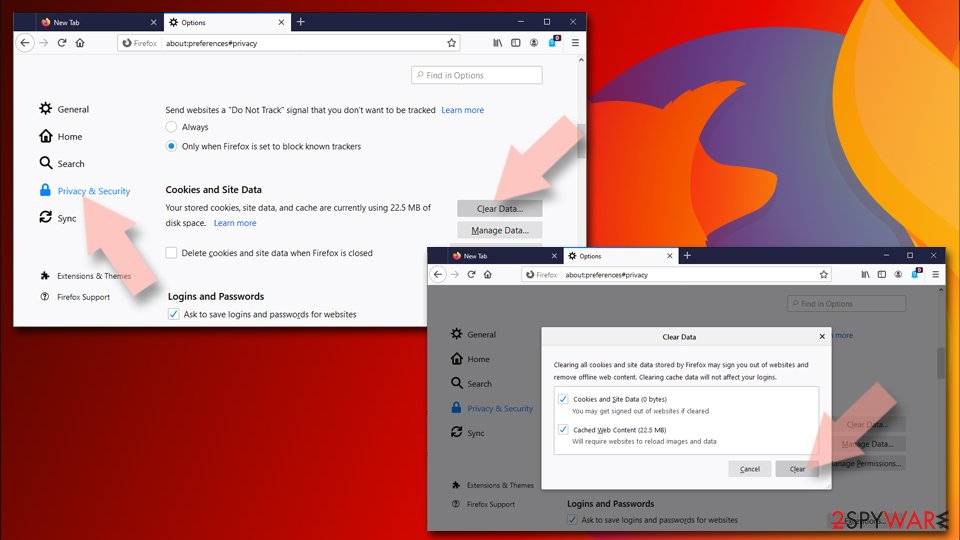
Clear cookies and site data:
- Click Menu and pick Settings.
- Go to Privacy & Security section.
- Scroll down to locate Cookies and Site Data.
- Click on Clear Data...
- Select Cookies and Site Data and Temporary cached files and pages, then click Clear.
Reset Mozilla Firefox
If clearing the browser as explained above did not help, reset Mozilla Firefox:
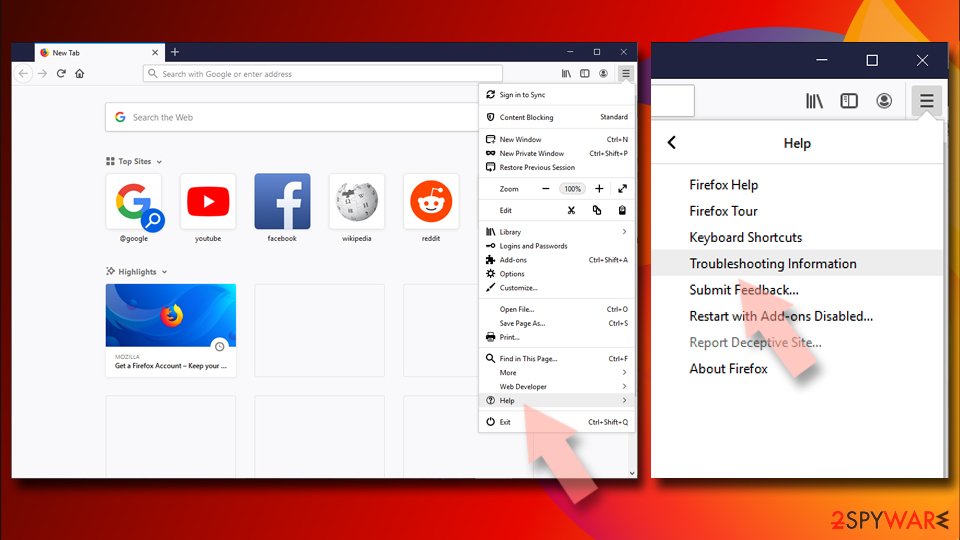
- Open Mozilla Firefox browser and click the Menu.
- Go to Help and then choose Troubleshooting Information.
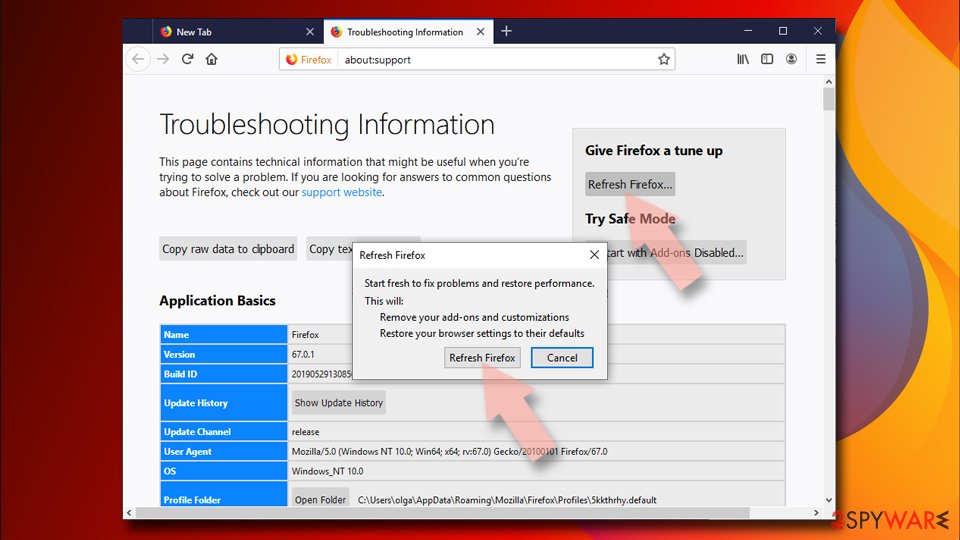
- Under Give Firefox a tune up section, click on Refresh Firefox...
- Once the pop-up shows up, confirm the action by pressing on Refresh Firefox.
Our tested steps are for Windows 11 and 10. For Safari (Mac), use the instructions below.
Instructions for Safari (Mac)
Safari
- Go to Safari > Preferences…
- Under Websites tab, pick Notifications
- Pick the page and then select Deny
Delete from Safari
Remove dangerous extensions:
- Open Safari, click Safari in the menu at the top-left of the screen, and select Preferences.
- Go to the Extensions tab, look for any suspicious entries, and click Uninstall to remove them.
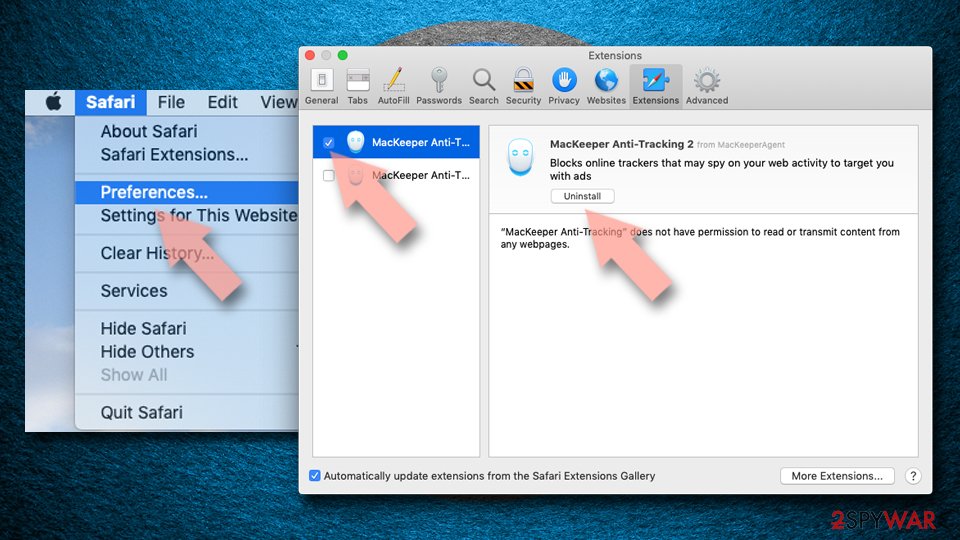
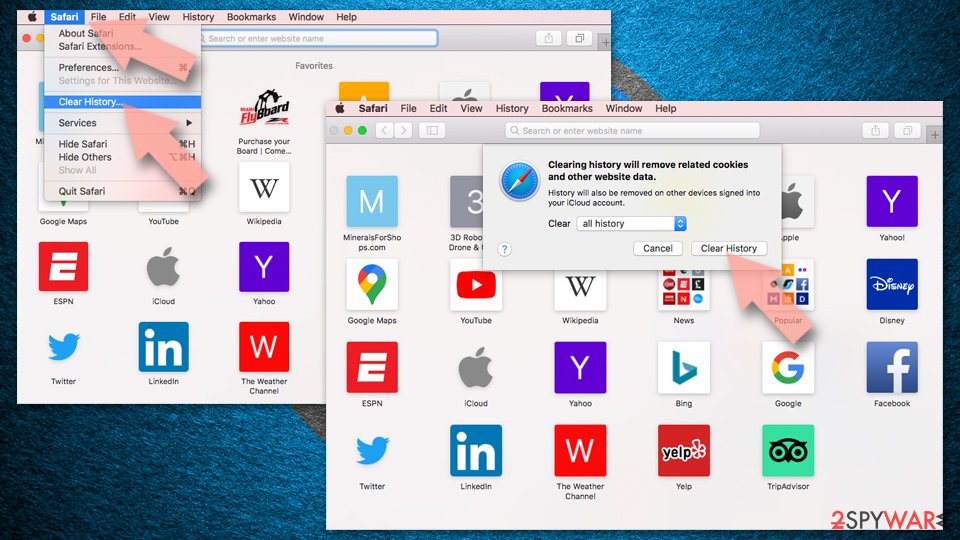
Clear history and website data:
- Click Safari in the menu and pick Clear History.
- Set Clear to all history and confirm with Clear History.
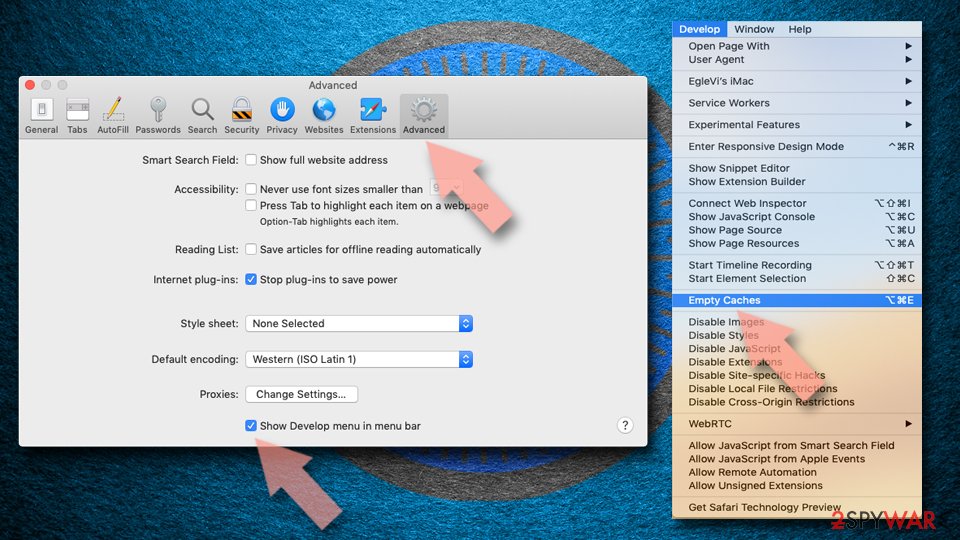
Reset Safari:
- Click Safari in the menu and select Preferences > Advanced.
- Enable Show Develop menu in menu bar.
- From the menu bar, click Develop and select Empty Caches.
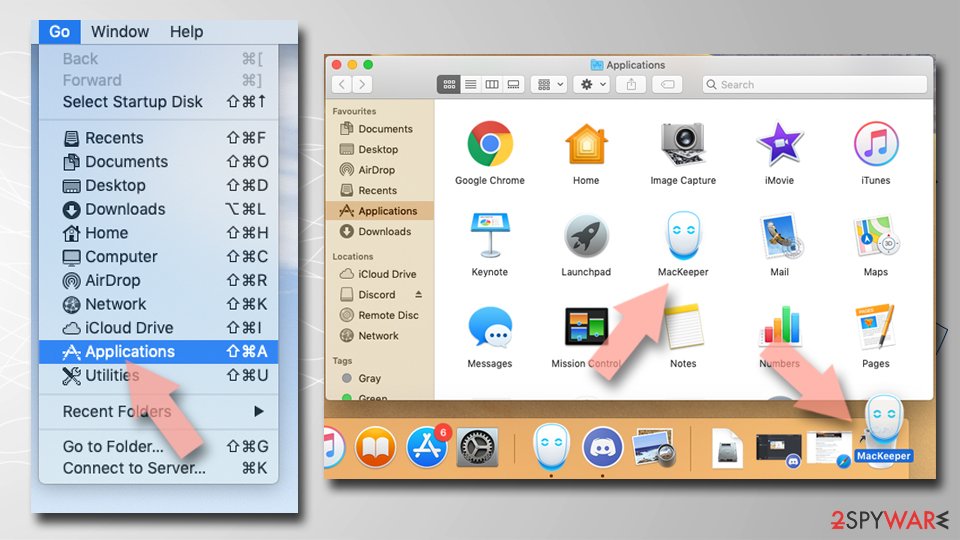
Delete from macOS
Remove the unwanted application:
- From the menu bar, select Go > Applications.
- In the Applications folder, look for any suspicious entries, then drag them to Trash (or right-click and pick Move to Trash).
Delete leftover files and folders:
- Select Go > Go to Folder.
- Enter /Library/Application Support and remove any suspicious folders related to the unwanted program.
- Repeat the same check in the /Library/LaunchAgents and /Library/LaunchDaemons folders, deleting any suspicious entries.
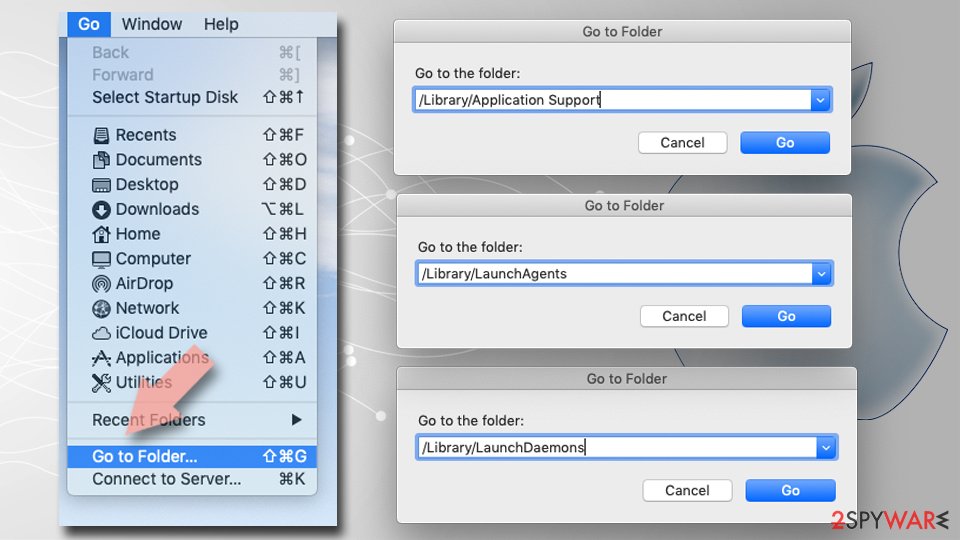
- Finally, empty the Trash to permanently remove the leftovers.
Then, whichever browser you use
Step 2: Scan the PC if you downloaded anything from the ads
If you only saw the notifications and clicked nothing, you can stop before this step. If a notification led you to download or run something, delete that file, then scan Windows.
In Windows Security > Virus & threat protection > Scan options, run a Full scan, then choose Microsoft Defender Antivirus (offline scan) and Scan now. The offline scan restarts the PC and takes about 15 minutes on Windows 11 and Windows 10.
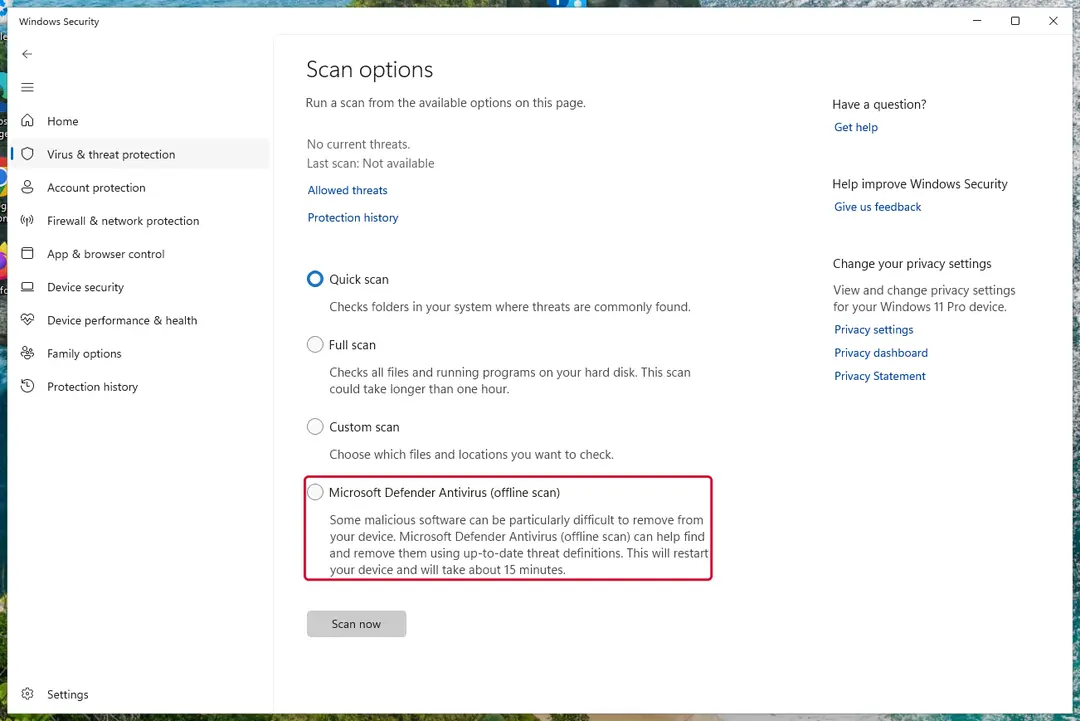
Windows 11: Windows Security > Virus & threat protection > Scan options. Full procedure with screenshots: Run a Microsoft Defender Offline scan
More removal instructions
For programs installed on the PC and older browsers. Open the one you need.
Follow the PUP removal instructions and disable notifications
The main trick in the Edundedpra.club removal lies within the permission of displaying notifications via the web browser (even though the ads appear directly on your desktop).
All you have to do is access the settings section of your web browser and stop this side from sending you notifications. Here's how to do it on different browsers:
Uninstall from Windows
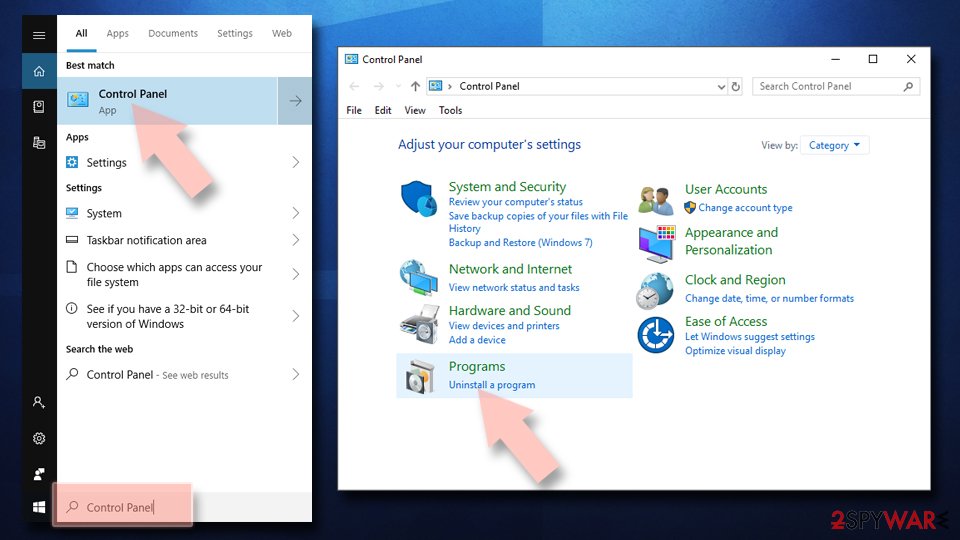
Uninstall from Windows 10/8:
- Type Control Panel into the Windows search box and open the result.
- Under Programs, select Uninstall a program.
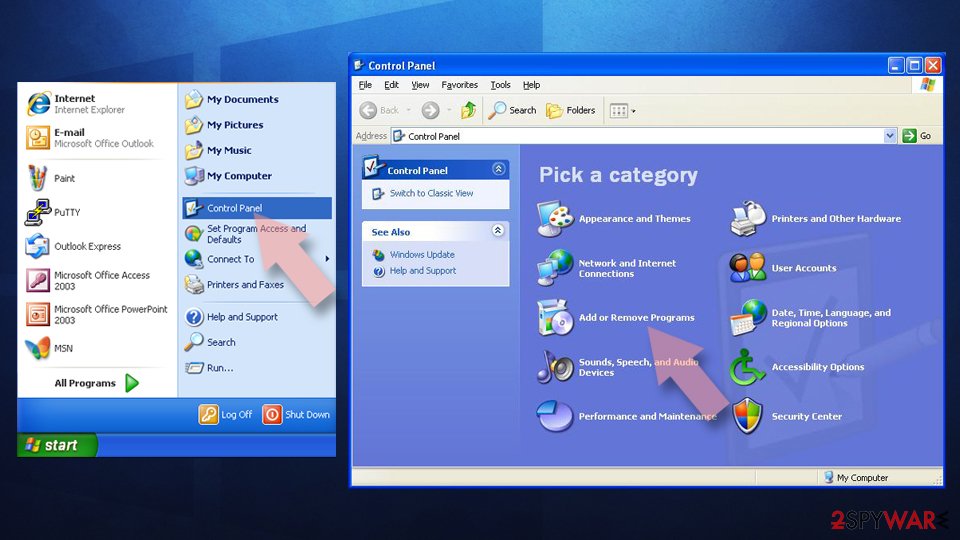
Uninstall from Windows 7/XP:
- Click on Windows Start > Control Panel (Windows XP users should click on Add/Remove Programs).
- In Control Panel, select Programs > Uninstall a program.
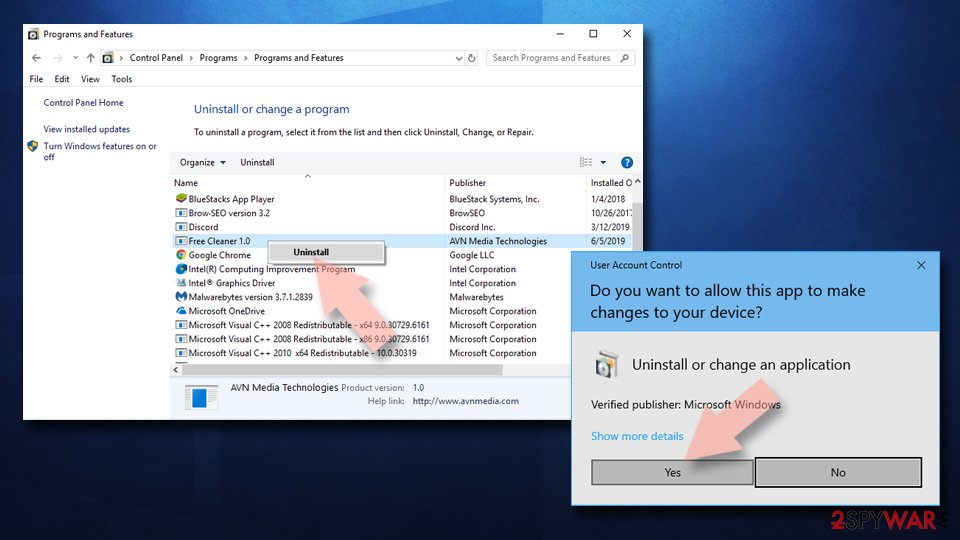
Remove the unwanted program:
- In the Programs and Features window, look for any recently installed suspicious entries, select them, and click Uninstall.
- If User Account Control appears, click Yes to confirm, then complete the removal.
Protect your privacy - employ a VPN
There are several ways how to make your online time more private - you can access an incognito tab.
However, there is no secret that even in this mode, you are tracked for advertising purposes. There is a way to add an extra layer of protection and create a completely anonymous web browsing practice with the help of VPN. This software reroutes traffic through different servers, thus leaving your IP address and geolocation in disguise.
Besides, it is based on a strict no-log policy, meaning that no data will be recorded, leaked, and available for both first and third parties. The combination of a secure web browser and VPN will let you browse the Internet without a feeling of being spied or targeted by criminals.
No backups? No problem. Use a data recovery tool
If you wonder how data loss can occur, you should not look any further for answers - human errors, malware attacks, hardware failures, power cuts, natural disasters, or even simple negligence.
In some cases, lost files are extremely important, and many straight out panic when such an unfortunate course of events happen. Due to this, you should always ensure that you prepare proper data backups on a regular basis.
If you were caught by surprise and did not have any backups to restore your files from, not everything is lost. is one of the leading file recovery solutions you can find on the market - it is likely to restore even lost emails or data located on an external device.
Questions about Edundedpra.club ads
Why do I get notifications from edundedpra.club when the browser is closed?
Chrome and Edge can keep a small part running in the background so that sites can deliver notifications, and Windows shows them in its notification area. That is why messages from edundedpra.club keep arriving with no browser window open.
The permission to send them was granted when someone clicked Allow on a prompt from that site, often disguised as a robot check or a video player. Closing the browser does not remove it; only the notification settings do.
Remove edundedpra.club from the allowed sites and the background messages stop. You can also stop the browser from running in the background in its system settings, but the permission is the real fix.
Did a notification from edundedpra.club infect my computer?
A notification cannot infect a PC. It is a short text with a link that the browser displays. Clicking it opens a page, and a page cannot install anything unless you agree to a download and run the file.
So the answer depends on what you did after clicking. Looked and closed: you are fine. Downloaded but did not open: delete the file.
Opened a downloaded file: uninstall what it added and scan the PC. Typed card or login details: contact the bank and change the password. In every case, remove edundedpra.club from the browser's allowed notifications so the messages stop.
Why does Edundedpra.club show me ads?
Because that is its whole purpose. Edundedpra.club is a push-notification spam site, and its operators are paid for every ad it displays and every click it gets. In this case the ads take the form of desktop notifications.
They are chosen by ad networks that accept almost any advertiser, which is why so many look like warnings or prizes. The ads are not a sign that your PC is broken or infected with something worse; they are a sign that something on it, or in the browser, has permission to advertise. Removing that permission or program stops them.
Is edundedpra.club safe to visit?
No. The site edundedpra.club exists to push visitors towards ads, and the pages it leads to include fake virus warnings, fake updates, prize scams and notification prompts. Visiting it once does not infect an up-to-date PC, but anything you click or download there is a gamble.
Do not enter personal details, do not allow notifications and do not call phone numbers it shows. If it opens by itself, close the tab and check the browser's extensions and notification permissions. Blocking the single domain helps little, because the operators register new names regularly.
Which browser is sending the edundedpra.club notifications?
Each notification shows the name of the browser and the site in its small print. In the cases we saw, the messages from edundedpra.club came through Chrome, Edge and Firefox. Permissions are stored per browser and per profile, so removing the site in one browser does not affect another.
If you use several Chrome or Edge profiles, check each one. If you sync the browser with an account, remove the permission while signed in, otherwise another computer may still hold it and keep receiving the same messages.
How do I know the ads come from Edundedpra.club?
Look for notifications from edundedpra.club. That is the trace Edundedpra.club leaves, and it shows up as desktop notifications. Ads that appear on every site, including ones that never carried ads before, point to something on your PC or in the browser rather than to the sites themselves.
A quick test is a private window, where extensions are off by default: if the ads disappear there, an extension is responsible. If they appear even with the browser closed, the source is a notification permission or a program in Windows.
Why didn't my antivirus catch Edundedpra.club?
Many security products do not block adware or notification sites by default, because users often agreed to them, even through a misleading prompt. Notification spam installs nothing at all, so there is no file to detect.
In Windows 11 you can make Microsoft Defender block potentially unwanted apps: open Windows Security > App & browser control > Reputation-based protection settings and turn on Potentially unwanted app blocking. If notifications caused the pop-ups, no scanner will report them; the fix is in the browser's site settings.
Did clicking Allow install anything on my PC?
No. Allowing notifications stores a permission in the browser and nothing else. No file is downloaded and no program is added to Windows, which is also why antivirus scans find nothing. The risk comes later, from the notifications themselves: they lead to scam pages, fake updates and phishing forms.
Remove the permission in each browser where you allowed it. If you clicked a notification and downloaded something afterwards, delete that file and run a Microsoft Defender full scan and offline scan.
An ad showed a phone number and I called it. What now?
The number belongs to scammers, not to Microsoft or an antivirus company. If you only talked, hang up and do not call back. If you let them connect to the PC, disconnect it from the internet, uninstall the remote access program they used, such as AnyDesk, TeamViewer, ScreenConnect or UltraViewer, and run a full and offline scan.
If you paid or gave bank details, call your bank at once on the number printed on your card. Change any passwords you typed while they were connected, and report the call.
Will Fortect remove Edundedpra.club?
No program removes Edundedpra.club itself, because there is nothing on the PC to remove: the notifications come through a permission saved in the browser, and only the browser's settings take it away, as the steps above show.
What Fortect can do is check the rest of Windows. Its free scan looks for malware, unwanted programs and damaged system files, which is useful if you clicked the ads, downloaded something from the pages they opened, or are not sure what else changed on the PC.
If the scan finds nothing and the notifications stopped after you removed the permission, this problem is solved. Use Microsoft Defender as a second opinion whenever you have downloaded files from pages like these.
Sources
- Wikipedia: Social engineering (security) (read October 6, 2026)
- Webroot: What are Bots, Botnets and Zombies? (read October 6, 2026)
- Dieviren: Dieviren (read October 6, 2026)
- Google Chrome Help: Use notifications to get alerts (no longer online) (read October 6, 2026)
- FTC: How to recognize, remove and avoid malware (read October 6, 2026)