Mirar Toolbar (Free Instructions) - 2021 update
Mirar Toolbar Removal Guide
What is Mirar Toolbar?
Mirar is the toolbar that gets installed on the web browser and triggers changes to the speed and performance issues on the machine
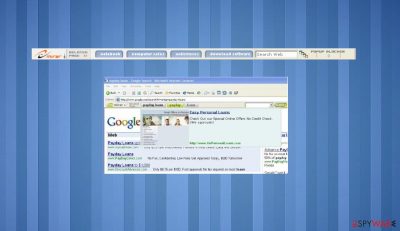
Mirar Toolbar is a commercial Internet Explorer toolbar designed to find and open Internet sites that seem to be related to web pages currently being viewed. The addon can appear installed out of nowhere on various browsers, including Google Chrome, Mozilla Firefox, or even Safari. This is the intruder controlled by a PUP, otherwise called a browser hijacker. Once such an unwanted application gets installed, the machine suffers from all the additional processes running in the background all the time. You should get rid of this suspicious toolbar since it is not giving any value to the computer.
| Name | Mirar Toolbar |
|---|---|
| Type | Browser hijacker, potentially unwanted program |
| Distribution | Software bundle packages, deceptive ads, fake update prompts |
| Symptoms | Unknown extension or application is installed on the system; homepage and new tab address are set to something else |
| Risks | Installation of other potentially unwanted programs, privacy risks due to information gathering practices |
| Removal | You can uninstall potentially unwanted programs by following the manual guide below |
| Optional steps | Computer infections can cause significant damage to system files or disrupt normal settings. To revert these changes and remediate the OS, perform a full system scan with FortectIntego or similar system recovery software |
The browser hijacker toolbar is injected into the machine, and once that happens, additional programs might be added without users' knowledge or permission because PUPs tend to come in bundles. Due to this fact, users also encounter tons of pop-up ads and redirects once the intruder finds the way on the computer.
Such Mirar functionality does not work well and annoys numerous users. The related adware program also serves commercial advertisements while browsing the Internet. The program is not classified as a dangerous parasite. However, a lot of people are experiencing difficulties while trying to get rid of this threat. It runs on every Windows startup.
We recommend getting a tool like SpyHunter 5Combo Cleaner or Malwarebytes to remove the intruder. There might be aliases or similar programs in bundles that this browser hijacker is delivered with, so detection names associated with the intruder can resemble:
- Adware.Mirar,
- Adware.Mirar.D,
- AdWare.Win32.SaveNow.bj
Avoid suspicious sites and pop-up ads
Deceptive material online is the thing that any internet user encounters on a daily basis, so it is not new information that online ads can be intrusive. However, such content can be considered dangerous too because various redirects to malicious or advertising pages result in PUP infiltration.
Free download sites, freeware distributors, torrent platforms, and pirating services should also be considered dangerous. You should always go for official sources and Advanced or Custom installation options, so freeware is installed without additional PUPs or malware pieces.
Scan the machine to clear any browser-based threats fully
Mirar Toolbar elimination is crucial for the state of the machine and security of the computer because there are parts that this PUP can affect besides the browsing experience. This PUP can install itself to various directories and trigger issues with the system itself.
This is why we recommend getting a tool that is detecting malware to remove the Mirar Toolbar and then run a proper system tool that can repair any issues in the registry or different folders of the system. Make sure to reset the web browser too – follow the guide below.
You may remove virus damage with a help of FortectIntego. SpyHunter 5Combo Cleaner and Malwarebytes are recommended to detect potentially unwanted programs and viruses with all their files and registry entries that are related to them.
Getting rid of Mirar Toolbar. Follow these steps
Uninstall from Windows
Instructions for Windows 10/8 machines:
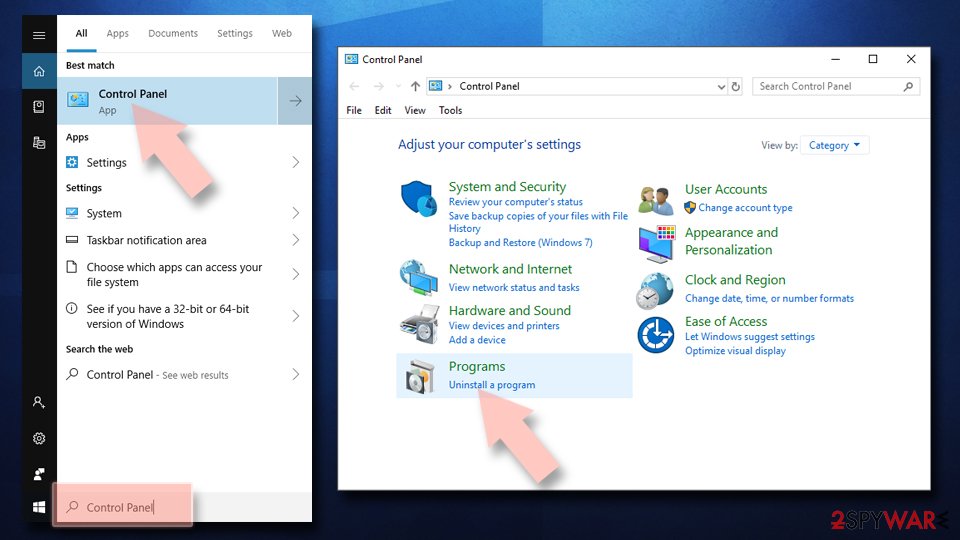
- Enter Control Panel into Windows search box and hit Enter or click on the search result.
- Under Programs, select Uninstall a program.

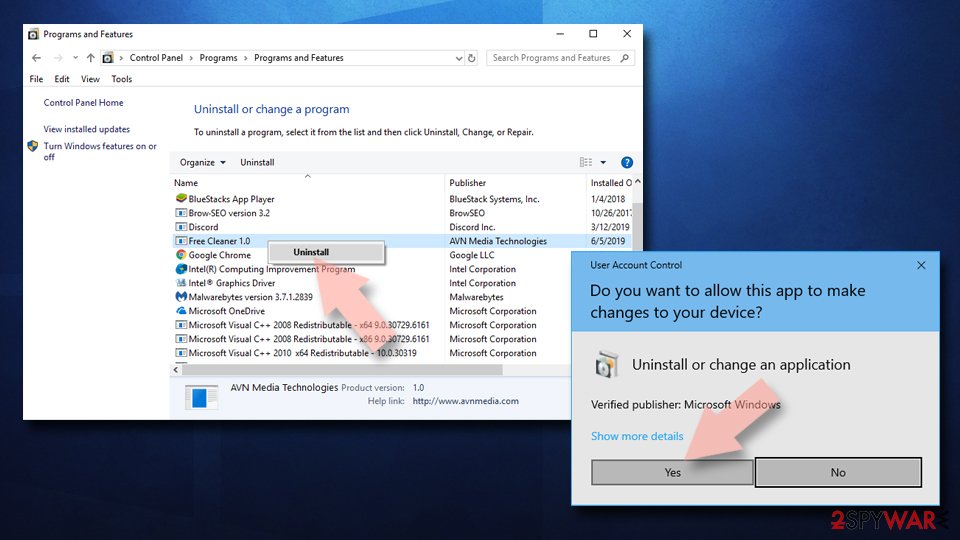
- From the list, find the entry of the suspicious program.
- Right-click on the application and select Uninstall.
- If User Account Control shows up, click Yes.
- Wait till uninstallation process is complete and click OK.

If you are Windows 7/XP user, proceed with the following instructions:
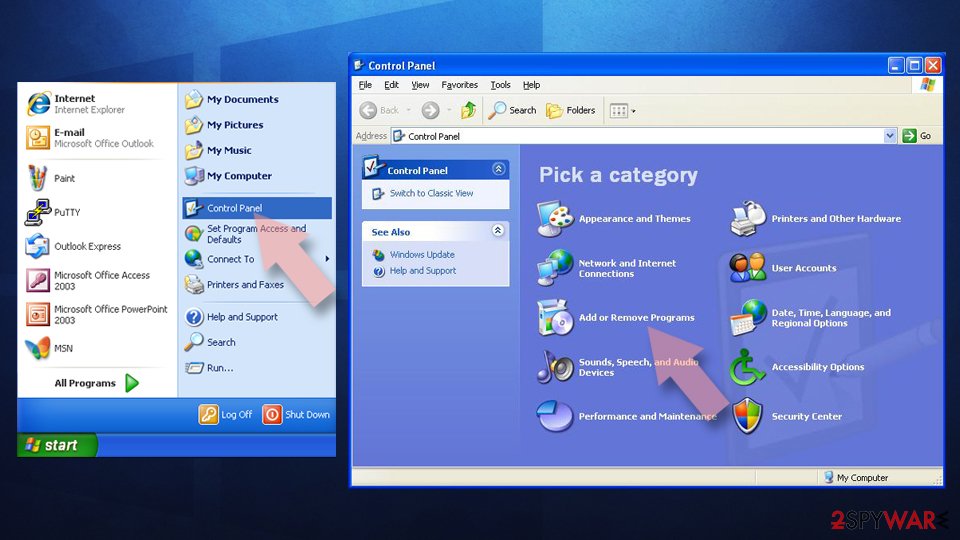
- Click on Windows Start > Control Panel located on the right pane (if you are Windows XP user, click on Add/Remove Programs).
- In Control Panel, select Programs > Uninstall a program.

- Pick the unwanted application by clicking on it once.
- At the top, click Uninstall/Change.
- In the confirmation prompt, pick Yes.
- Click OK once the removal process is finished.
Delete from macOS
Remove items from Applications folder:
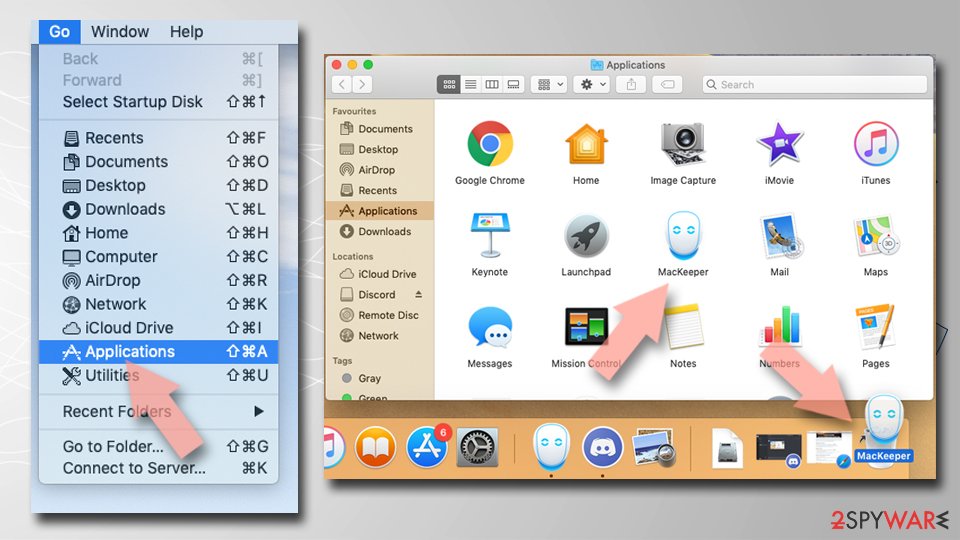
- From the menu bar, select Go > Applications.
- In the Applications folder, look for all related entries.
- Click on the app and drag it to Trash (or right-click and pick Move to Trash)

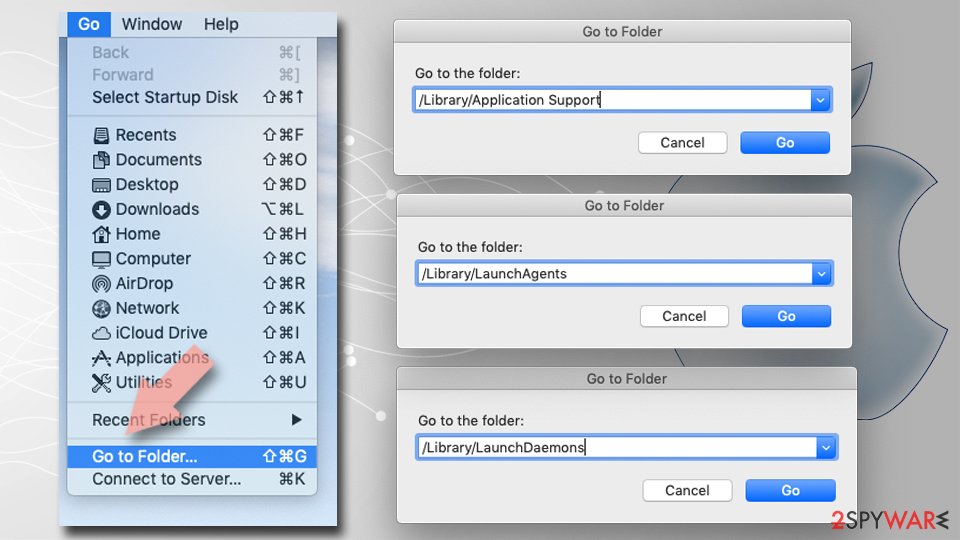
To fully remove an unwanted app, you need to access Application Support, LaunchAgents, and LaunchDaemons folders and delete relevant files:
- Select Go > Go to Folder.
- Enter /Library/Application Support and click Go or press Enter.
- In the Application Support folder, look for any dubious entries and then delete them.
- Now enter /Library/LaunchAgents and /Library/LaunchDaemons folders the same way and terminate all the related .plist files.

Remove from Microsoft Edge
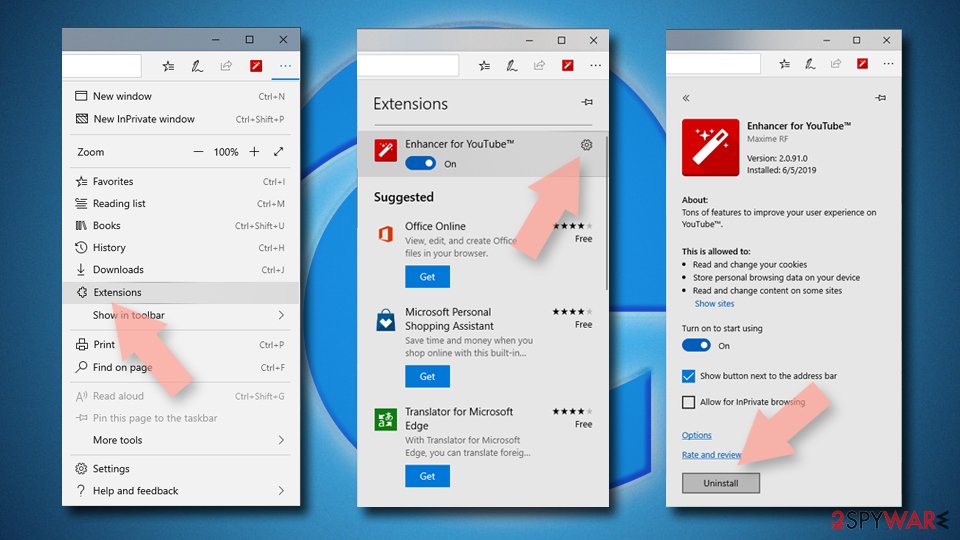
Delete unwanted extensions from MS Edge:
- Select Menu (three horizontal dots at the top-right of the browser window) and pick Extensions.
- From the list, pick the extension and click on the Gear icon.
- Click on Uninstall at the bottom.

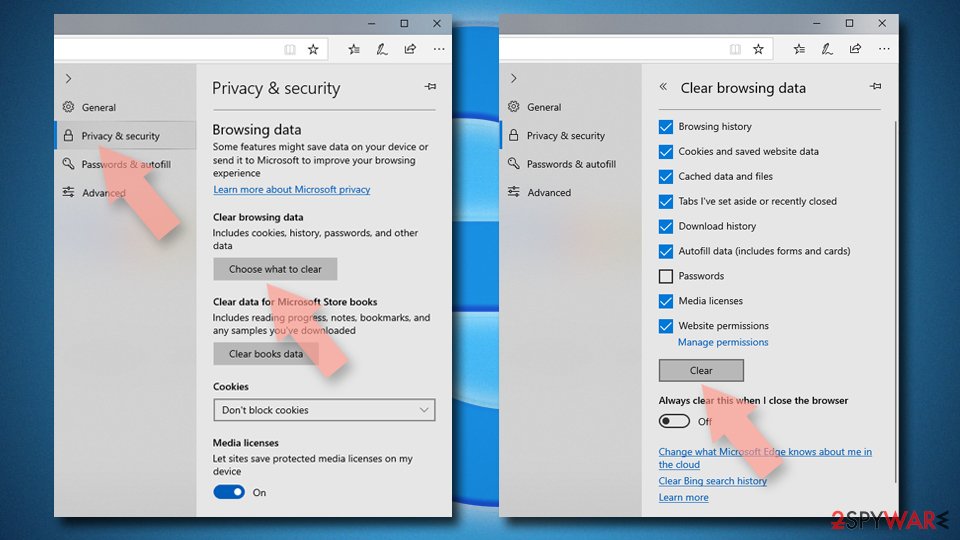
Clear cookies and other browser data:
- Click on the Menu (three horizontal dots at the top-right of the browser window) and select Privacy & security.
- Under Clear browsing data, pick Choose what to clear.
- Select everything (apart from passwords, although you might want to include Media licenses as well, if applicable) and click on Clear.

Restore new tab and homepage settings:
- Click the menu icon and choose Settings.
- Then find On startup section.
- Click Disable if you found any suspicious domain.
Reset MS Edge if the above steps did not work:
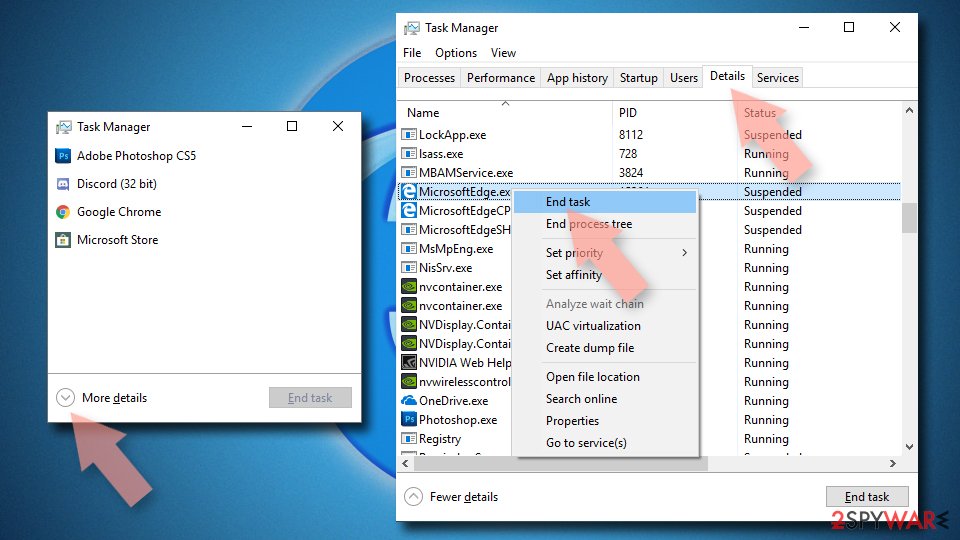
- Press on Ctrl + Shift + Esc to open Task Manager.
- Click on More details arrow at the bottom of the window.
- Select Details tab.
- Now scroll down and locate every entry with Microsoft Edge name in it. Right-click on each of them and select End Task to stop MS Edge from running.

If this solution failed to help you, you need to use an advanced Edge reset method. Note that you need to backup your data before proceeding.
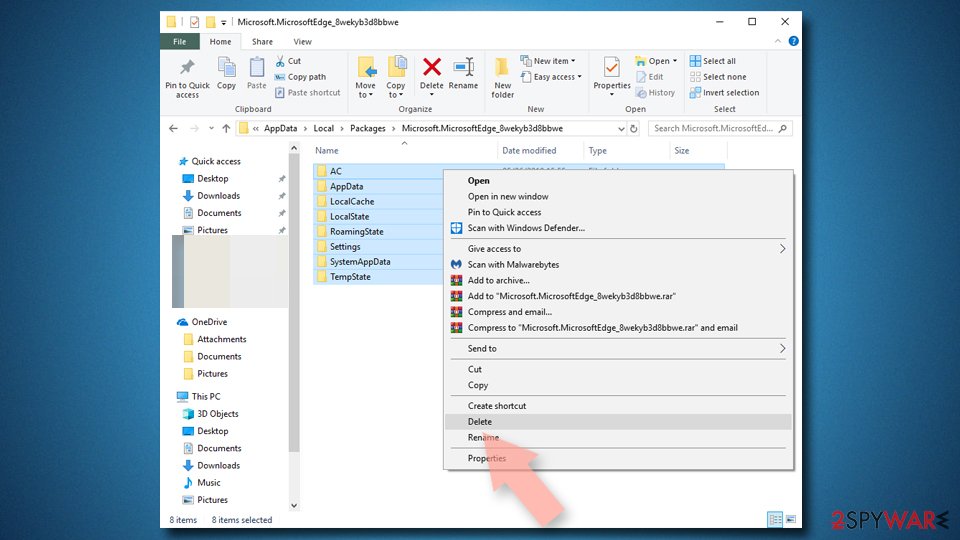
- Find the following folder on your computer: C:\\Users\\%username%\\AppData\\Local\\Packages\\Microsoft.MicrosoftEdge_8wekyb3d8bbwe.
- Press Ctrl + A on your keyboard to select all folders.
- Right-click on them and pick Delete

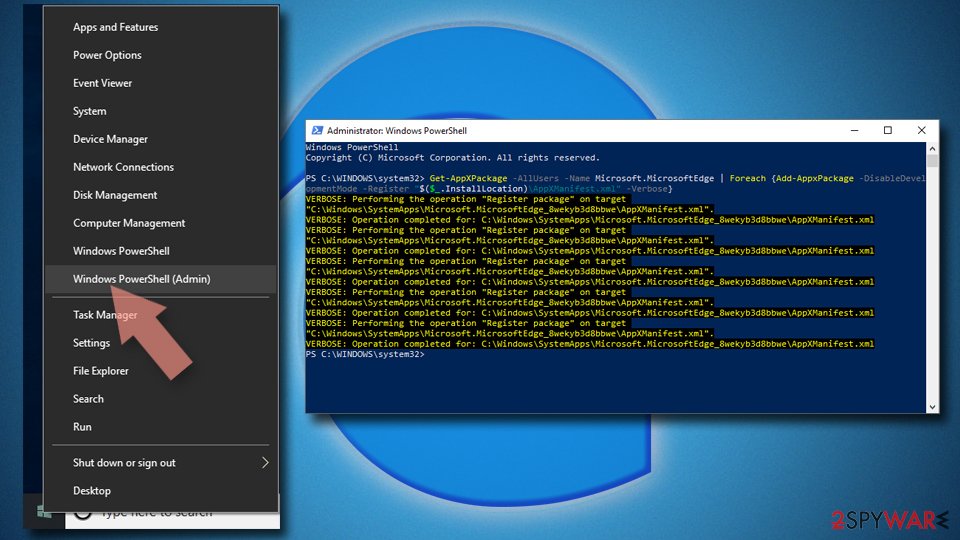
- Now right-click on the Start button and pick Windows PowerShell (Admin).
- When the new window opens, copy and paste the following command, and then press Enter:
Get-AppXPackage -AllUsers -Name Microsoft.MicrosoftEdge | Foreach {Add-AppxPackage -DisableDevelopmentMode -Register “$($_.InstallLocation)\\AppXManifest.xml” -Verbose

Instructions for Chromium-based Edge
Delete extensions from MS Edge (Chromium):
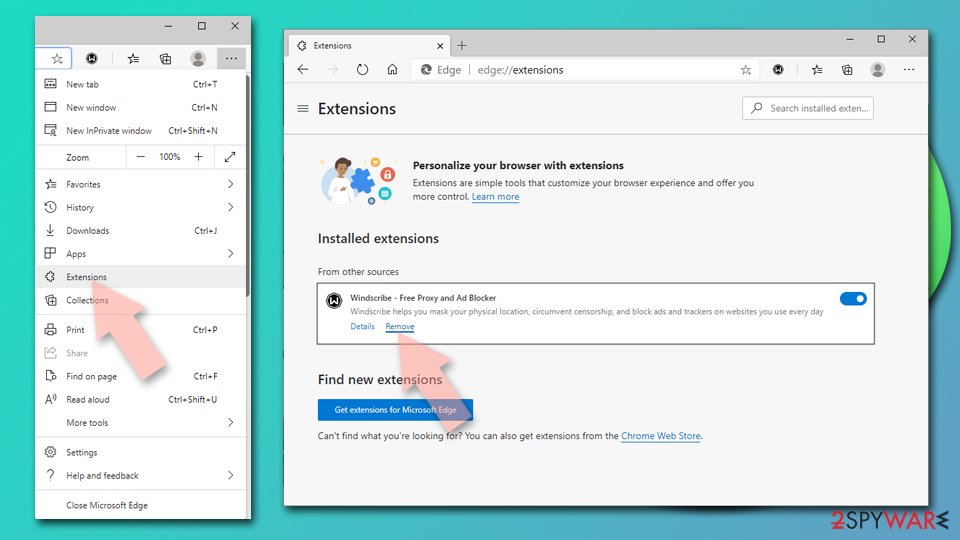
- Open Edge and click select Settings > Extensions.
- Delete unwanted extensions by clicking Remove.

Clear cache and site data:
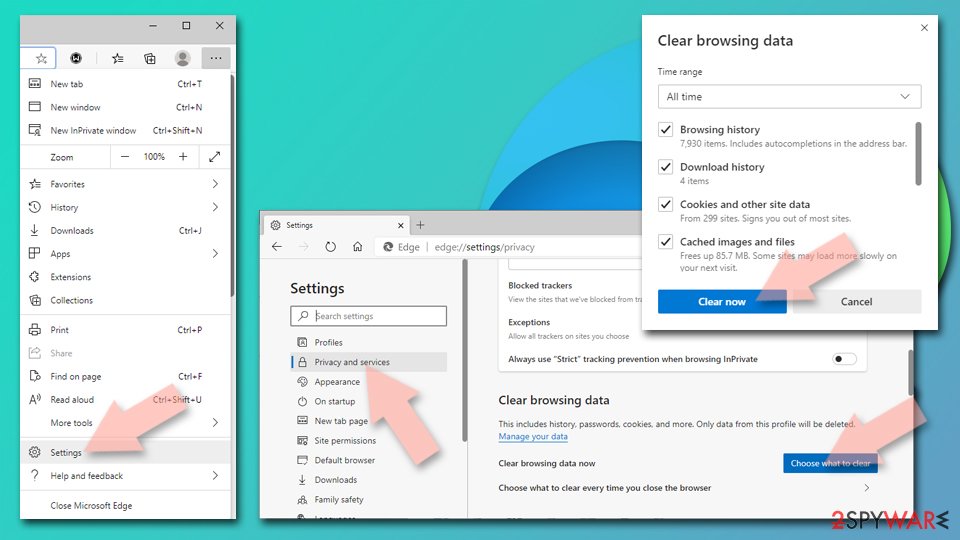
- Click on Menu and go to Settings.
- Select Privacy, search and services.
- Under Clear browsing data, pick Choose what to clear.
- Under Time range, pick All time.
- Select Clear now.

Reset Chromium-based MS Edge:
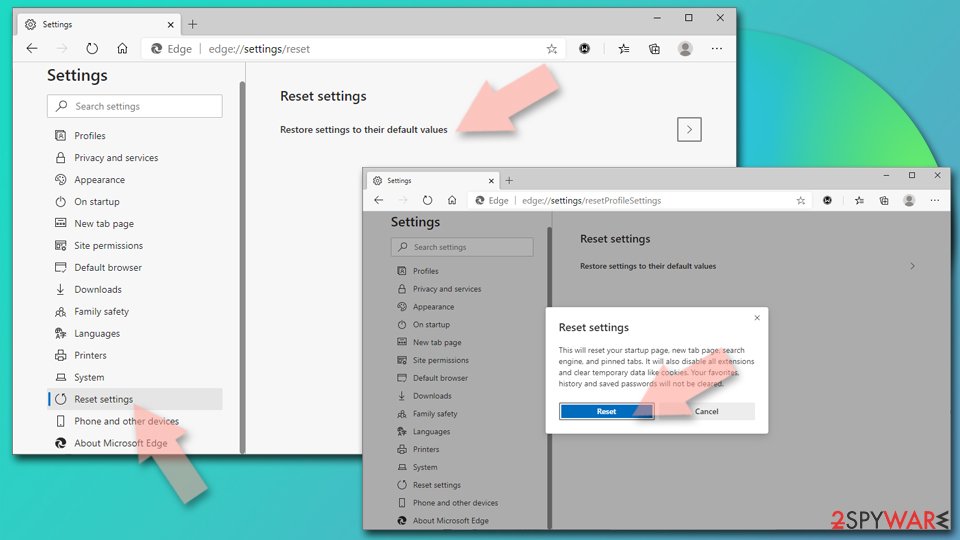
- Click on Menu and select Settings.
- On the left side, pick Reset settings.
- Select Restore settings to their default values.
- Confirm with Reset.

Remove from Mozilla Firefox (FF)
Remove dangerous extensions:
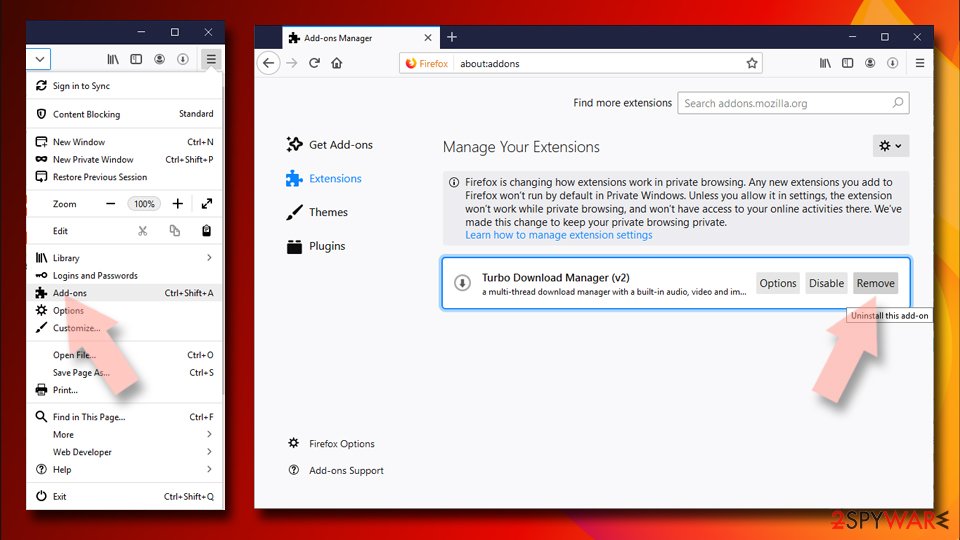
- Open Mozilla Firefox browser and click on the Menu (three horizontal lines at the top-right of the window).
- Select Add-ons.
- In here, select unwanted plugin and click Remove.

Reset the homepage:
- Click three horizontal lines at the top right corner to open the menu.
- Choose Options.
- Under Home options, enter your preferred site that will open every time you newly open the Mozilla Firefox.
Clear cookies and site data:
- Click Menu and pick Settings.
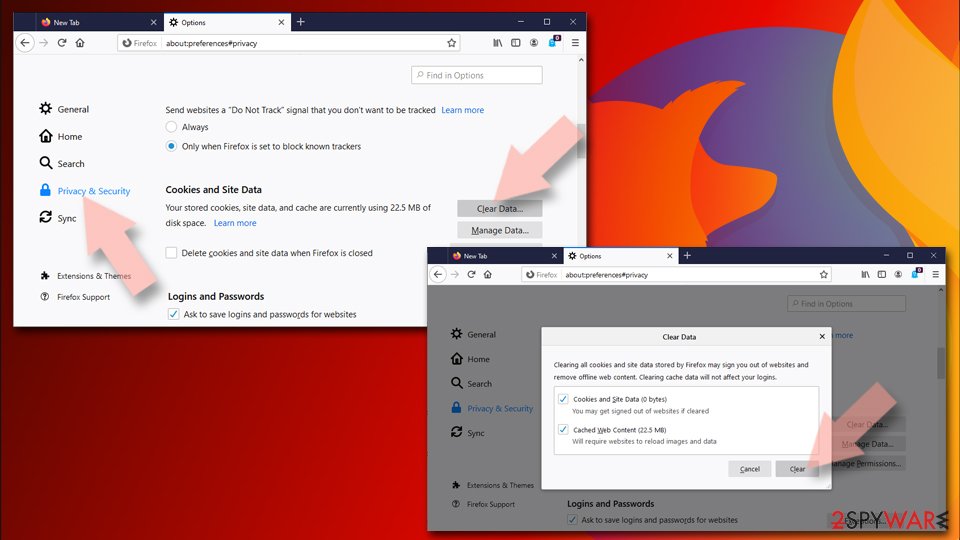
- Go to Privacy & Security section.
- Scroll down to locate Cookies and Site Data.
- Click on Clear Data…
- Select Cookies and Site Data, as well as Cached Web Content and press Clear.

Reset Mozilla Firefox
If clearing the browser as explained above did not help, reset Mozilla Firefox:
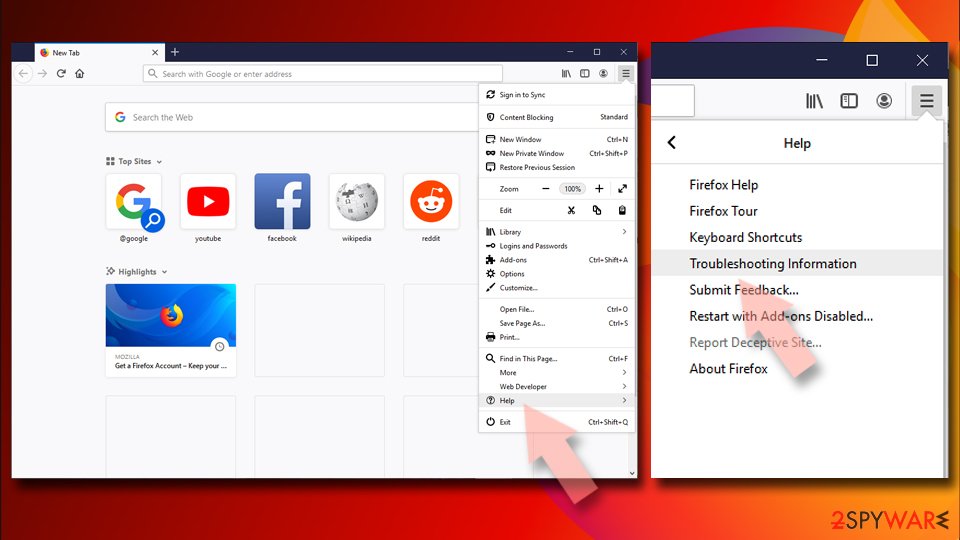
- Open Mozilla Firefox browser and click the Menu.
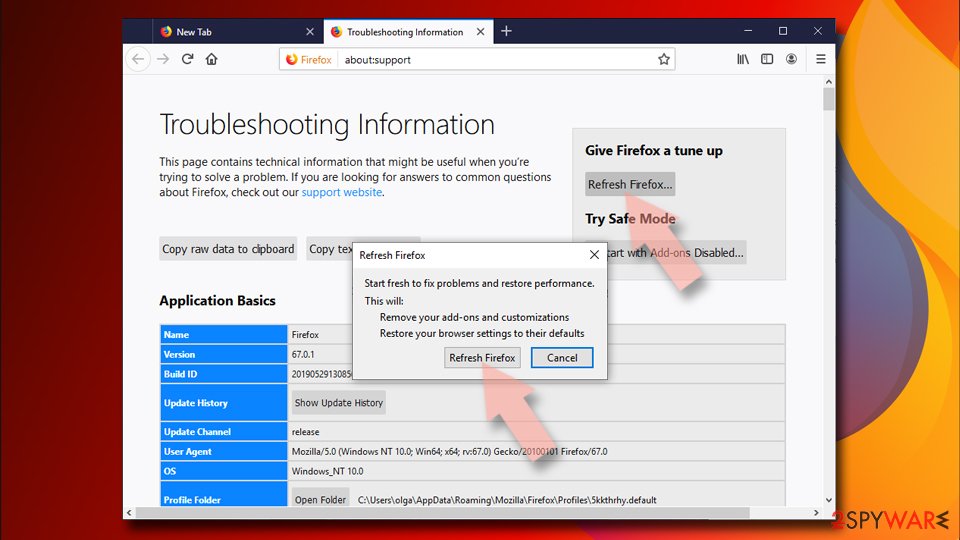
- Go to Help and then choose Troubleshooting Information.

- Under Give Firefox a tune up section, click on Refresh Firefox…
- Once the pop-up shows up, confirm the action by pressing on Refresh Firefox.

Remove from Google Chrome
Delete malicious extensions from Google Chrome:
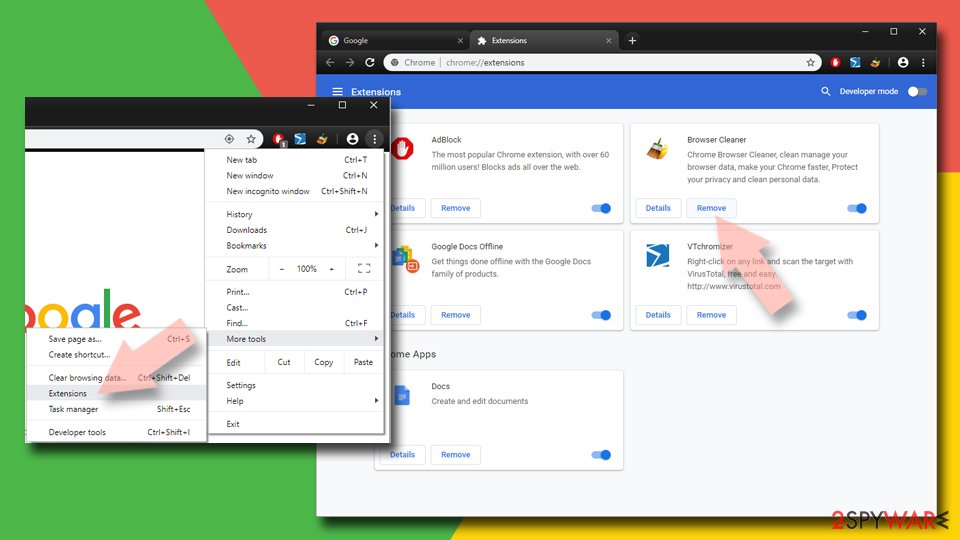
- Open Google Chrome, click on the Menu (three vertical dots at the top-right corner) and select More tools > Extensions.
- In the newly opened window, you will see all the installed extensions. Uninstall all the suspicious plugins that might be related to the unwanted program by clicking Remove.

Clear cache and web data from Chrome:
- Click on Menu and pick Settings.
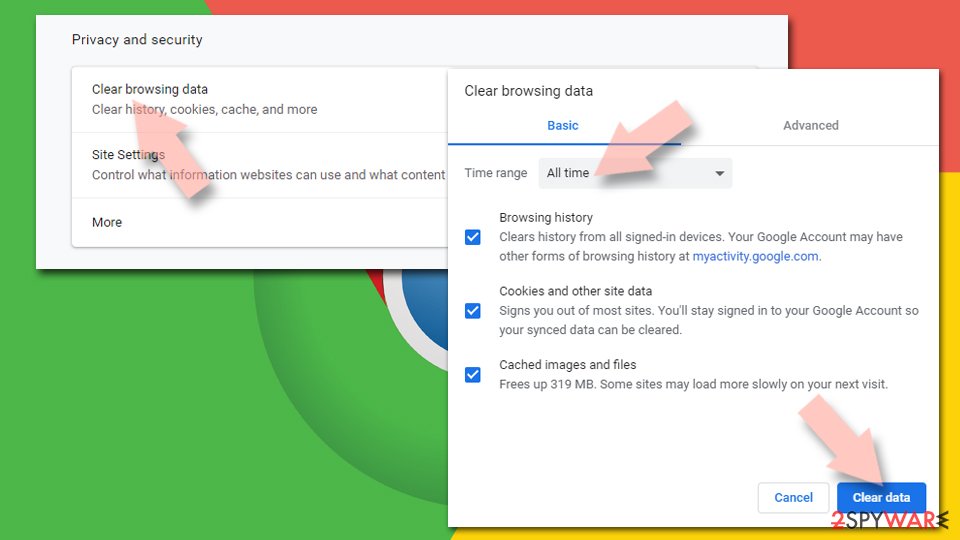
- Under Privacy and security, select Clear browsing data.
- Select Browsing history, Cookies and other site data, as well as Cached images and files.
- Click Clear data.

Change your homepage:
- Click menu and choose Settings.
- Look for a suspicious site in the On startup section.
- Click on Open a specific or set of pages and click on three dots to find the Remove option.
Reset Google Chrome:
If the previous methods did not help you, reset Google Chrome to eliminate all the unwanted components:
- Click on Menu and select Settings.
- In the Settings, scroll down and click Advanced.
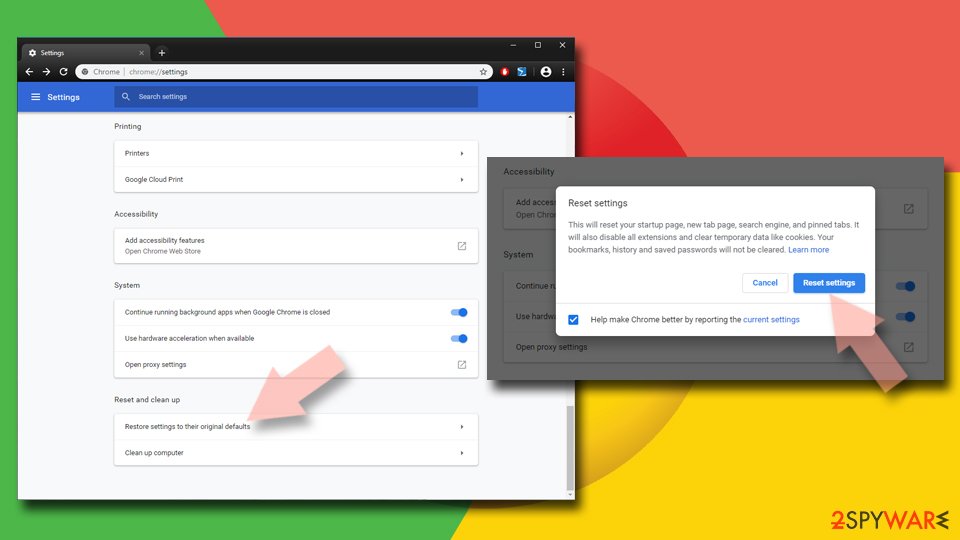
- Scroll down and locate Reset and clean up section.
- Now click Restore settings to their original defaults.
- Confirm with Reset settings.

Delete from Safari
Remove unwanted extensions from Safari:
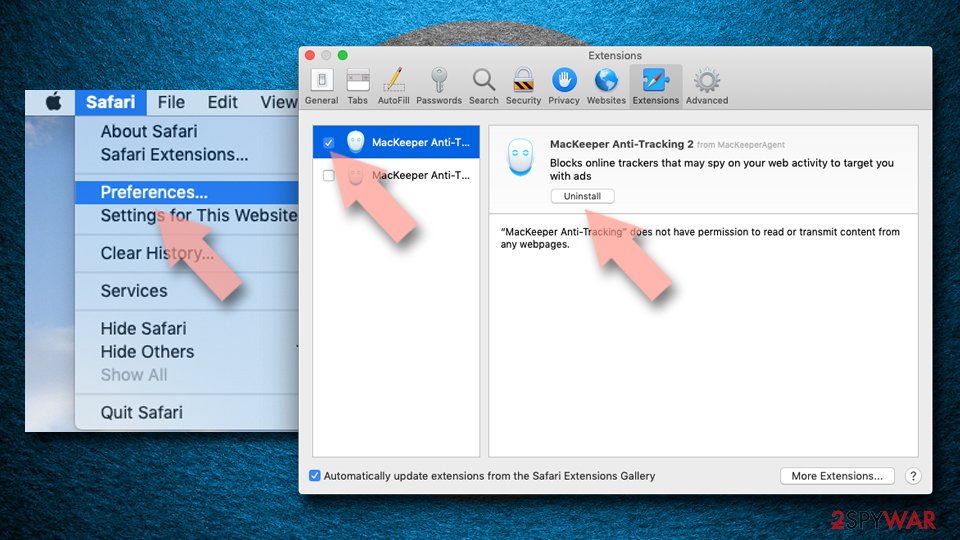
- Click Safari > Preferences…
- In the new window, pick Extensions.
- Select the unwanted extension and select Uninstall.

Clear cookies and other website data from Safari:
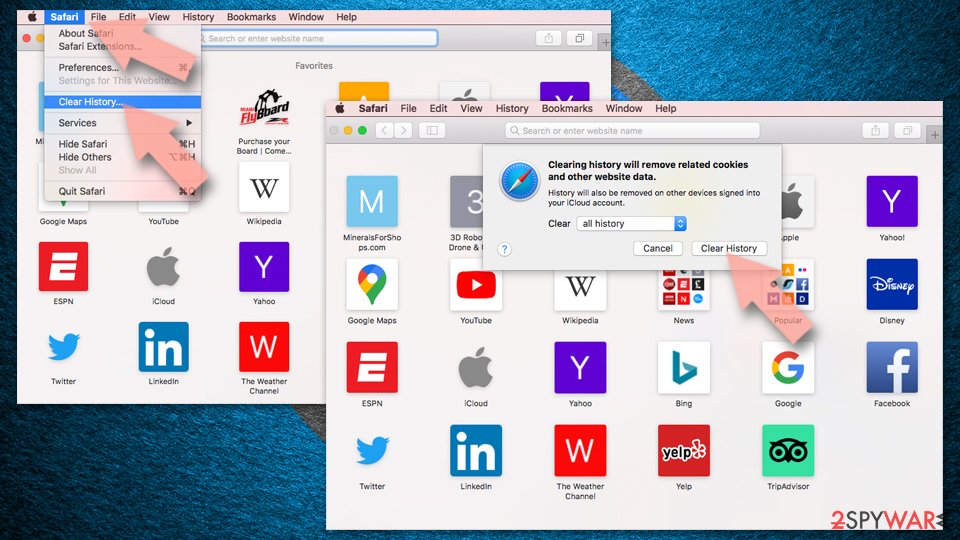
- Click Safari > Clear History…
- From the drop-down menu under Clear, pick all history.
- Confirm with Clear History.

Reset Safari if the above-mentioned steps did not help you:
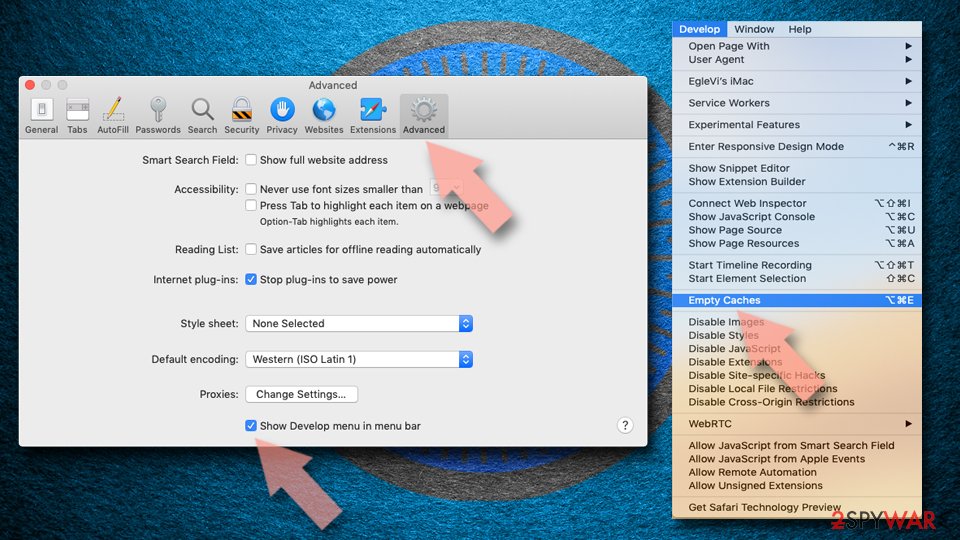
- Click Safari > Preferences…
- Go to Advanced tab.
- Tick the Show Develop menu in menu bar.
- From the menu bar, click Develop, and then select Empty Caches.

After uninstalling this potentially unwanted program (PUP) and fixing each of your web browsers, we recommend you to scan your PC system with a reputable anti-spyware. This will help you to get rid of Mirar Toolbar registry traces and will also identify related parasites or possible malware infections on your computer. For that you can use our top-rated malware remover: FortectIntego, SpyHunter 5Combo Cleaner or Malwarebytes.
How to prevent from getting browser plugins
Access your website securely from any location
When you work on the domain, site, blog, or different project that requires constant management, content creation, or coding, you may need to connect to the server and content management service more often. The best solution for creating a tighter network could be a dedicated/fixed IP address.
If you make your IP address static and set to your device, you can connect to the CMS from any location and do not create any additional issues for the server or network manager that needs to monitor connections and activities. VPN software providers like Private Internet Access can help you with such settings and offer the option to control the online reputation and manage projects easily from any part of the world.
Recover files after data-affecting malware attacks
While much of the data can be accidentally deleted due to various reasons, malware is one of the main culprits that can cause loss of pictures, documents, videos, and other important files. More serious malware infections lead to significant data loss when your documents, system files, and images get encrypted. In particular, ransomware is is a type of malware that focuses on such functions, so your files become useless without an ability to access them.
Even though there is little to no possibility to recover after file-locking threats, some applications have features for data recovery in the system. In some cases, Data Recovery Pro can also help to recover at least some portion of your data after data-locking virus infection or general cyber infection.
