

Notification-centar.com – adware that is promoting highly questionable domains for monetising
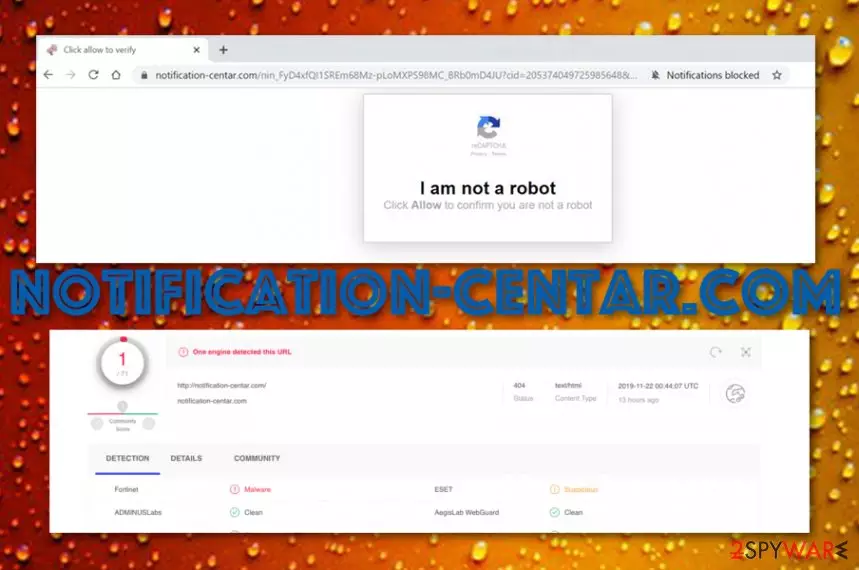
Notification-centar.com is an adware domain that is related to other URLs such as www1.notification-centar.com and www2.notification-centar.com. These third-party websites are responsible for displaying an entire load of ads and forcing redirects during browsing sessions. Serving from the 3.224.16.189 IP address, Notification-centar.com virus might get you involved in intrusive advertising campaigns that provide users with suspicious surveys, questionnaires, and fake reward claims. Be careful not to reveal any personally-identifiable information or credentials, otherwise, you might have to experience the loss of personal data or even huge monetary losses straight from your bank account.
| Name | Notification-centar.com |
|---|---|
| Type | Potentially unwanted program/adware |
| IP | 3.224.16.189 |
| Affiliates | www1.notification-centar.com and www2.notification-centar.com are two URL addresses that are related to this adware and also might be responsible for a constant ad flow on your computer |
| Danger | Even though adware programs are not dangerous malware strings themselves, these apps can still cause indirect damage. For example, intrusive redirecting can take you to infected locations and bogus surveys might try to swindle your personal data |
| Removal | Delete the potentially unwanted application with the help of antimalware software or step-by-step guidelines that have been added to the end of this article |
| Repair | If you have been looking for a tool to repair some compromised system files, you can try employing FortectIntego |
Technically, Notification-centar.com is not considered to be malware, however, this app still has a negative reputation and can cause big damage indirectly. First of all, the adware might force you to land on a malicious website during its redirects where ransomware, trojan viruses, worms, and other computer parasites might be hiding.
Continuously, Notification-centar.com pop-up ads might try to lure you in various scams and convince you to download and install completely useless security software for an inadequate price. Do not take any offers from this adware program[1] as none of them will be built to suit your needs and be directed only towards the developers' income.
To add, Notification-centar.com might start recording non-personal information of yours that includes browsing history, habits, and experience. However, sometimes, the adware program might be able to get hold of your email addresses or mobile phone number that can result in receiving bogus offers via these sources/devices.
Later on, the adware developers can use the collected information for getting you involved in targeted advertising campaigns. You might start receiving deals from Notification-centar.com that relate to your recent search results, however, do not get too excited as these are possibly false too.

Additionally, you might find that Notification-centar.com has managed to touch your web browser apps such as Google Chrome, Mozilla Firefox, Internet Explorer, Microsoft Edge, or Safari. As a result, you might see certain modifications in the browser's homepage and new tab URL.
Also, the adware might fill you hijacked web browsers with unwanted extensions, plug-ins, and other browser helper objects, also known as BHOs. Keep in mind that once you are performing Notification-centar.com removal, you need to eliminate all suspicious products from your web browsers too.
If you do not get rid of these components from your browser apps, the adware program might repeatedly show up again after a short period of time. After you remove Notification-centar.com from your machine and browsers (that can be done automatically or manually), you should look for compromised files.
If you find out that Notification-centar.com has made a negative effect on some of your system components such as files, entries, processes, and similar, you can try repairing them with a system repair tool such as FortectIntego. There is no 100% guarantee that the product will work but you can definitely give it a try.
One more thing you should keep in mind is that Notification-centar.com pop-ups and redirects might not always be a sign of a rooted adware infection. In some cases, you can simply start experiencing advertising while visiting unsecured third-party sources only and prevent it from continuation by using Adblock Plu[2] or a similar adblocker.
Also, if you are looking forward to finding a manual technique from stopping the notification flow from Notification-centar.com domain, you can enter your web browser and go to Settings > Advanced > Notifications. Scroll down the list, find all rogue URL addresses and eliminate them from the menu.

“Software bundling” is known to be the most popular adware spreading source
Ad-supported applications come together with other programs that can be downloaded from the Internet for free. This deceptive method is known as “bundling” and has been promoted by various adware developers worldwide.
You can decrease the risk of adware infections by preventing visiting pages such as download.com, softonic.com, and other third-party downloading sources. Also, make sure that you have chosen the Advanced downloading mode instead of the Recommended one as the first option gives you full control of your installations.
Continuously, do not open any links or click on adverts that look understandable or concerning to you. Close any suspicious websites that you might have been redirected to, avoid installing updates that you are not sure, and keep your antivirus software and all other programs regularly updated to prevent possible flaws.
Note that manual protection is not the only kind of safety to improve. You should also get reliable antimalware software and do not be afraid to invest in it as the human eye is not capable of spotting everything exactly like automatical products are.
Removing Notification-centar.com within a few steps
Remove Notification-centar.com with the help of antivirus software or by using step-by-step guidelines that are placed at the end of this article. The option you are going to take is all upon you, however, we recommend employing automatical software at least for performing a full computer check-up process.
Once you find the adware's main location and all other affected places that have been filled with suspicious components during the PUP's infiltration process, you can start the elimination process. Make sure that Notification-centar.com removal includes all suspicious content, otherwise, the adware might return again easily.
Security experts from LesVirus.fr[3] remind that web browsers need to be perfectly managed while dealing with the adware elimination process. The same is valid for Notification-centar.com virus deletion task.
Uninstall from Windows
Uninstall from Windows 10/8:
- Type Control Panel into the Windows search box and open the result.
- Under Programs, select Uninstall a program.


Uninstall from Windows 7/XP:
- Click on Windows Start > Control Panel (Windows XP users should click on Add/Remove Programs).
- In Control Panel, select Programs > Uninstall a program.


Remove the unwanted program:
- In the Programs and Features window, look for any recently installed suspicious entries, select them, and click Uninstall.
- If User Account Control appears, click Yes to confirm, then complete the removal.


Delete from macOS
Remove the unwanted application:
- From the menu bar, select Go > Applications.
- In the Applications folder, look for any suspicious entries, then drag them to Trash (or right-click and pick Move to Trash).


Delete leftover files and folders:
- Select Go > Go to Folder.
- Enter /Library/Application Support and remove any suspicious folders related to the unwanted program.
- Repeat the same check in the /Library/LaunchAgents and /Library/LaunchDaemons folders, deleting any suspicious entries.

- Finally, empty the Trash to permanently remove the leftovers.

Reset Internet Explorer
Remove dangerous add-ons:
- Open Internet Explorer, click on the Gear icon (IE menu) on the top-right corner of the browser
- Pick Manage Add-ons.
- You will see a Manage Add-ons window. Here, look for suspicious plugins. Click on these entries and select Disable.


Change your homepage if it was altered:
- Open IE and click on the Gear icon.
- Select Internet Options.
- In the General tab, delete the Home page address and replace it by your preferred one (for example, Google.com).
- Click Apply and then select OK.


Delete temporary files:
- Press on the Gear icon and select Internet Options.
- Under Browsing history, click Delete...
- Select relevant fields and press Delete.


Reset Internet Explorer:
- Click on Gear icon > Internet options and select Advanced tab.
- Select Reset.
- In the new window, check Delete personal settings and select Reset.


Remove from Microsoft Edge
Delete unwanted extensions from MS Edge:
- Select Menu (three horizontal dots at the top-right of the browser window) and pick Extensions.
- From the list, pick the extension and click on the Gear icon.
- Click Remove.


Clear cookies and other browser data:
- Click on the Menu (three horizontal dots at the top-right of the browser window) and select Settings > Privacy, search, and services..
- Under Clear browsing data, pick Choose what to clear.
- Select Cookies and other site data and Cached images and files. (apart from passwords, although you might want to include Media licenses as well, if applicable) and click on Clear.


Restore new tab and homepage settings:
- Click the menu icon and choose Settings.
- Then find On startup section.
- Click Remove next to any suspicious startup page.
Reset MS Edge if the above steps did not work:
- Press on Ctrl + Shift + Esc to open Task Manager.
- Click on More details arrow at the bottom of the window.
- Select Details tab.
- Now scroll down and locate every entry with Microsoft Edge name in it. Right-click on each of them and select End Task to stop MS Edge from running.


Instructions for Chromium-based Edge
Delete extensions from MS Edge (Chromium):
- Open Edge and click select Settings > Extensions.
- Delete unwanted extensions by clicking Remove.


Clear cache and site data:
- Click on Menu and go to Settings.
- Select Privacy, search and services.
- Under Clear browsing data, pick Choose what to clear.
- Under Time range, pick All time.
- Select Clear now.


Reset Chromium-based MS Edge:
- Click on Menu and select Settings.
- On the left side, pick Reset settings.
- Select Restore settings to their default values.
- Confirm with Reset.
- This will disable extensions and reset startup pages but will not delete bookmarks, saved passwords, or browsing history.


Remove from Mozilla Firefox (FF)
Remove dangerous extensions:
- Open Mozilla Firefox browser and click on the Menu (three horizontal lines at the top-right of the window).
- Select Add-ons.
- In here, select the unwanted extension and click Remove.


Reset the homepage:
- Click three horizontal lines at the top right corner to open the menu.
- Choose Settings.
- Under Home, set your preferred homepage and new tab settings.
Clear cookies and site data:
- Click Menu and pick Settings.
- Go to Privacy & Security section.
- Scroll down to locate Cookies and Site Data.
- Click on Clear Data...
- Select Cookies and Site Data and Temporary cached files and pages, then click Clear.


Reset Mozilla Firefox
If clearing the browser as explained above did not help, reset Mozilla Firefox:
- Open Mozilla Firefox browser and click the Menu.
- Go to Help and then choose Troubleshooting Information.

- Under Give Firefox a tune up section, click on Refresh Firefox...
- Once the pop-up shows up, confirm the action by pressing on Refresh Firefox.



Remove from Google Chrome
Delete malicious extensions from Google Chrome:
- Open Google Chrome, click on the Menu (three vertical dots at the top-right corner) and select More tools > Extensions.
- In the newly opened window, you will see all the installed extensions. Uninstall all suspicious extensions related to the unwanted program by clicking Remove.


Clear cache and web data from Chrome:
- Click on Menu and pick Settings.
- Under Privacy and security, select Clear browsing data.
- Select Browsing history, Cookies and other site data, as well as Cached images and files.
- Click Clear data.


Change your homepage:
- Click menu and choose Settings.
- Look for a suspicious site in the On startup section.
- Click on Open a specific or set of pages and click on three dots to find the Remove option.
Reset Google Chrome:
If the previous methods did not help you, reset Google Chrome to eliminate all the unwanted components:
- Click on Menu and select Settings.
- In the Settings, scroll down and click Advanced.
- Scroll down and locate Reset and clean up section.
- Now click Restore settings to their original defaults.
- Confirm with Reset settings.


Delete from Safari
Remove dangerous extensions:
- Open Safari, click Safari in the menu at the top-left of the screen, and select Preferences.
- Go to the Extensions tab, look for any suspicious entries, and click Uninstall to remove them.


Clear history and website data:
- Click Safari in the menu and pick Clear History.
- Set Clear to all history and confirm with Clear History.


Reset Safari:
- Click Safari in the menu and select Preferences > Advanced.
- Enable Show Develop menu in menu bar.
- From the menu bar, click Develop and select Empty Caches.


Did this guide help?
Be the first to comment