

Search.searchlwradar.com – a threat to popular web browsers
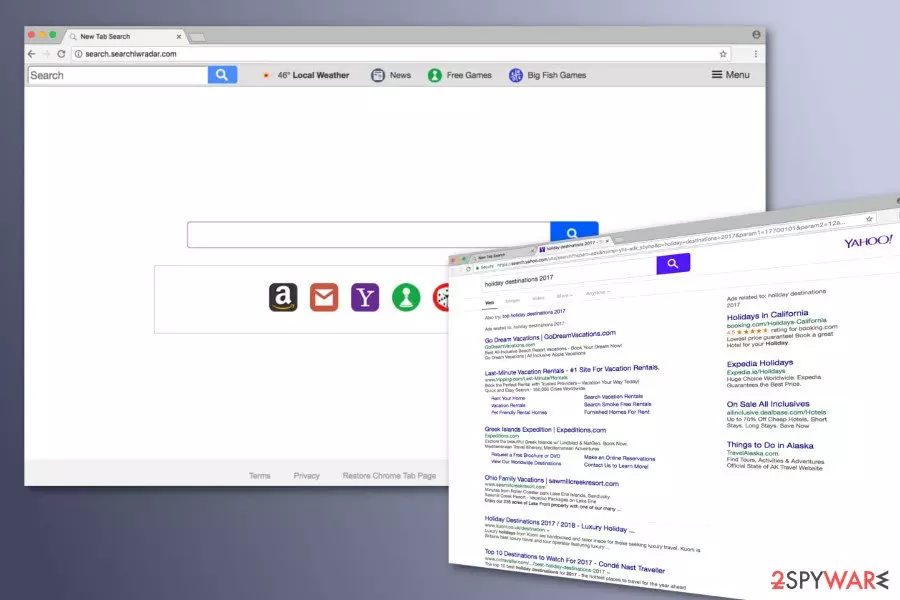
Search.searchlwradar.com is a bogus search engine created by Polarity Technologies Ltd. Cybersecurity specialists classified this application as a browser hijacker[1] due to its negative feature to take over the attacked web browser. After the hijack, it alters browsers' settings and shortcuts.
As a result, users find their default browser and search engine changed to search.searchlwradar.com and cannot get rid of it quickly. Once it takes complete control over the browser, the hijacker might start collecting information about users and deliver commercial content in the form of search results and ads.
Nevertheless, this search tool generates search results from Yahoo; it is still suspected of modifying search results and replacing organic links with sponsored ones. In this way, developers get advertising-based revenue by driving traffic to affiliates’ websites.
Obviously, it’s one of the reasons why you should remove Search.searchlwradar.com from the device immediately. Not only this search engine might trick you into visiting unrelated sites, but it also redirects you to potentially dangerous online places. We're going to walk you through the removal process.
| name | Search.searchlwradar.com |
|---|---|
| Type | Redirect virus, potentially unwanted program, browser hijacker |
| Symptoms | Altered browser settings (homepage, default search engine, new tab); search results filled with ads; redirects to questionable sites; diminished device performance; slower internet connection |
| Risks | Exposure to affiliated sites might cause privacy issues, financial losses, infections with other PUPs, or even malware |
| Distribution | Fake Flash Player updates, deceptive ads, software bundling |
| Elimination | The quickest way to remove any threat from your infected device is by running a full system scan with reliable anti-malware software |
| System health check | Ensure a stable working environment by resolving system issues with the FortectIntego PC repair software |
Search.searchlwradar.com is similar to many other search engines created by Polarity Technologies and causes the same problems and puts users at risk. The main page includes links to popular email services, shopping, and gaming sites.
Nevertheless, some sites are credible; some of them are not. Thus, it’s better to avoid clicking these links in order to prevent redirects to suspicious online places. The Privacy Policy of the program informs what information the browser hijacker collects and how it is used.
Thus, if you read this document, you would find that it might track your browsing history, search terms, clicked ads, technical information about your browser and device, IP address, geographic location, and more. All this information allows providing engaging commercial content.[2]
Thus, the chances that you will click on sponsored link or ad becomes higher. However, showing interest in advertisements might be dangerous because of shady Search.searchlwradar.com redirect tendencies. This potentially unwanted program (PUP) might provide commercial content that redirects to questionable or infected sites.
Therefore, you might be tricked into installing bogus software, reveal private information,[3] or catch ransomware.[4] Users also complain about sudden redirects to promotional sites and an increased amount of pop-ups and other types of online ads. The only medicine for all these problems is Search.searchlwradar.com removal.
So it would be best if you did it now. The easiest way to take care of this browser hijacker is to run a full system scan with reliable security software such as MalwarebytesMalwarebytes, SpyHunterCombo Cleaner, or similar. Once the threat is gone, run system diagnostics with the FortectIntego optimizer to ensure that your device doesn't freeze, crash, or exhibit any other strange behavior.
Browser hijacker travels with the help of freeware
The article's culprit might get inside computers using assistance from freeware and shareware. Authors of the search engine use the bundling technique, which allows attaching it as an optional component in a software bundle. Thus, if you “unpack” software during the installation, you might find a pre-selected agreement to make Search.searchlwradar.com your default homepage.
However, the majority of victims forget security tips and tricks when installing new programs. Usually, they rely on Quick/Standard installation wizard. As a result, they find unknown applications or search tools installed on their computers and browsers.
Thus, if you have encountered Search.searchlwradar.com hijack, probably, you made the same mistake. We want to remind you that Quick installation does not openly disclose third-party apps and install them by default. To protect your PC from PUPs, you need to opt for Advanced/Custom settings and carefully watch each step.

Instructions to remove Search.searchlwradar.com browser hijacker
You can complete Search.searchlwradar.com removal either manually or automatically. If you are willing to take a challenge, you can try to find all hijacker-related entries and delete them manually. Our prepared instructions below will help you to do that.
However, if these steps look time-consuming and require putting too much effort, you should opt for the second option. Automatic removal is performed using anti-malware programs. Thus, you will need to install a security program and run a full system scan. However, if you decide to remove Search.searchlwradar.com automatically, don’t forget to update your chosen tool first!
Uninstall from Windows
Uninstall from Windows 10/8:
- Type Control Panel into the Windows search box and open the result.
- Under Programs, select Uninstall a program.


Uninstall from Windows 7/XP:
- Click on Windows Start > Control Panel (Windows XP users should click on Add/Remove Programs).
- In Control Panel, select Programs > Uninstall a program.


Remove the unwanted program:
- In the Programs and Features window, look for any recently installed suspicious entries, select them, and click Uninstall.
- If User Account Control appears, click Yes to confirm, then complete the removal.


Delete from macOS
Remove the unwanted application:
- From the menu bar, select Go > Applications.
- In the Applications folder, look for any suspicious entries, then drag them to Trash (or right-click and pick Move to Trash).


Delete leftover files and folders:
- Select Go > Go to Folder.
- Enter /Library/Application Support and remove any suspicious folders related to the unwanted program.
- Repeat the same check in the /Library/LaunchAgents and /Library/LaunchDaemons folders, deleting any suspicious entries.

- Finally, empty the Trash to permanently remove the leftovers.

Remove from Microsoft Edge
Delete unwanted extensions from MS Edge:
- Select Menu (three horizontal dots at the top-right of the browser window) and pick Extensions.
- From the list, pick the extension and click on the Gear icon.
- Click Remove.


Clear cookies and other browser data:
- Click on the Menu (three horizontal dots at the top-right of the browser window) and select Settings > Privacy, search, and services..
- Under Clear browsing data, pick Choose what to clear.
- Select Cookies and other site data and Cached images and files. (apart from passwords, although you might want to include Media licenses as well, if applicable) and click on Clear.


Restore new tab and homepage settings:
- Click the menu icon and choose Settings.
- Then find On startup section.
- Click Remove next to any suspicious startup page.
Reset MS Edge if the above steps did not work:
- Press on Ctrl + Shift + Esc to open Task Manager.
- Click on More details arrow at the bottom of the window.
- Select Details tab.
- Now scroll down and locate every entry with Microsoft Edge name in it. Right-click on each of them and select End Task to stop MS Edge from running.


Instructions for Chromium-based Edge
Delete extensions from MS Edge (Chromium):
- Open Edge and click select Settings > Extensions.
- Delete unwanted extensions by clicking Remove.


Clear cache and site data:
- Click on Menu and go to Settings.
- Select Privacy, search and services.
- Under Clear browsing data, pick Choose what to clear.
- Under Time range, pick All time.
- Select Clear now.


Reset Chromium-based MS Edge:
- Click on Menu and select Settings.
- On the left side, pick Reset settings.
- Select Restore settings to their default values.
- Confirm with Reset.
- This will disable extensions and reset startup pages but will not delete bookmarks, saved passwords, or browsing history.


Remove from Mozilla Firefox (FF)
Remove dangerous extensions:
- Open Mozilla Firefox browser and click on the Menu (three horizontal lines at the top-right of the window).
- Select Add-ons.
- In here, select the unwanted extension and click Remove.


Reset the homepage:
- Click three horizontal lines at the top right corner to open the menu.
- Choose Settings.
- Under Home, set your preferred homepage and new tab settings.
Clear cookies and site data:
- Click Menu and pick Settings.
- Go to Privacy & Security section.
- Scroll down to locate Cookies and Site Data.
- Click on Clear Data...
- Select Cookies and Site Data and Temporary cached files and pages, then click Clear.


Reset Mozilla Firefox
If clearing the browser as explained above did not help, reset Mozilla Firefox:
- Open Mozilla Firefox browser and click the Menu.
- Go to Help and then choose Troubleshooting Information.

- Under Give Firefox a tune up section, click on Refresh Firefox...
- Once the pop-up shows up, confirm the action by pressing on Refresh Firefox.



Remove from Google Chrome
Delete malicious extensions from Google Chrome:
- Open Google Chrome, click on the Menu (three vertical dots at the top-right corner) and select More tools > Extensions.
- In the newly opened window, you will see all the installed extensions. Uninstall all suspicious extensions related to the unwanted program by clicking Remove.


Clear cache and web data from Chrome:
- Click on Menu and pick Settings.
- Under Privacy and security, select Clear browsing data.
- Select Browsing history, Cookies and other site data, as well as Cached images and files.
- Click Clear data.


Change your homepage:
- Click menu and choose Settings.
- Look for a suspicious site in the On startup section.
- Click on Open a specific or set of pages and click on three dots to find the Remove option.
Reset Google Chrome:
If the previous methods did not help you, reset Google Chrome to eliminate all the unwanted components:
- Click on Menu and select Settings.
- In the Settings, scroll down and click Advanced.
- Scroll down and locate Reset and clean up section.
- Now click Restore settings to their original defaults.
- Confirm with Reset settings.


Delete from Safari
Remove dangerous extensions:
- Open Safari, click Safari in the menu at the top-left of the screen, and select Preferences.
- Go to the Extensions tab, look for any suspicious entries, and click Uninstall to remove them.


Clear history and website data:
- Click Safari in the menu and pick Clear History.
- Set Clear to all history and confirm with Clear History.


Reset Safari:
- Click Safari in the menu and select Preferences > Advanced.
- Enable Show Develop menu in menu bar.
- From the menu bar, click Develop and select Empty Caches.


Did this guide help?
4 comments
Martell
I tried to use this search engine, but theres nothing good about it . After a couple of days I started receiving so many strange ads, and once in a while redirects to gaming sites disturbs browsing the Internet. So, I can tell from my personal experience that its not a good idea to use it.
Beatrice
I cannot understand when and how I installed this search engine... Well, at least I managed to get rid of it!
Zell
Ive just used your provided instructions to fix my mothers computer. I can confirm - they are actually working! Thanks a lot!
Mila
Ive decided to remove it with antivirus program. I was surprised that other dangerous files were found on the system as well. I think this browser hijacker is responsible for it. Please, remove it quickly!