SearchQuest is an adware that may collect browsing-related information and show annoying ads
SearchQuest is a browser add-on that has recently been attributed to the 'adware' and 'potentially unwanted programs' (PUP) categories. It's developers present this tool as a “utility that makes searching and translating information you find online easy.” Unfortunately, this useful functionality may be beaten by the inconveniences that this application may cause.
Once installed, it may install itself on Windows startup, create several registries, and affect all of your web browsers, including Google Chrome, Mozilla Firefox, and Internet Explorer. This way, it launches along with the system boot and enables advertisements of its sponsors. Consequently, you may start receiving tons of “Ads by SearchQuest”, “SearchQuest Ads”, “Powered by SearchQuest”, and similarly marked advertisements each time when browsing the net.
The main problem is not the annoyance of those ads, but rather risk that they pose to your PC's security. Keep in mind that such and similar advertisements are prepared by unreliable third parties, so there is always a chance that SearchQuest redirects exposes you to questionable or unreliable domains.
On top of that, this adware also poses a risk to your private security.
In most of the cases, it drops cookies on all web browsers that it manages to find on a computer and starts collecting browsing-related information. Although it cannot gather information, such as your name, telephone number, credit card details, and similar information without your permission, do not underestimate the fact that it may continuously gather your PC's IP address, location, email address, search terms, clicks, and similar data that may also be used for suspicious purposes. This is one of the reasons why you should remove SearchQuest as soon as possible.

Last, but not least, is the fact that this ad-supported extension may affect your PC's performance in a negative way, so you may start experiencing slowdowns, crashes, and freezes. That's why we recommend you to get rid of SearchQuest virus from your PC's system without a delay. The best solution to check the system and eliminate various computer risks is a reputable anti-spyware. We recommend using SpyHunterCombo Cleaner or MalwarebytesMalwarebytes.
Also, some problems can persist even after deleting unwanted components. If you notice that your computer is running slower or is experiencing any other problems, you should use a fixing tool such as FortectIntego.
Users often install potentially unwanted programs themselves
Unfortunately, very often users are lured by beautiful promises and install adware themselves. As stated on the official website of SearchQuest,
Search Quest is free so in order to pay for servers and other expenses we show ads while you browse the internet. All of these ads are labeled with a link to uninstall instructions and a logo so you can easily recognize them.
After reading this on the official domain, users seldom decide to install it. That's why its developers have started applying 'bundling', which is a stealthy distribution with the help of other freeware, which means that it's not necessary to install Search Quest virus as a standalone file. It may enter PC systems in one pack with various download managers, media players, PDF creators, or other freeware that have been involved in the distribution of this add-on.
Therefore, no matter what kind of freeware you decide to install, always pay an appropriate amount of attention to its installation method. Make sure that you opt for Advanced or Custom installation option and carefully read all the terms. This way, you should spot the list of 'optional downloads' and get the chance to opt-out of them all.
Remove SearchQuest virus from your system with our help
Constant pop-up ads, a slower system, and other problems can be extremely annoying and interfere with normal computer use. To avoid such things, it is best to get rid of SearchQuest. Also, be more careful in the future and always install new applications by using the Advanced/Custom installation option.
If you want to remove SearchQuest from the system, you can do it manually and automatically. The best solution is to check your PC with a reputable anti-spyware because this way all potentially unwanted and dangerous programs will be removed.
Uninstall from Windows
Uninstall from Windows 10/8:
- Type Control Panel into the Windows search box and open the result.
- Under Programs, select Uninstall a program.


Uninstall from Windows 7/XP:
- Click on Windows Start > Control Panel (Windows XP users should click on Add/Remove Programs).
- In Control Panel, select Programs > Uninstall a program.


Remove the unwanted program:
- In the Programs and Features window, look for any recently installed suspicious entries, select them, and click Uninstall.
- If User Account Control appears, click Yes to confirm, then complete the removal.


Delete from macOS
Remove the unwanted application:
- From the menu bar, select Go > Applications.
- In the Applications folder, look for any suspicious entries, then drag them to Trash (or right-click and pick Move to Trash).


Delete leftover files and folders:
- Select Go > Go to Folder.
- Enter /Library/Application Support and remove any suspicious folders related to the unwanted program.
- Repeat the same check in the /Library/LaunchAgents and /Library/LaunchDaemons folders, deleting any suspicious entries.

- Finally, empty the Trash to permanently remove the leftovers.

Reset Internet Explorer
Remove dangerous add-ons:
- Open Internet Explorer, click on the Gear icon (IE menu) on the top-right corner of the browser
- Pick Manage Add-ons.
- You will see a Manage Add-ons window. Here, look for suspicious plugins. Click on these entries and select Disable.


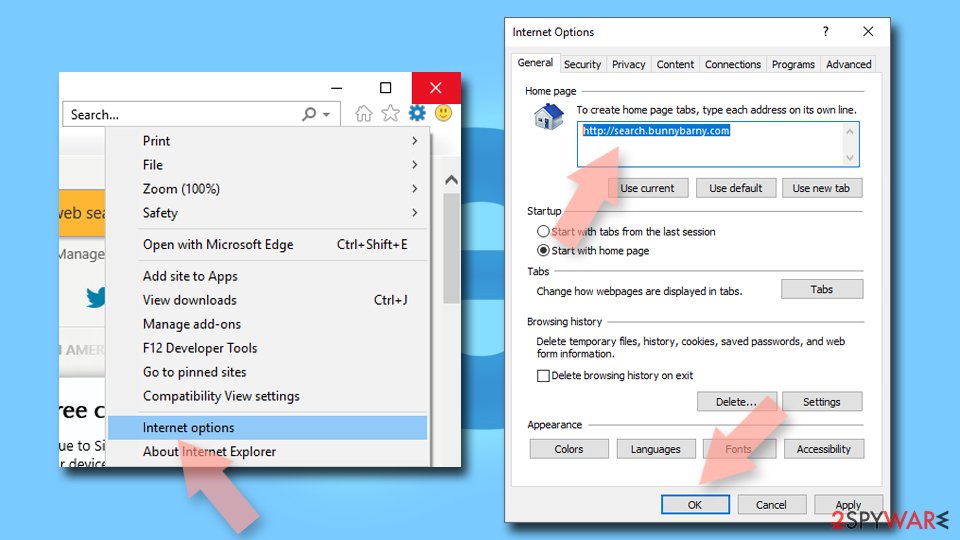
Change your homepage if it was altered:
- Open IE and click on the Gear icon.
- Select Internet Options.
- In the General tab, delete the Home page address and replace it by your preferred one (for example, Google.com).
- Click Apply and then select OK.

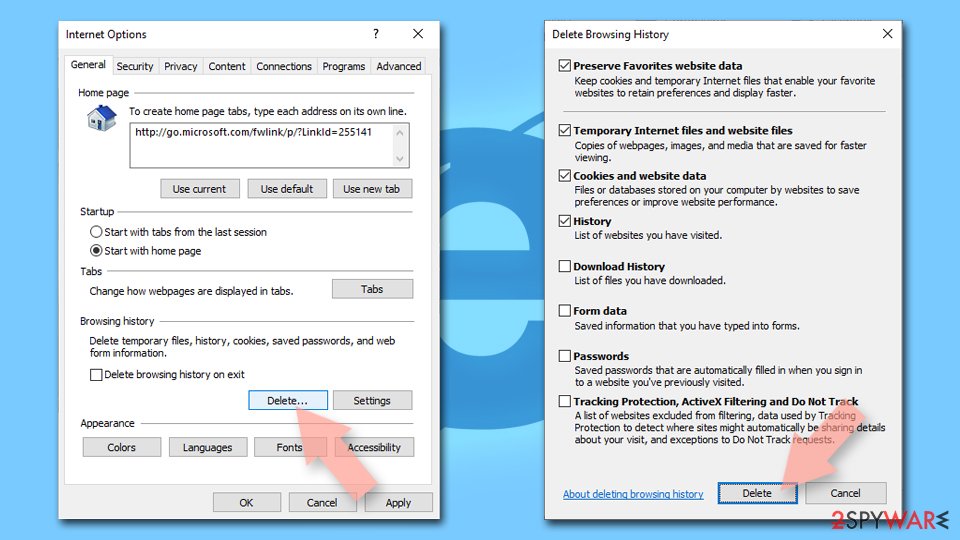
Delete temporary files:
- Press on the Gear icon and select Internet Options.
- Under Browsing history, click Delete...
- Select relevant fields and press Delete.

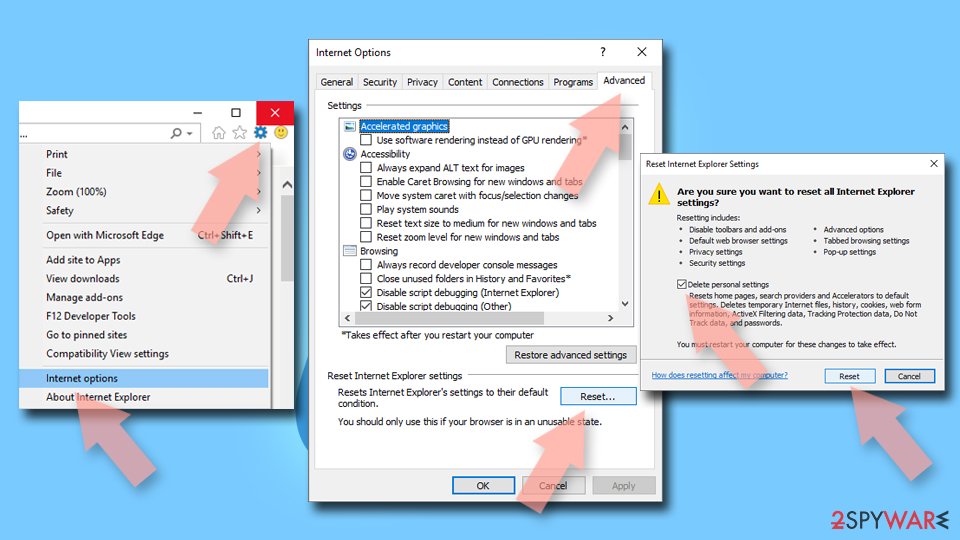
Reset Internet Explorer:
- Click on Gear icon > Internet options and select Advanced tab.
- Select Reset.
- In the new window, check Delete personal settings and select Reset.

Remove from Microsoft Edge
Delete unwanted extensions from MS Edge:
- Select Menu (three horizontal dots at the top-right of the browser window) and pick Extensions.
- From the list, pick the extension and click on the Gear icon.
- Click Remove.


Clear cookies and other browser data:
- Click on the Menu (three horizontal dots at the top-right of the browser window) and select Settings > Privacy, search, and services..
- Under Clear browsing data, pick Choose what to clear.
- Select Cookies and other site data and Cached images and files. (apart from passwords, although you might want to include Media licenses as well, if applicable) and click on Clear.


Restore new tab and homepage settings:
- Click the menu icon and choose Settings.
- Then find On startup section.
- Click Remove next to any suspicious startup page.
Reset MS Edge if the above steps did not work:
- Press on Ctrl + Shift + Esc to open Task Manager.
- Click on More details arrow at the bottom of the window.
- Select Details tab.
- Now scroll down and locate every entry with Microsoft Edge name in it. Right-click on each of them and select End Task to stop MS Edge from running.


Instructions for Chromium-based Edge
Delete extensions from MS Edge (Chromium):
- Open Edge and click select Settings > Extensions.
- Delete unwanted extensions by clicking Remove.


Clear cache and site data:
- Click on Menu and go to Settings.
- Select Privacy, search and services.
- Under Clear browsing data, pick Choose what to clear.
- Under Time range, pick All time.
- Select Clear now.


Reset Chromium-based MS Edge:
- Click on Menu and select Settings.
- On the left side, pick Reset settings.
- Select Restore settings to their default values.
- Confirm with Reset.
- This will disable extensions and reset startup pages but will not delete bookmarks, saved passwords, or browsing history.


Remove from Mozilla Firefox (FF)
Remove dangerous extensions:
- Open Mozilla Firefox browser and click on the Menu (three horizontal lines at the top-right of the window).
- Select Add-ons.
- In here, select the unwanted extension and click Remove.


Reset the homepage:
- Click three horizontal lines at the top right corner to open the menu.
- Choose Settings.
- Under Home, set your preferred homepage and new tab settings.
Clear cookies and site data:
- Click Menu and pick Settings.
- Go to Privacy & Security section.
- Scroll down to locate Cookies and Site Data.
- Click on Clear Data...
- Select Cookies and Site Data and Temporary cached files and pages, then click Clear.


Reset Mozilla Firefox
If clearing the browser as explained above did not help, reset Mozilla Firefox:
- Open Mozilla Firefox browser and click the Menu.
- Go to Help and then choose Troubleshooting Information.

- Under Give Firefox a tune up section, click on Refresh Firefox...
- Once the pop-up shows up, confirm the action by pressing on Refresh Firefox.


Remove from Google Chrome
Delete malicious extensions from Google Chrome:
- Open Google Chrome, click on the Menu (three vertical dots at the top-right corner) and select More tools > Extensions.
- In the newly opened window, you will see all the installed extensions. Uninstall all suspicious extensions related to the unwanted program by clicking Remove.


Clear cache and web data from Chrome:
- Click on Menu and pick Settings.
- Under Privacy and security, select Clear browsing data.
- Select Browsing history, Cookies and other site data, as well as Cached images and files.
- Click Clear data.


Change your homepage:
- Click menu and choose Settings.
- Look for a suspicious site in the On startup section.
- Click on Open a specific or set of pages and click on three dots to find the Remove option.
Reset Google Chrome:
If the previous methods did not help you, reset Google Chrome to eliminate all the unwanted components:
- Click on Menu and select Settings.
- In the Settings, scroll down and click Advanced.
- Scroll down and locate Reset and clean up section.
- Now click Restore settings to their original defaults.
- Confirm with Reset settings.


Delete from Safari
Remove dangerous extensions:
- Open Safari, click Safari in the menu at the top-left of the screen, and select Preferences.
- Go to the Extensions tab, look for any suspicious entries, and click Uninstall to remove them.


Clear history and website data:
- Click Safari in the menu and pick Clear History.
- Set Clear to all history and confirm with Clear History.


Reset Safari:
- Click Safari in the menu and select Preferences > Advanced.
- Enable Show Develop menu in menu bar.
- From the menu bar, click Develop and select Empty Caches.


Was this guide helpful?
Be the first to comment