

What should you know before using theSearch.net?
TheSearch.net virus might hijack your computer whether you are a regular Internet user or just occasionally browse the Web. This search engine might look like a reliable search engine. It doesn’t require any special knowledge to see that this browsing tool fails to perform the same as a reliable and legitimate tool. However, you should be aware that this PUP belongs to the category of browser hijackers. It means that you might be redirected to a completely different domain, or your browser might be stuffed with an enormous amount of intrusive banners and commercial offers. We highly recommend you to proceed to theSearch.net removal. For that purpose, FortectIntego will be of assistance.
The developers of this hijacker did not try hard to create an impelling and attractive design. On the other hand, they anticipate that without colorful veneer they will attract more users who are quality-oriented. It does not offer you any quick access links to popular domains or other references to affiliated domains. Though this might be hijacker’s advantage, its drawbacks significantly outweigh. When you type any topic, the number of delivered search results is ridiculously low.
While legitimate search databases provide millions of search results, theSearch.net fails to keep up. It might look like as if it uses Google as the main database, however, do not fall into deception. Because this hijacker employs a certain “filter”, it provides different search results. You might notice that there are more advertising-related search targets. In addition, this questionable browsing tool deprived you of the ability to evade potentially dangerous websites because it switches off the security plug-in.
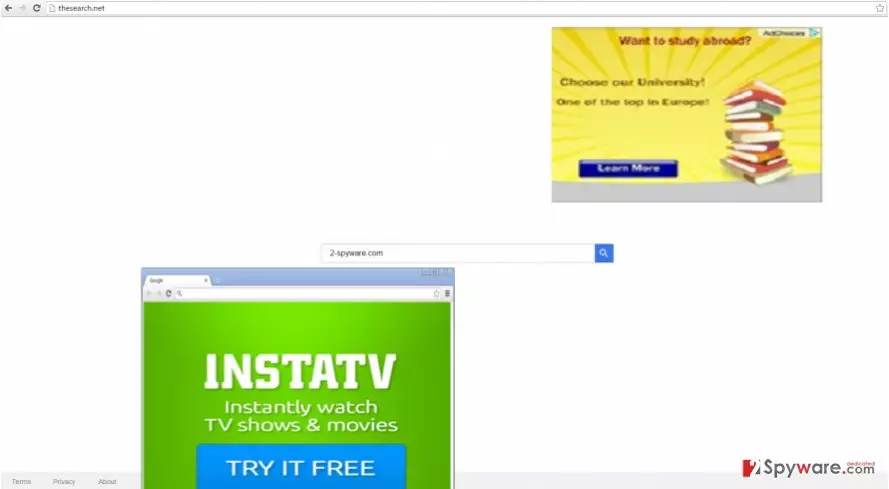
In addition, theSearch.net redirect becomes a burden. Due to this phenomenon, you cannot access the wanted websites as quickly as you expect. The emerging redirect pop-ups greatly slow down the overall speed of the browser processing. Keep in mind that you should not visit those domains either since they might shelter vivid malware. All in all, remove theSearch.net permanently.
The transmission ways of the hijacker
Crooks and developers of such questionable browsing tools prefer using “bundling’ technique for distributing purposes. Unfortunately, this technique proves to be highly profitable because the Internet users still avoid reading “Terms of Use” or give a second look to the installation process. As a consequence, you also overlooked the add-on which hid TheSearch hijacker. Next time you intend to install a new application, select “Advanced” mode. This will enable you to see optional software. If you find it unnecessary, unmark its checkbox. Such sequence of actions will assist you in detecting a PUP on time before it settles on the computer.
How should I remove TheSearch.net?
There are two ways to put an end to this hijacker – either manually or automatically. If you opt for the former method, make sure not to miss any vital detail while performing each removal stage. Some users might find this method time-consuming and bothersome. In that case, opt for the automatic TheSearch.net removal option. Install an anti-spyware application. Afterward, the elimination process will only take several minutes. You can be sure that the hijacker is completely deleted. Additionally, it guards your back while you browse the Web.
Uninstall from Windows
Uninstall from Windows 10/8:
- Type Control Panel into the Windows search box and open the result.
- Under Programs, select Uninstall a program.


Uninstall from Windows 7/XP:
- Click on Windows Start > Control Panel (Windows XP users should click on Add/Remove Programs).
- In Control Panel, select Programs > Uninstall a program.


Remove the unwanted program:
- In the Programs and Features window, look for any recently installed suspicious entries, select them, and click Uninstall.
- If User Account Control appears, click Yes to confirm, then complete the removal.


Delete from macOS
Remove the unwanted application:
- From the menu bar, select Go > Applications.
- In the Applications folder, look for any suspicious entries, then drag them to Trash (or right-click and pick Move to Trash).


Delete leftover files and folders:
- Select Go > Go to Folder.
- Enter /Library/Application Support and remove any suspicious folders related to the unwanted program.
- Repeat the same check in the /Library/LaunchAgents and /Library/LaunchDaemons folders, deleting any suspicious entries.

- Finally, empty the Trash to permanently remove the leftovers.

Remove from Microsoft Edge
Delete unwanted extensions from MS Edge:
- Select Menu (three horizontal dots at the top-right of the browser window) and pick Extensions.
- From the list, pick the extension and click on the Gear icon.
- Click Remove.


Clear cookies and other browser data:
- Click on the Menu (three horizontal dots at the top-right of the browser window) and select Settings > Privacy, search, and services..
- Under Clear browsing data, pick Choose what to clear.
- Select Cookies and other site data and Cached images and files. (apart from passwords, although you might want to include Media licenses as well, if applicable) and click on Clear.


Restore new tab and homepage settings:
- Click the menu icon and choose Settings.
- Then find On startup section.
- Click Remove next to any suspicious startup page.
Reset MS Edge if the above steps did not work:
- Press on Ctrl + Shift + Esc to open Task Manager.
- Click on More details arrow at the bottom of the window.
- Select Details tab.
- Now scroll down and locate every entry with Microsoft Edge name in it. Right-click on each of them and select End Task to stop MS Edge from running.


Instructions for Chromium-based Edge
Delete extensions from MS Edge (Chromium):
- Open Edge and click select Settings > Extensions.
- Delete unwanted extensions by clicking Remove.


Clear cache and site data:
- Click on Menu and go to Settings.
- Select Privacy, search and services.
- Under Clear browsing data, pick Choose what to clear.
- Under Time range, pick All time.
- Select Clear now.


Reset Chromium-based MS Edge:
- Click on Menu and select Settings.
- On the left side, pick Reset settings.
- Select Restore settings to their default values.
- Confirm with Reset.
- This will disable extensions and reset startup pages but will not delete bookmarks, saved passwords, or browsing history.


Remove from Mozilla Firefox (FF)
Remove dangerous extensions:
- Open Mozilla Firefox browser and click on the Menu (three horizontal lines at the top-right of the window).
- Select Add-ons.
- In here, select the unwanted extension and click Remove.


Reset the homepage:
- Click three horizontal lines at the top right corner to open the menu.
- Choose Settings.
- Under Home, set your preferred homepage and new tab settings.
Clear cookies and site data:
- Click Menu and pick Settings.
- Go to Privacy & Security section.
- Scroll down to locate Cookies and Site Data.
- Click on Clear Data...
- Select Cookies and Site Data and Temporary cached files and pages, then click Clear.


Reset Mozilla Firefox
If clearing the browser as explained above did not help, reset Mozilla Firefox:
- Open Mozilla Firefox browser and click the Menu.
- Go to Help and then choose Troubleshooting Information.

- Under Give Firefox a tune up section, click on Refresh Firefox...
- Once the pop-up shows up, confirm the action by pressing on Refresh Firefox.



Remove from Google Chrome
Delete malicious extensions from Google Chrome:
- Open Google Chrome, click on the Menu (three vertical dots at the top-right corner) and select More tools > Extensions.
- In the newly opened window, you will see all the installed extensions. Uninstall all suspicious extensions related to the unwanted program by clicking Remove.


Clear cache and web data from Chrome:
- Click on Menu and pick Settings.
- Under Privacy and security, select Clear browsing data.
- Select Browsing history, Cookies and other site data, as well as Cached images and files.
- Click Clear data.


Change your homepage:
- Click menu and choose Settings.
- Look for a suspicious site in the On startup section.
- Click on Open a specific or set of pages and click on three dots to find the Remove option.
Reset Google Chrome:
If the previous methods did not help you, reset Google Chrome to eliminate all the unwanted components:
- Click on Menu and select Settings.
- In the Settings, scroll down and click Advanced.
- Scroll down and locate Reset and clean up section.
- Now click Restore settings to their original defaults.
- Confirm with Reset settings.


Delete from Safari
Remove dangerous extensions:
- Open Safari, click Safari in the menu at the top-left of the screen, and select Preferences.
- Go to the Extensions tab, look for any suspicious entries, and click Uninstall to remove them.


Clear history and website data:
- Click Safari in the menu and pick Clear History.
- Set Clear to all history and confirm with Clear History.


Reset Safari:
- Click Safari in the menu and select Preferences > Advanced.
- Enable Show Develop menu in menu bar.
- From the menu bar, click Develop and select Empty Caches.


Did this guide help?
2 comments
Brian
What a boring hijacker...
Vanessa
At first, looks harmless, but it is surely annoying!