

Windows Warning Alert is the browser pop-up window displaying fake warning alerts with tech support number which cannot be trusted
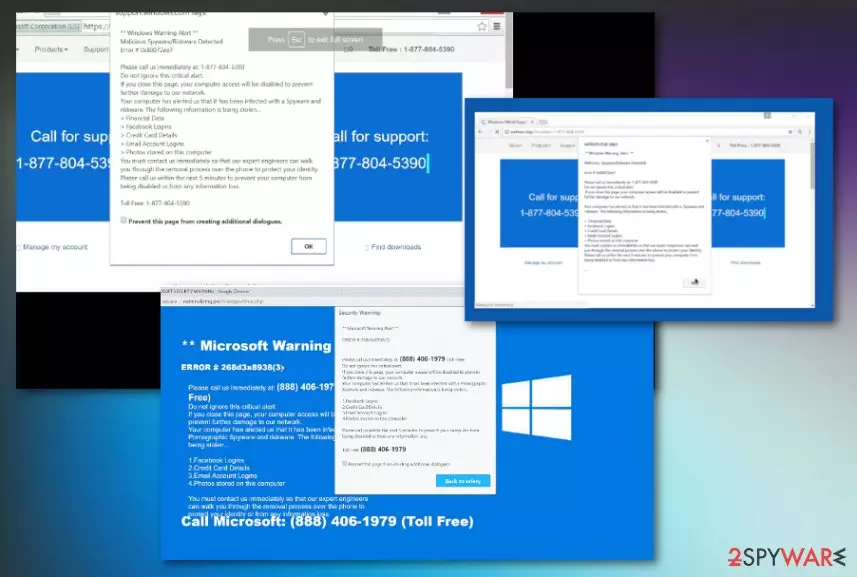
Windows Warning Alert is a fake message which is displayed to users with an intent to scam[1] them and extort money. This alert shows a pop-up error message which warns victims that their machine has been infected by spyware and riskware[2] and their personal information is in great danger. However, this warning is bogus and is caused by an adware program installed on users’ PC.
The fake Windows Warning Alert pop-up states that multiple malware infections have been detected and users personal information (financial data, Facebook logins, email account logins, etc.) are at high risk of being stolen. To resolve these issues, a user should contact the supposed “technicians” by a provided telephone number or scan the system to see for themselves. Please note that the phone number might vary for every individual or the fake scan showing up on the screen delivers predetermined results of errors and malware.
People complain about such alerts and questions whether this is a real message from the Microsoft or a virus.[3] Remember these messages are not from the support team, software developers and application distributors. Calling the suggested phone number may end in lost money or a damaged machine.
| Name | Windows Warning Alert |
|---|---|
| Type | Adware |
| Category | Scam |
| Main danger | Redirects to possibly dangerous pages, aims to trick people into revealing their personal information |
| Tactics | Social engineering[4] |
| Distribution | Software bundling, deceptive websites, advertisements, fake software |
| Elimination | Use the anti-malware program and remove Windows Warning Alert. Get FortectIntego clean the machine fully |
Social engineering is a fantastic skill that dramatically helps in the marketing industry. However, cybercriminals learned to adopt this technique and use it for illegal purposes – such as scamming innocent victims while abusing their trust and scaring them into installing software or revealing personal data. Thus, users need to learn how to protect themselves from such dangerous scams. We can help you with Windows Warning Alert removal – simply continue reading this article.
As soon as the victim contacts the alleged tech support via the contact information or the toll-free number, the crooks start explaining the “situation.” We must note that they usually do it with no rush and try to use complicated technical terms to confuse people even more and scare users into believing that their machine is in trouble.
However, do not trust these crooks as they are merely lying and Windows Warning Alert is bogus. The only threat your computer is most likely infected with is adware, and it can be dealt with relatively easy, as long as elimination is not delayed. You can use security software like FortectIntego to exterminate the virus with ease.

Sometimes Windows Warning Alert creators might ask you to provide remote access to the computer. If granted, schemers might install malware/spyware on your PC and steal credentials or other personal information. They can also record data stored on the machine.
This data might later be sold to cybercriminals on the dark web forums and used for monetary gain. Additionally, they might offer useless software and make you pay for it. Thus, do not agree to anything they offer or rather, never contact them in the first place.
Scammers can even claim that you need to pay for the provided service. This is a method used to get money directly from users or collect credentials and logins using keystroke loggers and other data-stealing techniques.
There are multiple scams out there which claim that users’ PC is damaged, infected by malware or it requires an alleged software update. These fake messages are caused by adware and should be ignored. We urge you to remove Windows Warning Alert virus for good and not put your personal information and money at risk.

Windows Warning Alert is a scam that can lead to various issues with your machine or even put a risk on personal information or privacy issues. If you reveal your email, full name or any other personally-identifiable details, your identity might be at risk.
Other secondary scams like sextortion, email scam techniques use such data to spread around and scare people into paying the ransom or revealing more valuable data. Keep away from contacting these criminals and remove Windows Warning Alert pop-up window and all the PUPs that cause such alerts as soon as possible with anti-malware tools
Particular Windows Warning Error 0x80092ee9 scam
Social engineering attacks that put full-screen error messages look scary enough to make people eager to call the provided number or use suggested tool. This method works especially great when the fake alert states about particular malware, error or a system risk because this specific fact seems to be more legitimate.
Error #0x80092ee9 alert is one of them. This scam shows the message stating that your device might be exposed to spyware, riskware or malicious pornographic content. To find out what is the particular issue, the message offers to call the Windows support team and report the details of this possible security incidents.
Unfortunately, the toll-free number can cost you more than you think and further activities like remote access or rogue tool installation lead to more damage to your machine. The alert is fake, but all the risk can come from accessing the scammers via the provided phone number or pop-up redirects. Stay away from this warning alert and remove Error 0x80092ee9, PUP or another application that causes these messages using automatic anti-malware tools like FortectIntego or SpyHunterCombo Cleaner.

Adware can be potentially dangerous
Security experts[5] concluded that adware is relatively harmless software which typically exposes users to various advertisements which are sponsored by partners. To say the least, adware is incredibly frustrating to deal with, as it often installs additional components without users’ permission, covers the legitimate content of official websites with ads, banners, offers, deals and redirects users to gambling, porn, online gaming or other suspicious domains.
Additionally, adware slows down users machines as it runs multiple background processes to deliver advertisements. Thus, every browsing session becomes a nightmare to users affected by it. Therefore, we highly advise avoiding adware and researching information on products or services yourself.

Adware is distributed within software bundles
If you noticed adware present on your computer, you should check which freeware you recently installed. Bundling is a common scheme used by free software developers. They do not adequately disclose the full list of installation; hence users end up with unwanted programs on their machines.
To avoid PUPs and adware, we advise always picking “Advanced/Custom” installation modes. A lot of users often pick “Recommended/Quick” settings as they are trying to save time. However, this method should be deflected.
Once in “Advanced” settings, untick any pre-checked tick boxes. Also, do not forget to read through EULA and Privacy Policy of the application.
Remove Windows Warning Alert scam for good
If you already contacted cybercriminals and got scammed, make sure you follow these steps:
- Remove Windows Warning Alert scam from your computer entirely;
- Reset your browser settings and all passwords;
- Contact your bank and ask for a refund if any money was paid;
- In some cases, you might want to contact your local fraud department so they can investigate.
Windows Warning Alert removal can be performed either manually or automatically. We suggest using robust security software and deleting all the unwanted PUPs, spyware, malware, etc. with just a few button clicks. You can pick one of the programs mentioned below.
Manual virus removal can also be performed; however, it is not that convenient and takes much longer to execute. If you are a computer-savvy individual, you can follow our step-by-step guide below this article. Every effort has been made by our security experts to make the tutorial as clear as possible. Therefore, we urge you to follow each step without mistakes as the incorrect procedure will merely fail to eliminate the infection.
Uninstall from Windows
Uninstall from Windows 10/8:
- Type Control Panel into the Windows search box and open the result.
- Under Programs, select Uninstall a program.


Uninstall from Windows 7/XP:
- Click on Windows Start > Control Panel (Windows XP users should click on Add/Remove Programs).
- In Control Panel, select Programs > Uninstall a program.


Remove the unwanted program:
- In the Programs and Features window, look for any recently installed suspicious entries, select them, and click Uninstall.
- If User Account Control appears, click Yes to confirm, then complete the removal.


Delete from macOS
Remove the unwanted application:
- From the menu bar, select Go > Applications.
- In the Applications folder, look for any suspicious entries, then drag them to Trash (or right-click and pick Move to Trash).


Delete leftover files and folders:
- Select Go > Go to Folder.
- Enter /Library/Application Support and remove any suspicious folders related to the unwanted program.
- Repeat the same check in the /Library/LaunchAgents and /Library/LaunchDaemons folders, deleting any suspicious entries.

- Finally, empty the Trash to permanently remove the leftovers.

Reset Internet Explorer
Remove dangerous add-ons:
- Open Internet Explorer, click on the Gear icon (IE menu) on the top-right corner of the browser
- Pick Manage Add-ons.
- You will see a Manage Add-ons window. Here, look for suspicious plugins. Click on these entries and select Disable.


Change your homepage if it was altered:
- Open IE and click on the Gear icon.
- Select Internet Options.
- In the General tab, delete the Home page address and replace it by your preferred one (for example, Google.com).
- Click Apply and then select OK.


Delete temporary files:
- Press on the Gear icon and select Internet Options.
- Under Browsing history, click Delete...
- Select relevant fields and press Delete.


Reset Internet Explorer:
- Click on Gear icon > Internet options and select Advanced tab.
- Select Reset.
- In the new window, check Delete personal settings and select Reset.


Remove from Microsoft Edge
Delete unwanted extensions from MS Edge:
- Select Menu (three horizontal dots at the top-right of the browser window) and pick Extensions.
- From the list, pick the extension and click on the Gear icon.
- Click Remove.


Clear cookies and other browser data:
- Click on the Menu (three horizontal dots at the top-right of the browser window) and select Settings > Privacy, search, and services..
- Under Clear browsing data, pick Choose what to clear.
- Select Cookies and other site data and Cached images and files. (apart from passwords, although you might want to include Media licenses as well, if applicable) and click on Clear.


Restore new tab and homepage settings:
- Click the menu icon and choose Settings.
- Then find On startup section.
- Click Remove next to any suspicious startup page.
Reset MS Edge if the above steps did not work:
- Press on Ctrl + Shift + Esc to open Task Manager.
- Click on More details arrow at the bottom of the window.
- Select Details tab.
- Now scroll down and locate every entry with Microsoft Edge name in it. Right-click on each of them and select End Task to stop MS Edge from running.


Instructions for Chromium-based Edge
Delete extensions from MS Edge (Chromium):
- Open Edge and click select Settings > Extensions.
- Delete unwanted extensions by clicking Remove.


Clear cache and site data:
- Click on Menu and go to Settings.
- Select Privacy, search and services.
- Under Clear browsing data, pick Choose what to clear.
- Under Time range, pick All time.
- Select Clear now.


Reset Chromium-based MS Edge:
- Click on Menu and select Settings.
- On the left side, pick Reset settings.
- Select Restore settings to their default values.
- Confirm with Reset.
- This will disable extensions and reset startup pages but will not delete bookmarks, saved passwords, or browsing history.


Remove from Mozilla Firefox (FF)
Remove dangerous extensions:
- Open Mozilla Firefox browser and click on the Menu (three horizontal lines at the top-right of the window).
- Select Add-ons.
- In here, select the unwanted extension and click Remove.


Reset the homepage:
- Click three horizontal lines at the top right corner to open the menu.
- Choose Settings.
- Under Home, set your preferred homepage and new tab settings.
Clear cookies and site data:
- Click Menu and pick Settings.
- Go to Privacy & Security section.
- Scroll down to locate Cookies and Site Data.
- Click on Clear Data...
- Select Cookies and Site Data and Temporary cached files and pages, then click Clear.


Reset Mozilla Firefox
If clearing the browser as explained above did not help, reset Mozilla Firefox:
- Open Mozilla Firefox browser and click the Menu.
- Go to Help and then choose Troubleshooting Information.

- Under Give Firefox a tune up section, click on Refresh Firefox...
- Once the pop-up shows up, confirm the action by pressing on Refresh Firefox.



Remove from Google Chrome
Delete malicious extensions from Google Chrome:
- Open Google Chrome, click on the Menu (three vertical dots at the top-right corner) and select More tools > Extensions.
- In the newly opened window, you will see all the installed extensions. Uninstall all suspicious extensions related to the unwanted program by clicking Remove.


Clear cache and web data from Chrome:
- Click on Menu and pick Settings.
- Under Privacy and security, select Clear browsing data.
- Select Browsing history, Cookies and other site data, as well as Cached images and files.
- Click Clear data.


Change your homepage:
- Click menu and choose Settings.
- Look for a suspicious site in the On startup section.
- Click on Open a specific or set of pages and click on three dots to find the Remove option.
Reset Google Chrome:
If the previous methods did not help you, reset Google Chrome to eliminate all the unwanted components:
- Click on Menu and select Settings.
- In the Settings, scroll down and click Advanced.
- Scroll down and locate Reset and clean up section.
- Now click Restore settings to their original defaults.
- Confirm with Reset settings.


Delete from Safari
Remove dangerous extensions:
- Open Safari, click Safari in the menu at the top-left of the screen, and select Preferences.
- Go to the Extensions tab, look for any suspicious entries, and click Uninstall to remove them.


Clear history and website data:
- Click Safari in the menu and pick Clear History.
- Set Clear to all history and confirm with Clear History.


Reset Safari:
- Click Safari in the menu and select Preferences > Advanced.
- Enable Show Develop menu in menu bar.
- From the menu bar, click Develop and select Empty Caches.


Did this guide help?
Be the first to comment