

Activitytonic.com generates revenue with PPC advertising
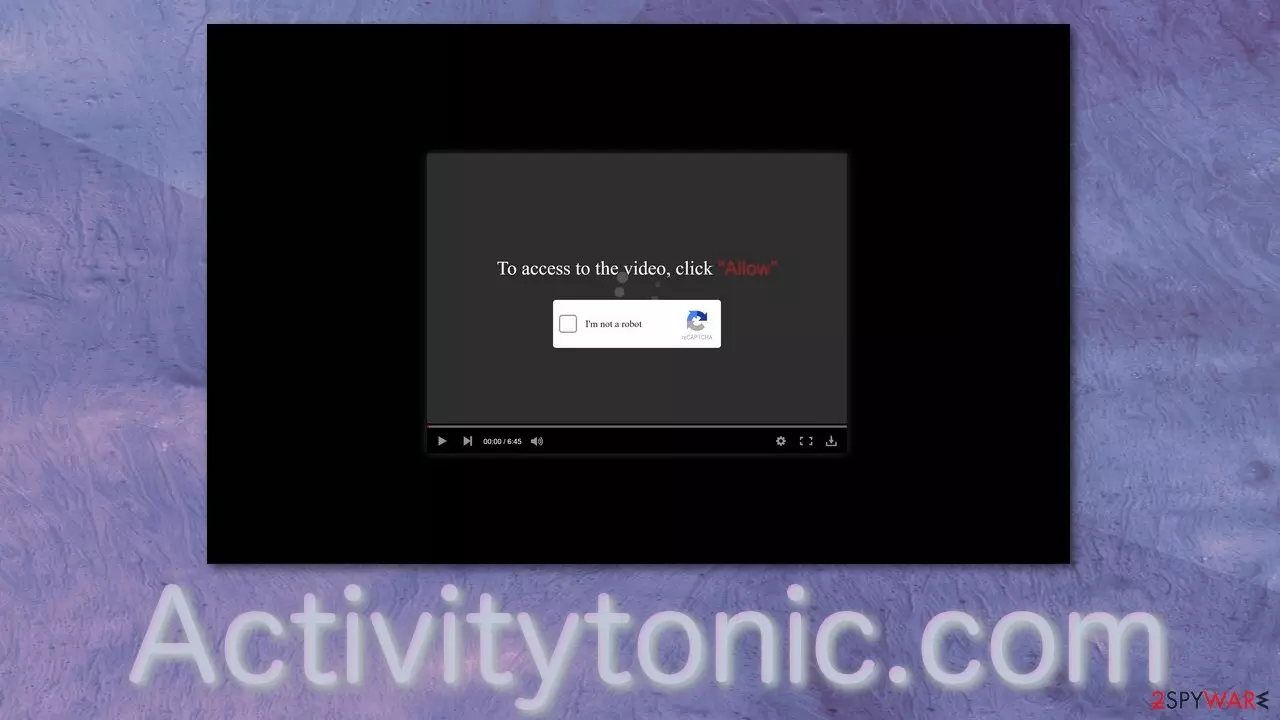
Activitytonic.com is designed to infect users' browsers with intrusive pop-up ads. In some cases, they can appear even when the browser is not in use. The creators use the push notification function, which is available in most browsers, to deliver the advertisements. Push notification marketing is normally used by marketers to inform their target audience about services and products on an array of devices.
Push ads use a subscription-based model, which means that users have to agree to receive push notifications first. The authors of this site use social engineering tactics[1] to trick people into doing this, which leaves many of them with questions because many do not realize what is causing this issue. Furthermore, people do not find websites like this in their search results. Usually, they get redirected by other shady sites or adware – a potentially unwanted program installed on the machine that generates ads and causes redirects.
The website acts as a middleman between consumers and advertisers. It pushes their content on your screen, so every time you click, they generate revenue.[2] Moreover, creators do not background-check all the promoters that go through their site because they do not care about your safety or privacy. That is why clicking on links embedded in these push notifications might be dangerous. They might lead to scam sites and result in monetary losses or installations of more PUPs or even malware.[3]
| NAME | Activitytonic.com |
| TYPE | Push notification spam; adware |
| SYMPTOMS | After interacting with the website, pop-up ads start appearing in the corner of the screen, sometimes even when the browser is closed |
| DISTRIBUTION | Shady pages, deceptive ads, freeware installations |
| DANGERS | Advertisements sent by this site can lead to scam sites and other dangerous places where users risk suffering from monetary losses |
| ELIMINATION | Getting rid of intrusive ads is possible by accessing your browser settings |
| FURTHER STEPS | Use a maintenance tool like FortectIntego to fix any remaining damage and optimize your machine |
How did this happen in the first place?
It is a rare occasion for people to open Activitytonic.com by themselves. Usually, this page opens in a new tab while they are clicking through a shady site. People think that they opened another page of the previous one they were on. But that is actually not true – the site is completely unrelated and just an ad.
Users get tricked because of their limited knowledge or rushing habits. Some think that in order to receive something they want – a video or other type of content they need to give the website permission by clicking “Allow” when actually all they do is agree to start receiving advertisements.
Obviously, after clicking on the button, users do not receive anything in return except for annoying push notifications. There are thousands of similar websites to this one that we already wrote about. Some examples include – Totaltopposts.com, Oataltaul.com, and Zuglomo.net. This activity does not seem to be stopping anytime soon.
The main reason – websites like this are very easily reproducible. All the developers need to do is get a domain name[4] and just copy-paste the content. Some of the messages you might see from pages created to generate revenue from pay-per-click adverting are:
Press Allow to verify your age is 18+
Click Allow to watch the video
Download is ready. Click Allow to download your file
Press Allow to verify that you are not a robot

Stop the shady ads from coming
If you allowed the ads yourself and this is not an adware infection, the removal is simple and fast. All you have to do is go to your browser settings and block the site's permission to send you push notifications:
Google Chrome (desktop):
- Open Google Chrome browser and go to Menu > Settings.
- Scroll down and click on Advanced.
- Locate the Privacy and security section and pick Site Settings > Notifications.
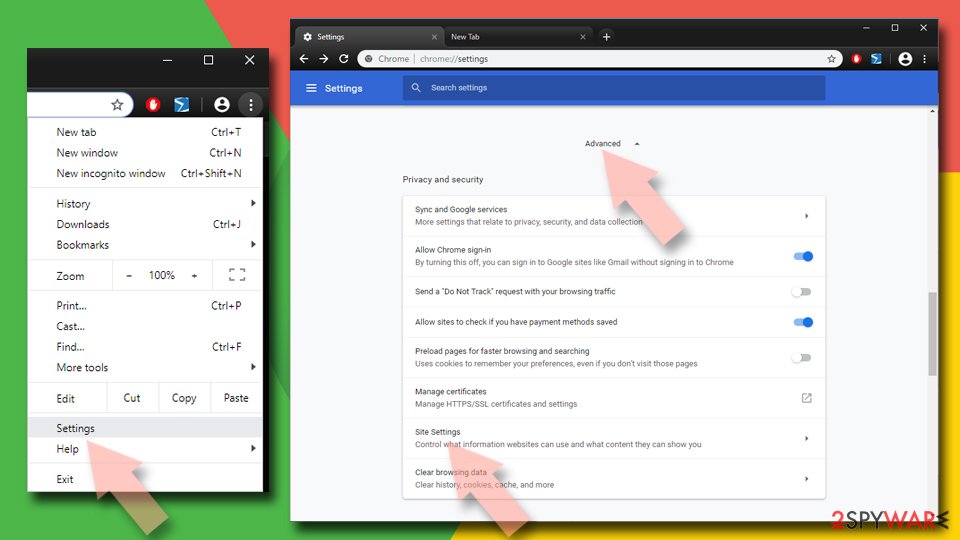
- Look at the Allow section and look for a suspicious URL.
- Click the three vertical dots next to it and pick Block. This should remove unwanted notifications from Google Chrome.


Google Chrome (Android):
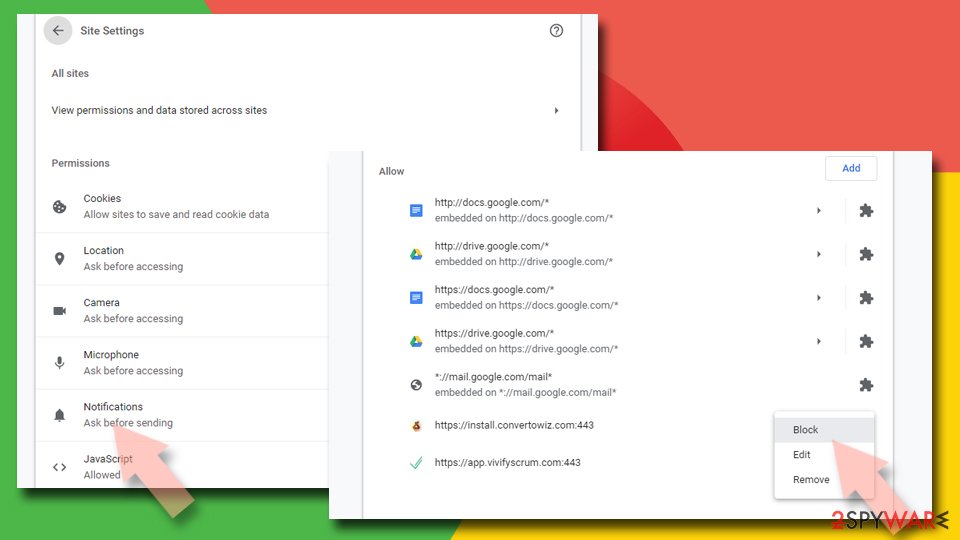
- Open Google Chrome and tap on Settings (three vertical dots).
- Select Notifications.
- Scroll down to Sites section.
- Locate the unwanted URL and toggle the button to the left (Off setting).

Mozilla Firefox:
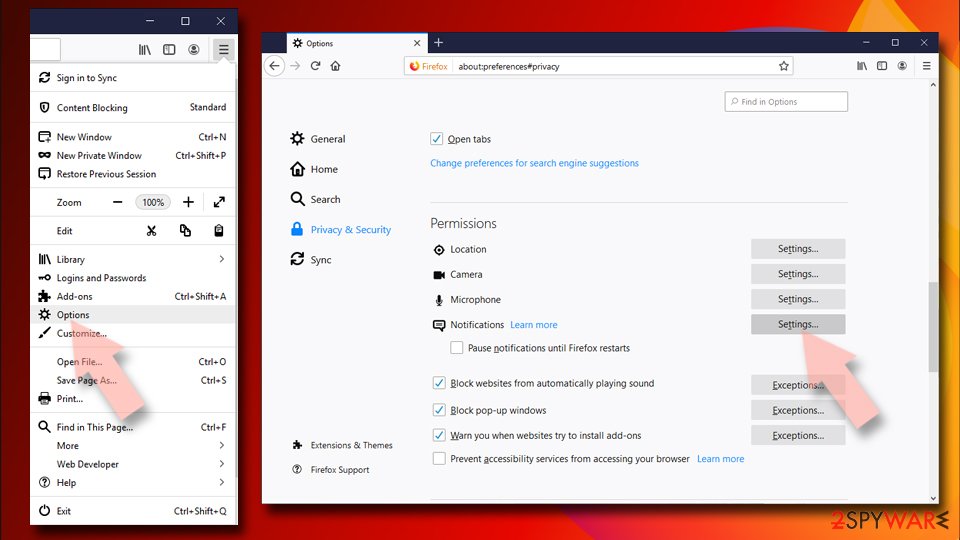
- Open Mozilla Firefox and go to Menu > Options.
- Click on Privacy & Security section.
- Under Permissions, you should be able to see Notifications. Click Settings button next to it.
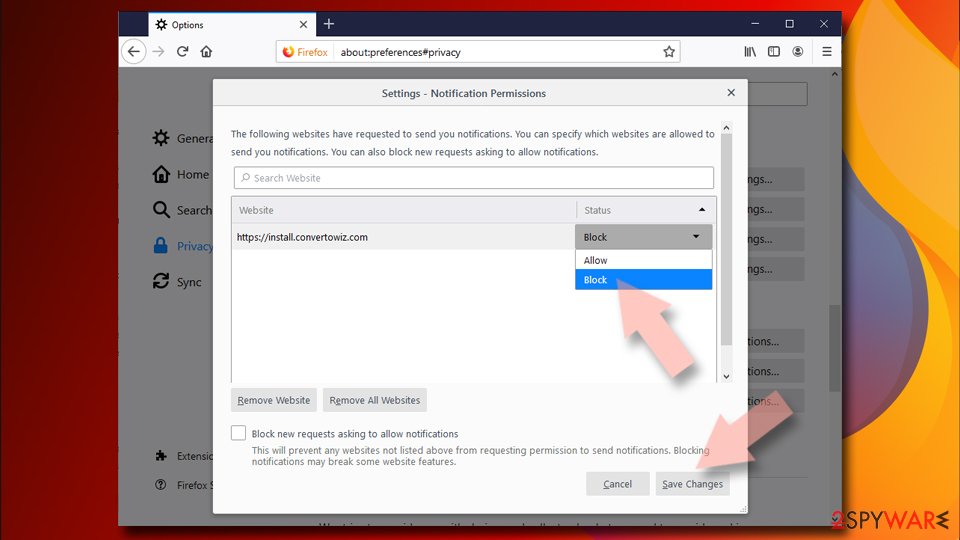
- In the Settings – Notification Permissions window, click on the drop-down menu by the URL in question.
- Select Block and then click on Save Changes. This should remove unwanted notifications from Mozilla Firefox.


Safari:
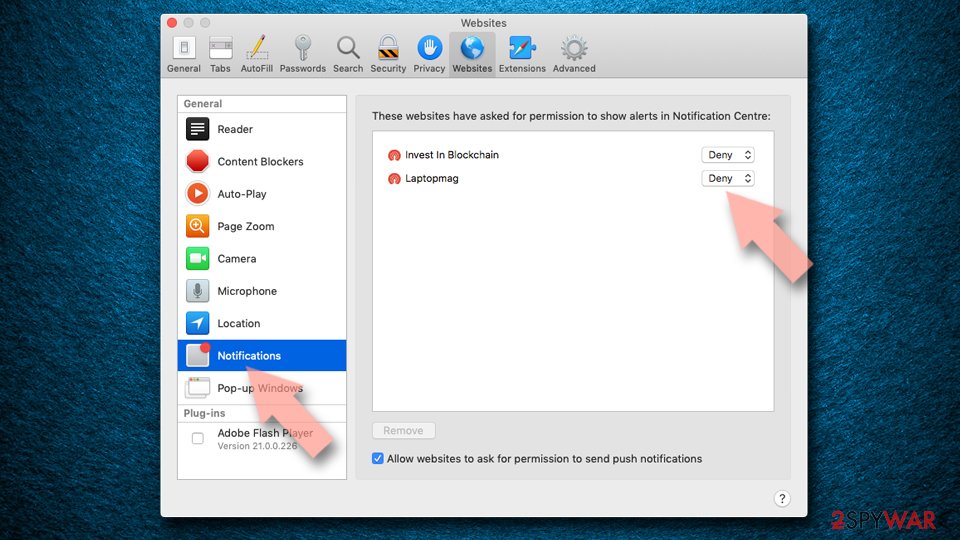
- Click on Safari > Preferences…
- Go to Websites tab and, under General, select Notifications.
- Select the web address in question, click the drop-down menu and select Deny.

MS Edge:
- Open Microsoft Edge, and click the Settings and more button (three horizontal dots) at the top-right of the window.
- Select Settings and then go to Advanced.
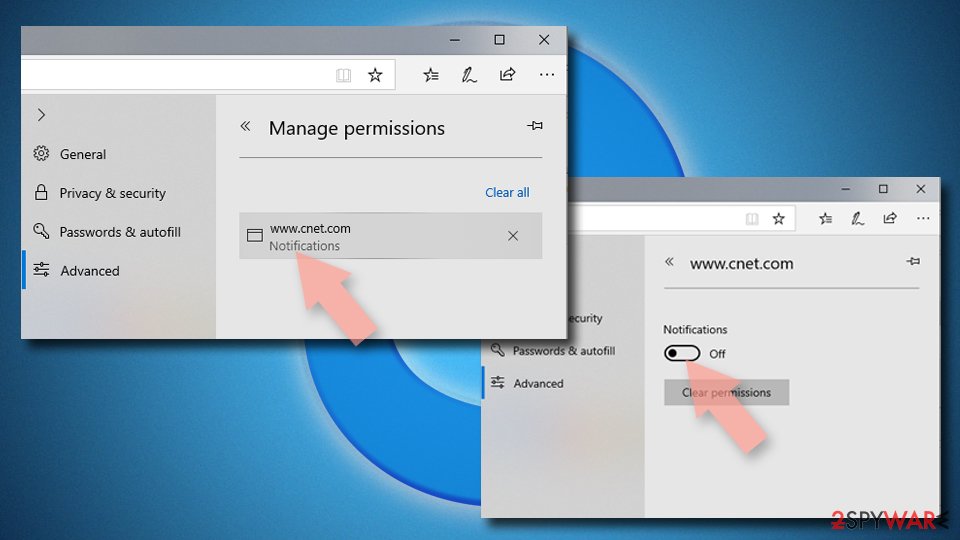
- Under Website permissions, pick Manage permissions and select the URL in question.
- Toggle the switch to the left to turn notifications off on Microsoft Edge.

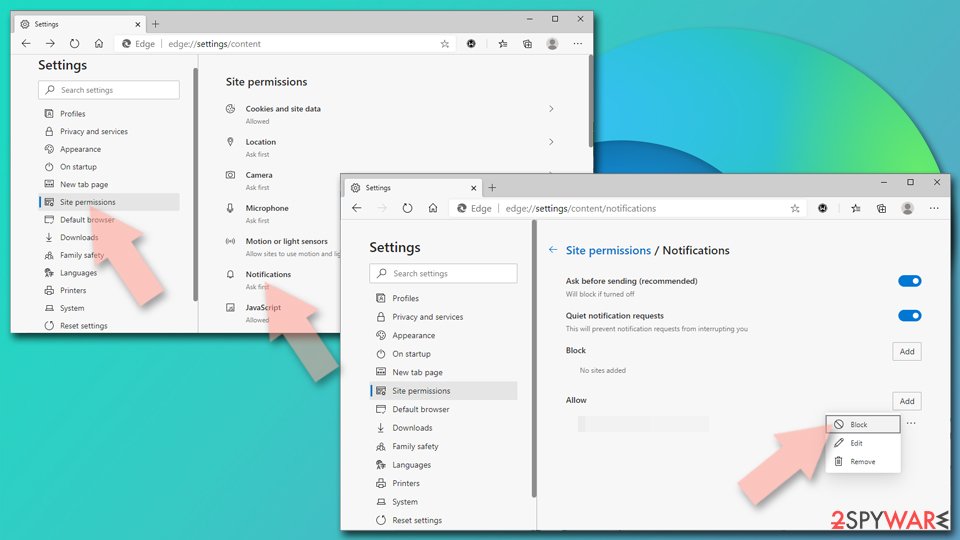
MS Edge (Chromium):
- Open Microsoft Edge, and go to Settings.
- Select Site permissions.
- Go to Notifications on the right.
- Under Allow, you will find the unwanted entry.
- Click on More actions and select Block.

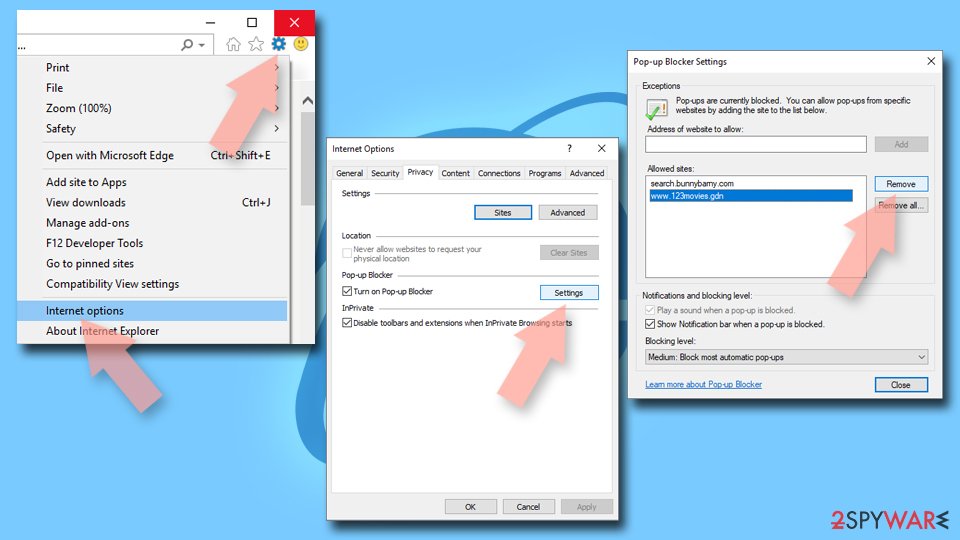
Internet Explorer:
- Open Internet Explorer, and click on the Gear icon at the top-right on the window.
- Select Internet options and go to Privacy tab.
- In the Pop-up Blocker section, click on Settings.
- Locate web address in question under Allowed sites and pick Remove.

Clear cache and web data
After successful removal, you need to take care of your browsers separately. With the help of cookies, suspicious websites you visited could have collected data about your browsing behavior, purchases, etc. To delete this data automatically, use FortectIntego, or you can do it manually by following this guide:
Chrome:
- Click on Menu and pick Settings.
- Under Privacy and security, select Clear browsing data.
- Select Browsing history, Cookies, and other site data, as well as Cached images and files.
- Click Clear data.
MS Edge:
- Click on the Menu (three horizontal dots at the top-right of the browser window) and select Privacy & security.
- Under Clear browsing data, pick Choose what to clear.
- Select everything (apart from passwords, although you might want to include Media licenses as well, if applicable) and click on Clear.
Safari:
- Click Safari > Clear History…
- From the drop-down menu under Clear, pick all history.
- Confirm with Clear History.
Mozilla Firefox:
- Click Menu and pick Options.
- Go to Privacy & Security section.
- Scroll down to locate Cookies and Site Data.
- Click on Clear Data…
- Select Cookies and Site Data, as well as Cached Web Content, and press Clear.
Internet Explorer:
- Press on the Gear icon and select Internet Options.
- Under Browsing history, click Delete.
- Select relevant fields and press Delete.
Additional tips
If the previous removal method did not work, you might have a PUP installed. This might have happened when you were downloading freeware from unofficial sources. Software bundling is a common method to spread PUAs because most people rush through the installation process. It is important to check if there are no additional programs included as a package when you download something for free:
- Choose “Custom” or “Advanced” installation methods
- Read the Terms of Use and Privacy Policy
- Untick the boxes next to files you do not need
You will most likely want to use anti-malware tools like SpyHunterCombo Cleaner and MalwarebytesMalwarebytes to scan your system. It can be difficult to determine which program is responsible for unwanted behavior by yourself because it is not clear what the exact icon and name of it is. Professional security tools will do this automatically and prevent such infections in the future.
If you still want to proceed with the manual removal, you can look for the instructions below for Windows and macOS operating systems.
Uninstall from Windows
Uninstall from Windows 10/8:
- Type Control Panel into the Windows search box and open the result.
- Under Programs, select Uninstall a program.


Uninstall from Windows 7/XP:
- Click on Windows Start > Control Panel (Windows XP users should click on Add/Remove Programs).
- In Control Panel, select Programs > Uninstall a program.


Remove the unwanted program:
- In the Programs and Features window, look for any recently installed suspicious entries, select them, and click Uninstall.
- If User Account Control appears, click Yes to confirm, then complete the removal.


Delete from macOS
Remove the unwanted application:
- From the menu bar, select Go > Applications.
- In the Applications folder, look for any suspicious entries, then drag them to Trash (or right-click and pick Move to Trash).


Delete leftover files and folders:
- Select Go > Go to Folder.
- Enter /Library/Application Support and remove any suspicious folders related to the unwanted program.
- Repeat the same check in the /Library/LaunchAgents and /Library/LaunchDaemons folders, deleting any suspicious entries.

- Finally, empty the Trash to permanently remove the leftovers.

Did this guide help?
Be the first to comment