
CastVPN virus: what it is and how to remove it
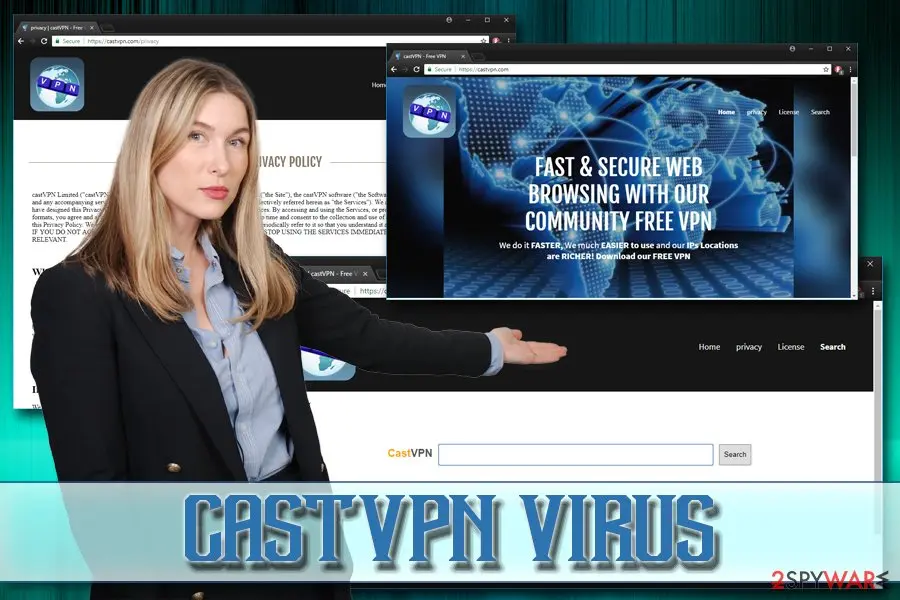
CastVPN virus is a potentially unwanted program that typically distributed via software bundling, as the official website no longer exists. Developers of the app promise a "Fast & secure web browsing with our community free VPN" which would also allow users to enter geo-restricted content and stay anonymous while doing so.
Facts checked October 7, 2026. Removal steps tested on Windows 11 (26H2) and checked against Microsoft's and the browser makers' current documentation. Sections marked as our earlier report are the original text: they describe the threat as it was then and have not been reviewed since. The 2026 status, the removal steps and the questions are current.
Automatic
Get a free scan and check if your PC is infected.
Fortect finds malware, unwanted programs and the Windows damage they leave behind, and repairs it in one pass.
An automatic scan checks installed programs, startup items and browser extensions for anything that came with CastVPN virus.
Do it yourself · free Remove CastVPN virus yourself 4 steps, about 12 minutes, no software needed.
Start the steps
CastVPN virus: summary
| Detection names | No Microsoft detection name is known |
|---|---|
| Distribution | Not recorded in the old report |
| Damage | Not recorded in the old report |
| Name | CastVPN virus |
| Type | Adware extension |
| Symptoms | An unknown program in Installed apps |
| Removal | Scan the PC with security software to find and remove the malware and anything installed with it. Fortect scans Windows for malware and repairs the system files and settings it damaged. Remove it nowTo use the full-featured product, you have to purchase a license for Fortect. The scan is free. |
Show 4 more facts
| Evidence | 5 write-ups by security sites; details still limited |
|---|---|
| Program | CastVPN virus |
| First seen | 11 February 2019 |
| Facts checked | 7 October 2026 |
Is CastVPN virus dangerous?
From our report of Feb 2019 · not reviewed since
CastVPN virus is an unsafe app that promises users to bypass restrictions to view certain sites
CastVPN virus is a potentially unwanted program that typically distributed via software bundling, as the official website no longer exists.
Developers of the app promise a "Fast & secure web browsing with our community free VPN" which would also allow users to enter geo-restricted content and stay anonymous while doing so. Truth to be told, many users might be tempted by such functionality, as recent data breaches like Facebook's Cambridge Analytica scandal prompted users to increase the security of their personal information online.
Unfortunately, CastVPN software is actually an adware program which delivers a countless amount of advertisement and heavily tracks its users. Most recently, the domain was bought by Divi Group, an advertisement-based monetizing platform. Besides, the official site is blocked and marked as unsafe by multiple browsers like Google Chrome, Mozilla Firefox, and Safari.
CastVPN sets up scheduled tasks and modifies Windows Registry in order to perform its activity. By performing these changes, the PUP ensures its launch at every Windows bootup. Only CastVPN virus removal can revert these changes, and make the computer act normal again.
The first sign that users can notice after their PCs get infected with CastVPN virus are intrusive banners, in-text links, pop-ups, offers, deals, flashing windows and similar commercial content. Additionally, the dubious app hijacks Google Chrome, Internet Explorer, Mozilla Firefox, Safari or any other browser and sets its homepage and search engine by default.
For that reason, users are forced to use CastVPN's search engine, which brings search results that are not entirely genuine. Every search query will be littered with sponsored links that appear at the top of the page, increasing the traffic to sponsored domains and artificially bloating its rankings.
In the meantime, CastVPN authors gain money for every click, as pay-per-click revenue is used. Thus, the app can redirect you to potentially dangerous places on the internet, including malware-ridden sites.
Pop-up ads initiated by CastVPN virus can spawn at random times, as well as on all websites that are visited by users. For example, domains that usually do not display advertisements might start showing ads with the following text (although most of the adverts will have no markings):
Intrusive ads and pop-ups might be annoying to deal with, but the most alarming feature of CastVPN virus is information tracking. Not only the adware collects anonymous data (it is quite typical behavior for a potentially unwanted program, although still might not be safe), but also focuses on personal details. The Privacy Policy states the following:
Furthermore, this personal data can be transferred to unknown parties in case the company undergoes a merger or goes bankrupt. Additionally, if the latter occurs, CastVPN authors have "no control over the use and transfer of your personal information." However, by using their services, users agree to these terms automatically.
There are several ways to remove CastVPN virus from your computer.
While VPN is an excellent tool for secure browsing and a way to stay anonymous online, security experts recommend picking trusted VPN providers that do not track an excessive amount of data about you.
- Ads by CastVPN;
- Sponsored by CastVPN;
- Powered by CastVPN
- Brought to you by CastVPN, etc.

From our report of Feb 2019 · not reviewed since
Pay attention while installing freeware and shareware
Unfortunately, not many users know about the software bundling technique.
That's why they are baffled when they see new browser extensions, toolbars, media players, PDF converters and similar programs on their computers. In reality, users give their consent to install these unwanted apps, and it happens during freeware or shareware installation.
Thus, to avoid PUPs that could potentially cause harm to your PC, you need to pay close attention to the installation procedure. First of all, make sure you do not download anything from file-sharing or torrent sites, as these sites can contain not only adware but also malware. Instead, select a trusted download source.
When installation wizard pops up, make sure you never click "Next" several times without looking. Carefully read through all instructions and, when prompted, select Advanced/Custom installation settings. Only this way you will be able to deselect all the optional installs, which would be automatically installed if you would have picked Recommended/Quick mode.
From our report of Feb 2019 · not reviewed since
More from our earlier report on CastVPN virus
- Google Chrome, Internet Explorer, Mozilla Firefox, Opera, Safari, etc.
- Excessive information tracking can lead to its leakage to unsafe parties
- PUPs often modify various settings that might be difficult to revert.
- The Personal Information we collect and retain include your IP address, your name and email address, identifying documents (driver license/ID/passport), office/home address, screen name, payment and billing information or other information we may ask from time to time as will be required for the on-boarding process and services provisioning.
How to remove CastVPN virus
How to remove the CastVPN virus extension
Do the browser steps in every browser and profile on the PC, then check Windows for the program that installed the extension.
Step 1: Remove extensions you did not add
In Chrome open
chrome://extensions, in Edgeedge://extensions, and in Firefox the menu > Extensions and themes.Remove every extension you do not remember adding, especially search, new tab, coupon, PDF, weather or video downloader add-ons. Check every browser and every profile, because each keeps its own list.
If an extension has no Remove button or comes back, a browser policy holds it (see "Managed by your organization" in the procedure below). The pages are the same on Windows 11 and Windows 10.
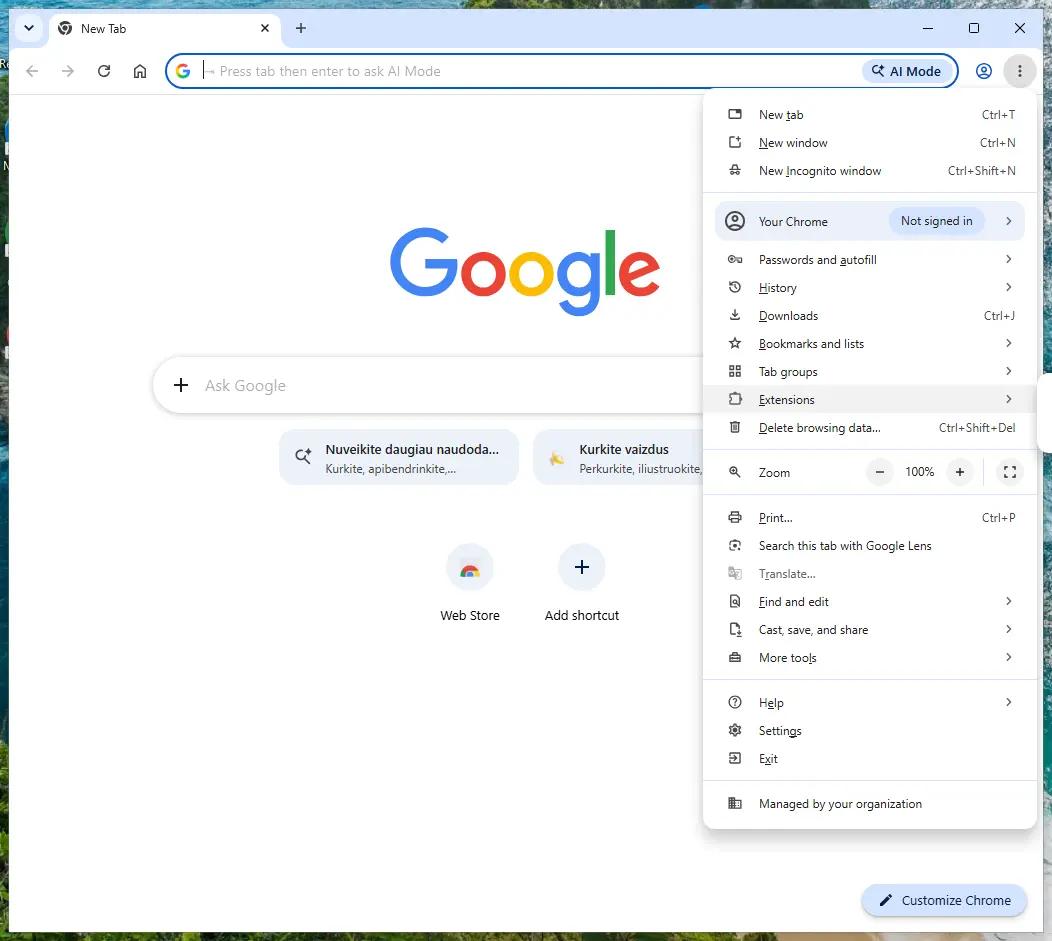
Chrome on Windows 11: More > Extensions > Manage extensions. Full procedure with screenshots: Remove a browser extension
Step 2: Uninstall CastVPN virus
CastVPN virus is removed like any other program, from the list of installed apps. In Windows 11 that is Settings > Apps > Installed apps, in Windows 10 Settings > Apps > Apps & features, and in both you can also use Control Panel > Programs and Features.
Select CastVPN virus, click Uninstall and follow the uninstaller to the end. Then look at the entries just above and below it when the list is sorted by date: bundled programs install at the same minute.
Full procedure with screenshots: Uninstall a program or app in Windows On uGetFix
Step 3: Reset the browser
A reset removes what the steps above could miss:
- changed start pages
- site permissions
- hidden settings
In Chrome open Settings > Reset settings > Restore settings to their original defaults; in Edge Settings > Reset settings; in Firefox Help > More troubleshooting information > Refresh Firefox.
Tip: Bookmarks and saved passwords stay, while extensions are turned off and the search engine and start page return to the defaults.
Reset every browser on the PC, including Edge, which Windows 11 and Windows 10 always have.
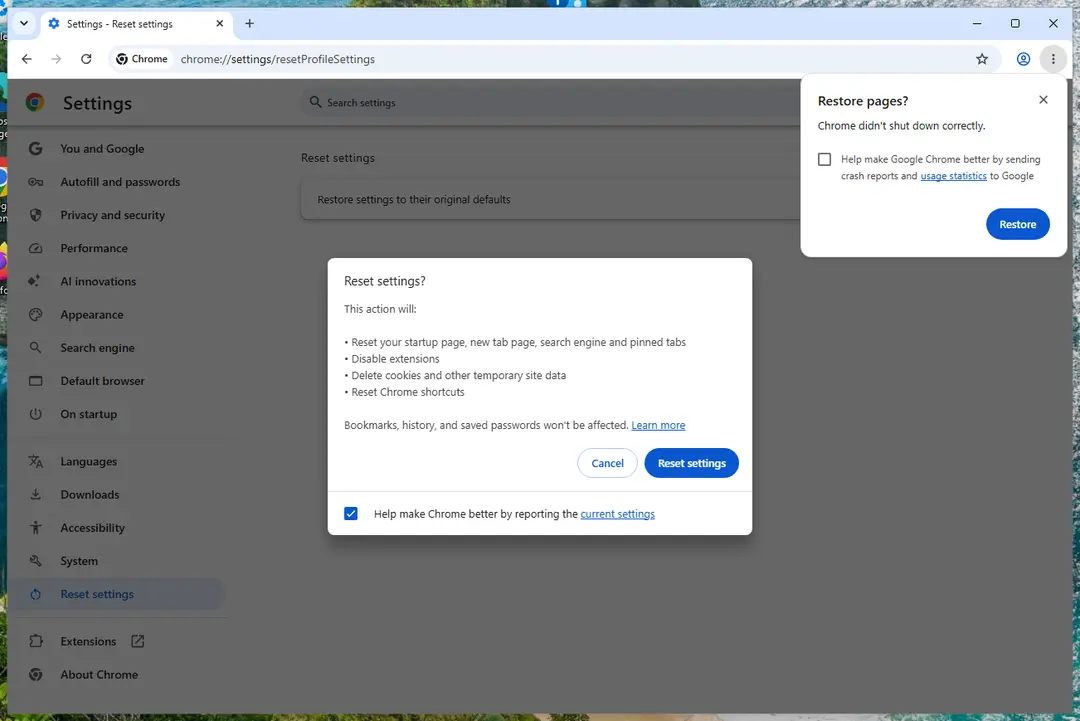
Chrome on Windows 11: Settings > Reset settings. Full procedure with screenshots: Reset a browser and fix a hijacked search engine
Step 4: Scan the PC, then run the offline scan
A scan finds the parts of CastVPN virus that the manual steps cannot see. In Windows Security > Virus & threat protection > Scan options, start a Full scan and quarantine what it reports.
Follow it with Microsoft Defender Antivirus (offline scan) > Scan now, which restarts the PC and checks the disk while Windows and the malware are not running.
It takes about 15 minutes and works the same in Windows 11 and Windows 10. If either scan finds something, run the full scan again after removal until it comes back clean.
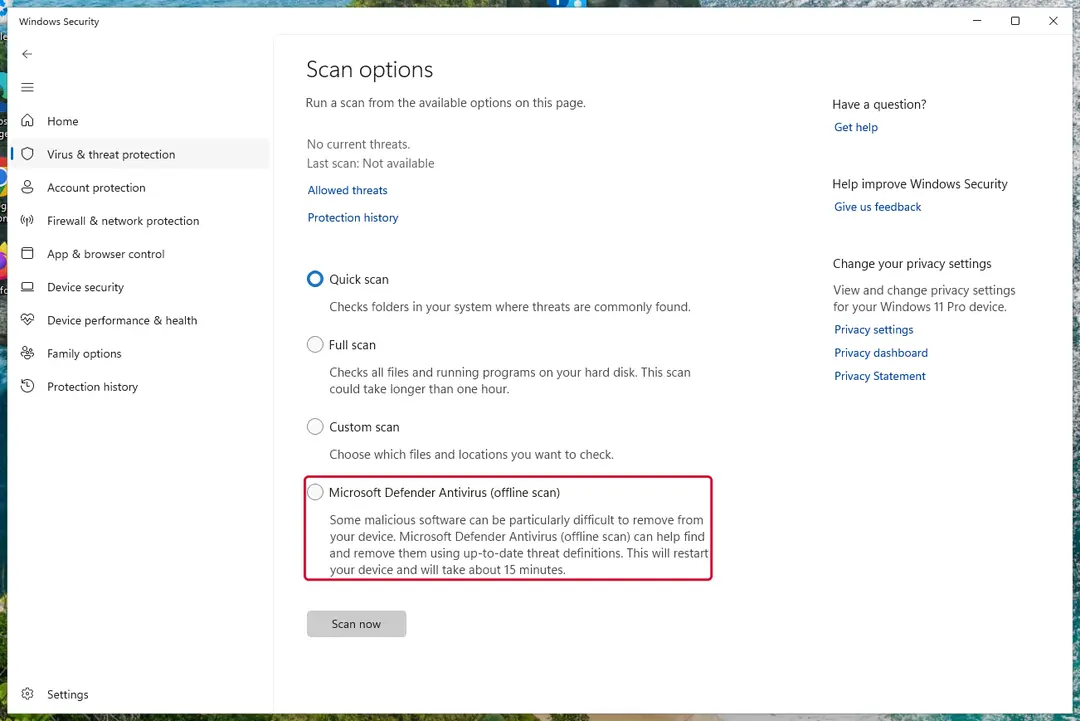
Windows 11: Windows Security > Virus & threat protection > Scan options. Full procedure with screenshots: Run a Microsoft Defender Offline scan
Instructions for each browser and system
The detailed steps for every browser and system this guide covers. Open the one you use.
Uninstall from Windows
To eliminate CastVPN virus from Windows OS, follow these steps:
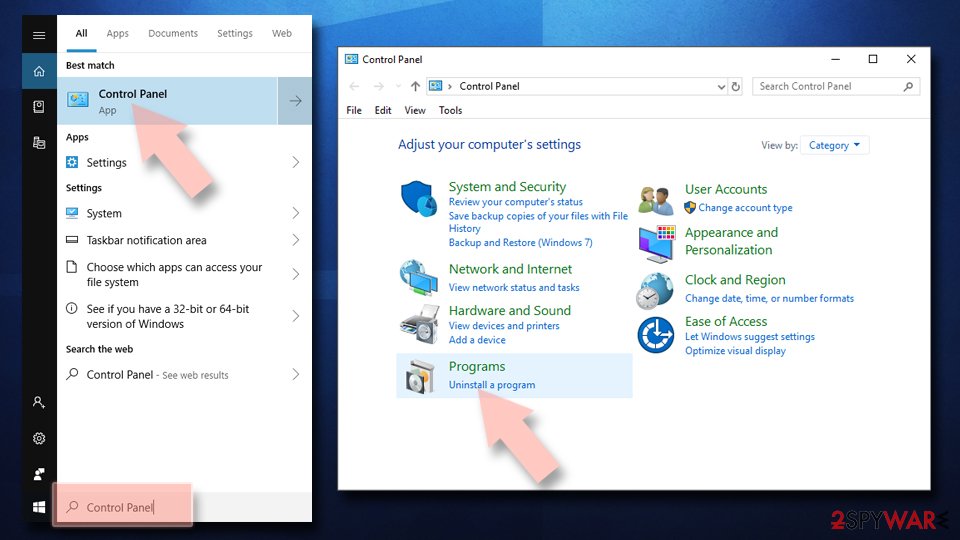
Uninstall from Windows 10/8:
- Type Control Panel into the Windows search box and open the result.
- Under Programs, select Uninstall a program.
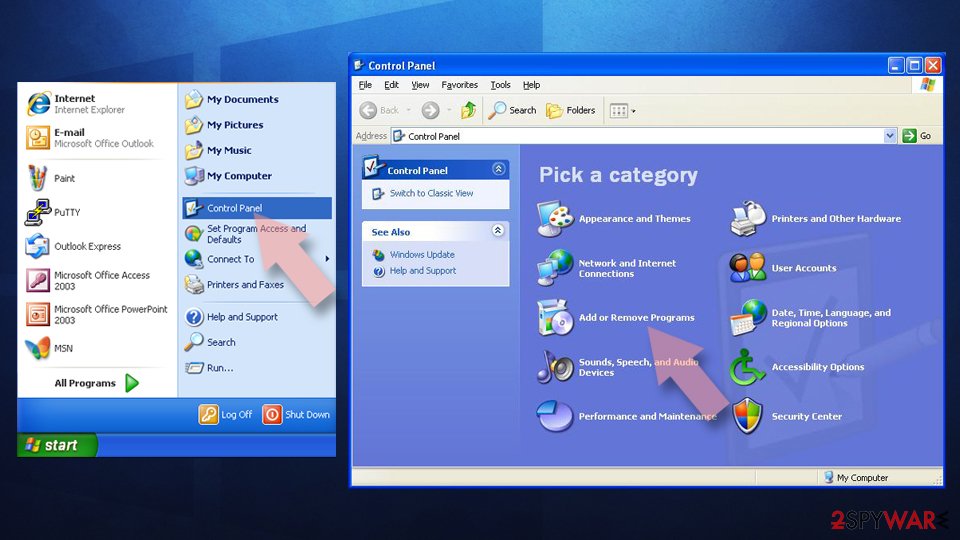
Uninstall from Windows 7/XP:
- Click on Windows Start > Control Panel (Windows XP users should click on Add/Remove Programs).
- In Control Panel, select Programs > Uninstall a program.
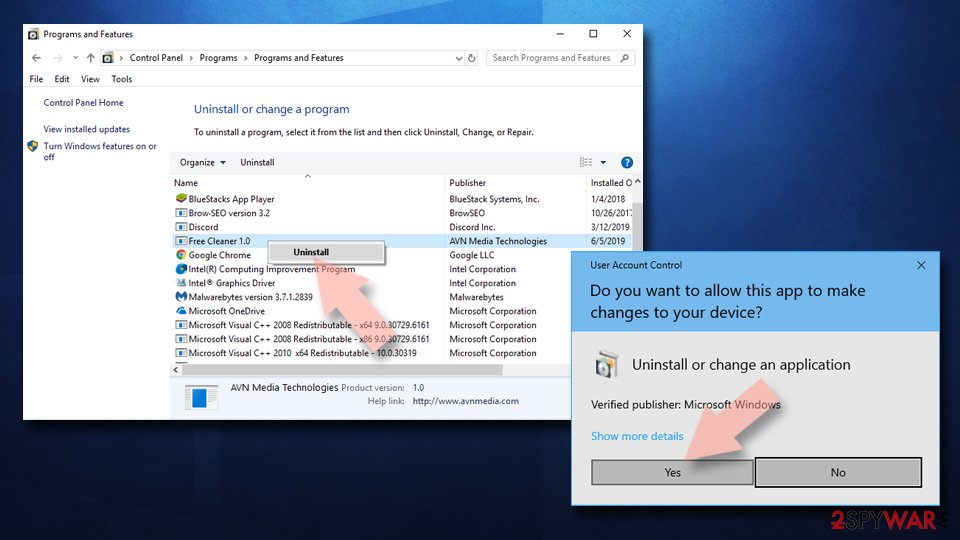
Remove the unwanted program:
- In the Programs and Features window, look for any recently installed suspicious entries, select them, and click Uninstall.
- If User Account Control appears, click Yes to confirm, then complete the removal.
Remove from Google Chrome
Give Google Chrome a fresh start by resetting it the following way:
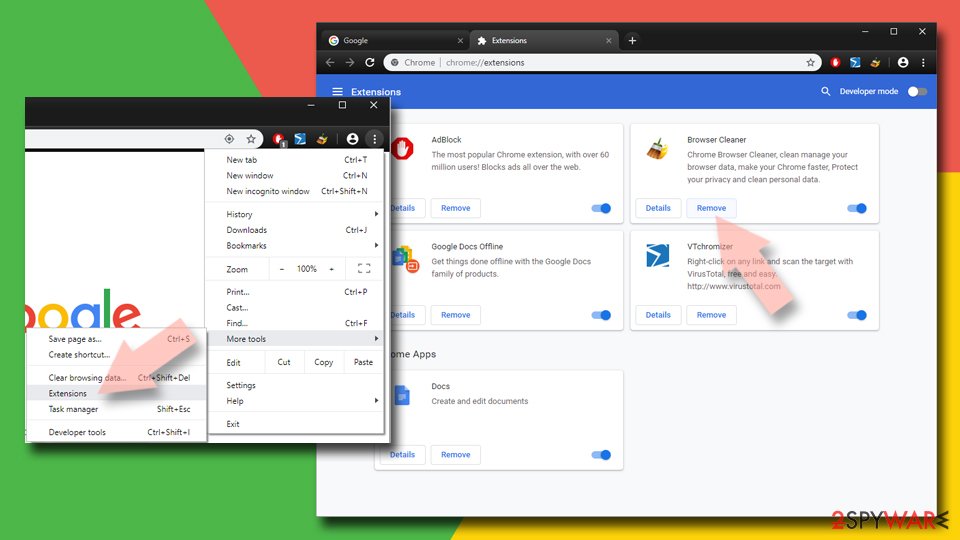
Delete malicious extensions from Google Chrome:
- Open Google Chrome, click on the Menu (three vertical dots at the top-right corner) and select More tools > Extensions.
- In the newly opened window, you will see all the installed extensions. Uninstall all suspicious extensions related to the unwanted program by clicking Remove.
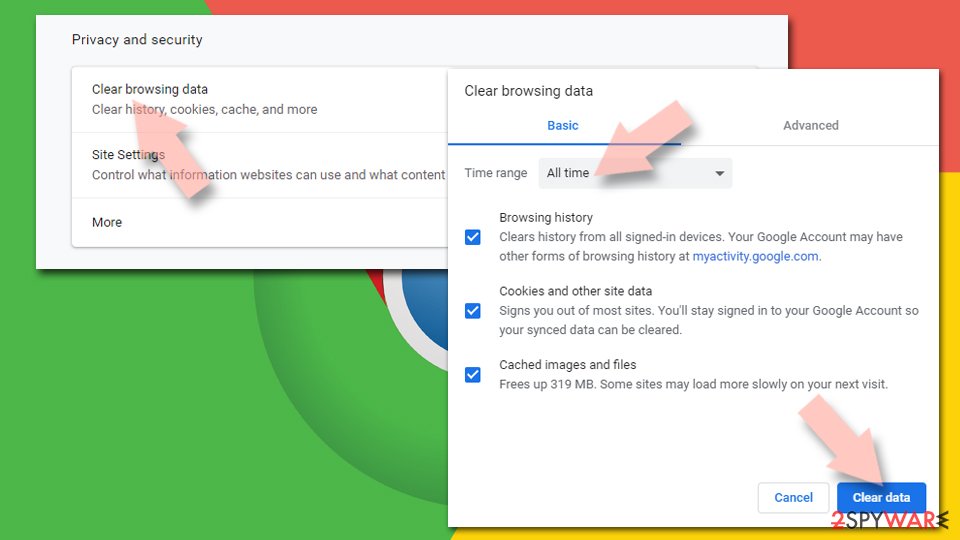
Clear cache and web data from Chrome:
- Click on Menu and pick Settings.
- Under Privacy and security, select Clear browsing data.
- Select Browsing history, Cookies and other site data, as well as Cached images and files.
- Click Clear data.
Change your homepage:
- Click menu and choose Settings.
- Look for a suspicious site in the On startup section.
- Click on Open a specific or set of pages and click on three dots to find the Remove option.
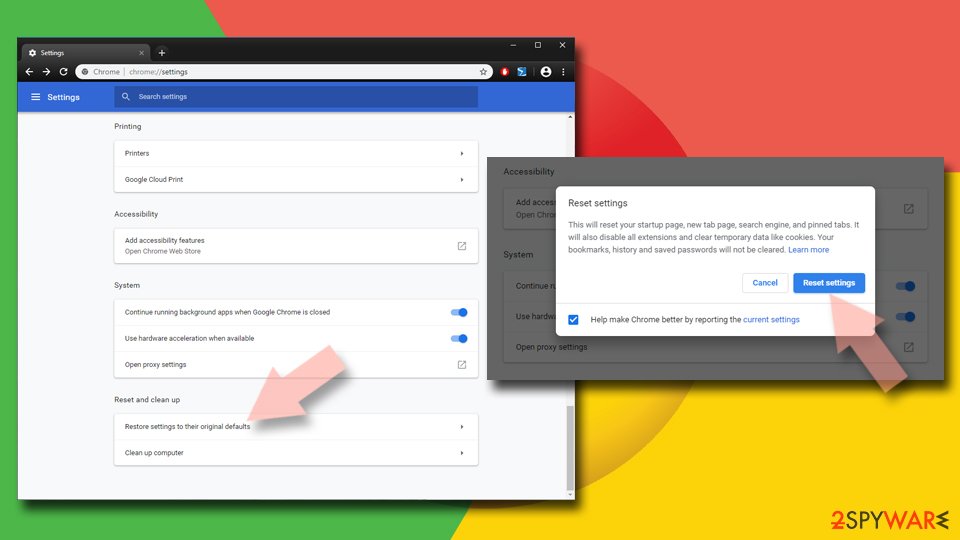
Reset Google Chrome:
If the previous methods did not help you, reset Google Chrome to eliminate all the unwanted components:
- Click on Menu and select Settings.
- In the Settings, scroll down and click Advanced.
- Scroll down and locate Reset and clean up section.
- Now click Restore settings to their original defaults.
- Confirm with Reset settings.
Remove from Microsoft Edge
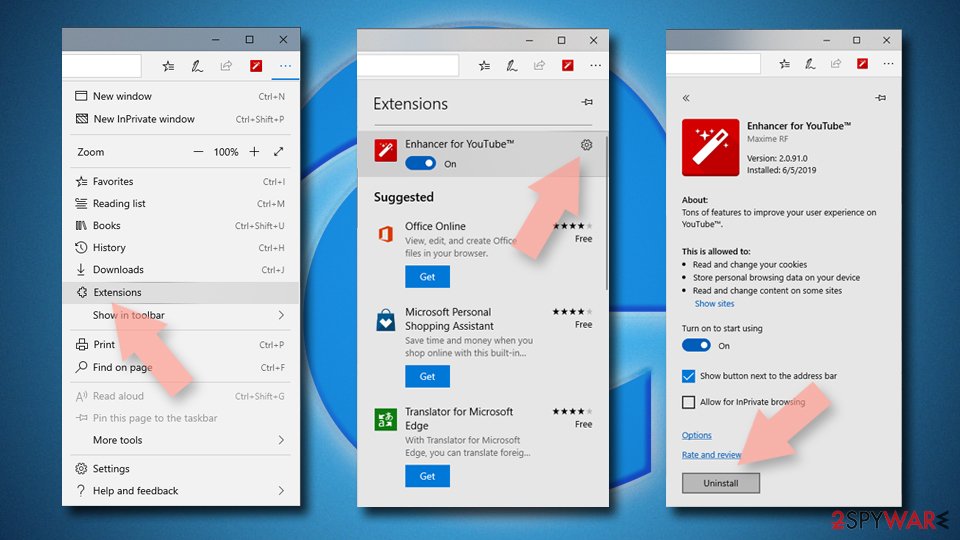
Delete unwanted extensions from MS Edge:
- Select Menu (three horizontal dots at the top-right of the browser window) and pick Extensions.
- From the list, pick the extension and click on the Gear icon.
- Click Remove.
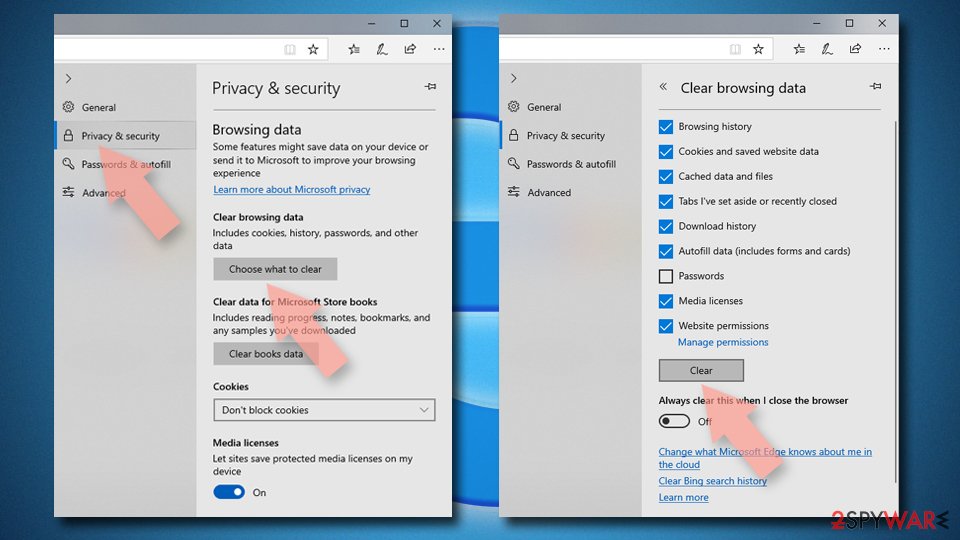
Clear cookies and other browser data:
- Click on the Menu (three horizontal dots at the top-right of the browser window) and select Settings > Privacy, search, and services..
- Under Clear browsing data, pick Choose what to clear.
- Select Cookies and other site data and Cached images and files. (apart from passwords, although you might want to include Media licenses as well, if applicable) and click on Clear.
Restore new tab and homepage settings:
- Click the menu icon and choose Settings.
- Then find On startup section.
- Click Remove next to any suspicious startup page.
Reset MS Edge if the above steps did not work:
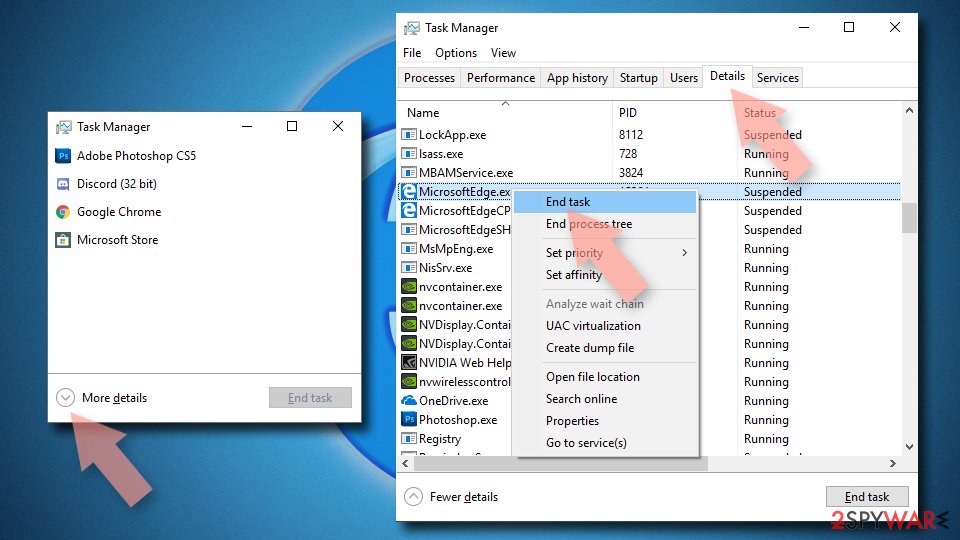
- Press on Ctrl + Shift + Esc to open Task Manager.
- Click on More details arrow at the bottom of the window.
- Select Details tab.
- Now scroll down and locate every entry with Microsoft Edge name in it. Right-click on each of them and select End Task to stop MS Edge from running.
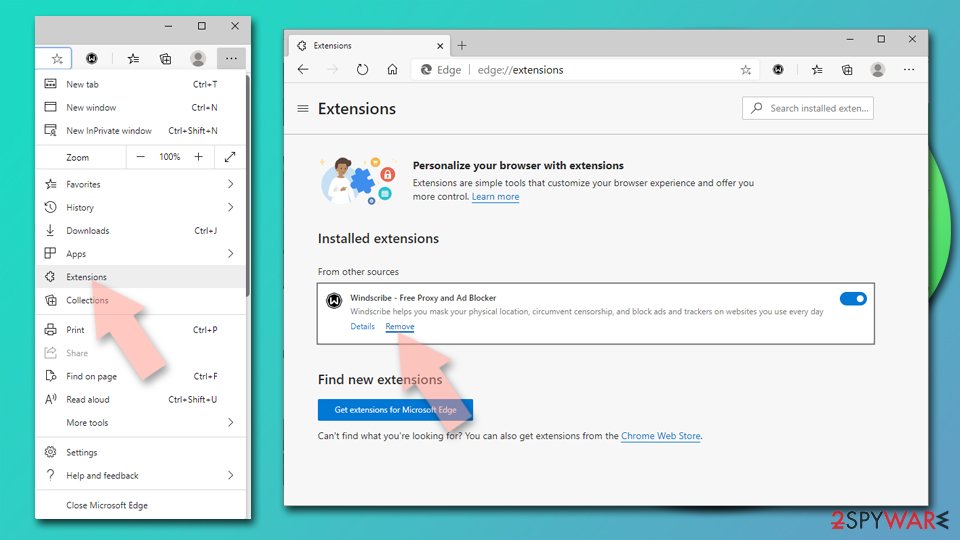
Delete extensions from MS Edge (Chromium):
- Open Edge and click select Settings > Extensions.
- Delete unwanted extensions by clicking Remove.
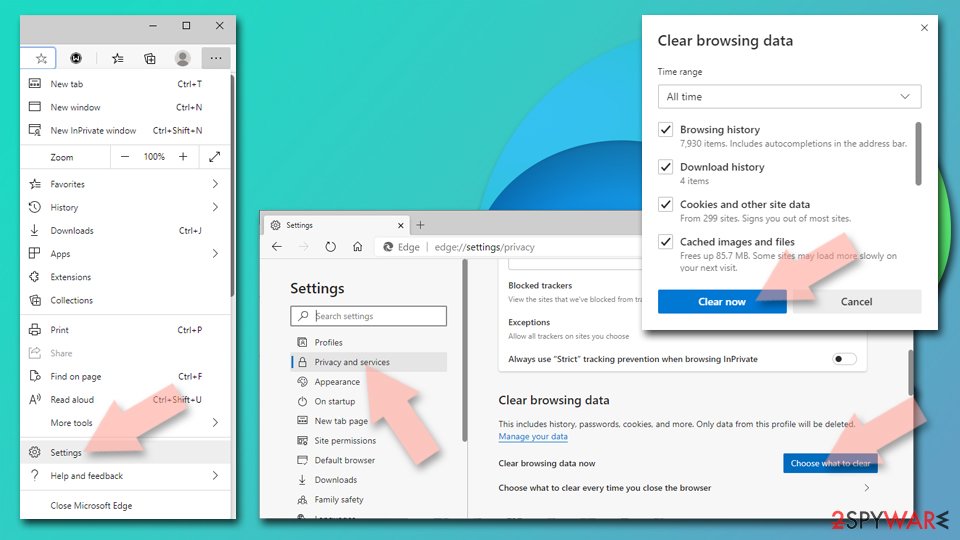
Clear cache and site data:
- Click on Menu and go to Settings.
- Select Privacy, search and services.
- Under Clear browsing data, pick Choose what to clear.
- Under Time range, pick All time.
- Select Clear now.
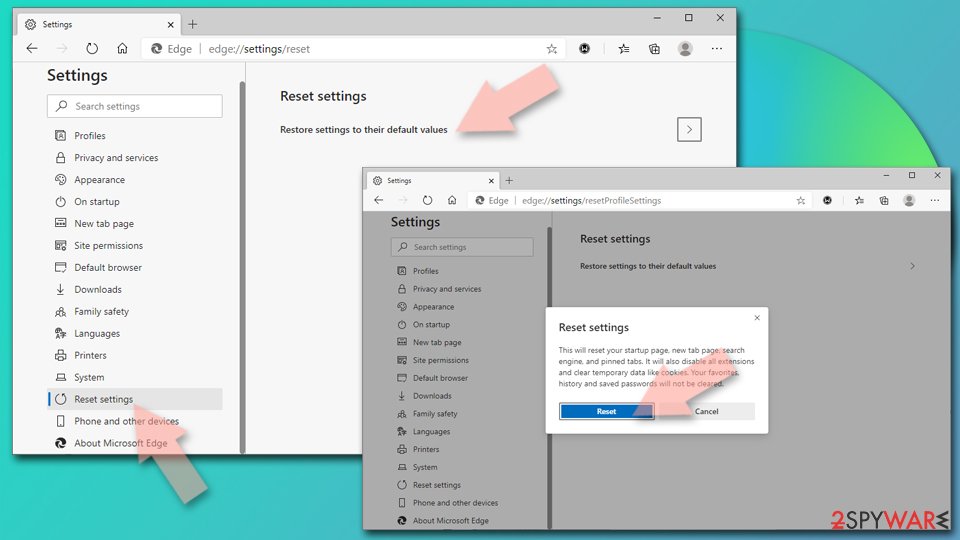
Reset Chromium-based MS Edge:
- Click on Menu and select Settings.
- On the left side, pick Reset settings.
- Select Restore settings to their default values.
- Confirm with Reset.
- This will disable extensions and reset startup pages but will not delete bookmarks, saved passwords, or browsing history.
Remove from Mozilla Firefox (FF)
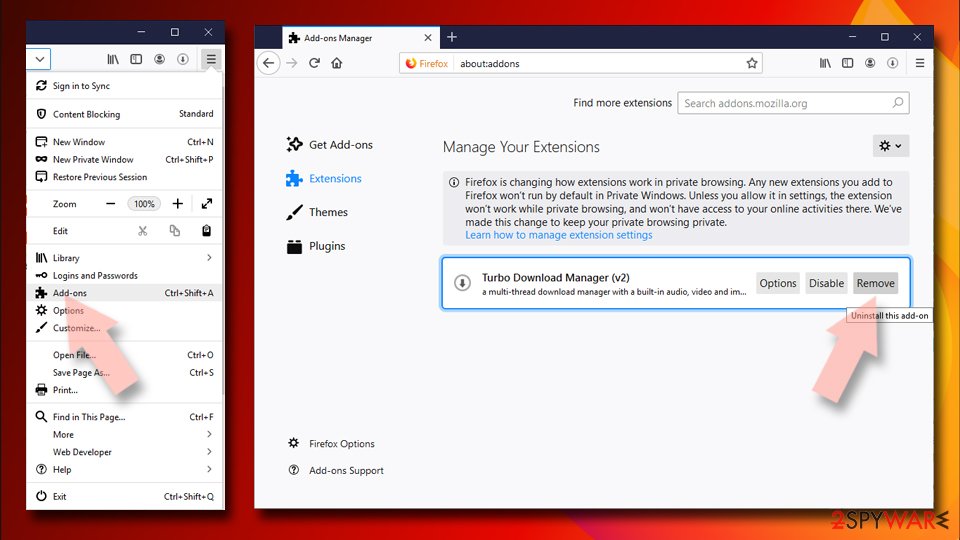
Remove dangerous extensions:
- Open Mozilla Firefox browser and click on the Menu (three horizontal lines at the top-right of the window).
- Select Add-ons.
- In here, select the unwanted extension and click Remove.
Reset the homepage:
- Click three horizontal lines at the top right corner to open the menu.
- Choose Settings.
- Under Home, set your preferred homepage and new tab settings.
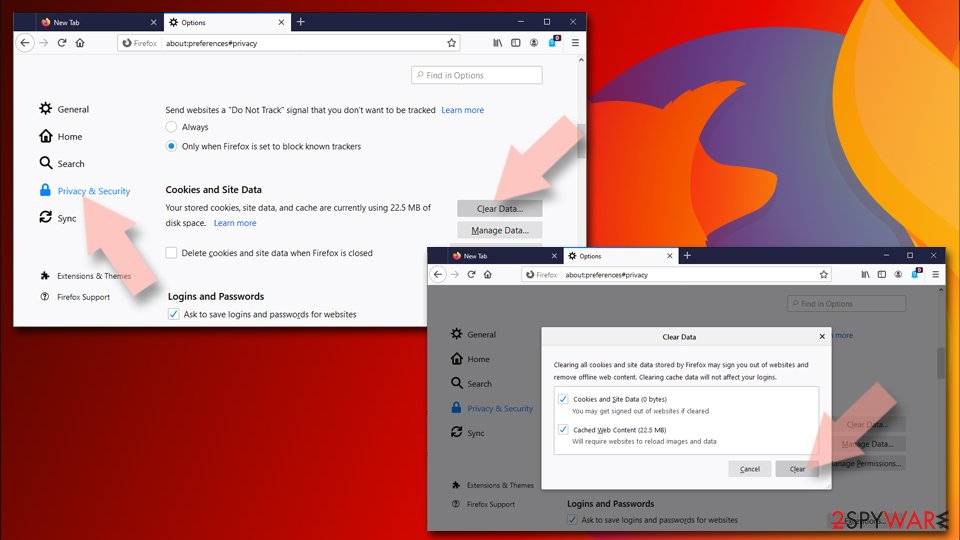
Clear cookies and site data:
- Click Menu and pick Settings.
- Go to Privacy & Security section.
- Scroll down to locate Cookies and Site Data.
- Click on Clear Data...
- Select Cookies and Site Data and Temporary cached files and pages, then click Clear.
Reset Mozilla Firefox
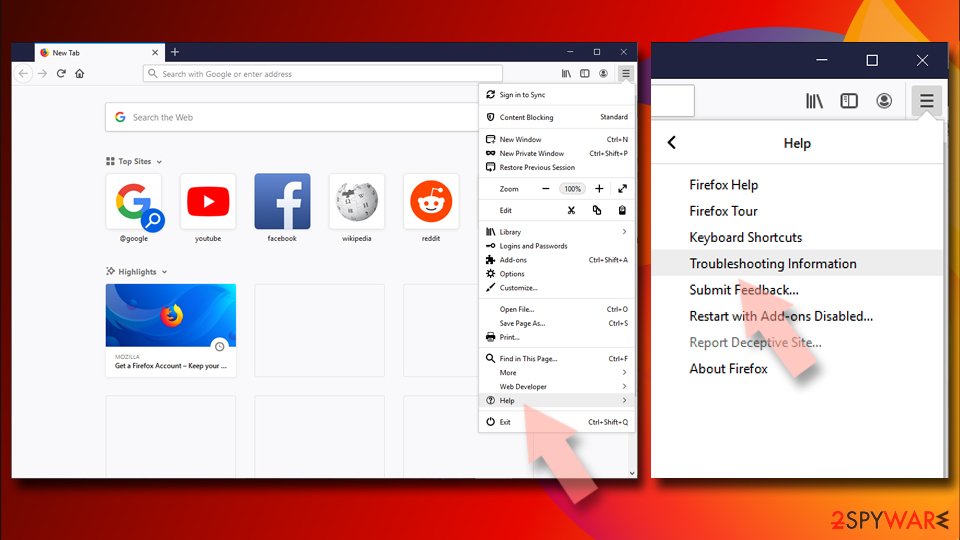
If clearing the browser as explained above did not help, reset Mozilla Firefox:
- Open Mozilla Firefox browser and click the Menu.
- Go to Help and then choose Troubleshooting Information.
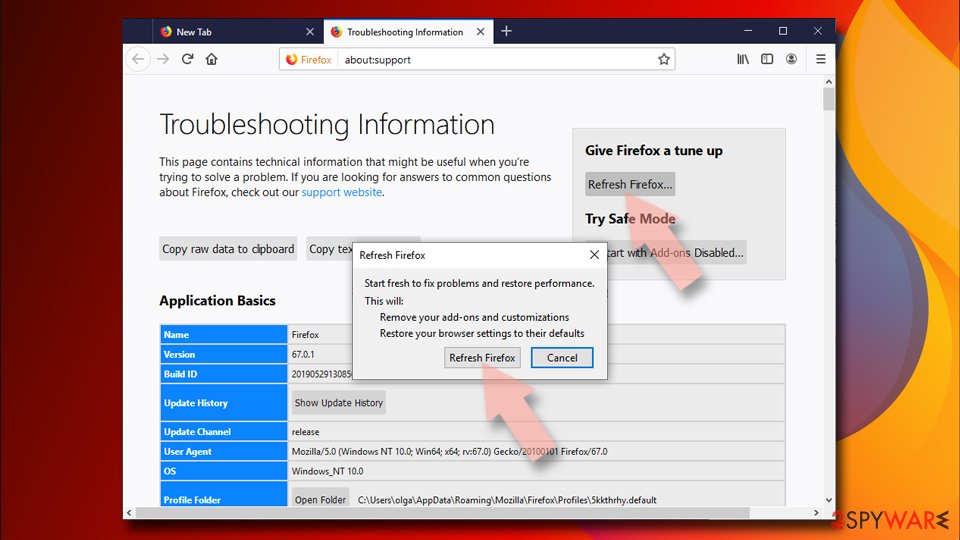
- Under Give Firefox a tune up section, click on Refresh Firefox...
- Once the pop-up shows up, confirm the action by pressing on Refresh Firefox.
Delete from Safari
Remove dangerous extensions:
- Open Safari, click Safari in the menu at the top-left of the screen, and select Preferences.
- Go to the Extensions tab, look for any suspicious entries, and click Uninstall to remove them.
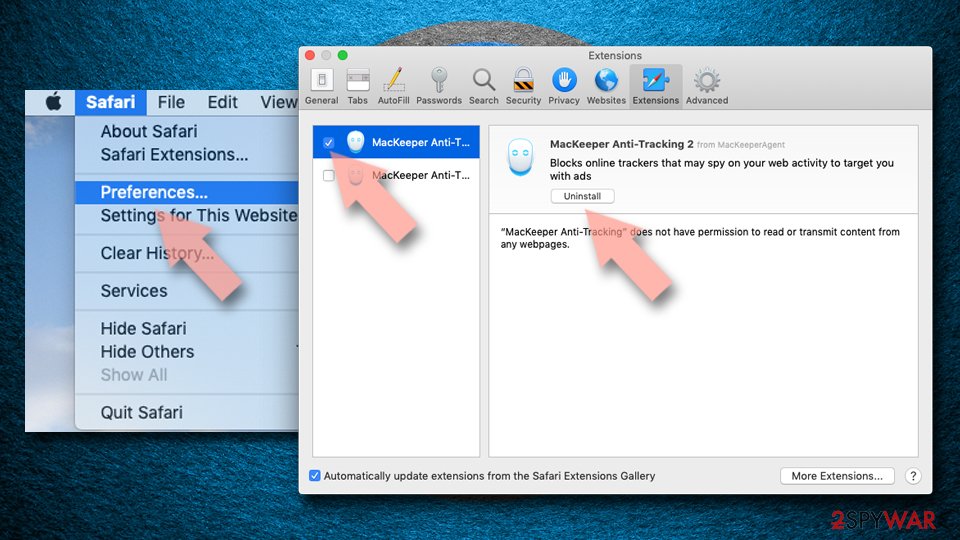
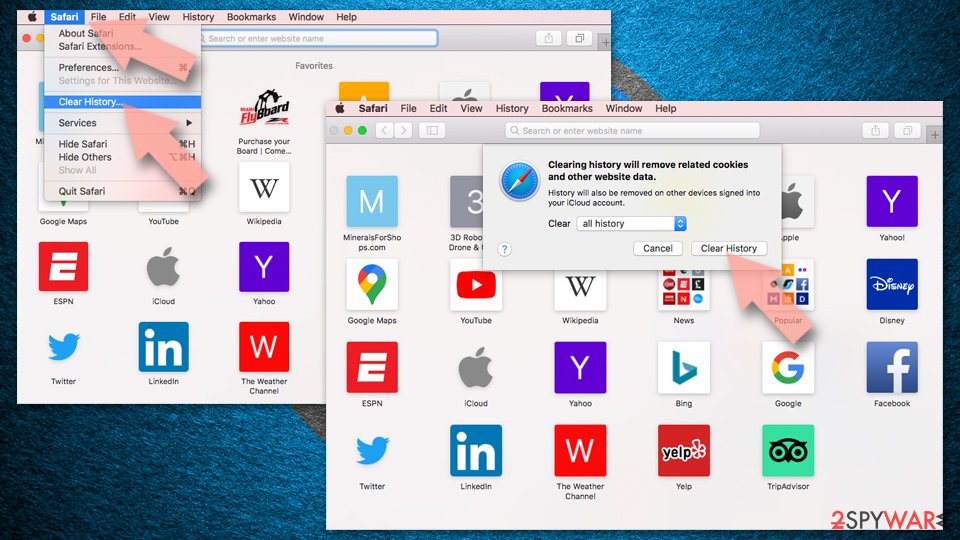
Clear history and website data:
- Click Safari in the menu and pick Clear History.
- Set Clear to all history and confirm with Clear History.
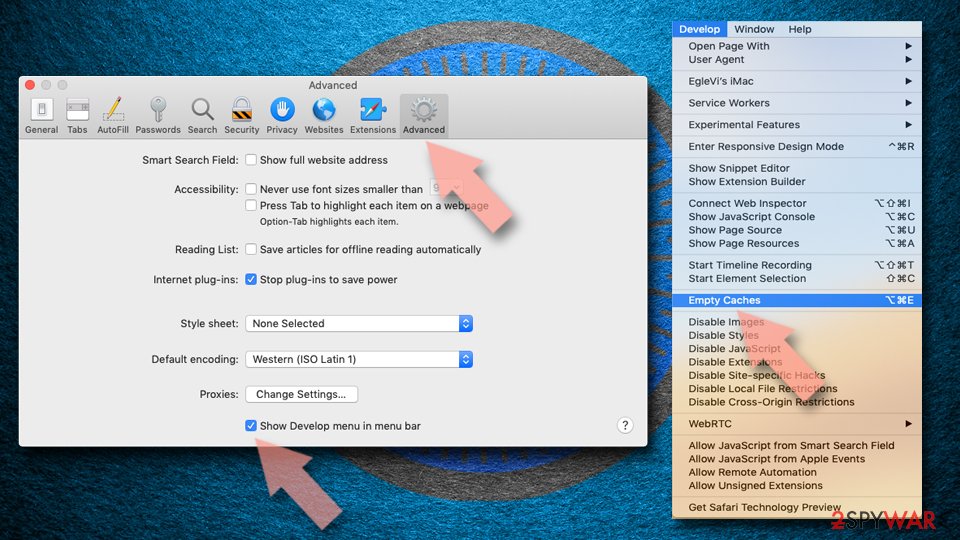
Reset Safari:
- Click Safari in the menu and select Preferences > Advanced.
- Enable Show Develop menu in menu bar.
- From the menu bar, click Develop and select Empty Caches.
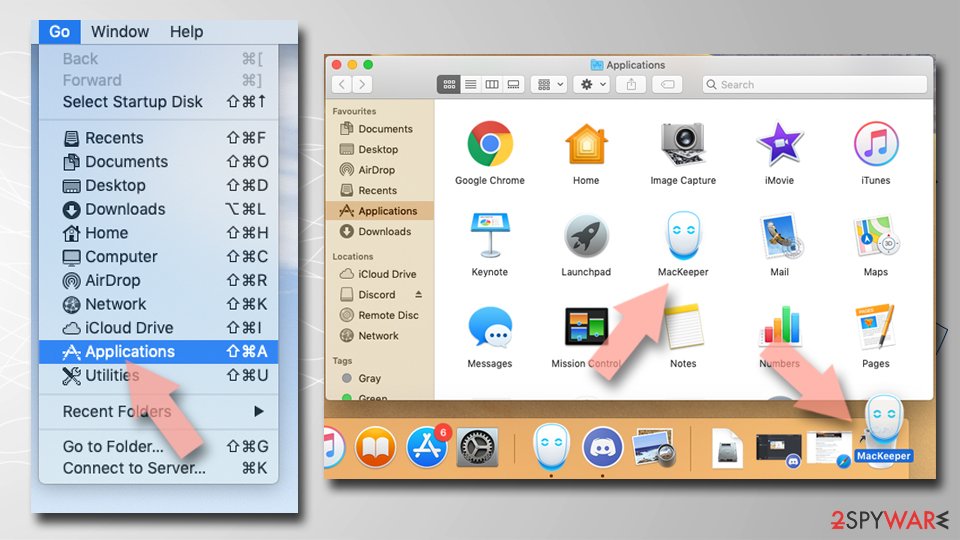
Delete from macOS
Remove the unwanted application:
- From the menu bar, select Go > Applications.
- In the Applications folder, look for any suspicious entries, then drag them to Trash (or right-click and pick Move to Trash).
Delete leftover files and folders:
- Select Go > Go to Folder.
- Enter /Library/Application Support and remove any suspicious folders related to the unwanted program.
- Repeat the same check in the /Library/LaunchAgents and /Library/LaunchDaemons folders, deleting any suspicious entries.
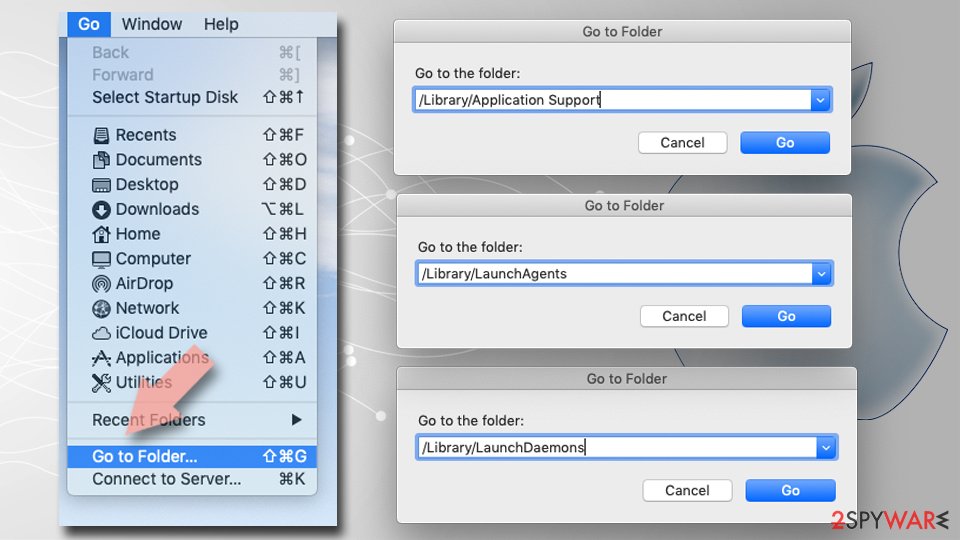
- Finally, empty the Trash to permanently remove the leftovers.
Reset Internet Explorer
Internet Explorer should be reset after PUP is deleted:
Remove dangerous add-ons:
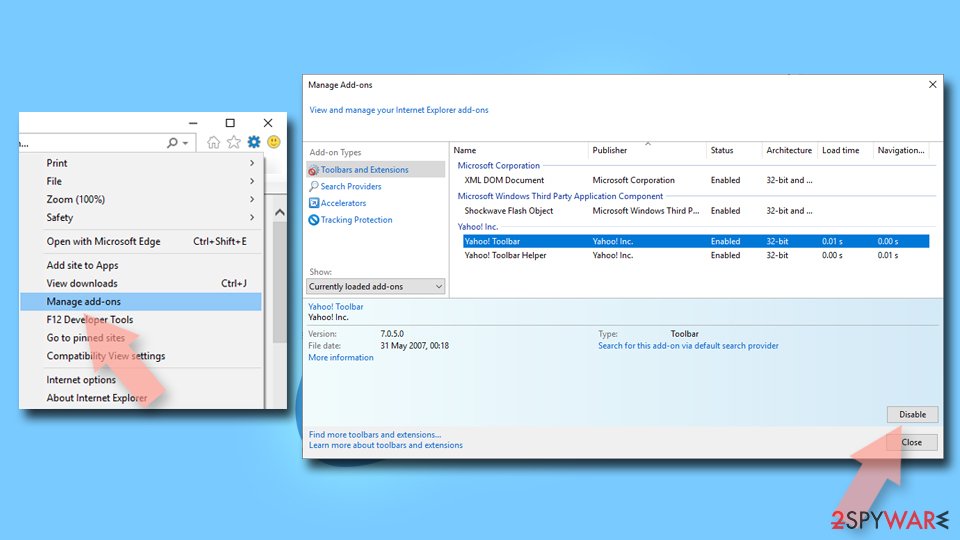
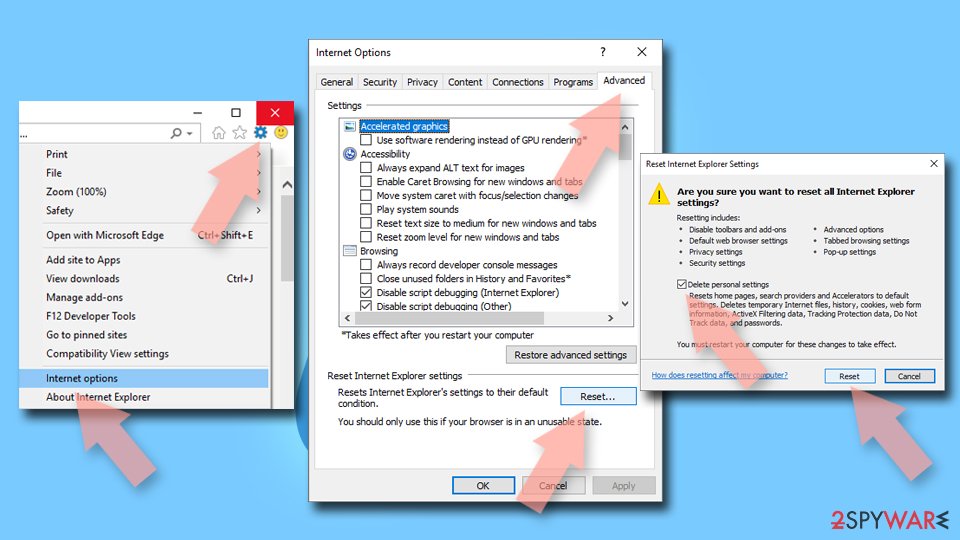
- Open Internet Explorer, click on the Gear icon (IE menu) on the top-right corner of the browser
- Pick Manage Add-ons.
- You will see a Manage Add-ons window. Here, look for suspicious plugins. Click on these entries and select Disable.
Change your homepage if it was altered:
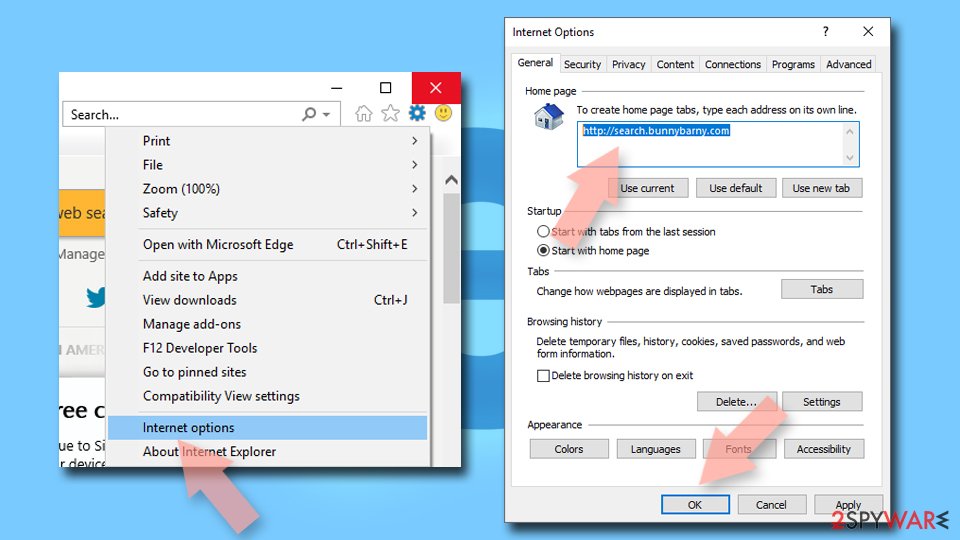
- Open IE and click on the Gear icon.
- Select Internet Options.
- In the General tab, delete the Home page address and replace it by your preferred one (for example, Google.com).
- Click Apply and then select OK.
Delete temporary files:
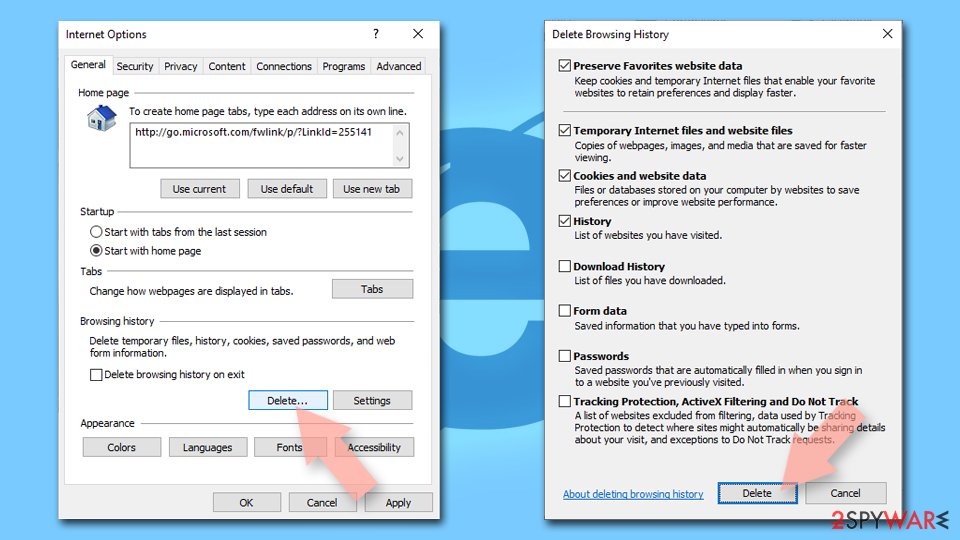
- Press on the Gear icon and select Internet Options.
- Under Browsing history, click Delete...
- Select relevant fields and press Delete.
Reset Internet Explorer:
- Click on Gear icon > Internet options and select Advanced tab.
- Select Reset.
- In the new window, check Delete personal settings and select Reset.
Stream videos without limitations, no matter where you are
There are multiple parties that could find out almost anything about you by checking your online activity.
While this is highly unlikely, advertisers and tech companies are constantly tracking you online. The first step to privacy should be a secure browser that focuses on tracker reduction to a minimum.
Even if you employ a secure browser, you will not be able to access websites that are restricted due to local government laws or other reasons. In other words, you may not be able to stream Disney+ or US-based Netflix in some countries. To bypass these restrictions, you can employ a powerful VPN, which provides dedicated servers for torrenting and streaming, not slowing you down in the process.
Data backups are important - recover your lost files
Ransomware is one of the biggest threats to personal data.
Once it is executed on a machine, it launches a sophisticated encryption algorithm that locks all your files, although it does not destroy them. The most common misconception is that anti-malware software can return files to their previous states. This is not true, however, and data remains locked after the malicious payload is deleted.
While regular data backups are the only secure method to recover your files after a ransomware attack, tools such as can also be effective and restore at least some of your lost data.
From our report of Feb 2019 · not reviewed since
Delete CastVPN virus and protect your personal information from theft
To stop CastVPN virus, you will have to pick the elimination method that suits you the most.
There are two options available - manual and automatic. Both of them will result in CastVPN removal, although the latter will save a lot of time and can be beneficial in other ways.
If you decide to go for a quick option, you should download and install security software (some excellent choices are presented below). Anti-virus programs are an efficient way to get rid of pests that clutter your computer. Additionally, it can also restore Windows Registry automatically, so no traces of CastVPN virus are present.
If, however, you are keen to remove CastVPN manually, you should check our step-by-step guide below. While this method does not require you to install additional programs, it will not protect you from any malware or PUPs in the future. Furthermore, please do not attempt this procedure if you are confident with your computer skills.
Questions about CastVPN virus
Can I safely uninstall CastVPN virus?
If you did not install CastVPN virus yourself and it is not part of your hardware or a program you rely on, yes. Uninstalling an unwanted program does not harm Windows. Before you do, search the exact name and publisher to be sure it is not a driver tool, a printer utility or a game launcher with an odd name.
Then remove it from Settings, Apps, Installed apps. Ignore any offers or warnings in its uninstaller about losing protection or performance. Afterwards check Startup apps and your browsers for leftovers, and restart once to confirm that it does not reinstall itself.
CastVPN virus came back after I uninstalled it. Why?
Something else is reinstalling it. Common causes are a second program from the same publisher, a scheduled task that downloads it again, or a browser extension that keeps prompting for it. Sort Installed apps by install date and uninstall each entry from the same day that you did not choose.
Then open Task Scheduler and look in the Task Scheduler Library for tasks with updater-style names that you do not recognise. Check Startup apps in Task Manager too. If CastVPN virus still returns, start Windows in Safe Mode, uninstall it there and run a Microsoft Defender offline scan, which looks for loaders that ordinary scans can miss.
An ad showed a phone number and I called it. What now?
The number belongs to scammers, not to Microsoft or an antivirus company. If you only talked, hang up and do not call back. If you let them connect to the PC, disconnect it from the internet, uninstall the remote access program they used, such as AnyDesk, TeamViewer, ScreenConnect or UltraViewer, and run a full and offline scan.
If you paid or gave bank details, call your bank at once on the number printed on your card. Change any passwords you typed while they were connected, and report the call.
Can adware slow down my PC?
Yes. Adware runs in the background, loads ad scripts, opens extra tabs and contacts its servers, all of which use processor time, memory and bandwidth. Ad-heavy extensions also slow down every page, because they inspect and change it before you see it.
The effect is strongest on older PCs and when several adware programs arrived together. After removal, restart the PC and check Task Manager for anything still using a lot of resources that you do not recognise. Speed usually returns to normal once the ads stop.
Does adware steal passwords?
Ordinary adware is built to show ads, not to steal logins, and most of it never touches saved passwords. The line is blurry, though. Extensions that can read every page could capture what you type, and adware ads sometimes lead to phishing pages that ask for passwords directly.
If you entered credentials on a page reached through an ad, change that password from a clean device and turn on two-step verification. Otherwise, removing adware extension and clearing cookies is usually enough.
I clicked on one of the ads. Am I infected?
Probably not. Clicking an ad usually only opens a page, and a page cannot install programs on an up-to-date Windows PC without your help.
You are at risk only if you then downloaded and ran a file, allowed notifications, entered card or login details, or called a phone number shown on the page. Delete any download and run a full and offline scan.
Change passwords you typed, from a clean device. Call your bank if you gave card details. If you called a number or allowed remote access, see the next question.
Why didn't my antivirus catch CastVPN virus?
Many security products do not block adware or notification sites by default, because users often agreed to them, even through a misleading prompt. Notification spam installs nothing at all, so there is no file to detect.
In Windows 11 you can make Microsoft Defender block potentially unwanted apps: open Windows Security > App & browser control > Reputation-based protection settings and turn on Potentially unwanted app blocking. If notifications caused the pop-ups, no scanner will report them; the fix is in the browser's site settings.
What is CastVPN?
CastVPN virus is a potentially unwanted program that typically distributed via software bundling, as the official website no longer exists. Developers of the app promise a "Fast & secure web browsing with our community free VPN" which would also allow users to enter geo-restricted content and stay anonymous while doing so.
The summary table at the top of this guide lists the type, the detection names, the symptoms and the damage of CastVPN. Reading it first helps you decide whether your computer shows the same signs.
Will Fortect remove CastVPN virus?
Fortect scans Windows for malware and unwanted programs and repairs the system files and settings they change, and its free scan shows what it finds on your PC before you decide anything.
For CastVPN virus, follow the plan above as well: the browser steps take back permissions and settings that no scanner treats as a threat, and uninstalling the program that brought it removes the source.
Run Microsoft Defender's full scan and, if anything was found, its offline scan as a second opinion. If the symptoms are gone after the plan and both scans are clean, there is nothing more to do.
Sources
- How-To Geek: PUPs Explained: What is a "Potentially Unwanted Program"? (read October 7, 2026)
- 2-Spyware: Cambridge Analytica leaked data of 87m users, Facebook reveals (read October 7, 2026)
- Iceni: Why You Should Avoid Free Online PDF Converters (read October 7, 2026)
- Google Chrome Help: Use notifications to get alerts (no longer online) (read October 7, 2026)
- FTC: How to recognize, remove and avoid malware (read October 7, 2026)