
Evernote virus: what it is and how to remove it
Evernote virus, which is also known as Evernote Web virus, is a term used for cyber infections that can get into user devices by pretending to be an official Evernote app, published by a trustworthy company . The service is designed initially to take notes and organize to-do tasks and has over 1.5 million downloads on Google Play.
Facts checked October 7, 2026. Removal steps tested on Windows 11 (26H2) and checked against Microsoft's and the browser makers' current documentation. Sections marked as our earlier report are the original text: they describe the threat as it was then and have not been reviewed since. The 2026 status, the removal steps and the questions are current.
Automatic
Get a free scan and check if your PC is infected.
Fortect finds malware, unwanted programs and the Windows damage they leave behind, and repairs it in one pass.
If content.js returns after removal, a full scan can find the entry that brings it back.
Do it yourself · free Remove Evernote virus yourself 4 steps, about 12 minutes, no software needed.
Start the steps
Evernote virus: summary
| Name | Evernote virus |
|---|---|
| Type | Malware, software vulnerability |
| Associated CVE | CVE-2019-12592 |
| Malicious version dropped by | Multiplug potentially unwanted program |
| Risk factors | Sensitive data exposure to bad actors, money loss, other malware infections |
| Detection names | No Microsoft detection name is known |
| Removal | Scan the PC with security software to find and remove the malware and anything installed with it. Fortect scans Windows for malware and repairs the system files and settings it damaged. Remove it nowTo use the full-featured product, you have to purchase a license for Fortect. The scan is free. |
Show 7 more facts
| Distribution | Not recorded in the old report |
|---|---|
| Damage | Not recorded in the old report |
| Symptoms | An unknown process in Task Manager |
| Files and processes | content.js |
| Evidence | 10 write-ups by security sites; details still limited |
| First seen | 19 June 2019 |
| Facts checked | 7 October 2026 |
Is Evernote virus safe? Why it is flagged
From our report of Jun 2019 · not reviewed since
Evernote virus is a set of cyber infections and scams that try impersonate a legitimate application
Evernote virus, which is also known as Evernote Web virus, is a term used for cyber infections that can get into user devices by pretending to be an official Evernote app, published by a trustworthy company . The service is designed initially to take notes and organize to-do tasks and has over 1.5 million downloads on Google Play.
It turns out, scammers are using the name of this legitimate company to trick computer users into thinking that they are using a browser extension, while in reality, the malicious version is being installed. Evernote Web virus uses the same name as the real Chrome extension, so it can be very hard to identify whether you are infected or not.
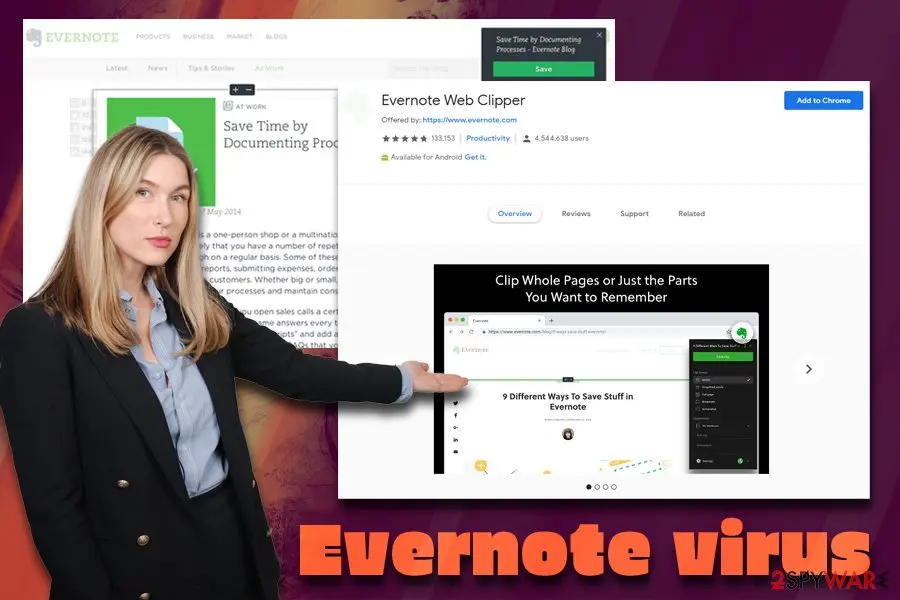
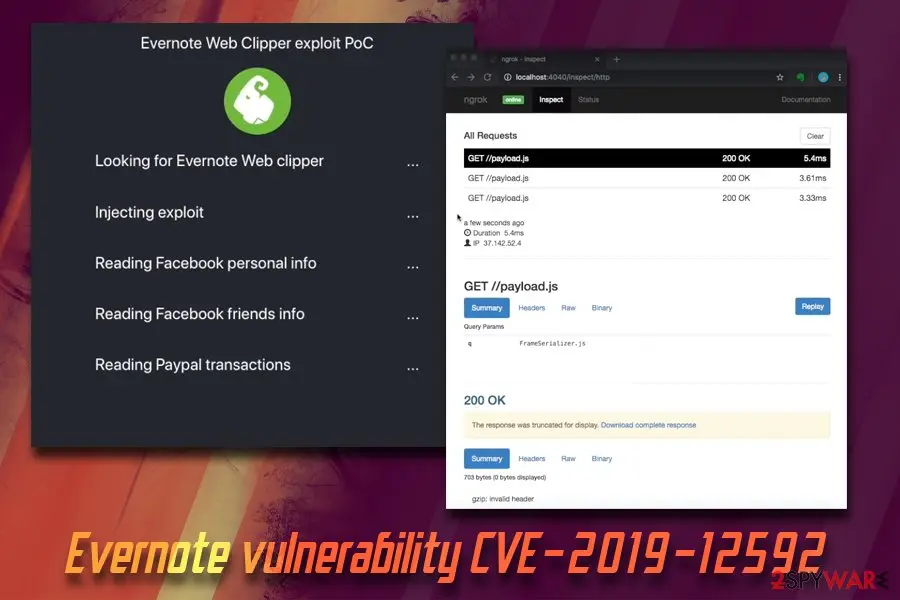
Besides the fake Evernote version, security researchers also recently uncovered a security vulnerability inside the Evernote Web Clipper Extension for Chrome under the code name CVE-2019-12592. It allows hackers to hijack the Chrome Web browser and harvest sensitive user data like cookies, login credentials, and other private information.
From our report of Jun 2019 · not reviewed since
Evernote virus dropped by a potentially unwanted program Multiplug
Reportedly, Evernote virus, which is a fake version of the official app, s distributed with the help of Multiplug (a potentially unwanted program), which is digitally signed by Sergei Ivanovich Drozdov, who claims to be an open source developer.
This PUP manages to insert the deceptive browser extension to Comodo Dragon , Torch, and Google Chrome browsers. Upon the infiltration, Multiplug PUP drops the following files into the host browser extension folder:
Thanks to the inserted JavaScript code, as well as the tricks that Multiplug PUP uses, the fake extension receives a name "Evernote Web," which can trick users into believing the app is legitimate.
While the Evernote virus does not show any symptoms of the infection, there is a small hint that shows discrepancies - when visiting Chrome://extensions page, click on the "visit website" button next to the Evernote Web extension - it will bring you nowhere.
Evernote virus extension loads a content script into every Internet website that the victim visits, and as a result, the user receives a virtual layer of various web advertisements in a variety of different forms - banners, pop-up and pop-under ads, in-text links and more.
These ads can lead you to highly insecure Internet sites, especially those that promote spyware and malware programs . You should not blame Evernote firm for these ads - it has nothing to do with with the legitimate Evernote app. Instead, you should remove Evernote Web fake extension using a tutorial that we have prepared, or run a system scan with an anti-spyware program for automatic Evernote removal.
For malware termination, we suggest using reputable security applications which should delete the Evernote virus without troubles.
In most of the cases, such ads appear right after installing some free application without checking what is hiding inside it. As we have already mentioned, Multiplug can easily be involved in the distribution of Evernote web adware.
When inside and active, the fake Evernote virus may not only cause unwanted ads during your browsing. It can also be set to track your browsing habits and redirect you to affiliate websites. While there is no guarantee that each of such sites is safe, you should be very careful with 'ads by Evernote web,' 'brought to you by Evernote web,' 'Evernote web ads' and similar pop-up notifications.
- content.js
- lsdb.js
- manifest.json
- WJA4Pkzixj3.js
From our report of Jun 2019 · not reviewed since
The vulnerability allows hackers remote code execution
There is no doubt that third-party extensions are useful features used by many users worldwide, as they make the browsing smoother and provide useful functionality.
However, letting the unknown code to enter your browser and potentially make changes to the way it operates is much more dangerous than most people think.
It is true that various extensions often require additional permissions to better take care of the tasks they are designed to do. However, when a critical software vulnerability like CVE-2019-12592 gets involved, things get much worse, as even the most private data like banking details might be stolen by cybercriminals.
To exploit the vulnerability, hackers would have to perform the following steps:
The researchers who discovered the vulnerability at Guardio reported the issue to Evernote, and Evernote Web Clipper extension was immediately patched. To avoid this version of Evernote virus, please make sure you run 7.11.1 (or later) version of the application.
- Redirect the user to a malicious website with the help of the installed adware, or a malicious link on social media.
- The malicious site secretly loads legitimate iframe tags of the particular websites.
- The vulnerability then allows the malicious payload to be inserted into all iframes contexts.
- Malicious payload allows hackers to steal cookies, credentials, and perform user actions.
From our report of Jun 2019 · not reviewed since
Watch out for the malicious versions of the application
The malicious app's hijack happens without user's knowledge because this fake browser extension arrives alongside Multiplug software.
You can accidentally agree to install these programs when installing a free application that you downloaded from the Internet.
In general, potentially unwanted programs are distributed with a help of software developers that seek to increase their income by adding various extensions, plugins and add-ons to their popular free products in exchange for money.
That's why we must recommend you to be very careful when downloading such free programs as download managers, PDF creators and video streaming software to your computer because each of them can be filled with optional components.
If you want to check what programs are you installing on your computer, make sure you read End User License Agreement. In addition, if you see no suspicious information, you should select Custom or Advanced installation settings of the freeware .
After that, you should follow each of installation steps carefully and opt out of all unknown third-party programs. If you think that this program might be hiding in your PC system, you should follow a guide below and fix it. Leaving this PUP may increase the risk of infecting your PC with malware.
Check your PC and browser
- File:
content.js
How to uninstall Evernote virus
How to remove Evernote virus
Uninstall it, then remove what keeps it starting with Windows.
Nothing it flagged needs fixing.
Step 1: Uninstall programs you did not mean to install
Open Settings > Apps > Installed apps in Windows 11, or Settings > Apps > Apps & features in Windows 10, and sort the list by install date. Look at what appeared around the day the problem started and uninstall every program you do not recognise or did not choose.
Free converters, PDF and video tools, "system optimizers" and unknown browsers are the usual carriers of Evernote virus. If a name is unclear, search for it before you remove it, so you do not uninstall a driver or a Windows component.
Full procedure with screenshots: Uninstall a program or app in Windows On uGetFix
Step 2: Remove it from startup
Whatever Evernote virus installed usually starts with Windows. Open Task Manager with Ctrl + Shift + Esc, go to Startup apps in Windows 11 or the Startup tab in Windows 10, and disable what you do not know, starting with entries that have an empty Publisher column.
Open file location on the right-click menu shows the file, which helps you decide and tells you what to delete later. Disabling is safe: if something you need stops working, switch it back on.
Full procedure with screenshots: Stop apps from opening at startup On uGetFix
Step 3: Delete the folders left behind
What the uninstaller leaves behind is usually in the user folders. Open File Explorer, switch on View > Show > Hidden items (in Windows 10 View > Hidden items), and go through
%LocalAppData%,%AppData%, %ProgramData% and the two Program Files folders.Sort by Date modified and delete folders that appeared together with the problem and belong to no program you use. Folders with random names that hold
.exe,.dll, .js or .ps1 files are the strongest sign.Full procedure with screenshots: Remove what malware leaves behind in Windows
Step 4: Scan the PC, then run the offline scan
Open Windows Security > Virus & threat protection > Scan options, run a Full scan and remove everything it finds. Then select Microsoft Defender Antivirus (offline scan) and click Scan now: the PC restarts and scans before Windows loads, which finds files that hide while Windows runs.
Save your work first, because the offline scan takes about 15 minutes. Both scans are built into Windows 11 and Windows 10, and a second scanner from another vendor is a useful extra opinion.
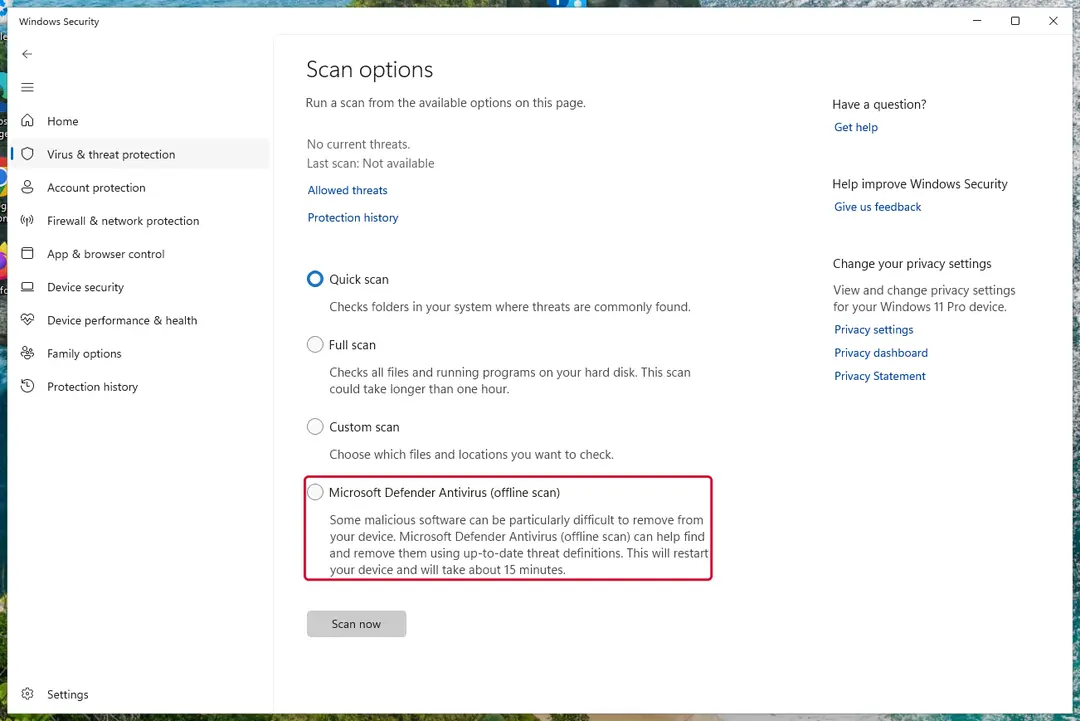
Windows 11: Windows Security > Virus & threat protection > Scan options. Full procedure with screenshots: Run a Microsoft Defender Offline scan
Instructions for each browser and system
The detailed steps for every browser and system this guide covers. Open the one you use.
Uninstall from Windows
In Windows, you need to remove MultiPlug application and then clean affected web browsers from the fake Evernote extension.
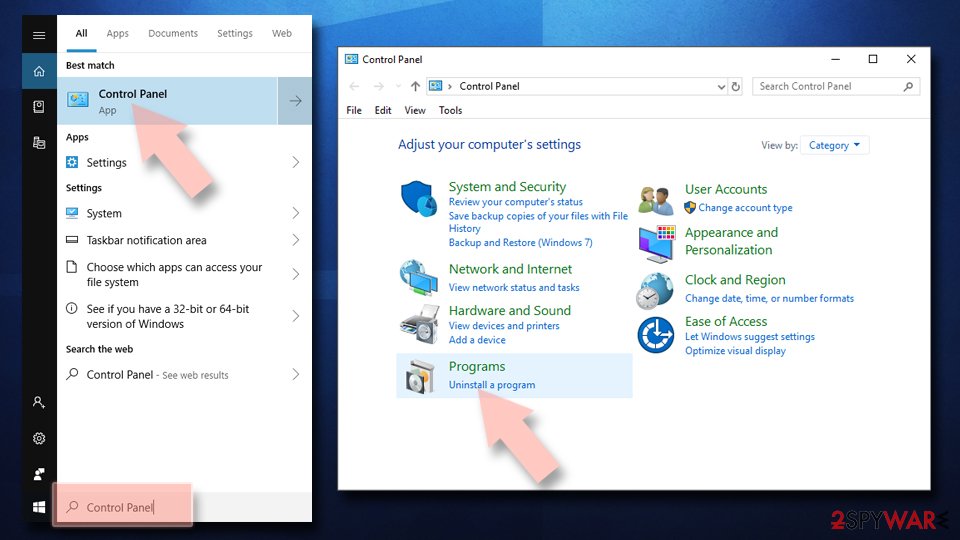
Uninstall from Windows 10/8:
- Type Control Panel into the Windows search box and open the result.
- Under Programs, select Uninstall a program.
Uninstall from Windows 7/XP:
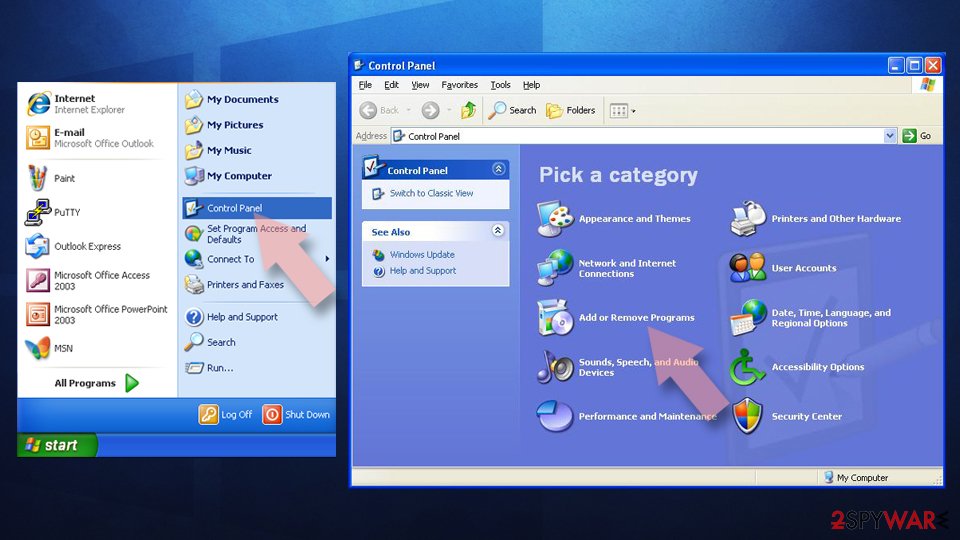
- Click on Windows Start > Control Panel (Windows XP users should click on Add/Remove Programs).
- In Control Panel, select Programs > Uninstall a program.
Remove the unwanted program:
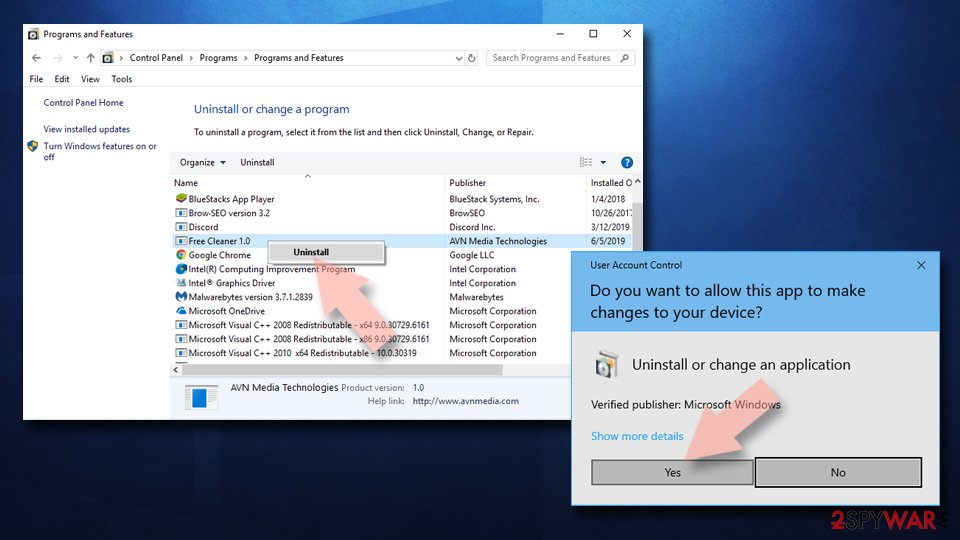
- In the Programs and Features window, look for any recently installed suspicious entries, select them, and click Uninstall.
- If User Account Control appears, click Yes to confirm, then complete the removal.
Remove from Google Chrome
Go to Extensions tab, find Evernote Web and click on the trash bin icon next to it to delete the extension. We highly recommend you to delete all other unknown browser extensions as well.
Delete malicious extensions from Google Chrome:
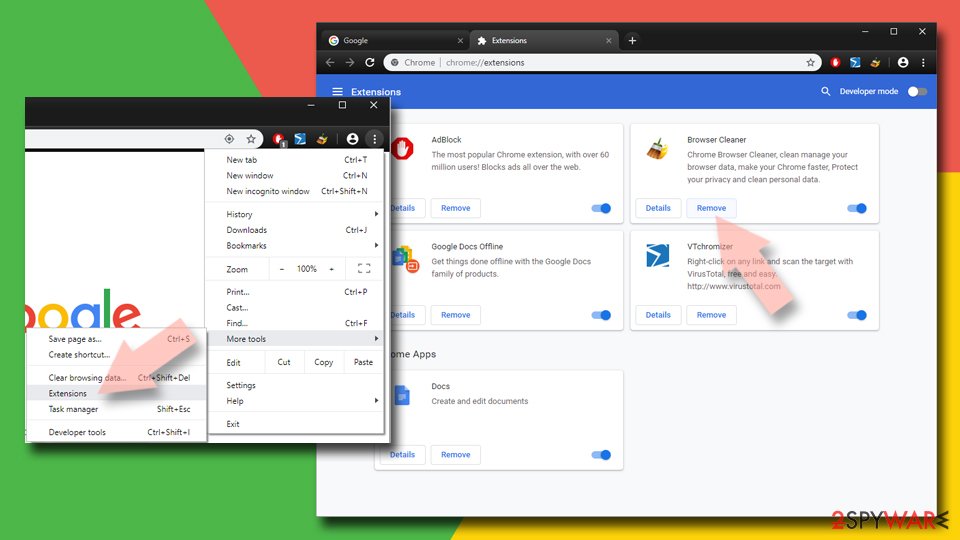
- Open Google Chrome, click on the Menu (three vertical dots at the top-right corner) and select More tools > Extensions.
- In the newly opened window, you will see all the installed extensions. Uninstall all suspicious extensions related to the unwanted program by clicking Remove.
Clear cache and web data from Chrome:
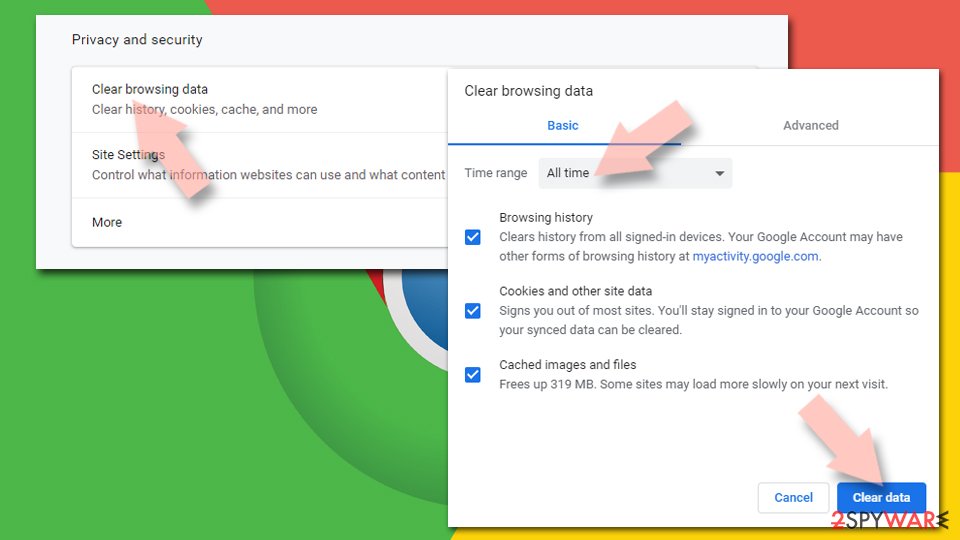
- Click on Menu and pick Settings.
- Under Privacy and security, select Clear browsing data.
- Select Browsing history, Cookies and other site data, as well as Cached images and files.
- Click Clear data.
Change your homepage:
- Click menu and choose Settings.
- Look for a suspicious site in the On startup section.
- Click on Open a specific or set of pages and click on three dots to find the Remove option.
Reset Google Chrome:
If the previous methods did not help you, reset Google Chrome to eliminate all the unwanted components:
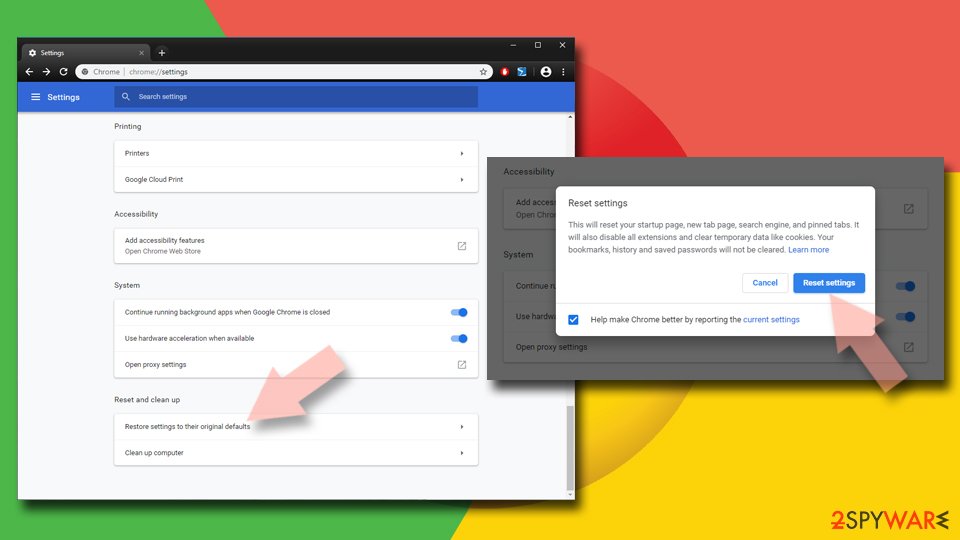
- Click on Menu and select Settings.
- In the Settings, scroll down and click Advanced.
- Scroll down and locate Reset and clean up section.
- Now click Restore settings to their original defaults.
- Confirm with Reset settings.
Remove from Microsoft Edge
Delete unwanted extensions from MS Edge:
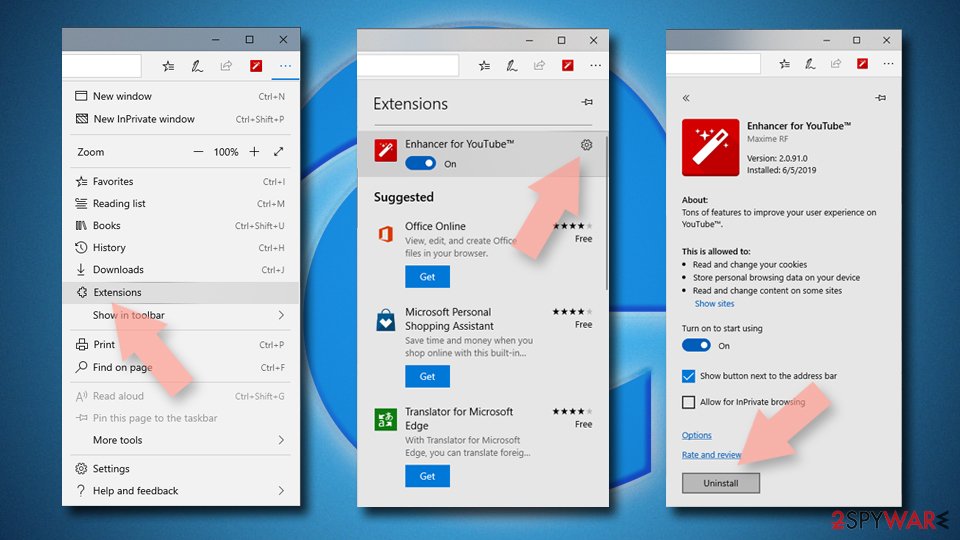
- Select Menu (three horizontal dots at the top-right of the browser window) and pick Extensions.
- From the list, pick the extension and click on the Gear icon.
- Click Remove.
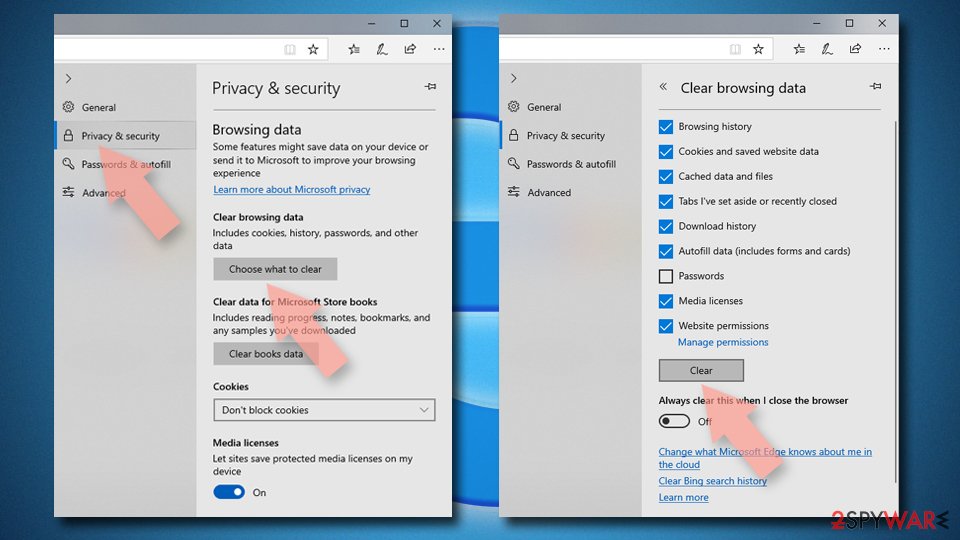
Clear cookies and other browser data:
- Click on the Menu (three horizontal dots at the top-right of the browser window) and select Settings > Privacy, search, and services..
- Under Clear browsing data, pick Choose what to clear.
- Select Cookies and other site data and Cached images and files. (apart from passwords, although you might want to include Media licenses as well, if applicable) and click on Clear.
Restore new tab and homepage settings:
- Click the menu icon and choose Settings.
- Then find On startup section.
- Click Remove next to any suspicious startup page.
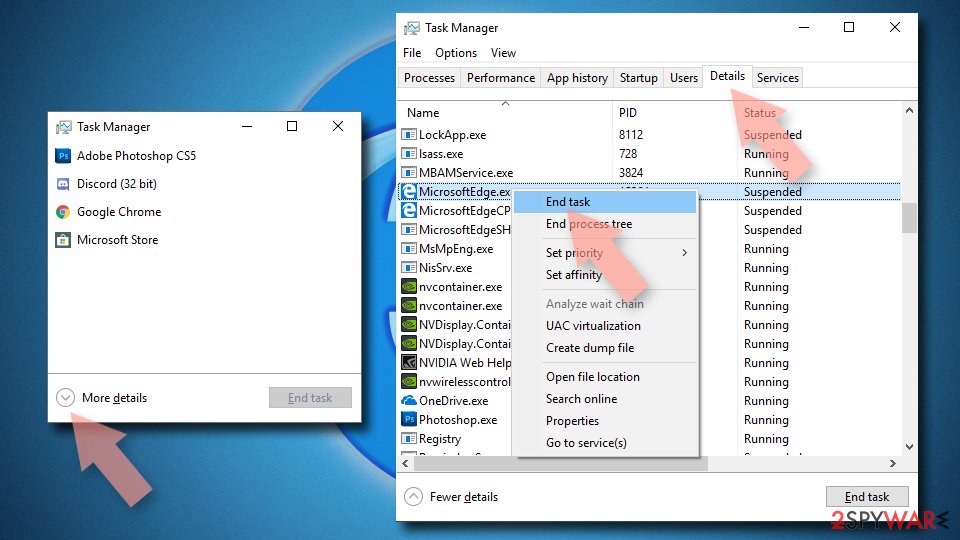
Reset MS Edge if the above steps did not work:
- Press on Ctrl + Shift + Esc to open Task Manager.
- Click on More details arrow at the bottom of the window.
- Select Details tab.
- Now scroll down and locate every entry with Microsoft Edge name in it. Right-click on each of them and select End Task to stop MS Edge from running.
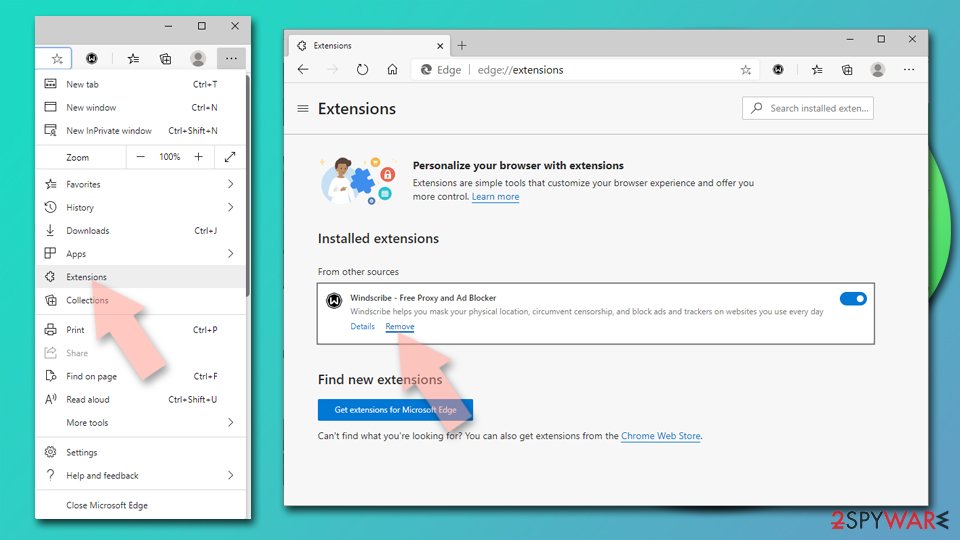
Delete extensions from MS Edge (Chromium):
- Open Edge and click select Settings > Extensions.
- Delete unwanted extensions by clicking Remove.
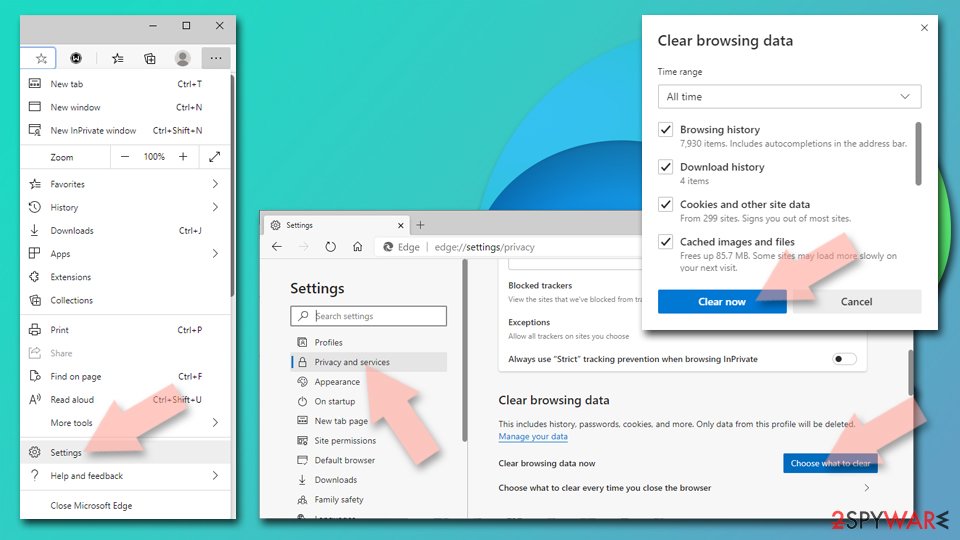
Clear cache and site data:
- Click on Menu and go to Settings.
- Select Privacy, search and services.
- Under Clear browsing data, pick Choose what to clear.
- Under Time range, pick All time.
- Select Clear now.
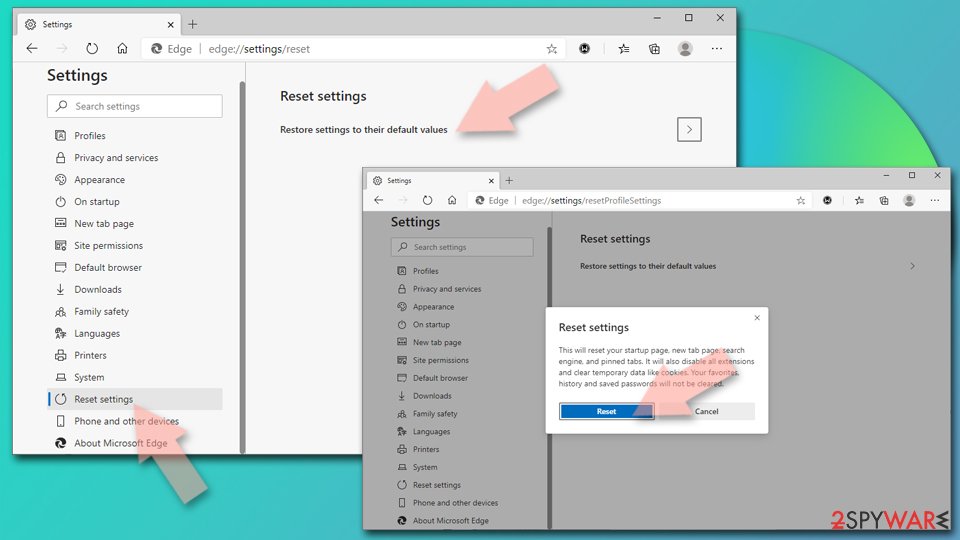
Reset Chromium-based MS Edge:
- Click on Menu and select Settings.
- On the left side, pick Reset settings.
- Select Restore settings to their default values.
- Confirm with Reset.
- This will disable extensions and reset startup pages but will not delete bookmarks, saved passwords, or browsing history.
Remove from Mozilla Firefox (FF)
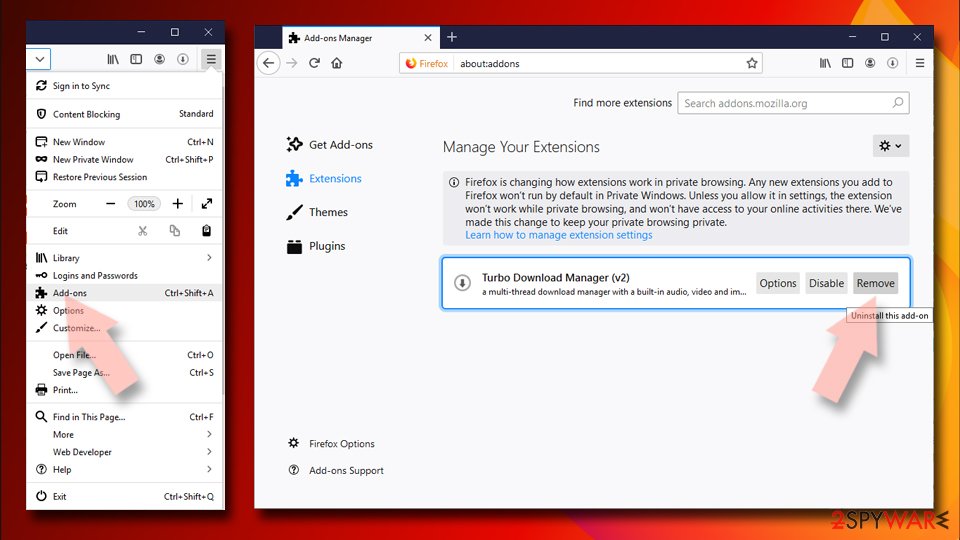
Remove dangerous extensions:
- Open Mozilla Firefox browser and click on the Menu (three horizontal lines at the top-right of the window).
- Select Add-ons.
- In here, select the unwanted extension and click Remove.
Reset the homepage:
- Click three horizontal lines at the top right corner to open the menu.
- Choose Settings.
- Under Home, set your preferred homepage and new tab settings.
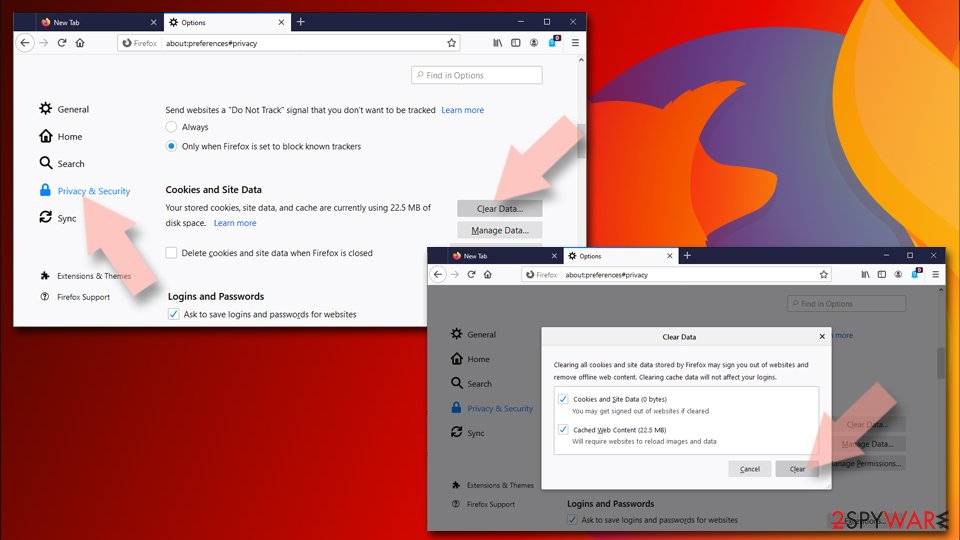
Clear cookies and site data:
- Click Menu and pick Settings.
- Go to Privacy & Security section.
- Scroll down to locate Cookies and Site Data.
- Click on Clear Data...
- Select Cookies and Site Data and Temporary cached files and pages, then click Clear.
Reset Mozilla Firefox
If clearing the browser as explained above did not help, reset Mozilla Firefox:
- Open Mozilla Firefox browser and click the Menu.
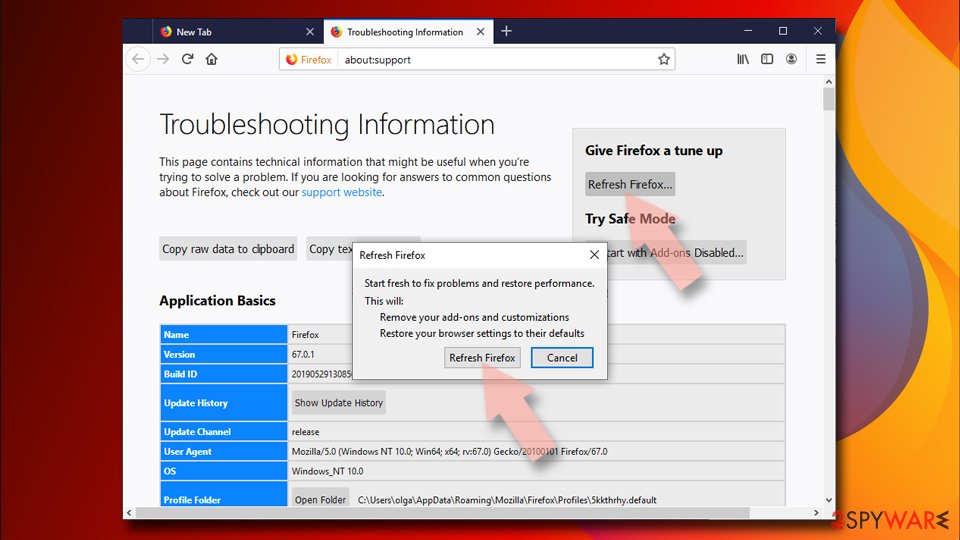
- Go to Help and then choose Troubleshooting Information.
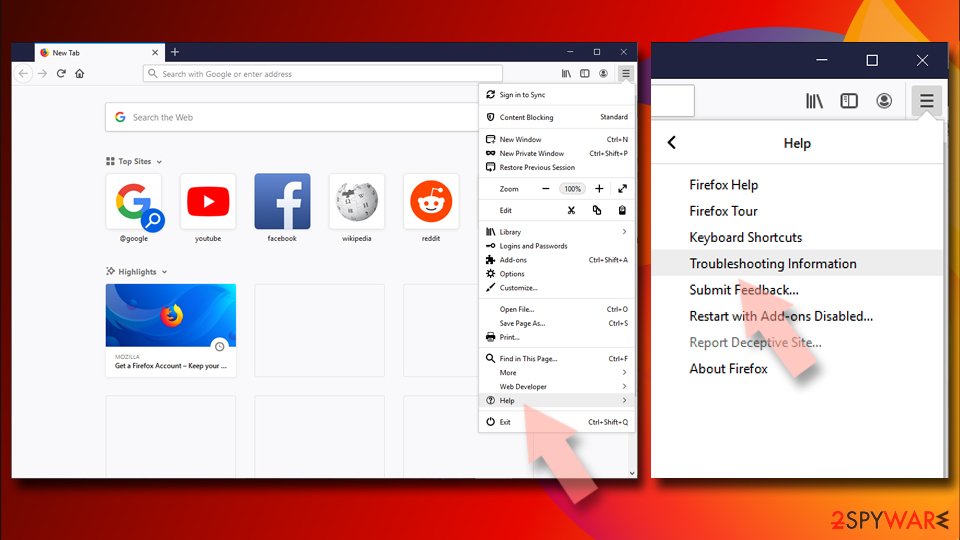
- Under Give Firefox a tune up section, click on Refresh Firefox...
- Once the pop-up shows up, confirm the action by pressing on Refresh Firefox.
Delete from Safari
Remove dangerous extensions:
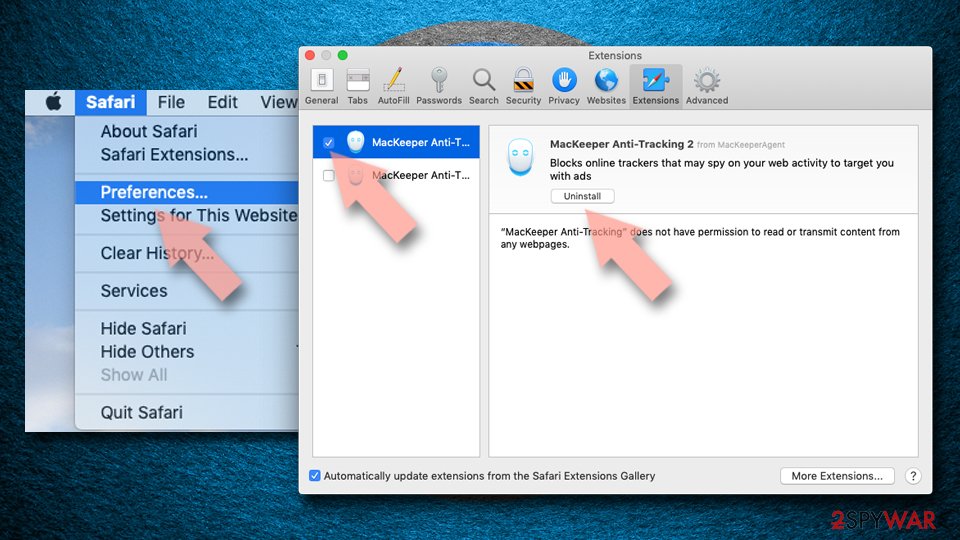
- Open Safari, click Safari in the menu at the top-left of the screen, and select Preferences.
- Go to the Extensions tab, look for any suspicious entries, and click Uninstall to remove them.
Clear history and website data:
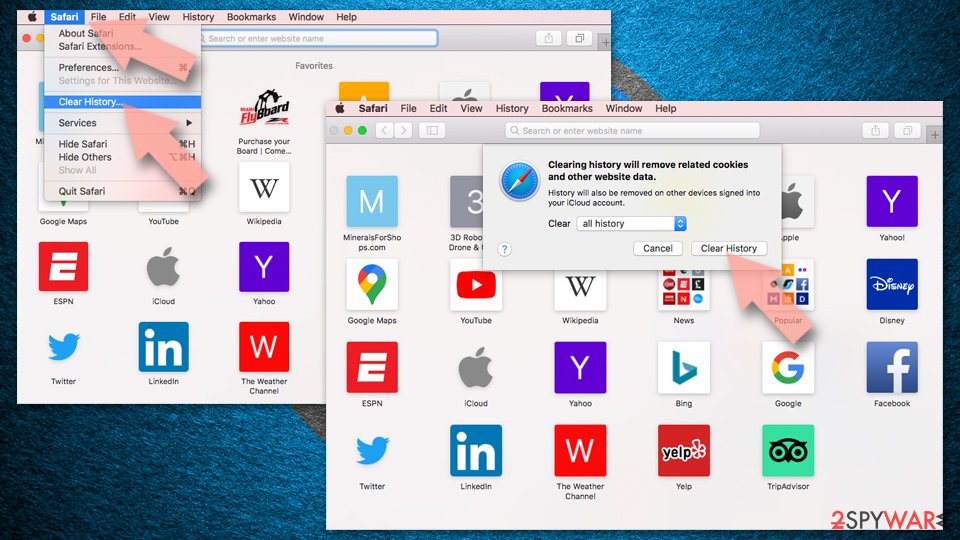
- Click Safari in the menu and pick Clear History.
- Set Clear to all history and confirm with Clear History.
Reset Safari:
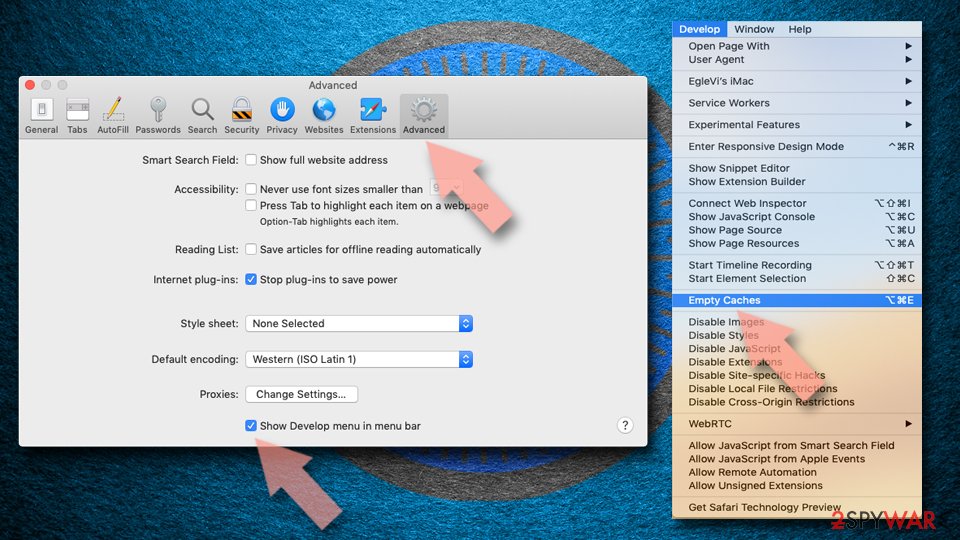
- Click Safari in the menu and select Preferences > Advanced.
- Enable Show Develop menu in menu bar.
- From the menu bar, click Develop and select Empty Caches.
Delete from macOS
Remove the unwanted application:
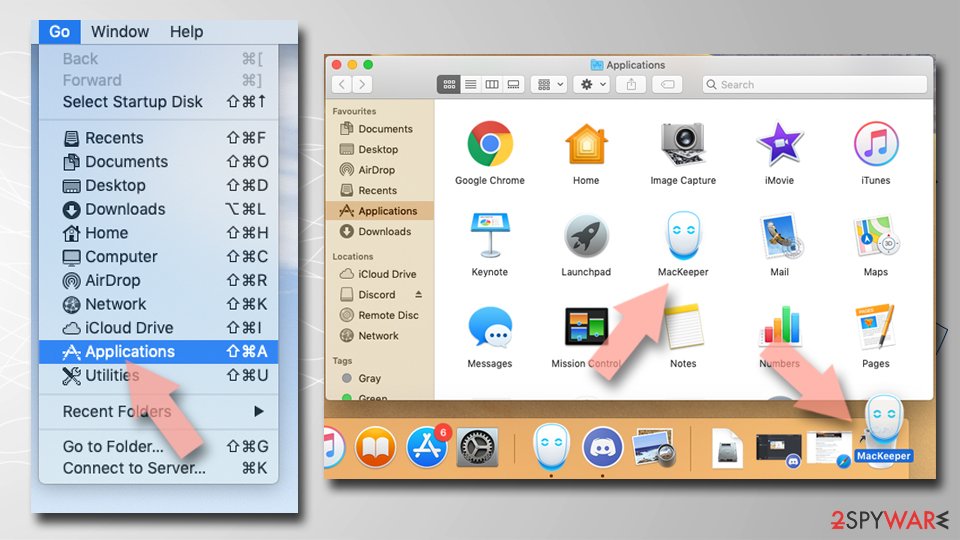
- From the menu bar, select Go > Applications.
- In the Applications folder, look for any suspicious entries, then drag them to Trash (or right-click and pick Move to Trash).
Delete leftover files and folders:
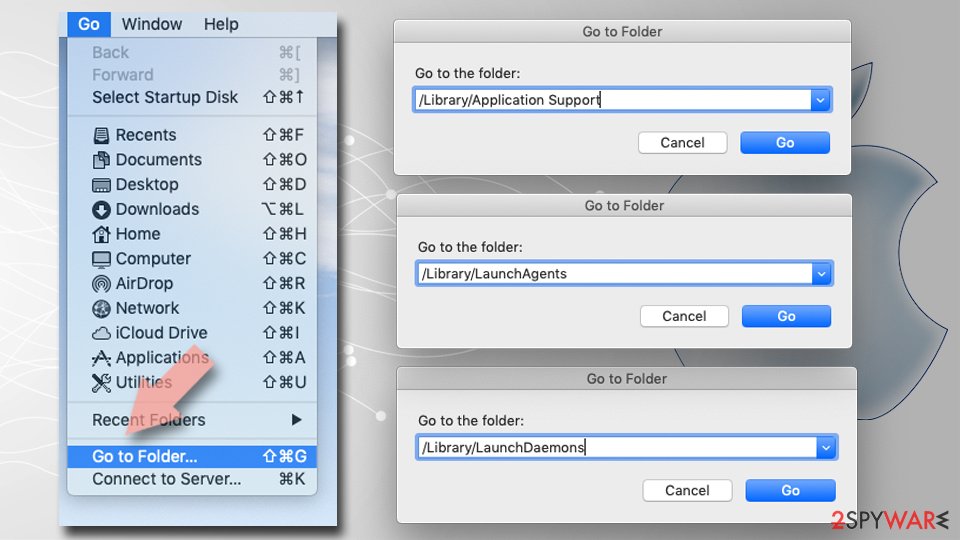
- Select Go > Go to Folder.
- Enter /Library/Application Support and remove any suspicious folders related to the unwanted program.
- Repeat the same check in the /Library/LaunchAgents and /Library/LaunchDaemons folders, deleting any suspicious entries.
- Finally, empty the Trash to permanently remove the leftovers.
Reset Internet Explorer
Remove dangerous add-ons:
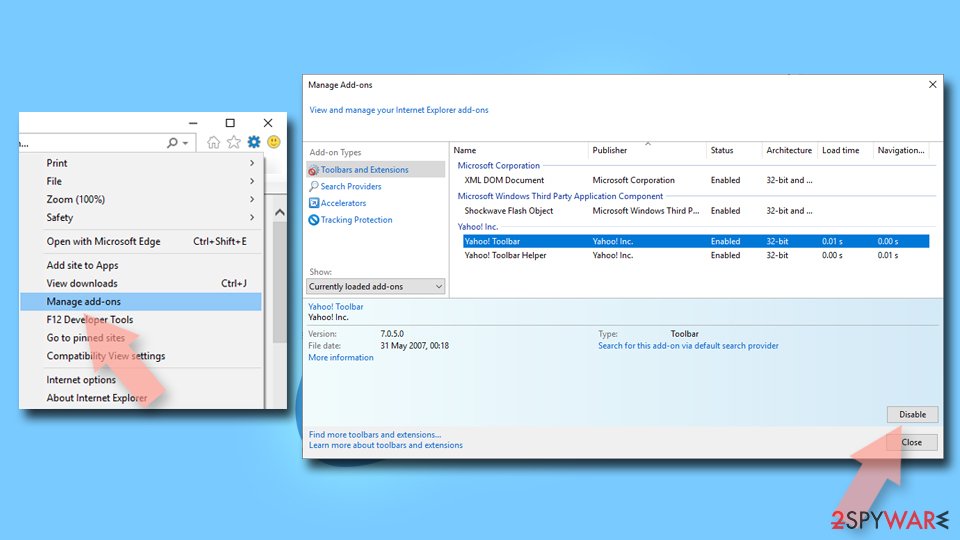
- Open Internet Explorer, click on the Gear icon (IE menu) on the top-right corner of the browser
- Pick Manage Add-ons.
- You will see a Manage Add-ons window. Here, look for suspicious plugins. Click on these entries and select Disable.
Change your homepage if it was altered:
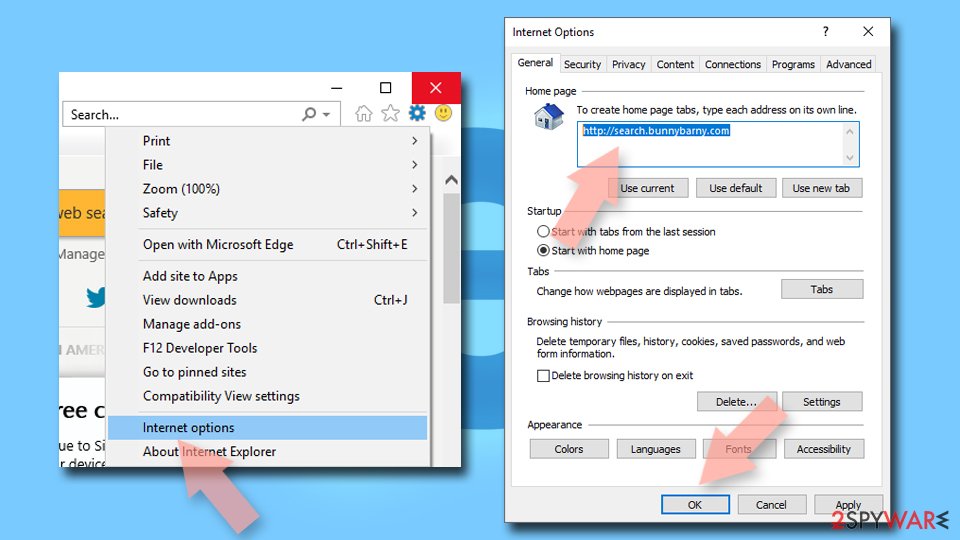
- Open IE and click on the Gear icon.
- Select Internet Options.
- In the General tab, delete the Home page address and replace it by your preferred one (for example, Google.com).
- Click Apply and then select OK.
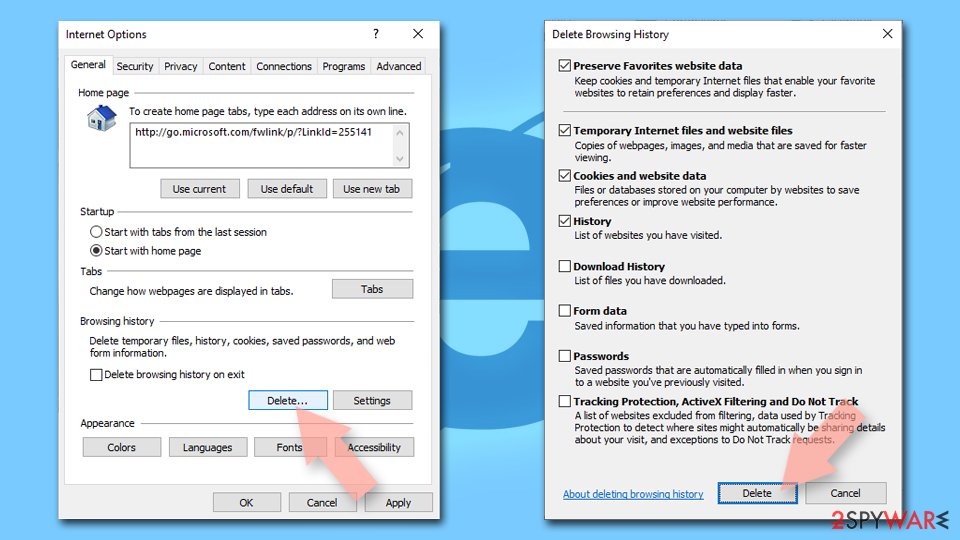
Delete temporary files:
- Press on the Gear icon and select Internet Options.
- Under Browsing history, click Delete...
- Select relevant fields and press Delete.
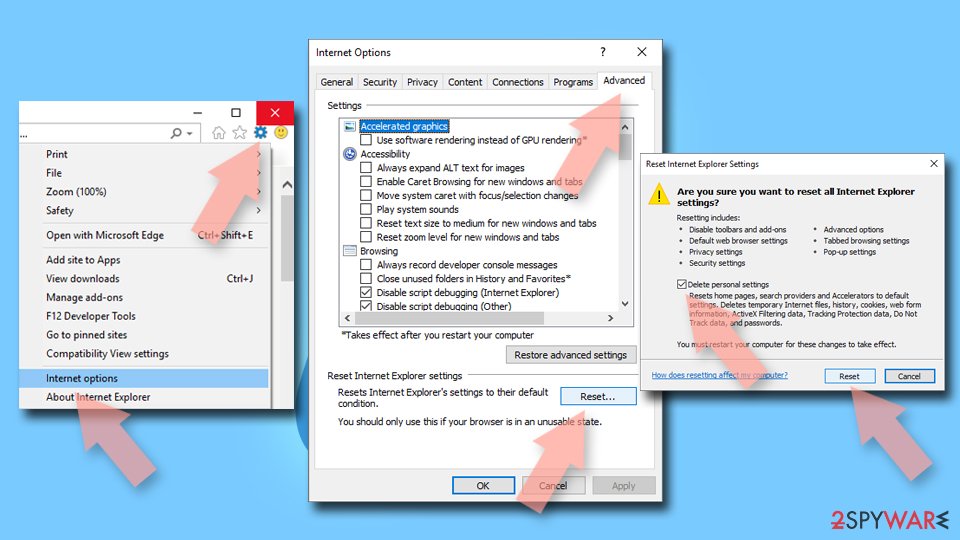
Reset Internet Explorer:
- Click on Gear icon > Internet options and select Advanced tab.
- Select Reset.
- In the new window, check Delete personal settings and select Reset.
Stream videos without limitations, no matter where you are
There are multiple parties that could find out almost anything about you by checking your online activity.
While this is highly unlikely, advertisers and tech companies are constantly tracking you online. The first step to privacy should be a secure browser that focuses on tracker reduction to a minimum.
Even if you employ a secure browser, you will not be able to access websites that are restricted due to local government laws or other reasons. In other words, you may not be able to stream Disney+ or US-based Netflix in some countries. To bypass these restrictions, you can employ a powerful VPN, which provides dedicated servers for torrenting and streaming, not slowing you down in the process.
Data backups are important - recover your lost files
Ransomware is one of the biggest threats to personal data.
Once it is executed on a machine, it launches a sophisticated encryption algorithm that locks all your files, although it does not destroy them. The most common misconception is that anti-malware software can return files to their previous states. This is not true, however, and data remains locked after the malicious payload is deleted.
While regular data backups are the only secure method to recover your files after a ransomware attack, tools such as can also be effective and restore at least some of your lost data.
From our report of Jun 2019 · not reviewed since
Remove the bogus Evernote Web app and patch Evernote Web Clipper Extension
Evernote virus is one of those programs that may trick you into visiting unsafe websites or make you install questionable programs on your computer.
To avoid that, you must remove Evernote Web virus and make sure the app you are using is legitimate. You can find the helpful removal guide that we have written below. However, an even easier method to complete Evernote Web removal is to scan the system with anti-malware application and let it clean the system for you.
Besides making sure that the malicious version of the application is terminated, you also need to take care of Evernote Web Clipper Extension that is designed for Google Chrome. The browser checks for all the installed browser plugins updates automatically, although just to be sure, you should check if the Evernote extension is version 7.11.1 or later.
Questions about Evernote virus
Is content.js a virus?
The name content.js is not enough to say. Malware often uses technical-sounding names, and harmless updaters often use odd ones. Check three things:
- the folder the file runs from
- the Digital Signatures tab in its properties
- the program that starts it (Startup apps, Task Scheduler or services)
A signed file from a company whose product you use is almost certainly fine. An unsigned file in a user folder that no installed program explains should be removed, and the PC scanned with Microsoft Defender in offline mode.
Can I end content.js in Task Manager?
Ending an unknown process is safe in the sense that Windows will warn you before you close anything critical, and a restart brings back whatever Windows needs. Ending content.js will not remove it, though: if a task or startup entry launches it, it returns at the next sign-in.
Use ending the process as a test. If something important stops working, it belonged to a program you use. If nothing changes and it comes back by itself, find and disable its starter, delete the file and scan the PC.
Do I need special software to remove Evernote virus?
No. Windows has everything needed:
- Installed apps for the uninstall
- the Startup list and Task Scheduler for what restarts it
- Windows Security for a scan afterwards
The steps in this guide take about fifteen minutes. A dedicated tool is a convenience when you would rather not check each place yourself or when the program keeps coming back.
Whatever you use, finish by confirming that an unfamiliar process called content.js in Task Manager is gone after a restart, and avoid downloading removal tools from pages that promote them through scary warnings.
Why can't I uninstall Evernote virus?
Usually because it is still running or because a helper reinstalls it. Close it from the notification area first, then end its process in Task Manager and try Settings > Apps > Installed apps again. If there is no uninstall entry, look for a folder under Program Files or AppData with the same name and an uninstaller inside.
If the program comes back after removal, the cause of an unfamiliar process called content.js in Task Manager is a scheduled task, a startup entry or the program it was bundled with. Remove those, restart and check again. Starting Windows in Safe Mode stops most helpers and makes stubborn programs easier to remove.
Will removing Evernote virus speed up Windows?
It often helps a little and sometimes a lot, depending on how many programs came in the same bundle. Every unwanted program that starts with Windows adds to boot time and uses memory. The one behind an unfamiliar process called content.js in Task Manager is no exception.
Remove it, check the Startup list for others, restart and compare. If the PC is still slow, look at disk space, Windows updates and the processes at the top of Task Manager. A clean PC should sit almost idle when no programs are open.
Does Evernote virus collect my data?
Nobody has analysed Evernote virus yet, so there is no confirmed answer. Programs in this category often collect usage data, browsing history or device details and share them with advertisers, and their privacy policies usually allow it.
The sign reported, an unfamiliar process called content.js in Task Manager, does not by itself show data theft, and nothing points to passwords or files being taken.
If you want to be careful, clear the browser's cookies after removal and review which apps may run in the background. Change passwords only if you also see signs of something more serious, such as unknown sign-ins or messages sent from your accounts.
Should I call Evernote virus malware?
Most security vendors would call it a potentially unwanted program rather than malware. The difference is intent and consent:
- malware hides and harms
- while unwanted programs are installed with a click someone barely noticed
- then do more than expected
The sign reported here, an unfamiliar process called content.js in Task Manager, is typical of the second group. In practice the label matters less than the result.
Whatever it is called, a program you did not choose should go, and the place it came from should be checked for other programs. Microsoft Defender can block this class of software if you switch on Potentially unwanted app blocking in Windows Security.
How do I know if I need Evernote virus?
Ask three questions. Did you install it on purpose? Have you ever opened it?
Does anything you use depend on it? If the answers are no, you do not need it. The sign that brought you here, an unfamiliar process called content.js in Task Manager, suggests it arrived without a clear choice.
Programs bundled with free software rarely do anything their host program needs. Uninstall it, restart, and see whether anything you rely on stops working. If nothing does, which is the usual outcome, you can forget about it.
Will Fortect remove Evernote virus?
Fortect scans Windows for malware and unwanted programs and repairs the system files and settings they change, and its free scan shows what it finds on your PC before you decide anything.
For Evernote virus, follow the plan above as well: the browser steps take back permissions and settings that no scanner treats as a threat, and uninstalling the program that brought it removes the source.
Run Microsoft Defender's full scan and, if anything was found, its offline scan as a second opinion. If the symptoms are gone after the plan and both scans are clean, there is nothing more to do.
Sources
- Evernote official website: Evernote (read October 7, 2026)
- Google Play: Evernote (read October 7, 2026)
- NVD: CVE-2019-12592 Detail (read October 7, 2026)
- Guardio: Critical Vulnerability Discovered in Evernote's Chrome Extension (read October 7, 2026)
- Wikipedia, the free encyclopedia: Freeware (read October 7, 2026)