Privacyassistant.net virus has two identical versions: Ext.privacyassistant.net and Search.privacyassistant.net

Ext.privacyassistant.net is a questionable search engine that belongs to Privacyassistant.net browser hijacker's[1] family. This bogus search tool spreads in software packages as SearchAssist extension for Google Chrome. After the direct or indirect installation, it alters browsers settings and controls user’s behavior.
However, the developer promotes Privacyassistant.net as a useful tool that enhances browsing experiences and offers to design your homepage as you prefer by changing background picture or placing favorite links. Sadly, it can infiltrate the system secretly and cause unwanted changes.
The Privacyassistant.net hijack occurs as soon as users download software package with this PUP[2] inside. Since then user’s homepage and default search engine might be set to Ext.privacyassistant.net or Search.privacyassistant.net. Despite different domains, these search tools are identical.
When users find hijacked web browser, the first instinct often encourages to go to the Settings and replace these modifications. However, Privacyassistant.net virus is developed in the way that users cannot simply delete this domain and type their preferred. The hijacker rejects all users’ attempts to set their preferred homepage or search engine because the developers are interested in forcing people to use it as long as possible.
The hijacker tries aggressively remain on the browser because it works as a marketing tool. It promotes third-party content or boosts traffic to the promotional websites. The problem with this sponsored content is that some of the links or ads may redirect to the potentially dangerous sites where you can get infected with ransomware, tricked by tech support scam or become a victim of other cyber crime[3].
Apart from Privacyassistant.net redirect problems, this search engine does not perform its primary function properly. Search engines are supposed to deliver accurate and objective search results; however, this one has nothing in common with objectivity.
Some of the organic search[4] results may be eliminated from the results page. Instead of them, you may receive some sponsored third-party links. Besides, in the Privacy Policy developers reveal about the partnership with Trovi Search which is a quite popular browser hijacker.
Therefore, if you do not want to browse through potentially dangerous commercial content, you have to hurry up and remove Privacyassistant.net from the computer as soon as you notice it. Powerful anti-malware tools, such as FortectIntego, can eliminate it within several minutes.
Hesitation is not recommended because the hijacker might collect non-personally identifiable information[5] about the users. Based on this knowledge, developers can display even more tricky targeted ads. Thus, do not delay this important task and start Privacyassistant.net removal right now!

Versions of the Privacyassistant.net virus
Ext.privacyassistant.net. This version of the browser hijacker is identical to the original version of the search engine. It has the same designed, features and infiltration method. After the hijack, it sets its domain as default search engine or/and homepage. It might also modify new tab URL address and disturb browsing sessions by displaying intrusive online ads.
Ext.privacyassistant.net removal is crucial in order to get take back control over the browser. However, it might be complicated because the PUP might alter browser’s settings and install various third-party components to strengthen its presence.
Search.privacyassistant.net. This search tool differs from ext.privacyassistant.net and privacyassistant.net only by its domain. The hijacker also spread via SearchAssist extension and might alter browser’s settings. After the hijack, users cannot access any reliable search provider from the browser’s startup page; they are forced to use search.privacyassistant.net.
However, just like the original version, this search tool might also display paid links at the top of the results page and in this way trick users into visiting potentially dangerous websites. Therefore, hijacker’s removal is crucial.
Shifty distribution method of shady search engines
Ext.privacyassistant.net, Search.privacyassistant.net, and Privacyassistant.net search engines spread in software bundles, or in other words, along with freeware and shareware. Every program downloaded from the Internet may include optional applications attached to it. However, you may not be informed about them if you choose wrong installation setup.
The most popular and widely used Quick/Recommended settings are not reliable. Instead of disclosing extra applications, they install them by default. Therefore, the hijack may be a surprise for many inattentive computer users. In order to avoid unwanted and unexpected presents, you have to get used to installing new software under Advanced/Custom setup. Then, you can see all additional programs that are offered to and reject their installation.
These search tools become default search engines when users install SearchAssist browser extension. Thus, to avoid undesired changes and browsing-related problems, you should stay away from this program.
Remove Ext.privacyassistant.net, Search.privacyassistant.net, and Privacyassistant.net from Google Chrome
You can remove all these hijackers in the same way. Therefore, it doesn’t matter which domain you see on Chrome, you should follow the same removal instructions. Besides, if some version of the hijacker managed to attack Firefox, Explorer or Safari, you can find removal guidelines below too.
For Privacyassistant.net removal you have two options – manual and automatic methods. The first method requires investigating computer’s system and deleting hijacker-related components. Below you will find illustrated instructions that will guide you through this quite challenging task. The second method allows simplifying this procedure.
In order to remove Privacyassistant.net automatically, you have to install anti-malware/anti-spyware program and run a full system scan. However, don’t forget to update your chosen software first. Scanning device with an outdated program may not be effective, and some of the virus elements may be left.
Uninstall from Windows
Uninstall from Windows 10/8:
- Type Control Panel into the Windows search box and open the result.
- Under Programs, select Uninstall a program.


Uninstall from Windows 7/XP:
- Click on Windows Start > Control Panel (Windows XP users should click on Add/Remove Programs).
- In Control Panel, select Programs > Uninstall a program.


Remove the unwanted program:
- In the Programs and Features window, look for any recently installed suspicious entries, select them, and click Uninstall.
- If User Account Control appears, click Yes to confirm, then complete the removal.


Delete from macOS
Remove the unwanted application:
- From the menu bar, select Go > Applications.
- In the Applications folder, look for any suspicious entries, then drag them to Trash (or right-click and pick Move to Trash).


Delete leftover files and folders:
- Select Go > Go to Folder.
- Enter /Library/Application Support and remove any suspicious folders related to the unwanted program.
- Repeat the same check in the /Library/LaunchAgents and /Library/LaunchDaemons folders, deleting any suspicious entries.

- Finally, empty the Trash to permanently remove the leftovers.

Reset Internet Explorer
Remove dangerous add-ons:
- Open Internet Explorer, click on the Gear icon (IE menu) on the top-right corner of the browser
- Pick Manage Add-ons.
- You will see a Manage Add-ons window. Here, look for suspicious plugins. Click on these entries and select Disable.


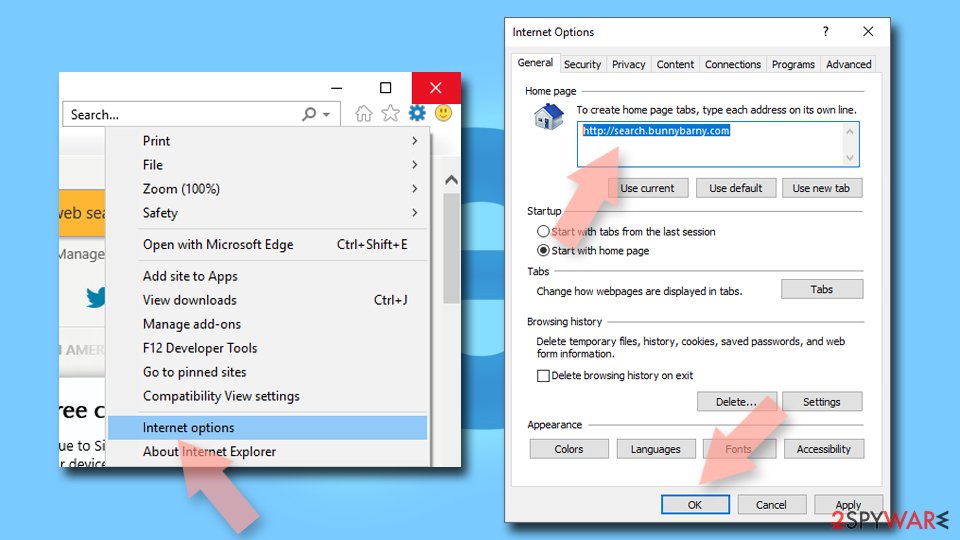
Change your homepage if it was altered:
- Open IE and click on the Gear icon.
- Select Internet Options.
- In the General tab, delete the Home page address and replace it by your preferred one (for example, Google.com).
- Click Apply and then select OK.

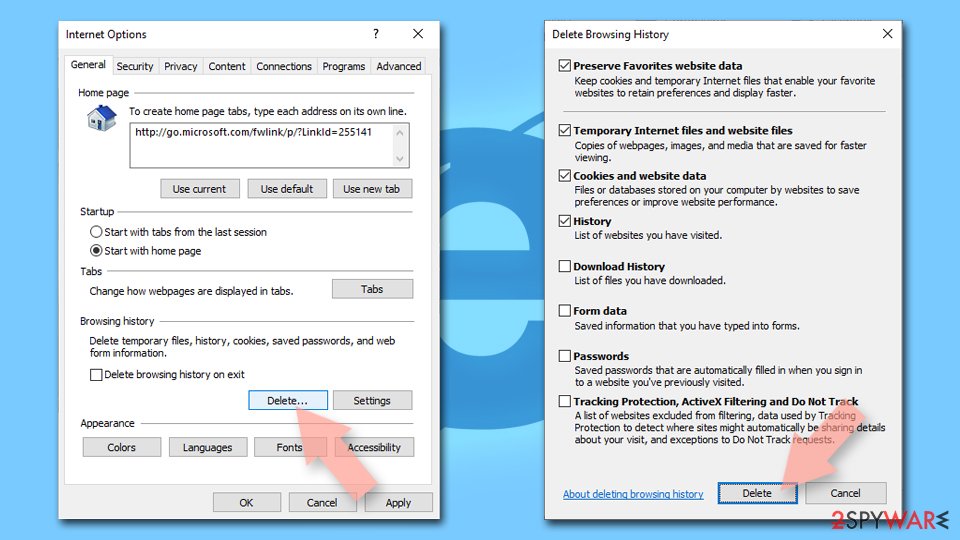
Delete temporary files:
- Press on the Gear icon and select Internet Options.
- Under Browsing history, click Delete...
- Select relevant fields and press Delete.

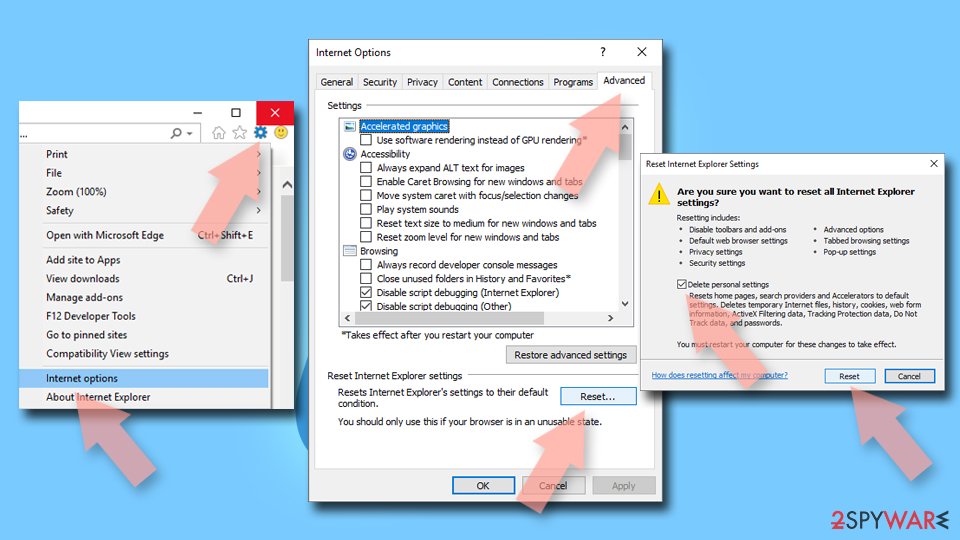
Reset Internet Explorer:
- Click on Gear icon > Internet options and select Advanced tab.
- Select Reset.
- In the new window, check Delete personal settings and select Reset.

Remove from Microsoft Edge
Delete unwanted extensions from MS Edge:
- Select Menu (three horizontal dots at the top-right of the browser window) and pick Extensions.
- From the list, pick the extension and click on the Gear icon.
- Click Remove.


Clear cookies and other browser data:
- Click on the Menu (three horizontal dots at the top-right of the browser window) and select Settings > Privacy, search, and services..
- Under Clear browsing data, pick Choose what to clear.
- Select Cookies and other site data and Cached images and files. (apart from passwords, although you might want to include Media licenses as well, if applicable) and click on Clear.


Restore new tab and homepage settings:
- Click the menu icon and choose Settings.
- Then find On startup section.
- Click Remove next to any suspicious startup page.
Reset MS Edge if the above steps did not work:
- Press on Ctrl + Shift + Esc to open Task Manager.
- Click on More details arrow at the bottom of the window.
- Select Details tab.
- Now scroll down and locate every entry with Microsoft Edge name in it. Right-click on each of them and select End Task to stop MS Edge from running.


Instructions for Chromium-based Edge
Delete extensions from MS Edge (Chromium):
- Open Edge and click select Settings > Extensions.
- Delete unwanted extensions by clicking Remove.


Clear cache and site data:
- Click on Menu and go to Settings.
- Select Privacy, search and services.
- Under Clear browsing data, pick Choose what to clear.
- Under Time range, pick All time.
- Select Clear now.


Reset Chromium-based MS Edge:
- Click on Menu and select Settings.
- On the left side, pick Reset settings.
- Select Restore settings to their default values.
- Confirm with Reset.
- This will disable extensions and reset startup pages but will not delete bookmarks, saved passwords, or browsing history.


Remove from Mozilla Firefox (FF)
Remove dangerous extensions:
- Open Mozilla Firefox browser and click on the Menu (three horizontal lines at the top-right of the window).
- Select Add-ons.
- In here, select the unwanted extension and click Remove.


Reset the homepage:
- Click three horizontal lines at the top right corner to open the menu.
- Choose Settings.
- Under Home, set your preferred homepage and new tab settings.
Clear cookies and site data:
- Click Menu and pick Settings.
- Go to Privacy & Security section.
- Scroll down to locate Cookies and Site Data.
- Click on Clear Data...
- Select Cookies and Site Data and Temporary cached files and pages, then click Clear.


Reset Mozilla Firefox
If clearing the browser as explained above did not help, reset Mozilla Firefox:
- Open Mozilla Firefox browser and click the Menu.
- Go to Help and then choose Troubleshooting Information.

- Under Give Firefox a tune up section, click on Refresh Firefox...
- Once the pop-up shows up, confirm the action by pressing on Refresh Firefox.


Remove from Google Chrome
Delete malicious extensions from Google Chrome:
- Open Google Chrome, click on the Menu (three vertical dots at the top-right corner) and select More tools > Extensions.
- In the newly opened window, you will see all the installed extensions. Uninstall all suspicious extensions related to the unwanted program by clicking Remove.


Clear cache and web data from Chrome:
- Click on Menu and pick Settings.
- Under Privacy and security, select Clear browsing data.
- Select Browsing history, Cookies and other site data, as well as Cached images and files.
- Click Clear data.


Change your homepage:
- Click menu and choose Settings.
- Look for a suspicious site in the On startup section.
- Click on Open a specific or set of pages and click on three dots to find the Remove option.
Reset Google Chrome:
If the previous methods did not help you, reset Google Chrome to eliminate all the unwanted components:
- Click on Menu and select Settings.
- In the Settings, scroll down and click Advanced.
- Scroll down and locate Reset and clean up section.
- Now click Restore settings to their original defaults.
- Confirm with Reset settings.


Delete from Safari
Remove dangerous extensions:
- Open Safari, click Safari in the menu at the top-left of the screen, and select Preferences.
- Go to the Extensions tab, look for any suspicious entries, and click Uninstall to remove them.


Clear history and website data:
- Click Safari in the menu and pick Clear History.
- Set Clear to all history and confirm with Clear History.


Reset Safari:
- Click Safari in the menu and select Preferences > Advanced.
- Enable Show Develop menu in menu bar.
- From the menu bar, click Develop and select Empty Caches.


Was this guide helpful?
3 comments