Therequire.biz (Simple Removal Guide) - Chrome, Firefox, IE, Edge
Therequire.biz Removal Guide
What is Therequire.biz?
Therequire.biz – a dangerous website that is trying to deceive you into allowing its push notifications

Therequire.biz is a dubious page that uses various deception techniques to try and trick you into pressing the Allow button. That would enable its notifications. At the time of writing, they were falsely advertised to bring you the latest sports updates/gaming news. Please don't accept notifications from this shady site.
If you do, Therequire.biz ads will start popping up on the bottom-right or top-right corners of your PC desktop or directly on your cell phone screen. These ads might seem harmless and alluring, but once they're clicked, you'll end up on a site that has nothing to do with them.
Adware infection could be the reason why this page is suddenly opened, as well as a mistyped URL and clicked deceptive ads. We're happy you chose us as your cybersecurity advisors. We're going to explain how this infection might have got into your device, its risks, and removal options.
| name | Therequire.biz |
|---|---|
| Type | Redirect virus, adware, PUP |
| IP address | 54.237.125.12 |
| Purpose | To show ads and cause redirects to affiliated sites by tricking visitors into accepting its notifications |
| Symptoms | New tabs with questionable pages opening up out of the blue, sluggish device performance, ads popping up directly on the desktop or screen |
| Risks | Financial losses, malware infections, privacy issues, PUP installations |
| Distribution | Fake Flash Player installers/updates, software bundles, deceptive ads, torrent platforms |
| Removal | You can eliminate any cyber threats by scanning the device in question with a reliable anti-malware security tool |
| System repair | All infections do some damage to the system settings and files. To get your device back on track, use the powerful FortectIntego system diagnostics tool that will fix any system irregularities and delete tracking cookies from shady sites |
Developers of Therequire.biz virus, and similar threats like Eriodordedl.biz virus, Ro01.biz virus, etc., have only one thing on their minds – money. They don't care about the privacy or safety of their users. That's why push notifications should be accepted only from legitimate sources.
Ads by Therequire.biz are displayed in the form of notifications and will annoy any device user. They will constantly pop-up, and in some cases, they're not that easy to close, as pressing the 'X' button will open a new tab on the browser of an affiliated site.
What's even more disturbing is that associated portals could be opened without you even clicking on anything. Sudden Therequire.biz redirect might open new tabs on demand, forcing you to visit questionable websites, which may even have malicious intentions, such as:
- draw out your private details (banking information, SSNs, phone numbers, etc.),
- lure you into gambling,
- involve you in various scams,
- push to install potentially unwanted programs,[1]
- infect your device with malware instantly, through drive-by downloads,[2] etc.
As we've mentioned before, users rarely visit pages like Therequire.biz willingly. Usually, they are redirected to such push notification virus websites due to potentially unwanted programs, like browser hijackers, adware, etc., being installed on their devices.

Thus to begin Therequire.biz removal process, the first thing you need to do is download a trustworthy anti-malware tool. We recommend using free security software such as SpyHunter 5Combo Cleaner or Malwarebytes. Install it, update its virus definitions, perform a full system scan, and let the AV engine take care of the infection.
When that's done, you have to remove Therequire.biz notifications from your browser manually. To make it easy for you, we've posted detailed free instructions on how to do it from any browser, including Chrome, Safari, and others, at the bottom of the article.
Afterward, it would help if you took care of your device's overall health because any infection, including Therequire.biz, could leave its mark on the system. IT experts from NoVirus.uk[3] suggest using the time-proven FortectIntego system diagnostics tool to remove all tracking cookies and fix any system irregularities that might prevent you from enjoying your device.
Believing a deceptive ad could cause potentially unwanted program infections
Shady websites are dangerous for numerous reasons, but one of the main ones is that they show tons of various advertisements. Some of those ads might be harmless, but some might be deceptive and cause a lot of problems if they're clicked on.
There are tons of variations on how a deceptive ad might look. Some of them might claim that your Flash Player is out of date, while others that your device is infected with a Trojan or other malware. When they're clicked, users are redirected to a site where PUPs might be pushed to download.
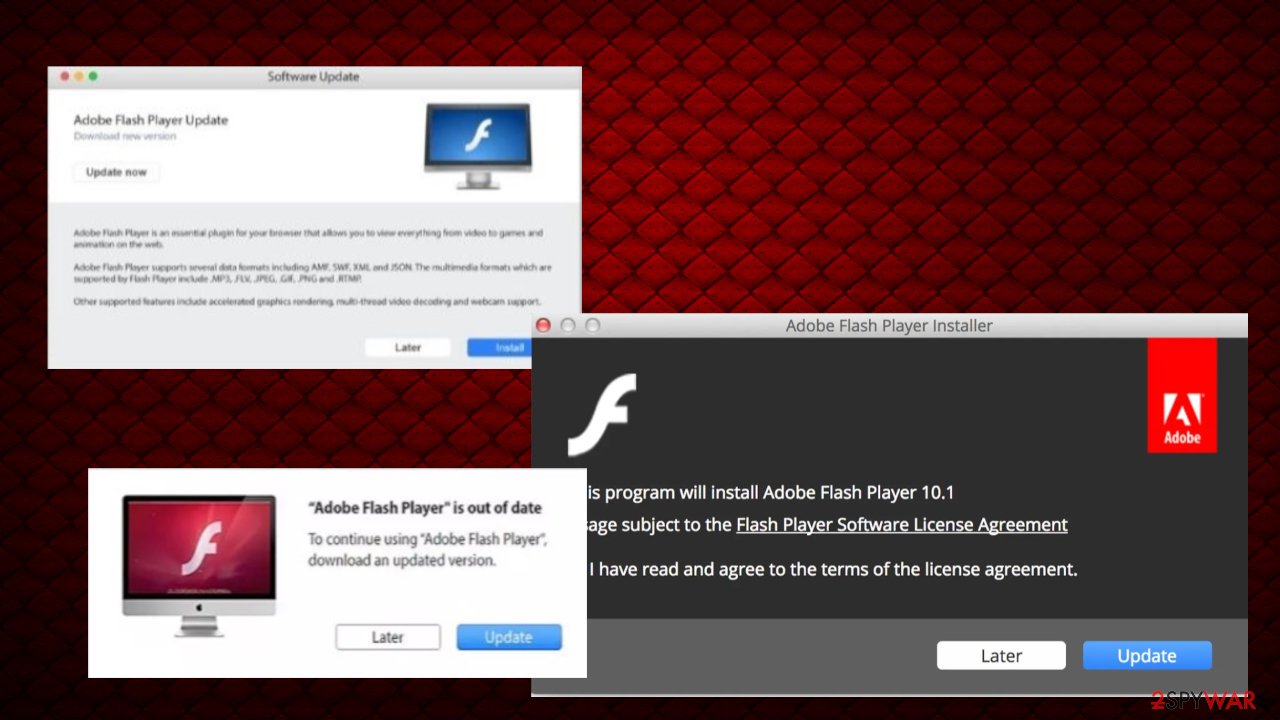
Applications that need to be spread using shady techniques should never be used as they will only cause harm. No internet portal is able to determine if your device has outdated software or detect malware. Please don't believe the cheap tricks that PUP developers use to spread their creations.
Remove Therequire.biz virus to get rid of annoying ads and enjoy your device anew
When Therequire.biz virus is on your device, deceptive ads will be popping up constantly, tabs with affiliated sites opened, the device itself will be visibly slower as well as the internet connection. The good news is that it can be fairly easily eliminated from both computers and cell phones.
You can remove Therequire.biz and possible PUPs that were forcing you to visit this site by running a full system scan with a reliable anti-malware tool. Such a tool is a must-have nowadays, as there's a myriad of various cyber threats roaming around the internet.
When Therequire.biz removal with AV tools is finished, you have to delete it from your browser. We've posted free guides for Safari, Mozilla, and other browsers below this paragraph for your convenience. Once the threat is completely eliminated, run system diagnostics to get rid of tracking cookies and restore any altered system values.
You may remove virus damage with a help of FortectIntego. SpyHunter 5Combo Cleaner and Malwarebytes are recommended to detect potentially unwanted programs and viruses with all their files and registry entries that are related to them.
Getting rid of Therequire.biz. Follow these steps
Stop browser notifications
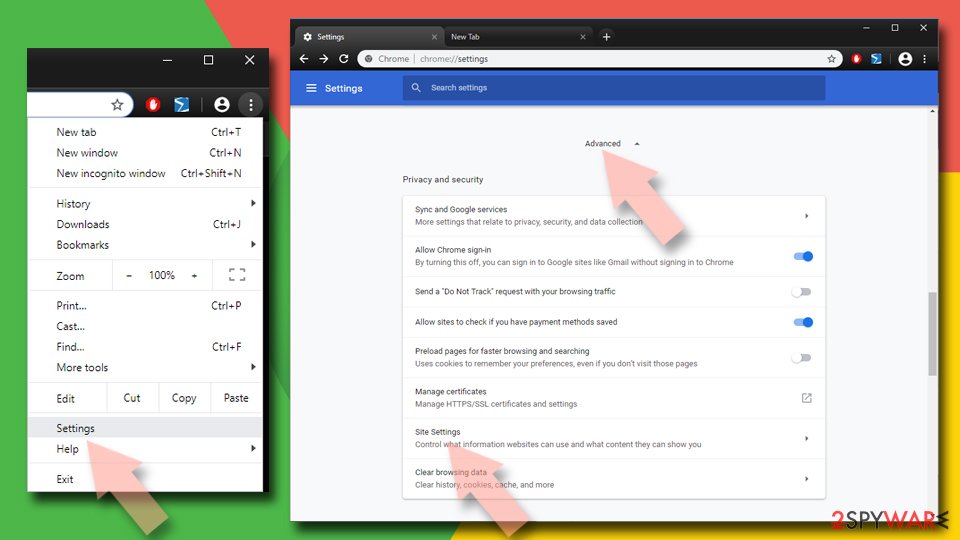
Remove unwanted notifications from Google Chrome (desktop):
- Open Google Chrome browser and go to Menu > Settings.
- Scroll down and click on Advanced.
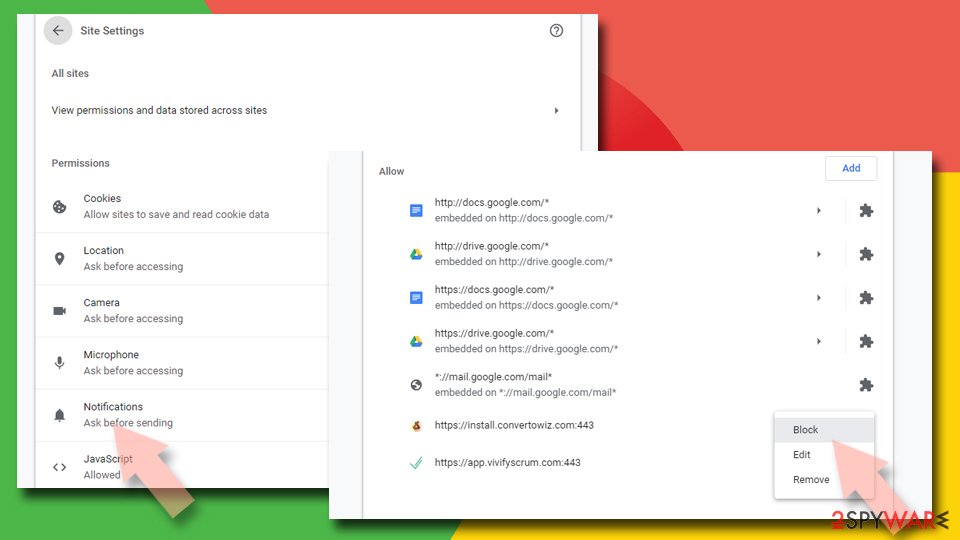
- Locate Privacy and security section and pick Site Settings > Notifications.

- Look at the Allow section and look for a suspicious URL.
- Click the three vertical dots next to it and pick Block. This should remove unwanted notifications from Google Chrome.

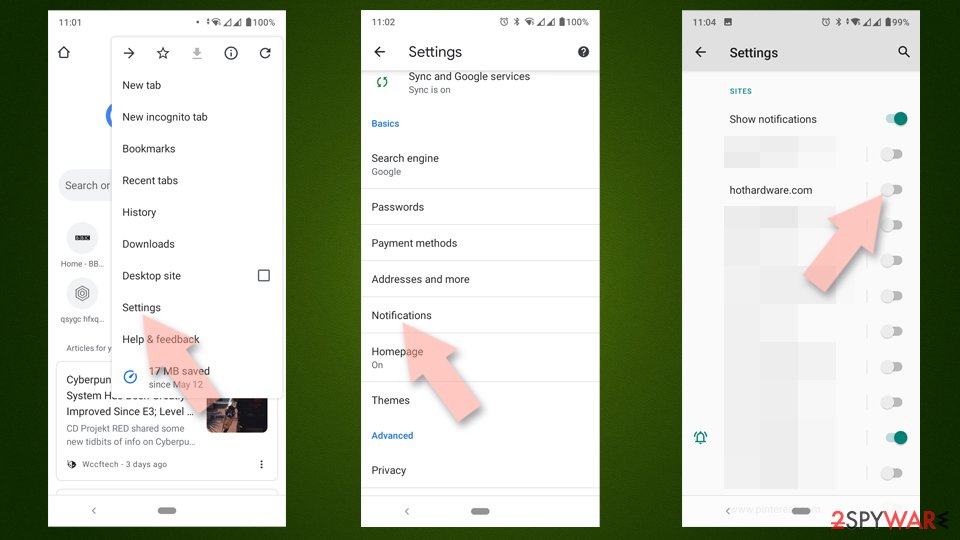
Remove unwanted notifications from Google Chrome (Android):
- Open Google Chrome and tap on Settings (three vertical dots).
- Select Notifications.
- Scroll down to the Sites section.
- Locate the unwanted URL and toggle the button to the left (Off setting).

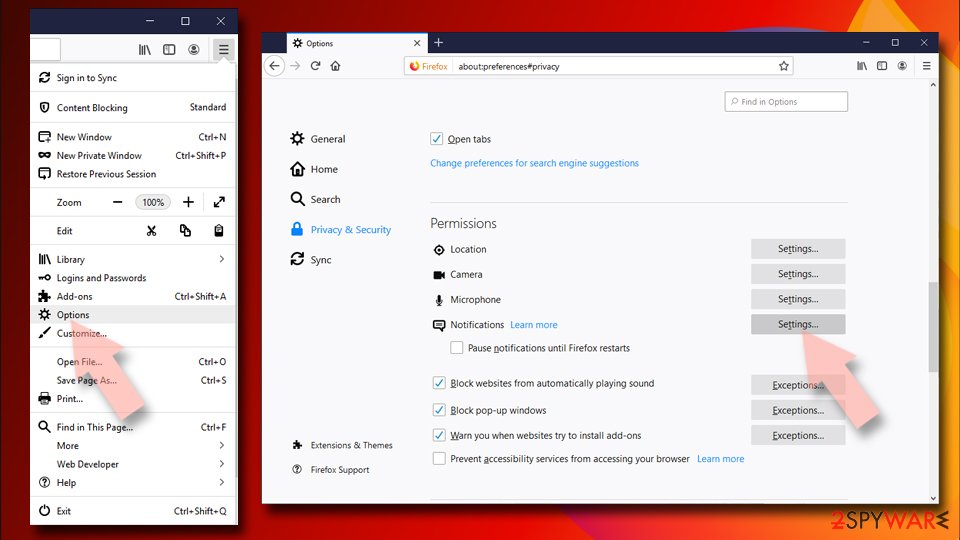
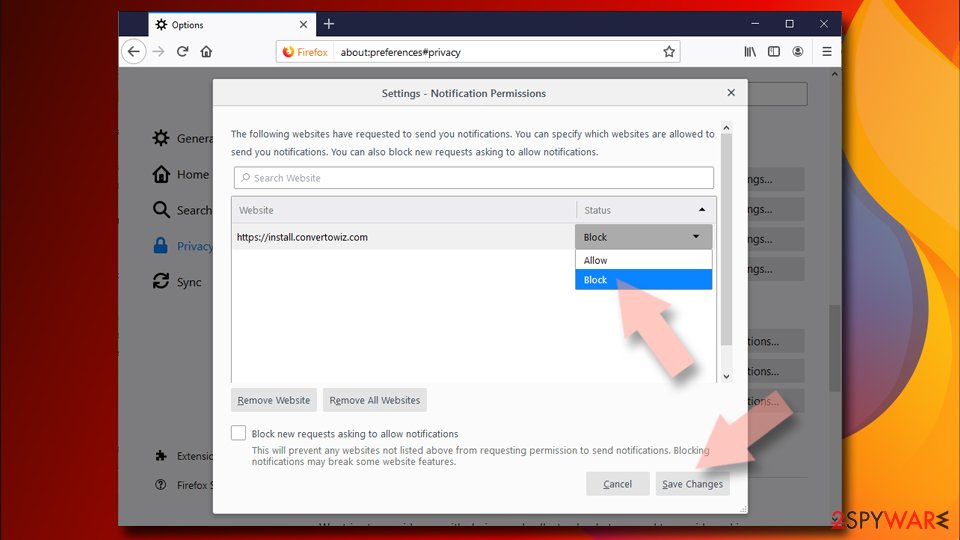
Remove unwanted notifications from Mozilla Firefox:
- Open Mozilla Firefox and go to Menu > Options.
- Click on Privacy & Security section.
- Under Permissions, you should be able to see Notifications. Click the Settings button next to it.

- In the Settings – Notification Permissions window, click on the drop-down menu by the URL in question.
- Select Block and then click on Save Changes. This should remove unwanted notifications from Mozilla Firefox.

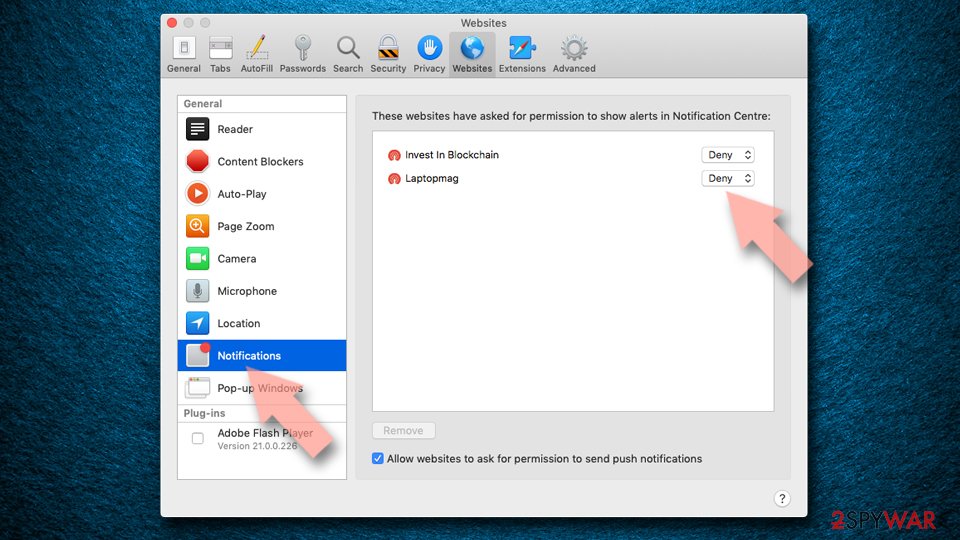
Remove unwanted notifications from Safari:
- Click on Safari > Preferences…
- Go to the Websites tab and, under General, select Notifications.
- Select the web address in question, click the drop-down menu and select Deny.

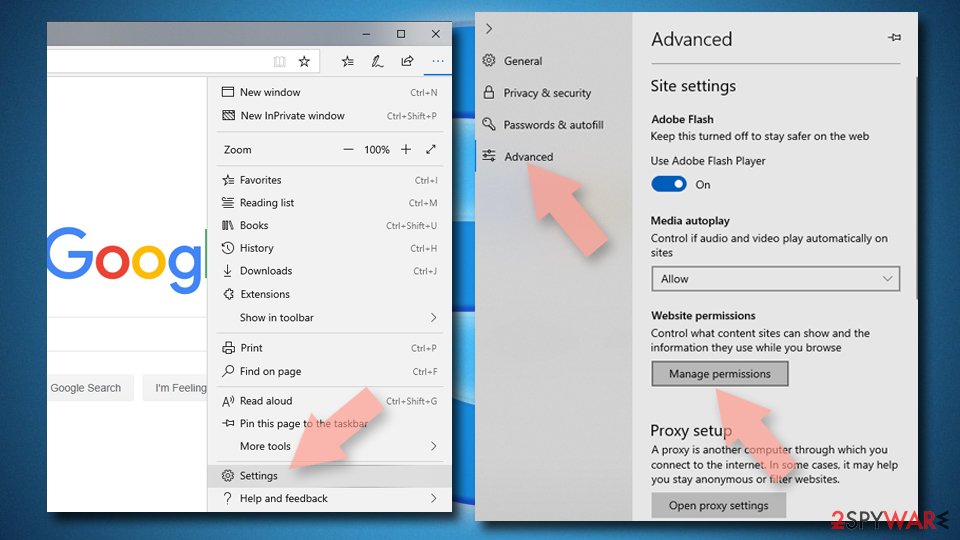
Remove unwanted notifications from MS Edge:
- Open Microsoft Edge, and click the Settings and more button (three horizontal dots) at the top-right of the window.
- Select Settings and then go to Advanced.
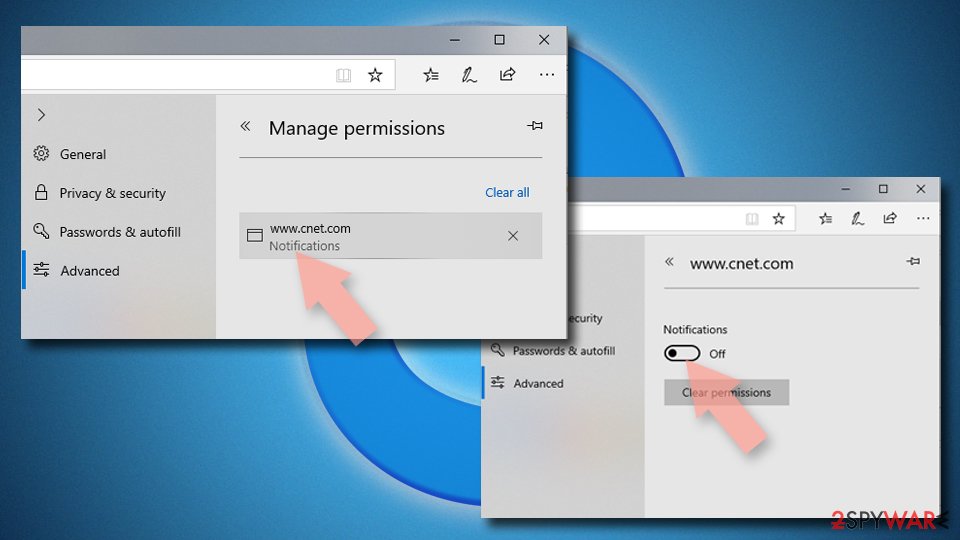
- Under Website permissions, pick Manage permissions and select the URL in question.

- Toggle the switch to the left to turn notifications off on Microsoft Edge.

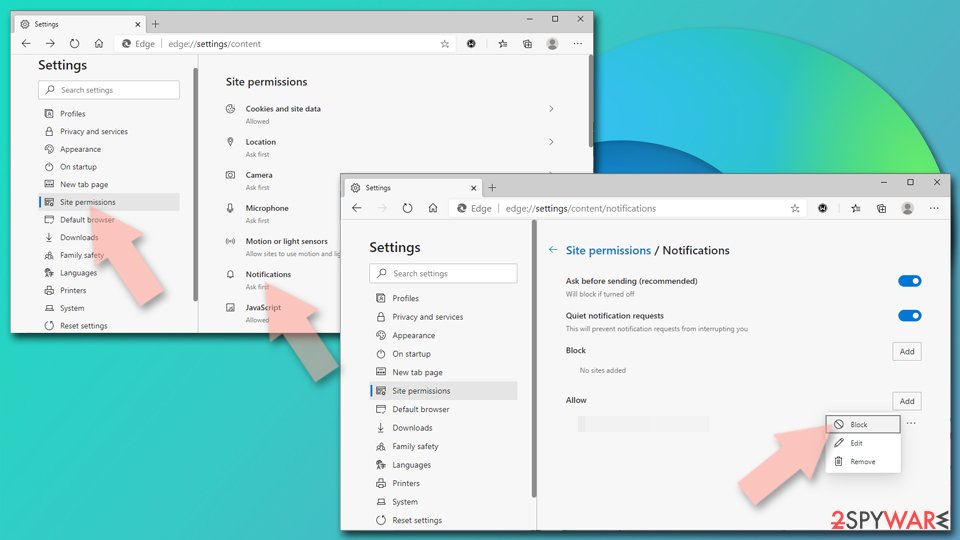
Remove unwanted notifications from MS Edge (Chromium):
- Open Microsoft Edge, and go to Settings.
- Select Site permissions.
- Go to Notifications on the right.
- Under Allow, you will find the unwanted entry.
- Click on More actions and select Block.

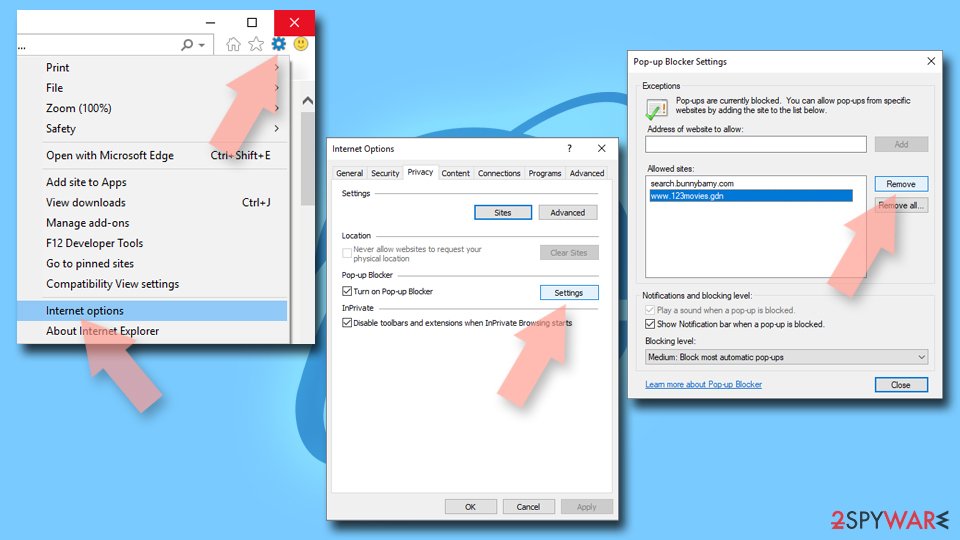
Remove unwanted notifications from Internet Explorer:
- Open Internet Explorer, and click on the Gear icon at the top-right of the window.
- Select Internet options and go to the Privacy tab.
- In the Pop-up Blocker section, click on Settings.
- Locate web address in question under Allowed sites and pick Remove.

Uninstall from Windows
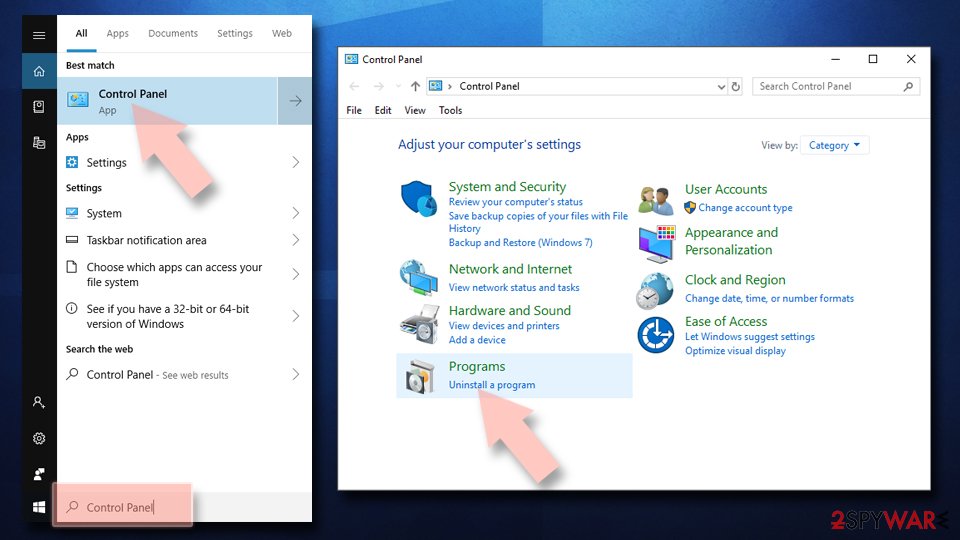
Instructions for Windows 10/8 machines:
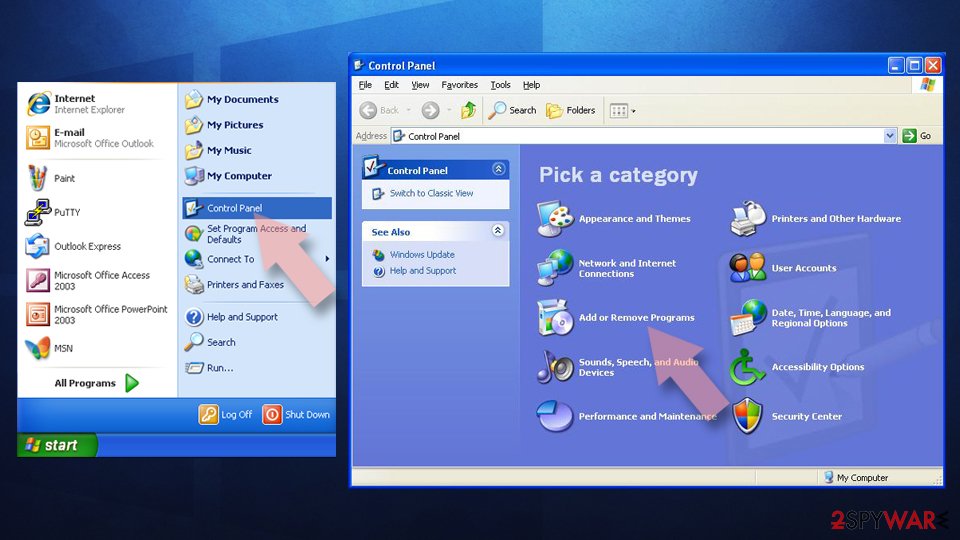
- Enter Control Panel into Windows search box and hit Enter or click on the search result.
- Under Programs, select Uninstall a program.

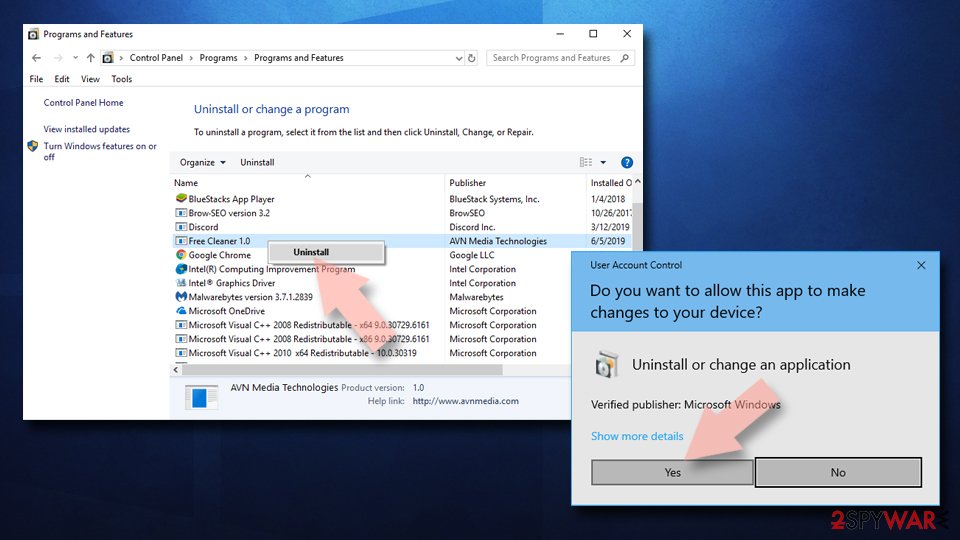
- From the list, find the entry of the suspicious program.
- Right-click on the application and select Uninstall.
- If User Account Control shows up, click Yes.
- Wait till uninstallation process is complete and click OK.

If you are Windows 7/XP user, proceed with the following instructions:
- Click on Windows Start > Control Panel located on the right pane (if you are Windows XP user, click on Add/Remove Programs).
- In Control Panel, select Programs > Uninstall a program.

- Pick the unwanted application by clicking on it once.
- At the top, click Uninstall/Change.
- In the confirmation prompt, pick Yes.
- Click OK once the removal process is finished.
Delete from macOS
Remove items from Applications folder:
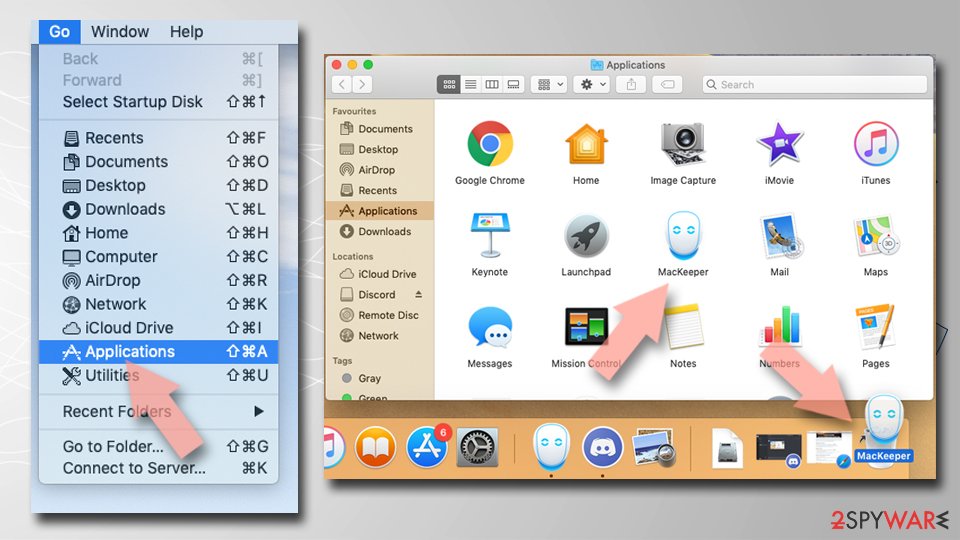
- From the menu bar, select Go > Applications.
- In the Applications folder, look for all related entries.
- Click on the app and drag it to Trash (or right-click and pick Move to Trash)

To fully remove an unwanted app, you need to access Application Support, LaunchAgents, and LaunchDaemons folders and delete relevant files:
- Select Go > Go to Folder.
- Enter /Library/Application Support and click Go or press Enter.
- In the Application Support folder, look for any dubious entries and then delete them.
- Now enter /Library/LaunchAgents and /Library/LaunchDaemons folders the same way and terminate all the related .plist files.

Uninstall from Android
Uninstall unwanted programs from Android device:
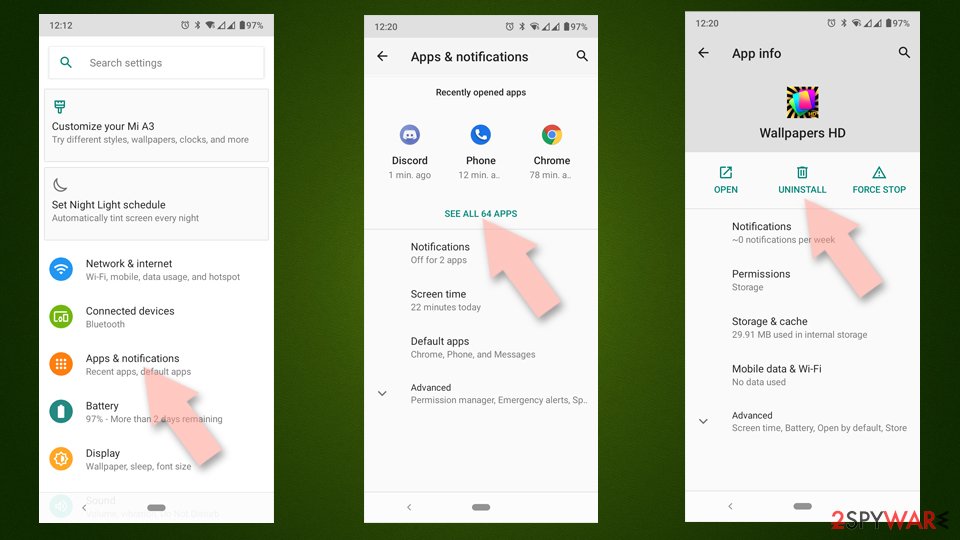
- Go to Settings -> Apps/Applications.
- Expand the full list of the installed apps.
- Scroll through the list and tap on a suspicious application once.
- Tap on it and select Uninstall.

- Reboot the device.
Clear Storage and data files on Android from Google Chrome or other apps:
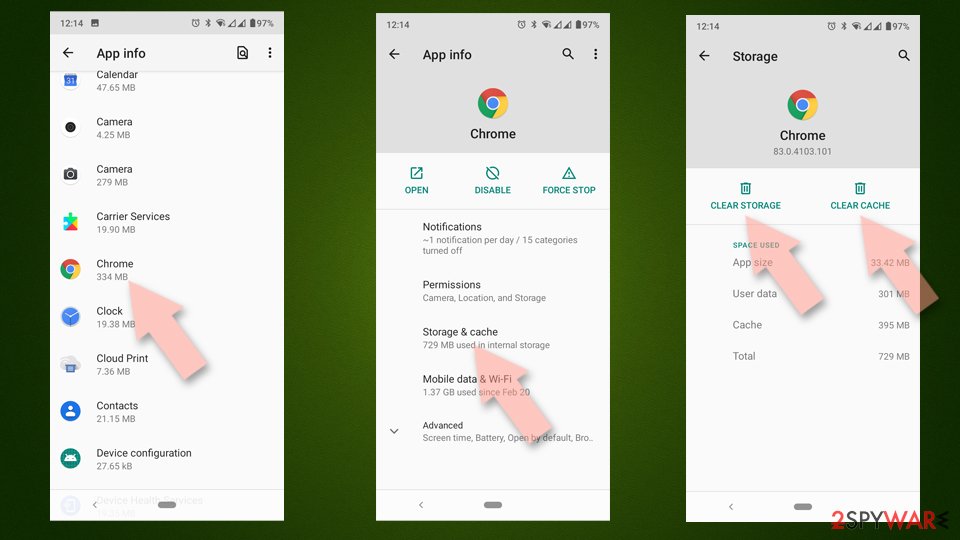
- Go to Settings > Apps/Applications.
- Expand the full list of the installed apps.
- Tap on Chrome and select Storage & cache.
- Clear storage and clear cache of the app.

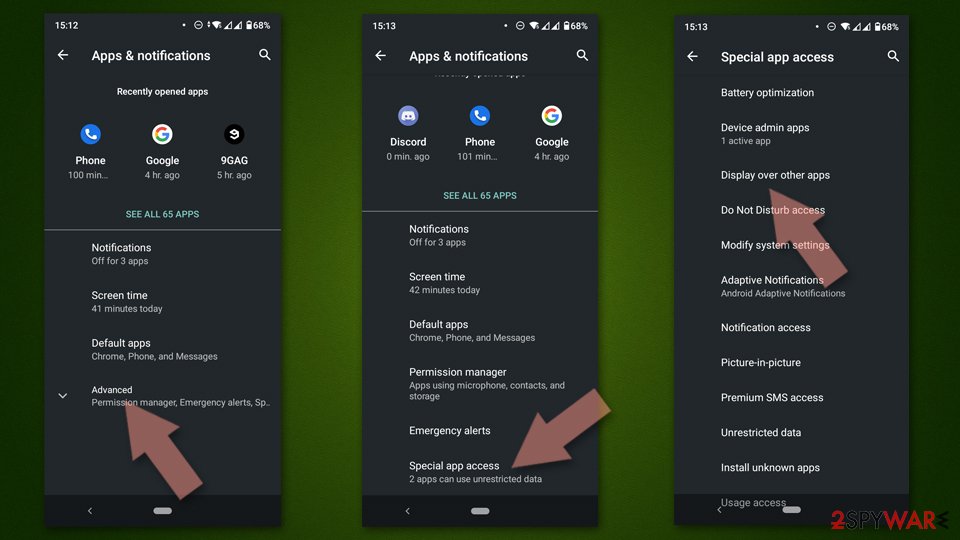
If you are seeing ads on top of other apps but are not sure what is causing it, perform the following steps:
- Go to Apps/Applications.
- Tap Advanced.
- Select Special App access.
- Tap on Display over other apps.

- Eliminate apps with these access rights enabled.
Remove from Microsoft Edge
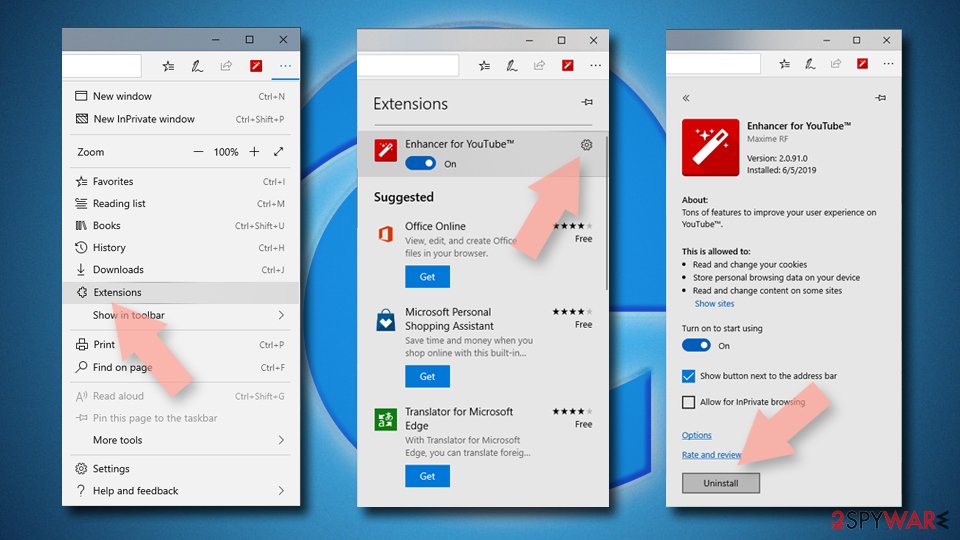
Delete unwanted extensions from MS Edge:
- Select Menu (three horizontal dots at the top-right of the browser window) and pick Extensions.
- From the list, pick the extension and click on the Gear icon.
- Click on Uninstall at the bottom.

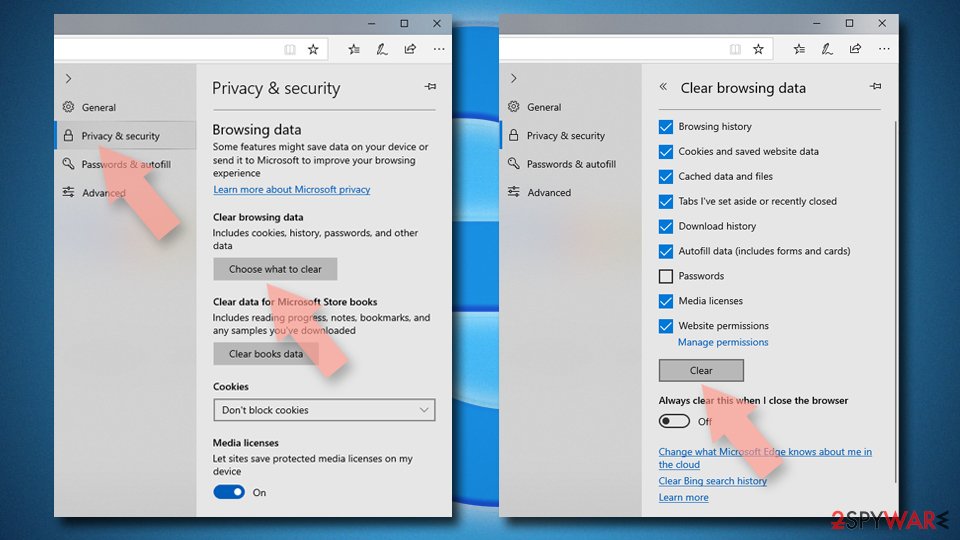
Clear cookies and other browser data:
- Click on the Menu (three horizontal dots at the top-right of the browser window) and select Privacy & security.
- Under Clear browsing data, pick Choose what to clear.
- Select everything (apart from passwords, although you might want to include Media licenses as well, if applicable) and click on Clear.

Restore new tab and homepage settings:
- Click the menu icon and choose Settings.
- Then find On startup section.
- Click Disable if you found any suspicious domain.
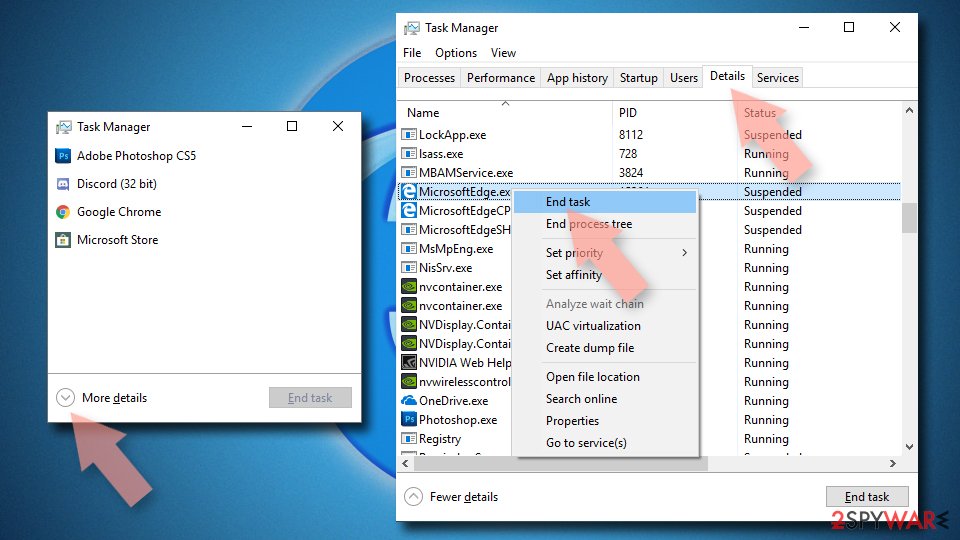
Reset MS Edge if the above steps did not work:
- Press on Ctrl + Shift + Esc to open Task Manager.
- Click on More details arrow at the bottom of the window.
- Select Details tab.
- Now scroll down and locate every entry with Microsoft Edge name in it. Right-click on each of them and select End Task to stop MS Edge from running.

If this solution failed to help you, you need to use an advanced Edge reset method. Note that you need to backup your data before proceeding.
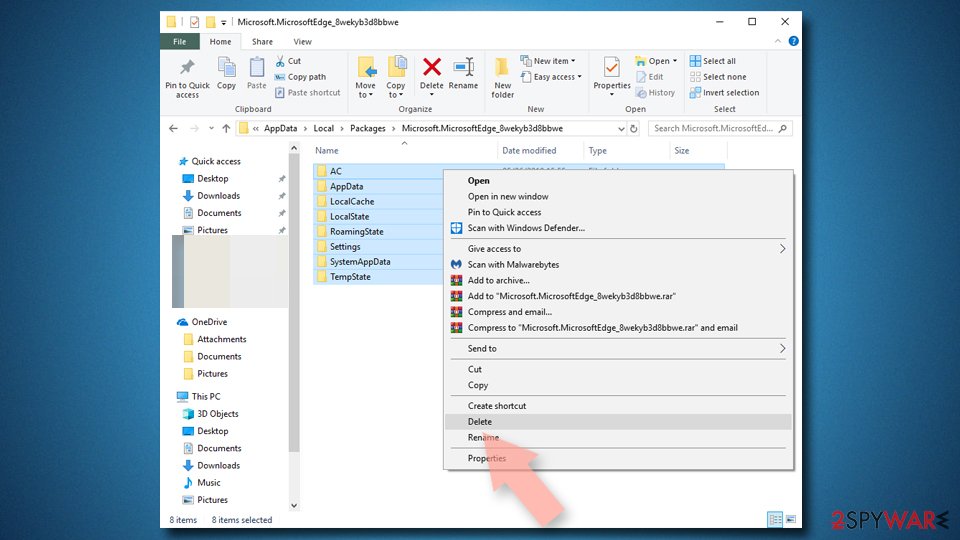
- Find the following folder on your computer: C:\\Users\\%username%\\AppData\\Local\\Packages\\Microsoft.MicrosoftEdge_8wekyb3d8bbwe.
- Press Ctrl + A on your keyboard to select all folders.
- Right-click on them and pick Delete

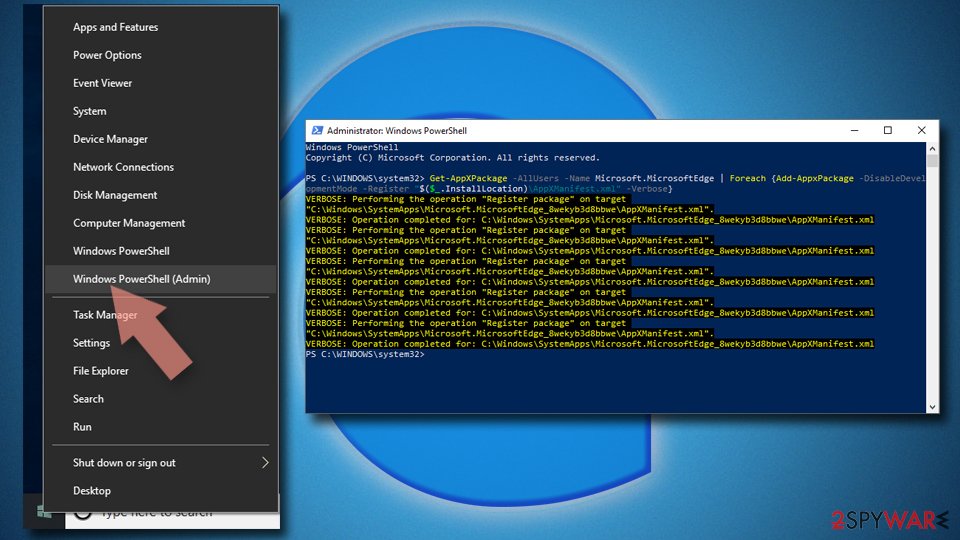
- Now right-click on the Start button and pick Windows PowerShell (Admin).
- When the new window opens, copy and paste the following command, and then press Enter:
Get-AppXPackage -AllUsers -Name Microsoft.MicrosoftEdge | Foreach {Add-AppxPackage -DisableDevelopmentMode -Register “$($_.InstallLocation)\\AppXManifest.xml” -Verbose

Instructions for Chromium-based Edge
Delete extensions from MS Edge (Chromium):
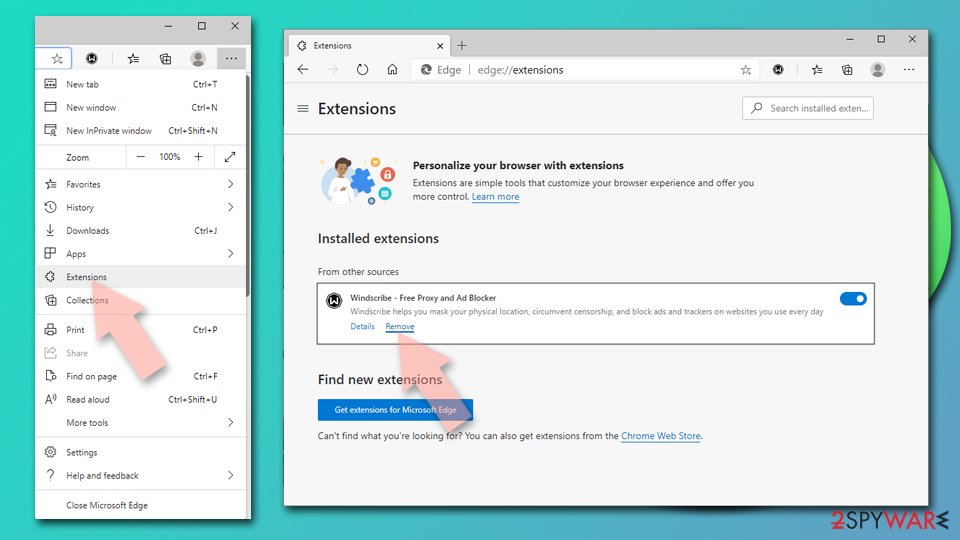
- Open Edge and click select Settings > Extensions.
- Delete unwanted extensions by clicking Remove.

Clear cache and site data:
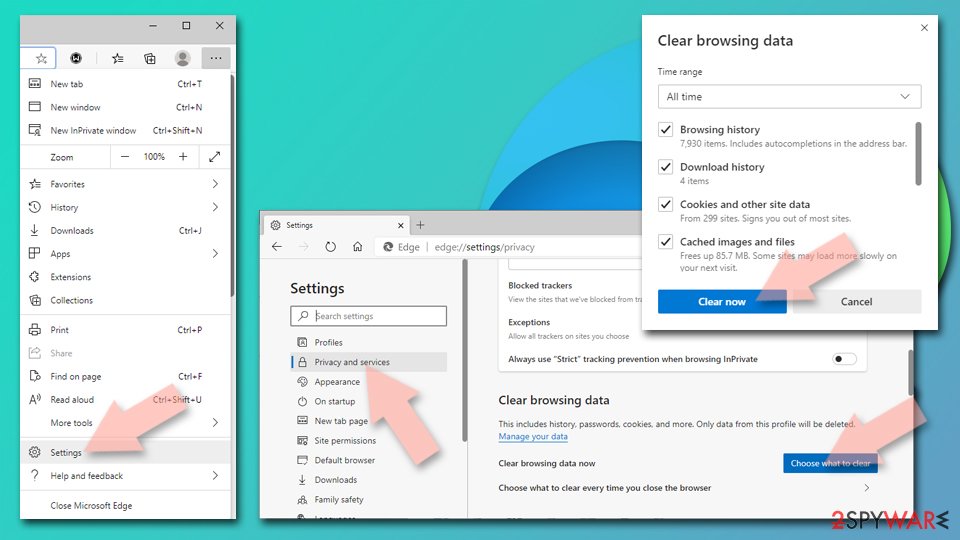
- Click on Menu and go to Settings.
- Select Privacy, search and services.
- Under Clear browsing data, pick Choose what to clear.
- Under Time range, pick All time.
- Select Clear now.

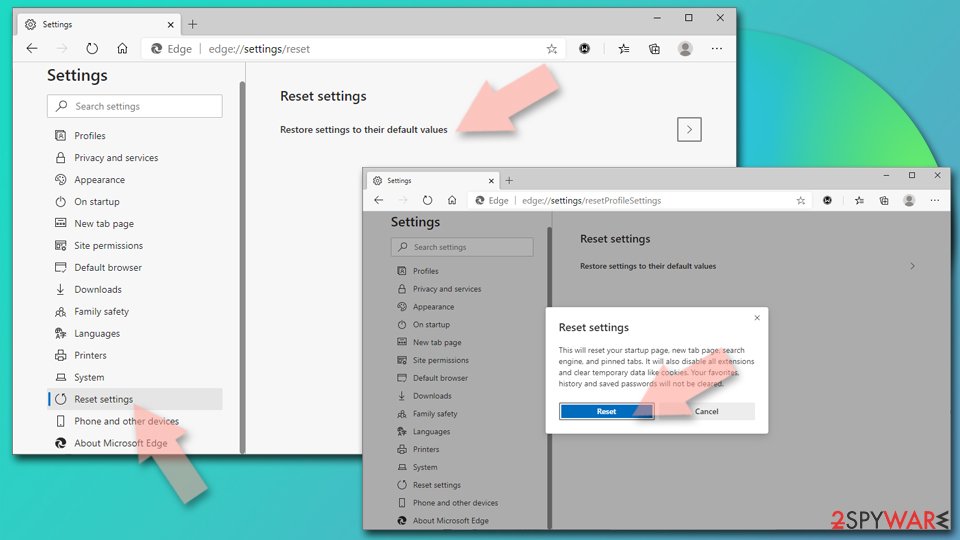
Reset Chromium-based MS Edge:
- Click on Menu and select Settings.
- On the left side, pick Reset settings.
- Select Restore settings to their default values.
- Confirm with Reset.

Remove from Mozilla Firefox (FF)
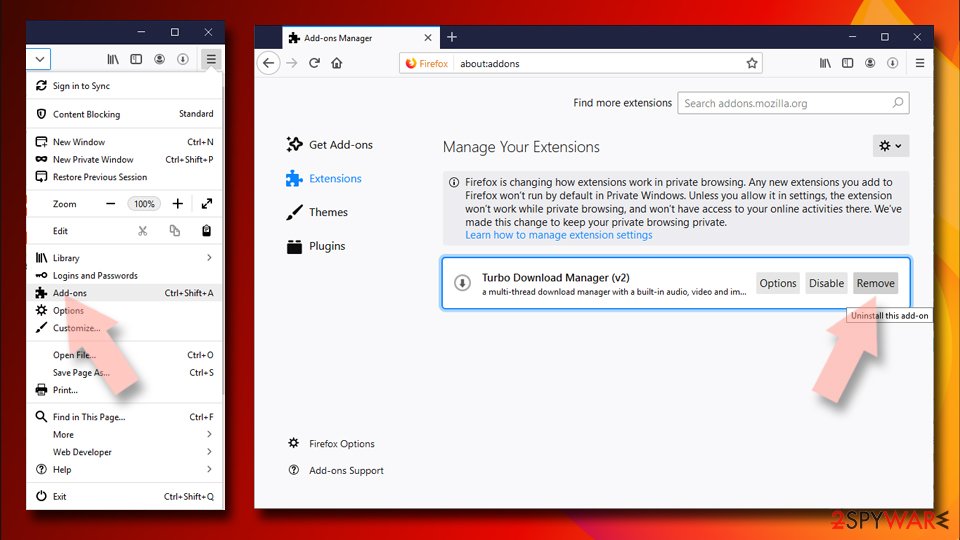
Remove dangerous extensions:
- Open Mozilla Firefox browser and click on the Menu (three horizontal lines at the top-right of the window).
- Select Add-ons.
- In here, select unwanted plugin and click Remove.

Reset the homepage:
- Click three horizontal lines at the top right corner to open the menu.
- Choose Options.
- Under Home options, enter your preferred site that will open every time you newly open the Mozilla Firefox.
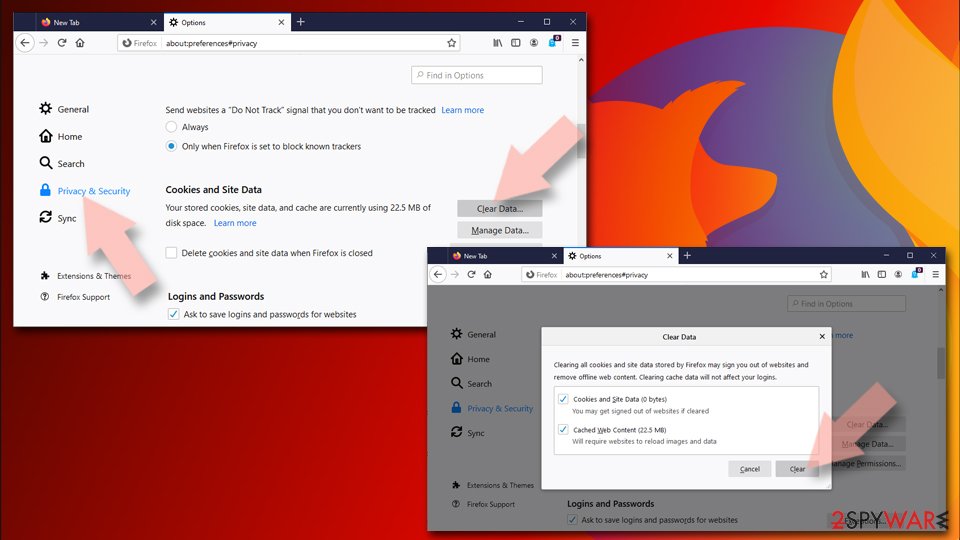
Clear cookies and site data:
- Click Menu and pick Settings.
- Go to Privacy & Security section.
- Scroll down to locate Cookies and Site Data.
- Click on Clear Data…
- Select Cookies and Site Data, as well as Cached Web Content and press Clear.

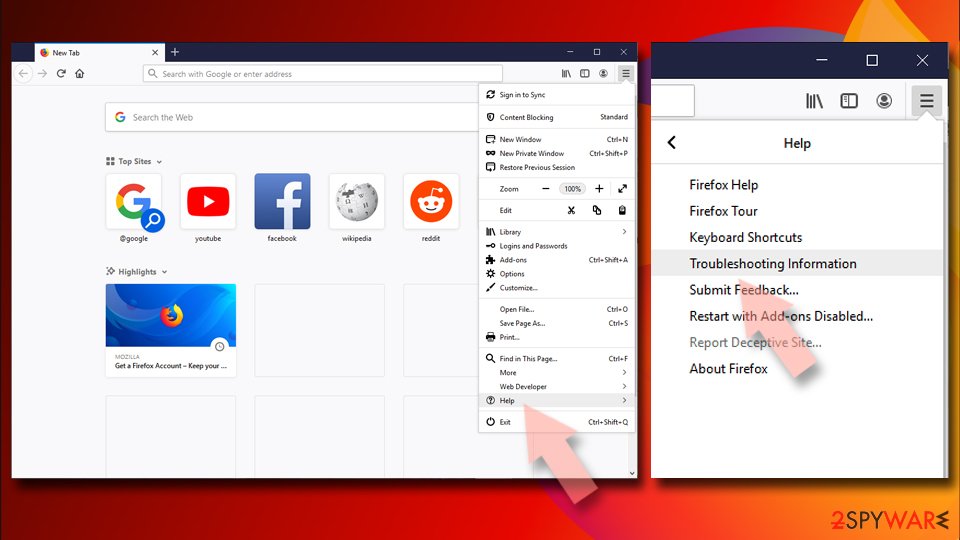
Reset Mozilla Firefox
If clearing the browser as explained above did not help, reset Mozilla Firefox:
- Open Mozilla Firefox browser and click the Menu.
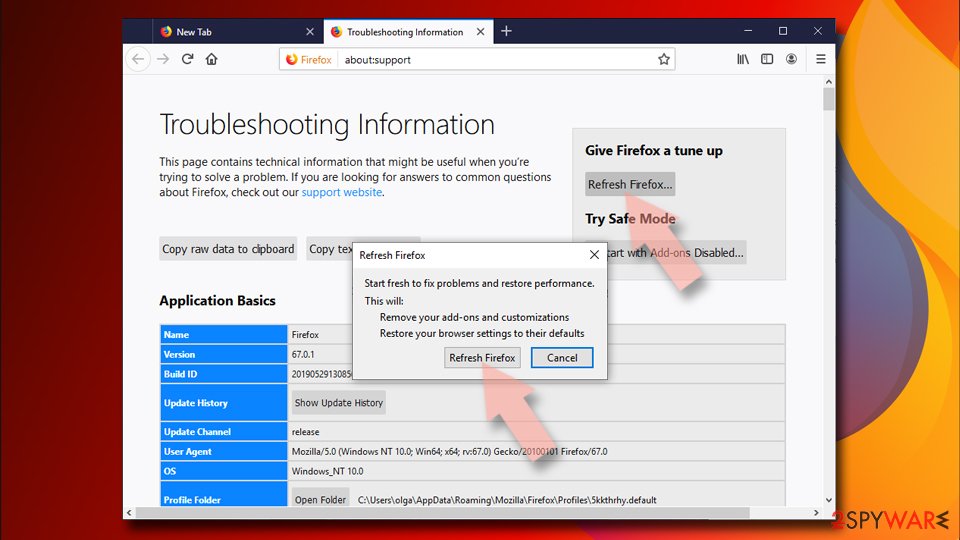
- Go to Help and then choose Troubleshooting Information.

- Under Give Firefox a tune up section, click on Refresh Firefox…
- Once the pop-up shows up, confirm the action by pressing on Refresh Firefox.

Remove from Google Chrome
Delete malicious extensions from Google Chrome:
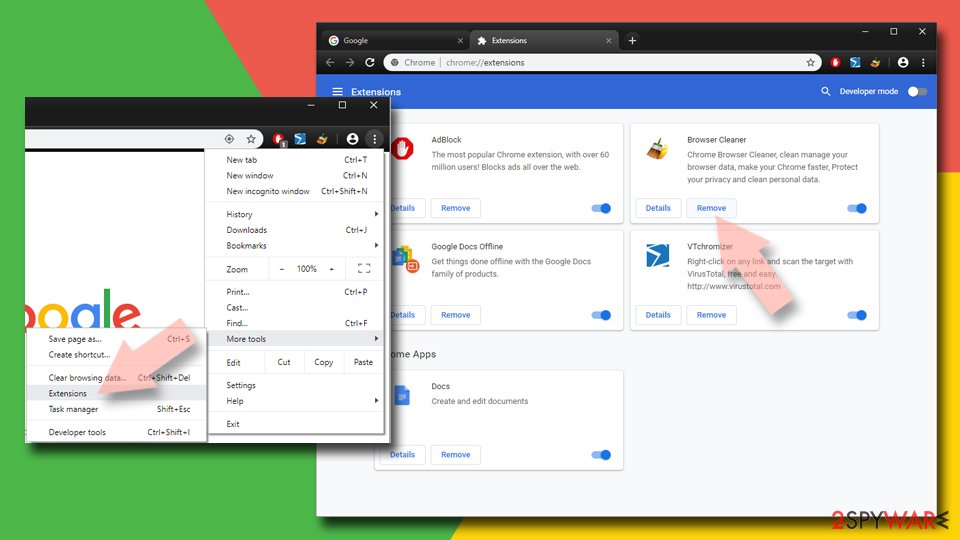
- Open Google Chrome, click on the Menu (three vertical dots at the top-right corner) and select More tools > Extensions.
- In the newly opened window, you will see all the installed extensions. Uninstall all the suspicious plugins that might be related to the unwanted program by clicking Remove.

Clear cache and web data from Chrome:
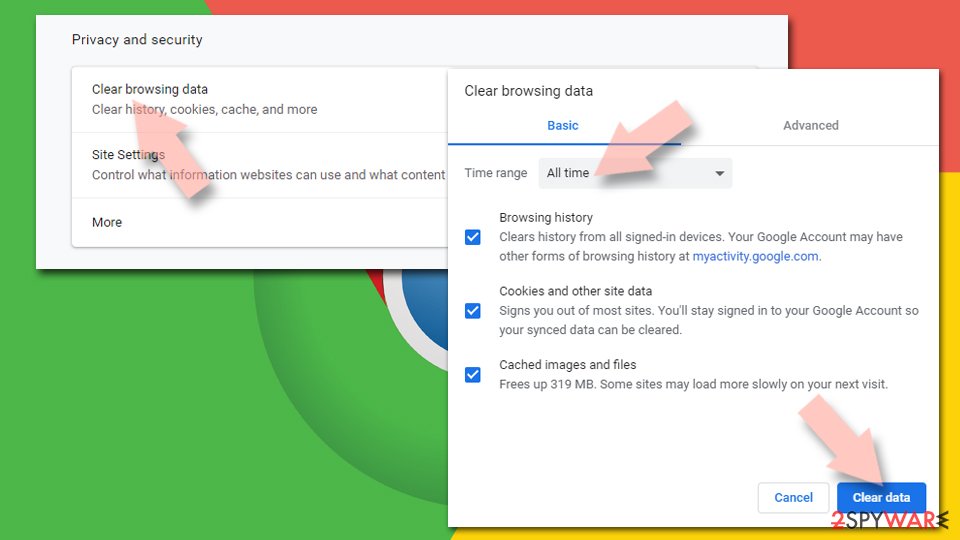
- Click on Menu and pick Settings.
- Under Privacy and security, select Clear browsing data.
- Select Browsing history, Cookies and other site data, as well as Cached images and files.
- Click Clear data.

Change your homepage:
- Click menu and choose Settings.
- Look for a suspicious site in the On startup section.
- Click on Open a specific or set of pages and click on three dots to find the Remove option.
Reset Google Chrome:
If the previous methods did not help you, reset Google Chrome to eliminate all the unwanted components:
- Click on Menu and select Settings.
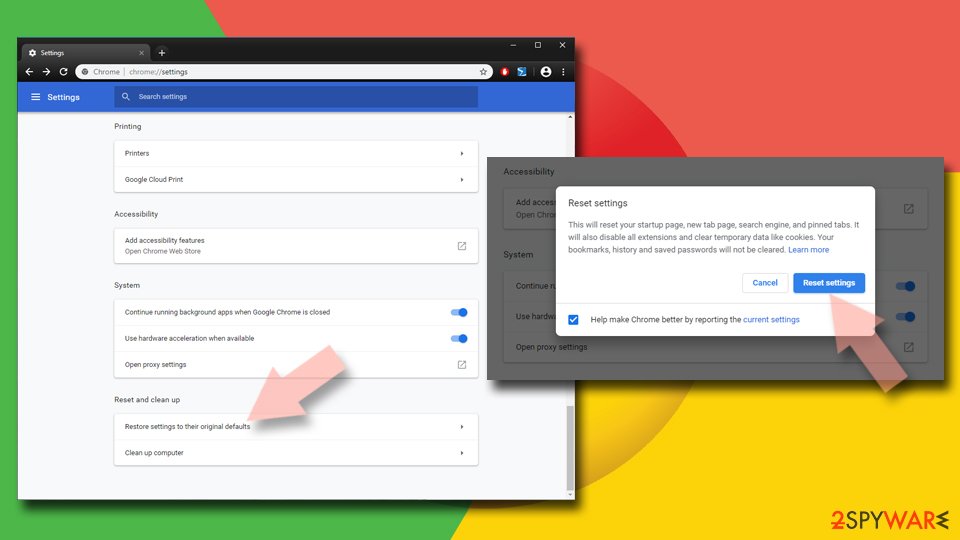
- In the Settings, scroll down and click Advanced.
- Scroll down and locate Reset and clean up section.
- Now click Restore settings to their original defaults.
- Confirm with Reset settings.

Delete from Safari
Remove unwanted extensions from Safari:
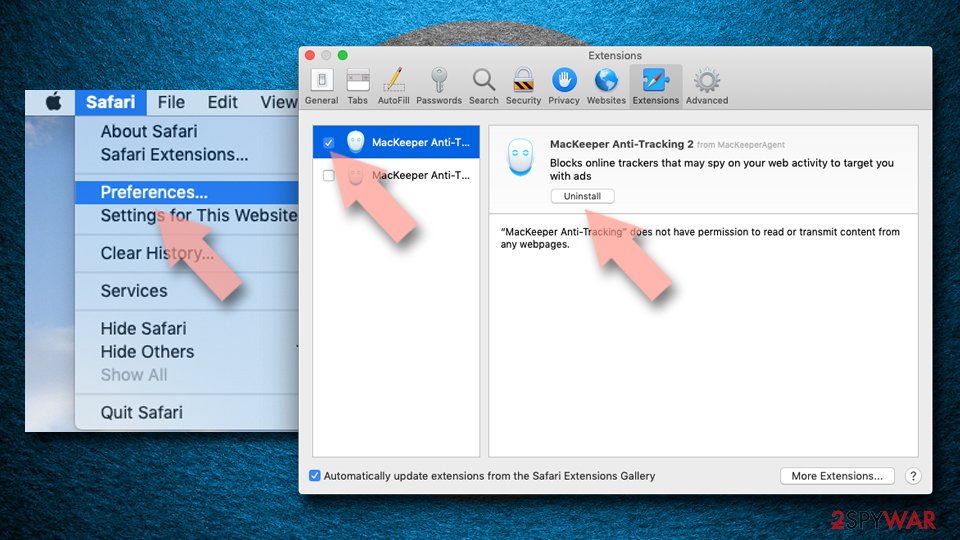
- Click Safari > Preferences…
- In the new window, pick Extensions.
- Select the unwanted extension and select Uninstall.

Clear cookies and other website data from Safari:
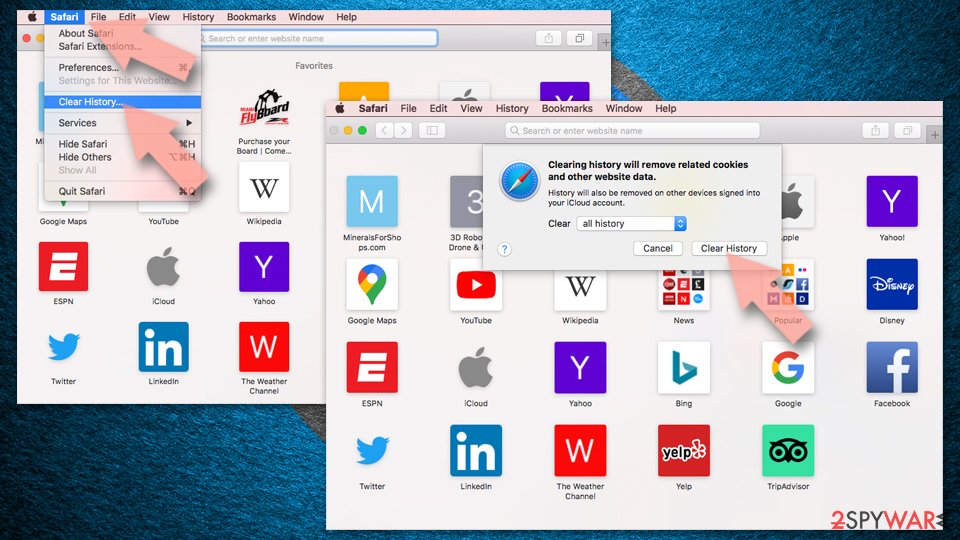
- Click Safari > Clear History…
- From the drop-down menu under Clear, pick all history.
- Confirm with Clear History.

Reset Safari if the above-mentioned steps did not help you:
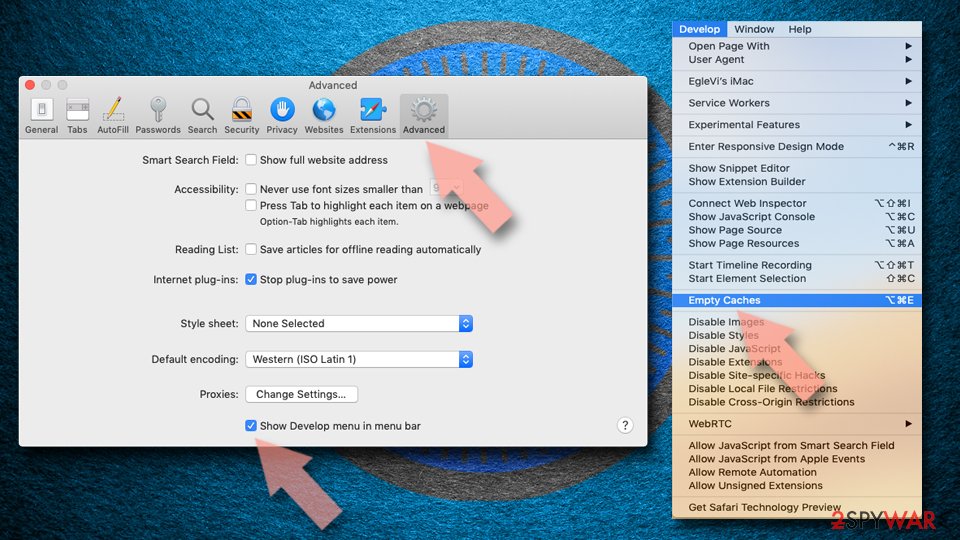
- Click Safari > Preferences…
- Go to Advanced tab.
- Tick the Show Develop menu in menu bar.
- From the menu bar, click Develop, and then select Empty Caches.

After uninstalling this potentially unwanted program (PUP) and fixing each of your web browsers, we recommend you to scan your PC system with a reputable anti-spyware. This will help you to get rid of Therequire.biz registry traces and will also identify related parasites or possible malware infections on your computer. For that you can use our top-rated malware remover: FortectIntego, SpyHunter 5Combo Cleaner or Malwarebytes.
How to prevent from getting adware
Do not let government spy on you
The government has many issues in regards to tracking users' data and spying on citizens, so you should take this into consideration and learn more about shady information gathering practices. Avoid any unwanted government tracking or spying by going totally anonymous on the internet.
You can choose a different location when you go online and access any material you want without particular content restrictions. You can easily enjoy internet connection without any risks of being hacked by using Private Internet Access VPN.
Control the information that can be accessed by government any other unwanted party and surf online without being spied on. Even if you are not involved in illegal activities or trust your selection of services, platforms, be suspicious for your own security and take precautionary measures by using the VPN service.
Backup files for the later use, in case of the malware attack
Computer users can suffer from data losses due to cyber infections or their own faulty doings. Ransomware can encrypt and hold files hostage, while unforeseen power cuts might cause a loss of important documents. If you have proper up-to-date backups, you can easily recover after such an incident and get back to work. It is also equally important to update backups on a regular basis so that the newest information remains intact – you can set this process to be performed automatically.
When you have the previous version of every important document or project you can avoid frustration and breakdowns. It comes in handy when malware strikes out of nowhere. Use Data Recovery Pro for the data restoration process.
- ^ Potentially unwanted program. Wikipedia. The free encyclopedia.
- ^ Forrest Stroud. Drive-By Download. Webopedia. Online tech dictionary.
- ^ NoVirus. Novirus. Spyware news and security.
