
YOUR APPLE COMPUTER HAS BEEN LOCKED" Tech Support Scam virus: what it is and how to remove it
'Your Apple Computer Has Been Locked' is a fake tech support scam displayed on compromised websites using Apple's brand to trick users into calling criminals. Never call the number or provide information.
Facts checked October 5, 2026. Removal steps tested on Windows 11 (26H2) and checked against Microsoft's and the browser makers' current documentation. Sections marked as our earlier report are the original text: they describe the threat as it was then and have not been reviewed since. The 2026 status, the removal steps and the questions are current.
Automatic
Get a free scan and check if your PC is infected.
Fortect finds malware, unwanted programs and the Windows damage they leave behind, and repairs it in one pass.
If the "YOUR APPLE COMPUTER HAS BEEN LOCKED' Tech Support Scam virus" warning keeps returning, an automatic scan can check browsers, extensions and installed programs in one pass.
Do it yourself · free Remove YOUR APPLE COMPUTER HAS BEEN LOCKED" Tech Support Scam virus yourself 2 steps, about 6 minutes, no software needed.
Start the steps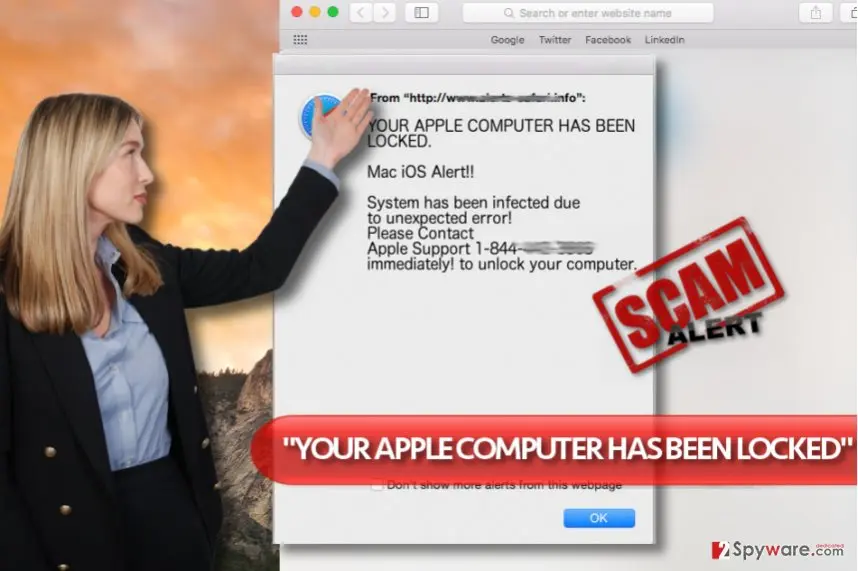
YOUR APPLE COMPUTER HAS BEEN LOCKED" Tech Support Scam virus: summary
| Detection names | No Microsoft detection name is known |
|---|---|
| Distribution | Not recorded in the old report |
| Damage | Not recorded in the old report |
| Name | YOUR APPLE COMPUTER HAS BEEN LOCKED" Tech Support Scam virus |
| Type | Tech support scam page |
| Symptoms | A fake virus warning in a browser tab |
| Removal | Scan the PC with security software to find and remove the malware and anything installed with it. Fortect scans Windows for malware and repairs the system files and settings it damaged. Remove it nowTo use the full-featured product, you have to purchase a license for Fortect. The scan is free. |
Show 3 more facts
| Evidence | 6 write-ups by security sites; details still limited |
|---|---|
| First seen | 7 February 2017 |
| Facts checked | 5 October 2026 |
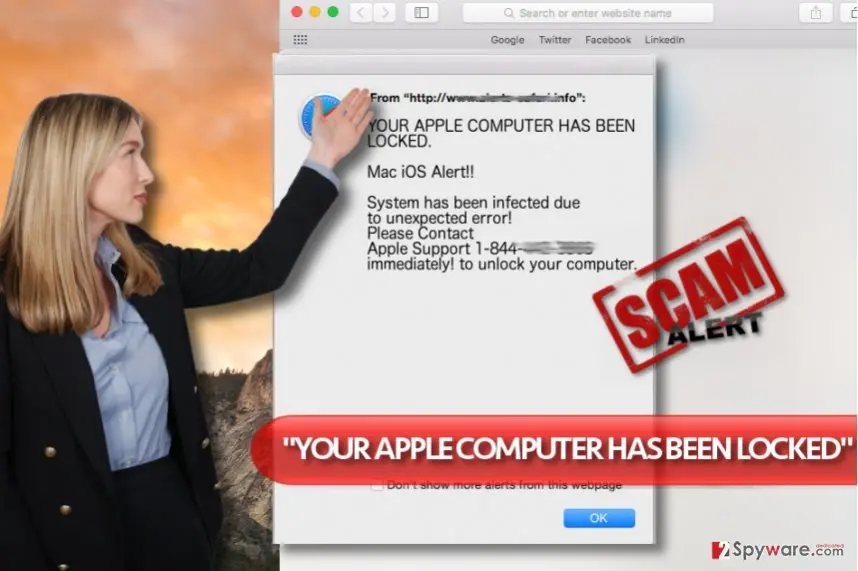
What the YOUR APPLE COMPUTER HAS BEEN LOCKED" Tech Support Scam virus pop-up looks like
YOUR APPLE COMPUTER HAS BEEN LOCKED" Tech Support Scam virus
What the YOUR APPLE COMPUTER HAS BEEN LOCKED" Tech Support Scam virus scammers want
From our report of Feb 2017 · not reviewed since
"YOUR APPLE COMPUTER HAS BEEN LOCKED" Tech Support Scam virus
Received a suspicious pop-up saying "YOUR APPLE COMPUTER HAS BEEN LOCKED "?
Wondering if someone has actually decided to lock iPhone Safari "for security reasons"? If so, you should not rush to call the number provided on the screen of your Mac, iPad or iPhone because you are simply dealing with tech support scammers who are trying to take advantage of unprofessional computer users who are trying to keep malware away from their devices.
Safari lock is simply a scam and you should not fall for it. These deceptive messages can compromise your iPhone as well as iPad or Mac computer - none of these devices is resistant to this type of malware yet . The scam is based on dozens of phishing websites that trigger official-looking alerts stating that user's "Apple computer has been blocked."
Scammers typically use Google Chrome or Safari to display these messages, but other web browsers may be affected as well. Scammers try to manipulate victim's feelings and scare him/her enough to force him/her call the provided "Apple Care" or "Apple Support" number without thinking. However, calling the provided number simply connects the victim to an underground office of criminals who pose as Apple's employees although they are not.
What is more, it has been noticed that the majority of such offices are detected in India, so if you have at least a slightest suspicion that you are dealing with tech support scam and the so-called "certified Apple technician" speaks with a strong Indian accent and asks you to reveal personal information or download and install some remote access programs, better hang up.
First of all, real Apple or Microsoft technicians would never ask you to provide sensitive information over the phone. Scammers might try to use your credit card details or your personal information for malevolent purposes, so be aware of tricks they use.
For example, they might try to sell you some suspicious "security" software for huge amounts of money ($100-$300 or more), sign in some suspicious portals that look like real Apple websites (phishing pages) using your Apple ID and so on. Remember that by logging into such portals you will simply send your login details directly to criminals servers.
If you suspect that your Mac has been affected by "YOUR APPLE COMPUTER HAS BEEN LOCKED" virus, run a system scan using and remove the infection. If you can't remove it with the help of this program, we suggest following instructions presented below the article.
Why YOUR APPLE COMPUTER HAS BEEN LOCKED" Tech Support Scam virus opens in your browser
From our report of Feb 2017 · not reviewed since
"YOUR APPLE COMPUTER HAS BEEN LOCKED" hijack takes place when the user visits compromised websites, downloads or installs questionable files and in many other cases.
If you noticed that your Mac/other iOS device started to act suspiciously, you should not ignore it and take actions immediately to solve the problem. The main advice from us is to watch what kind of content you access online. Remember that adult-oriented websites, gambling web pages, and especially websites that stock collections of wallpapers are considered dangerous and most likely to infect your PC with malware.
These sites make it to the list of the top hazardous places on the Internet. We advise you to be careful when browsing on one and avoid clicking on banners placed in them, and never explore offers that appear in pop-up or pop-under advertisements.
How to get rid of the YOUR APPLE COMPUTER HAS BEEN LOCKED" Tech Support Scam virus pop-up
The warning is a web page and your PC is not infected by it.
Close it, then remove what keeps bringing it back.
Step 1: Close the page without touching its buttons
Press Ctrl + Shift + Esc to open Task Manager, select the browser on Processes and click End task: buttons on the page, including Close and Cancel, can trigger downloads or more pop-ups. When you reopen the browser, do not restore the previous tabs.
Warning: Never call a number shown in a browser warning; Microsoft and antivirus companies do not put phone numbers in warnings.
If the page opens again by itself, notifications or an extension are bringing it back. Task Manager works the same in Windows 11 and Windows 10.
Full procedure with screenshots: Close a frozen app (Task Manager, Force Quit) On uGetFix
Step 2: Scan the PC, then run the offline scan
A scan finds the parts of YOUR APPLE COMPUTER HAS BEEN LOCKED" Tech Support Scam virus that the manual steps cannot see. In Windows Security > Virus & threat protection > Scan options, start a Full scan and quarantine what it reports.
Follow it with Microsoft Defender Antivirus (offline scan) > Scan now, which restarts the PC and checks the disk while Windows and the malware are not running.
It takes about 15 minutes and works the same in Windows 11 and Windows 10. If either scan finds something, run the full scan again after removal until it comes back clean.
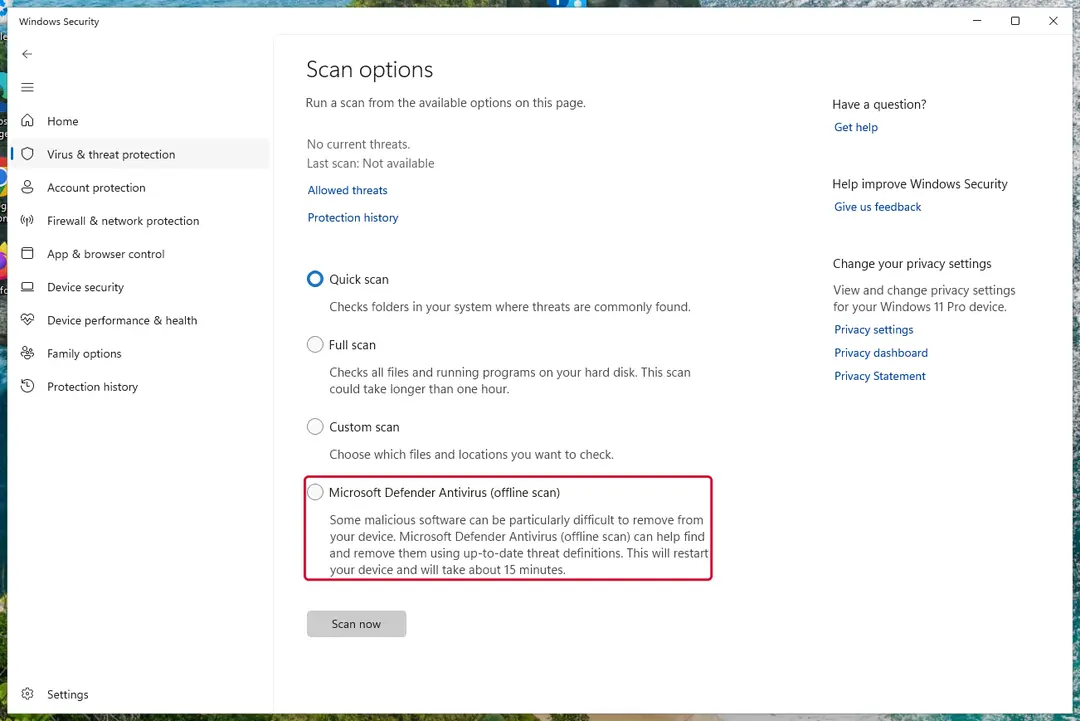
Windows 11: Windows Security > Virus & threat protection > Scan options. Full procedure with screenshots: Run a Microsoft Defender Offline scan
Instructions for each browser and system
The detailed steps for every browser and system this guide covers. Open the one you use.
Remove from Google Chrome
Delete malicious extensions from Google Chrome:
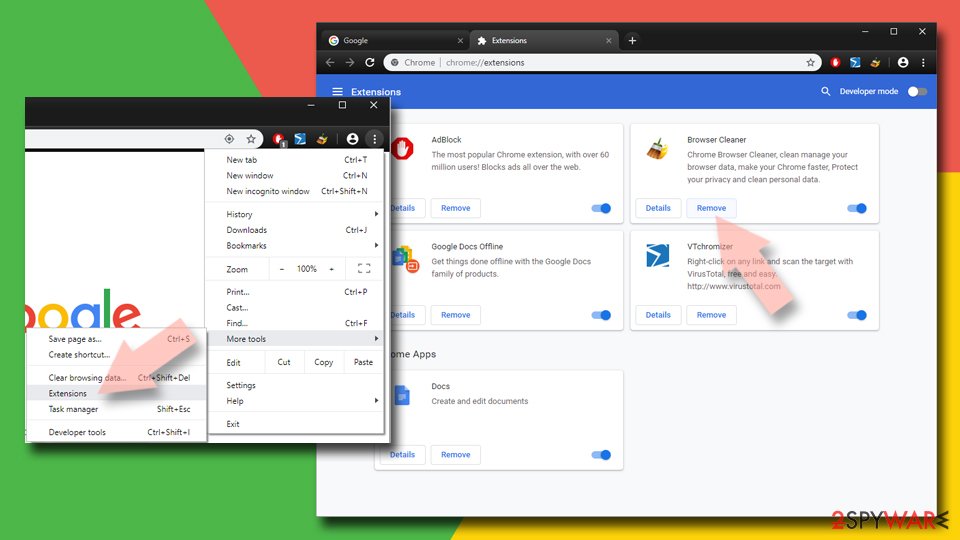
- Open Google Chrome, click on the Menu (three vertical dots at the top-right corner) and select More tools > Extensions.
- In the newly opened window, you will see all the installed extensions. Uninstall all suspicious extensions related to the unwanted program by clicking Remove.
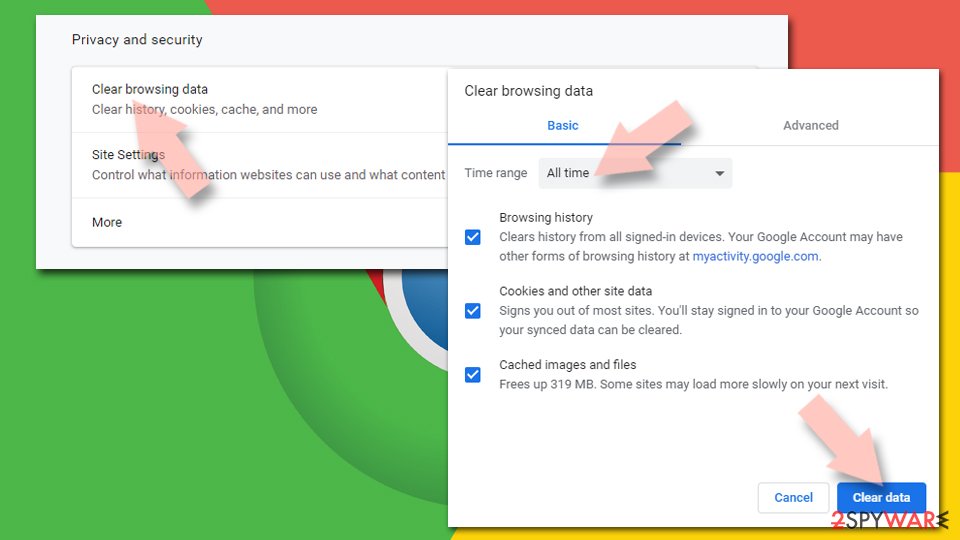
Clear cache and web data from Chrome:
- Click on Menu and pick Settings.
- Under Privacy and security, select Clear browsing data.
- Select Browsing history, Cookies and other site data, as well as Cached images and files.
- Click Clear data.
Change your homepage:
- Click menu and choose Settings.
- Look for a suspicious site in the On startup section.
- Click on Open a specific or set of pages and click on three dots to find the Remove option.
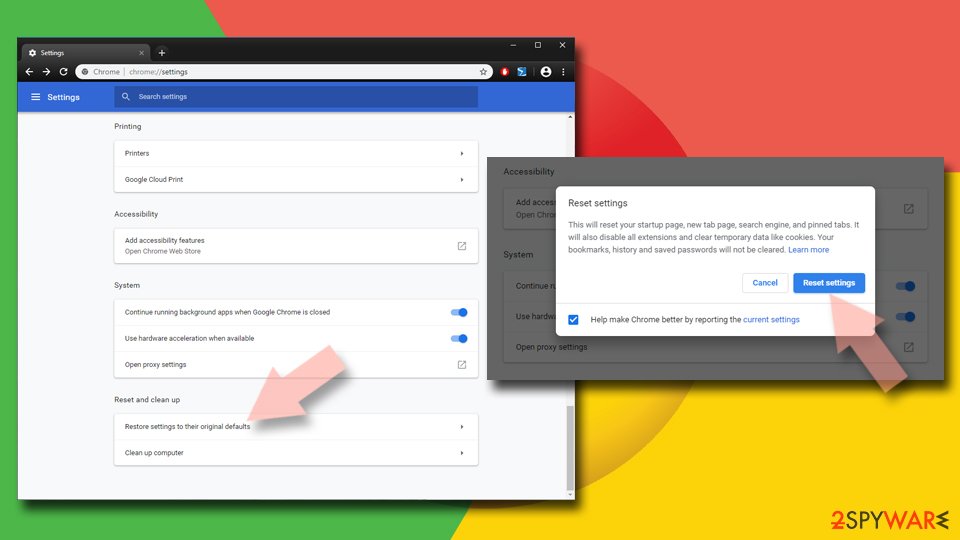
Reset Google Chrome:
If the previous methods did not help you, reset Google Chrome to eliminate all the unwanted components:
- Click on Menu and select Settings.
- In the Settings, scroll down and click Advanced.
- Scroll down and locate Reset and clean up section.
- Now click Restore settings to their original defaults.
- Confirm with Reset settings.
Remove from Microsoft Edge
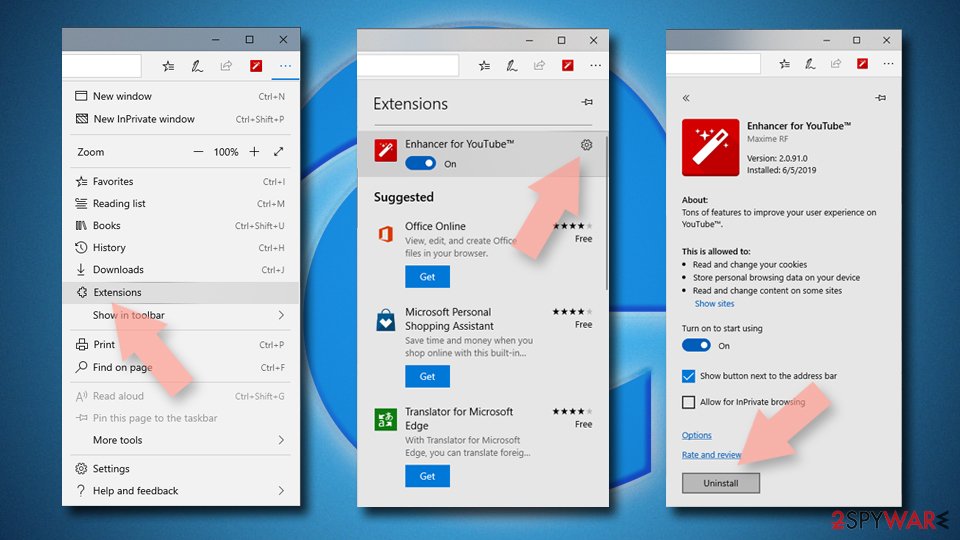
Delete unwanted extensions from MS Edge:
- Select Menu (three horizontal dots at the top-right of the browser window) and pick Extensions.
- From the list, pick the extension and click on the Gear icon.
- Click Remove.
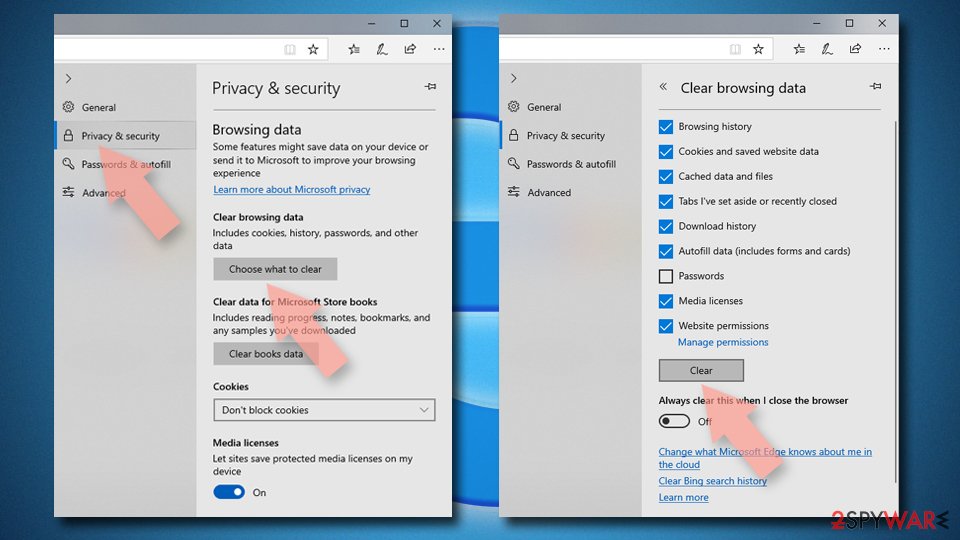
Clear cookies and other browser data:
- Click on the Menu (three horizontal dots at the top-right of the browser window) and select Settings > Privacy, search, and services..
- Under Clear browsing data, pick Choose what to clear.
- Select Cookies and other site data and Cached images and files. (apart from passwords, although you might want to include Media licenses as well, if applicable) and click on Clear.
Restore new tab and homepage settings:
- Click the menu icon and choose Settings.
- Then find On startup section.
- Click Remove next to any suspicious startup page.
Reset MS Edge if the above steps did not work:
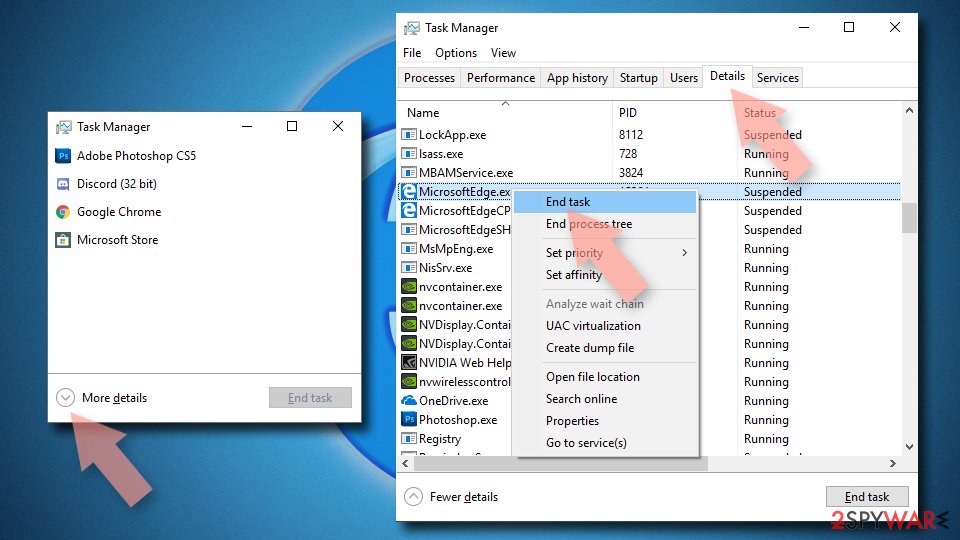
- Press on Ctrl + Shift + Esc to open Task Manager.
- Click on More details arrow at the bottom of the window.
- Select Details tab.
- Now scroll down and locate every entry with Microsoft Edge name in it. Right-click on each of them and select End Task to stop MS Edge from running.
Delete extensions from MS Edge (Chromium):
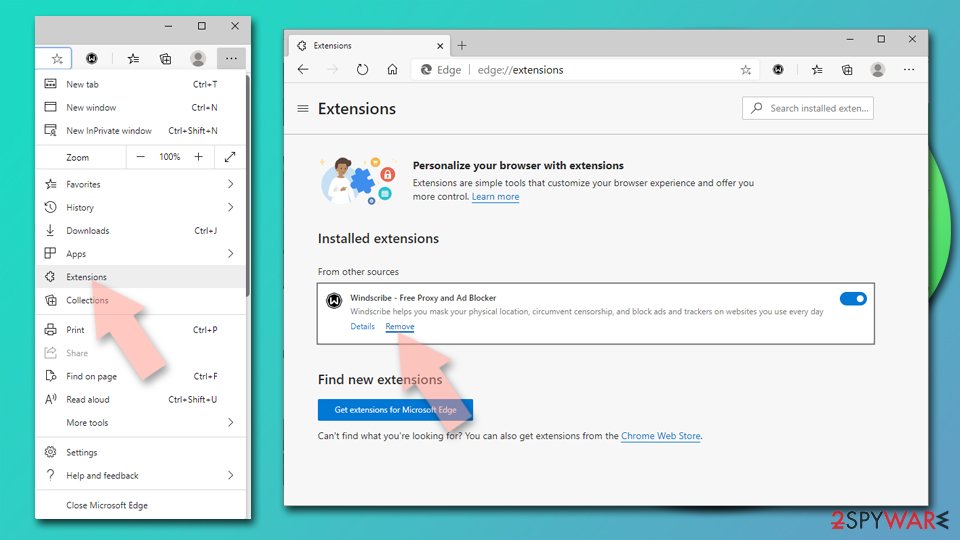
- Open Edge and click select Settings > Extensions.
- Delete unwanted extensions by clicking Remove.
Clear cache and site data:
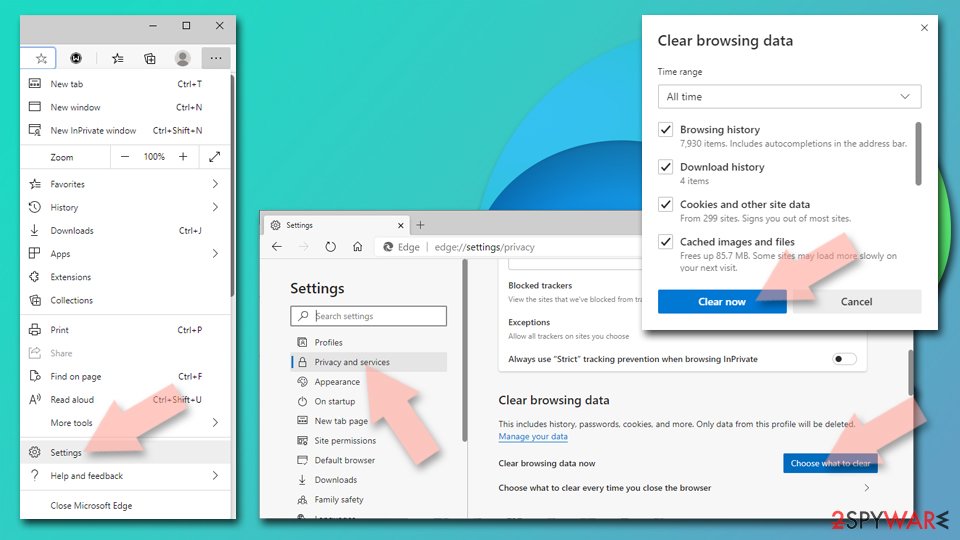
- Click on Menu and go to Settings.
- Select Privacy, search and services.
- Under Clear browsing data, pick Choose what to clear.
- Under Time range, pick All time.
- Select Clear now.
Reset Chromium-based MS Edge:
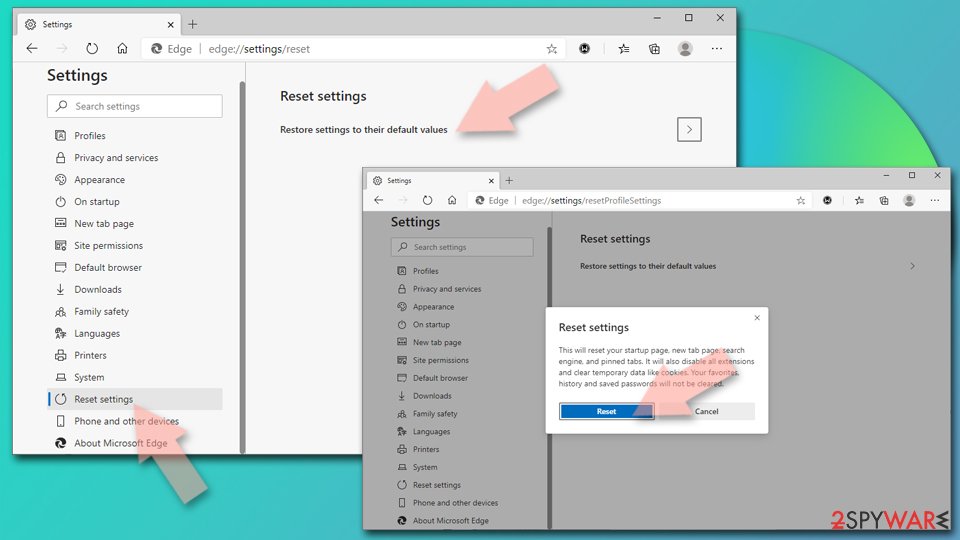
- Click on Menu and select Settings.
- On the left side, pick Reset settings.
- Select Restore settings to their default values.
- Confirm with Reset.
- This will disable extensions and reset startup pages but will not delete bookmarks, saved passwords, or browsing history.
Remove from Mozilla Firefox (FF)
Remove dangerous extensions:
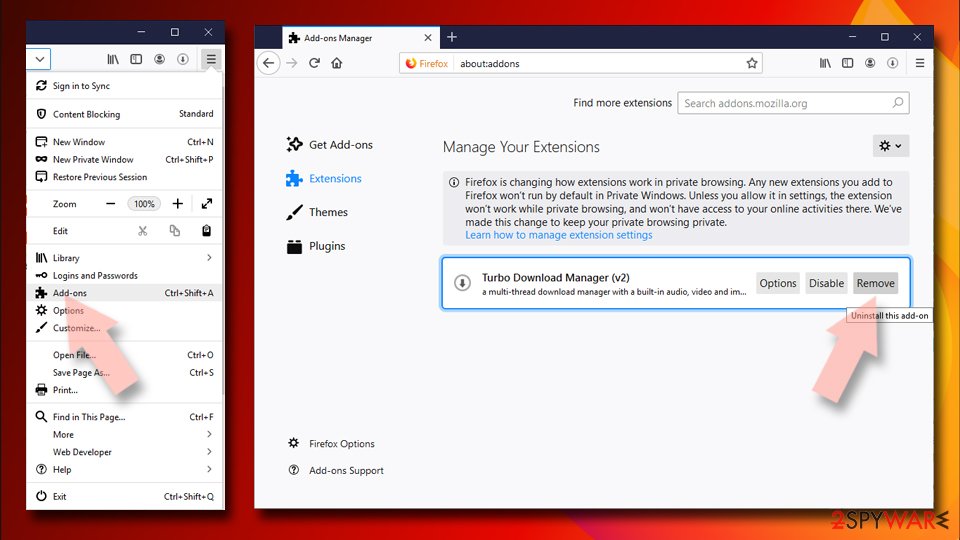
- Open Mozilla Firefox browser and click on the Menu (three horizontal lines at the top-right of the window).
- Select Add-ons.
- In here, select the unwanted extension and click Remove.
Reset the homepage:
- Click three horizontal lines at the top right corner to open the menu.
- Choose Settings.
- Under Home, set your preferred homepage and new tab settings.
Clear cookies and site data:
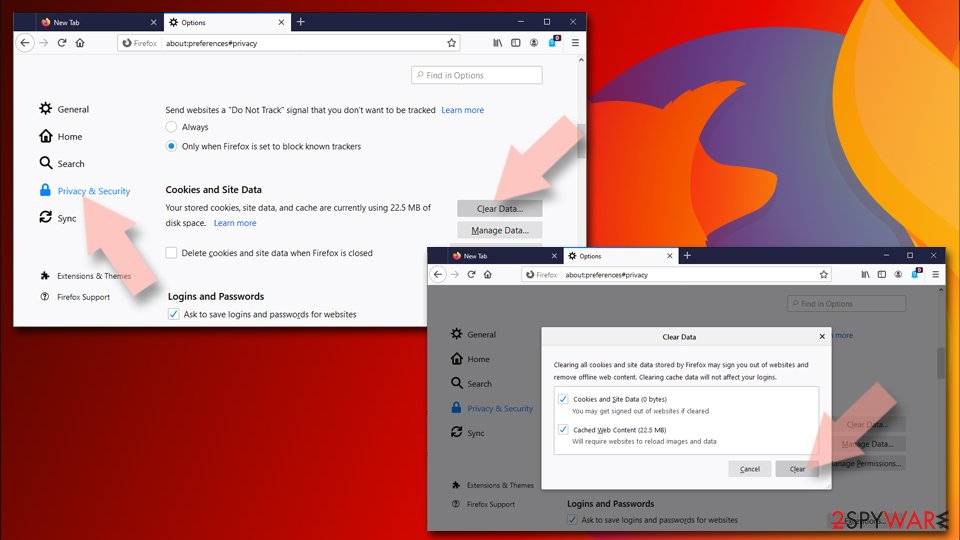
- Click Menu and pick Settings.
- Go to Privacy & Security section.
- Scroll down to locate Cookies and Site Data.
- Click on Clear Data...
- Select Cookies and Site Data and Temporary cached files and pages, then click Clear.
Reset Mozilla Firefox
If clearing the browser as explained above did not help, reset Mozilla Firefox:
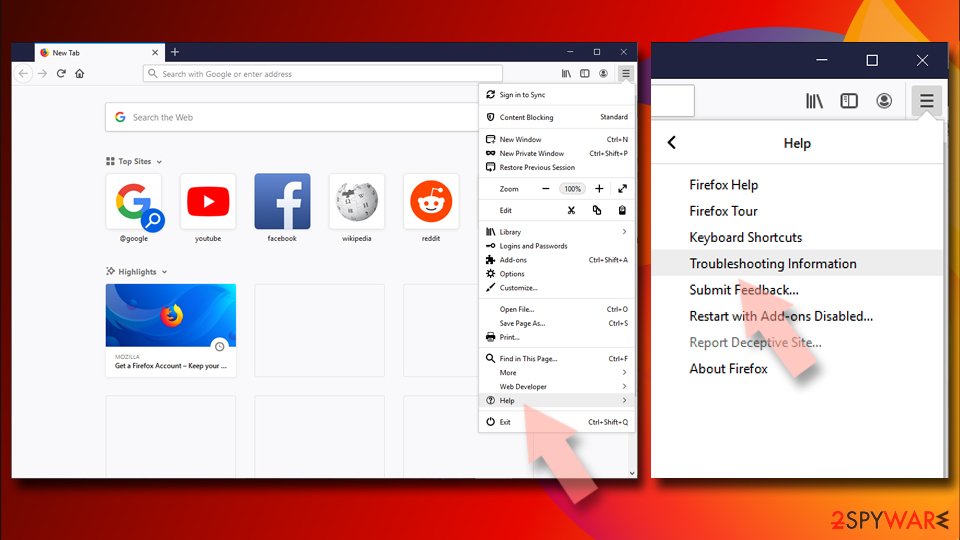
- Open Mozilla Firefox browser and click the Menu.
- Go to Help and then choose Troubleshooting Information.
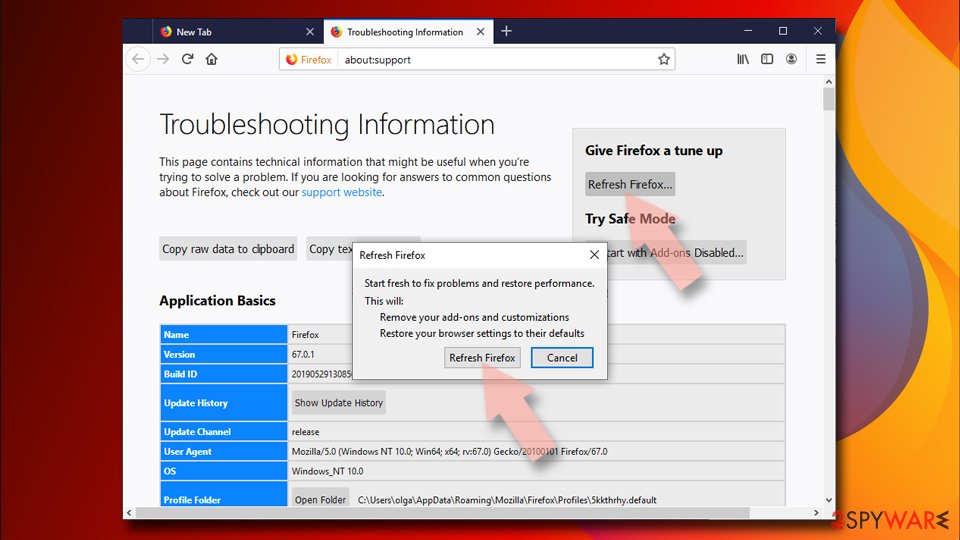
- Under Give Firefox a tune up section, click on Refresh Firefox...
- Once the pop-up shows up, confirm the action by pressing on Refresh Firefox.
Delete from Safari
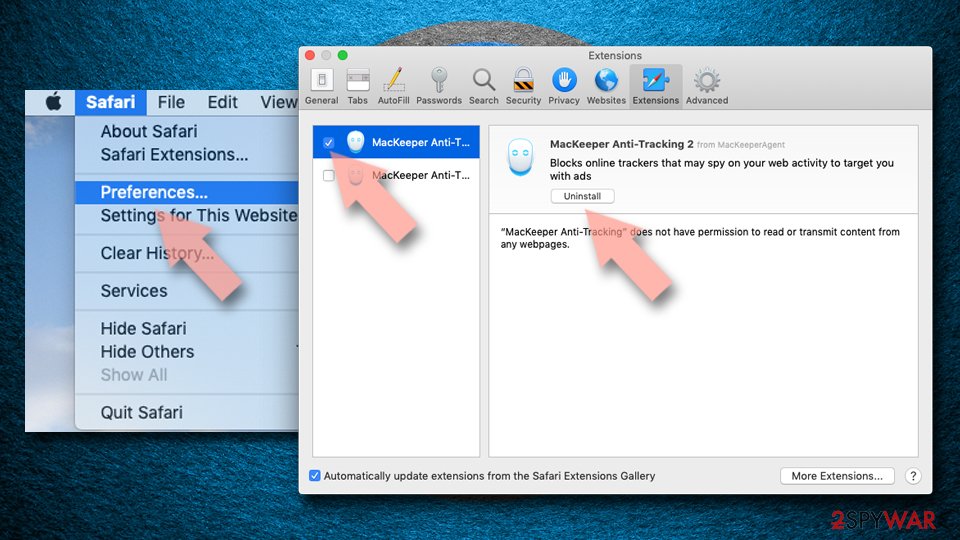
Remove dangerous extensions:
- Open Safari, click Safari in the menu at the top-left of the screen, and select Preferences.
- Go to the Extensions tab, look for any suspicious entries, and click Uninstall to remove them.
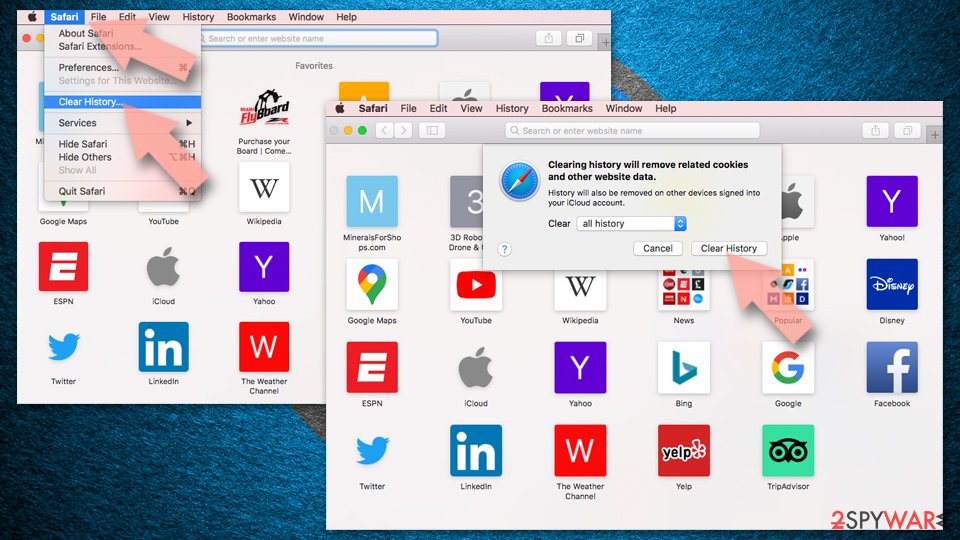
Clear history and website data:
- Click Safari in the menu and pick Clear History.
- Set Clear to all history and confirm with Clear History.
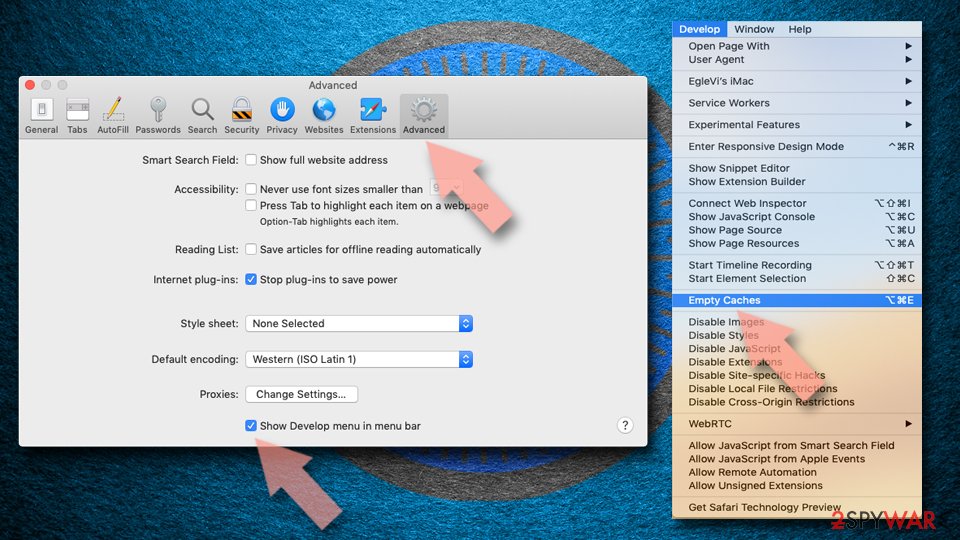
Reset Safari:
- Click Safari in the menu and select Preferences > Advanced.
- Enable Show Develop menu in menu bar.
- From the menu bar, click Develop and select Empty Caches.
Delete from macOS
Uninstall all suspicious apps from your Mac. You might need to take a look at these instructions to do everything in a correct order. First of all, close Safari and reopen it with Shift key held down.
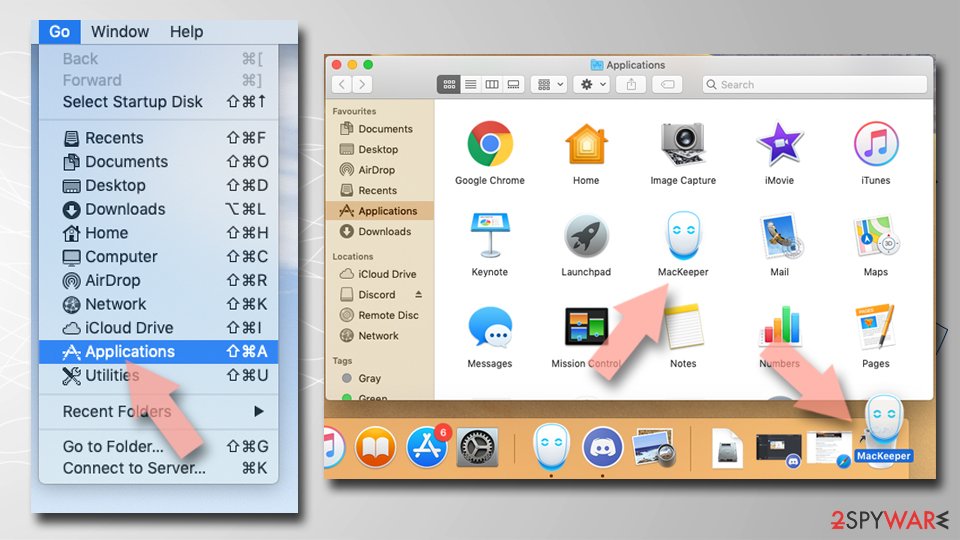
Remove the unwanted application:
- From the menu bar, select Go > Applications.
- In the Applications folder, look for any suspicious entries, then drag them to Trash (or right-click and pick Move to Trash).
Delete leftover files and folders:
- Select Go > Go to Folder.
- Enter /Library/Application Support and remove any suspicious folders related to the unwanted program.
- Repeat the same check in the /Library/LaunchAgents and /Library/LaunchDaemons folders, deleting any suspicious entries.
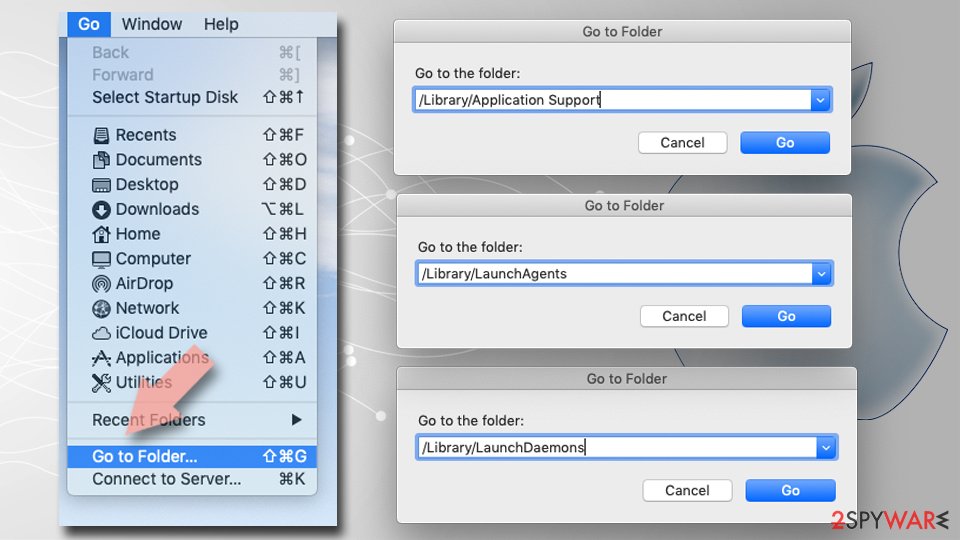
- Finally, empty the Trash to permanently remove the leftovers.
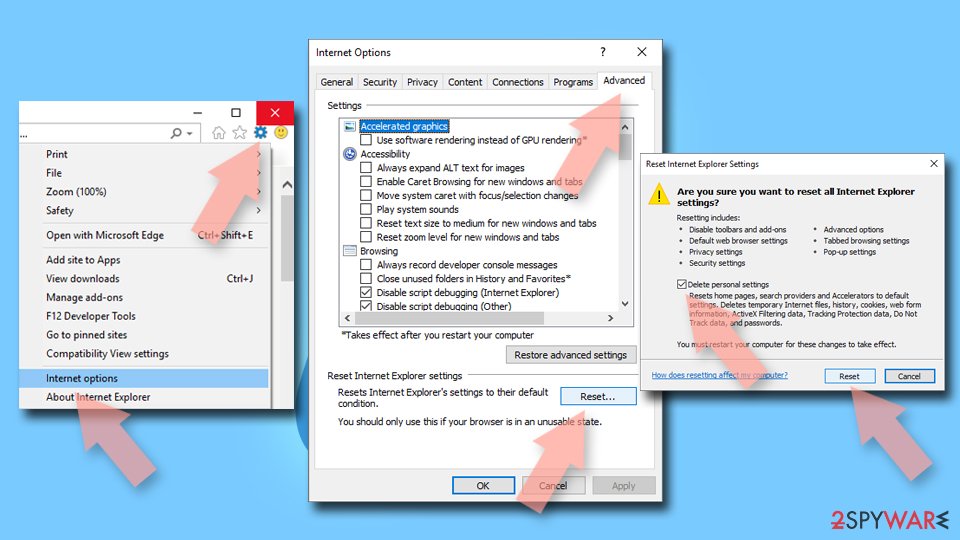
Reset Internet Explorer
Remove dangerous add-ons:
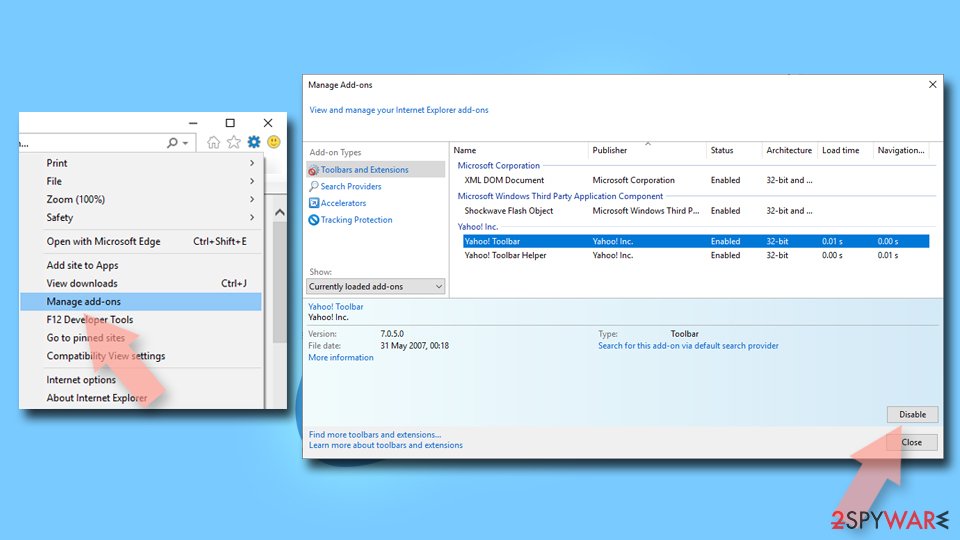
- Open Internet Explorer, click on the Gear icon (IE menu) on the top-right corner of the browser
- Pick Manage Add-ons.
- You will see a Manage Add-ons window. Here, look for suspicious plugins. Click on these entries and select Disable.
Change your homepage if it was altered:
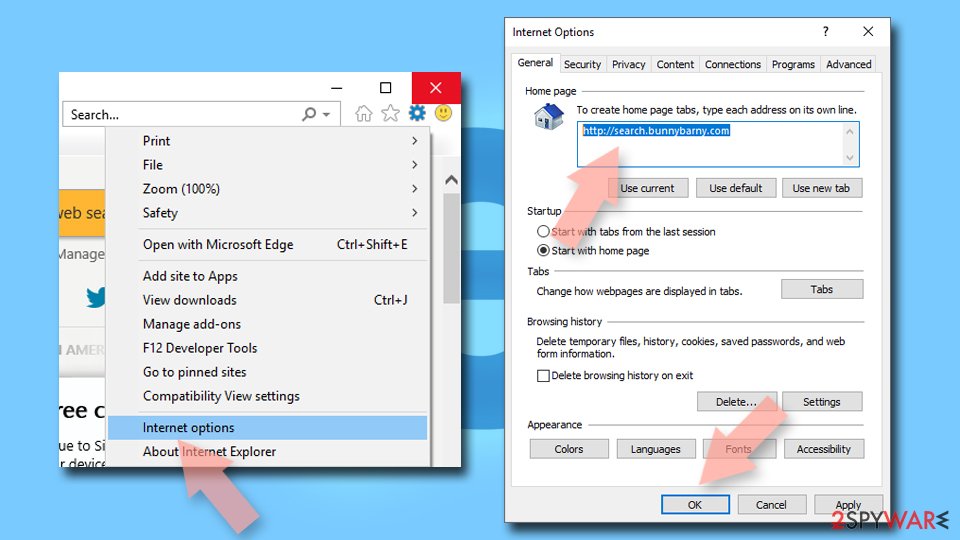
- Open IE and click on the Gear icon.
- Select Internet Options.
- In the General tab, delete the Home page address and replace it by your preferred one (for example, Google.com).
- Click Apply and then select OK.
Delete temporary files:
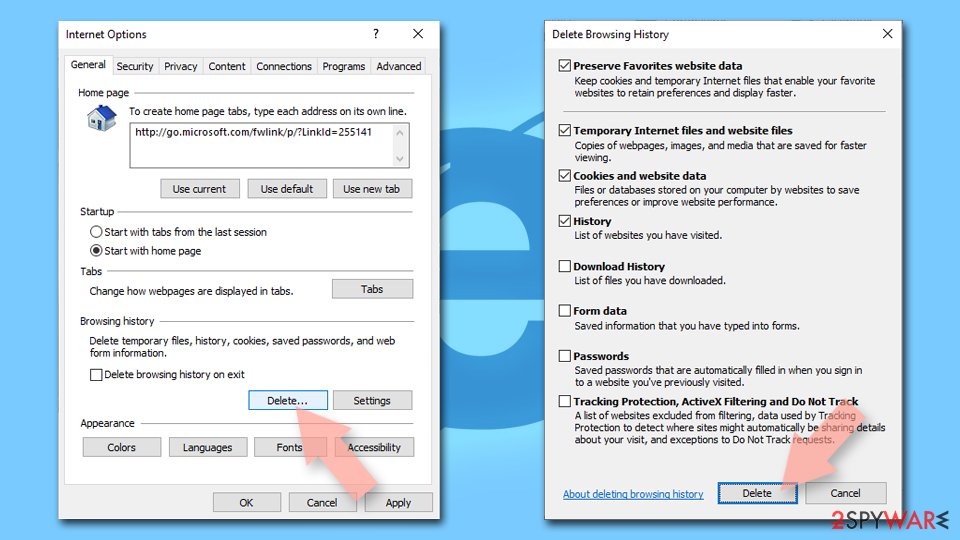
- Press on the Gear icon and select Internet Options.
- Under Browsing history, click Delete...
- Select relevant fields and press Delete.
Reset Internet Explorer:
- Click on Gear icon > Internet options and select Advanced tab.
- Select Reset.
- In the new window, check Delete personal settings and select Reset.
Protect your privacy - employ a VPN
There are several ways how to make your online time more private - you can access an incognito tab.
However, there is no secret that even in this mode, you are tracked for advertising purposes. There is a way to add an extra layer of protection and create a completely anonymous web browsing practice with the help of VPN. This software reroutes traffic through different servers, thus leaving your IP address and geolocation in disguise.
Besides, it is based on a strict no-log policy, meaning that no data will be recorded, leaked, and available for both first and third parties. The combination of a secure web browser and VPN will let you browse the Internet without a feeling of being spied or targeted by criminals.
No backups? No problem. Use a data recovery tool
If you wonder how data loss can occur, you should not look any further for answers - human errors, malware attacks, hardware failures, power cuts, natural disasters, or even simple negligence.
In some cases, lost files are extremely important, and many straight out panic when such an unfortunate course of events happen. Due to this, you should always ensure that you prepare proper data backups on a regular basis.
If you were caught by surprise and did not have any backups to restore your files from, not everything is lost. is one of the leading file recovery solutions you can find on the market - it is likely to restore even lost emails or data located on an external device.
From our report of Feb 2017 · not reviewed since
How to fix my computer after "YOUR APPLE COMPUTER HAS BEEN LOCKED" attack?
If you wish to remove "YOUR APPLE COMPUTER HAS BEEN LOCKED" virus shortly, run a system scan with program.
It is compatible with Mac OS and it will help you to clean the system from suspicious components. However, you can also try to delete the infection manually. Use "YOUR APPLE COMPUTER HAS BEEN LOCKED" removal instructions provided by our support team - you will find these below.
From our report of Feb 2017 · not reviewed since
How to remove "YOUR APPLE COMPUTER HAS BEEN LOCKED" Tech Support Scam virus from your iPhone/iPad
1.
Press down Sleep/Wake button on your device, and also Home button (both at the same time)! Hold down these buttons until the device turns off.
2. Wait a little and then turn the device back on.
3. Delete browsing related information from your device: just go to Settings > Safari > Clear History > Clear Cookies and Data/Clear History and Website Data.
To learn how to uninstall the virus from Mac OS, see instructions provided below.
Questions about YOUR APPLE COMPUTER HAS BEEN LOCKED" Tech Support Scam virus
Is 'Your Apple Computer Has Been Locked' a real Apple alert?
No. 'Your Apple Computer Has Been Locked' is a tech support scam using Apple's brand to appear legitimate. The fake alert appears on Mac, iPad, or iPhone screens claiming your device is locked for security reasons and demanding you call a provided number.
Real Apple and Microsoft technicians never lock devices remotely without explicit user authorization, and they never contact users demanding immediate action. The scam exploits users' security concerns and Apple's trusted reputation to create urgency. According to 2017 reports, most fake support offices operating these scams are located in India, with operators posing as 'Apple Care' or 'Apple Support' representatives.
What do scammers ask for during the call?
When you call the fake support number, criminals posing as Apple technicians request sensitive information including Apple ID credentials, passwords, credit card numbers, and personal details. They may ask you to download and install remote access software, giving them complete control over your device.
Some scammers attempt to sell fake security software for $100-$300 or more, providing no actual protection. Others direct you to log into phishing websites that look like Apple pages, stealing your login credentials directly. Never provide sensitive information, passwords, or remote access to any caller claiming to be tech support.
How is this scam delivered?
The scam spreads through compromised websites that display the fake alert using JavaScript code or redirects to malicious sites. Visiting gambling websites, adult sites, wallpaper collection sites, or clicking on deceptive pop-up ads can trigger the alert.
The fake message appears full-screen with official-looking Apple branding, making closure difficult or impossible in some cases. No actual malware infiltrates your device; the alert is purely a website manipulation designed to force user action. When users call the provided number, they connect to criminals rather than actual Apple representatives, triggering the scam.
What should I do if I see this alert?
Do not call the provided number under any circumstances. Instead, force-close your browser by pressing Command-Option-Escape (Mac) or Task Manager (Windows), or restart your device entirely. The alert cannot lock or harm your device—it only manipulates the browser display.
Refresh your browser to verify the alert disappears. If you accidentally called and provided information, immediately change your Apple ID password, monitor credit card accounts for unauthorized charges, and contact Apple directly using official contact information from apple.com. Run a system scan with reputable anti-malware software to check for any actual infections.
What happens if I actually called them?
If you contacted the scammers, you may have provided sufficient information for identity theft, financial fraud, unauthorized purchases, or account takeovers.
Immediate actions include changing your Apple ID and iCloud passwords, calling your credit card issuer to freeze or replace cards, and reviewing recent statements for fraudulent charges. If you gave remote access, assume criminals explored your device for valuable data or installed spyware.
Contact Apple's official support line immediately to verify account security. Report the scam to the Federal Trade Commission at reportfraud.ftc.gov. Monitor credit reports for suspicious activity and consider credit monitoring services if significant personal information was compromised.
How can I prevent this scam?
The strongest prevention is never calling phone numbers displayed in pop-up alerts, as legitimate tech support never contacts users this way. Avoid high-risk websites including illegal streaming sites, adult content pages, and wallpaper collections where these scams frequently launch. Use pop-up blockers and browser security extensions to prevent malicious JavaScript execution.
Keep your device's operating system and browsers updated with latest security patches. Understand that official Apple never locks devices remotely or demands immediate payment or personal information. If concerned about device security, visit apple.com directly and use official support channels rather than calling provided numbers.
Is my device actually infected if I see this alert?
Not necessarily. The fake alert alone does not indicate infection; it is purely a website manipulation. However, if the alert originated from visiting a compromised website, your device may have been exposed to other malware.
To be certain, restart your device and run a complete system scan with reputable anti-malware software. Pay attention to unusual behavior like unexpected slowdowns, strange processes, unfamiliar applications, or unexplained network activity. If the alert continues appearing after device restart, suspicious applications may exist and require professional removal.
Is this scam specific to Safari?
No. While the scam commonly appears in Safari on Apple devices, it also targets Chrome, Firefox, and other browsers on Windows PCs and Android devices. The fundamental mechanism remains identical: malicious websites display fake alerts claiming device infection or locking. Operating system doesn't matter; the scam exploits human psychology through fake official-looking alerts.
Windows users see variants claiming Windows or Microsoft account locks, Android users receive fake Android security alerts, all funneling victims to criminal support lines. Understanding that these scams target all devices and browsers helps you recognize variations regardless of your system type.
Will Fortect remove YOUR APPLE COMPUTER HAS BEEN LOCKED" Tech Support Scam virus?
Fortect scans Windows for malware and unwanted programs and repairs the system files and settings they change, and its free scan shows what it finds on your PC before you decide anything.
For YOUR APPLE COMPUTER HAS BEEN LOCKED" Tech Support Scam virus, follow the plan above as well: the browser steps take back permissions and settings that no scanner treats as a threat, and uninstalling the program that brought it removes the source.
Run Microsoft Defender's full scan and, if anything was found, its offline scan as a second opinion. If the symptoms are gone after the plan and both scans are clean, there is nothing more to do.
Sources
- Discussions - Apple: Scam Alert: Received an awful beeping message saying "YOUR APPLE COMPUTER HAS BEEN LOCKED" (read October 5, 2026)
- Malwarebytes Labs: Tech Support Scams – Help (read October 5, 2026)
- Discussions - Apple: Phony "tech support" / "ransomware" popups and web pages (read October 5, 2026)
- Federal Trade Commission: Tech Support Scams (read October 5, 2026)
- FTC: How to spot, avoid and report tech support scams (read October 5, 2026)