
123movies.co: what it is and how to remove it
123movies.co is a browser hijacker that promises free access to movies and TV series but might compromise online privacy. Those who do not think that redirects could cause danger should be reminded about the collection of information.
Facts checked October 10, 2026. Removal steps tested on Windows 11 (26H2) and checked against Microsoft's and the browser makers' current documentation. Sections marked as our earlier report are the original text: they describe the threat as it was then and have not been reviewed since. The 2026 status, the removal steps and the questions are current.
Automatic
Get a free scan and check if your PC is infected.
Fortect finds malware, unwanted programs and the Windows damage they leave behind, and repairs it in one pass.
A quick scan confirms nothing else was installed alongside the 123movies.co search hijacker.
Do it yourself · free Remove 123movies.co yourself 5 steps, about 15 minutes, no software needed.
Start the steps
123movies.co: summary
| Detection names | No Microsoft detection name is known |
|---|---|
| Distribution | Not recorded in the old report |
| Damage | Not recorded in the old report |
| Name | 123movies.co |
| Type | Search hijacker extension |
| Symptoms | A changed search engine |
| Removal | Scan the PC with security software to find and remove the malware and anything installed with it. Fortect scans Windows for malware and repairs the system files and settings it damaged. Remove it nowTo use the full-featured product, you have to purchase a license for Fortect. The scan is free. |
Show 5 more facts
| Evidence | 4 write-ups by security sites; details still limited |
|---|---|
| Search page | 123movies.co |
| Browsers | Chrome, Edge and Firefox |
| First seen | 5 March 2021 |
| Facts checked | 5 October 2026 |
123movies.co in 2026: what we found
We opened 123movies.co in a clean desktop Chrome browser on 4 October 2026 and clicked nothing. This is one visit from one location: ad pages often behave differently on a second visit, in another country, on a phone or after a click, and many hide from automated browsers, so a quiet result is not proof that the page is clean.
123movies.co · desktop Chrome · 4 October 2026
- Notification requestNone on this one visit.
- Pop-ups and new tabsNone on this one visit.
- Where it ledIt forwarded our browser to
forsale.godaddy.com. - Ad networksNone found in the page.
- Page title"Access Denied"
Use with care Nothing was forced on us, but the page works with ad networks or sends visitors elsewhere; they change what they show by country, device and time.
Is 123movies.co dangerous? What it collects
123movies.co: what changed since our report
March 2021
Our first report
We described 123movies.co on 5 March 2021 and updated the report on 1 April 2021.
October 2026
Our new check
We opened the address again in a clean browser; the results are above.
From our report of Mar 2021 · outdated details corrected in October 2026
123movies.co is a browser hijacker that promises free access to movies and TV series but might compromise online privacy
123movies.co is the redirect that adware-type intruder triggers.
These reroute, pop-ups, and other contents that appears out of nowhere are triggered by a potentially unwanted program that establishes its homepage, new tab address and search engine without adequately asking for permission to do so. For such reasons, the PUP is categorized as a browser hijacker which can affect Google Chrome, Mozilla Firefox, Opera, and Safari.
123movies.co hijack initiates an intense advertisement of sponsored websites and their products/services, allowing the authors to generate revenue. Unfortunately, the end user is the one who has to deal with persistent redirects and altered search results. Additionally, browser hijackers are known to congregate non-personally identifiable information about internet browsing habits and other data.
123movies.co hijacker is most likely established after the installation of third-party software that is initiated by users themselves. This method is called software bundling, and many freeware and shareware developers make use of it.
While legal, many researchers believe that it is highly unfair, as it uses deceptive tricks to make users skip some vital installation steps that install additional components on the machine. For such reason, the unwanted app can be called 123movies.co virus by some.
While browser hijackers like this are often considered to be just a nuisance, they actually bring in much more than an annoyance. Those who are not wary enough might end up on malware-laden sites where malicious JavaScript could abuse software vulnerabilities to inject much more prominent malware.
In such a case, users might not even notice the infiltration, as they do not have to initiate any downloads and a simple redirect to an unsafe site is enough.
Additionally, this PUP could initiate the infiltration of additional add-ons, toolbars, browser extensions and other potentially unwanted programs. Therefore, experts suggest not to click on any hyperlinks, ads, pop-ups or other questionable content and remove 123movies.co from their browsers instead. Only then the unwanted activity can be terminated.
Those who do not think that redirects could cause danger should be reminded about the collection of information. Data collection is a common practice among browser hijackers, and such tracking technologies as cookies can be used to gather:
Therefore, if you value your privacy, start 123movies.co removal immediately.
- IP address;
- Geolocation;
- Sites visited;
- Search queries;
- Technical details;
- Links clicked;
- Bookmarks added, etc.


From our report of Mar 2021 · not reviewed since
Install free applications caefully: PUPs might be hidden inside
It surprising how many individuals are still not aware of PUP distribution method - bundling.
However, it manages to stay unnoticed and not is generally not publicized, hence many users do not know of its existence. Unfortunately, but freeware and shareware developers are quick to abuse this fact, and employ bundling technique to add optional installs into the setups of free applications that they offer. Because the suggested apps are free, this way of monetizing greatly benefits their creators.
Unfortunately, it does the opposite to regular users, as they let in PUPs without even noticing. The trick is to hide additional applications, add-ons, toolbars, system optimizers, and similar useless software under Advanced or Custom Installation mode. It is well known that most users rush the installation process and pick Recommended/Quick settings. Therefore, select Advanced settings and eliminate the pre-selected tick boxes before proceeding.
Additionally, users can also install the PUP when clicking on misleading advertisements.Therefore, it is recommended to refrain from installing browser extensions and add-ons that are advertised on random websites.
From our report of Mar 2021 · not reviewed since
More from our earlier report on 123movies.co
- Browser hijacker / Potentially unwanted program
- Software bundling, unsafe sites, pop-up ads
- Altered homepage of the browser, unwanted redirects, altered search results, etc.
- Potentially unwanted programs might leave a mess on your machine, e.g., changed registry entries.
Check your browser and PC
- Address:
123movies.co
How to remove 123movies.co
How to remove 123movies.co and get your search engine back
Remove the extension first.
The search settings only stay fixed once nothing on the PC can change them again.
Step 1: Remove extensions you did not add
123movies.co often works through an extension, so go through the extension list of each browser:
chrome://extensionsedge://extensions- Extensions and themes in Firefox
Switch suspicious extensions off one at a time and reload the page where the problem shows, then remove the one that stops it, and any other you did not add.
Remember the other browsers and profiles on the PC. If Remove is missing or greyed out, a policy forces the extension, which the policy step deals with. Windows 11 and Windows 10 show the same pages.
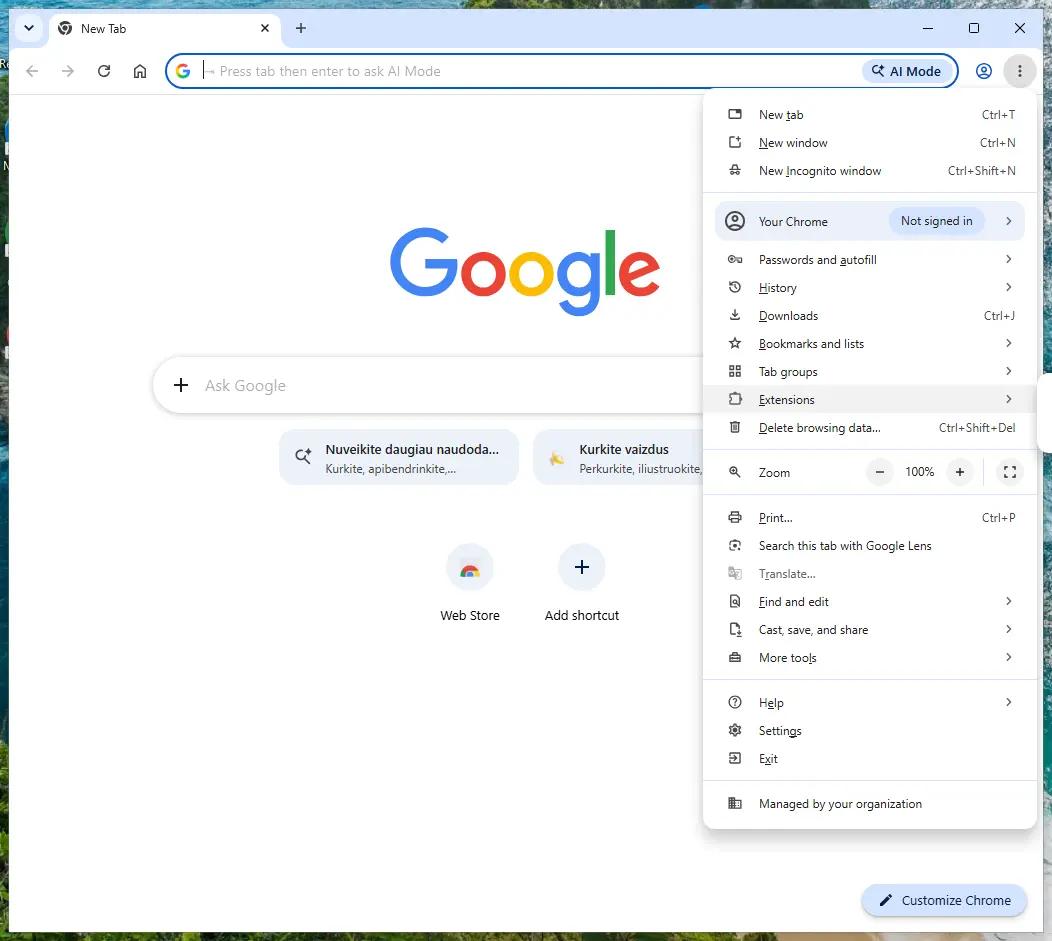
Chrome on Windows 11: More > Extensions > Manage extensions. Full procedure with screenshots: Remove a browser extension
Step 2: Put the search engine back and delete 123movies.co
Searches that pass through
123movies.comean the browser's default search engine was replaced. Chrome: Settings > Search engine > Manage search engines and site search, then Make default on Google, Bing or another engine you chose, and Delete on 123movies.co.Edge has the same list under Manage search engines (search the Settings page for it), and Firefox under Settings > Search.
Look at On startup and the homepage settings too and remove the hijacker's address there. Nothing in this step differs between Windows 11 and Windows 10.
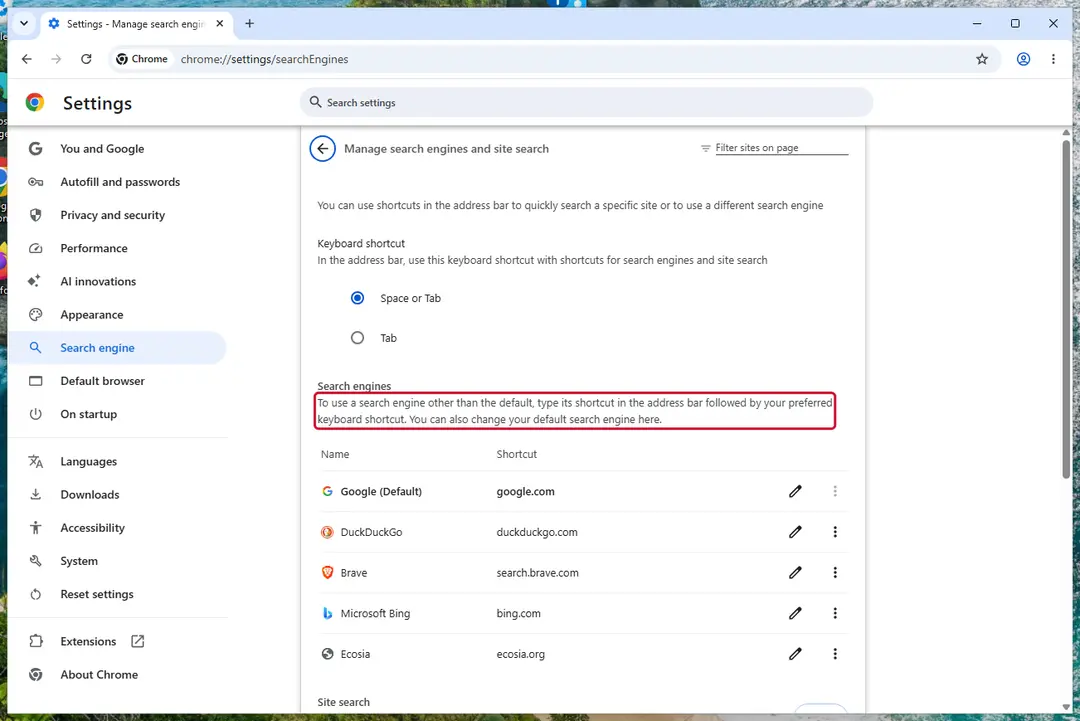
Chrome on Windows 11: check Search engine and On startup. Full procedure with screenshots: Reset a browser and fix a hijacked search engine
Step 3: Uninstall programs you did not mean to install
Open Settings > Apps > Installed apps in Windows 11, or Settings > Apps > Apps & features in Windows 10, and sort the list by install date. Look at what appeared around the day the problem started and uninstall every program you do not recognise or did not choose.
Free converters, PDF and video tools, "system optimizers" and unknown browsers are the usual carriers of 123movies.co. If a name is unclear, search for it before you remove it, so you do not uninstall a driver or a Windows component.
Full procedure with screenshots: Uninstall a program or app in Windows On uGetFix
Step 4: Reset the browser
Finish the browser part with a reset, which puts the search engine, start page, new tab page and site permissions back to their defaults and switches extensions off. Chrome: Settings > Reset settings > Restore settings to their original defaults.
Edge: Settings > Reset settings. Firefox: Help > More troubleshooting information > Refresh Firefox, which also removes its extensions. Your bookmarks and saved passwords are kept, and the menus are the same on Windows 11 and Windows 10.
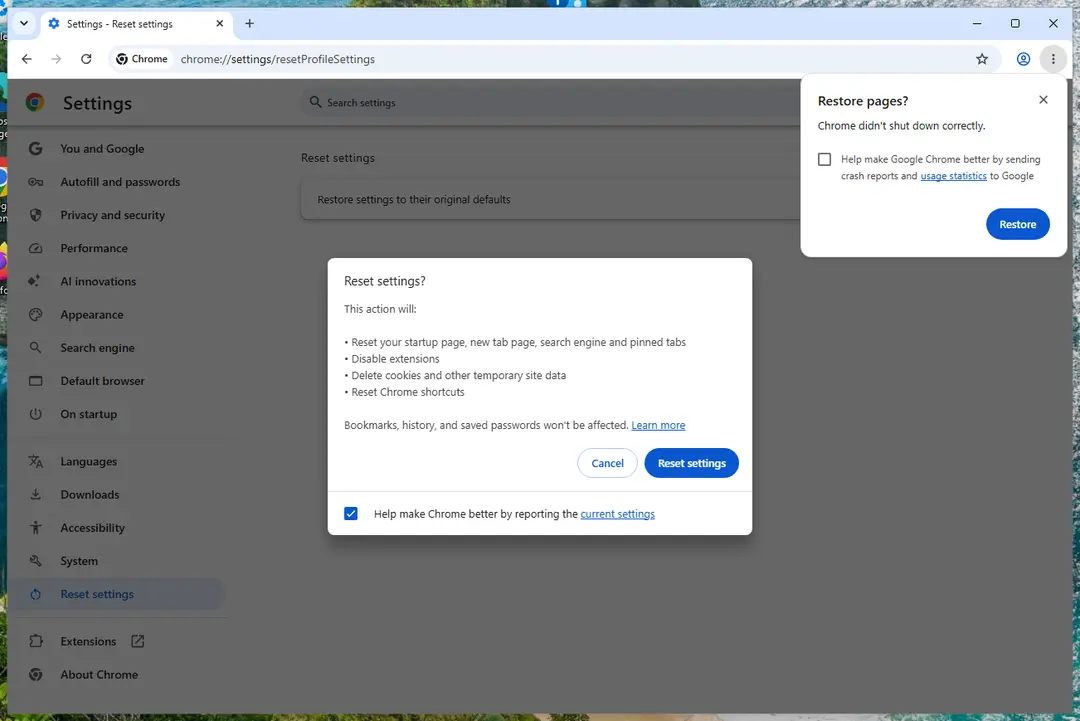
Chrome on Windows 11: Settings > Reset settings. Full procedure with screenshots: Reset a browser and fix a hijacked search engine
Step 5: Scan the PC, then run the offline scan
Open Windows Security > Virus & threat protection > Scan options, run a Full scan and remove everything it finds. Then select Microsoft Defender Antivirus (offline scan) and click Scan now: the PC restarts and scans before Windows loads, which finds files that hide while Windows runs.
Save your work first, because the offline scan takes about 15 minutes. Both scans are built into Windows 11 and Windows 10, and a second scanner from another vendor is a useful extra opinion.
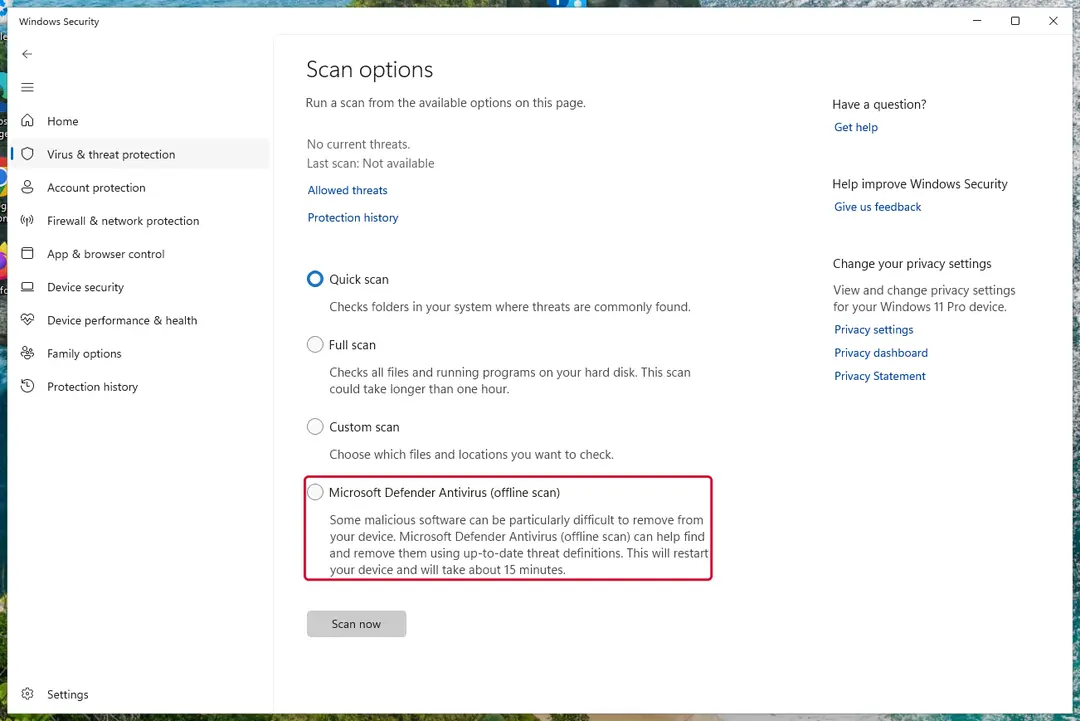
Windows 11: Windows Security > Virus & threat protection > Scan options. Full procedure with screenshots: Run a Microsoft Defender Offline scan
Instructions for each browser and system
The detailed steps for every browser and system this guide covers. Open the one you use.
Uninstall from Windows
To eliminate 123movies.co virus from Windows, follow these steps carefully:
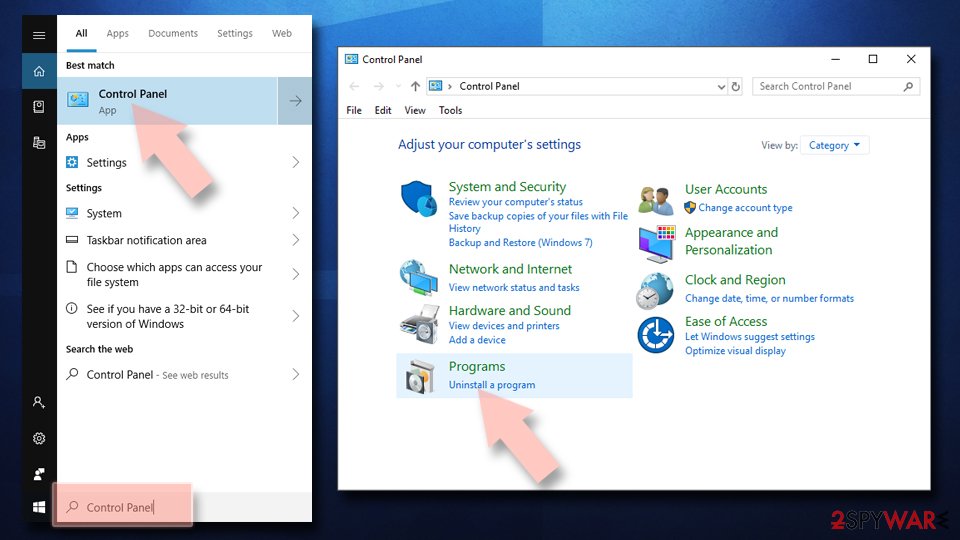
Uninstall from Windows 10/8:
- Type Control Panel into the Windows search box and open the result.
- Under Programs, select Uninstall a program.
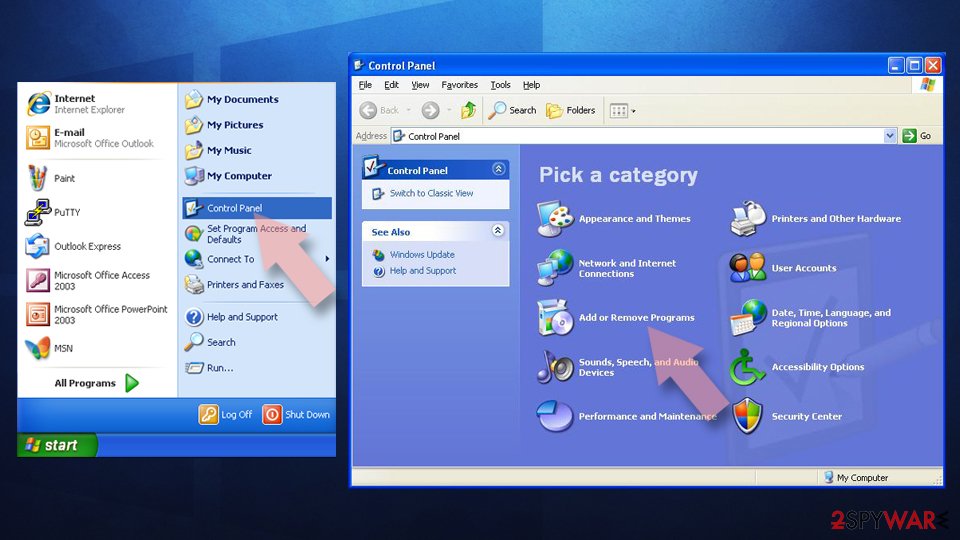
Uninstall from Windows 7/XP:
- Click on Windows Start > Control Panel (Windows XP users should click on Add/Remove Programs).
- In Control Panel, select Programs > Uninstall a program.
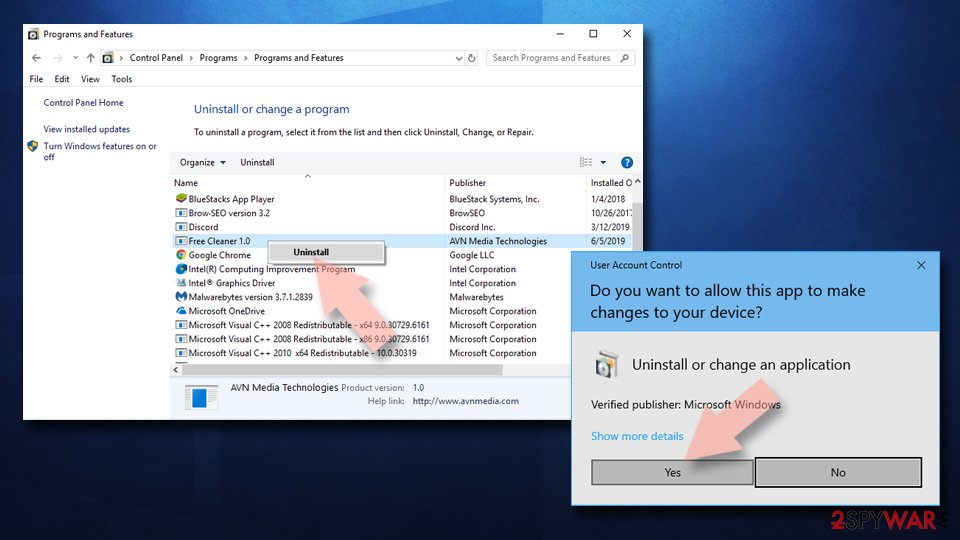
Remove the unwanted program:
- In the Programs and Features window, look for any recently installed suspicious entries, select them, and click Uninstall.
- If User Account Control appears, click Yes to confirm, then complete the removal.
Remove from Google Chrome
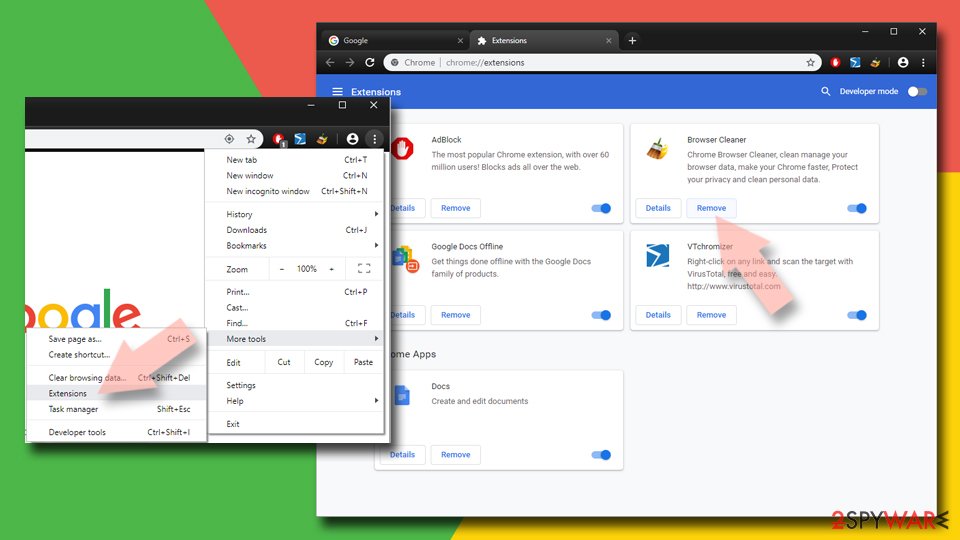
Delete malicious extensions from Google Chrome:
- Open Google Chrome, click on the Menu (three vertical dots at the top-right corner) and select More tools > Extensions.
- In the newly opened window, you will see all the installed extensions. Uninstall all suspicious extensions related to the unwanted program by clicking Remove.
Clear cache and web data from Chrome:
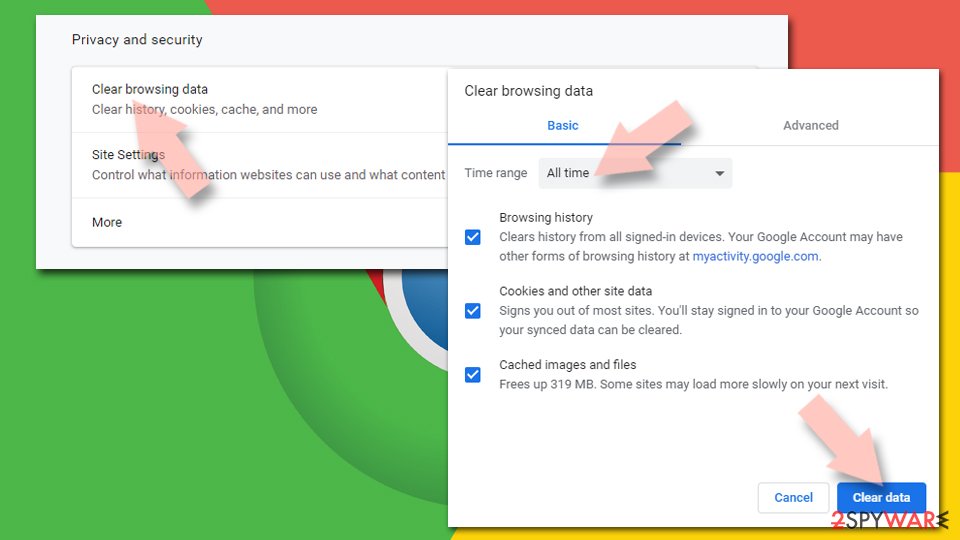
- Click on Menu and pick Settings.
- Under Privacy and security, select Clear browsing data.
- Select Browsing history, Cookies and other site data, as well as Cached images and files.
- Click Clear data.
Change your homepage:
- Click menu and choose Settings.
- Look for a suspicious site in the On startup section.
- Click on Open a specific or set of pages and click on three dots to find the Remove option.
Reset Google Chrome:
If the previous methods did not help you, reset Google Chrome to eliminate all the unwanted components:
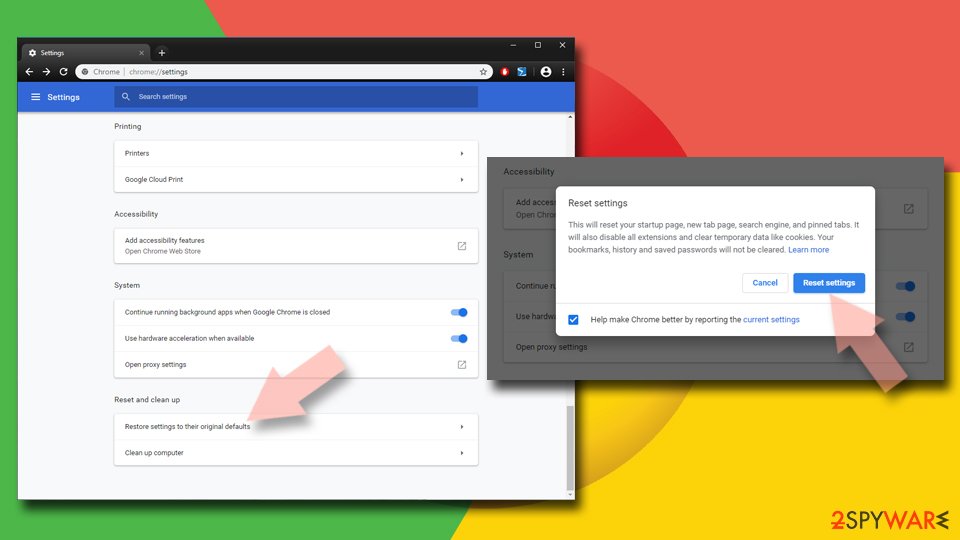
- Click on Menu and select Settings.
- In the Settings, scroll down and click Advanced.
- Scroll down and locate Reset and clean up section.
- Now click Restore settings to their original defaults.
- Confirm with Reset settings.
Remove from Microsoft Edge
You have to manually reset Internet Explorer to revert changes done by the hijacker:
Delete unwanted extensions from MS Edge:
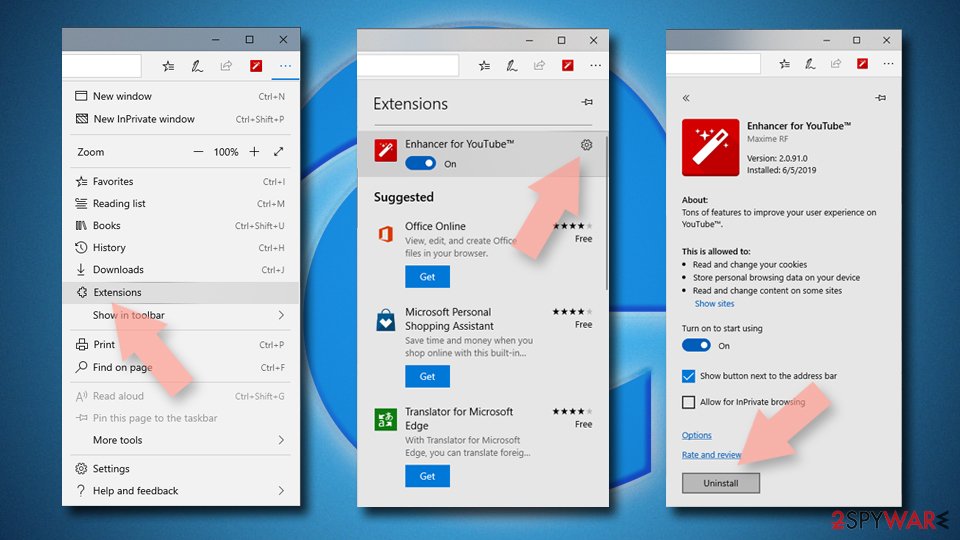
- Select Menu (three horizontal dots at the top-right of the browser window) and pick Extensions.
- From the list, pick the extension and click on the Gear icon.
- Click Remove.
Clear cookies and other browser data:
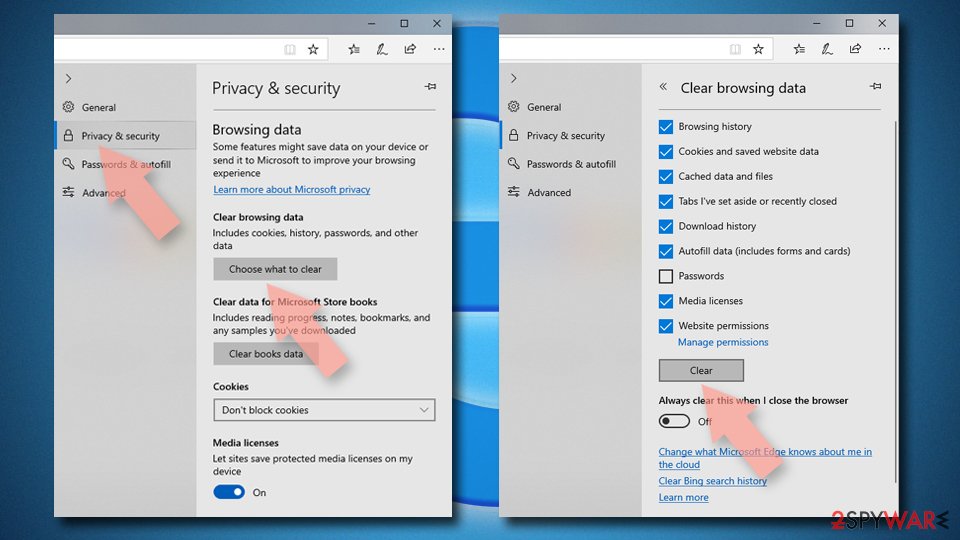
- Click on the Menu (three horizontal dots at the top-right of the browser window) and select Settings > Privacy, search, and services..
- Under Clear browsing data, pick Choose what to clear.
- Select Cookies and other site data and Cached images and files. (apart from passwords, although you might want to include Media licenses as well, if applicable) and click on Clear.
Restore new tab and homepage settings:
- Click the menu icon and choose Settings.
- Then find On startup section.
- Click Remove next to any suspicious startup page.
Reset MS Edge if the above steps did not work:
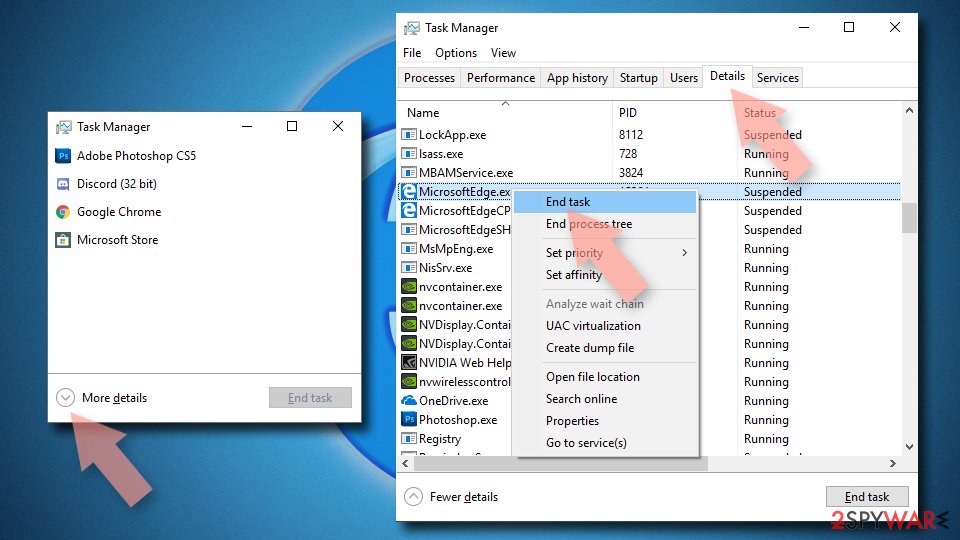
- Press on Ctrl + Shift + Esc to open Task Manager.
- Click on More details arrow at the bottom of the window.
- Select Details tab.
- Now scroll down and locate every entry with Microsoft Edge name in it. Right-click on each of them and select End Task to stop MS Edge from running.
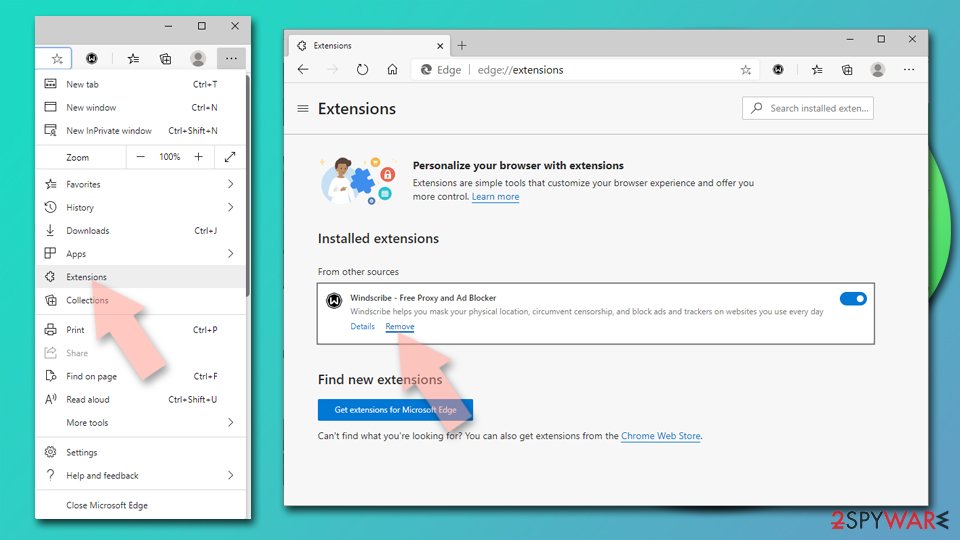
Delete extensions from MS Edge (Chromium):
- Open Edge and click select Settings > Extensions.
- Delete unwanted extensions by clicking Remove.
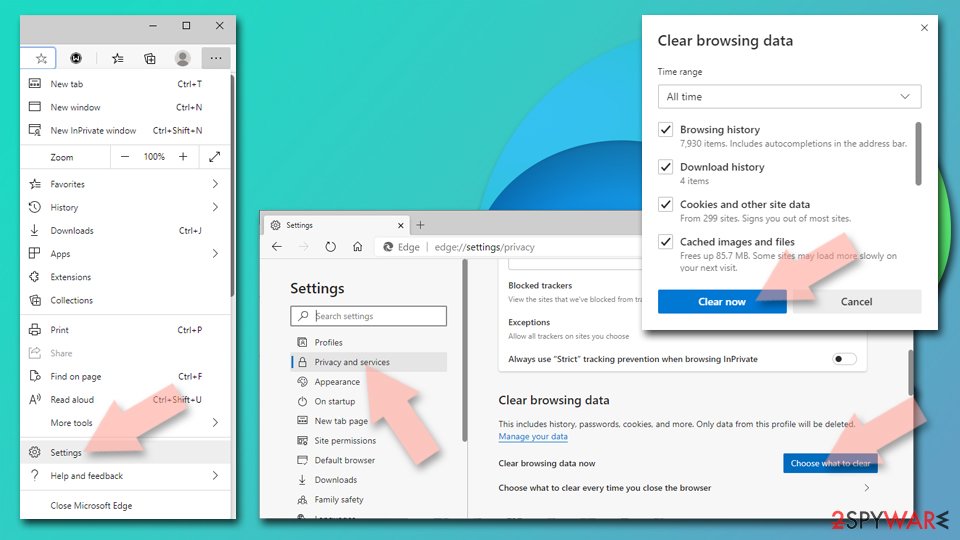
Clear cache and site data:
- Click on Menu and go to Settings.
- Select Privacy, search and services.
- Under Clear browsing data, pick Choose what to clear.
- Under Time range, pick All time.
- Select Clear now.
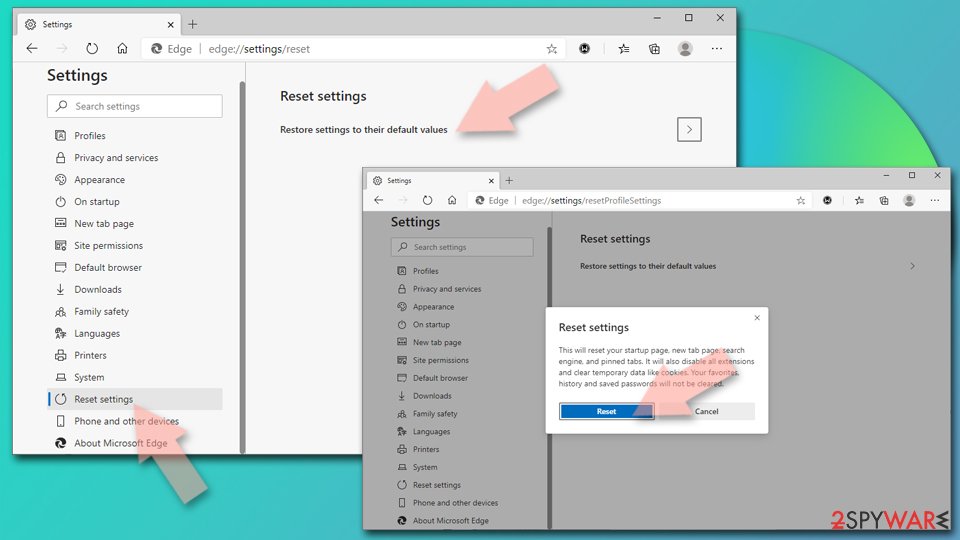
Reset Chromium-based MS Edge:
- Click on Menu and select Settings.
- On the left side, pick Reset settings.
- Select Restore settings to their default values.
- Confirm with Reset.
- This will disable extensions and reset startup pages but will not delete bookmarks, saved passwords, or browsing history.
Remove from Mozilla Firefox (FF)
Make sure you refresh Mozilla Firefox and the PUP is eliminated:
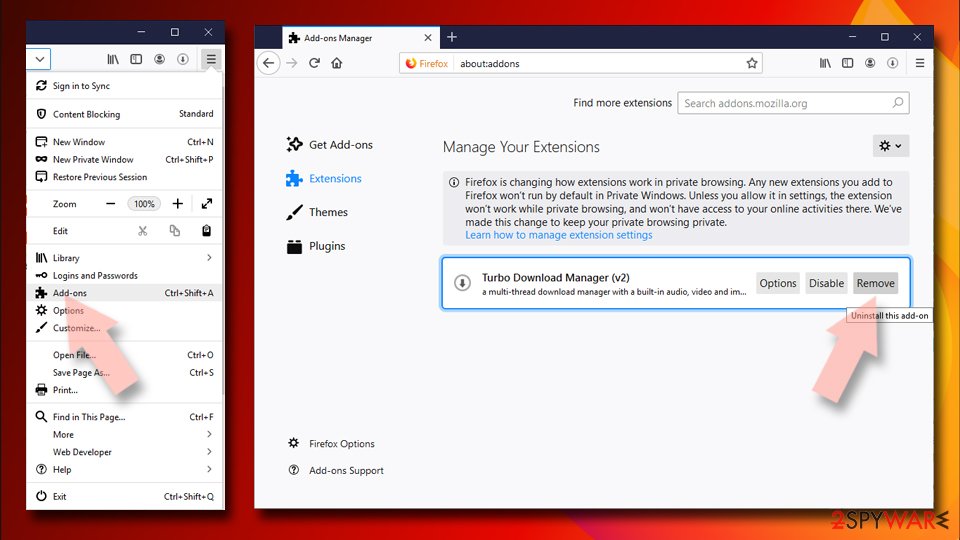
Remove dangerous extensions:
- Open Mozilla Firefox browser and click on the Menu (three horizontal lines at the top-right of the window).
- Select Add-ons.
- In here, select the unwanted extension and click Remove.
Reset the homepage:
- Click three horizontal lines at the top right corner to open the menu.
- Choose Settings.
- Under Home, set your preferred homepage and new tab settings.
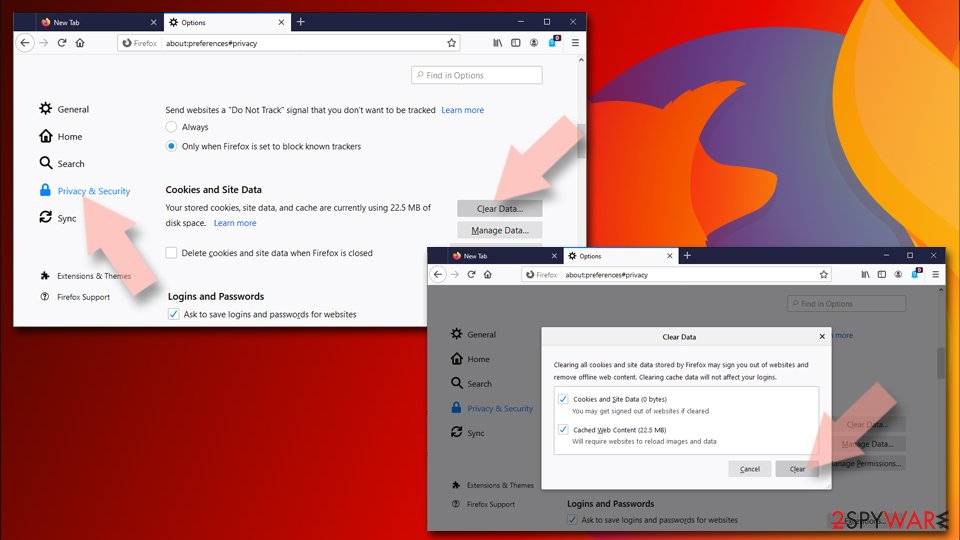
Clear cookies and site data:
- Click Menu and pick Settings.
- Go to Privacy & Security section.
- Scroll down to locate Cookies and Site Data.
- Click on Clear Data...
- Select Cookies and Site Data and Temporary cached files and pages, then click Clear.
Reset Mozilla Firefox
If clearing the browser as explained above did not help, reset Mozilla Firefox:
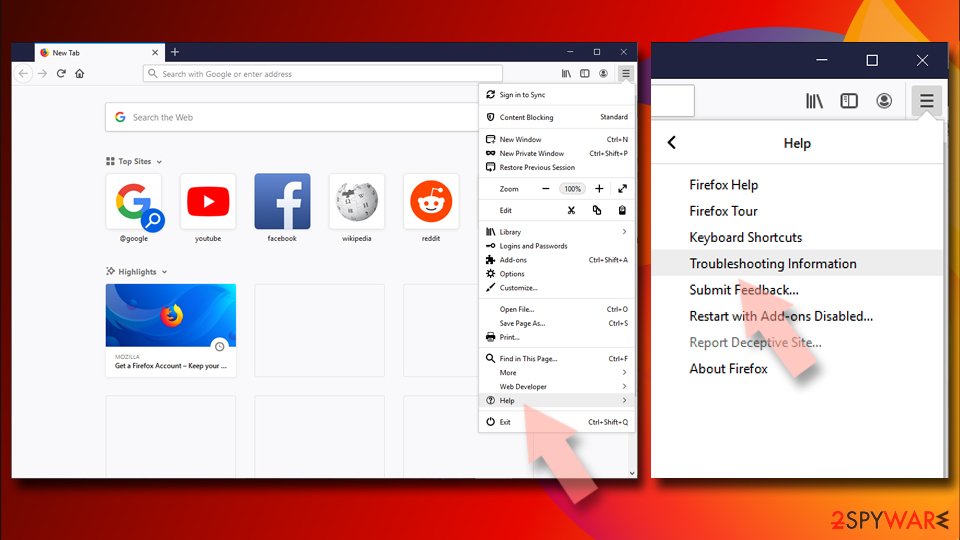
- Open Mozilla Firefox browser and click the Menu.
- Go to Help and then choose Troubleshooting Information.
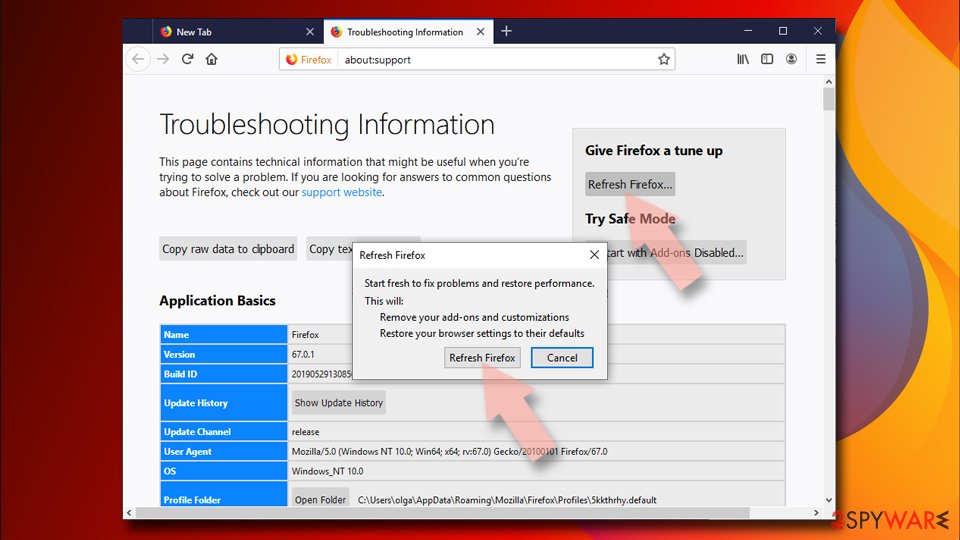
- Under Give Firefox a tune up section, click on Refresh Firefox...
- Once the pop-up shows up, confirm the action by pressing on Refresh Firefox.
Delete from Safari
Remove dangerous extensions:
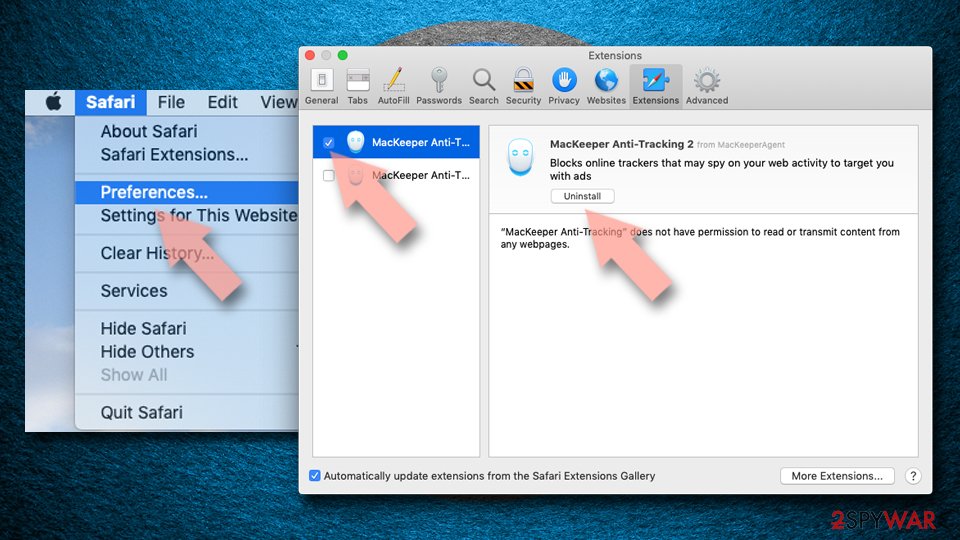
- Open Safari, click Safari in the menu at the top-left of the screen, and select Preferences.
- Go to the Extensions tab, look for any suspicious entries, and click Uninstall to remove them.
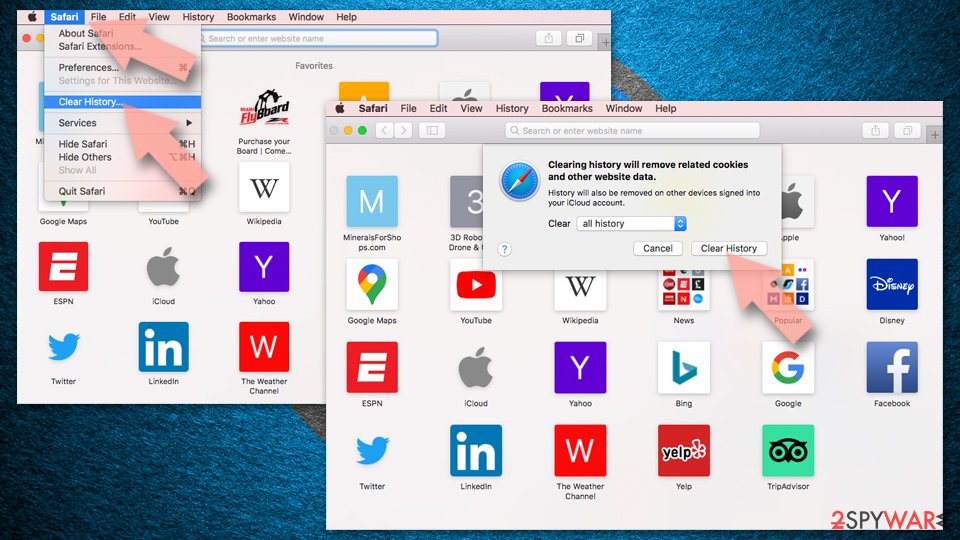
Clear history and website data:
- Click Safari in the menu and pick Clear History.
- Set Clear to all history and confirm with Clear History.
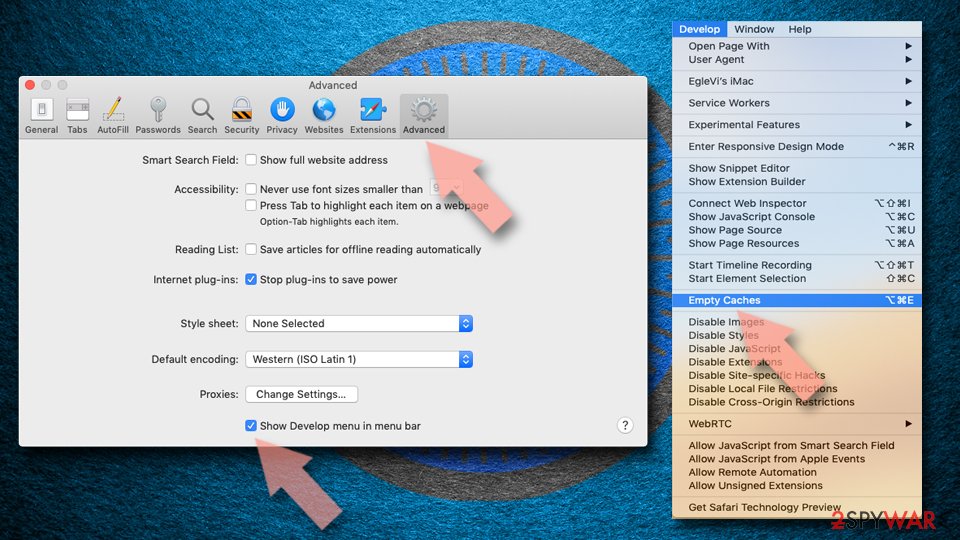
Reset Safari:
- Click Safari in the menu and select Preferences > Advanced.
- Enable Show Develop menu in menu bar.
- From the menu bar, click Develop and select Empty Caches.
Delete from macOS
Remove the unwanted application:
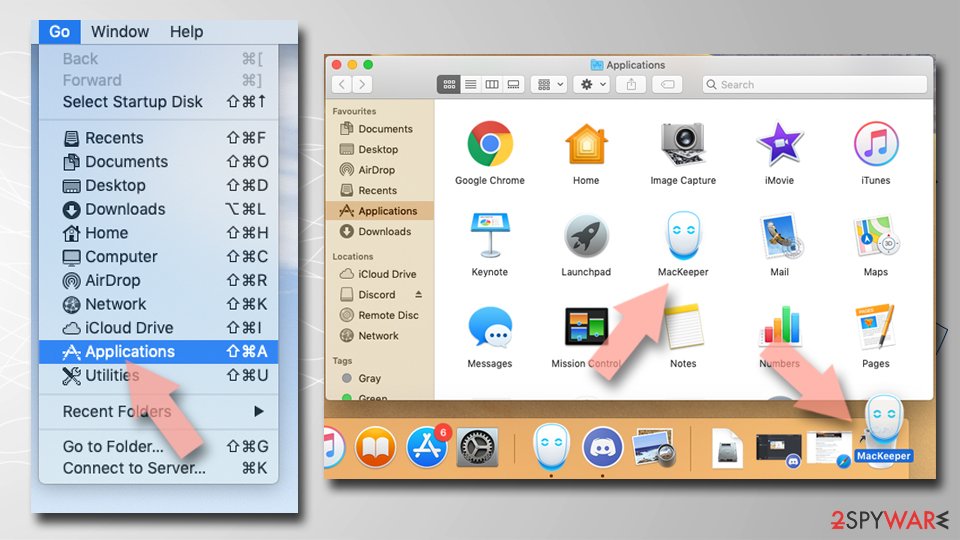
- From the menu bar, select Go > Applications.
- In the Applications folder, look for any suspicious entries, then drag them to Trash (or right-click and pick Move to Trash).
Delete leftover files and folders:
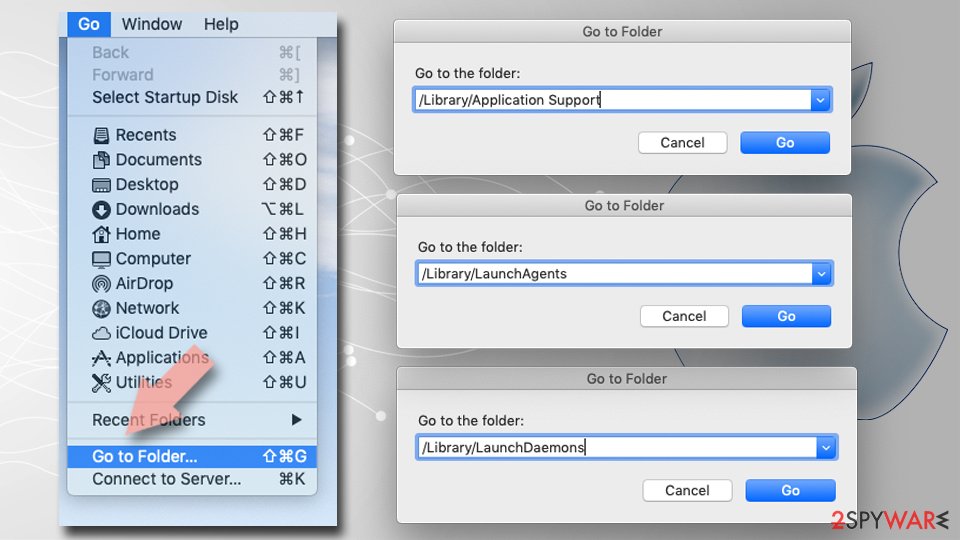
- Select Go > Go to Folder.
- Enter /Library/Application Support and remove any suspicious folders related to the unwanted program.
- Repeat the same check in the /Library/LaunchAgents and /Library/LaunchDaemons folders, deleting any suspicious entries.
- Finally, empty the Trash to permanently remove the leftovers.
Do not let government spy on you
The government has many issues in regards to tracking users' data and spying on citizens, so you should take this into consideration and learn more about shady information gathering practices.
Avoid any unwanted government tracking or spying by going totally anonymous on the internet.
You can choose a different location when you go online and access any material you want without particular content restrictions. You can easily enjoy internet connection without any risks of being hacked by using VPN.
Control the information that can be accessed by government any other unwanted party and surf online without being spied on. Even if you are not involved in illegal activities or trust your selection of services, platforms, be suspicious for your own security and take precautionary measures by using the VPN service.
Backup files for the later use, in case of the malware attack
Computer users can suffer from data losses due to cyber infections or their own faulty doings.
Ransomware can encrypt and hold files hostage, while unforeseen power cuts might cause a loss of important documents. If you have proper up-to-date backups, you can easily recover after such an incident and get back to work. It is also equally important to update backups on a regular basis so that the newest information remains intact - you can set this process to be performed automatically.
When you have the previous version of every important document or project you can avoid frustration and breakdowns. It comes in handy when malware strikes out of nowhere. Use for the data restoration process.
From our report of Mar 2021 · not reviewed since
Get rid of 123movies.co redirects by using our instructions
Many users might not realize what is causing an increased amount of ads, redirects, and other unwanted activities on their PCs.
However, if your search engine is turned to 123movies.co, and you are unable to revert these changes, your computer needs to be cleansed from PUPs.
Our team prepared a set of instructions that can help you remove 123movies.co virus from your computer. Therefore, please follow each step carefully and in the correct order. Do not attempt manual elimination if you are not that computer savvy, however, and rely on security software instead.
Automatic 123movies.co removal can be performed in just a few minutes. All you have to do is download and install reputable security software and bring it up to date. Then, you should run a full system scan which will detect all the unwanted apps installed on your machine and get rid of them automatically.
Questions about 123movies.co
What is 123movies.co m?
123movies.co is a browser hijacker that promises free access to movies and TV series but might compromise online privacy. 123movies.co is the redirect that adware-type intruder triggers.
These reroute, pop-ups, and other contents that appears out of nowhere are triggered by a potentially unwanted program that establishes its homepage, new tab address and search engine without adequately asking for permission to do so.
Unfortunately, the end user is the one who has to deal with persistent redirects and altered search results. For such reasons, the PUP is categorized as a browser hijacker which can affect Google Chrome, Internet Explorer, Mozilla Firefox, Opera, and Safari.
Is 123movies.co m safe?
No. 123movies.co is a browser hijacker that promises free access to movies and TV series but might compromise online privacy. To revert the damage done and ensure optimization of your computer, scan it with. Those who are not wary enough might end up on malware-laden sites where malicious JavaScript could abuse software vulnerabilities to inject much more prominent malware.
123movies.co is the redirect that adware-type intruder triggers. These reroute, pop-ups, and other contents that appears out of nowhere are triggered by a potentially unwanted program that establishes its homepage, new tab address and search engine without adequately asking for permission to do so.
What is 123movies please disable sandbox?
123movies.co is a browser hijacker that promises free access to movies and TV series but might compromise online privacy. 123movies.co is the redirect that adware-type intruder triggers.
These reroute, pop-ups, and other contents that appears out of nowhere are triggered by a potentially unwanted program that establishes its homepage, new tab address and search engine without adequately asking for permission to do so.
Unfortunately, the end user is the one who has to deal with persistent redirects and altered search results. For such reasons, the PUP is categorized as a browser hijacker which can affect Google Chrome, Internet Explorer, Mozilla Firefox, Opera, and Safari.
Is 123movies please disable sandbox safe?
No. 123movies.co is a browser hijacker that promises free access to movies and TV series but might compromise online privacy. To revert the damage done and ensure optimization of your computer, scan it with. Those who are not wary enough might end up on malware-laden sites where malicious JavaScript could abuse software vulnerabilities to inject much more prominent malware.
123movies.co is the redirect that adware-type intruder triggers. These reroute, pop-ups, and other contents that appears out of nowhere are triggered by a potentially unwanted program that establishes its homepage, new tab address and search engine without adequately asking for permission to do so.
What is 123movies to not working?
123movies.co is a browser hijacker that promises free access to movies and TV series but might compromise online privacy. 123movies.co is the redirect that adware-type intruder triggers.
These reroute, pop-ups, and other contents that appears out of nowhere are triggered by a potentially unwanted program that establishes its homepage, new tab address and search engine without adequately asking for permission to do so.
Unfortunately, the end user is the one who has to deal with persistent redirects and altered search results. For such reasons, the PUP is categorized as a browser hijacker which can affect Google Chrome, Internet Explorer, Mozilla Firefox, Opera, and Safari.
Is 123movies to not working safe?
No. 123movies.co is a browser hijacker that promises free access to movies and TV series but might compromise online privacy. To revert the damage done and ensure optimization of your computer, scan it with. Those who are not wary enough might end up on malware-laden sites where malicious JavaScript could abuse software vulnerabilities to inject much more prominent malware.
123movies.co is the redirect that adware-type intruder triggers. These reroute, pop-ups, and other contents that appears out of nowhere are triggered by a potentially unwanted program that establishes its homepage, new tab address and search engine without adequately asking for permission to do so.
What is 123movies.to not working?
123movies.co is a browser hijacker that promises free access to movies and TV series but might compromise online privacy. 123movies.co is the redirect that adware-type intruder triggers.
These reroute, pop-ups, and other contents that appears out of nowhere are triggered by a potentially unwanted program that establishes its homepage, new tab address and search engine without adequately asking for permission to do so.
Unfortunately, the end user is the one who has to deal with persistent redirects and altered search results. For such reasons, the PUP is categorized as a browser hijacker which can affect Google Chrome, Internet Explorer, Mozilla Firefox, Opera, and Safari.
Is 123movies.to not working safe?
No. 123movies.co is a browser hijacker that promises free access to movies and TV series but might compromise online privacy. To revert the damage done and ensure optimization of your computer, scan it with. Those who are not wary enough might end up on malware-laden sites where malicious JavaScript could abuse software vulnerabilities to inject much more prominent malware.
123movies.co is the redirect that adware-type intruder triggers. These reroute, pop-ups, and other contents that appears out of nowhere are triggered by a potentially unwanted program that establishes its homepage, new tab address and search engine without adequately asking for permission to do so.
Will Fortect remove 123movies.co?
Fortect scans Windows for malware and unwanted programs and repairs the system files and settings they change, and its free scan shows what it finds on your PC before you decide anything.
For 123movies.co, follow the plan above as well: the browser steps take back permissions and settings that no scanner treats as a threat, and uninstalling the program that brought it removes the source.
Run Microsoft Defender's full scan and, if anything was found, its offline scan as a second opinion. If the symptoms are gone after the plan and both scans are clean, there is nothing more to do.
Sources
- How-To Geek: PUPs Explained: What is a "Potentially Unwanted Program"? (read October 5, 2026)
- Wikipedia: Vulnerability (computing) (read October 5, 2026)
- FTC: How to recognize, remove and avoid malware (read October 5, 2026)
- Microsoft Learn: Microsoft Defender Offline (read October 5, 2026)
- Microsoft Learn: How Microsoft names malware (read October 5, 2026)
- Apple Newsroom: Apple TV celebrates the season two premiere of Hijack (read October 10, 2026)