What are the main reasons GameLauncher is not a safe application?
GameLauncher virus is a name of a malware which automatically installs on the computer and hijacks Internet browsers. It may arrive to your device as a browser extension or add-on, sadly, such installation is often carried out without the user’s permission. The malware has so far been noticed on Windows operating system and its popular browsers, however, that does not mean that the users of competitive or less popular systems can be sure their devices will not be infected either. The computer experts have already put this program into a category of adware viruses which tells a lot about what can be expected from this program. Such viruses are focused on generating ads and collecting advertising profit for their creators. Thus, soon after its install the users would typically notice and increase of various online advertising on their browsers. “Ads by GameLauncher,” “Powered by GameLauncher,” “Brought by GameLauncher” are just a few examples of the ads that will start increasingly multiplying over the time this adware is installed on your computer. Do not be misled! These ads are mainly generated to help GameLauncher redirect users to sponsored sites which have ordered such advertising service to boost their traffic or sales. Sadly, adware that sneaks up on computers is unlikely to promote anything worth your time or even safe to download. In fact, GameLauncher ads are all a part of the pay-per-click system which sole purpose is to benefit the advertiser. Every click brings another penny to the pocket of the fraudulent advertisers. We think that gives enough reasoning to remove GameLauncher from the computer. If you have already decided upon the virus removal, we suggest doing it the easy way and obtain automatic antivirus utility, for instance, FortectIntego.

We have already talked about the most obvious signs of GameLauncher hijack. But there are some more subtle indications that prove that what you are seeing on your browser are not simply Google Ads. First, it’s the suspicious Clicker_new_cis.exe process running in your Task Manager. This process is directly associated with the adware in question and immediately points to the potential infection. If you notice it, you should terminate the process without delay and proceed with further GameLauncher removal steps. If you do not perform the system cleanup in time, the issues which may have been subtle at first may start manifesting more apparently. For instance, your computer may become sluggish, browsers and other random applications might start crashing out of the blue, and your computer may start overheating. Such activities may result in data loss and even corruption of hardware so you must make sure the adware is removed from your computer ASAP.
How did GameLauncher appear on my PC?
GameLauncher is one those programs that might appear on your computer out of nowhere. Or it only seems so. In reality, it is a lightweight cyber infection that simply has no capacity or resources of infecting your computer completely without your interference. Usually, malware creators integrate potentially unwanted programs in packages of third party software, and we inadvertently install them on computers ourselves. If you recently downloaded any freeware or shareware application and rushed through its installation using “Quick” or “Recommended” installation modes, you may have already allowed GameLauncher or any other potentially dangerous program to enter your PC. Thus, we suggest scanning your computer with an antivirus utility immediately and opt for the “Advanced” or “Custom” installation settings next time you install something on your device. You will at least have a chance to cancel the unwanted applications manually.
GameLauncher removal guidelines:
Though GameLauncher virus as an adware may not be malicious itself, it is still very important to eliminate this program from your computer. You know all the reasons to do it already, so why not get to work? Open your antivirus utility and choose the full system scan option. That’s it. That is all that takes to finish the GameLauncher removal. If you do not own an antivirus utility yet, there are numerous options to choose from, starting with professional anti-malware tools, free software, online scanners, etc. Choose the program that fits your computer capabilities, is reliable and lasting. If, however, you would choose to remove GameLauncher manually — we have some recommendations for you as well. Check them out below.
Uninstall from Windows
Uninstall from Windows 10/8:
- Type Control Panel into the Windows search box and open the result.
- Under Programs, select Uninstall a program.


Uninstall from Windows 7/XP:
- Click on Windows Start > Control Panel (Windows XP users should click on Add/Remove Programs).
- In Control Panel, select Programs > Uninstall a program.


Remove the unwanted program:
- In the Programs and Features window, look for any recently installed suspicious entries, select them, and click Uninstall.
- If User Account Control appears, click Yes to confirm, then complete the removal.


Reset Internet Explorer
Remove dangerous add-ons:
- Open Internet Explorer, click on the Gear icon (IE menu) on the top-right corner of the browser
- Pick Manage Add-ons.
- You will see a Manage Add-ons window. Here, look for suspicious plugins. Click on these entries and select Disable.


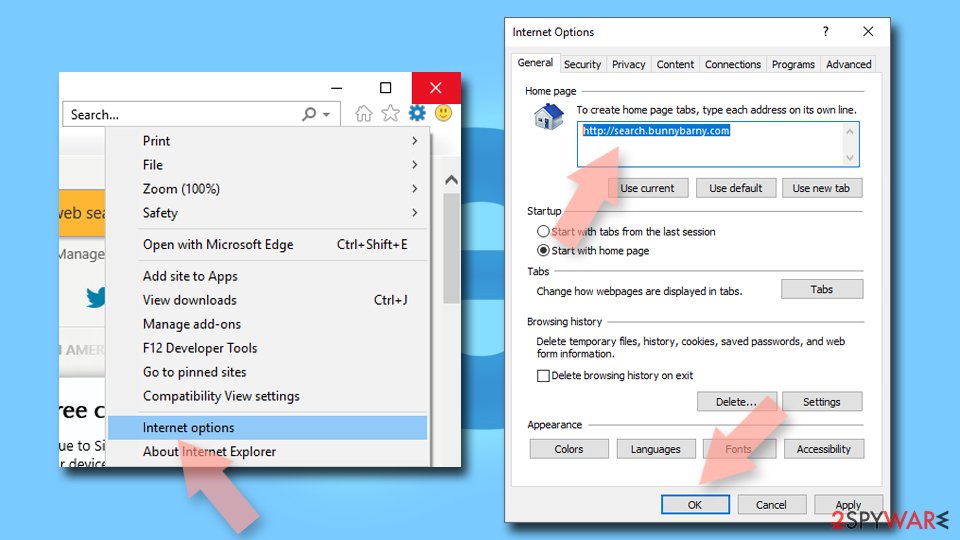
Change your homepage if it was altered:
- Open IE and click on the Gear icon.
- Select Internet Options.
- In the General tab, delete the Home page address and replace it by your preferred one (for example, Google.com).
- Click Apply and then select OK.

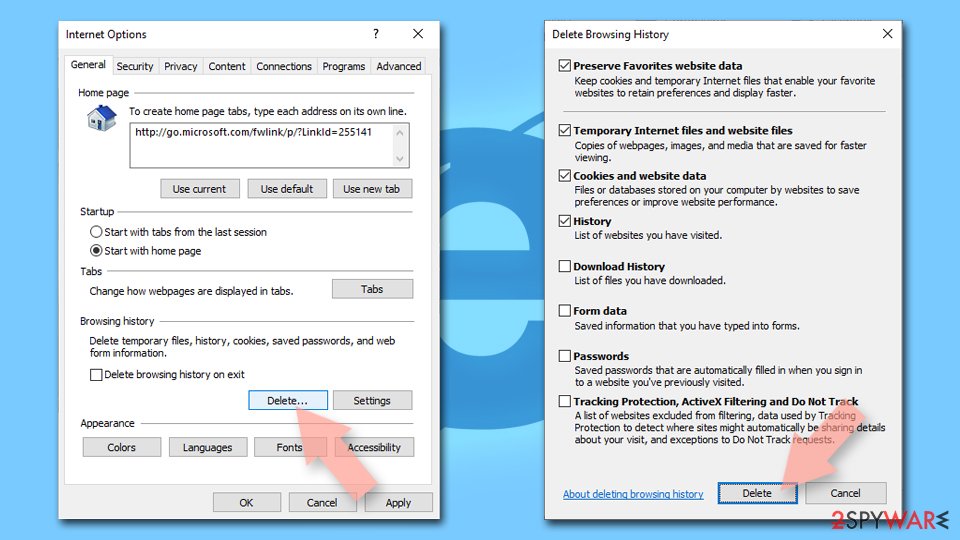
Delete temporary files:
- Press on the Gear icon and select Internet Options.
- Under Browsing history, click Delete...
- Select relevant fields and press Delete.

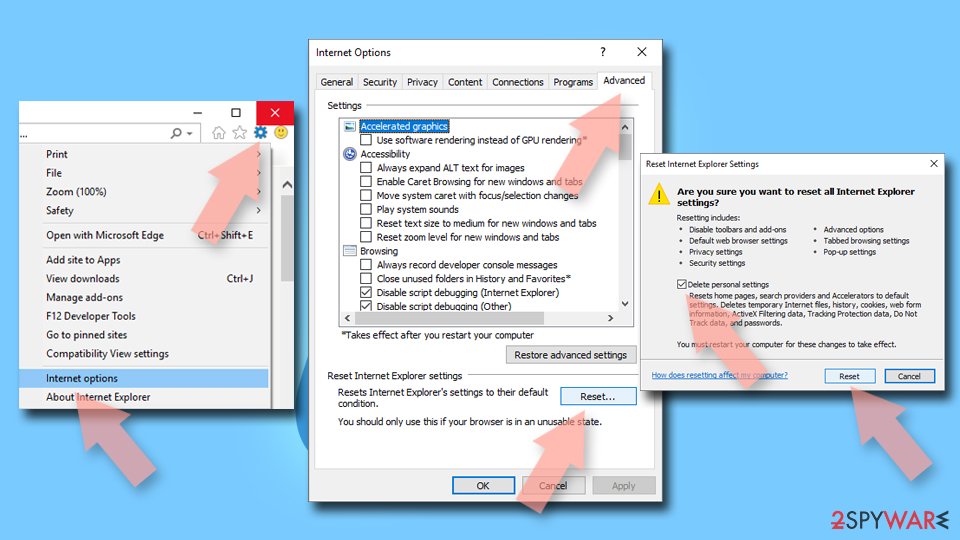
Reset Internet Explorer:
- Click on Gear icon > Internet options and select Advanced tab.
- Select Reset.
- In the new window, check Delete personal settings and select Reset.

Remove from Microsoft Edge
Delete unwanted extensions from MS Edge:
- Select Menu (three horizontal dots at the top-right of the browser window) and pick Extensions.
- From the list, pick the extension and click on the Gear icon.
- Click Remove.


Clear cookies and other browser data:
- Click on the Menu (three horizontal dots at the top-right of the browser window) and select Settings > Privacy, search, and services..
- Under Clear browsing data, pick Choose what to clear.
- Select Cookies and other site data and Cached images and files. (apart from passwords, although you might want to include Media licenses as well, if applicable) and click on Clear.


Restore new tab and homepage settings:
- Click the menu icon and choose Settings.
- Then find On startup section.
- Click Remove next to any suspicious startup page.
Reset MS Edge if the above steps did not work:
- Press on Ctrl + Shift + Esc to open Task Manager.
- Click on More details arrow at the bottom of the window.
- Select Details tab.
- Now scroll down and locate every entry with Microsoft Edge name in it. Right-click on each of them and select End Task to stop MS Edge from running.


Instructions for Chromium-based Edge
Delete extensions from MS Edge (Chromium):
- Open Edge and click select Settings > Extensions.
- Delete unwanted extensions by clicking Remove.


Clear cache and site data:
- Click on Menu and go to Settings.
- Select Privacy, search and services.
- Under Clear browsing data, pick Choose what to clear.
- Under Time range, pick All time.
- Select Clear now.


Reset Chromium-based MS Edge:
- Click on Menu and select Settings.
- On the left side, pick Reset settings.
- Select Restore settings to their default values.
- Confirm with Reset.
- This will disable extensions and reset startup pages but will not delete bookmarks, saved passwords, or browsing history.


Remove from Mozilla Firefox (FF)
Remove dangerous extensions:
- Open Mozilla Firefox browser and click on the Menu (three horizontal lines at the top-right of the window).
- Select Add-ons.
- In here, select the unwanted extension and click Remove.


Reset the homepage:
- Click three horizontal lines at the top right corner to open the menu.
- Choose Settings.
- Under Home, set your preferred homepage and new tab settings.
Clear cookies and site data:
- Click Menu and pick Settings.
- Go to Privacy & Security section.
- Scroll down to locate Cookies and Site Data.
- Click on Clear Data...
- Select Cookies and Site Data and Temporary cached files and pages, then click Clear.


Reset Mozilla Firefox
If clearing the browser as explained above did not help, reset Mozilla Firefox:
- Open Mozilla Firefox browser and click the Menu.
- Go to Help and then choose Troubleshooting Information.

- Under Give Firefox a tune up section, click on Refresh Firefox...
- Once the pop-up shows up, confirm the action by pressing on Refresh Firefox.


Remove from Google Chrome
Delete malicious extensions from Google Chrome:
- Open Google Chrome, click on the Menu (three vertical dots at the top-right corner) and select More tools > Extensions.
- In the newly opened window, you will see all the installed extensions. Uninstall all suspicious extensions related to the unwanted program by clicking Remove.


Clear cache and web data from Chrome:
- Click on Menu and pick Settings.
- Under Privacy and security, select Clear browsing data.
- Select Browsing history, Cookies and other site data, as well as Cached images and files.
- Click Clear data.


Change your homepage:
- Click menu and choose Settings.
- Look for a suspicious site in the On startup section.
- Click on Open a specific or set of pages and click on three dots to find the Remove option.
Reset Google Chrome:
If the previous methods did not help you, reset Google Chrome to eliminate all the unwanted components:
- Click on Menu and select Settings.
- In the Settings, scroll down and click Advanced.
- Scroll down and locate Reset and clean up section.
- Now click Restore settings to their original defaults.
- Confirm with Reset settings.


Was this guide helpful?
Be the first to comment