
Go.padsdel.com pop: what it is and how to remove it
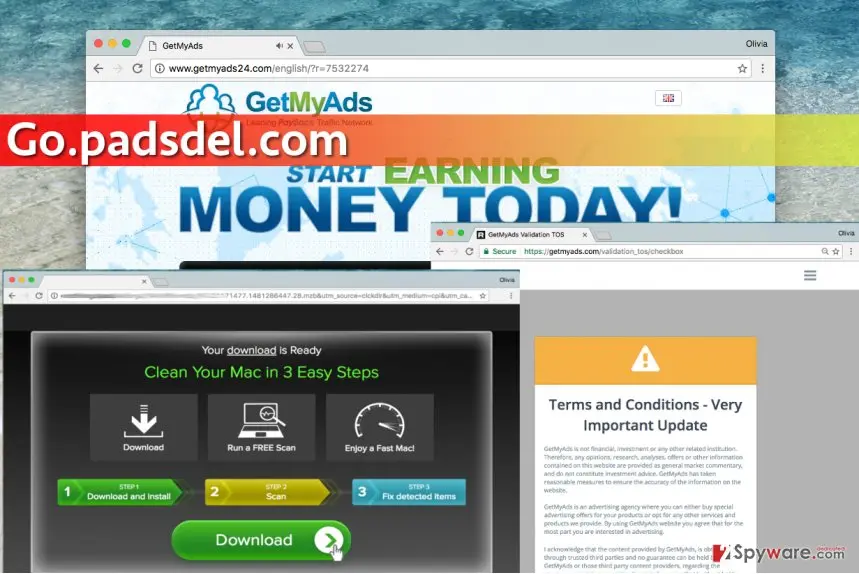
Go.padsdel.com virus can start bothering you right after installing some kind of free program. Although Padsdel virus cannot added to malware category, it truly belongs to spyware group and annoys hundreds of computer users daily.
Facts checked October 6, 2026. Removal steps tested on Windows 11 (26H2) and checked against Microsoft's and the browser makers' current documentation. Sections marked as our earlier report are the original text: they describe the threat as it was then and have not been reviewed since. The 2026 status, the removal steps and the questions are current.
Automatic
Get a free scan and check if your PC is infected.
Fortect finds malware, unwanted programs and the Windows damage they leave behind, and repairs it in one pass.
If redirects to go.padsdel.com keep coming back, a free scan can check extensions, programs and browser settings in one pass.
Do it yourself · free Remove Go.padsdel.com pop yourself 4 steps, about 12 minutes, no software needed.
Start the steps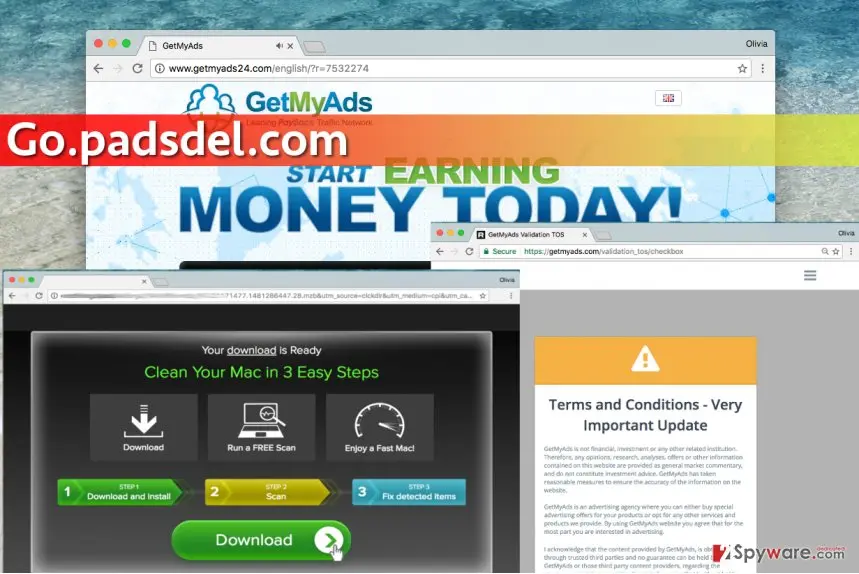
Go.padsdel.com pop: summary
| Detection names | No Microsoft detection name is known |
|---|---|
| Distribution | Not recorded in the old report |
| Damage | Not recorded in the old report |
| Name | Go.padsdel.com pop |
| Type | Adware extension |
| Symptoms | Redirects to an unknown domain |
| Removal | Scan the PC with security software to find and remove the malware and anything installed with it. Fortect scans Windows for malware and repairs the system files and settings it damaged. Remove it nowTo use the full-featured product, you have to purchase a license for Fortect. The scan is free. |
Show 6 more facts
| Evidence | 6 write-ups by security sites; details still limited |
|---|---|
| Domains | go.padsdel.com |
| Ads shown as | Redirects through ad pages |
| Browsers | Chrome, Edge and Firefox |
| First seen | 7 February 2017 |
| Facts checked | 6 October 2026 |
Is Go.padsdel.com pop dangerous?
From our report of Feb 2017 · not reviewed since
What is known about Go.padsdel.com ads?
Go.padsdel.com virus can start bothering you right after installing some kind of free program.
Although Padsdel virus cannot added to malware category, it truly belongs to spyware group and annoys hundreds of computer users daily. Once installed, it starts displaying all sorts of third-party advertisements using victim's web browser.
It opens new browser windows or tabs and loads a particular third-party ad from hxxp://go.padsdel.com/afu.php?id= domain. If these ads started to bother you on a daily basis, you should remove Padsdel virus - the sooner, the better.
Although the program that displays these annoying pop-up ads is not some kind of destructive program, it acts suspiciously, so it shouldn't be kept on the system. It inserts tracking cookies into victim's web browser and starts gathering user's recent search queries, click data, browsing history details and similar information. Consequently, the adware program generates third-party offers based on user's interests and then serves them via Go.padsdel.com pop-up ads.
Now, you have to understand that the majority of these ads look attractive and inviting, however, it doesn't mean that you should be clicking on them without thinking. The fact is, all these ads are intended to lure you into clicking on them. Each of them contains a link that points to a particular place on the world wide web.
Sadly, we can only say that Go.padsdel.com ads are not that trustworthy as we would wish them to be. It turns out, some of them can direct you to highly insecure websites that are full of questionable downloads, shady questionnaires or other content that can put your computer or your personal data at risk.
Therefore, we do not recommend clicking on such advertisements. What is more, continuous pop-up ads will annoy you to death, because they won't allow you to browse the Internet without interruptions. You can do it with tools like or use Go.padsdel.com removal guidelines presented right below the article.
Check your browser and PC
- Address:
go.padsdel.com
How to remove Go.padsdel.com pop
How to remove the Go.padsdel.com pop extension
Do the browser steps in every browser and profile on the PC, then check Windows for the program that installed the extension.
Step 1: Remove extensions you did not add
Go.padsdel.com pop often works through an extension, so go through the extension list of each browser:
chrome://extensionsedge://extensions- Extensions and themes in Firefox
Switch suspicious extensions off one at a time and reload the page where the problem shows, then remove the one that stops it, and any other you did not add.
Remember the other browsers and profiles on the PC. If Remove is missing or greyed out, a policy forces the extension, which the policy step deals with. Windows 11 and Windows 10 show the same pages.
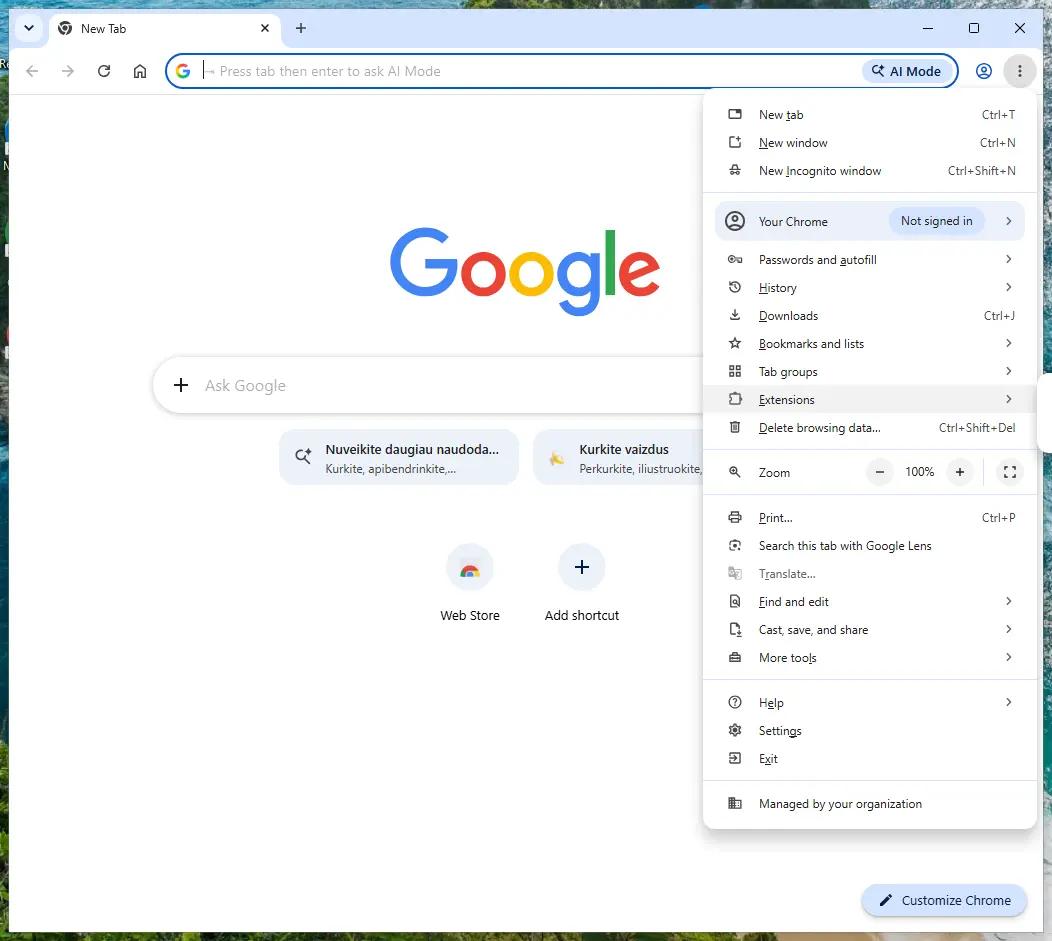
Chrome on Windows 11: More > Extensions > Manage extensions. Full procedure with screenshots: Remove a browser extension
Step 2: Uninstall programs you did not mean to install
Open Settings > Apps > Installed apps in Windows 11, or Settings > Apps > Apps & features in Windows 10, and sort the list by install date. Look at what appeared around the day the problem started and uninstall every program you do not recognise or did not choose.
Free converters, PDF and video tools, "system optimizers" and unknown browsers are the usual carriers of Go.padsdel.com pop. If a name is unclear, search for it before you remove it, so you do not uninstall a driver or a Windows component.
Full procedure with screenshots: Uninstall a program or app in Windows On uGetFix
Step 3: Reset the browser
Finish the browser part with a reset, which puts the search engine, start page, new tab page and site permissions back to their defaults and switches extensions off. Chrome: Settings > Reset settings > Restore settings to their original defaults.
Edge: Settings > Reset settings. Firefox: Help > More troubleshooting information > Refresh Firefox, which also removes its extensions. Your bookmarks and saved passwords are kept, and the menus are the same on Windows 11 and Windows 10.
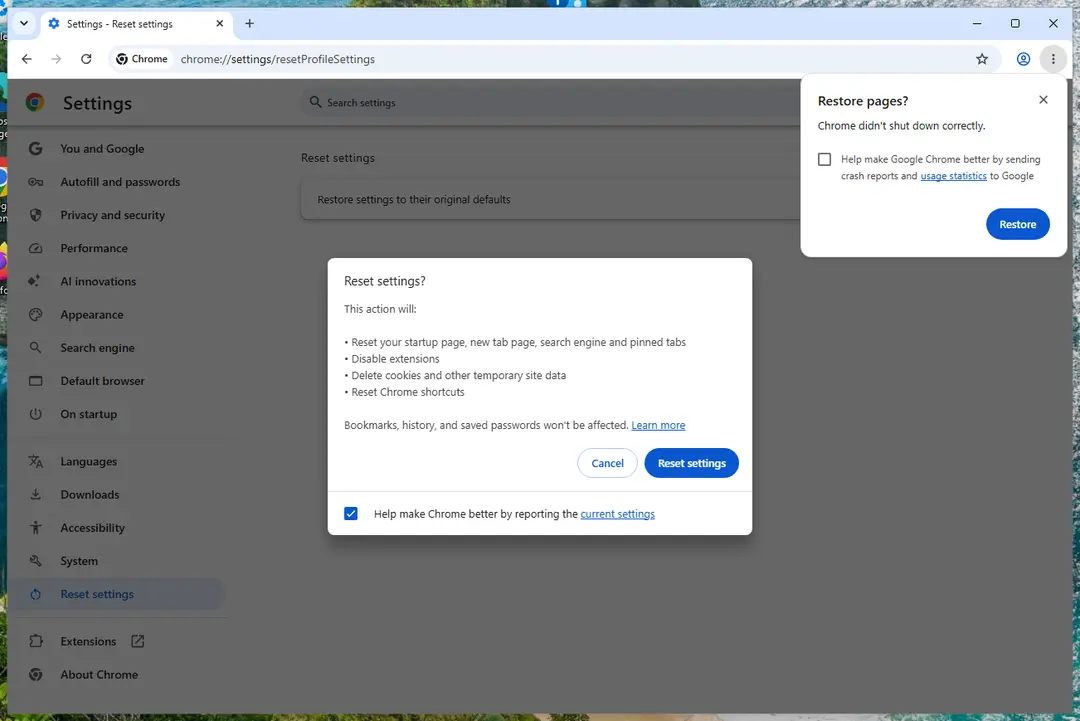
Chrome on Windows 11: Settings > Reset settings. Full procedure with screenshots: Reset a browser and fix a hijacked search engine
Step 4: Scan the PC, then run the offline scan
Open Windows Security > Virus & threat protection > Scan options, run a Full scan and remove everything it finds. Then select Microsoft Defender Antivirus (offline scan) and click Scan now: the PC restarts and scans before Windows loads, which finds files that hide while Windows runs.
Save your work first, because the offline scan takes about 15 minutes. Both scans are built into Windows 11 and Windows 10, and a second scanner from another vendor is a useful extra opinion.
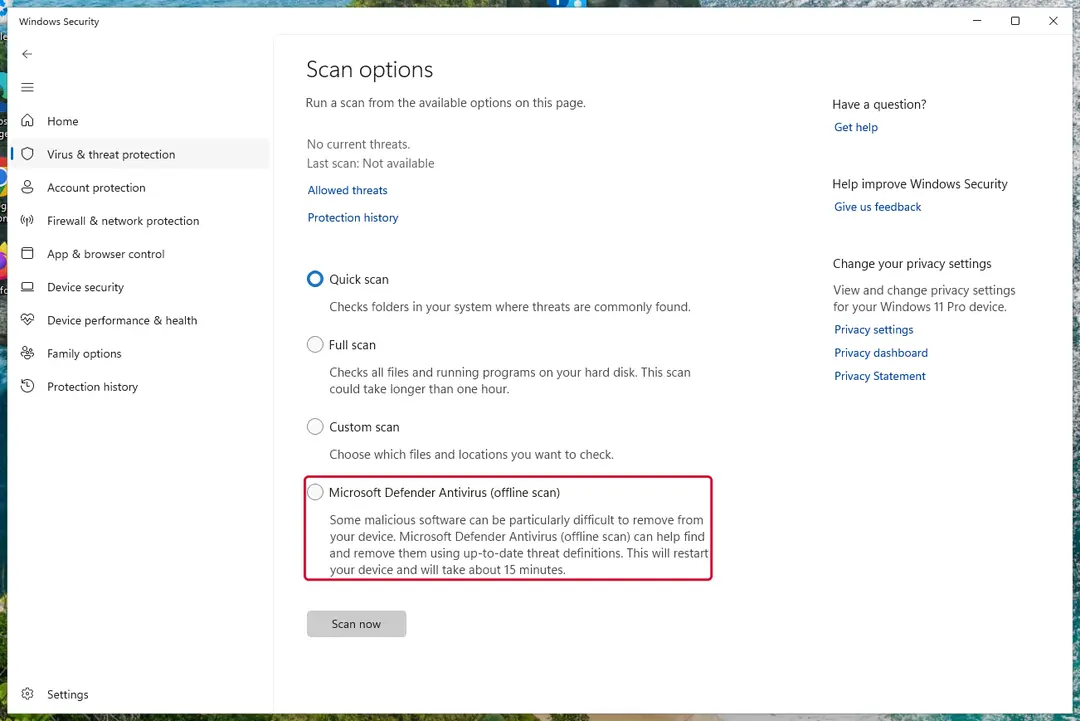
Windows 11: Windows Security > Virus & threat protection > Scan options. Full procedure with screenshots: Run a Microsoft Defender Offline scan
Instructions for each browser and system
The detailed steps for every browser and system this guide covers. Open the one you use.
Uninstall from Windows
To completely uninstall Padsdel virus, you should clean your PC from unknown/suspicious/shady programs. Uninstall all unwanted applications one by one with a help of this easy-to-follow guide.
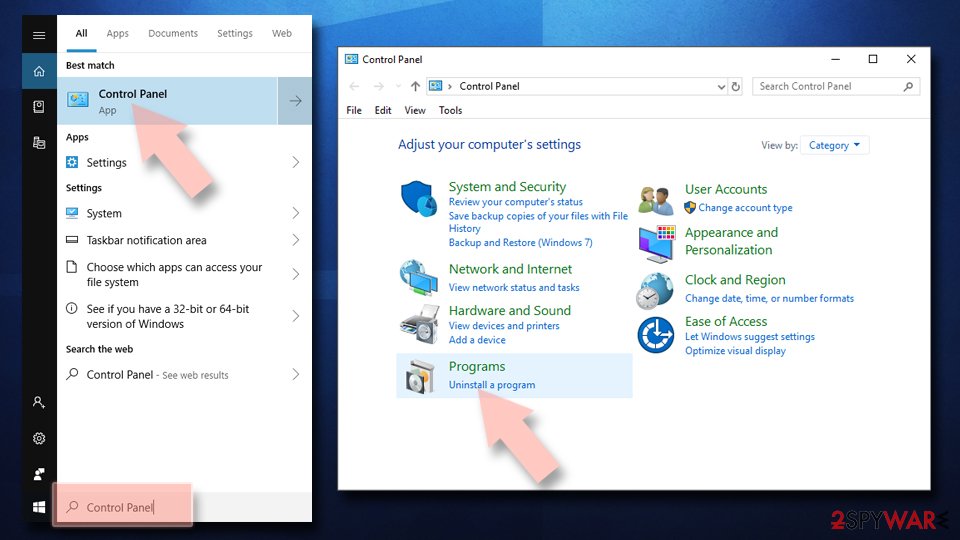
Uninstall from Windows 10/8:
- Type Control Panel into the Windows search box and open the result.
- Under Programs, select Uninstall a program.
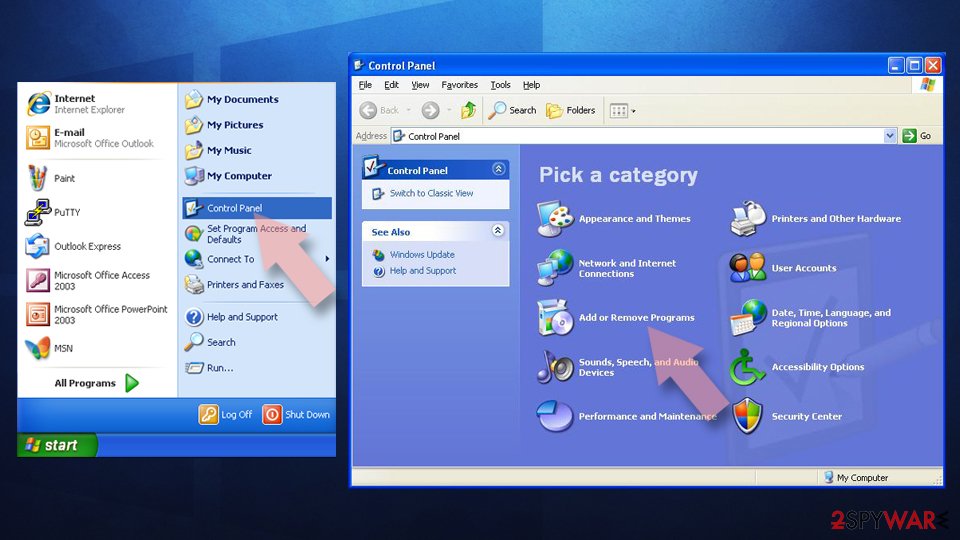
Uninstall from Windows 7/XP:
- Click on Windows Start > Control Panel (Windows XP users should click on Add/Remove Programs).
- In Control Panel, select Programs > Uninstall a program.
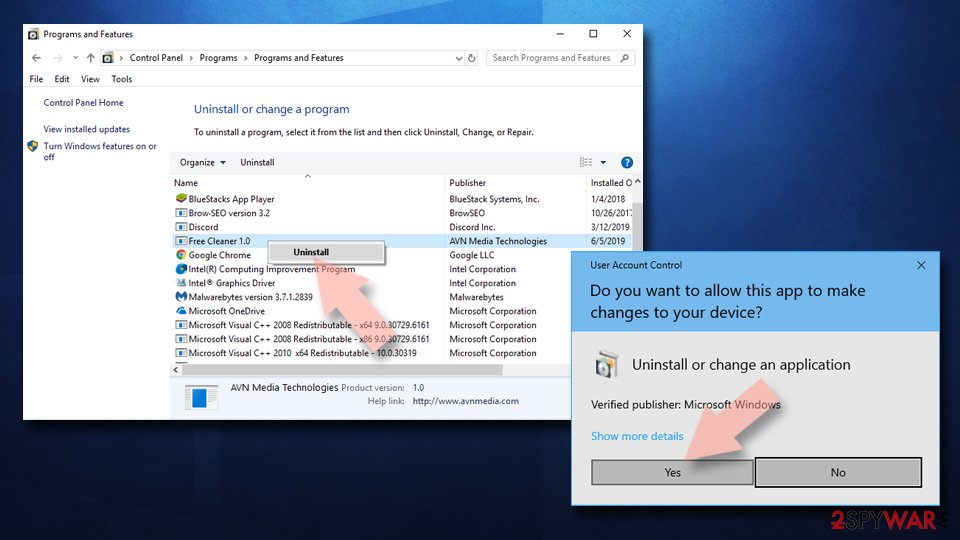
Remove the unwanted program:
- In the Programs and Features window, look for any recently installed suspicious entries, select them, and click Uninstall.
- If User Account Control appears, click Yes to confirm, then complete the removal.
Remove from Google Chrome
Your browsers most likely are affected by Go.padsdel.com pop-up virus, too. Therefore, you need to make sure that they are free of suspicious add-ons, which frequently turn out to be responsible for redirects, pop-up ads, and other unpleasant effects.
Delete malicious extensions from Google Chrome:
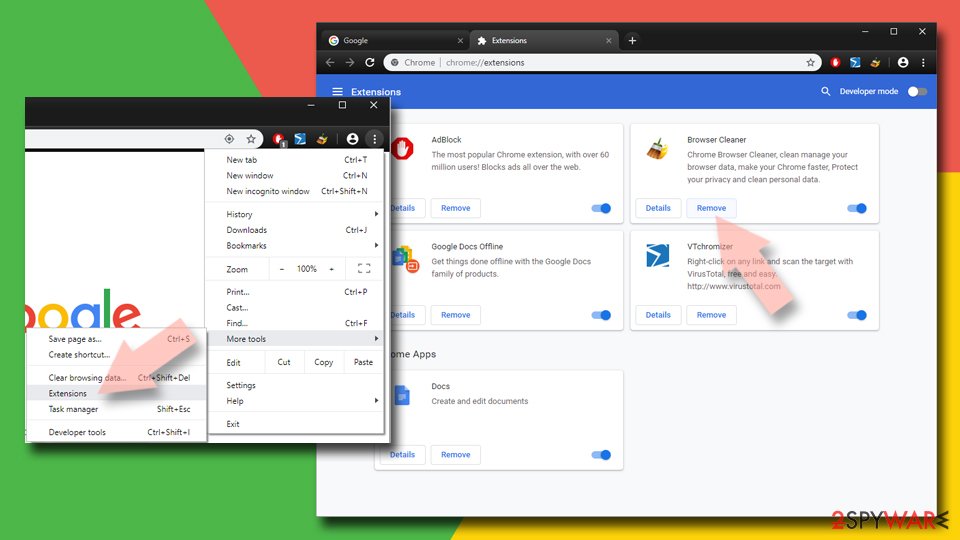
- Open Google Chrome, click on the Menu (three vertical dots at the top-right corner) and select More tools > Extensions.
- In the newly opened window, you will see all the installed extensions. Uninstall all suspicious extensions related to the unwanted program by clicking Remove.
Clear cache and web data from Chrome:
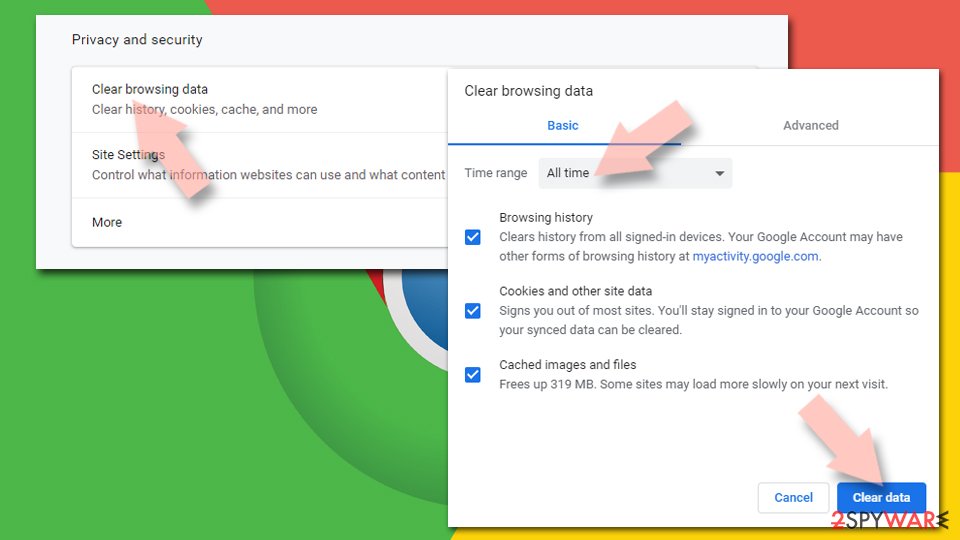
- Click on Menu and pick Settings.
- Under Privacy and security, select Clear browsing data.
- Select Browsing history, Cookies and other site data, as well as Cached images and files.
- Click Clear data.
Change your homepage:
- Click menu and choose Settings.
- Look for a suspicious site in the On startup section.
- Click on Open a specific or set of pages and click on three dots to find the Remove option.
Reset Google Chrome:
If the previous methods did not help you, reset Google Chrome to eliminate all the unwanted components:
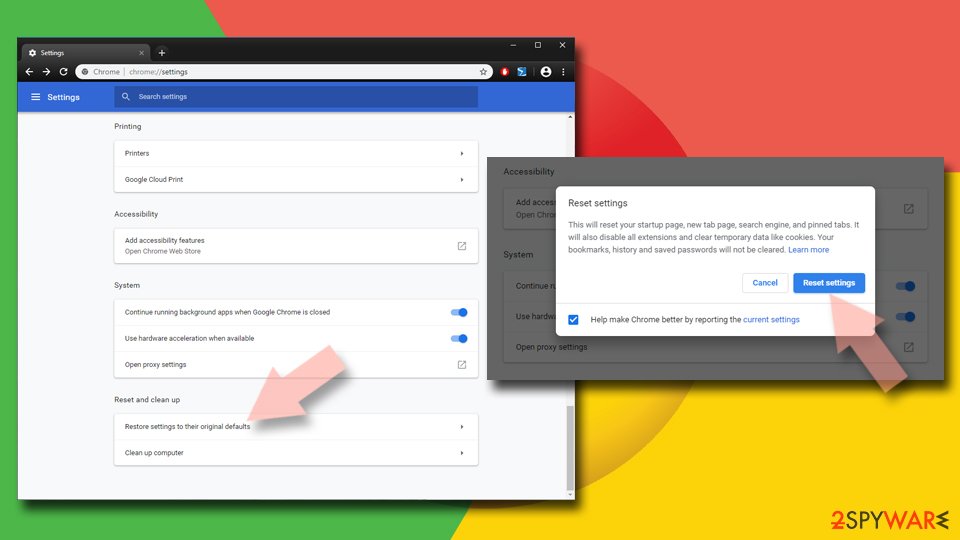
- Click on Menu and select Settings.
- In the Settings, scroll down and click Advanced.
- Scroll down and locate Reset and clean up section.
- Now click Restore settings to their original defaults.
- Confirm with Reset settings.
Remove from Microsoft Edge
Delete unwanted extensions from MS Edge:
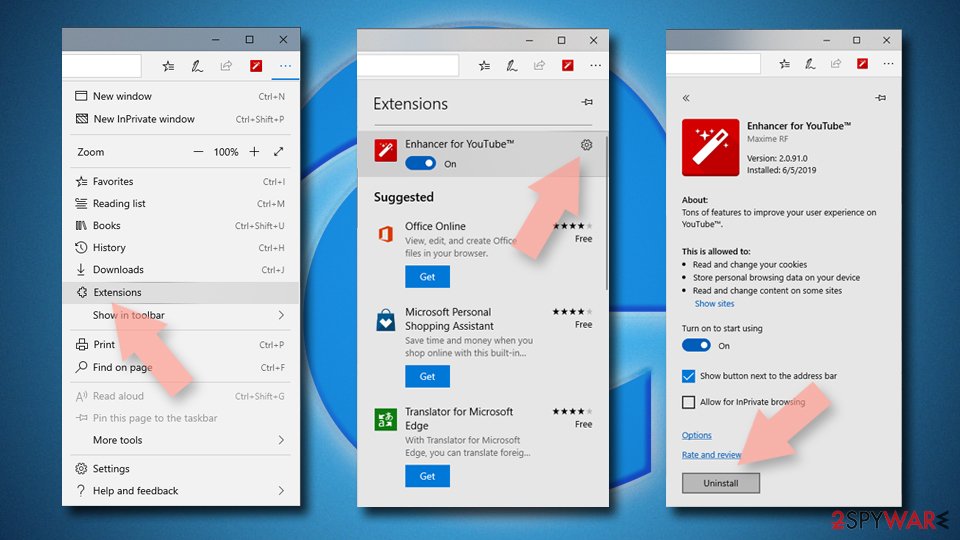
- Select Menu (three horizontal dots at the top-right of the browser window) and pick Extensions.
- From the list, pick the extension and click on the Gear icon.
- Click Remove.
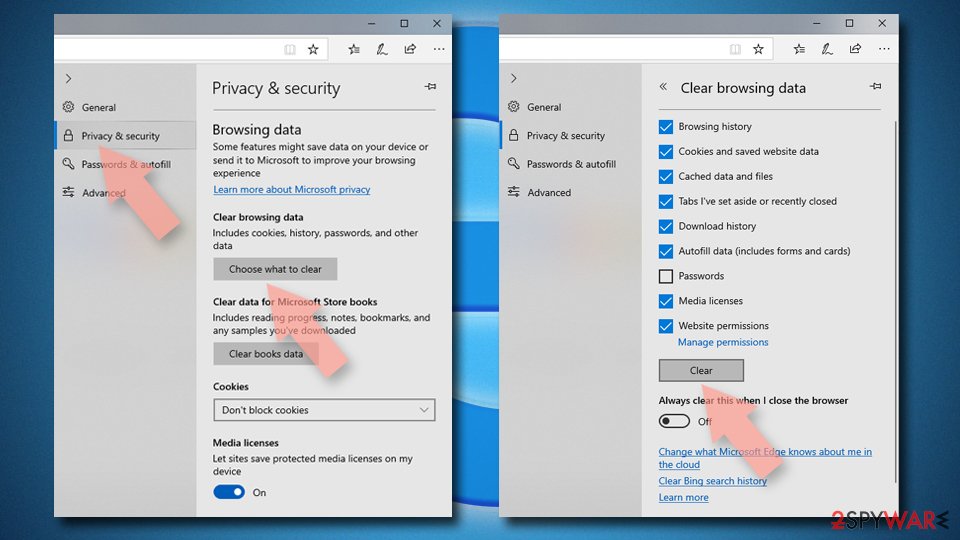
Clear cookies and other browser data:
- Click on the Menu (three horizontal dots at the top-right of the browser window) and select Settings > Privacy, search, and services..
- Under Clear browsing data, pick Choose what to clear.
- Select Cookies and other site data and Cached images and files. (apart from passwords, although you might want to include Media licenses as well, if applicable) and click on Clear.
Restore new tab and homepage settings:
- Click the menu icon and choose Settings.
- Then find On startup section.
- Click Remove next to any suspicious startup page.
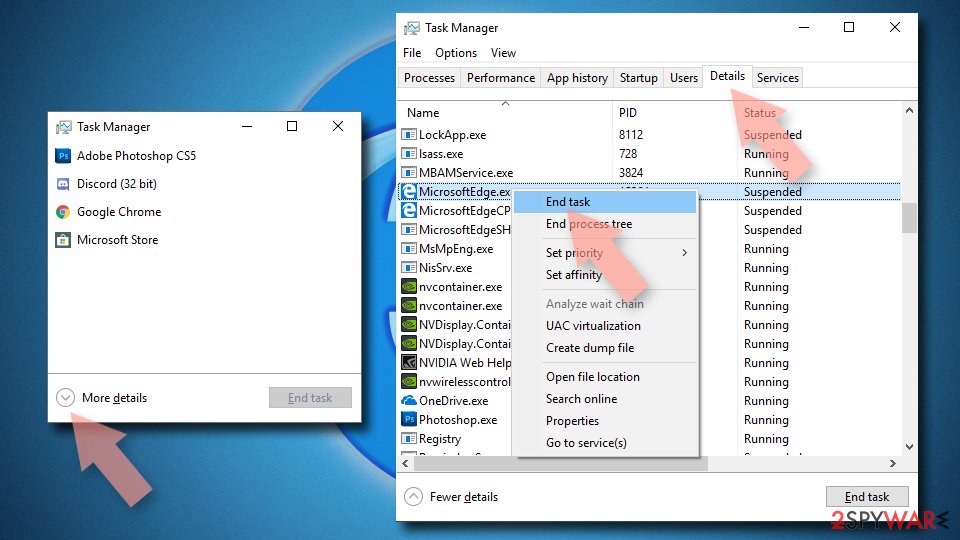
Reset MS Edge if the above steps did not work:
- Press on Ctrl + Shift + Esc to open Task Manager.
- Click on More details arrow at the bottom of the window.
- Select Details tab.
- Now scroll down and locate every entry with Microsoft Edge name in it. Right-click on each of them and select End Task to stop MS Edge from running.
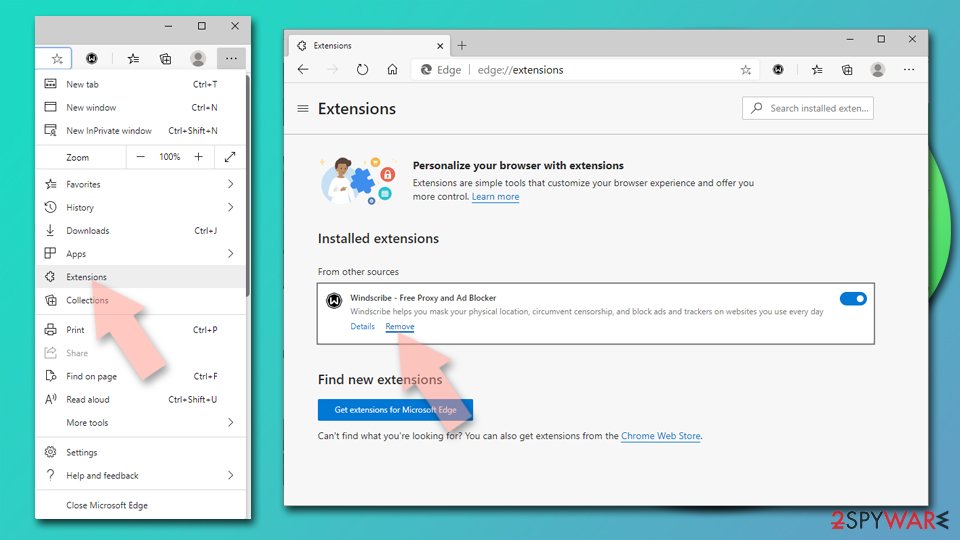
Delete extensions from MS Edge (Chromium):
- Open Edge and click select Settings > Extensions.
- Delete unwanted extensions by clicking Remove.
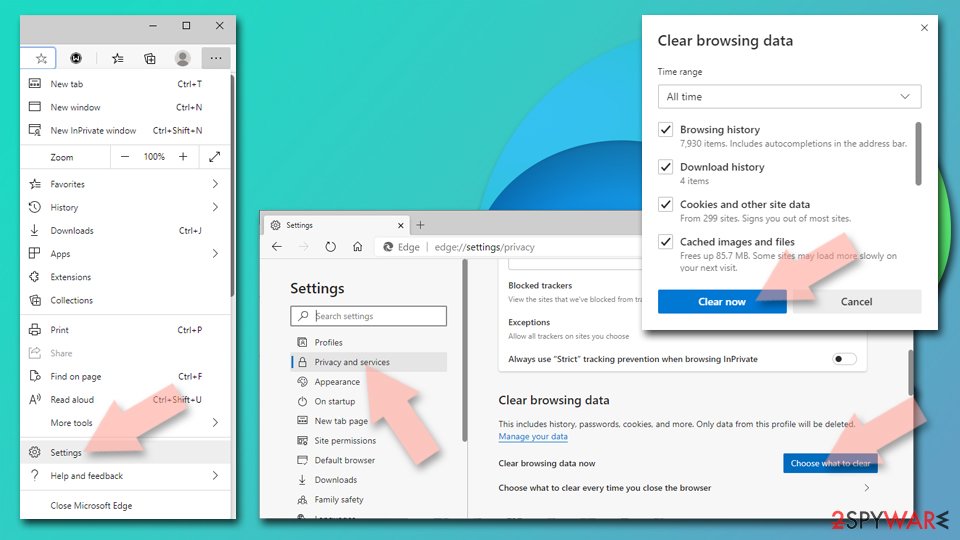
Clear cache and site data:
- Click on Menu and go to Settings.
- Select Privacy, search and services.
- Under Clear browsing data, pick Choose what to clear.
- Under Time range, pick All time.
- Select Clear now.
Reset Chromium-based MS Edge:
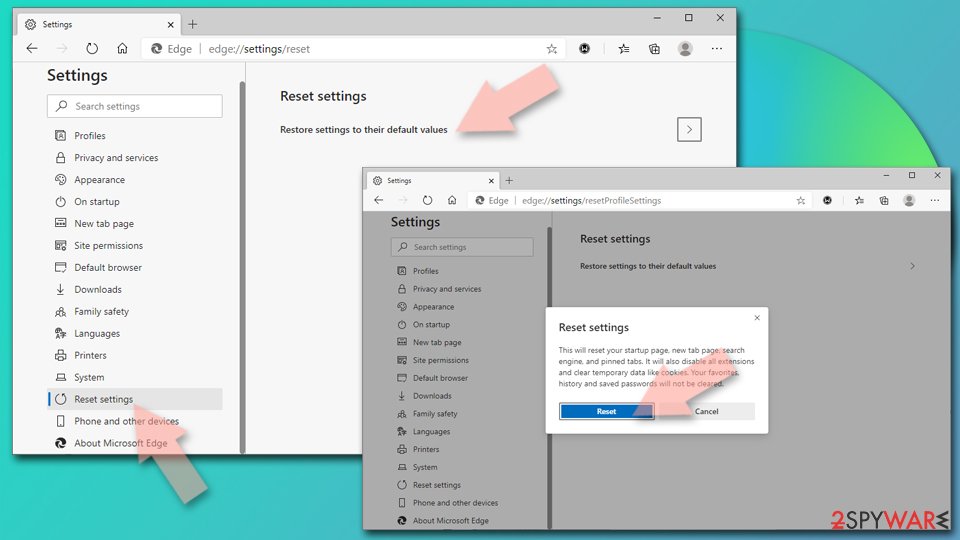
- Click on Menu and select Settings.
- On the left side, pick Reset settings.
- Select Restore settings to their default values.
- Confirm with Reset.
- This will disable extensions and reset startup pages but will not delete bookmarks, saved passwords, or browsing history.
Remove from Mozilla Firefox (FF)
Your browser must be cleaned from Padsdel components in order to function normally. Follow these easy steps for a quick Go.padsdel.com removal.
Remove dangerous extensions:
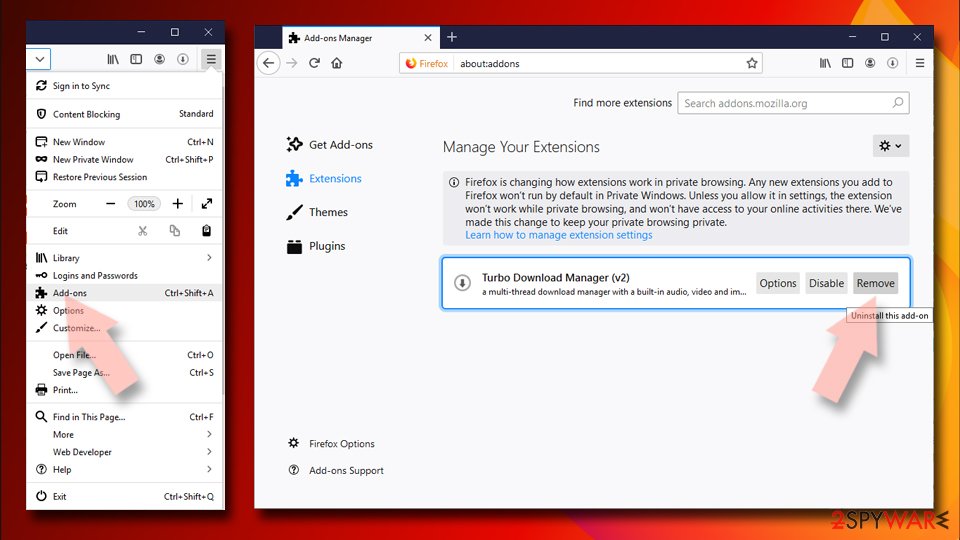
- Open Mozilla Firefox browser and click on the Menu (three horizontal lines at the top-right of the window).
- Select Add-ons.
- In here, select the unwanted extension and click Remove.
Reset the homepage:
- Click three horizontal lines at the top right corner to open the menu.
- Choose Settings.
- Under Home, set your preferred homepage and new tab settings.
Clear cookies and site data:
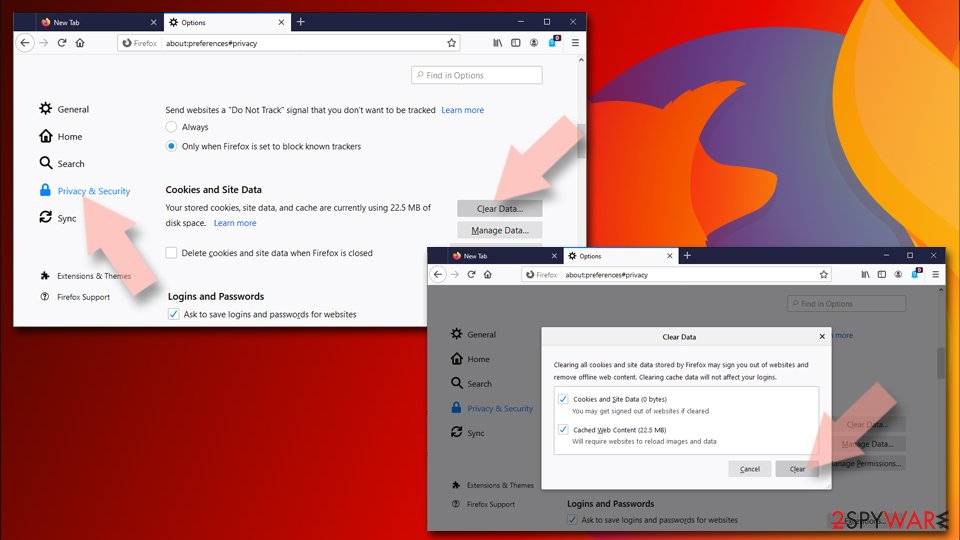
- Click Menu and pick Settings.
- Go to Privacy & Security section.
- Scroll down to locate Cookies and Site Data.
- Click on Clear Data...
- Select Cookies and Site Data and Temporary cached files and pages, then click Clear.
Reset Mozilla Firefox
If clearing the browser as explained above did not help, reset Mozilla Firefox:
- Open Mozilla Firefox browser and click the Menu.
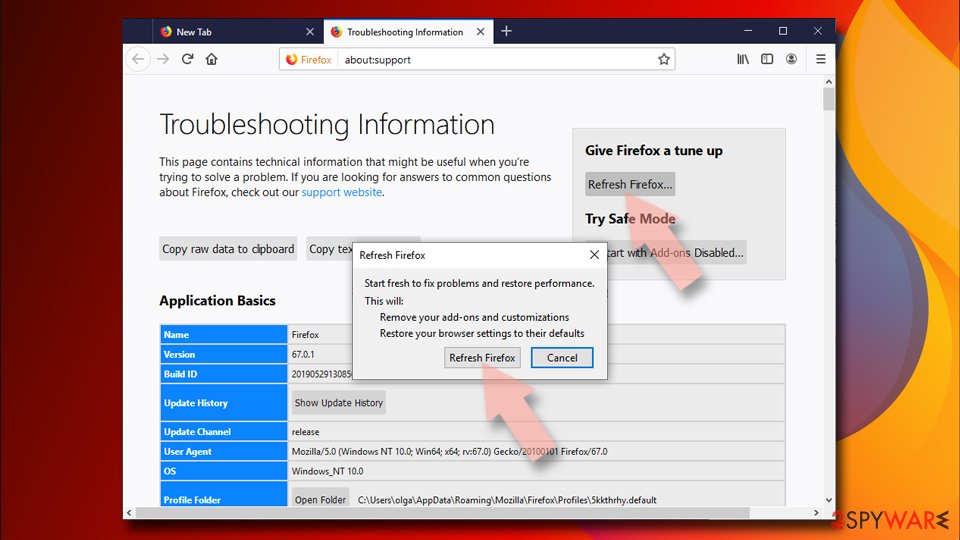
- Go to Help and then choose Troubleshooting Information.
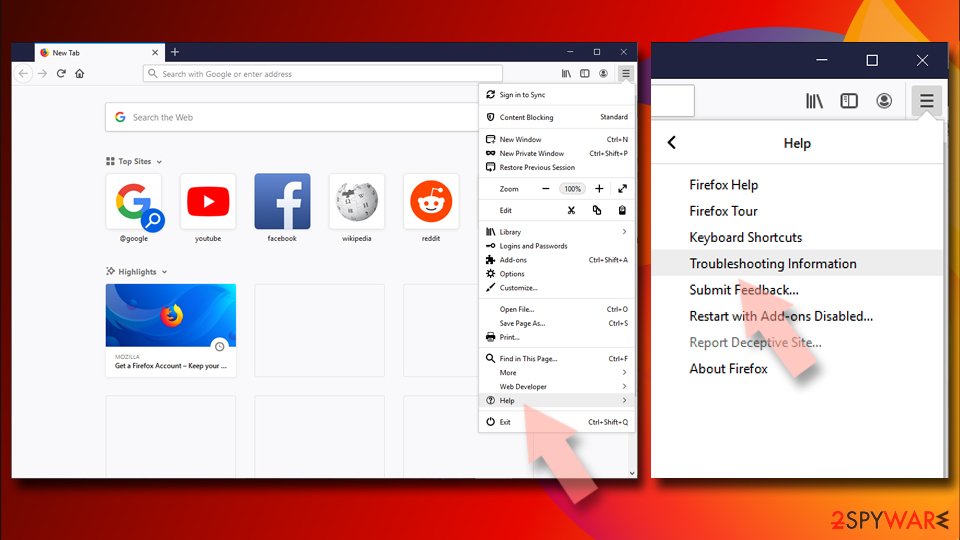
- Under Give Firefox a tune up section, click on Refresh Firefox...
- Once the pop-up shows up, confirm the action by pressing on Refresh Firefox.
Delete from Safari
Remove dangerous extensions:
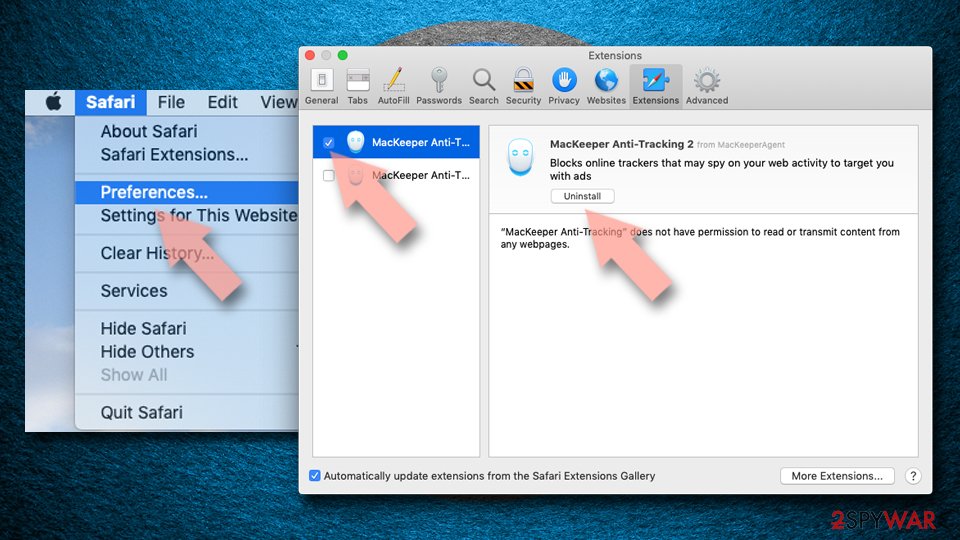
- Open Safari, click Safari in the menu at the top-left of the screen, and select Preferences.
- Go to the Extensions tab, look for any suspicious entries, and click Uninstall to remove them.
Clear history and website data:
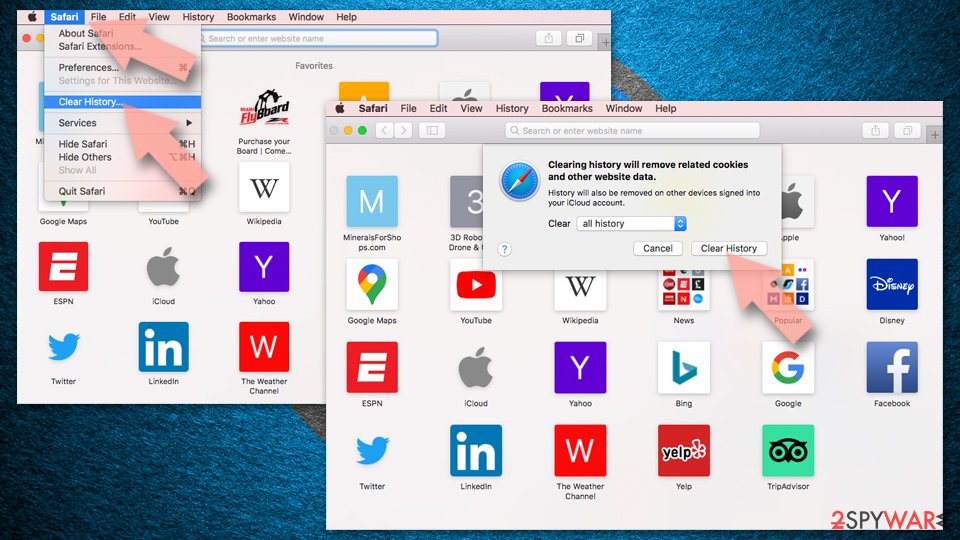
- Click Safari in the menu and pick Clear History.
- Set Clear to all history and confirm with Clear History.
Reset Safari:
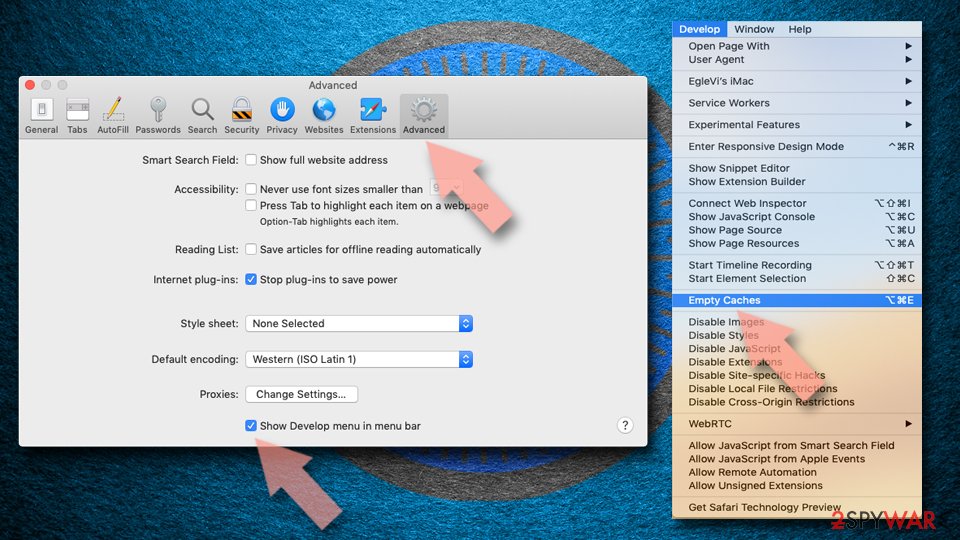
- Click Safari in the menu and select Preferences > Advanced.
- Enable Show Develop menu in menu bar.
- From the menu bar, click Develop and select Empty Caches.
Delete from macOS
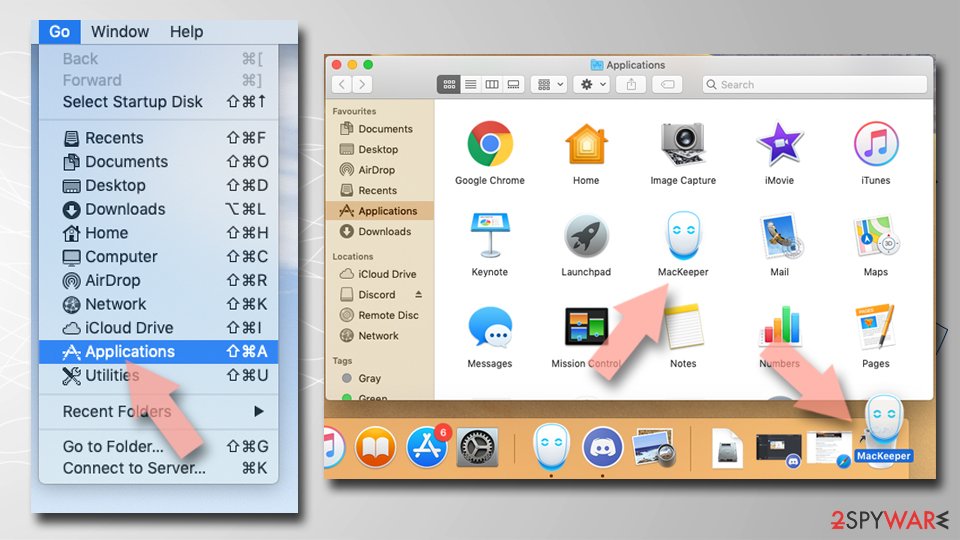
Remove the unwanted application:
- From the menu bar, select Go > Applications.
- In the Applications folder, look for any suspicious entries, then drag them to Trash (or right-click and pick Move to Trash).
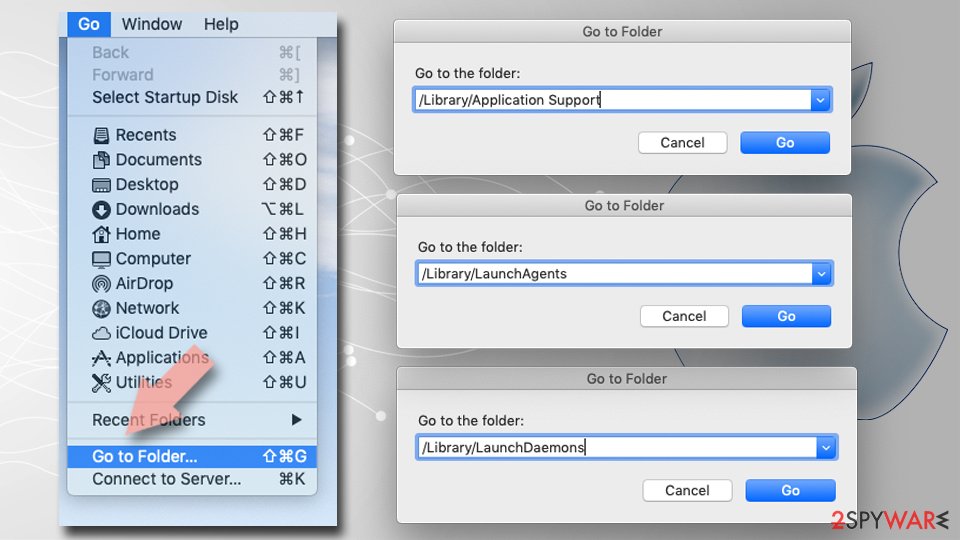
Delete leftover files and folders:
- Select Go > Go to Folder.
- Enter /Library/Application Support and remove any suspicious folders related to the unwanted program.
- Repeat the same check in the /Library/LaunchAgents and /Library/LaunchDaemons folders, deleting any suspicious entries.
- Finally, empty the Trash to permanently remove the leftovers.
Reset Internet Explorer
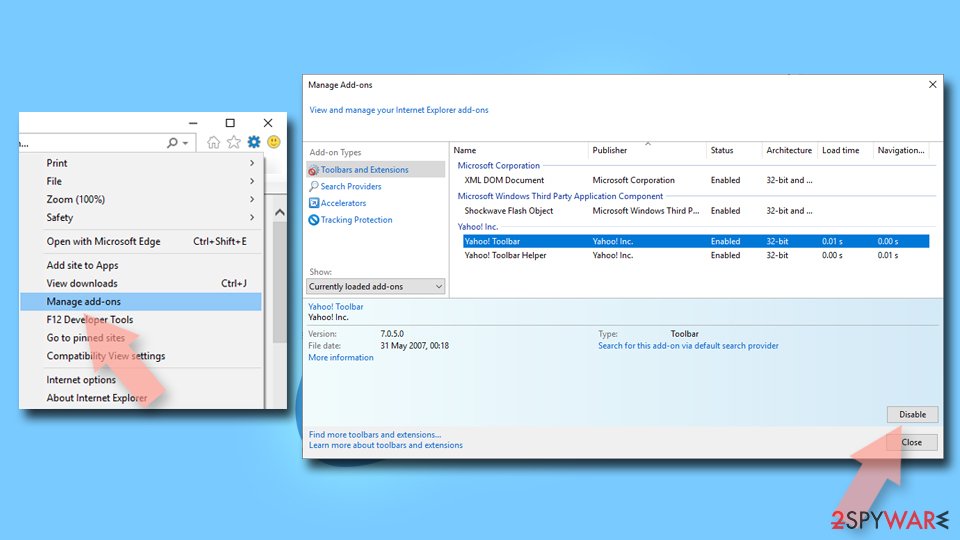
Remove dangerous add-ons:
- Open Internet Explorer, click on the Gear icon (IE menu) on the top-right corner of the browser
- Pick Manage Add-ons.
- You will see a Manage Add-ons window. Here, look for suspicious plugins. Click on these entries and select Disable.
Change your homepage if it was altered:
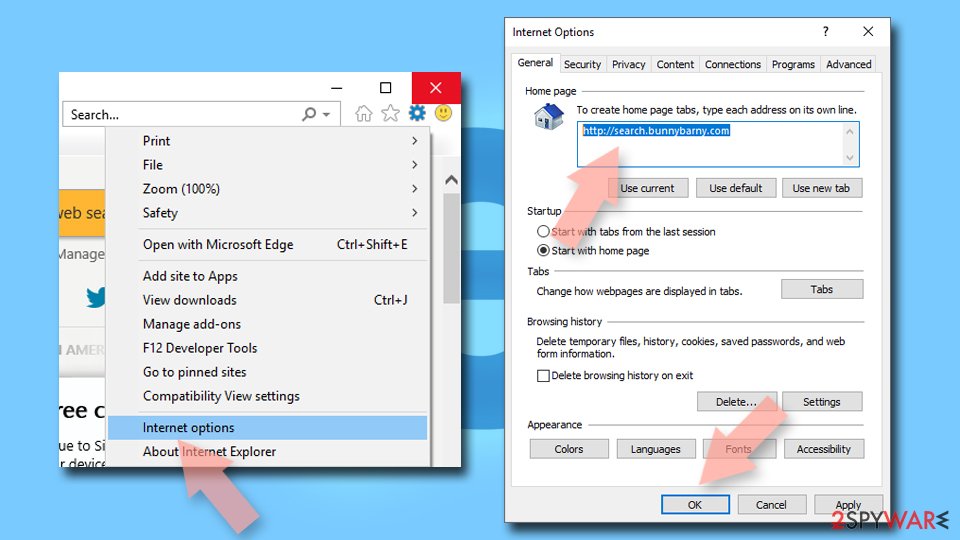
- Open IE and click on the Gear icon.
- Select Internet Options.
- In the General tab, delete the Home page address and replace it by your preferred one (for example, Google.com).
- Click Apply and then select OK.
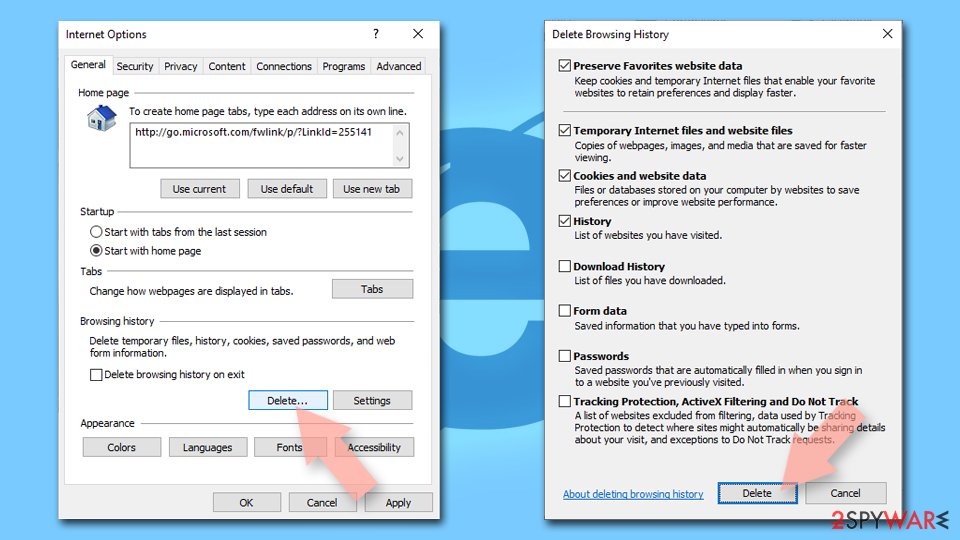
Delete temporary files:
- Press on the Gear icon and select Internet Options.
- Under Browsing history, click Delete...
- Select relevant fields and press Delete.
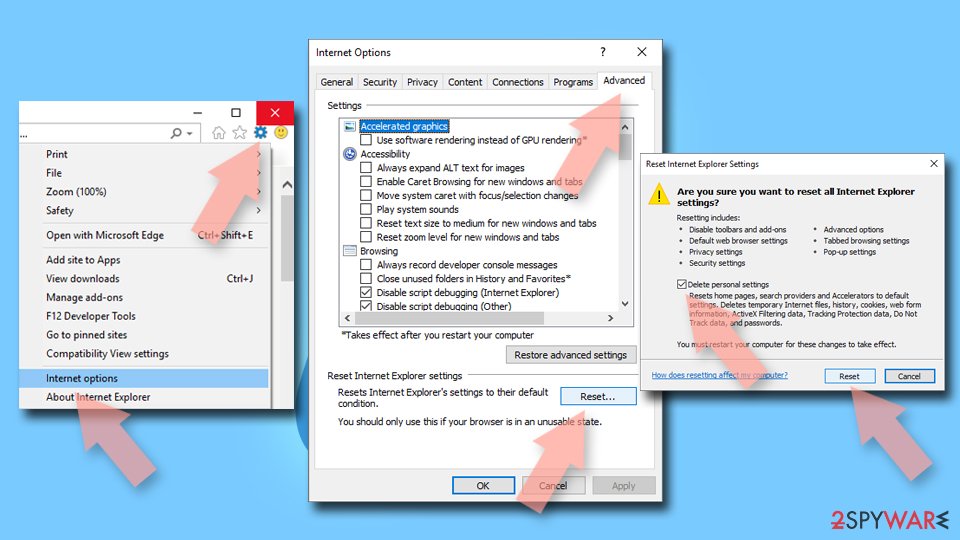
Reset Internet Explorer:
- Click on Gear icon > Internet options and select Advanced tab.
- Select Reset.
- In the new window, check Delete personal settings and select Reset.
Access your website securely from any location
When you work on the domain, site, blog, or different project that requires constant management, content creation, or coding, you may need to connect to the server and content management service more often. The best solution for creating a tighter network could be a dedicated/fixed IP address.
If you make your IP address static and set to your device, you can connect to the CMS from any location and do not create any additional issues for the server or network manager that needs to monitor connections and activities. VPN software providers like can help you with such settings and offer the option to control the online reputation and manage projects easily from any part of the world.
Recover files after data-affecting malware attacks
While much of the data can be accidentally deleted due to various reasons, malware is one of the main culprits that can cause loss of pictures, documents, videos, and other important files.
More serious malware infections lead to significant data loss when your documents, system files, and images get encrypted. In particular, ransomware is is a type of malware that focuses on such functions, so your files become useless without an ability to access them.
Even though there is little to no possibility to recover after file-locking threats, some applications have features for data recovery in the system. In some cases, can also help to recover at least some portion of your data after data-locking virus infection or general cyber infection.
From our report of Feb 2017 · not reviewed since
How to avoid installing similar programs?
If Go.padsdel.com hijack took place already, we believe that you want to know how did it happen.
The thing is, free applications often sneak into a computer system unnoticed, and computer users don't do anything about it. In order to prevent spyware or malware attacks, users should take certain actions, for example, customize installation settings whenever they download a new piece of software to their computers.
It is essential to set Custom/Advanced settings and deselect unwanted additional items in order to prevent infiltration of unwanted third-party applications that are typically bundled with popular free games and programs. Be careful and do not leave Default/Standard mode on, otherwise, additional software will be installed without your knowledge.
From our report of Feb 2017 · not reviewed since
How to remove Go.padsdel.com?
If you are tired of Go.padsdel.com pop-up ads, do not hesitate any longer and take actions to remove the infection from the system.
To remove Go.padsdel.com virus, use a strong anti-spyware program. The best one, at least in our opinion, is . However, you can also use tools like or . If you are strictly against usage of anti-malware programs, you can check out these manual Go.padsdel.com removal instructions - we are sure that they will come in handy when removing the infection manually.
Questions about Go.padsdel.com pop
go.padsdel.com opens when I click links. What causes it?
When every click leads to go.padsdel.com first, an extension or a script on the page is rewriting the links. If it happens only on one site, that site uses aggressive ads; close it and use another source. If it happens everywhere, open the browser in a private window, where extensions are normally off, and try again.
No redirect in the private window means one of your extensions is responsible: remove the ones you do not know. A redirect in the private window too means the cause is outside the extensions, such as a notification permission, a changed search setting or a program installed on the PC. The removal steps in this guide cover each of those.
Should I worry about redirects to go.padsdel.com?
Worry less about go.padsdel.com itself and more about what keeps sending you there. A single redirect from a free streaming or download site is normal and harmless once the tab is closed.
Repeated redirects on sites that used to work fine mean something in the browser or in Windows changed, often an extension or program installed alongside other software. It may also collect the pages you visit. Remove the cause with the steps in this guide, and do not act on anything the redirected pages ask:
- no Allow clicks
- no downloads
- no calls
If you already did one of those, the matching section of this guide explains what to do next.
What is Go.padsdel.com pop?
Go.padsdel.com pop is an adware extension, a kind of adware. It earns money by showing redirects through ad pages, and each view, click or redirect pays whoever runs it. It is not something people usually choose; it arrives through a free download, a fake button or a misleading prompt.
Go.padsdel.com pop does not encrypt files or take control of Windows, but its ads are sold to anyone, including scam operators, so they can lead to fake virus warnings and unwanted downloads. The steps in this guide remove it from Windows and from each browser.
Which browsers does Go.padsdel.com pop affect?
In the cases we checked, Go.padsdel.com pop showed up in Chrome, Edge and Firefox. That does not rule out others on your PC, since adware installers often target every browser they find, and permissions and extensions sync across computers signed in to the same browser account.
Open each browser you have, go to its extensions page and its notification settings, and remove anything you do not recognise. Profiles count separately: Chrome and Edge can each hold several, and each one needs checking on its own.
Are the pop-ups I see really from Go.padsdel.com pop?
Compare them with the details in the table above. Go.padsdel.com pop produces redirects through ad pages, and the clearest sign of it is redirects to go.padsdel.com. Other adware looks similar, so check the name of the sending site at the bottom of a notification, the address in the tab that opened, or the newest entries on the extensions page.
If those match, this guide fits. If you see a different name, the same kind of steps apply, but remove the item you actually find rather than guessing.
My scan found nothing, but the ads continue. Why?
Because the source may not be a file a scanner looks for. Browser notifications are a permission stored in the browser, and many adware extensions are not flagged because they come from an official store.
Some ad-supported programs are only reported if you enable detection of potentially unwanted apps. So a clean scan does not mean the job is done. Check each browser's notification permissions and extension list by hand, and turn on Potentially unwanted app blocking in Windows Security before scanning again.
Did Go.padsdel.com pop collect my data?
Adware typically collects what it needs to choose ads:
- the sites you visit
- search terms
- approximate location
- browser and system details
Extensions with permission to read and change data on all websites can technically see everything on those pages, including forms. That is a privacy problem rather than proof of theft.
If you typed card details or passwords while it was active, changing the most important passwords is a reasonable precaution. Clearing cookies after removal ends the tracking sessions it may have started.
Can an adware pop-up infect my PC just by appearing?
No. A pop-up, a notification or a new tab is only a web page or a message. It cannot run programs on Windows by itself, provided the browser and Windows are up to date. Infection needs a step from you:
- running a downloaded file
- installing an extension
- giving a stranger remote access
That is why scam pages work so hard to make you click. Close such pages with the tab's X or by closing the browser, not with buttons inside the page, which may start a download.
Why is my browser so slow since the ads started?
Each page now does extra work. An adware extension reads the page, decides where to put ads, loads them from ad servers and reports your visit, and that happens on every tab. Ad-supported programs add their own background activity.
Removing the extension or program usually makes the browser fast again at once. If it stays slow, open the browser's own task manager with Shift+Esc in Chrome or Edge and look for extensions using a lot of memory or processor time.
Will Fortect remove Go.padsdel.com pop?
Fortect scans Windows for malware and unwanted programs and repairs the system files and settings they change, and its free scan shows what it finds on your PC before you decide anything.
For Go.padsdel.com pop, follow the plan above as well: the browser steps take back permissions and settings that no scanner treats as a threat, and uninstalling the program that brought it removes the source.
Run Microsoft Defender's full scan and, if anything was found, its offline scan as a second opinion. If the symptoms are gone after the plan and both scans are clean, there is nothing more to do.
Sources
- Google Chrome Help: Use notifications to get alerts (no longer online) (read October 6, 2026)
- FTC: How to recognize, remove and avoid malware (read October 6, 2026)
- Microsoft Learn: Microsoft Defender Offline (read October 6, 2026)
- Microsoft Learn: How Microsoft names malware (read October 6, 2026)