Mobnotification.com ads (Tutorial) - Simple Removal Guide
Mobnotification.com ads Removal Guide
What is Mobnotification.com ads?
Can Mobnotification.com alerts might be a serious virus?
Once Mobnotification.com virus gets into a computer, you may start encountering fake messages about a heavily infected operating system. Though this virtual infection operates more like adware program, it contains the main features of a tech support scam [1]. This category is full of viruses which come in different forms and shapes [2]. Naturally, there is quite the number of websites which are able to lock users inside them and convince them about the number of virtual threats residing on their computers. However, such terror only lasts until you exit the web page. Likewise, this malware seems to be the case. There is no need to delay Mobnotification.com removal.
Tech support scams are a second most profitable way of stealing money only budging to ransomware threats; they are only said to thrive more in 2017 [3]. Racketeers devise realistic scams to make users comply with their scenario. Usually, they come up with a counterfeited BSOD (“blue screen of death”) screen which contains the alerts about the damaged operating system or other fatal issues. Less credulous users fall for the bait and dial the indicated phone number. Furthermore, the penetrators instruct victims to follow certain steps which would eliminate non-existent malware. They might even ask you to install a remote access application.
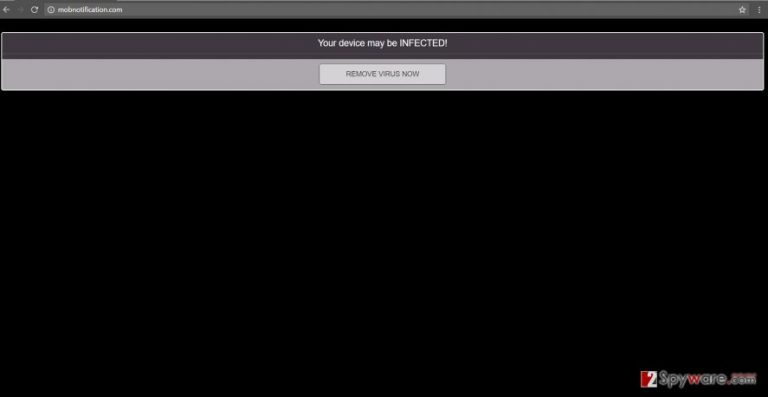
Eventually, users end up paying several hundreds of dollars without failing to realize that they have become the victims of a felony [4]. Likewise, Mobnotification.com ads are also harbingers of the virtual threat residing on the computer. There is a need to follow the demands, as you can simply scan your device with FortectIntego or Malwarebytes to see whether your computer is really infected. Sometimes adware imitating tech support scams may barely differ from the real scam. Thus, it is crucial to take action right away. If you follow the traces of Mobnotification.com redirect, you might end up in the domain sheltering more complex spyware or and viruses of the diverse ilk. Likewise, such action might only complicate matters more. If you notice any popping windows in the background or opening new windows, exit them right away.
How does the adware settle on a computer?
Mobnotification.com hijack occurs either when you accidentally install corrupted elements with the freeware downloaded from shady websites or when you visit such domains by yourself. Elaborating more on the first channel of distribution, there is a way to block or at least lower the risk of such hijack by following these recommendations. Before installing a new program, compare the publisher with the original one. Suspicious or corrupted applications usually come under “Unknown” publisher. When the installation wizard is initiated, choose “Advanced” settings. As a result, you will be able to unmark unnecessary applications on time. Now, let us proceed to the most important part where we will instruct you how to remove Mobnotification.com.
Quick removal solution
Adware-type programs do not cause many problems of elimination. When it comes to similar threats like this, we recommend opting for automatic Mobnotification.com removal. For that reason, you will need to install an anti-spyware application. Update the program and then scan the computer. It will remove Mobnotification.com virus and all related components within a couple of minutes. The following manual guidelines might come in handy as well. On the final note, update your security as well as system applications regularly, be vigilant while downloading new applications and then avoid visiting ad-supported websites [5].
You may remove virus damage with a help of FortectIntego. SpyHunter 5Combo Cleaner and Malwarebytes are recommended to detect potentially unwanted programs and viruses with all their files and registry entries that are related to them.
Getting rid of Mobnotification.com ads. Follow these steps
Uninstall from Windows
Instructions for Windows 10/8 machines:
- Enter Control Panel into Windows search box and hit Enter or click on the search result.
- Under Programs, select Uninstall a program.
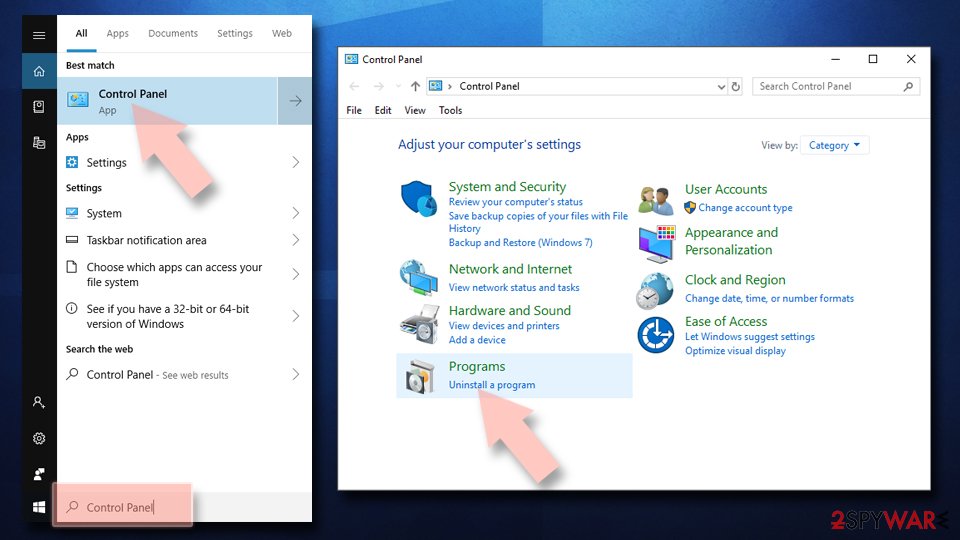
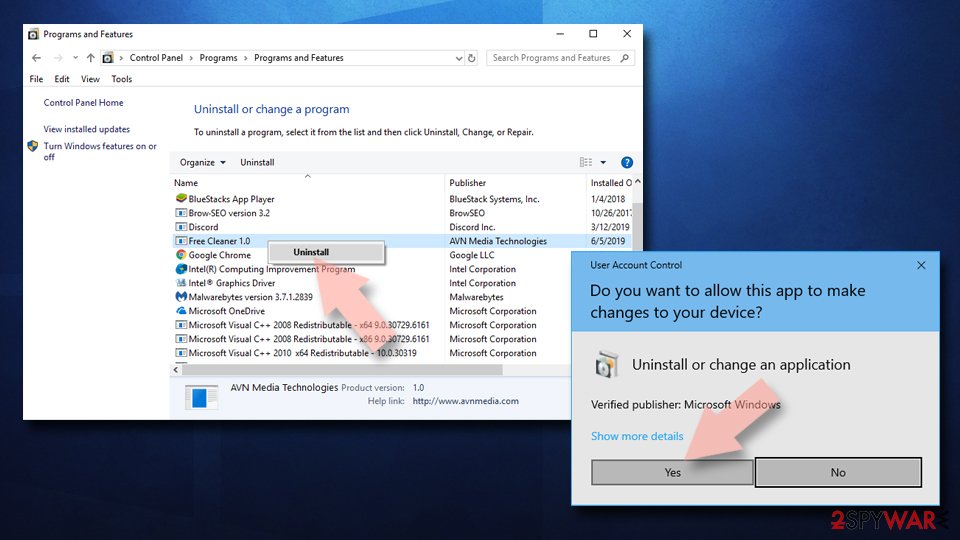
- From the list, find the entry of the suspicious program.
- Right-click on the application and select Uninstall.
- If User Account Control shows up, click Yes.
- Wait till uninstallation process is complete and click OK.
If you are Windows 7/XP user, proceed with the following instructions:
- Click on Windows Start > Control Panel located on the right pane (if you are Windows XP user, click on Add/Remove Programs).
- In Control Panel, select Programs > Uninstall a program.
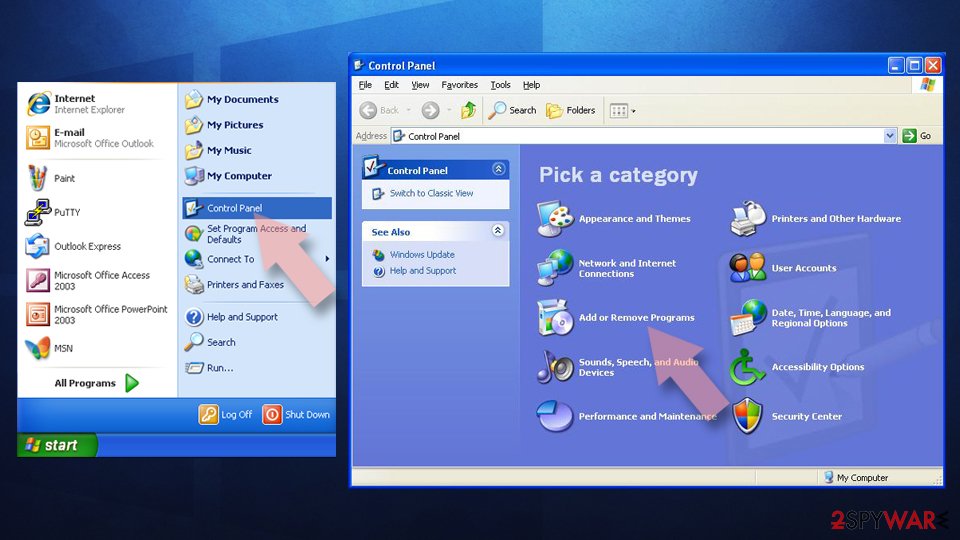
- Pick the unwanted application by clicking on it once.
- At the top, click Uninstall/Change.
- In the confirmation prompt, pick Yes.
- Click OK once the removal process is finished.
Delete from macOS
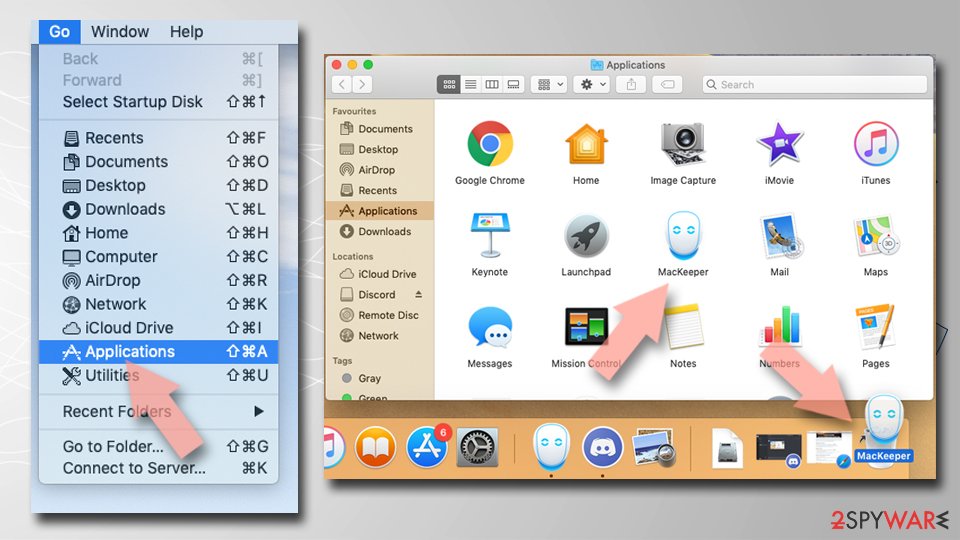
Remove items from Applications folder:
- From the menu bar, select Go > Applications.
- In the Applications folder, look for all related entries.
- Click on the app and drag it to Trash (or right-click and pick Move to Trash)
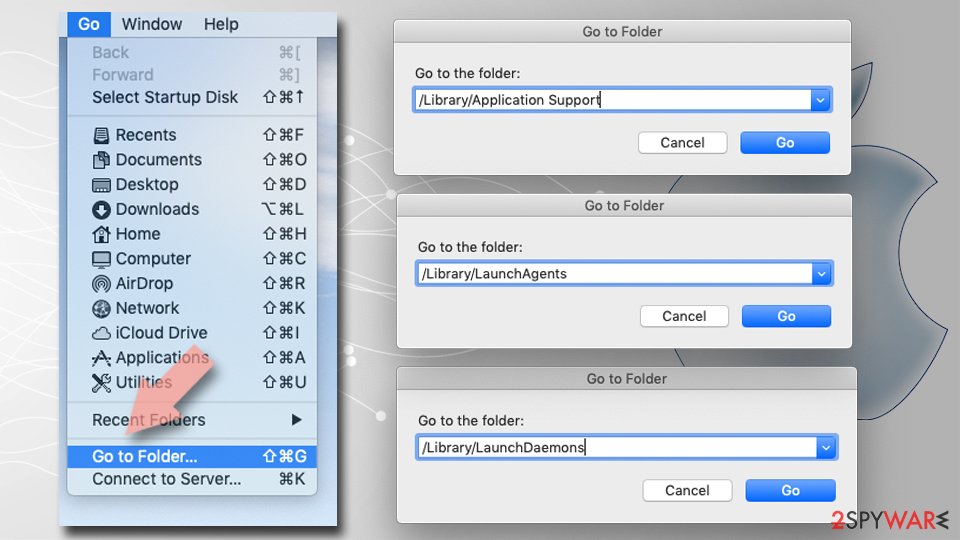
To fully remove an unwanted app, you need to access Application Support, LaunchAgents, and LaunchDaemons folders and delete relevant files:
- Select Go > Go to Folder.
- Enter /Library/Application Support and click Go or press Enter.
- In the Application Support folder, look for any dubious entries and then delete them.
- Now enter /Library/LaunchAgents and /Library/LaunchDaemons folders the same way and terminate all the related .plist files.
Remove from Microsoft Edge
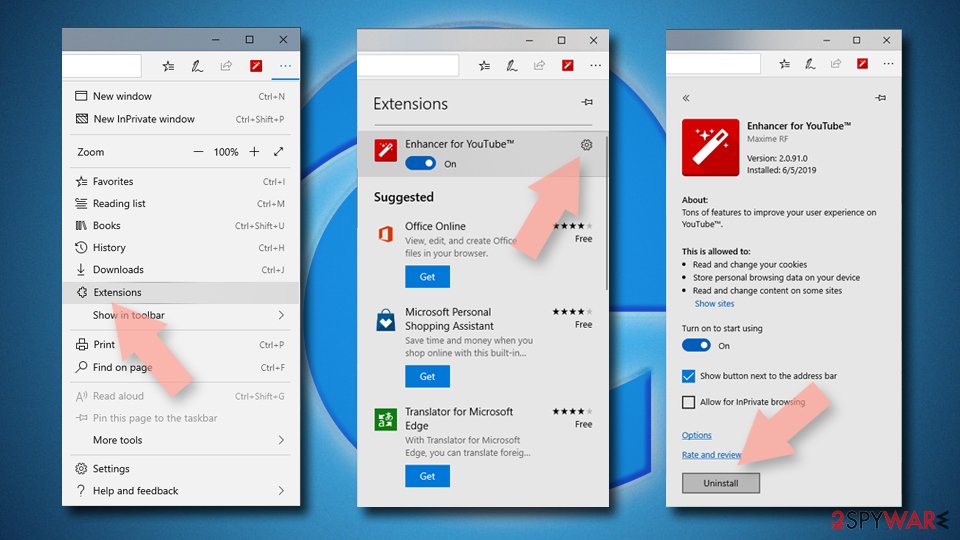
Delete unwanted extensions from MS Edge:
- Select Menu (three horizontal dots at the top-right of the browser window) and pick Extensions.
- From the list, pick the extension and click on the Gear icon.
- Click on Uninstall at the bottom.
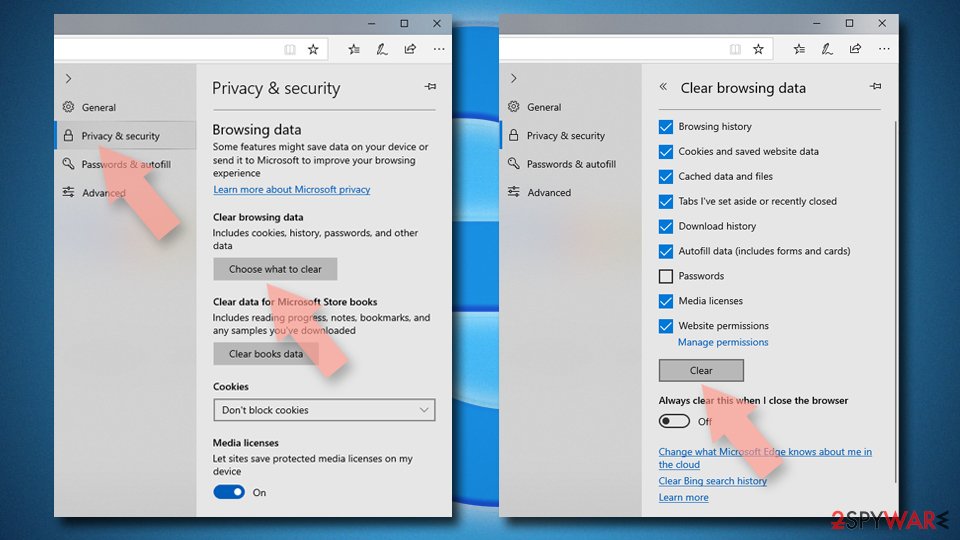
Clear cookies and other browser data:
- Click on the Menu (three horizontal dots at the top-right of the browser window) and select Privacy & security.
- Under Clear browsing data, pick Choose what to clear.
- Select everything (apart from passwords, although you might want to include Media licenses as well, if applicable) and click on Clear.
Restore new tab and homepage settings:
- Click the menu icon and choose Settings.
- Then find On startup section.
- Click Disable if you found any suspicious domain.
Reset MS Edge if the above steps did not work:
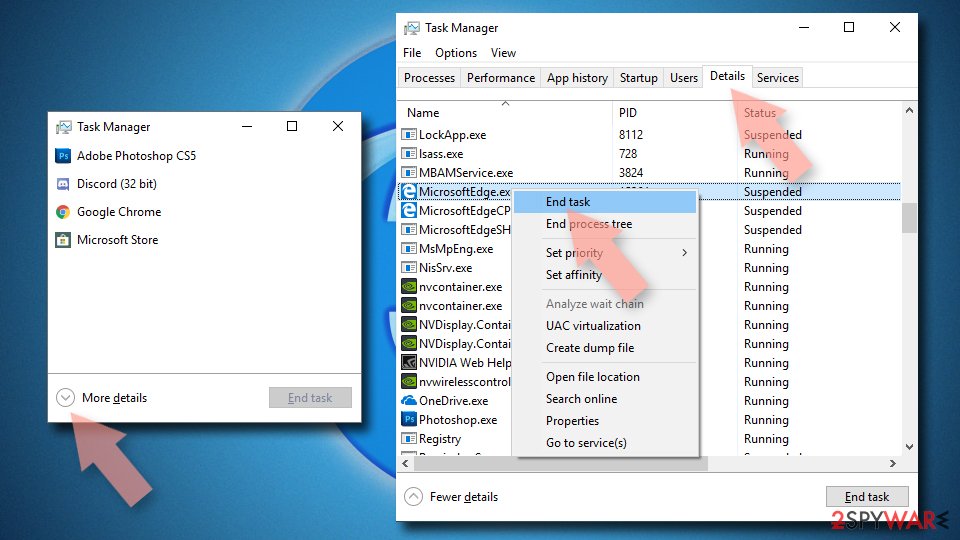
- Press on Ctrl + Shift + Esc to open Task Manager.
- Click on More details arrow at the bottom of the window.
- Select Details tab.
- Now scroll down and locate every entry with Microsoft Edge name in it. Right-click on each of them and select End Task to stop MS Edge from running.
If this solution failed to help you, you need to use an advanced Edge reset method. Note that you need to backup your data before proceeding.
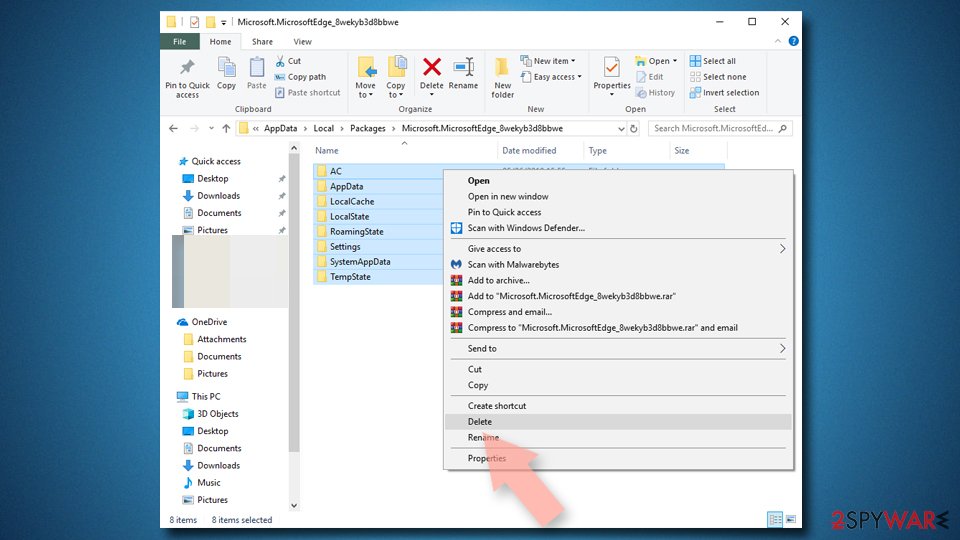
- Find the following folder on your computer: C:\\Users\\%username%\\AppData\\Local\\Packages\\Microsoft.MicrosoftEdge_8wekyb3d8bbwe.
- Press Ctrl + A on your keyboard to select all folders.
- Right-click on them and pick Delete
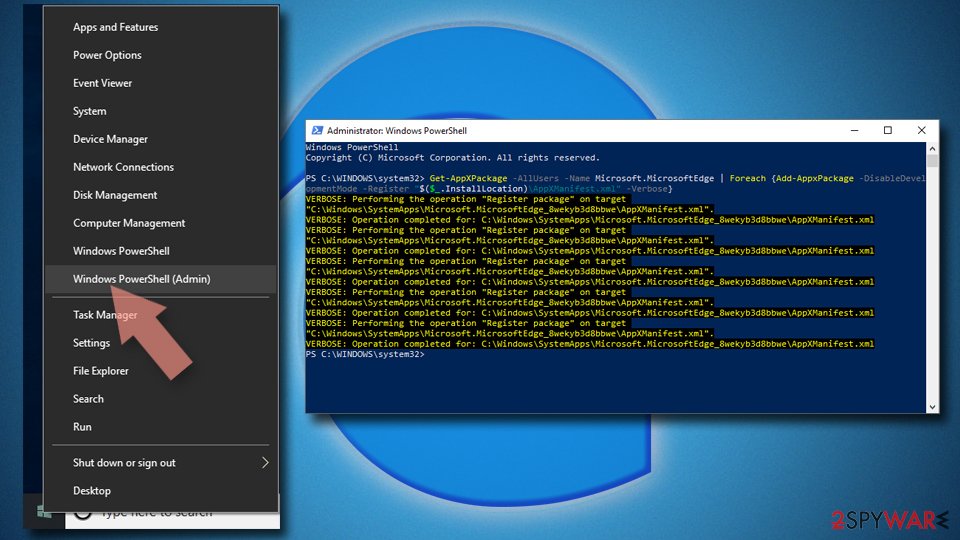
- Now right-click on the Start button and pick Windows PowerShell (Admin).
- When the new window opens, copy and paste the following command, and then press Enter:
Get-AppXPackage -AllUsers -Name Microsoft.MicrosoftEdge | Foreach {Add-AppxPackage -DisableDevelopmentMode -Register “$($_.InstallLocation)\\AppXManifest.xml” -Verbose
Instructions for Chromium-based Edge
Delete extensions from MS Edge (Chromium):
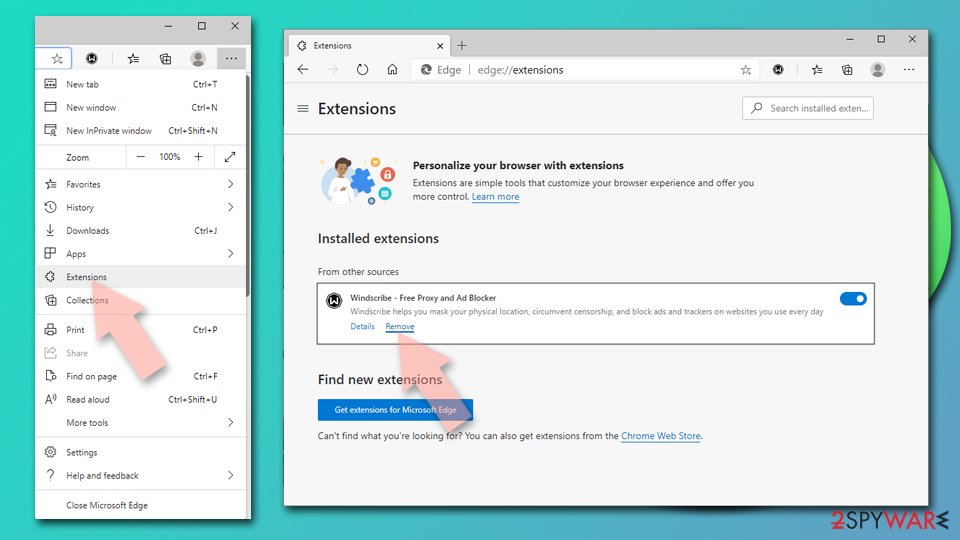
- Open Edge and click select Settings > Extensions.
- Delete unwanted extensions by clicking Remove.
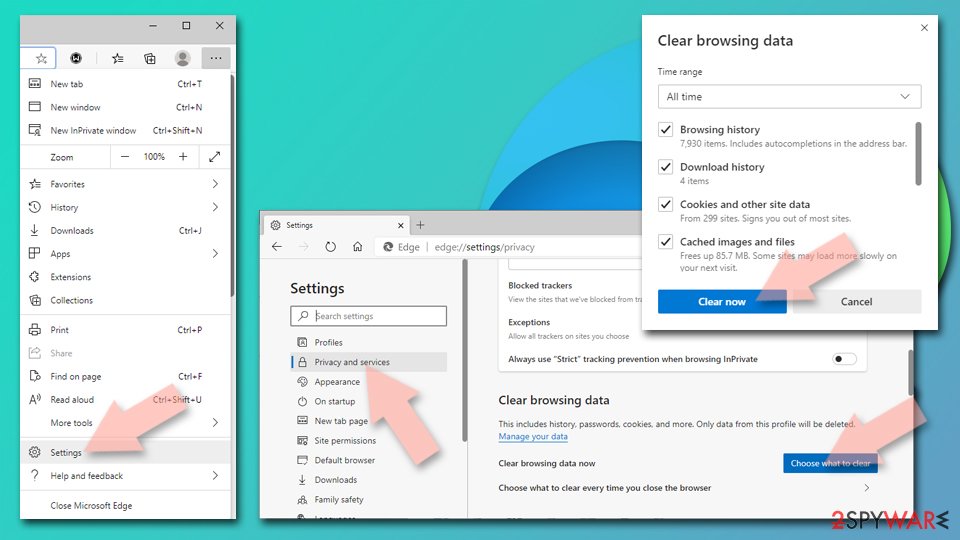
Clear cache and site data:
- Click on Menu and go to Settings.
- Select Privacy, search and services.
- Under Clear browsing data, pick Choose what to clear.
- Under Time range, pick All time.
- Select Clear now.
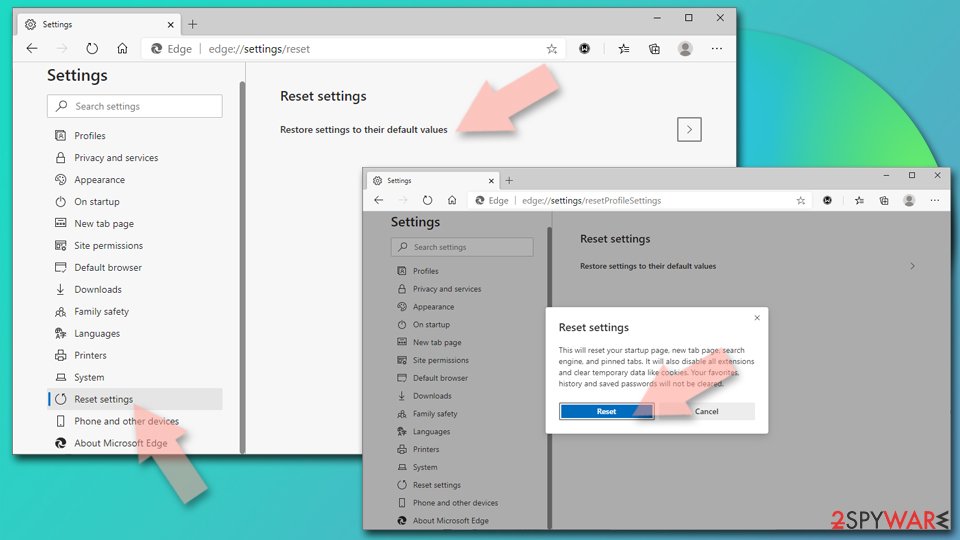
Reset Chromium-based MS Edge:
- Click on Menu and select Settings.
- On the left side, pick Reset settings.
- Select Restore settings to their default values.
- Confirm with Reset.
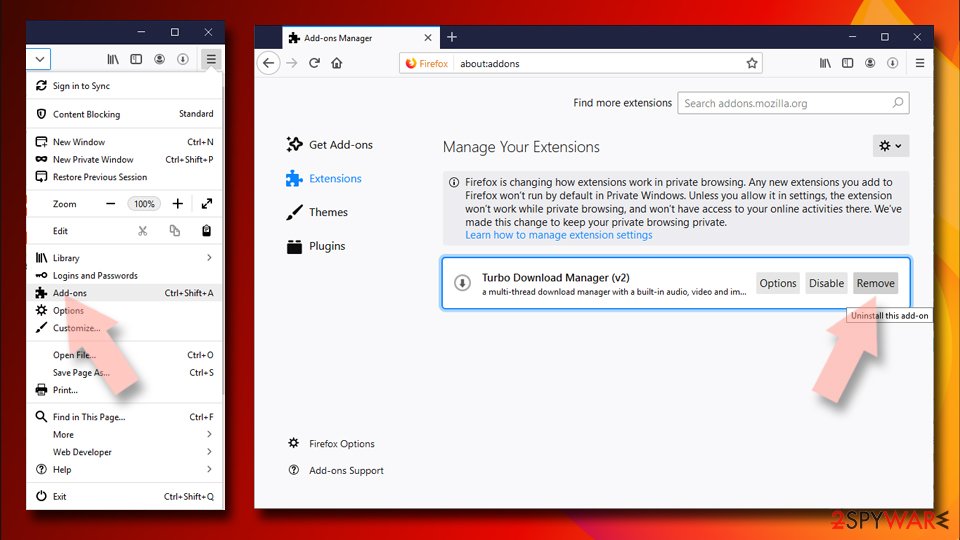
Remove from Mozilla Firefox (FF)
Remove dangerous extensions:
- Open Mozilla Firefox browser and click on the Menu (three horizontal lines at the top-right of the window).
- Select Add-ons.
- In here, select unwanted plugin and click Remove.
Reset the homepage:
- Click three horizontal lines at the top right corner to open the menu.
- Choose Options.
- Under Home options, enter your preferred site that will open every time you newly open the Mozilla Firefox.
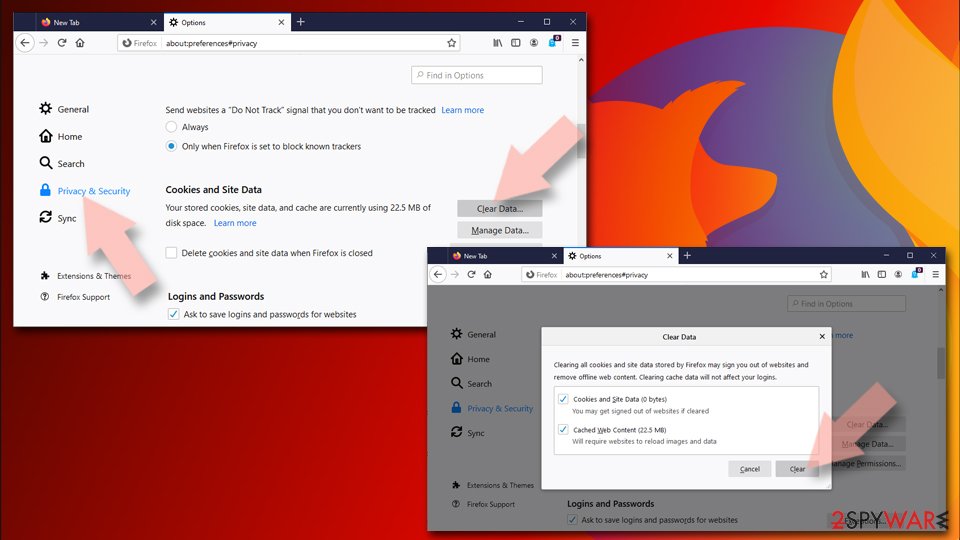
Clear cookies and site data:
- Click Menu and pick Settings.
- Go to Privacy & Security section.
- Scroll down to locate Cookies and Site Data.
- Click on Clear Data…
- Select Cookies and Site Data, as well as Cached Web Content and press Clear.
Reset Mozilla Firefox
If clearing the browser as explained above did not help, reset Mozilla Firefox:
- Open Mozilla Firefox browser and click the Menu.
- Go to Help and then choose Troubleshooting Information.
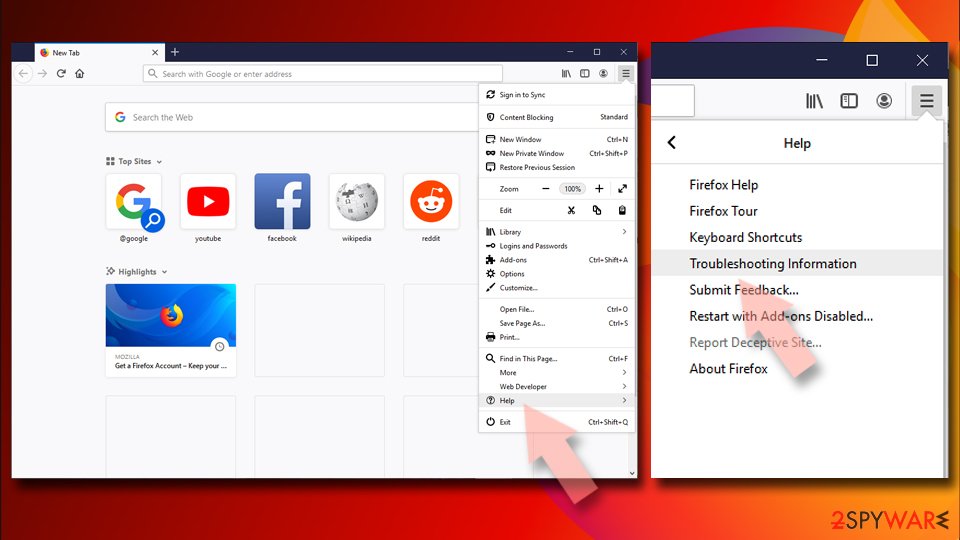
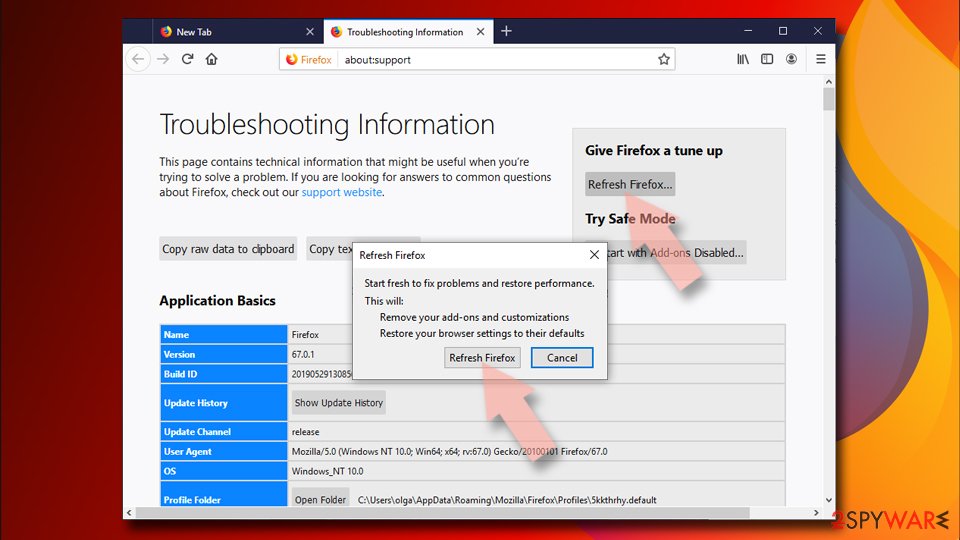
- Under Give Firefox a tune up section, click on Refresh Firefox…
- Once the pop-up shows up, confirm the action by pressing on Refresh Firefox.
Remove from Google Chrome
Delete malicious extensions from Google Chrome:
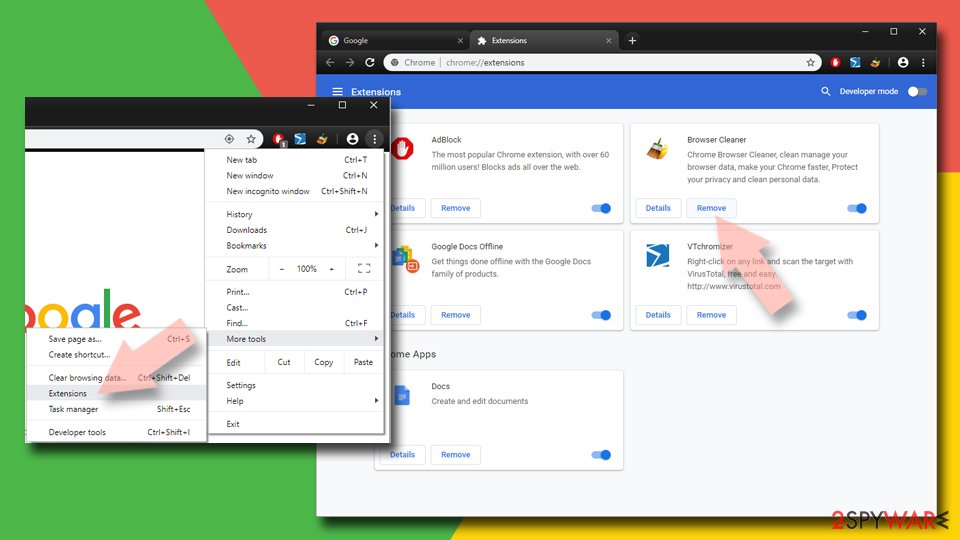
- Open Google Chrome, click on the Menu (three vertical dots at the top-right corner) and select More tools > Extensions.
- In the newly opened window, you will see all the installed extensions. Uninstall all the suspicious plugins that might be related to the unwanted program by clicking Remove.
Clear cache and web data from Chrome:
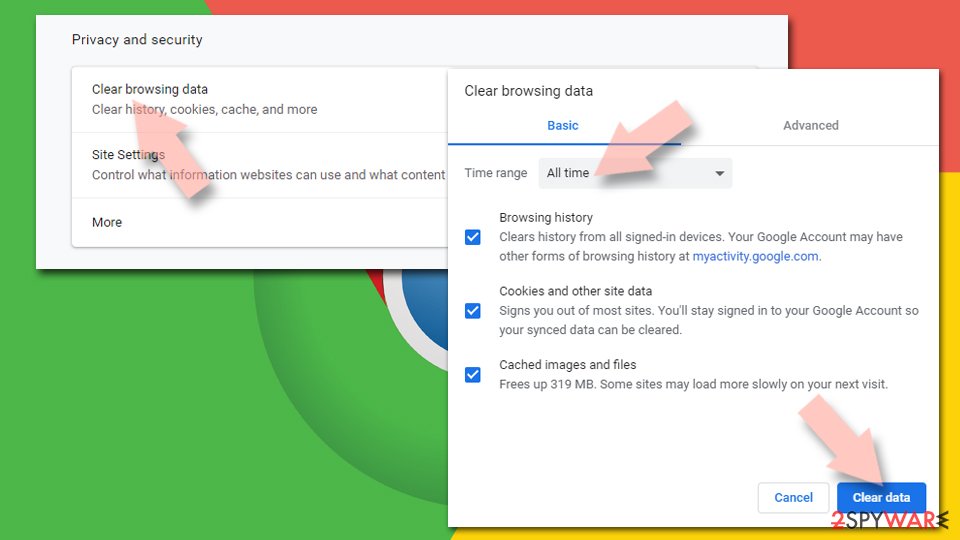
- Click on Menu and pick Settings.
- Under Privacy and security, select Clear browsing data.
- Select Browsing history, Cookies and other site data, as well as Cached images and files.
- Click Clear data.
Change your homepage:
- Click menu and choose Settings.
- Look for a suspicious site in the On startup section.
- Click on Open a specific or set of pages and click on three dots to find the Remove option.
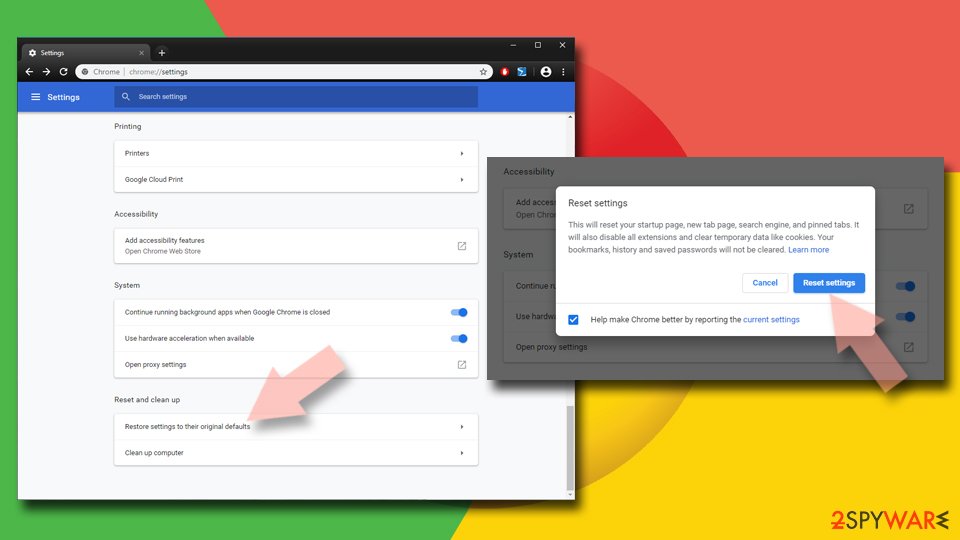
Reset Google Chrome:
If the previous methods did not help you, reset Google Chrome to eliminate all the unwanted components:
- Click on Menu and select Settings.
- In the Settings, scroll down and click Advanced.
- Scroll down and locate Reset and clean up section.
- Now click Restore settings to their original defaults.
- Confirm with Reset settings.
Delete from Safari
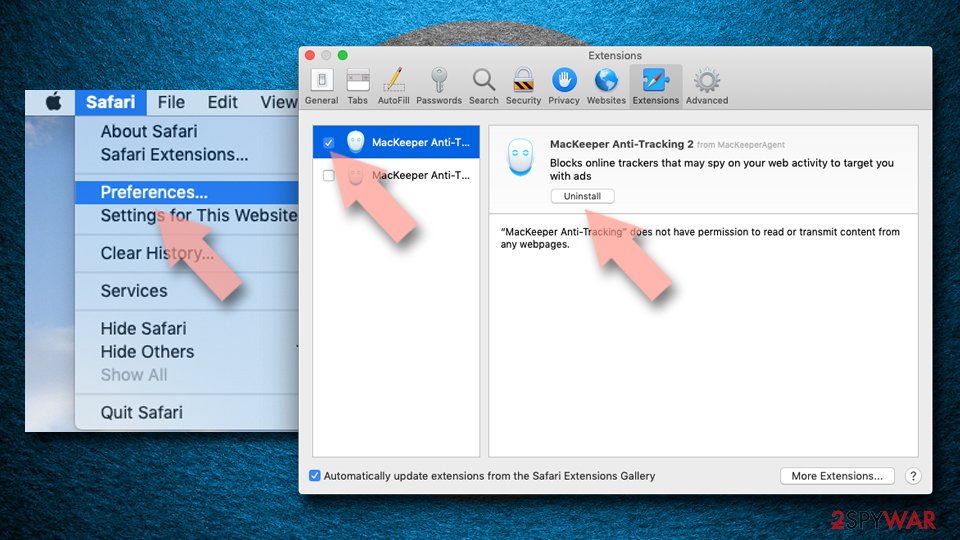
Remove unwanted extensions from Safari:
- Click Safari > Preferences…
- In the new window, pick Extensions.
- Select the unwanted extension and select Uninstall.
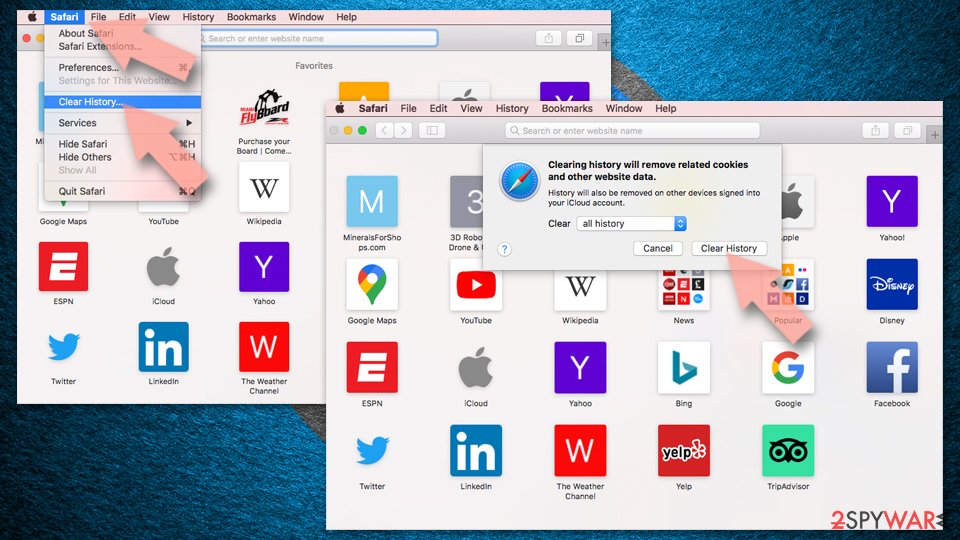
Clear cookies and other website data from Safari:
- Click Safari > Clear History…
- From the drop-down menu under Clear, pick all history.
- Confirm with Clear History.
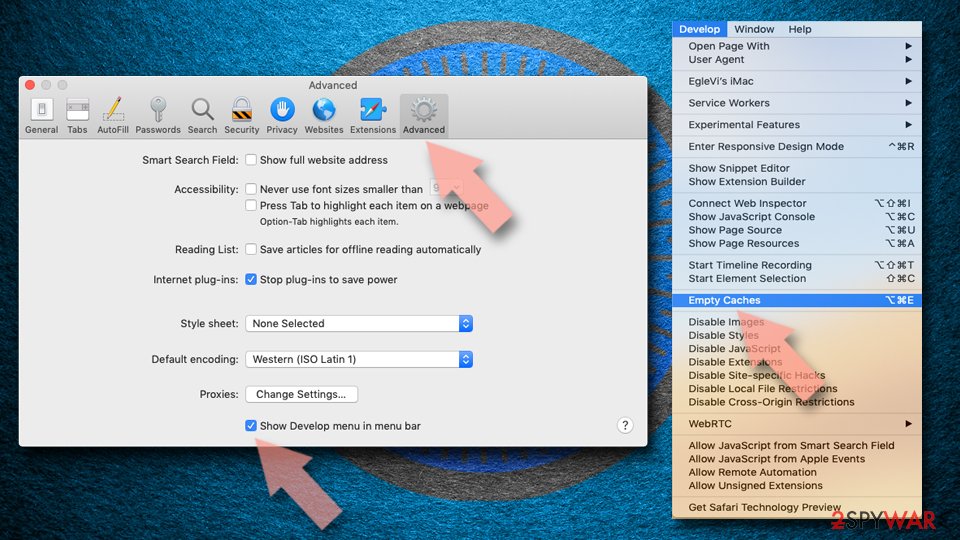
Reset Safari if the above-mentioned steps did not help you:
- Click Safari > Preferences…
- Go to Advanced tab.
- Tick the Show Develop menu in menu bar.
- From the menu bar, click Develop, and then select Empty Caches.
After uninstalling this potentially unwanted program (PUP) and fixing each of your web browsers, we recommend you to scan your PC system with a reputable anti-spyware. This will help you to get rid of Mobnotification.com registry traces and will also identify related parasites or possible malware infections on your computer. For that you can use our top-rated malware remover: FortectIntego, SpyHunter 5Combo Cleaner or Malwarebytes.
How to prevent from getting adware
Stream videos without limitations, no matter where you are
There are multiple parties that could find out almost anything about you by checking your online activity. While this is highly unlikely, advertisers and tech companies are constantly tracking you online. The first step to privacy should be a secure browser that focuses on tracker reduction to a minimum.
Even if you employ a secure browser, you will not be able to access websites that are restricted due to local government laws or other reasons. In other words, you may not be able to stream Disney+ or US-based Netflix in some countries. To bypass these restrictions, you can employ a powerful Private Internet Access VPN, which provides dedicated servers for torrenting and streaming, not slowing you down in the process.
Data backups are important – recover your lost files
Ransomware is one of the biggest threats to personal data. Once it is executed on a machine, it launches a sophisticated encryption algorithm that locks all your files, although it does not destroy them. The most common misconception is that anti-malware software can return files to their previous states. This is not true, however, and data remains locked after the malicious payload is deleted.
While regular data backups are the only secure method to recover your files after a ransomware attack, tools such as Data Recovery Pro can also be effective and restore at least some of your lost data.
- ^ Tech support scam ‘popping up’ in Michiana. WNDU. South Bend Indiana. News, Weather, Sports.
- ^ Greg Masters. DoS attacks target Mac users in tech support scam. SC Magazine. The cybersecurity source.
- ^ Warwick Ashford. Ransomware expected to dominate in 2017. ComputerWeekly. IT News, UK IT jobs, Industry News.
- ^ Catalin Cimpanu . US Authorities Come Down Hard on Prodigious Tech Support Scammers. Softpedia. Free Downloads Encyclopedia.
- ^ Eric Geier. 8 tech dangers every novice can avoid with these tips. PC World. News, tips, reviews from the experts on PCs, Windows, and more.
