

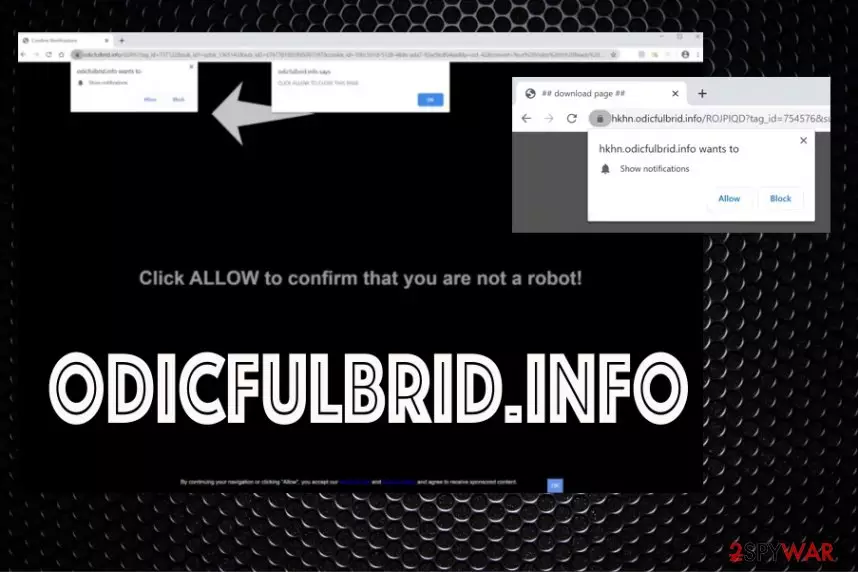
Odicfulbrid.info is the site that proposes to allow notifications or agree to get additional content
| Name | Odicfulbrid.info |
|---|---|
| Type | Adware/ Redirect virus |
| Symptoms | Advertisements start showing up out of nowhere, additional push notifications appear on the desktop directly and trigger redirects to commercial sites. Other browser-based applications get installed without permission or you knowledge |
| Distribution | Freeware installations deliver PUPs without any notices and permissions required when the user is skipping through steps during recommended or quick installation. Other deceptive sites also trigger installs of these browser-based PUPs |
| Danger | The potentially unwanted program can interfere with the system by loading additional applications on the machine that control the internet traffic and expose you to malicious online sites. Also, the data tracking function can lead to privacy issues or even identity theft |
| Elimination | Make sure to remove Odicfulbrid.info completely by scanning the system with AV tool that can find all associated programs and delete them off of the PC |
| Repair | Be cautious and repair damage made on the system that can possibly affect the performance of your device in the future. Run FortectIntego to check for affected or corrupted data and fix these issues to ensure that the machine is running smooth and is secure |
Odicfulbrid.info virus is the adware-type cyber infection, but really this is only a result or a symptom of the potentially unwanted program that runs on the machine you are using. It is a redirect that uses clickbait to make people willingly agreeing to additional notifications by clicking on “Click Allow to continue” or “Click Allow to close this window” pop-ups. It may seem harmless, but any clicking on the window triggers additional push notifications and browser pop-ups from this or any other sites that have the same purpose of generating views and revenue.[2]
Odicfulbrid.info lure online users to click on these pop-ups because eery page visit counts and generates pay-per-click revenue that is the main goal of these adware-type intruders. This webpage is designed to promote dubious content and redirect to untrustworthy or even malicious pages, so it shares these functions with many other rogue pages. Intrusive advertisements, useless application installations are triggered by the infection that, unfortunately, runs in the background.
It means that when you want to remove Odicfulbrid.info it is not enough to just exit the browser or clean the additional applications. You need a powerful anti-malware tool that could scan the system fully for you and find all the associated or non-related apps and clean the machine from real intruders.
Even though Odicfulbrid.info seems harmless running intrusive advertising campaigns involves tracking browsing-related data. The behavior of rogue sites can be based on your location, IP address, preferences regarding the content you visit and search for online. Personalized advertisements are ensuring that you are more likely going to click on the banner or pop-up that gets delivered before you.
Unfortunately, that also ensures the persistence on the PUP and the difficulty of Odicfulbrid.info removal since the more application controls the more changes in the system get made. The potentially unwanted program can alter startup preferences or registry entries, so once you reboot the machine, the application is also launched. For those changes, you need a PC repair tool like FortectIntego because files and system features are crucial for performance and security. 
Odicfulbrid.info is the program responsible for the decreased performance of the computer, browser tracking issues, and even possible malware infections. You need to get rid of the PUP as soon as you can, so there are no other intruders that trigger malicious ads and redirects. You may end up installing a serious virus without noticing it.
Odicfulbrid.info ads not originating from the website you visit at the time can promote tools that look legitimate and useful. Those banners, in-text links, and pop-up ads, redirects all can trigger direct downloads of applications, tools, programs, and browser-based plugins, toolbars. getting an anti-malware tool helps to remove all the additional programs and files, so you no longer encounter those intrusive redirects.
Since push notifications and direct desktop pop-ups get also triggered by the Odicfulbrid.info PUP, you should go through browser settings and Block any permission to control settings or send notifications. You can access these preferences under Advanced settings and Site or Content preferences. Make sure to clear the list and the browser itself. Rely on the guide below for full browser resetting. 
Pay attention to official sites and Privacy Policies and EULAs if you want to avoid PUPs
You see advertisements when you get redirected to them by the misleading or deceptive sites or when the machine is affected by the PUP itself that shows affiliated content constantly. Gaming sites, adult content, freeware providers, torrent sites, pirating services, online movie platforms all can contain malicious advertisements, and one or two clicks on such material leads to issues with PUP infiltrations.
Especially when you don't pay attention to the material you click on and the Privacy Policy of sites you rely on for software installs. Go for official developers and providers, choose Advanced or Custom installations, and check every application that is included in the list on the setup.
Never trust promotional advertisements that you find on random pop-ups or banners delivered to you by the redirect. Always read more about the program you install and search for customer reviews online.
Get rid of the Odicfulbrid.info virus by cleaning the system fully
To remove Odicfulbrid.info from your browser, you also need to get rid of the changes made in settings. Since it mainly appears on Chrome:
- In the top right corner, click on the menu button.
- Click on Settings.
- Scroll to the bottom of the page and click on Advanced.
- In the Privacy and Security section, click on Site settings.
- Click on Notifications.
- Find Odicfulbrid.info and click the three vertical dots, then click on Remove.
After such Odicfulbrid.info removal, go for the general system cleaning procedure and run the anti-malware tool that can fully eliminate any suspicious or even malicious programs. AV engines detect risky programs and clear them for you automatically, so the machine is safe to use again. Also, remember to repair system settings with the help of the system optimizer tool.
Uninstall from Windows
Uninstall from Windows 10/8:
- Type Control Panel into the Windows search box and open the result.
- Under Programs, select Uninstall a program.


Uninstall from Windows 7/XP:
- Click on Windows Start > Control Panel (Windows XP users should click on Add/Remove Programs).
- In Control Panel, select Programs > Uninstall a program.


Remove the unwanted program:
- In the Programs and Features window, look for any recently installed suspicious entries, select them, and click Uninstall.
- If User Account Control appears, click Yes to confirm, then complete the removal.


Delete from macOS
Remove the unwanted application:
- From the menu bar, select Go > Applications.
- In the Applications folder, look for any suspicious entries, then drag them to Trash (or right-click and pick Move to Trash).


Delete leftover files and folders:
- Select Go > Go to Folder.
- Enter /Library/Application Support and remove any suspicious folders related to the unwanted program.
- Repeat the same check in the /Library/LaunchAgents and /Library/LaunchDaemons folders, deleting any suspicious entries.

- Finally, empty the Trash to permanently remove the leftovers.

Reset Internet Explorer
Remove dangerous add-ons:
- Open Internet Explorer, click on the Gear icon (IE menu) on the top-right corner of the browser
- Pick Manage Add-ons.
- You will see a Manage Add-ons window. Here, look for suspicious plugins. Click on these entries and select Disable.


Change your homepage if it was altered:
- Open IE and click on the Gear icon.
- Select Internet Options.
- In the General tab, delete the Home page address and replace it by your preferred one (for example, Google.com).
- Click Apply and then select OK.


Delete temporary files:
- Press on the Gear icon and select Internet Options.
- Under Browsing history, click Delete...
- Select relevant fields and press Delete.


Reset Internet Explorer:
- Click on Gear icon > Internet options and select Advanced tab.
- Select Reset.
- In the new window, check Delete personal settings and select Reset.


Remove from Microsoft Edge
Delete unwanted extensions from MS Edge:
- Select Menu (three horizontal dots at the top-right of the browser window) and pick Extensions.
- From the list, pick the extension and click on the Gear icon.
- Click Remove.


Clear cookies and other browser data:
- Click on the Menu (three horizontal dots at the top-right of the browser window) and select Settings > Privacy, search, and services..
- Under Clear browsing data, pick Choose what to clear.
- Select Cookies and other site data and Cached images and files. (apart from passwords, although you might want to include Media licenses as well, if applicable) and click on Clear.


Restore new tab and homepage settings:
- Click the menu icon and choose Settings.
- Then find On startup section.
- Click Remove next to any suspicious startup page.
Reset MS Edge if the above steps did not work:
- Press on Ctrl + Shift + Esc to open Task Manager.
- Click on More details arrow at the bottom of the window.
- Select Details tab.
- Now scroll down and locate every entry with Microsoft Edge name in it. Right-click on each of them and select End Task to stop MS Edge from running.


Instructions for Chromium-based Edge
Delete extensions from MS Edge (Chromium):
- Open Edge and click select Settings > Extensions.
- Delete unwanted extensions by clicking Remove.


Clear cache and site data:
- Click on Menu and go to Settings.
- Select Privacy, search and services.
- Under Clear browsing data, pick Choose what to clear.
- Under Time range, pick All time.
- Select Clear now.


Reset Chromium-based MS Edge:
- Click on Menu and select Settings.
- On the left side, pick Reset settings.
- Select Restore settings to their default values.
- Confirm with Reset.
- This will disable extensions and reset startup pages but will not delete bookmarks, saved passwords, or browsing history.


Remove from Mozilla Firefox (FF)
Remove dangerous extensions:
- Open Mozilla Firefox browser and click on the Menu (three horizontal lines at the top-right of the window).
- Select Add-ons.
- In here, select the unwanted extension and click Remove.


Reset the homepage:
- Click three horizontal lines at the top right corner to open the menu.
- Choose Settings.
- Under Home, set your preferred homepage and new tab settings.
Clear cookies and site data:
- Click Menu and pick Settings.
- Go to Privacy & Security section.
- Scroll down to locate Cookies and Site Data.
- Click on Clear Data...
- Select Cookies and Site Data and Temporary cached files and pages, then click Clear.


Reset Mozilla Firefox
If clearing the browser as explained above did not help, reset Mozilla Firefox:
- Open Mozilla Firefox browser and click the Menu.
- Go to Help and then choose Troubleshooting Information.

- Under Give Firefox a tune up section, click on Refresh Firefox...
- Once the pop-up shows up, confirm the action by pressing on Refresh Firefox.



Remove from Google Chrome
Delete malicious extensions from Google Chrome:
- Open Google Chrome, click on the Menu (three vertical dots at the top-right corner) and select More tools > Extensions.
- In the newly opened window, you will see all the installed extensions. Uninstall all suspicious extensions related to the unwanted program by clicking Remove.


Clear cache and web data from Chrome:
- Click on Menu and pick Settings.
- Under Privacy and security, select Clear browsing data.
- Select Browsing history, Cookies and other site data, as well as Cached images and files.
- Click Clear data.


Change your homepage:
- Click menu and choose Settings.
- Look for a suspicious site in the On startup section.
- Click on Open a specific or set of pages and click on three dots to find the Remove option.
Reset Google Chrome:
If the previous methods did not help you, reset Google Chrome to eliminate all the unwanted components:
- Click on Menu and select Settings.
- In the Settings, scroll down and click Advanced.
- Scroll down and locate Reset and clean up section.
- Now click Restore settings to their original defaults.
- Confirm with Reset settings.


Delete from Safari
Remove dangerous extensions:
- Open Safari, click Safari in the menu at the top-left of the screen, and select Preferences.
- Go to the Extensions tab, look for any suspicious entries, and click Uninstall to remove them.


Clear history and website data:
- Click Safari in the menu and pick Clear History.
- Set Clear to all history and confirm with Clear History.


Reset Safari:
- Click Safari in the menu and select Preferences > Advanced.
- Enable Show Develop menu in menu bar.
- From the menu bar, click Develop and select Empty Caches.


Did this guide help?
Be the first to comment