PCenter (Removal Guide) - 2021 update
PCenter Removal Guide
What is PCenter?
PCenter is a rogue anti-malware program that acts like malware

PCenter is a malicious program that imitates Windows Defender; it is a copy of its previous version known as Privacy Center. The application tries to convince users that their systems were infected with dangerous malware and the only way to resolve this situation is by purchasing an alleged one-year or lifetime license for the software.
During this time, users might be locked out of their computers and main features, such as the Task Manager, disabled. If not taken care of, victims would not be able to operate their Windows machines properly. Do not purchase the license for this scamware, as you may disclose personal data to cybercriminals and lose your money. If you are looking for a removal guide, you came to the right place.
| Name | PCenter |
| Type | Malware, rogue anti-spyware |
| Distribution | Trojan droppers, fake scanners on malicious websites, software bundlers |
| Dangers | Windows file damage, financial losses, installation of other malware, personal data disclosure to cybercriminals |
| Elimination | If you are unable launch any programs, access Safe Mode as explained below and launch SpyHunter 5Combo Cleaner to remove malware |
| System fix | Malware modifies Windows OS in order to perform its malicious tasks. In order to fix damage done to the system files, you can either start a Windows reinstall or employ FortectIntego to do it for you automatically |
There could be multiple ways how you could have installed the program on Windows, as it is spread in several ways. Some of them include (the program can also be downloaded and installed manually from its homepage, but this is a less common situation):
- Trojans such as Zlob
- Software cracks
- Fake codec packs
- Software bundles
- Fake virus infection notifications/scans.
Once installed, PCenter behaves very aggressively on Windows, as it prevents users from operating their devices properly in many ways. From this point, victims would see how it takes over their devices within just a few minutes.
The rogue will perform a fake system scan and state that you should purchase the program to remove all found infections. But none of the reported threats are actually real. All those infections are fake and are being shown only to scare you into purchasing the full license.
Without a doubt, the goal of this malware is to make users pay for its license and spend money on it. Those who are not familiar with Windows operating systems and ways to remove malware might give in to this scam, as they would be thinking that some type of infection is causing all this erratic behavior.
However, you should not pay. If you do, not only will you lose money that you are unlikely to get back, but you might also disclose sensitive credit card information to malicious actors. As a result, you may suffer further monetary losses, phishing attacks, or even identity theft.
To remove PCenter correctly, you would have access Safe Mode with Networking and perform a full system scan with SpyHunter 5Combo Cleaner or another reputable security software. To remediate the Windows system and clean your browsers automatically, use FortectIntego.
Protect yourself from dangerous threats easily
It is not a secret that cybercriminals often use social engineering to make users download malicious files. For example, codec packs were extremely prevalent years ago (they were developed in order to allow users to launch various video formats), so hackers would create fake codec versions and distribute them on various websites. In this case, victims would think they are installing a codec pack, all while installing malware themselves.
Therefore, it is imperative to install a robust security application and never ignore warnings that it produces. Most of the infection of malware occur under circumstances where users simply believe that the detection is a false positive and proceed with executing the file.
It is also important to patch your Windows with the latest updates, avoid pirated programs, and never believe claims that the system is infected with a virus, promoting some type of program to remediate the situation.
Remove malware safely and never pay for its full version
It is by now should be evident that PCenter is a scam and should be removed upon detection. However, many users might not be able to do that easily, as malware disables several Windows elements in order to prevent its easy removal. For example, you might not be able to launch the Task Manager or use Registry Editor.
To bypass this, you should access Safe Mode with networking – a Windows mode that starts only with minimal resources and the most necessary drivers, temporarily disabling the functions of most computer parasites. Once there, do not try to look for malicious files yourself but rather perform a full system scan with SpyHunter 5Combo Cleaner or Malwarebytes, and then fix virus damage and clean web browsers automatically with a repair tool FortectIntego.
Getting rid of PCenter. Follow these steps
Remove from Microsoft Edge
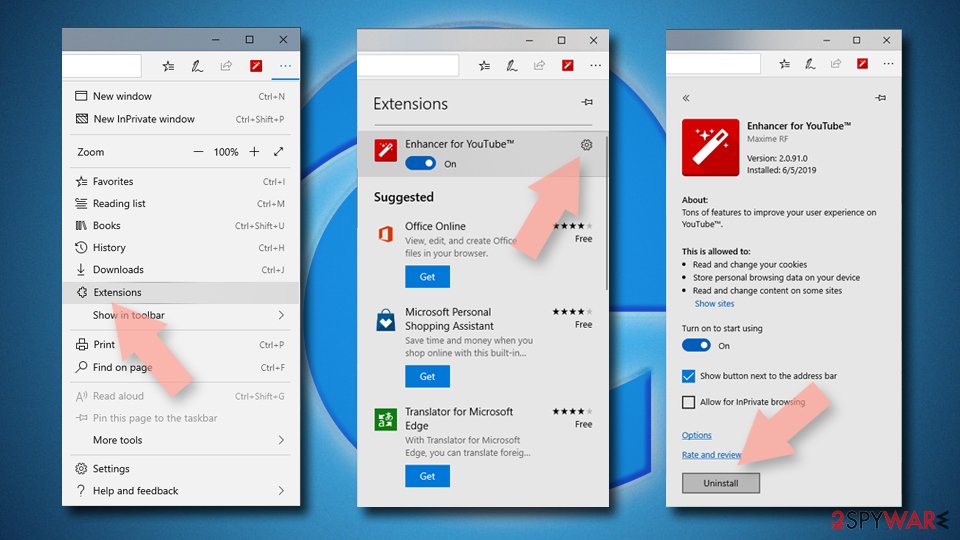
Delete unwanted extensions from MS Edge:
- Select Menu (three horizontal dots at the top-right of the browser window) and pick Extensions.
- From the list, pick the extension and click on the Gear icon.
- Click on Uninstall at the bottom.

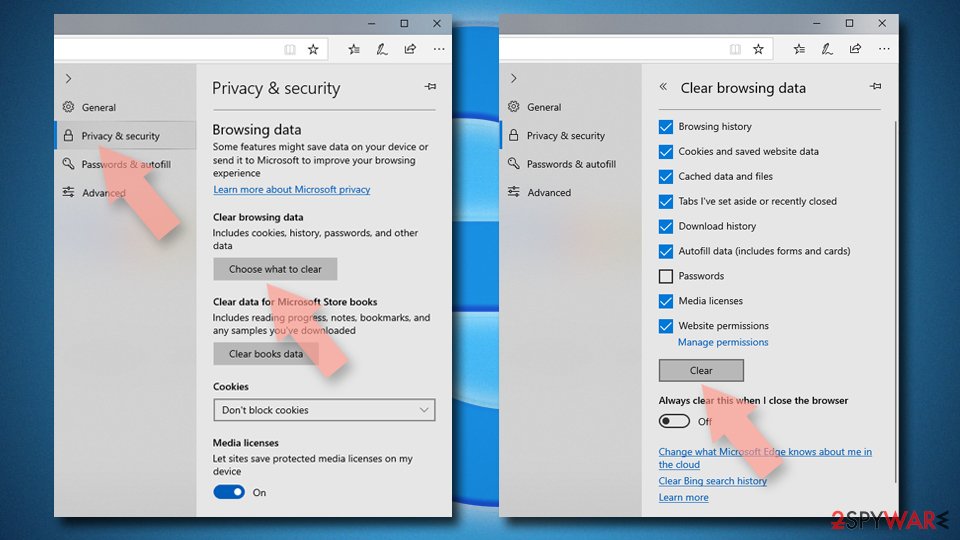
Clear cookies and other browser data:
- Click on the Menu (three horizontal dots at the top-right of the browser window) and select Privacy & security.
- Under Clear browsing data, pick Choose what to clear.
- Select everything (apart from passwords, although you might want to include Media licenses as well, if applicable) and click on Clear.

Restore new tab and homepage settings:
- Click the menu icon and choose Settings.
- Then find On startup section.
- Click Disable if you found any suspicious domain.
Reset MS Edge if the above steps did not work:
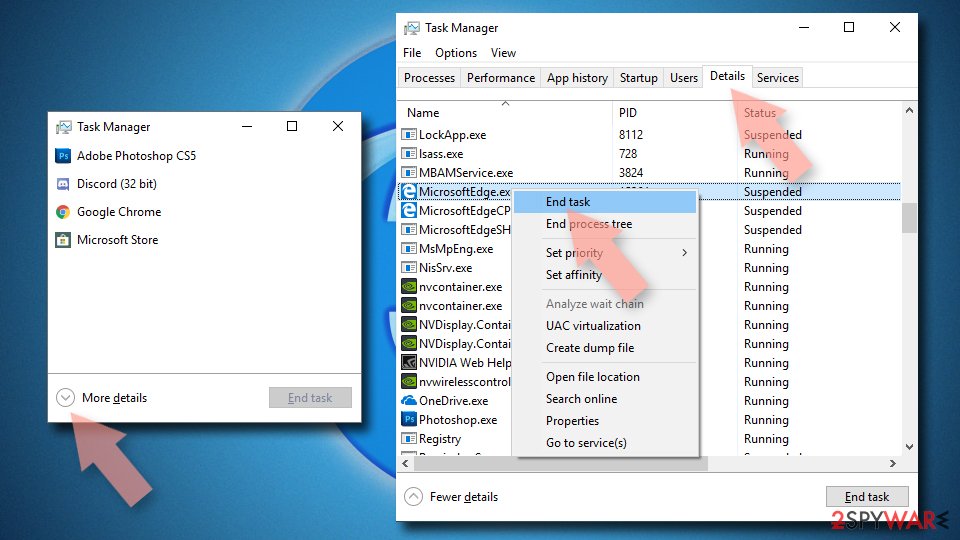
- Press on Ctrl + Shift + Esc to open Task Manager.
- Click on More details arrow at the bottom of the window.
- Select Details tab.
- Now scroll down and locate every entry with Microsoft Edge name in it. Right-click on each of them and select End Task to stop MS Edge from running.

If this solution failed to help you, you need to use an advanced Edge reset method. Note that you need to backup your data before proceeding.
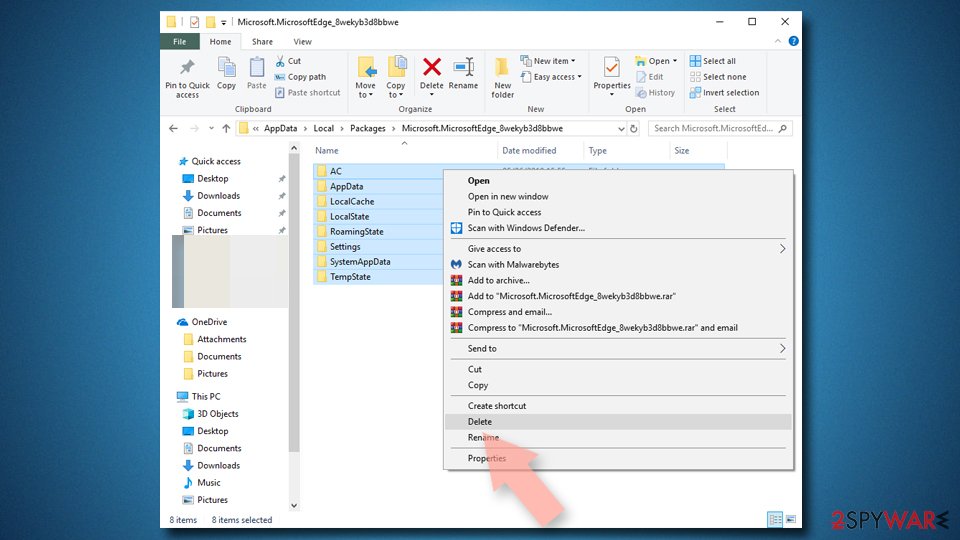
- Find the following folder on your computer: C:\\Users\\%username%\\AppData\\Local\\Packages\\Microsoft.MicrosoftEdge_8wekyb3d8bbwe.
- Press Ctrl + A on your keyboard to select all folders.
- Right-click on them and pick Delete

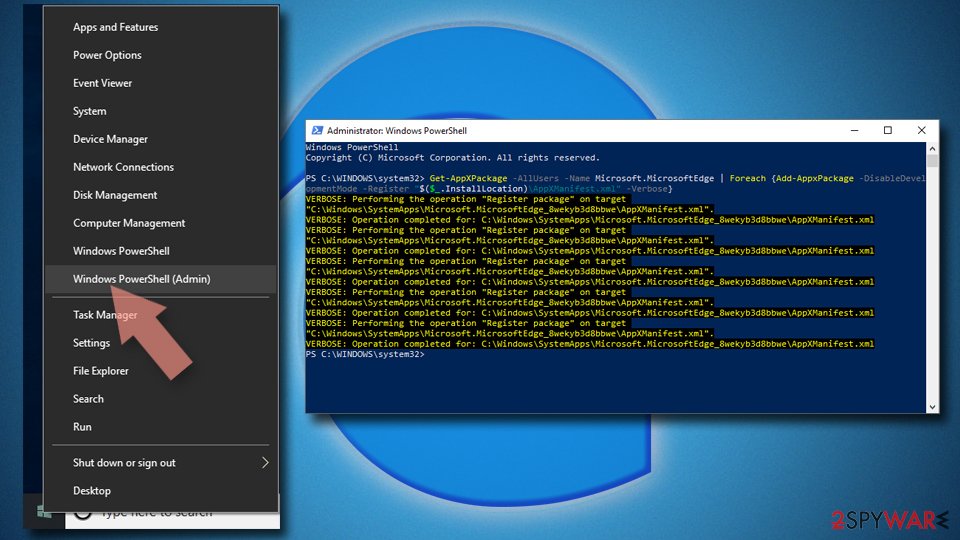
- Now right-click on the Start button and pick Windows PowerShell (Admin).
- When the new window opens, copy and paste the following command, and then press Enter:
Get-AppXPackage -AllUsers -Name Microsoft.MicrosoftEdge | Foreach {Add-AppxPackage -DisableDevelopmentMode -Register “$($_.InstallLocation)\\AppXManifest.xml” -Verbose

Instructions for Chromium-based Edge
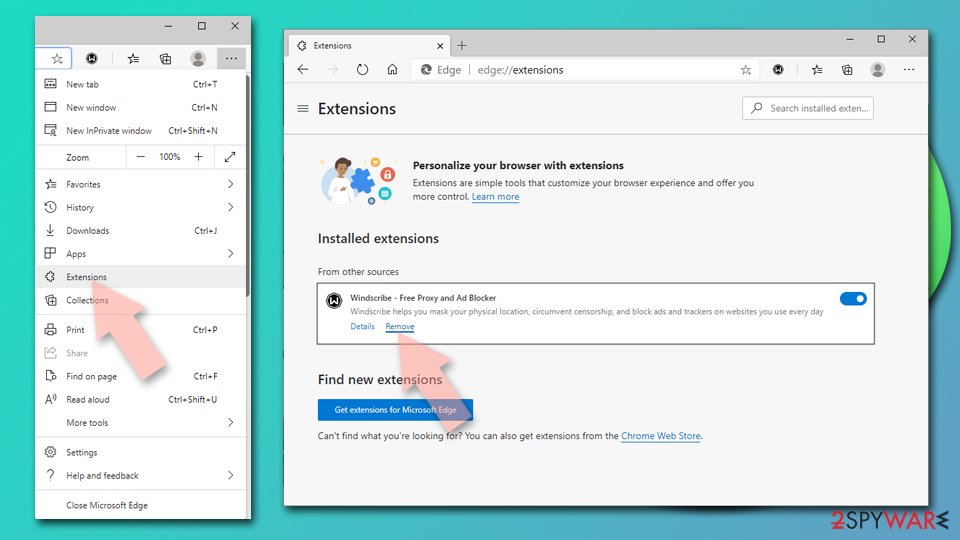
Delete extensions from MS Edge (Chromium):
- Open Edge and click select Settings > Extensions.
- Delete unwanted extensions by clicking Remove.

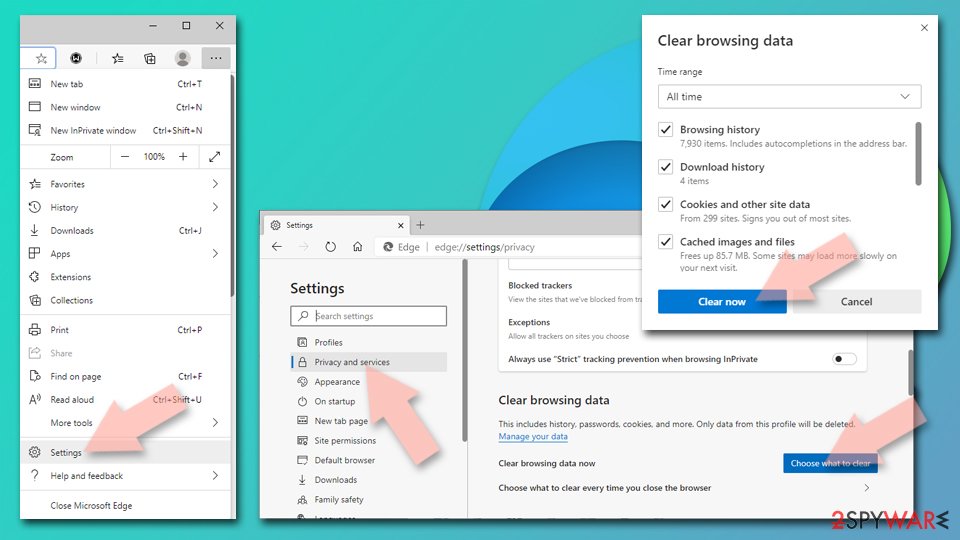
Clear cache and site data:
- Click on Menu and go to Settings.
- Select Privacy, search and services.
- Under Clear browsing data, pick Choose what to clear.
- Under Time range, pick All time.
- Select Clear now.

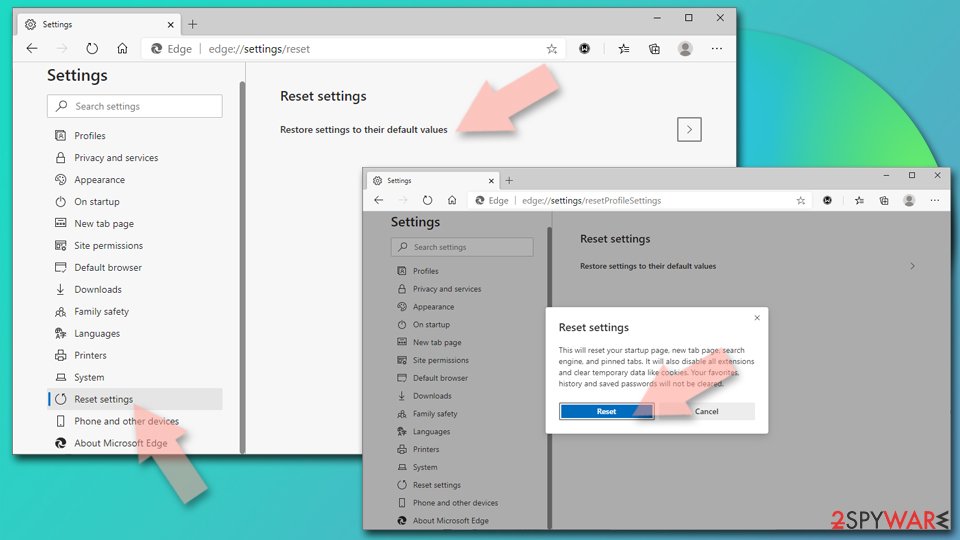
Reset Chromium-based MS Edge:
- Click on Menu and select Settings.
- On the left side, pick Reset settings.
- Select Restore settings to their default values.
- Confirm with Reset.

Remove from Mozilla Firefox (FF)
Remove dangerous extensions:
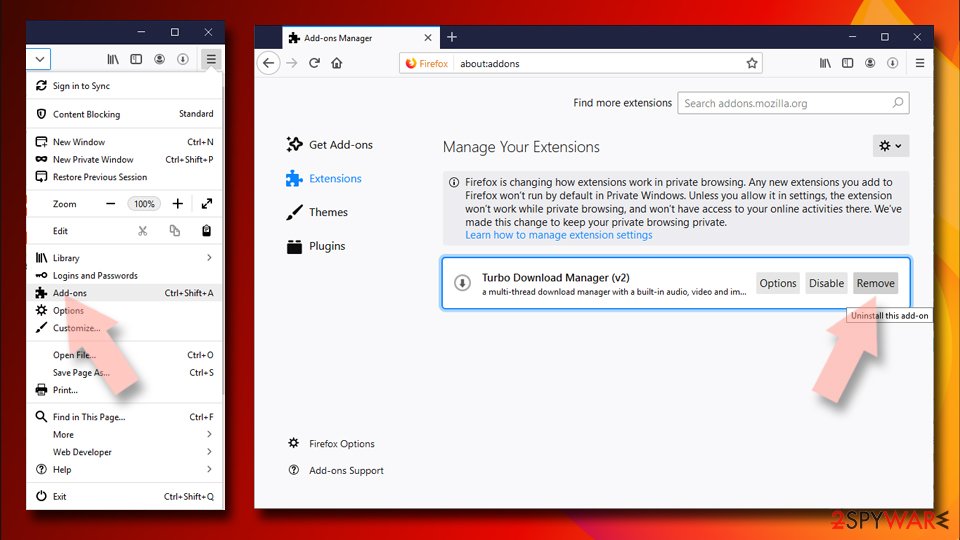
- Open Mozilla Firefox browser and click on the Menu (three horizontal lines at the top-right of the window).
- Select Add-ons.
- In here, select unwanted plugin and click Remove.

Reset the homepage:
- Click three horizontal lines at the top right corner to open the menu.
- Choose Options.
- Under Home options, enter your preferred site that will open every time you newly open the Mozilla Firefox.
Clear cookies and site data:
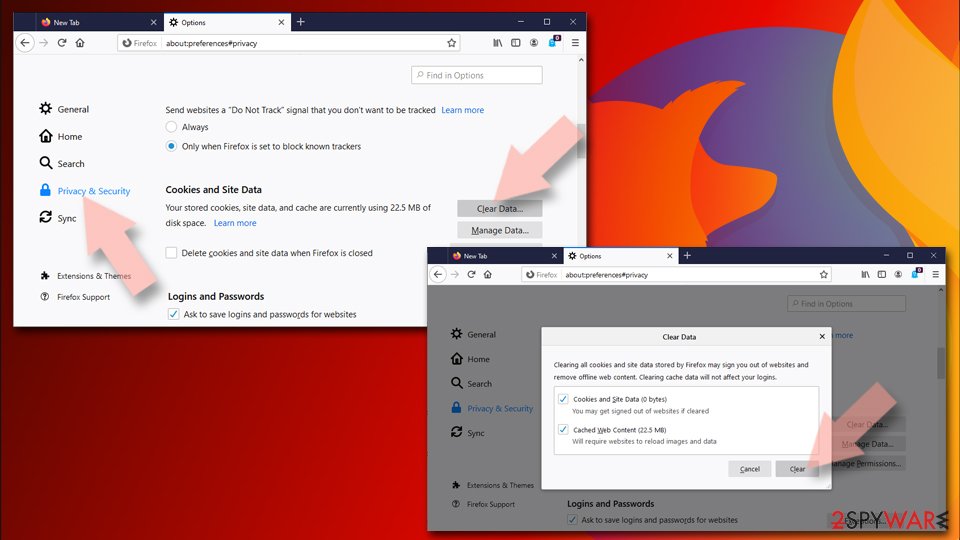
- Click Menu and pick Settings.
- Go to Privacy & Security section.
- Scroll down to locate Cookies and Site Data.
- Click on Clear Data…
- Select Cookies and Site Data, as well as Cached Web Content and press Clear.

Reset Mozilla Firefox
If clearing the browser as explained above did not help, reset Mozilla Firefox:
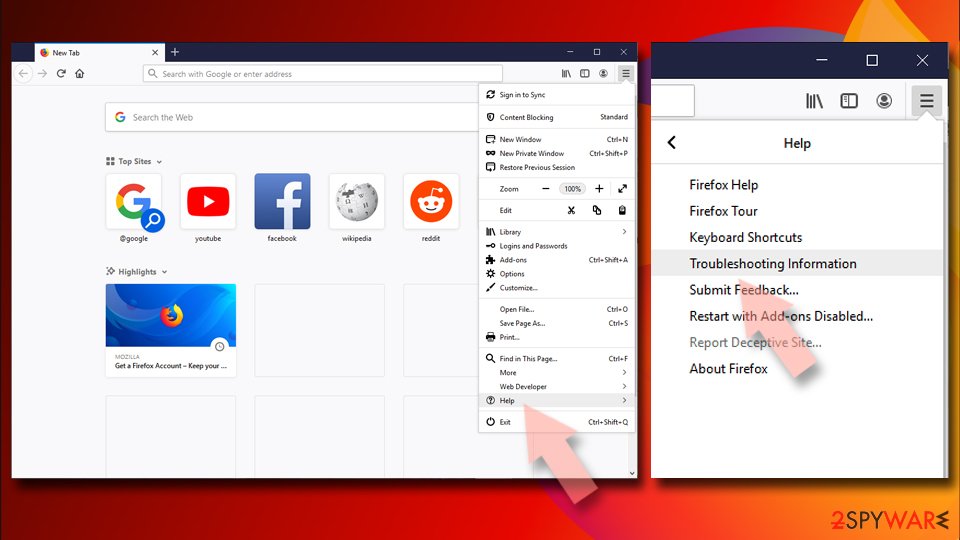
- Open Mozilla Firefox browser and click the Menu.
- Go to Help and then choose Troubleshooting Information.

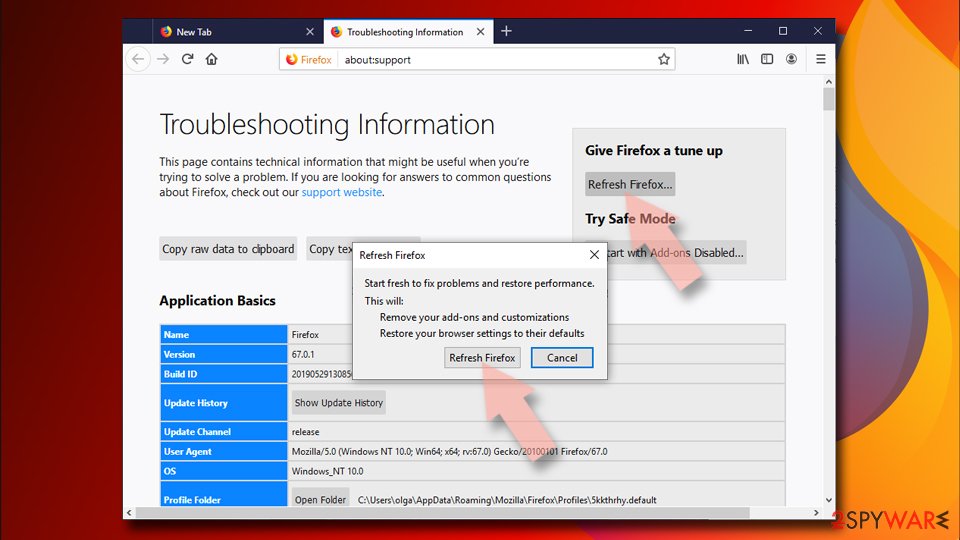
- Under Give Firefox a tune up section, click on Refresh Firefox…
- Once the pop-up shows up, confirm the action by pressing on Refresh Firefox.

Remove from Google Chrome
Delete malicious extensions from Google Chrome:
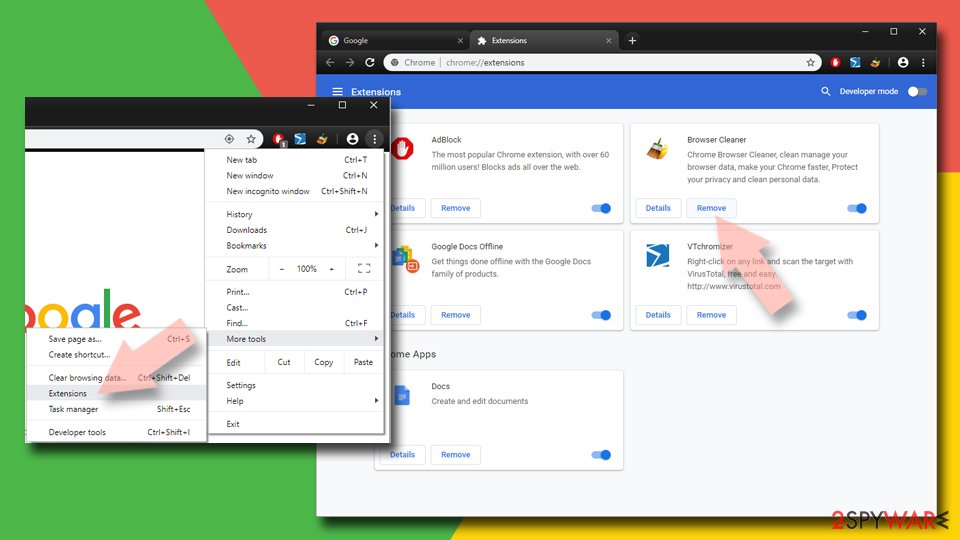
- Open Google Chrome, click on the Menu (three vertical dots at the top-right corner) and select More tools > Extensions.
- In the newly opened window, you will see all the installed extensions. Uninstall all the suspicious plugins that might be related to the unwanted program by clicking Remove.

Clear cache and web data from Chrome:
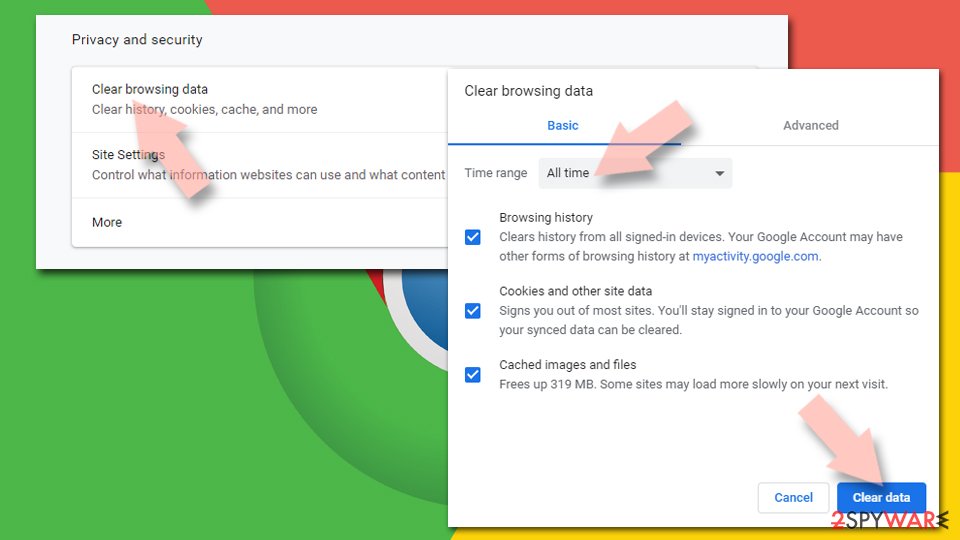
- Click on Menu and pick Settings.
- Under Privacy and security, select Clear browsing data.
- Select Browsing history, Cookies and other site data, as well as Cached images and files.
- Click Clear data.

Change your homepage:
- Click menu and choose Settings.
- Look for a suspicious site in the On startup section.
- Click on Open a specific or set of pages and click on three dots to find the Remove option.
Reset Google Chrome:
If the previous methods did not help you, reset Google Chrome to eliminate all the unwanted components:
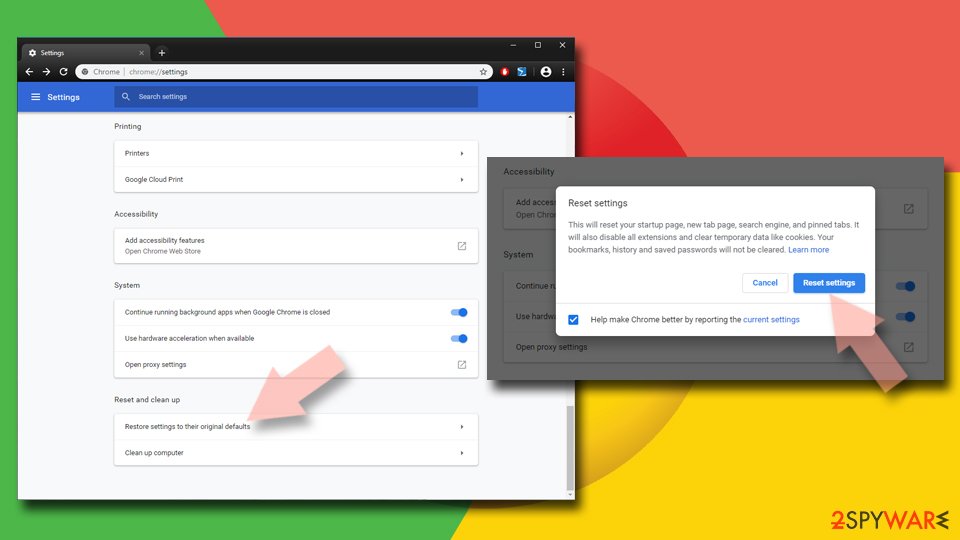
- Click on Menu and select Settings.
- In the Settings, scroll down and click Advanced.
- Scroll down and locate Reset and clean up section.
- Now click Restore settings to their original defaults.
- Confirm with Reset settings.

Delete from Safari
Remove unwanted extensions from Safari:
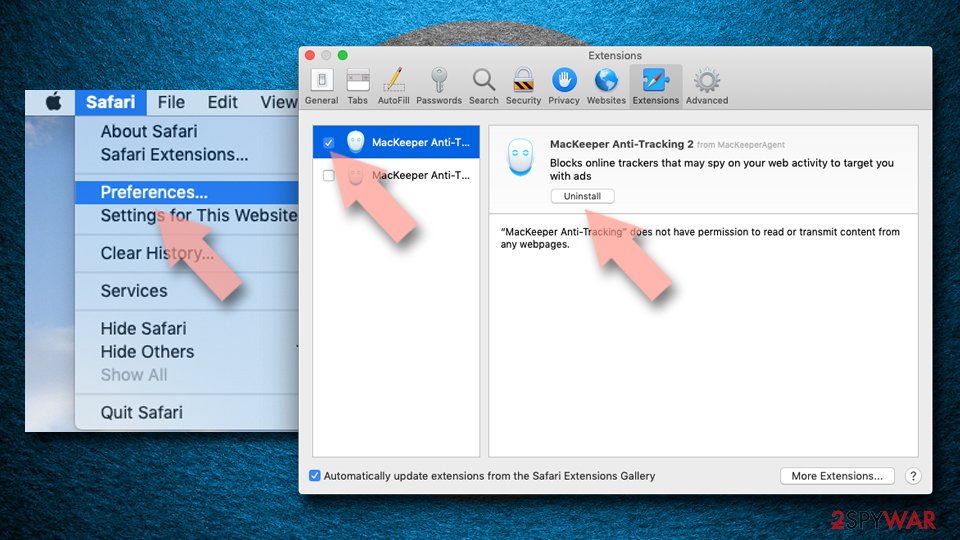
- Click Safari > Preferences…
- In the new window, pick Extensions.
- Select the unwanted extension and select Uninstall.

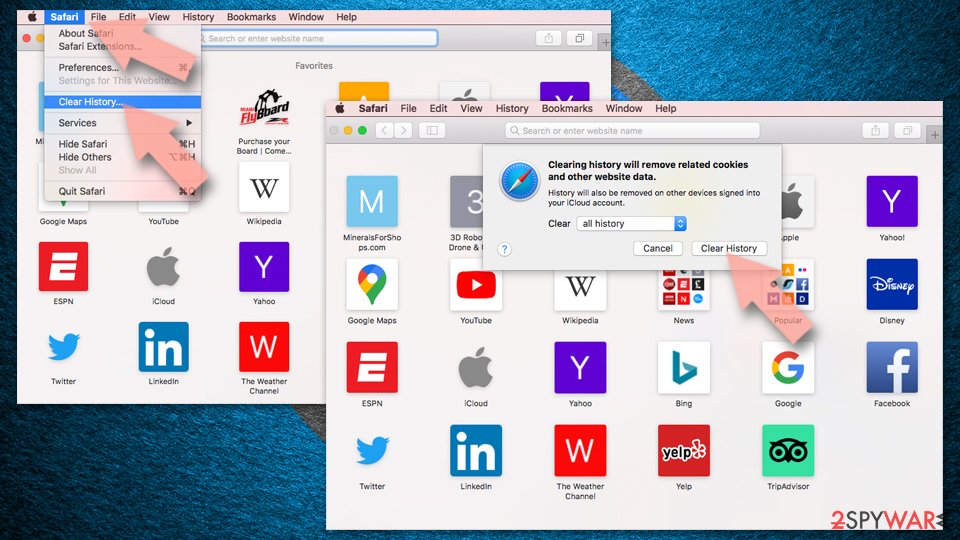
Clear cookies and other website data from Safari:
- Click Safari > Clear History…
- From the drop-down menu under Clear, pick all history.
- Confirm with Clear History.

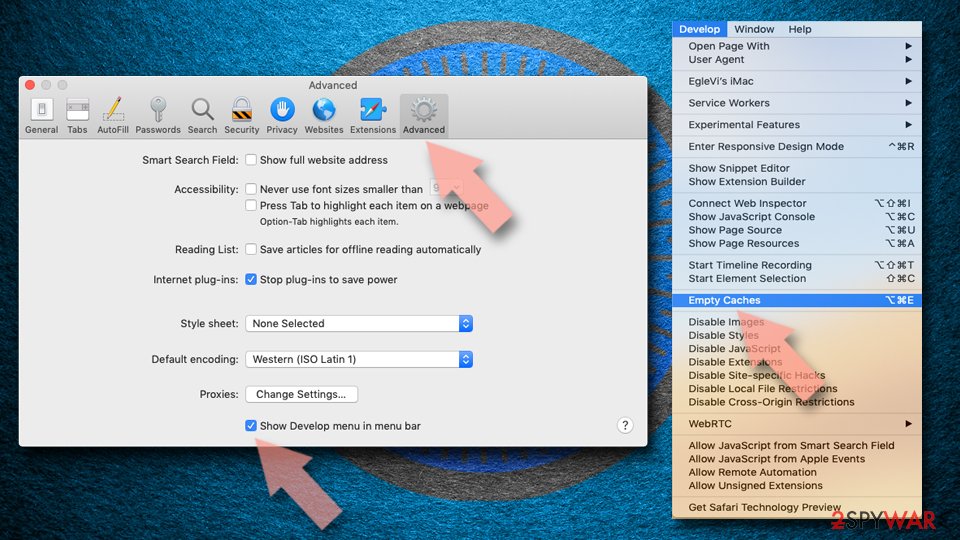
Reset Safari if the above-mentioned steps did not help you:
- Click Safari > Preferences…
- Go to Advanced tab.
- Tick the Show Develop menu in menu bar.
- From the menu bar, click Develop, and then select Empty Caches.

Manual removal using Safe Mode
Important! →
Manual removal guide might be too complicated for regular computer users. It requires advanced IT knowledge to be performed correctly (if vital system files are removed or damaged, it might result in full Windows compromise), and it also might take hours to complete. Therefore, we highly advise using the automatic method provided above instead.
Step 1. Access Safe Mode with Networking
Manual malware removal should be best performed in the Safe Mode environment.
Windows 7 / Vista / XP
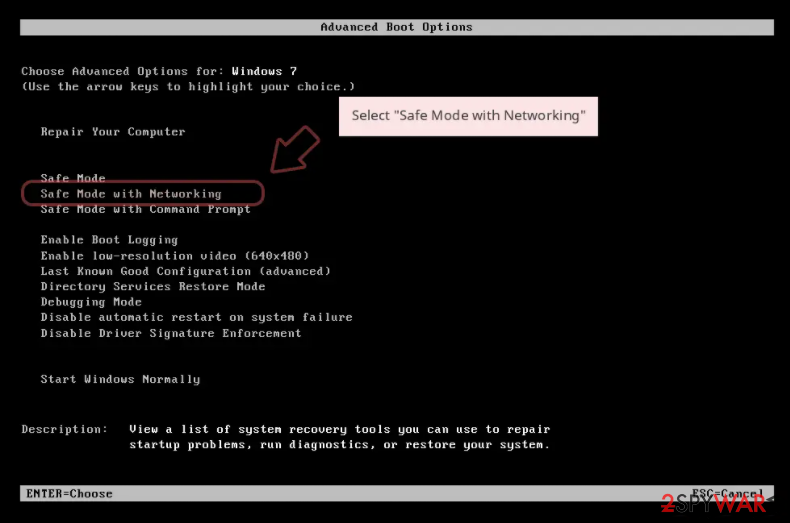
- Click Start > Shutdown > Restart > OK.
- When your computer becomes active, start pressing F8 button (if that does not work, try F2, F12, Del, etc. – it all depends on your motherboard model) multiple times until you see the Advanced Boot Options window.
- Select Safe Mode with Networking from the list.

Windows 10 / Windows 8
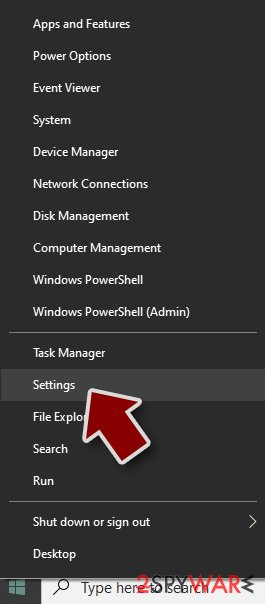
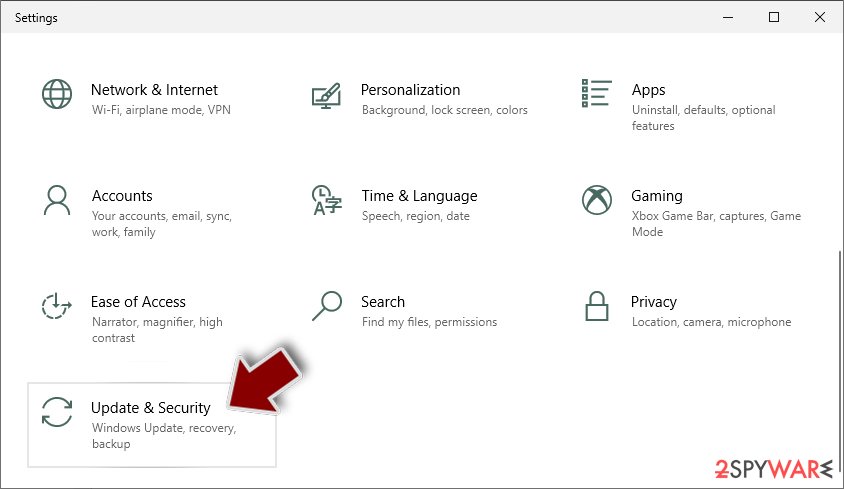
- Right-click on Start button and select Settings.

- Scroll down to pick Update & Security.

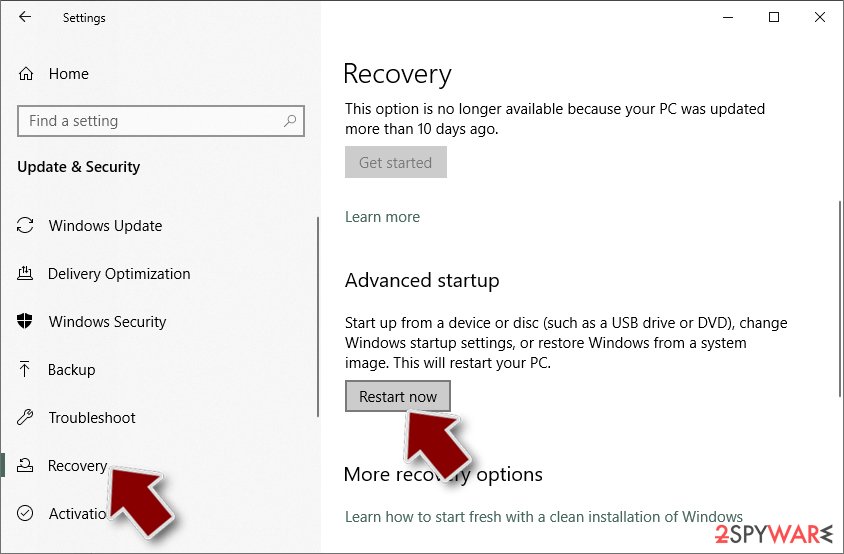
- On the left side of the window, pick Recovery.
- Now scroll down to find Advanced Startup section.
- Click Restart now.

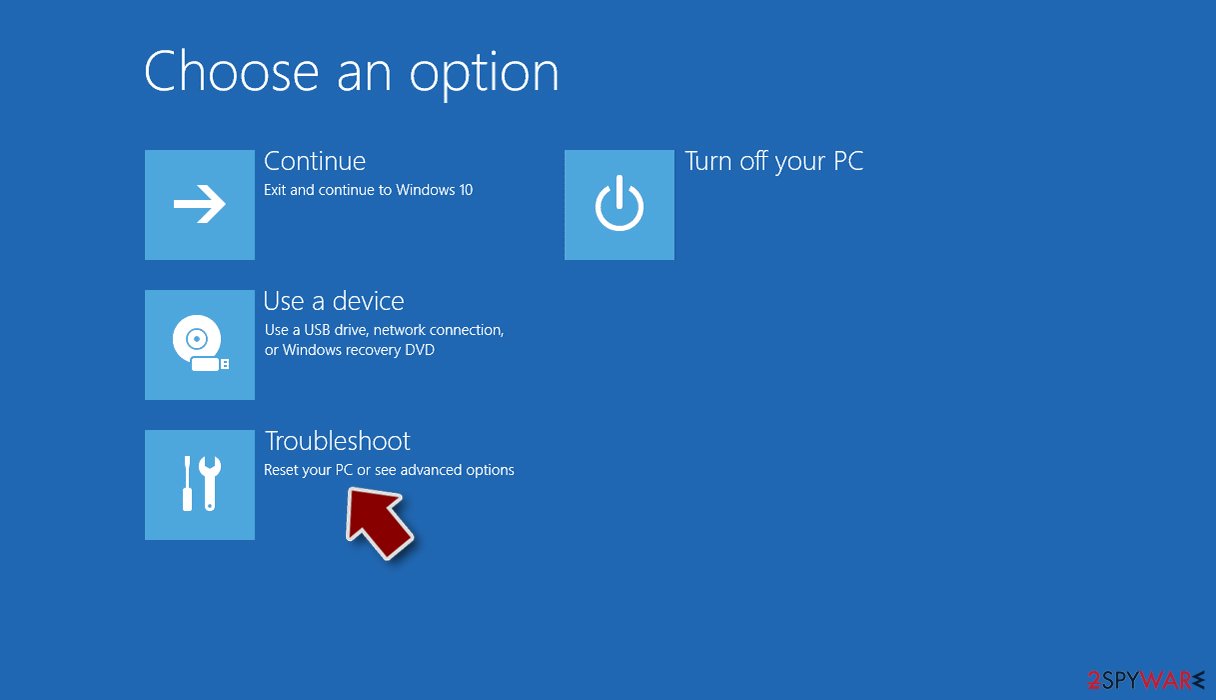
- Select Troubleshoot.

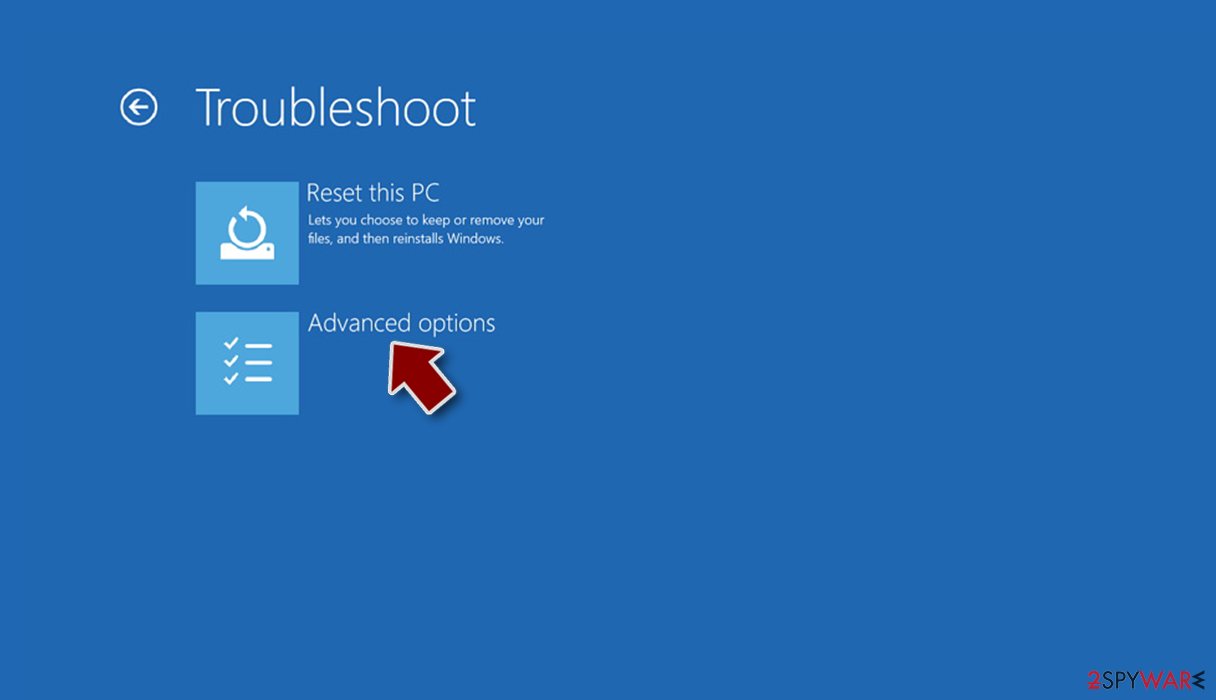
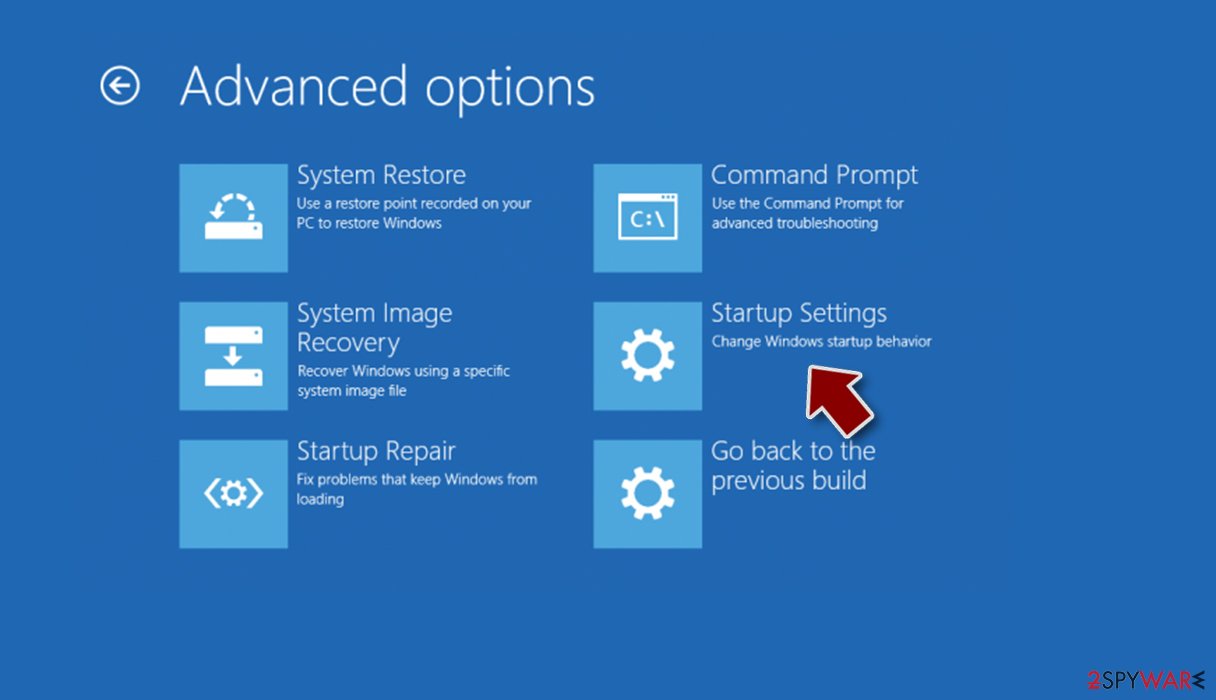
- Go to Advanced options.

- Select Startup Settings.

- Press Restart.
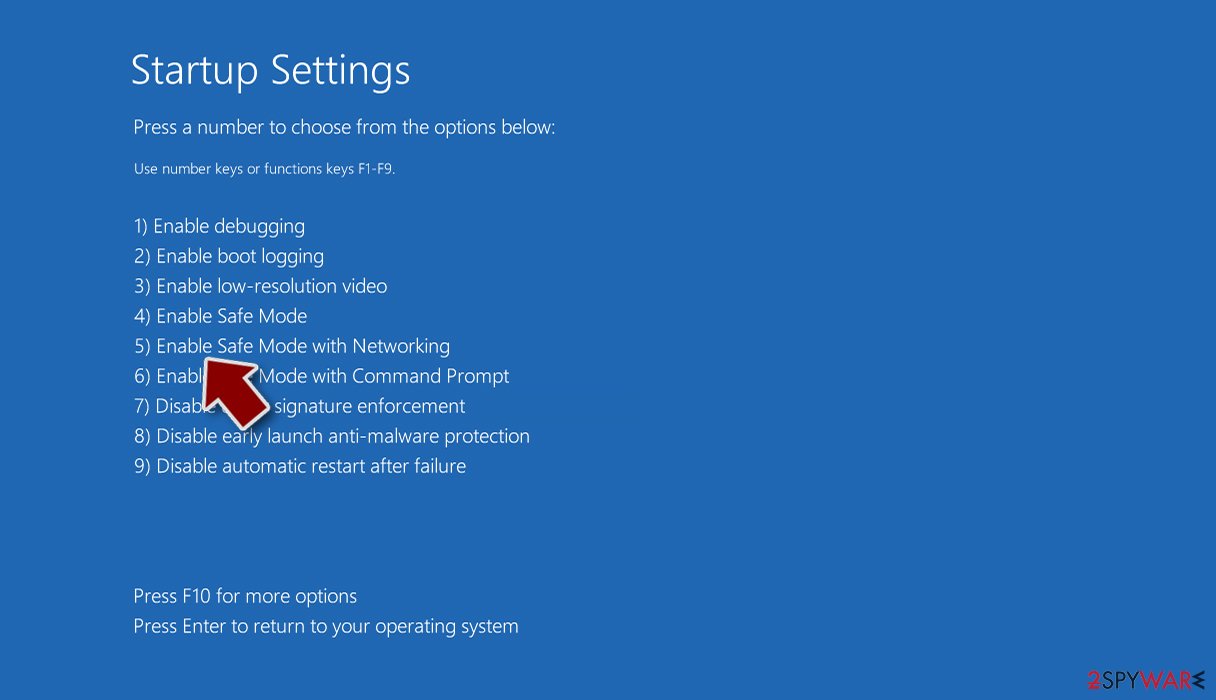
- Now press 5 or click 5) Enable Safe Mode with Networking.

Step 2. Shut down suspicious processes
Windows Task Manager is a useful tool that shows all the processes running in the background. If malware is running a process, you need to shut it down:
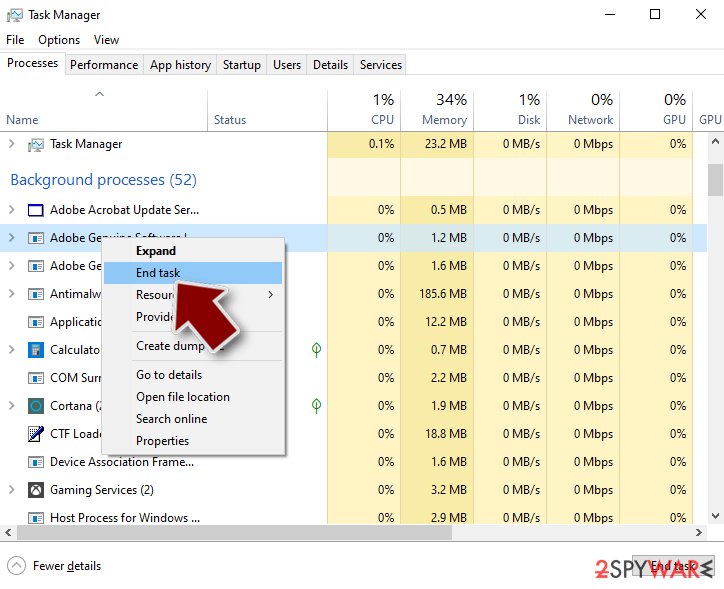
- Press Ctrl + Shift + Esc on your keyboard to open Windows Task Manager.
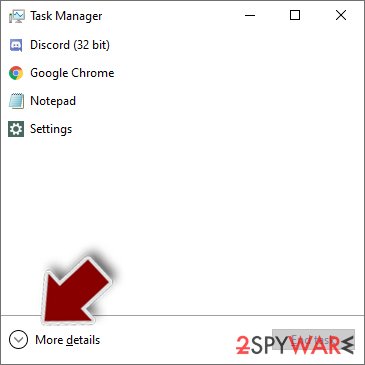
- Click on More details.

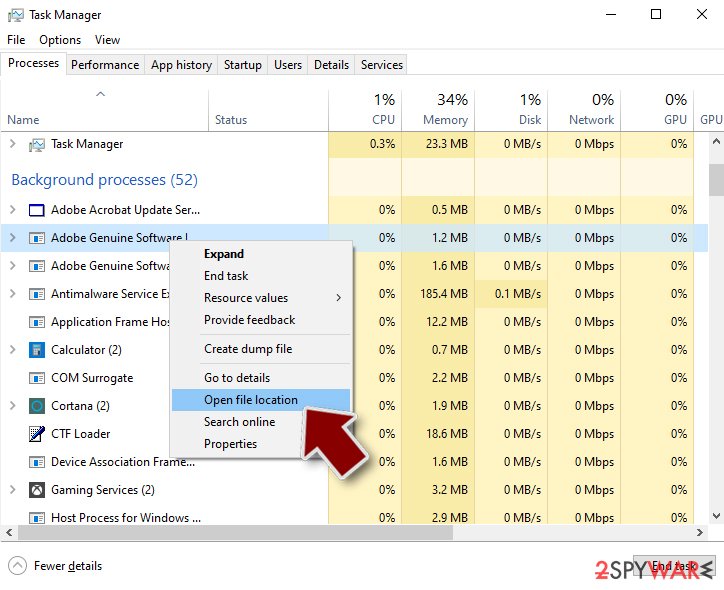
- Scroll down to Background processes section, and look for anything suspicious.
- Right-click and select Open file location.

- Go back to the process, right-click and pick End Task.

- Delete the contents of the malicious folder.
Step 3. Check program Startup
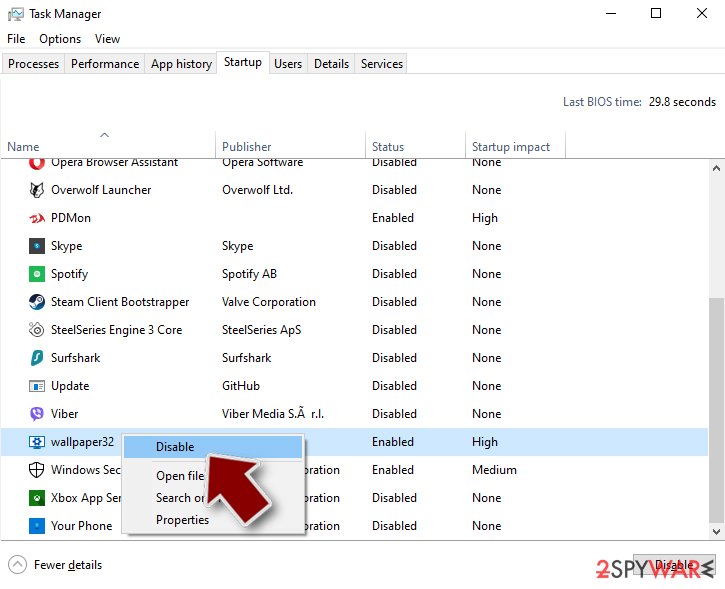
- Press Ctrl + Shift + Esc on your keyboard to open Windows Task Manager.
- Go to Startup tab.
- Right-click on the suspicious program and pick Disable.

Step 4. Delete virus files
Malware-related files can be found in various places within your computer. Here are instructions that could help you find them:
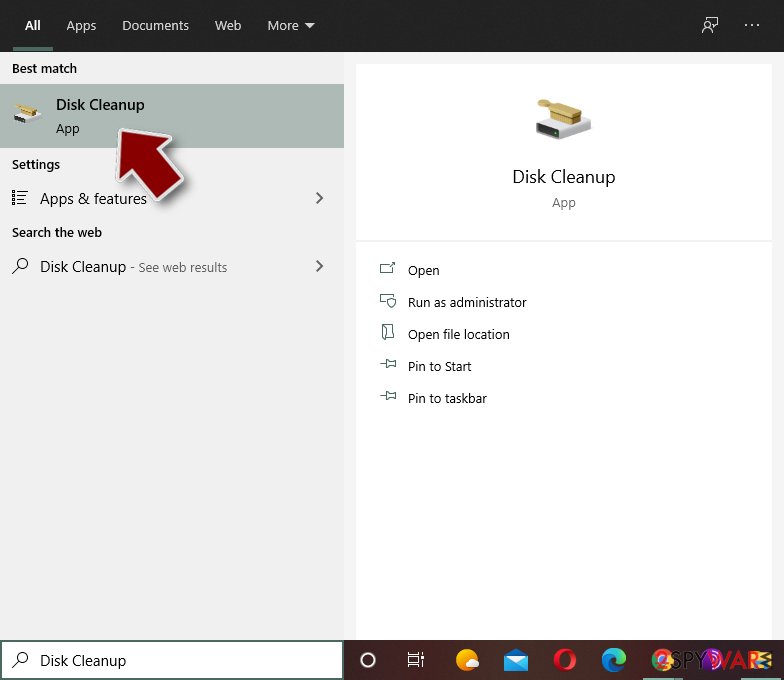
- Type in Disk Cleanup in Windows search and press Enter.

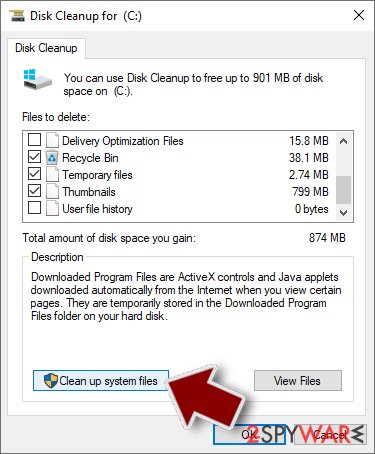
- Select the drive you want to clean (C: is your main drive by default and is likely to be the one that has malicious files in).
- Scroll through the Files to delete list and select the following:
Temporary Internet Files
Downloads
Recycle Bin
Temporary files - Pick Clean up system files.

- You can also look for other malicious files hidden in the following folders (type these entries in Windows Search and press Enter):
%AppData%
%LocalAppData%
%ProgramData%
%WinDir%
After you are finished, reboot the PC in normal mode.
How to prevent from getting rogue antispyware
Stream videos without limitations, no matter where you are
There are multiple parties that could find out almost anything about you by checking your online activity. While this is highly unlikely, advertisers and tech companies are constantly tracking you online. The first step to privacy should be a secure browser that focuses on tracker reduction to a minimum.
Even if you employ a secure browser, you will not be able to access websites that are restricted due to local government laws or other reasons. In other words, you may not be able to stream Disney+ or US-based Netflix in some countries. To bypass these restrictions, you can employ a powerful Private Internet Access VPN, which provides dedicated servers for torrenting and streaming, not slowing you down in the process.
Data backups are important – recover your lost files
Ransomware is one of the biggest threats to personal data. Once it is executed on a machine, it launches a sophisticated encryption algorithm that locks all your files, although it does not destroy them. The most common misconception is that anti-malware software can return files to their previous states. This is not true, however, and data remains locked after the malicious payload is deleted.
While regular data backups are the only secure method to recover your files after a ransomware attack, tools such as Data Recovery Pro can also be effective and restore at least some of your lost data.
