Pu6.biz (Chrome, Firefox, IE, Edge) - Virus Removal Guide
Pu6.biz Removal Guide
What is Pu6.biz?
Pu6.biz – a set of deceptive websites that try to trick you into accepting their alerts
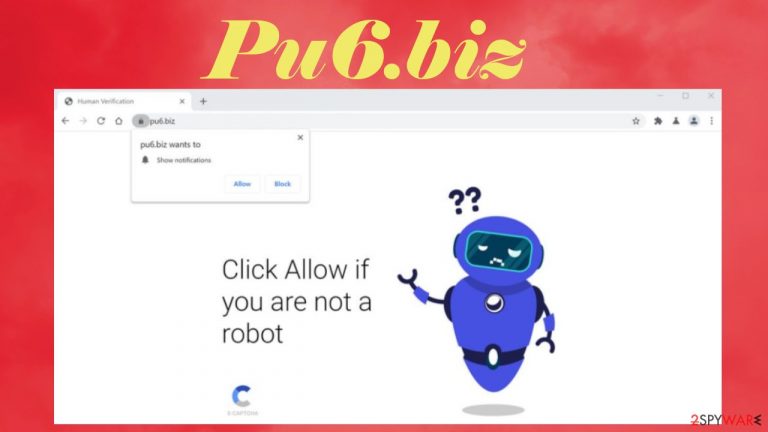
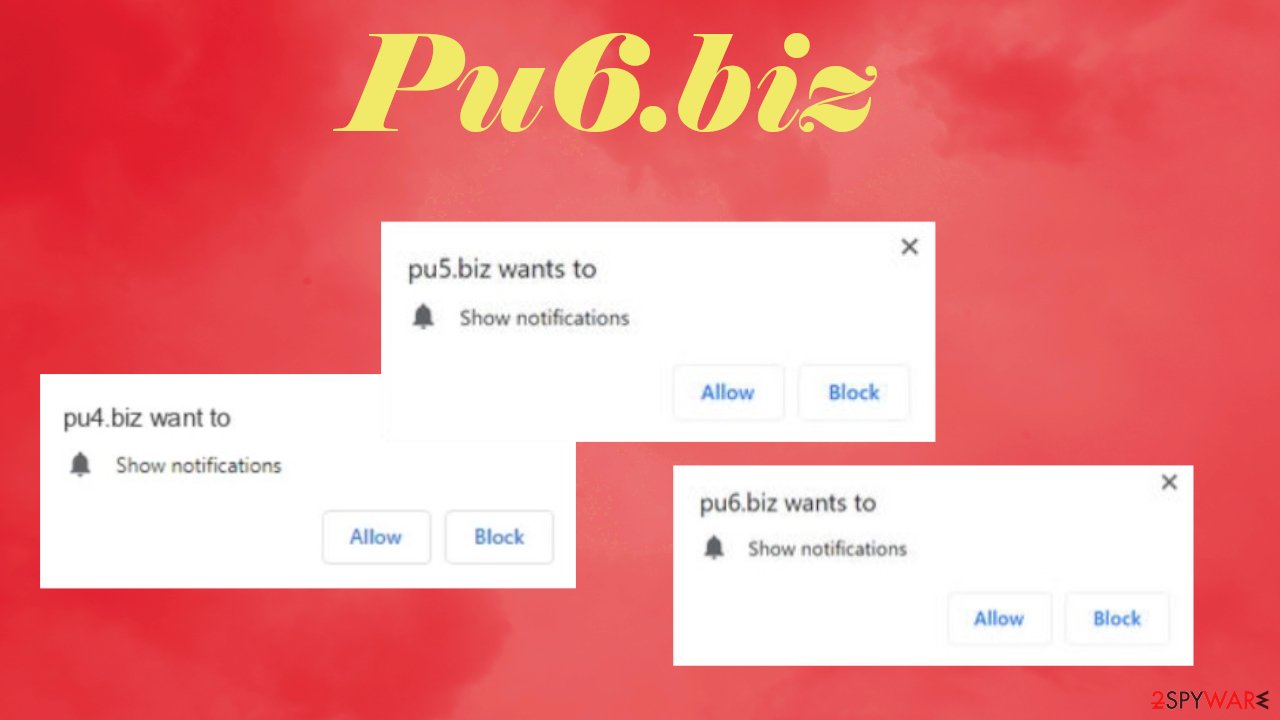
Pu6.biz is a push notification virus that will show you deceptive ads and cause redirects to affiliated pages if you press the Allow button while visiting the dubious portal. It does that by showing misleading prompts that depend on your geolocation. Please don't enable notifications from this treacherous web page or its other versions, including Pu1.biz, Pu2.biz, Pu3.biz, etc.
People that do have reported seeing Pu6.biz ads in the form of notification popping up directly on their desktop or screen. These ads are pervasive, annoying, deceptive, and almost impossible to close, as pressing the “X” button will either do nothing or open a site with sponsored content.
If you didn't click on a deceptive ad or typed in the culprit's address manually, then you have adware or other potentially unwanted program[1] installed on your device in-use. The good news is that it's not as dangerous as malware, but you should still use our guides below to eliminate the threat immediately.
| name | Pu6.biz |
|---|---|
| type | Adware, PUP, redirect virus |
| IP address | 128.199.45.147 |
| Purpose | Deceive visitors into allowing notifications which would allow placement of ads directly on the screen and redirects to shady websites |
| Other versions | Pu1.biz, Pu2.biz, Pu3.biz, Pu4.biz, Pu5.biz |
| Symptoms | Slower device and internet connection, ads popping up as notifications, new tabs with questionable pages open out of nowhere |
| Risks | Redirects to dubious pages might result in the installation of additional PUPs, malware infections |
| Distribution | Deceptive ads, torrent platforms, fake Flash Player updates, software bundling |
| Removal | Eliminate this browser-based intruder by running a full system scan with anti-malware software and then using our comprehensive guides at the bottom of the page |
| System health check | Infections leave many traces on system files and their settings, which might result in various system irregularities, such as BSoDs,[2] freezing, severe lag, etc. Resolve all these issues by running system diagnostics with the all-in-one FortectIntego system repair software |
This particular set of shady websites differ only by one number in their name. It goes from 1 in Pu1.biz to 6 in Pu6.biz. Such websites don't function very long, but people who have adware infections are redirected to them and can accept their notifications.
The main goal of such treacherous pages is to generate income by forwarding traffic to affiliated sites. That can be done in two ways. Either by luring people to press on Pu6.biz ads, or causing redirects, when a new tab on your browser suddenly opens with sponsored content.
In most cases, the displayed ads have nothing in common with the affiliated sites. An ad shown by Pu6.biz virus for an amazing deal on a brand new coffee maker could redirect you to pages with porn, gambling, potentially unwanted programs, malware, various tech support scams, and so on.
As mentioned before, any of these affiliated pages could also be opened out of the blue if a Pu6.biz redirect is triggered. And since threat actors behind such portals care only about money, some of the sponsored content could be harmful both to you and your device in-use.
Therefore you should scan your affected device with a reliable security tool to remove Pu6.biz and any other suspicious or malicious entries. According to experts,[3] free anti-malware software such as SpyHunter 5Combo Cleaner or Malwarebytes will not only complete this task within minutes but also protect your device from such perils in the future.
After a successful Pu6.biz removal with AV engines, use our guides below to eliminate its notifications from the browser you used when you pressed the Allow button. If you didn't, skip that part. And lastly, use the FortectIntego system diagnostics tool or similar software to delete tracking cookies and repair corrupted system files/settings.
PUPs usually infect devices via software bundles and deceptive ads
Potentially unwanted programs, such as unnecessary toolbars, browser hijackers, adware, etc., aren't as hazardous as Trojans, ransomware, or other malware, but they still pose threats. Usually, people have no clue how a PUP got on their system. That's because their operators use stealthy techniques for their distribution.
One of these methods is called software bundling. Lately, legitimate software developers have begun using this technique to gain extra revenue. Thus the only way to evade PUPs is to stay cautious when installing new apps. Choose the Custom or Advanced installation option and deselect all unknown, unneeded, or at least a bit suspicious apps from getting on your device.
Deceptive ads are yet another popular PUP delivery method. They are usually seen on questionable pages. They might state that you need to update your Flash Player, install some app to remove an imaginary virus, or update fictional drivers. Please note that no website is able to determine infection or outdated software on your device. These are tricks used to spread PUPs.
Use proper anti-malware software to remove Pu6.biz virus within minutes
There's no place for any infection, whether the annoying Pu6.biz virus or extremely dangerous ransomware, on anyone's device. Cyberthreats usually alter system files and settings, leading to various abnormal device behavior, such as crashing, severe lag, freezing, etc. Furthermore, a seemingly harmless PUP could open doors to hazardous malware.
That's why you should trust Pu6.biz removal to trustworthy anti-malware software to check if there are no severe infections hidden within your device. Download a dependable security tool and scan your computer or phone with it. A proper tool will detect, isolate, and eliminate any suspicious files and apps.
If you've accepted the notifications from this shady site, use our instructions below to remove Pu6.biz from your browser. For your convenience, we've included guides for every browser that this intruder could affect. Afterward, please consider using system repair software to check for any system errors that need to be taken care of.
You may remove virus damage with a help of FortectIntego. SpyHunter 5Combo Cleaner and Malwarebytes are recommended to detect potentially unwanted programs and viruses with all their files and registry entries that are related to them.
Getting rid of Pu6.biz. Follow these steps
Stop browser notifications
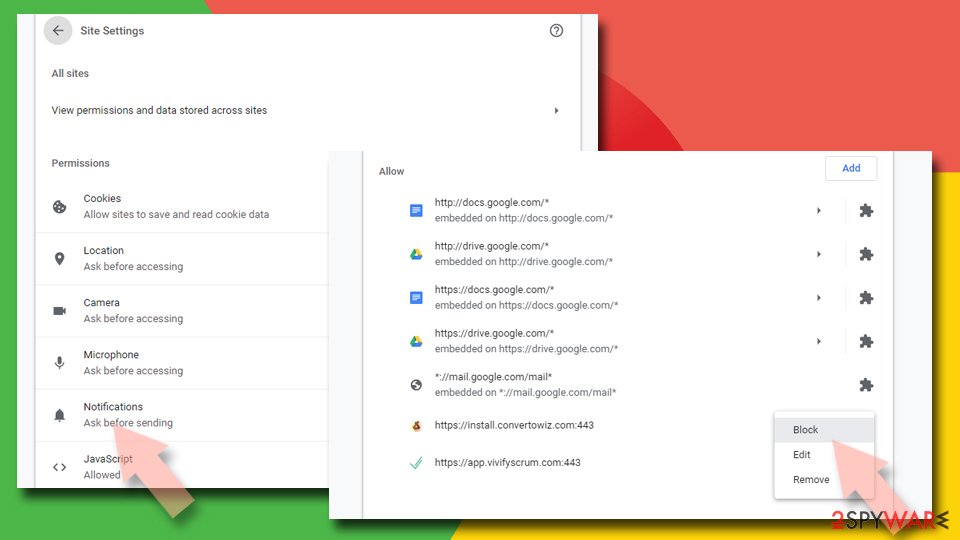
Remove unwanted notifications from Google Chrome (desktop):
- Open Google Chrome browser and go to Menu > Settings.
- Scroll down and click on Advanced.
- Locate Privacy and security section and pick Site Settings > Notifications.
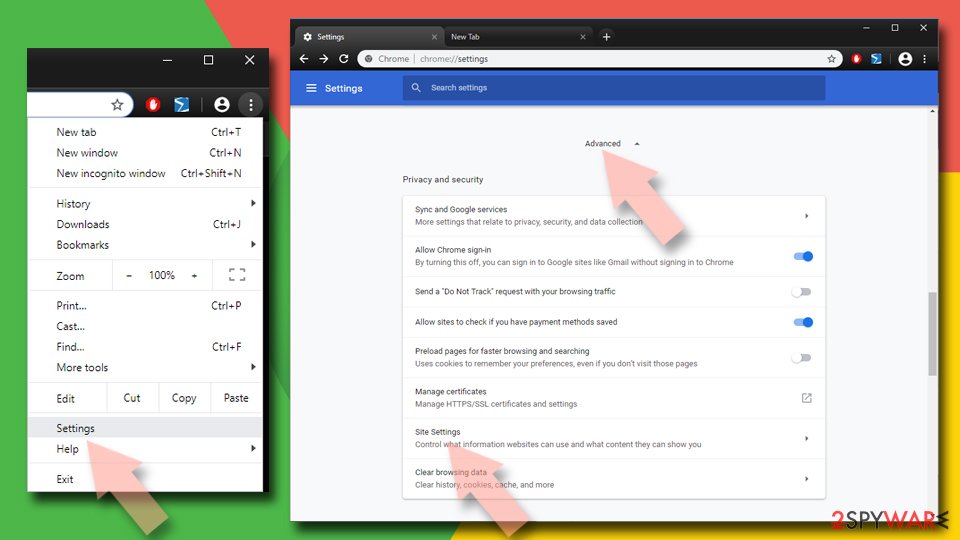
- Look at the Allow section and look for a suspicious URL.
- Click the three vertical dots next to it and pick Block. This should remove unwanted notifications from Google Chrome.
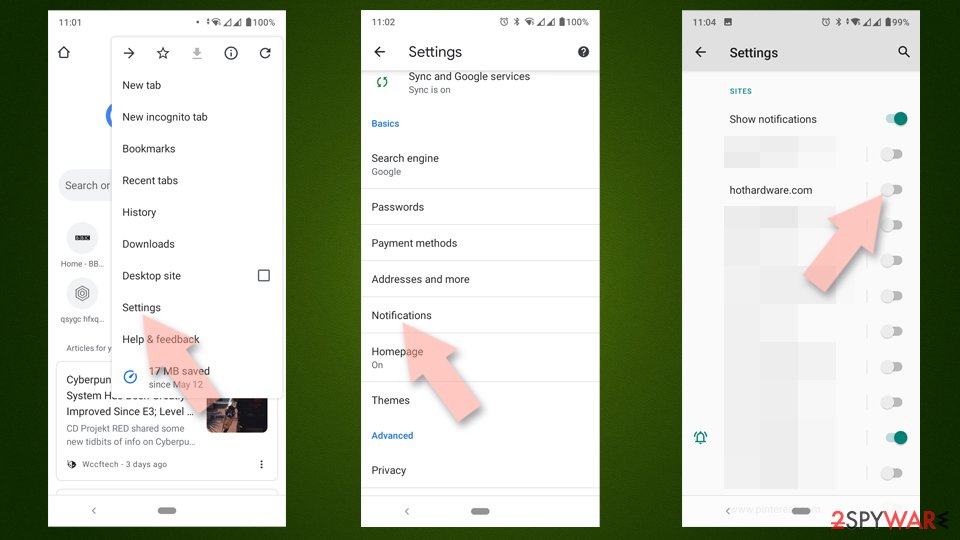
Remove unwanted notifications from Google Chrome (Android):
- Open Google Chrome and tap on Settings (three vertical dots).
- Select Notifications.
- Scroll down to the Sites section.
- Locate the unwanted URL and toggle the button to the left (Off setting).
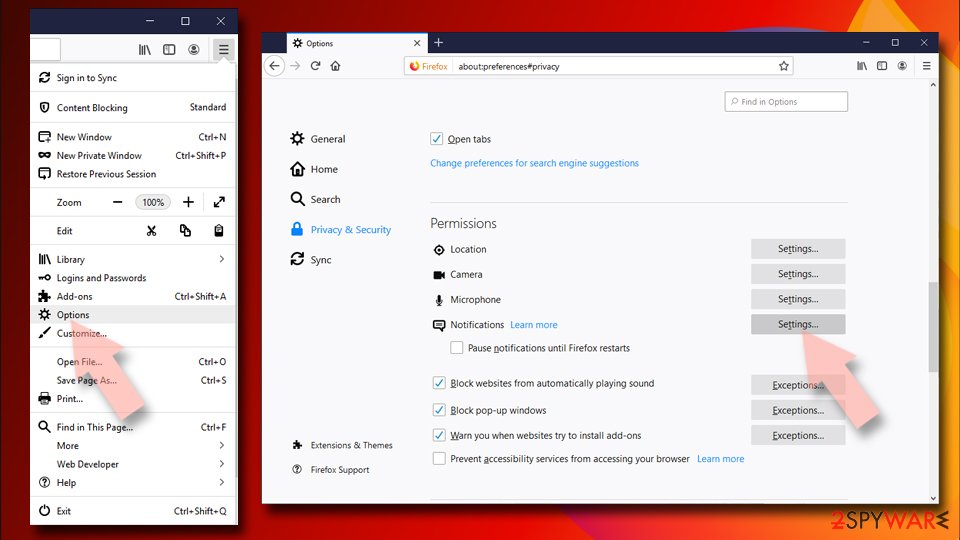
Remove unwanted notifications from Mozilla Firefox:
- Open Mozilla Firefox and go to Menu > Options.
- Click on Privacy & Security section.
- Under Permissions, you should be able to see Notifications. Click the Settings button next to it.
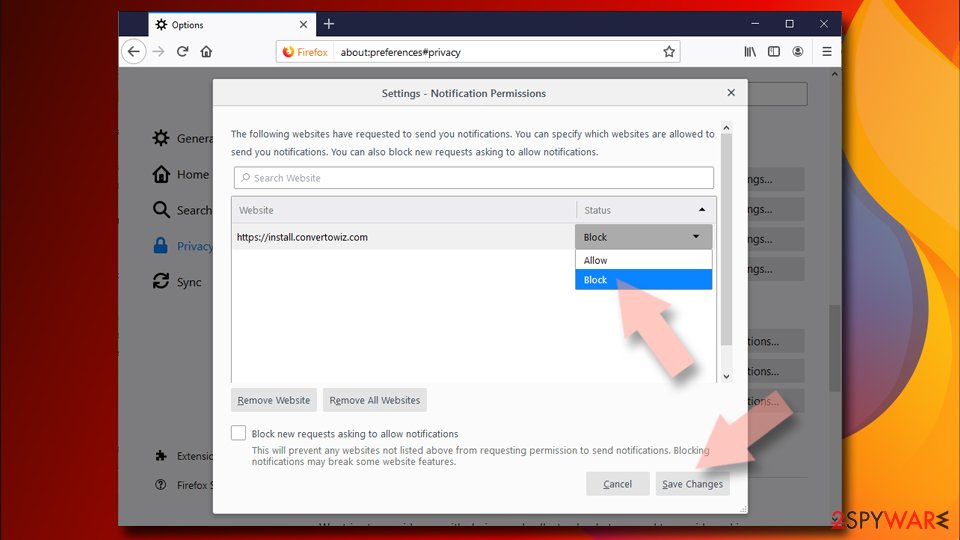
- In the Settings – Notification Permissions window, click on the drop-down menu by the URL in question.
- Select Block and then click on Save Changes. This should remove unwanted notifications from Mozilla Firefox.
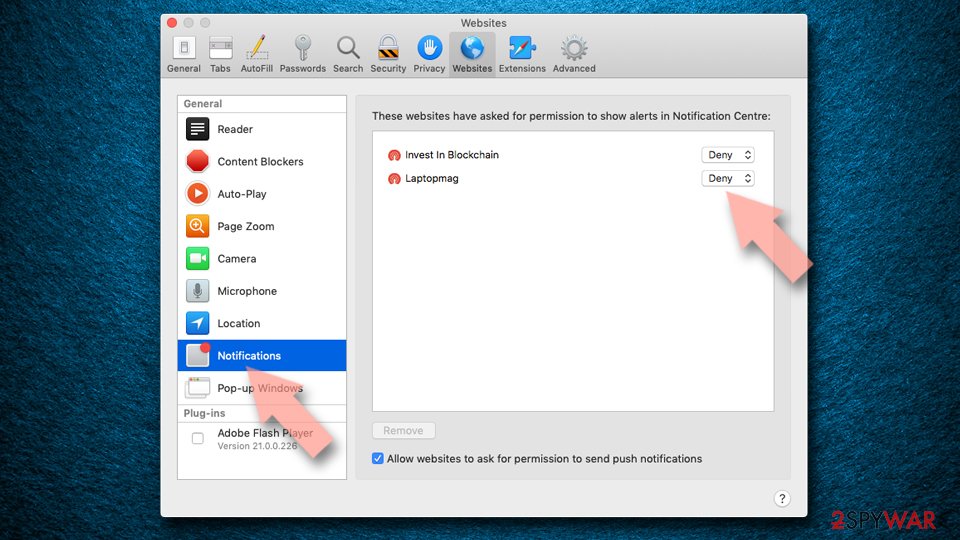
Remove unwanted notifications from Safari:
- Click on Safari > Preferences…
- Go to the Websites tab and, under General, select Notifications.
- Select the web address in question, click the drop-down menu and select Deny.
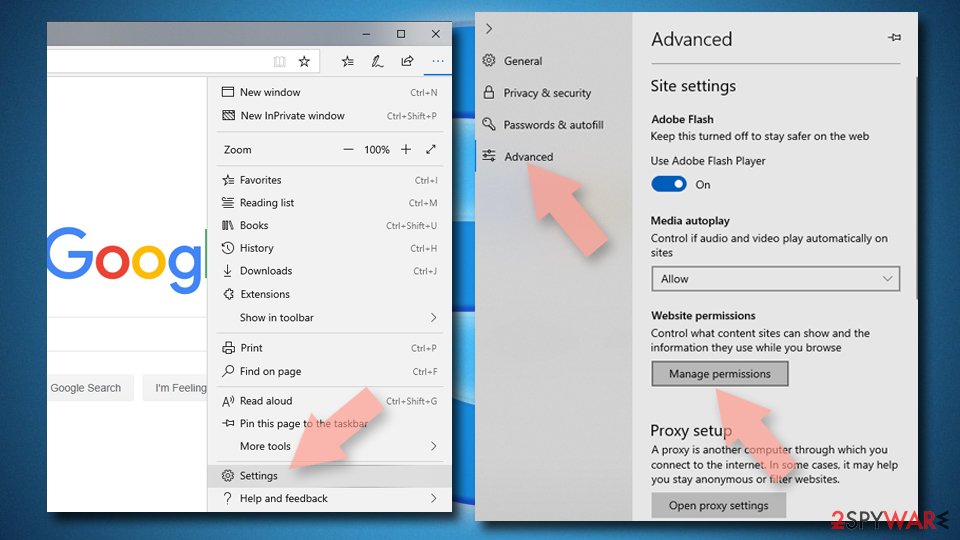
Remove unwanted notifications from MS Edge:
- Open Microsoft Edge, and click the Settings and more button (three horizontal dots) at the top-right of the window.
- Select Settings and then go to Advanced.
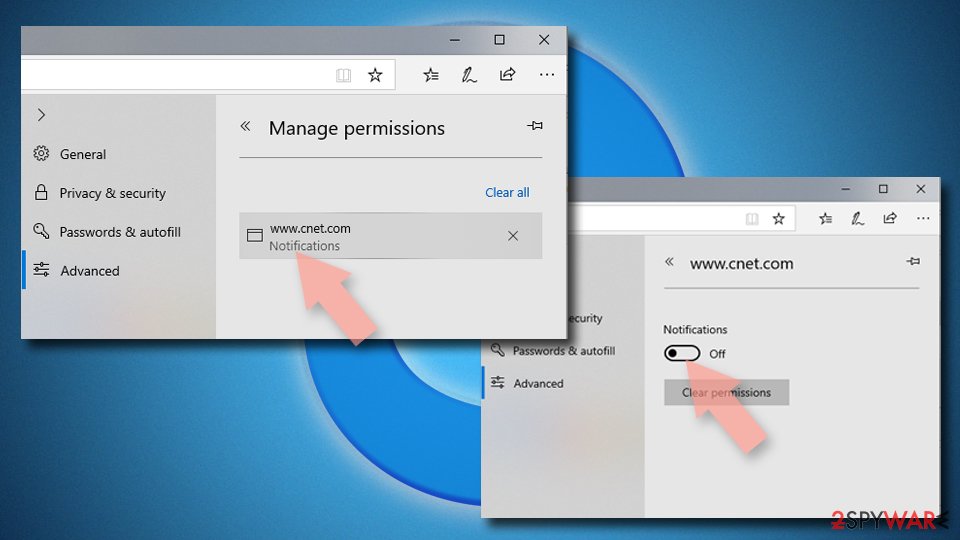
- Under Website permissions, pick Manage permissions and select the URL in question.
- Toggle the switch to the left to turn notifications off on Microsoft Edge.
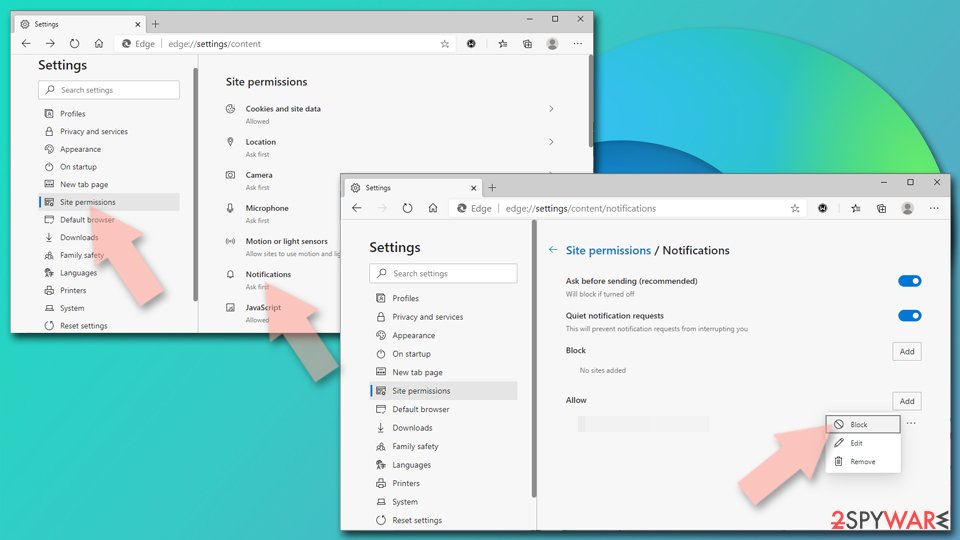
Remove unwanted notifications from MS Edge (Chromium):
- Open Microsoft Edge, and go to Settings.
- Select Site permissions.
- Go to Notifications on the right.
- Under Allow, you will find the unwanted entry.
- Click on More actions and select Block.
Remove unwanted notifications from Internet Explorer:
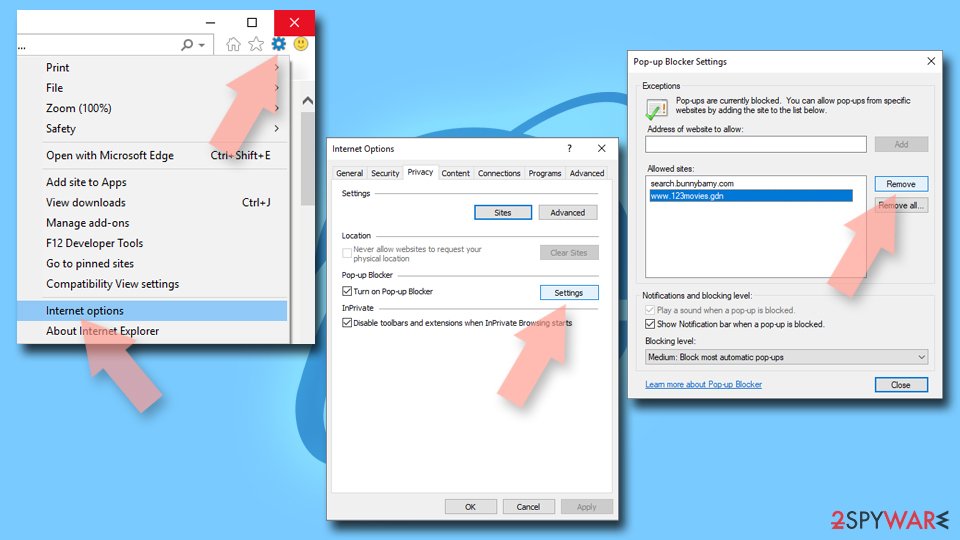
- Open Internet Explorer, and click on the Gear icon at the top-right of the window.
- Select Internet options and go to the Privacy tab.
- In the Pop-up Blocker section, click on Settings.
- Locate web address in question under Allowed sites and pick Remove.
Uninstall from Windows
Instructions for Windows 10/8 machines:
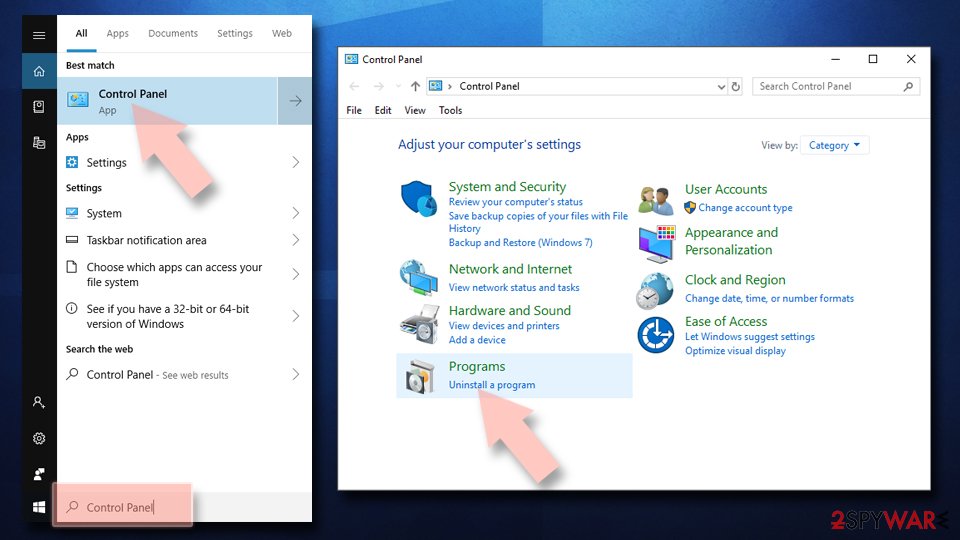
- Enter Control Panel into Windows search box and hit Enter or click on the search result.
- Under Programs, select Uninstall a program.
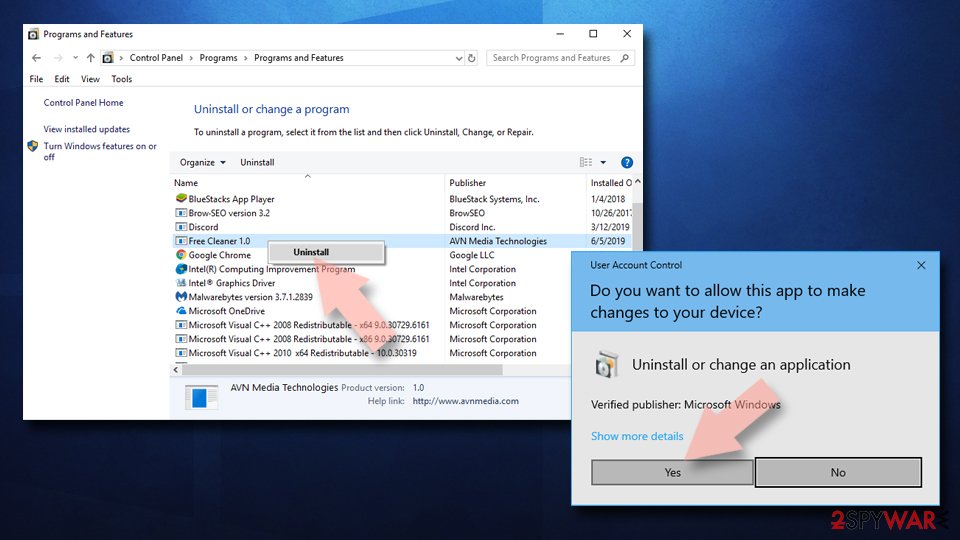
- From the list, find the entry of the suspicious program.
- Right-click on the application and select Uninstall.
- If User Account Control shows up, click Yes.
- Wait till uninstallation process is complete and click OK.
If you are Windows 7/XP user, proceed with the following instructions:
- Click on Windows Start > Control Panel located on the right pane (if you are Windows XP user, click on Add/Remove Programs).
- In Control Panel, select Programs > Uninstall a program.
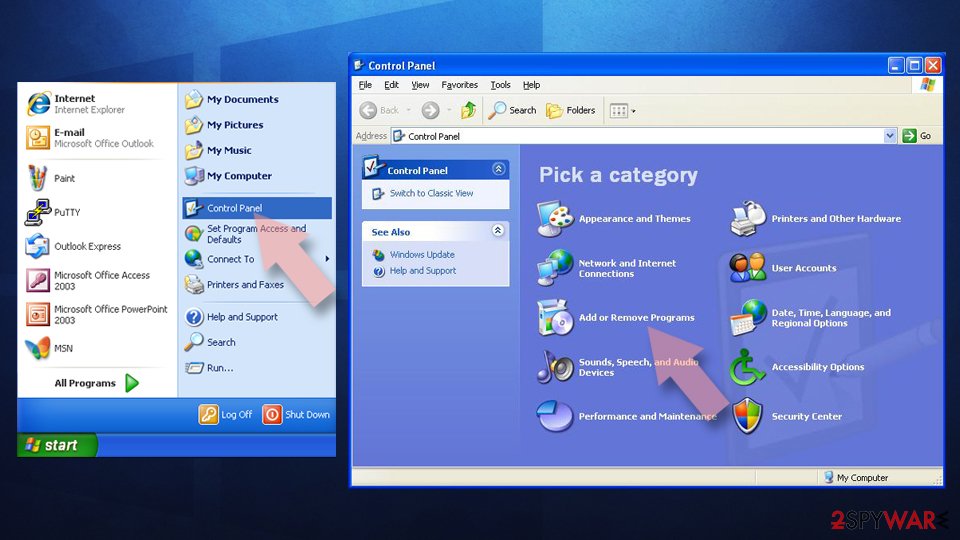
- Pick the unwanted application by clicking on it once.
- At the top, click Uninstall/Change.
- In the confirmation prompt, pick Yes.
- Click OK once the removal process is finished.
Uninstall from Android
Uninstall unwanted programs from Android device:
- Go to Settings -> Apps/Applications.
- Expand the full list of the installed apps.
- Scroll through the list and tap on a suspicious application once.
- Tap on it and select Uninstall.
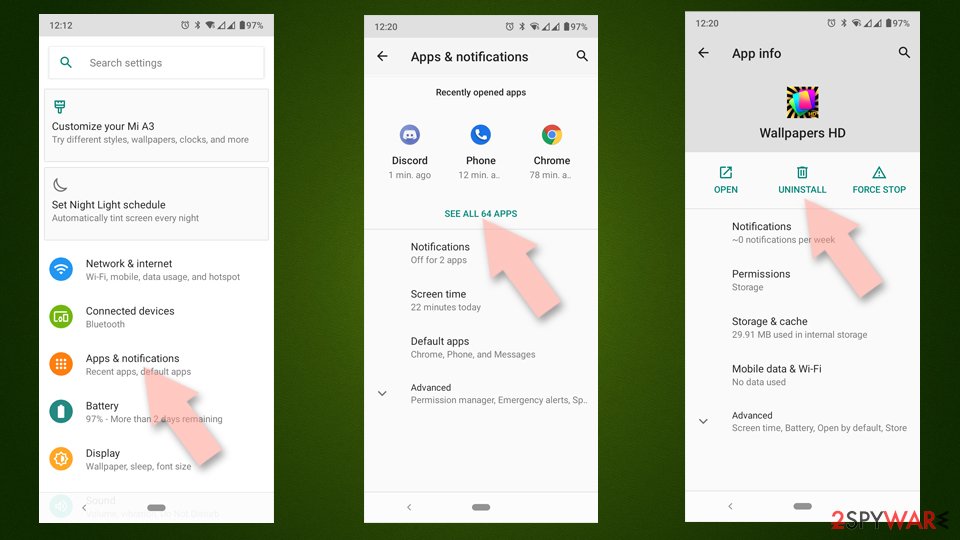
- Reboot the device.
Clear Storage and data files on Android from Google Chrome or other apps:
- Go to Settings > Apps/Applications.
- Expand the full list of the installed apps.
- Tap on Chrome and select Storage & cache.
- Clear storage and clear cache of the app.
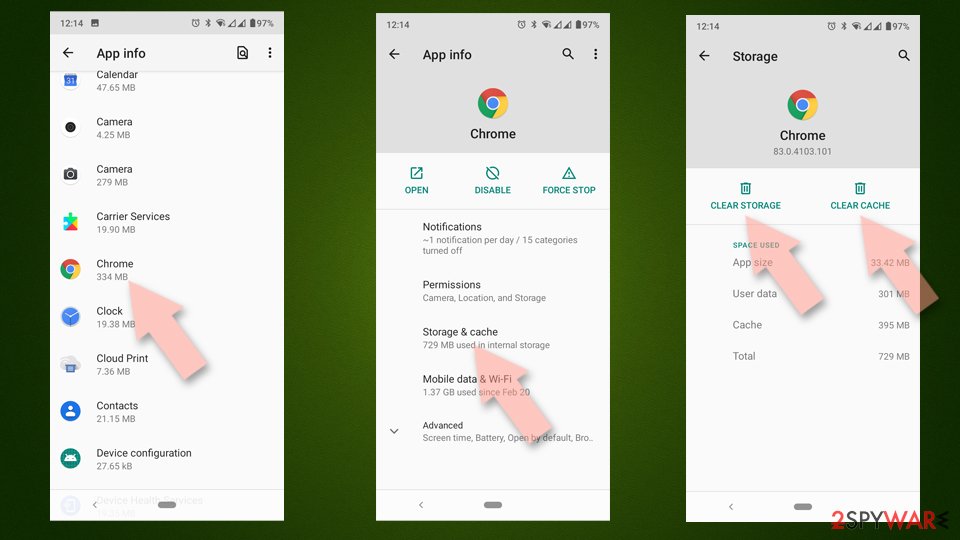
If you are seeing ads on top of other apps but are not sure what is causing it, perform the following steps:
- Go to Apps/Applications.
- Tap Advanced.
- Select Special App access.
- Tap on Display over other apps.
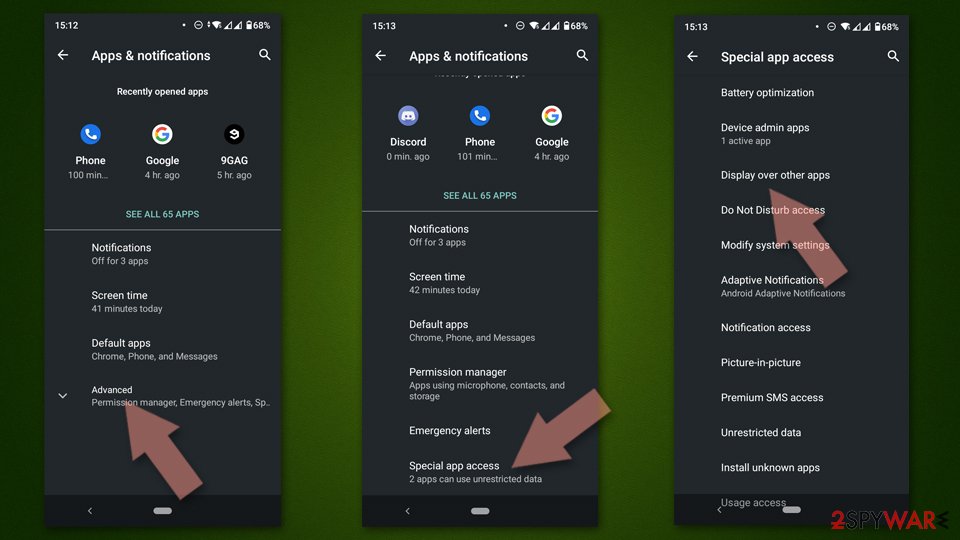
- Eliminate apps with these access rights enabled.
Delete from macOS
Remove items from Applications folder:
- From the menu bar, select Go > Applications.
- In the Applications folder, look for all related entries.
- Click on the app and drag it to Trash (or right-click and pick Move to Trash)
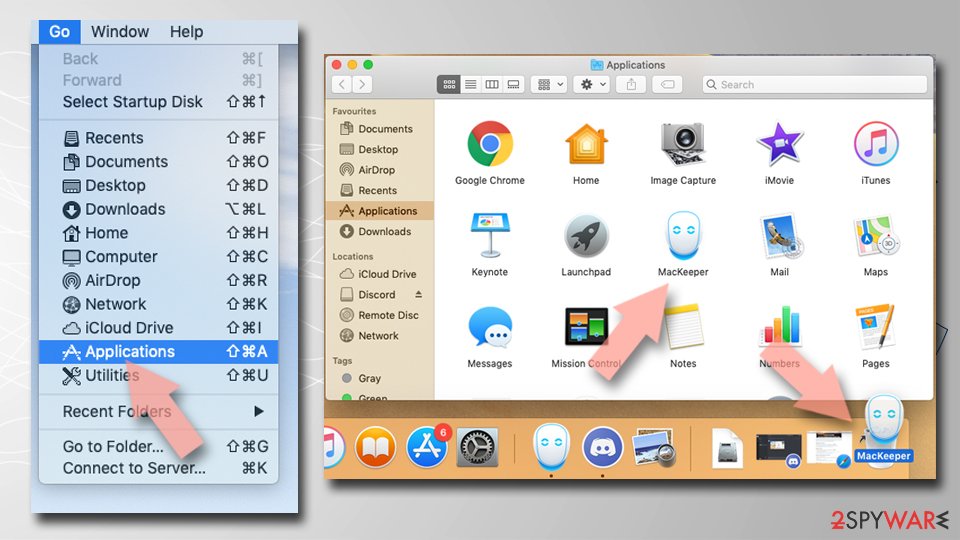
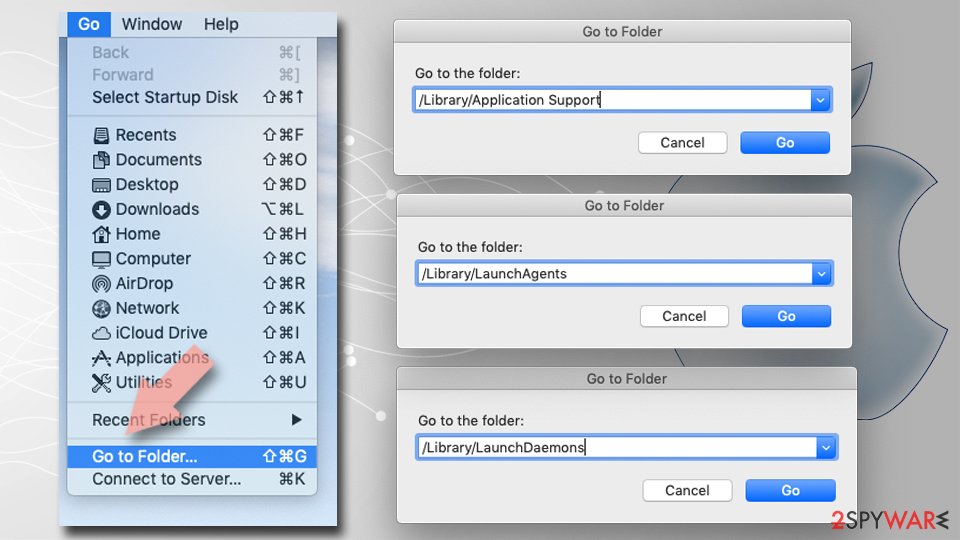
To fully remove an unwanted app, you need to access Application Support, LaunchAgents, and LaunchDaemons folders and delete relevant files:
- Select Go > Go to Folder.
- Enter /Library/Application Support and click Go or press Enter.
- In the Application Support folder, look for any dubious entries and then delete them.
- Now enter /Library/LaunchAgents and /Library/LaunchDaemons folders the same way and terminate all the related .plist files.
Remove from Microsoft Edge
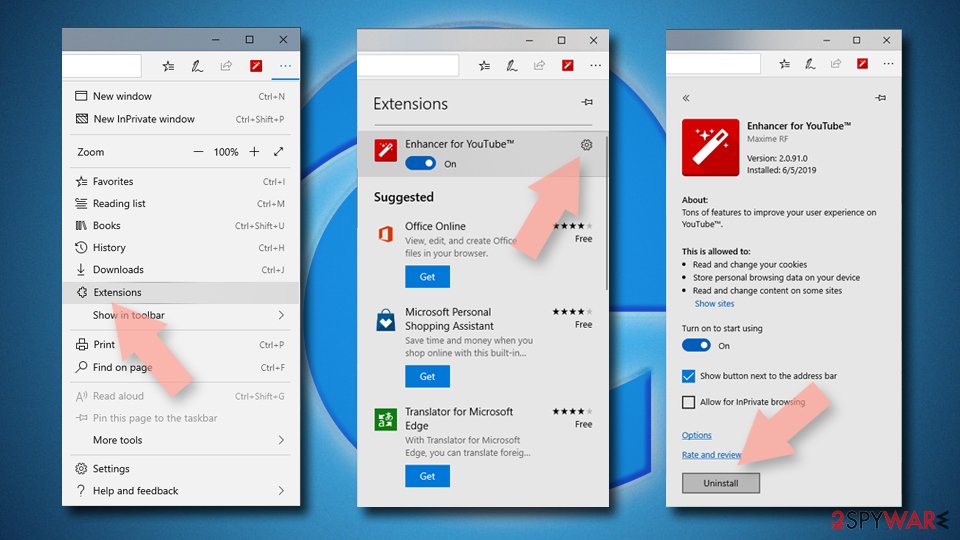
Delete unwanted extensions from MS Edge:
- Select Menu (three horizontal dots at the top-right of the browser window) and pick Extensions.
- From the list, pick the extension and click on the Gear icon.
- Click on Uninstall at the bottom.
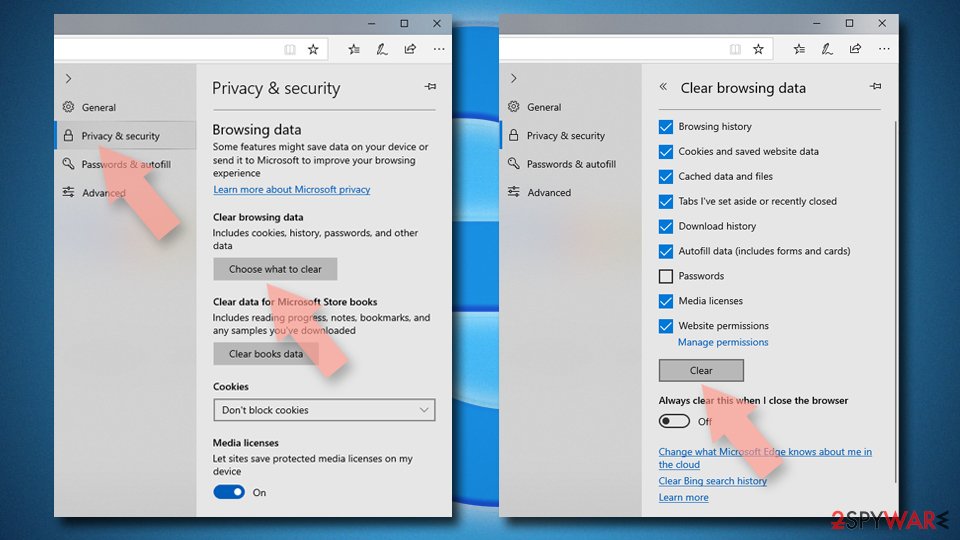
Clear cookies and other browser data:
- Click on the Menu (three horizontal dots at the top-right of the browser window) and select Privacy & security.
- Under Clear browsing data, pick Choose what to clear.
- Select everything (apart from passwords, although you might want to include Media licenses as well, if applicable) and click on Clear.
Restore new tab and homepage settings:
- Click the menu icon and choose Settings.
- Then find On startup section.
- Click Disable if you found any suspicious domain.
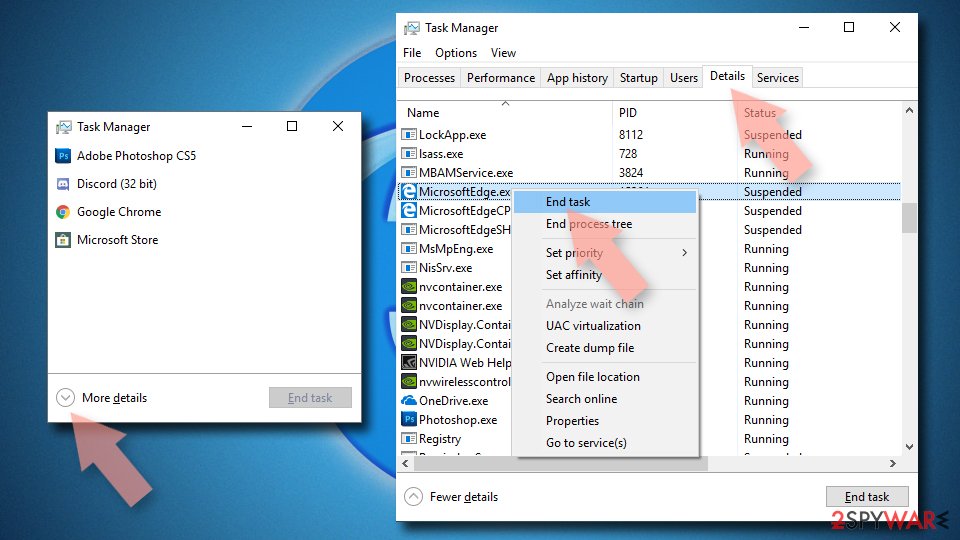
Reset MS Edge if the above steps did not work:
- Press on Ctrl + Shift + Esc to open Task Manager.
- Click on More details arrow at the bottom of the window.
- Select Details tab.
- Now scroll down and locate every entry with Microsoft Edge name in it. Right-click on each of them and select End Task to stop MS Edge from running.
If this solution failed to help you, you need to use an advanced Edge reset method. Note that you need to backup your data before proceeding.
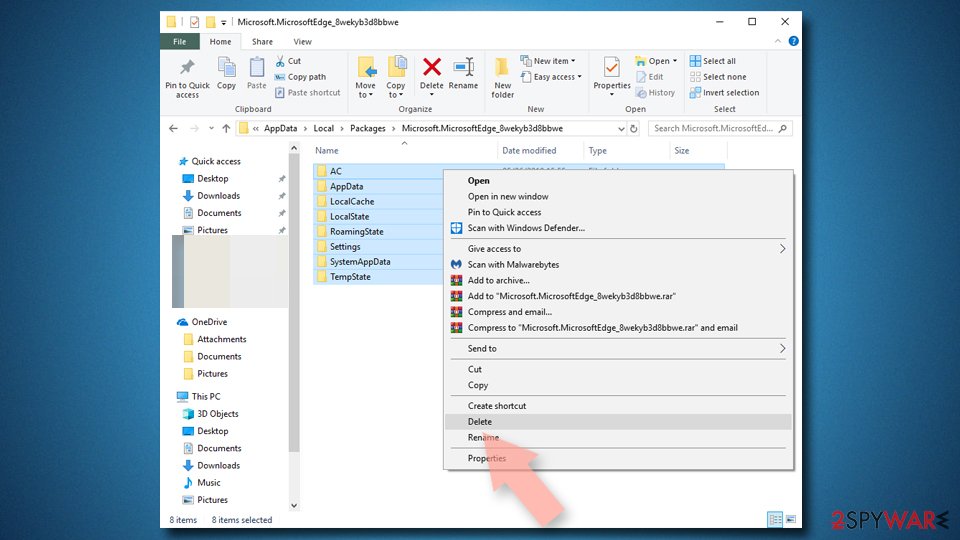
- Find the following folder on your computer: C:\\Users\\%username%\\AppData\\Local\\Packages\\Microsoft.MicrosoftEdge_8wekyb3d8bbwe.
- Press Ctrl + A on your keyboard to select all folders.
- Right-click on them and pick Delete
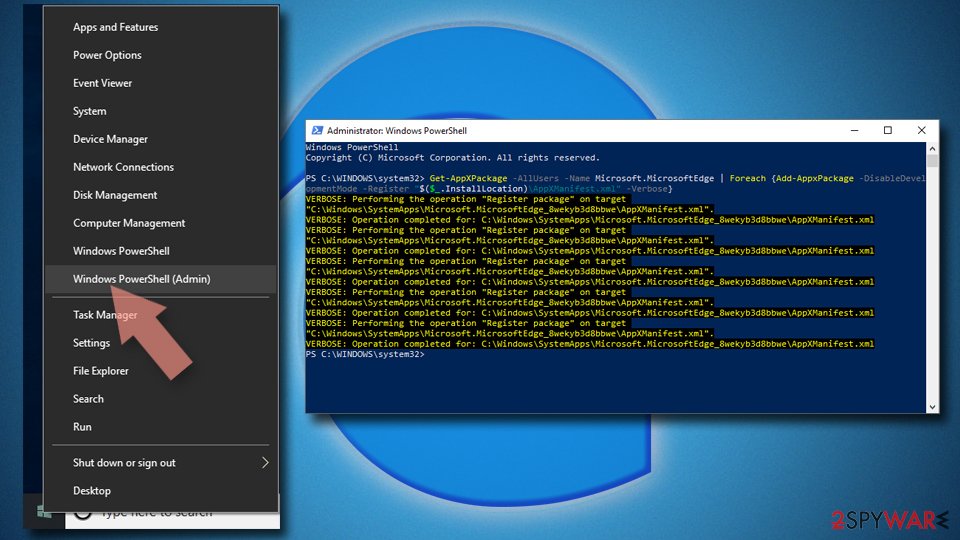
- Now right-click on the Start button and pick Windows PowerShell (Admin).
- When the new window opens, copy and paste the following command, and then press Enter:
Get-AppXPackage -AllUsers -Name Microsoft.MicrosoftEdge | Foreach {Add-AppxPackage -DisableDevelopmentMode -Register “$($_.InstallLocation)\\AppXManifest.xml” -Verbose
Instructions for Chromium-based Edge
Delete extensions from MS Edge (Chromium):
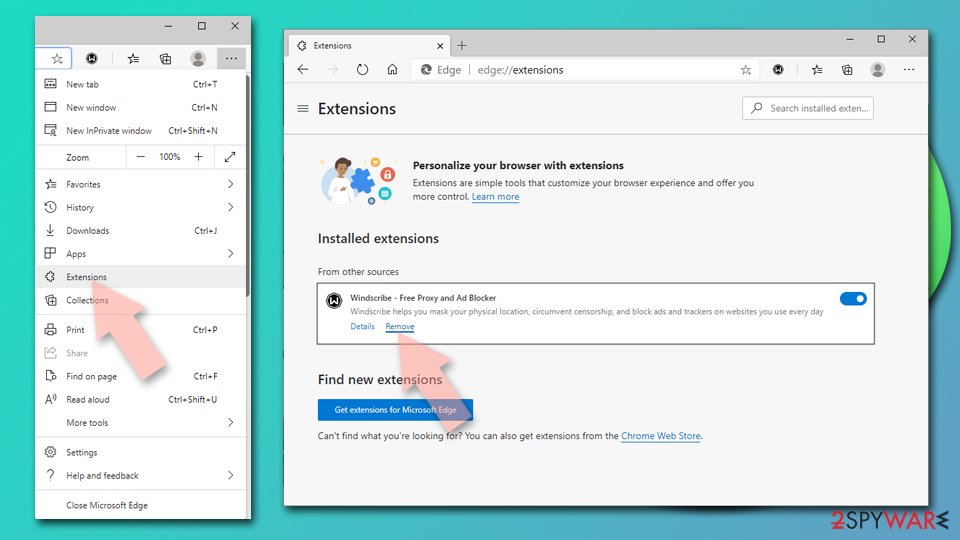
- Open Edge and click select Settings > Extensions.
- Delete unwanted extensions by clicking Remove.
Clear cache and site data:
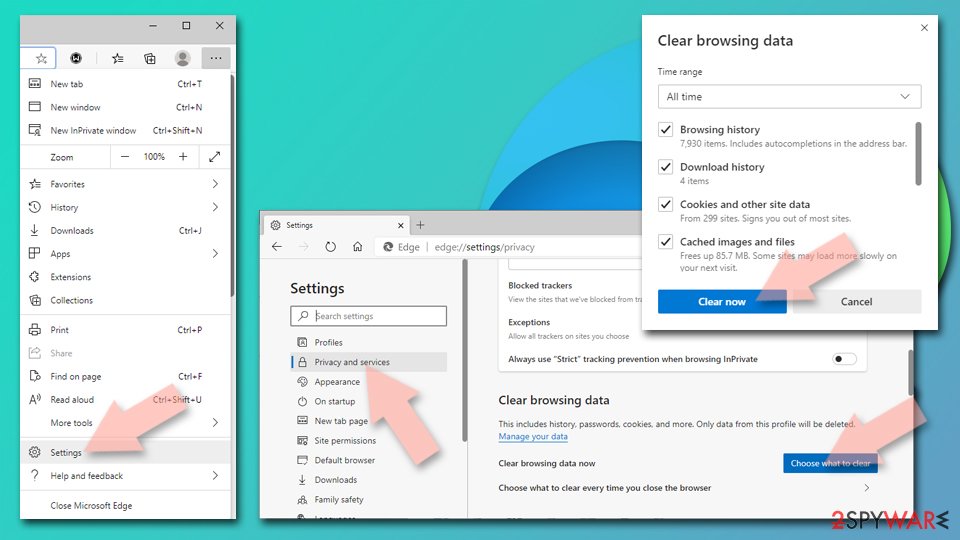
- Click on Menu and go to Settings.
- Select Privacy, search and services.
- Under Clear browsing data, pick Choose what to clear.
- Under Time range, pick All time.
- Select Clear now.
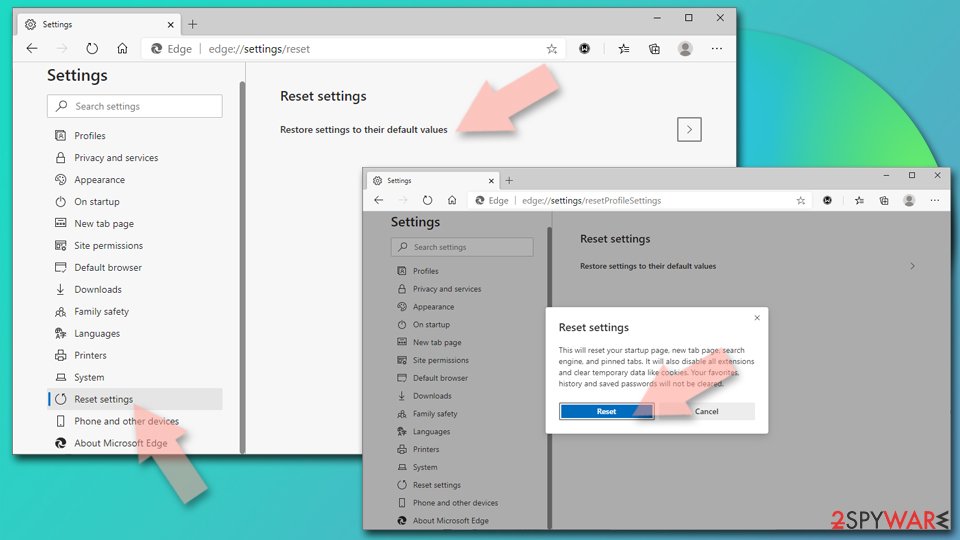
Reset Chromium-based MS Edge:
- Click on Menu and select Settings.
- On the left side, pick Reset settings.
- Select Restore settings to their default values.
- Confirm with Reset.
Remove from Mozilla Firefox (FF)
Remove dangerous extensions:
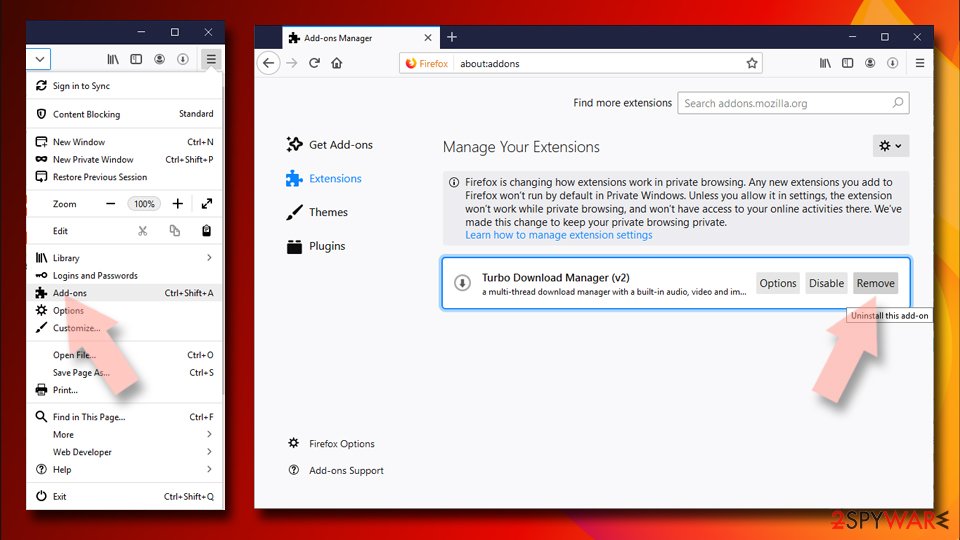
- Open Mozilla Firefox browser and click on the Menu (three horizontal lines at the top-right of the window).
- Select Add-ons.
- In here, select unwanted plugin and click Remove.
Reset the homepage:
- Click three horizontal lines at the top right corner to open the menu.
- Choose Options.
- Under Home options, enter your preferred site that will open every time you newly open the Mozilla Firefox.
Clear cookies and site data:
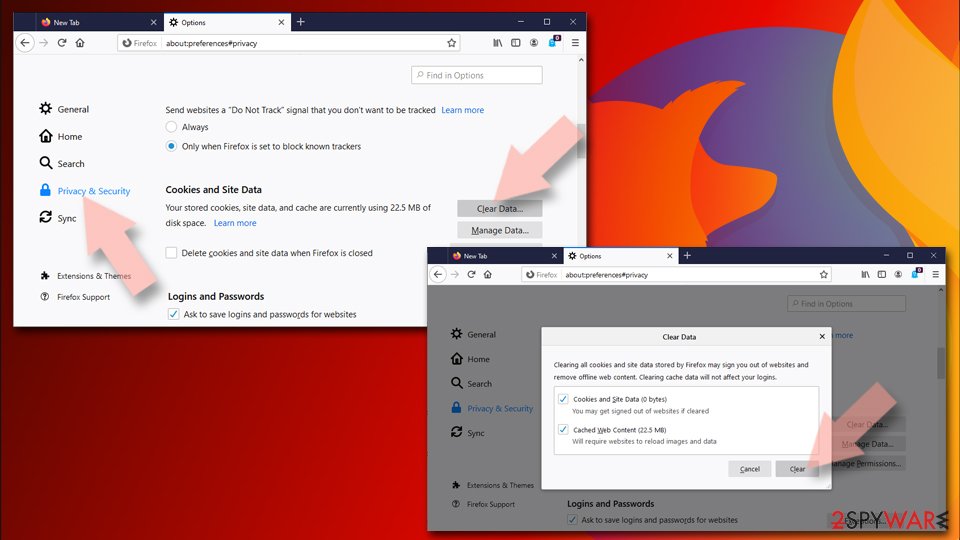
- Click Menu and pick Settings.
- Go to Privacy & Security section.
- Scroll down to locate Cookies and Site Data.
- Click on Clear Data…
- Select Cookies and Site Data, as well as Cached Web Content and press Clear.
Reset Mozilla Firefox
If clearing the browser as explained above did not help, reset Mozilla Firefox:
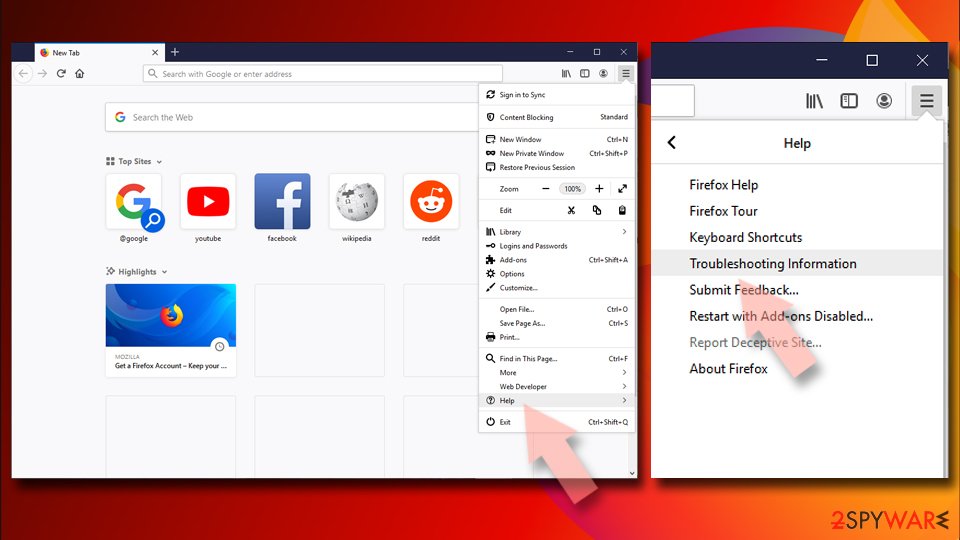
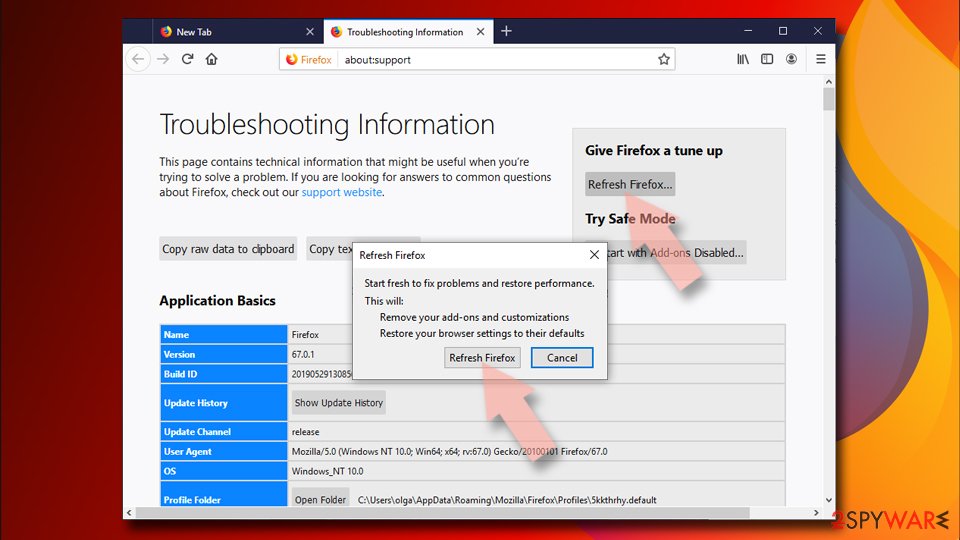
- Open Mozilla Firefox browser and click the Menu.
- Go to Help and then choose Troubleshooting Information.
- Under Give Firefox a tune up section, click on Refresh Firefox…
- Once the pop-up shows up, confirm the action by pressing on Refresh Firefox.
Remove from Google Chrome
Delete malicious extensions from Google Chrome:
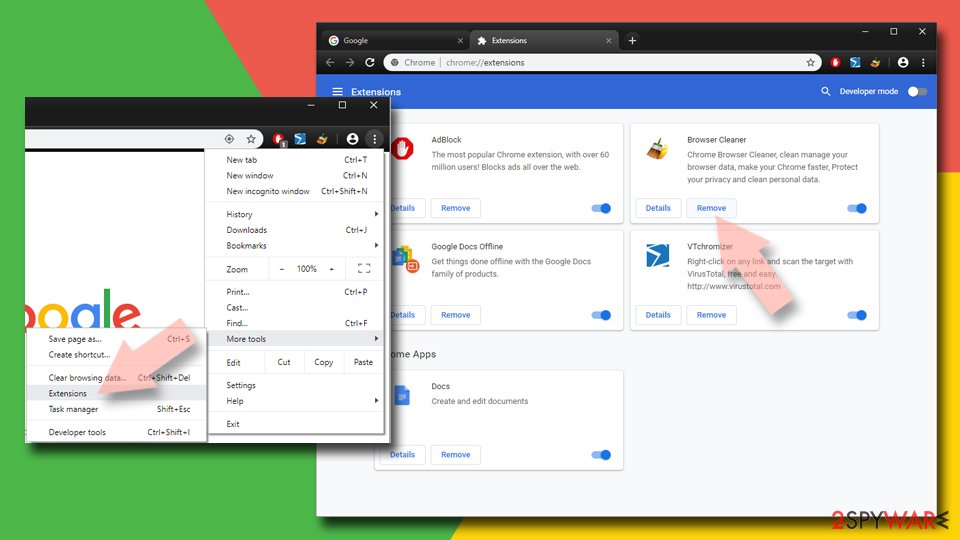
- Open Google Chrome, click on the Menu (three vertical dots at the top-right corner) and select More tools > Extensions.
- In the newly opened window, you will see all the installed extensions. Uninstall all the suspicious plugins that might be related to the unwanted program by clicking Remove.
Clear cache and web data from Chrome:
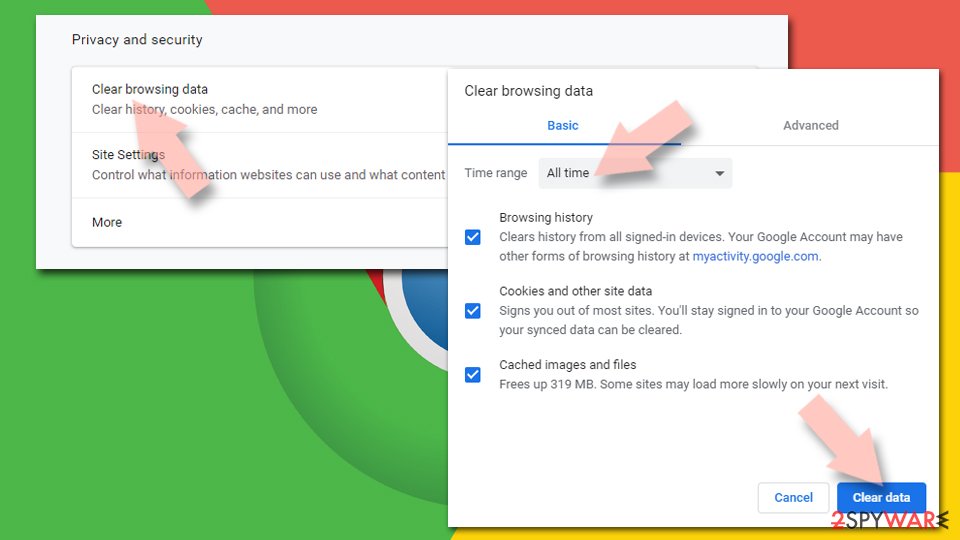
- Click on Menu and pick Settings.
- Under Privacy and security, select Clear browsing data.
- Select Browsing history, Cookies and other site data, as well as Cached images and files.
- Click Clear data.
Change your homepage:
- Click menu and choose Settings.
- Look for a suspicious site in the On startup section.
- Click on Open a specific or set of pages and click on three dots to find the Remove option.
Reset Google Chrome:
If the previous methods did not help you, reset Google Chrome to eliminate all the unwanted components:
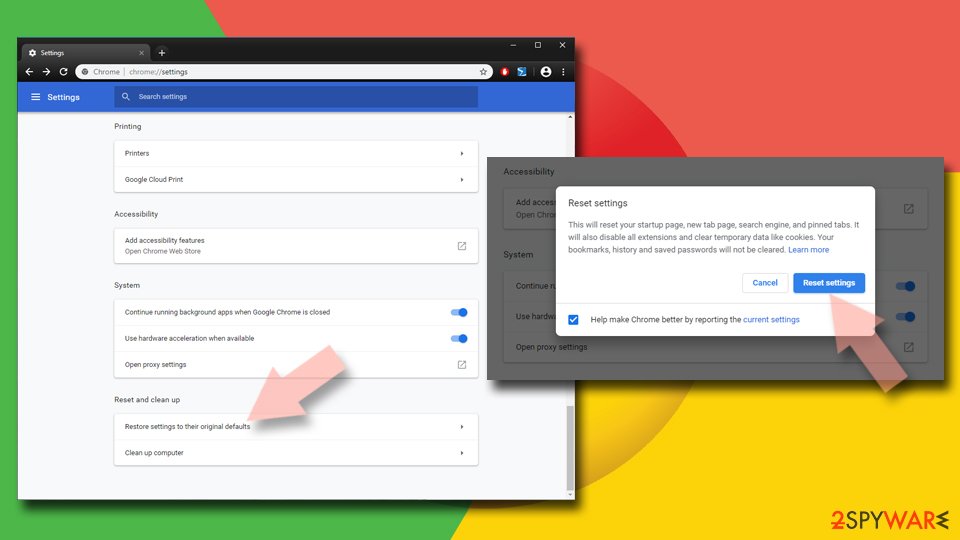
- Click on Menu and select Settings.
- In the Settings, scroll down and click Advanced.
- Scroll down and locate Reset and clean up section.
- Now click Restore settings to their original defaults.
- Confirm with Reset settings.
Delete from Safari
Remove unwanted extensions from Safari:
- Click Safari > Preferences…
- In the new window, pick Extensions.
- Select the unwanted extension and select Uninstall.
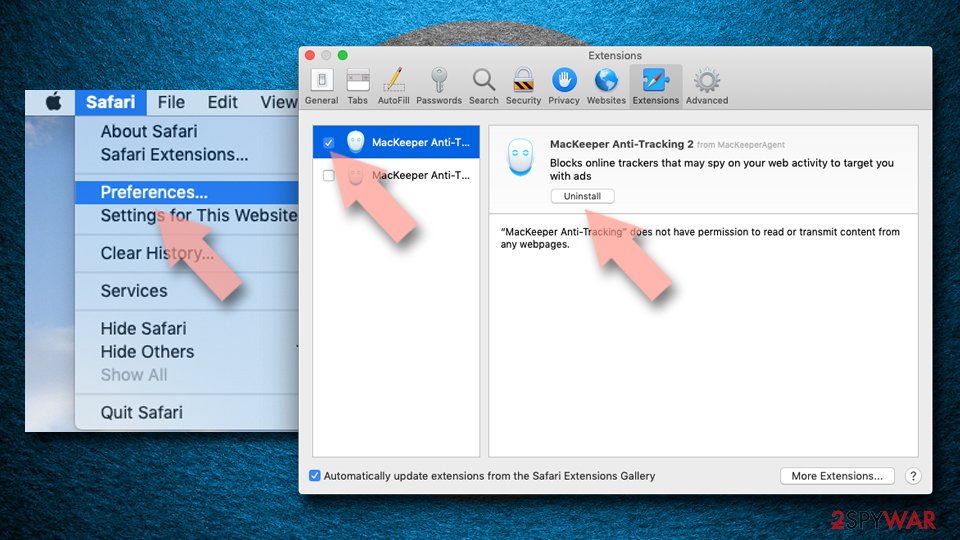
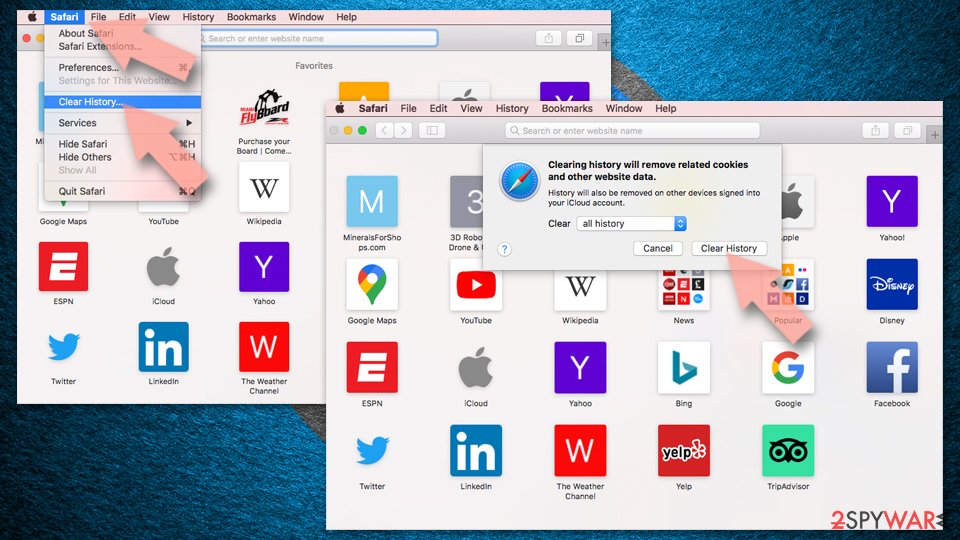
Clear cookies and other website data from Safari:
- Click Safari > Clear History…
- From the drop-down menu under Clear, pick all history.
- Confirm with Clear History.
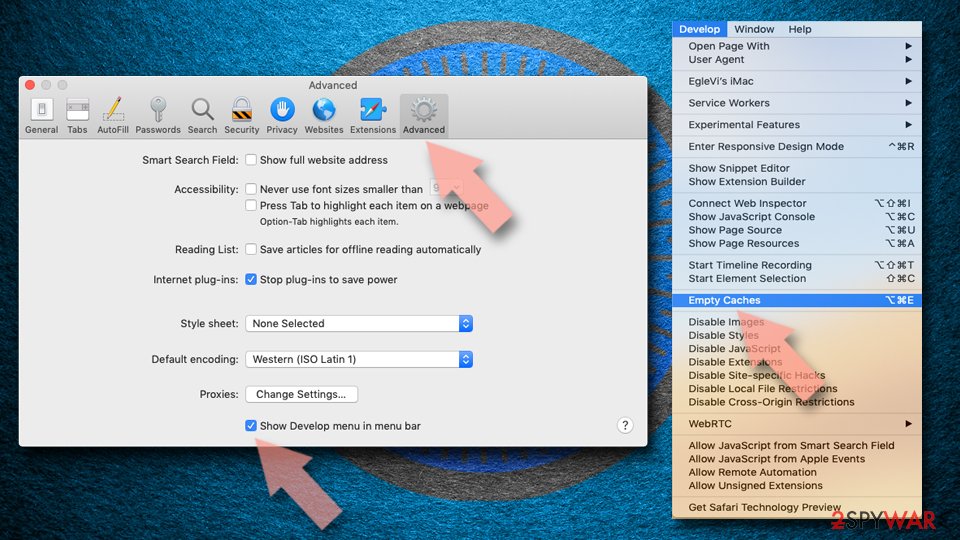
Reset Safari if the above-mentioned steps did not help you:
- Click Safari > Preferences…
- Go to Advanced tab.
- Tick the Show Develop menu in menu bar.
- From the menu bar, click Develop, and then select Empty Caches.
After uninstalling this potentially unwanted program (PUP) and fixing each of your web browsers, we recommend you to scan your PC system with a reputable anti-spyware. This will help you to get rid of Pu6.biz registry traces and will also identify related parasites or possible malware infections on your computer. For that you can use our top-rated malware remover: FortectIntego, SpyHunter 5Combo Cleaner or Malwarebytes.
How to prevent from getting adware
Choose a proper web browser and improve your safety with a VPN tool
Online spying has got momentum in recent years and people are getting more and more interested in how to protect their privacy online. One of the basic means to add a layer of security – choose the most private and secure web browser. Although web browsers can't grant full privacy protection and security, some of them are much better at sandboxing, HTTPS upgrading, active content blocking, tracking blocking, phishing protection, and similar privacy-oriented features. However, if you want true anonymity, we suggest you employ a powerful Private Internet Access VPN – it can encrypt all the traffic that comes and goes out of your computer, preventing tracking completely.
Lost your files? Use data recovery software
While some files located on any computer are replaceable or useless, others can be extremely valuable. Family photos, work documents, school projects – these are types of files that we don't want to lose. Unfortunately, there are many ways how unexpected data loss can occur: power cuts, Blue Screen of Death errors, hardware failures, crypto-malware attack, or even accidental deletion.
To ensure that all the files remain intact, you should prepare regular data backups. You can choose cloud-based or physical copies you could restore from later in case of a disaster. If your backups were lost as well or you never bothered to prepare any, Data Recovery Pro can be your only hope to retrieve your invaluable files.
- ^ Potentially unwanted program. Wikipedia. The free encyclopedia.
- ^ Blue Screen of Death (BSoD). Techopedia. Professional it insights.
- ^ Odstranitvirus. Odstranitvirus. Spyware news and security.
