Search9+ is an ad-supported program that delivers questionable content promoting rogue tools and services

Search9+ — adware that can seriously disrupt your searches by interrupting you with useless advertisements inside your browser. It aims to reroute users to pre-selected sites and convince them about the usefulness of the promoted products. However, taking into account that this PUP has already been included in the database of several security programs as Win32:PUP-gen and PUP.AD.SEARCH9+, you should stay away from its ads as far as you can. However, if you like downloading freeware without monitoring its installation properly, you may not notice the moment of this virus infiltration on your computer as it has been actively spreading with the help of bundling. Fortunately, it is not hard to prevent Search9+ virus on the system or eliminate it by using proper removal steps.
| Name | Search9+ |
|---|---|
| Type | Adware |
| Danger level | Low. Displays intrusive content, so it cannot harm the system directly |
| Main danger | Collects information about the user and shares data with third-party companies |
| Symptoms |
Specific changes on your web browser:
|
| detected as | Win32:PUP-gen or PUP.AD.SEARCH9+ |
| Distribution | Software bundling |
| Download FortectIntego and run a full system scan to eliminate Search9+ and related programs | |
Some people have seen a connection between Search9+ and Search9.js file. However, such relation is not proper. The .jp is a file associated with CodeWarrior Development Studio by Metrowerks[1] which is a legitimate application for Windows OS. The PUP renders the name of the legitimate file to evade easy detection and removal.
Fortunately, no matter how actively people tend to call this intruder a virus, it does not fall for the category of malicious cyber infections. Its danger level is low as the changes it initiates are more intrusive than dangerous. Once installed, the potentially unwanted program (PUP) performs the following:
- Installs browser's extensions, plugins, bookmarks;
- Replaces search engine, start page and similar settings on every browser;
- Installs tracking cookies to access Search Data;
- Random web page text turned into hyperlink;
- Displays intrusive pop-up ads promoting fake software updates;
- Infects banners, hyperlinks to commonly visited sites.
The aim of the Search9+ virus is to promote the websites of its affiliates and increase visitor's rate to related websites. However, cybersecurity experts do not monitor the content of all sites that the search may try to popularize. Dieviren.de[2] security team warns that some of the links or ads displayed may promote unsafe domains filled with rogue software installers, fake queries, quiz, prize giveaway scams, and so on.
Apart from misleading content, Search9+ removal is also advisable due to the unapproved use of tracking cookies and web beacons. These technologies are used to gather browsing-related information, including but not limited to IP address, email address, geolocation, etc. The problem is that accumulated data may circulate among suspicious third parties that may create catchy ads to catch your attention.
This particular browser hijacker appears to be oriented to Mac OS users (though Windows is not immune as well). In case of a hijack, Mac users should carefully check the libraries for the following PUP-related files in ~/Library/LaunchAgents:
- search9.askthepotato.com.AppVemoral.plist
- askthepotato.btvlit.plist
- askthepotato.disable.plist
- askthepotato.dolnwoad.plist
- askthepotato.uadpte.plist, etc.
All these entries have to be eliminated if you want to remove Search9+ once and for all. The easiest way to get rid of malware and all its components is by using a thorough system scan with anti-malware and system repair tools. We recommend using FortectIntego and SpyHunterCombo Cleaner in particular to see what malicious programs[3] are hiding on your Mac and Windows OS.
To get rid of Search9+ for good, make sure you also reset your web browsers. Instructions on how to do that without erasign your browser settings are provided below.


Malware developers use bundling technique to spread their viruses without being noticed
In a hurry or not, it's a must to check freeware installation setup as carefully as possible. Skipping through steps gets you nowhere because it allows additional programs to be installed. That's because even reliable free apps may contain “optional downloads” that are going to be installed by default unless you opt out of them.
To crack software bundle, its essential to select Advanced or Custom installation technique and read Privacy Policy, Terms, and other information provided. In particular, search for unknown browser extensions that are pre-marked. Make sure to uncheck each box saying that you agree with the installation of additional components and the changes that they may initiate.
Get rid of Search9+ to save yourself while browsing
If you are concerned about the state of your device because of the infiltration of potentially unwanted programs, make sure to remove Search9+ virus as soon as possible. For that, we recommend using automatic removal option which will help you find all malicious or at least unwanted components hiding in your system. Take into account that such PUPs tend to change the computer's registry to prevent their elimination.
If you are not willing to opt for automatic Search9+ removal, use guide that is presented down below. However, by using anti-malware or system repair tools, you can visibly improve the whole system and its functionality. Before you fix your Mac after the hijack, you should also terminate malicious processes by going thru these steps:
- Go Finder -> Activity Monitor;
- Look at running processes and mark the ones that seem to be related to Search9+ (typically, they consume numerous computer's resources);
- Click (i) located at the top side window and wait for a new window to show up;
- Click Quit.
Uninstall from Windows
Uninstall from Windows 10/8:
- Type Control Panel into the Windows search box and open the result.
- Under Programs, select Uninstall a program.


Uninstall from Windows 7/XP:
- Click on Windows Start > Control Panel (Windows XP users should click on Add/Remove Programs).
- In Control Panel, select Programs > Uninstall a program.


Remove the unwanted program:
- In the Programs and Features window, look for any recently installed suspicious entries, select them, and click Uninstall.
- If User Account Control appears, click Yes to confirm, then complete the removal.


Delete from macOS
Remove the unwanted application:
- From the menu bar, select Go > Applications.
- In the Applications folder, look for any suspicious entries, then drag them to Trash (or right-click and pick Move to Trash).


Delete leftover files and folders:
- Select Go > Go to Folder.
- Enter /Library/Application Support and remove any suspicious folders related to the unwanted program.
- Repeat the same check in the /Library/LaunchAgents and /Library/LaunchDaemons folders, deleting any suspicious entries.

- Finally, empty the Trash to permanently remove the leftovers.

Reset Internet Explorer
Remove dangerous add-ons:
- Open Internet Explorer, click on the Gear icon (IE menu) on the top-right corner of the browser
- Pick Manage Add-ons.
- You will see a Manage Add-ons window. Here, look for suspicious plugins. Click on these entries and select Disable.


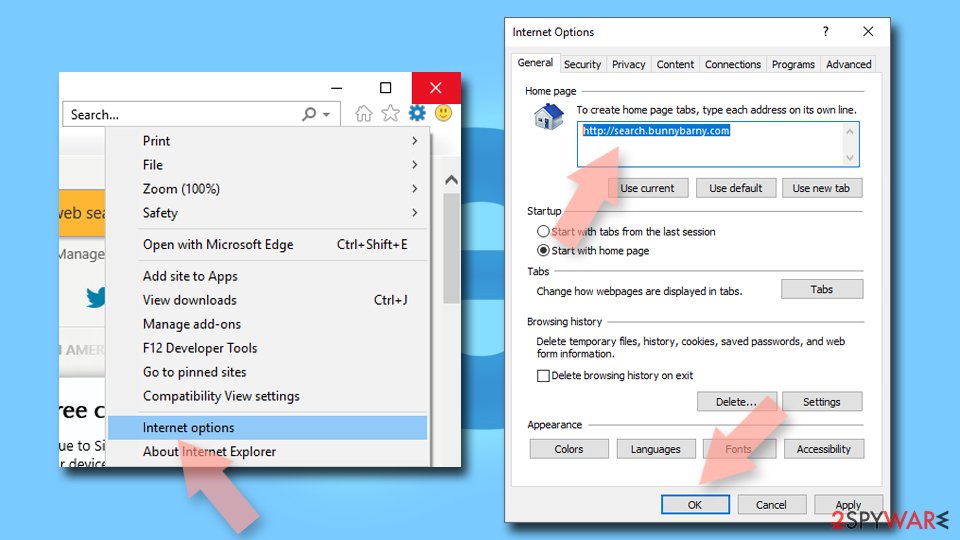
Change your homepage if it was altered:
- Open IE and click on the Gear icon.
- Select Internet Options.
- In the General tab, delete the Home page address and replace it by your preferred one (for example, Google.com).
- Click Apply and then select OK.

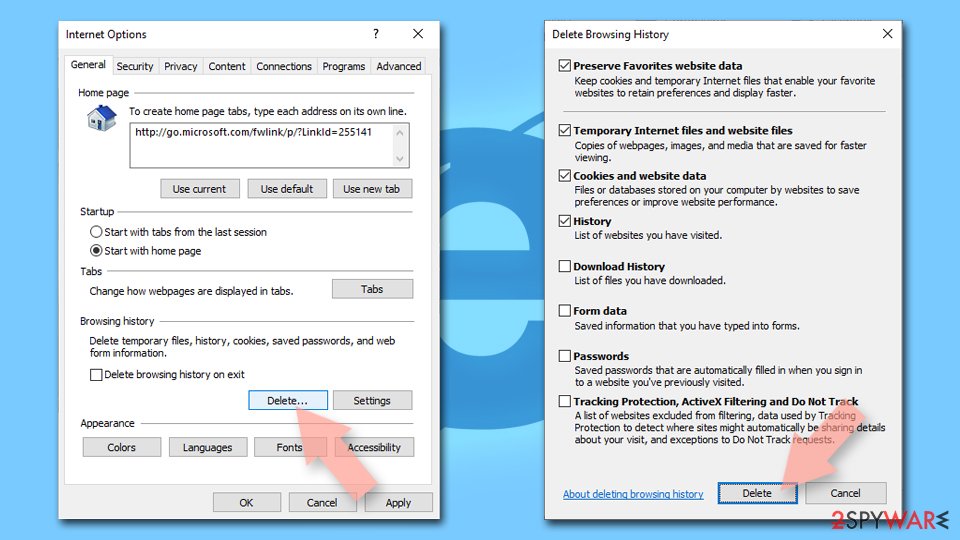
Delete temporary files:
- Press on the Gear icon and select Internet Options.
- Under Browsing history, click Delete...
- Select relevant fields and press Delete.

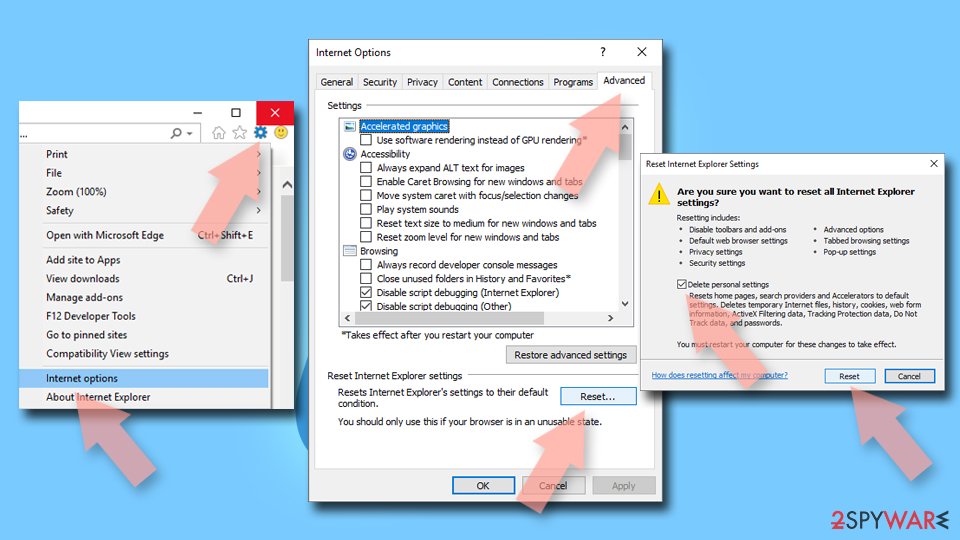
Reset Internet Explorer:
- Click on Gear icon > Internet options and select Advanced tab.
- Select Reset.
- In the new window, check Delete personal settings and select Reset.

Remove from Microsoft Edge
Delete unwanted extensions from MS Edge:
- Select Menu (three horizontal dots at the top-right of the browser window) and pick Extensions.
- From the list, pick the extension and click on the Gear icon.
- Click Remove.


Clear cookies and other browser data:
- Click on the Menu (three horizontal dots at the top-right of the browser window) and select Settings > Privacy, search, and services..
- Under Clear browsing data, pick Choose what to clear.
- Select Cookies and other site data and Cached images and files. (apart from passwords, although you might want to include Media licenses as well, if applicable) and click on Clear.


Restore new tab and homepage settings:
- Click the menu icon and choose Settings.
- Then find On startup section.
- Click Remove next to any suspicious startup page.
Reset MS Edge if the above steps did not work:
- Press on Ctrl + Shift + Esc to open Task Manager.
- Click on More details arrow at the bottom of the window.
- Select Details tab.
- Now scroll down and locate every entry with Microsoft Edge name in it. Right-click on each of them and select End Task to stop MS Edge from running.


Instructions for Chromium-based Edge
Delete extensions from MS Edge (Chromium):
- Open Edge and click select Settings > Extensions.
- Delete unwanted extensions by clicking Remove.


Clear cache and site data:
- Click on Menu and go to Settings.
- Select Privacy, search and services.
- Under Clear browsing data, pick Choose what to clear.
- Under Time range, pick All time.
- Select Clear now.


Reset Chromium-based MS Edge:
- Click on Menu and select Settings.
- On the left side, pick Reset settings.
- Select Restore settings to their default values.
- Confirm with Reset.
- This will disable extensions and reset startup pages but will not delete bookmarks, saved passwords, or browsing history.


Remove from Mozilla Firefox (FF)
Remove dangerous extensions:
- Open Mozilla Firefox browser and click on the Menu (three horizontal lines at the top-right of the window).
- Select Add-ons.
- In here, select the unwanted extension and click Remove.


Reset the homepage:
- Click three horizontal lines at the top right corner to open the menu.
- Choose Settings.
- Under Home, set your preferred homepage and new tab settings.
Clear cookies and site data:
- Click Menu and pick Settings.
- Go to Privacy & Security section.
- Scroll down to locate Cookies and Site Data.
- Click on Clear Data...
- Select Cookies and Site Data and Temporary cached files and pages, then click Clear.


Reset Mozilla Firefox
If clearing the browser as explained above did not help, reset Mozilla Firefox:
- Open Mozilla Firefox browser and click the Menu.
- Go to Help and then choose Troubleshooting Information.

- Under Give Firefox a tune up section, click on Refresh Firefox...
- Once the pop-up shows up, confirm the action by pressing on Refresh Firefox.


Remove from Google Chrome
Delete malicious extensions from Google Chrome:
- Open Google Chrome, click on the Menu (three vertical dots at the top-right corner) and select More tools > Extensions.
- In the newly opened window, you will see all the installed extensions. Uninstall all suspicious extensions related to the unwanted program by clicking Remove.


Clear cache and web data from Chrome:
- Click on Menu and pick Settings.
- Under Privacy and security, select Clear browsing data.
- Select Browsing history, Cookies and other site data, as well as Cached images and files.
- Click Clear data.


Change your homepage:
- Click menu and choose Settings.
- Look for a suspicious site in the On startup section.
- Click on Open a specific or set of pages and click on three dots to find the Remove option.
Reset Google Chrome:
If the previous methods did not help you, reset Google Chrome to eliminate all the unwanted components:
- Click on Menu and select Settings.
- In the Settings, scroll down and click Advanced.
- Scroll down and locate Reset and clean up section.
- Now click Restore settings to their original defaults.
- Confirm with Reset settings.


Delete from Safari
Remove dangerous extensions:
- Open Safari, click Safari in the menu at the top-left of the screen, and select Preferences.
- Go to the Extensions tab, look for any suspicious entries, and click Uninstall to remove them.


Clear history and website data:
- Click Safari in the menu and pick Clear History.
- Set Clear to all history and confirm with Clear History.


Reset Safari:
- Click Safari in the menu and select Preferences > Advanced.
- Enable Show Develop menu in menu bar.
- From the menu bar, click Develop and select Empty Caches.


Was this guide helpful?
Be the first to comment