Ukentaspe.xyz ads (virus) - Free Guide
Ukentaspe.xyz ads Removal Guide
What is Ukentaspe.xyz ads?
Ukentaspe.xyz attempts to mislead users into subscribing to push notifications and redirects to malicious websites

Ukentaspe.xyz is just one of the thousands of push notification scam sites on the world wide web. Created by scammers, it attempts to use various misleading messages to make people click the “Allow” button within the prompt, which is shown at the top of the page right after entry. Some confused users may get tricked and do as they are told, which would result in them starting to see strange pop-ups shown directly on their screens.
If you see suspicious Ukentaspe.xyz ads on your desktop, we recommend you don't interact with them. Quite often, fake websites like this one also engage in showing misleading or malicious links, where people may get tricked into subscribing to even more spam, wasting money on useless services, or even installing malware on their systems.
| Name | Ukentaspe.xyz |
| Type | Push notifications, ads, scam |
| Distribution | Intrusive pop-ups can start showing up at some point after the “Allow” button is pressed within the notification prompt |
| Symptoms | Pop-ups show up on a regular basis on the screen – these ads often include inappropriate, scam, phishing, or other similar content |
| Risks | Push notification prompts might include links to malicious websites, resulting in financial losses, personal information disclosure, or malware infections |
| Removal | You can disable the push notifications from any website via browser settings. Scanning the system with SpyHunter 5Combo Cleaner can also ensure that it's clean and secure |
| Tips | Potentially unwanted programs often leave traces within web browsers – cookies, for example, are used for tracking. Remove them with FortectIntego or proceed with our manual guide |
The scam scheme explained
Once users are redirected, they commonly don't expect to see what they do; in other words, they are caught off guard, which makes them more likely to make mistakes or proceed without thinking much about the happenings on the screen. This is one of the main reasons why Ukentaspe.xyz and similar scams are so successful, although there is more to it.
Even those who do pay attention to what is happening might be tricked by social engineering[1] tricks used by scammers. The main goal for them is to make visitors believe that the “Allow” button within the push notification prompt is designed for something entirely different – such as an age check or a human verification check. Check out these message examples you may encounter when visiting one of the push notification scam sites (these may vary on the same site):
- Please tap Allow button to continue
- To access the video, click “Allow”
- Click Allow if you are not a robot
- If you are 18+, tap Allow
- Click “Allow” to win a prize and get it in our shop!
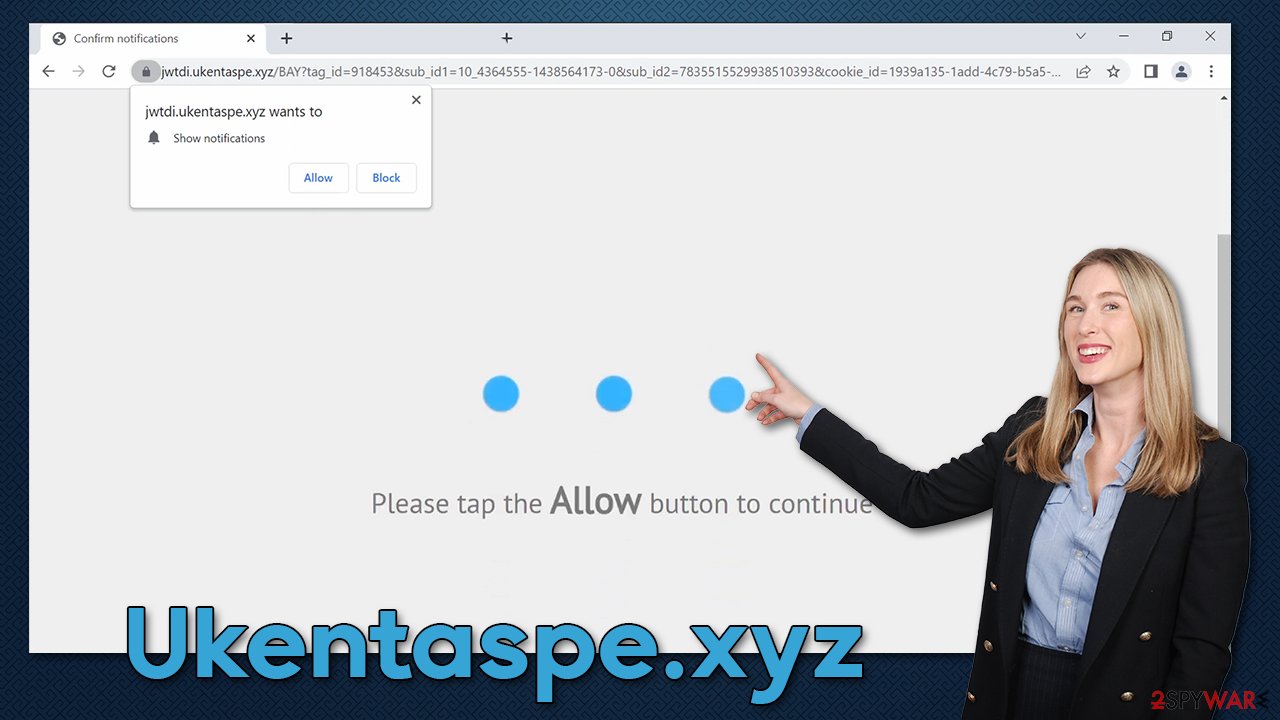
Even though it may seem like it a simple verification similar to a captcha that so many users encounter on various websites every day, it is not the case. In other cases, crooks attempt to make people believe that there is some type of underlying content on the page, which is not the case – those interacting with it would simply be forwarded to another malicious website, such as Ads4pc.com, News-guguho.cc, or Dryheataffilate.store.
Remove Ukentaspe.xyz ads
If you want to get rid of the annoying push notifications, it is not that difficult, as long as you know where to look. Many people struggle with push notification spam removal, as they can't connect all the dots and understand that the issue lies within them allowing the notifications from the site in the first place. Therefore, all you have to do is access browser settings and block the related website as follows:
Google Chrome
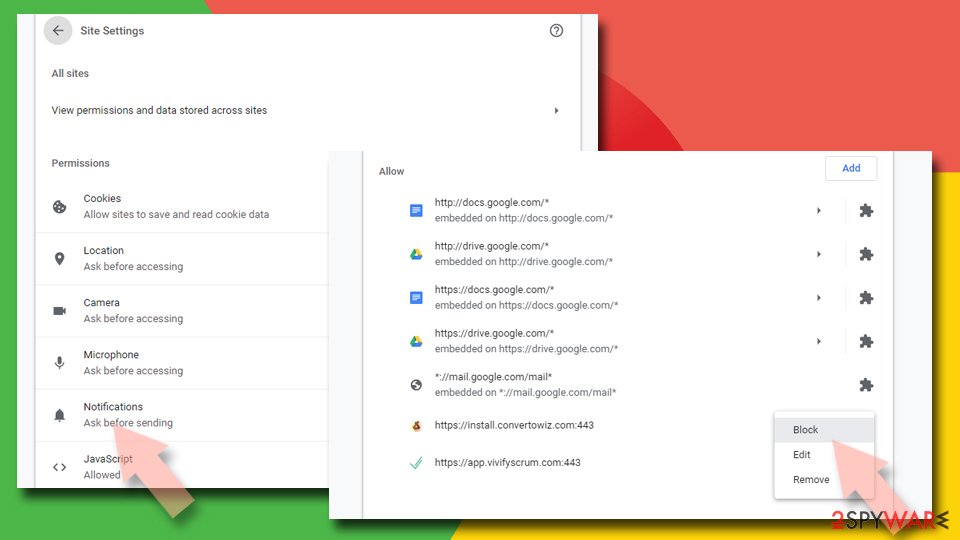
- Open the Google Chrome browser and go to Menu > Settings.
- Scroll down and click on Advanced.
- Locate the Privacy and security section and pick Site Settings > Notifications.
- Look at the Allow section and look for a suspicious URL.
- Click the three vertical dots next to it and pick Block. This should remove unwanted notifications from Google Chrome.
![Stop notifications on Chrome PC 2 Stop notifications on Chrome PC 2]()
Google Chrome (Android)
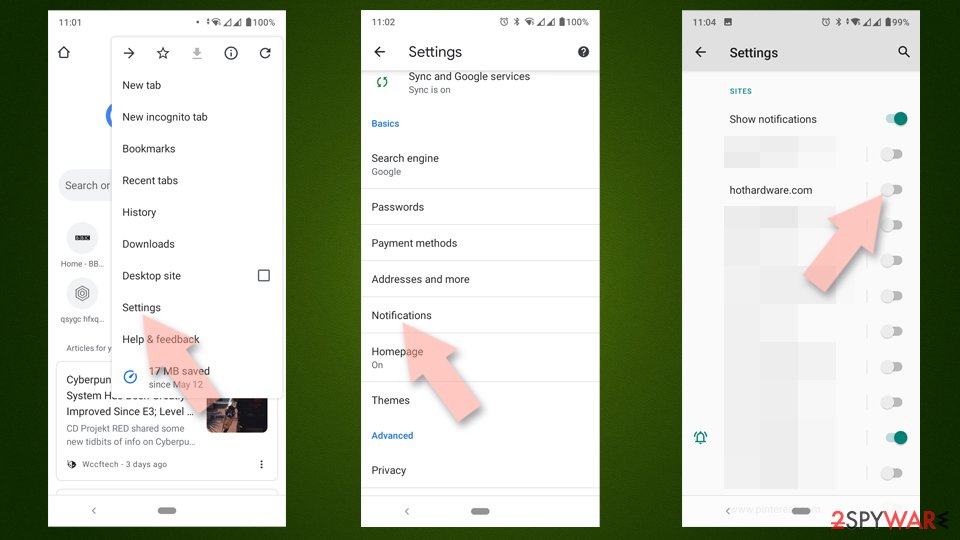
- Open Google Chrome and tap on Settings (three vertical dots).
- Select Notifications.
- Scroll down to the Sites section.
- Locate the unwanted URL and toggle the button to the left (Off position).
![Stop notifications on Chrome Android Stop notifications on Chrome Android]()
Mozilla Firefox
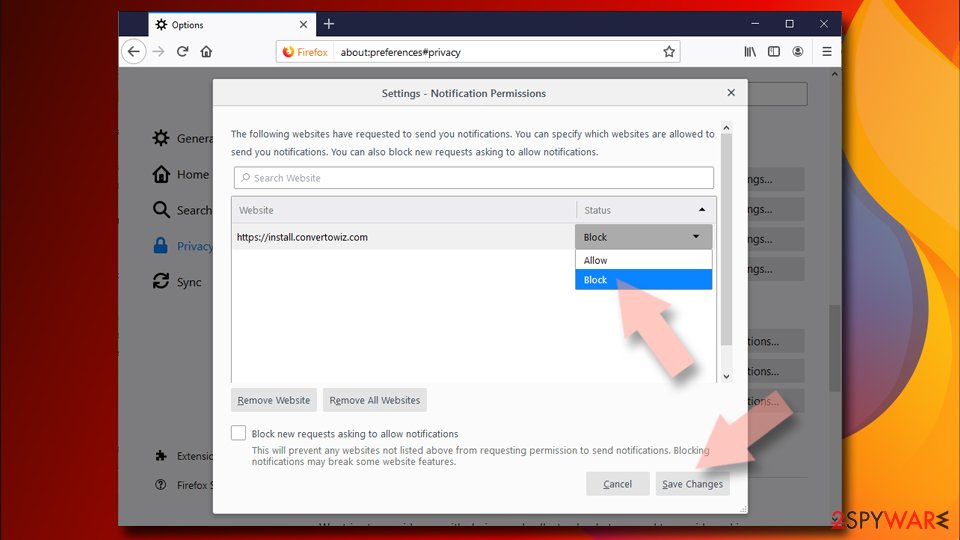
- Open Mozilla Firefox and go to Menu > Options.
- Click on Privacy & Security section.
- Under Permissions, you should be able to see Notifications. Click the Settings button next to it.
- In the Settings – Notification Permissions window, click on the drop-down menu by the URL in question.
- Select Block and then click on Save Changes. This should remove unwanted notifications from Mozilla Firefox.
![Stop notifications on Mozilla Firefox 2 Stop notifications on Mozilla Firefox 2]()
Safari
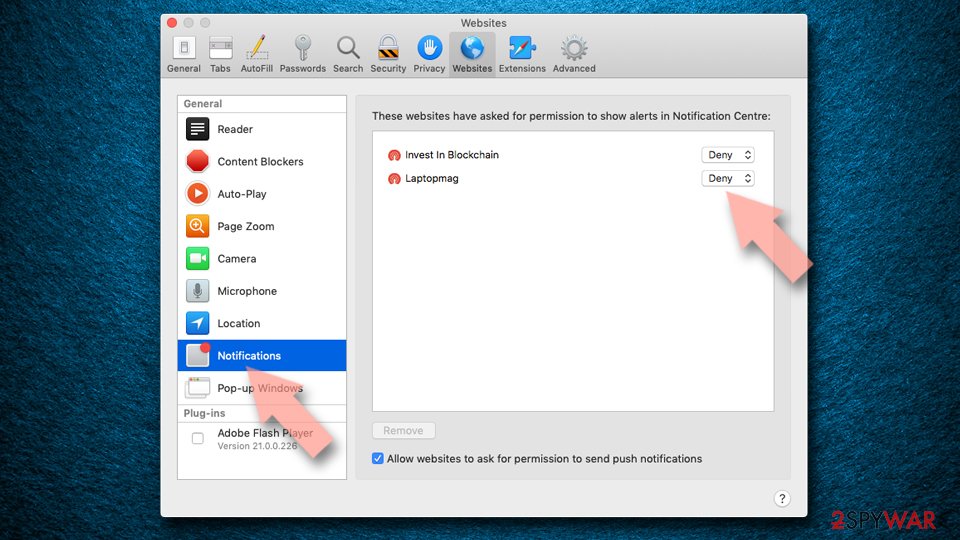
- Click on Safari > Preferences…
- Go to the Websites tab and, under General, select Notifications.
- Select the web address in question, click the drop-down menu and select Deny.
![Stop notifications on Safari Stop notifications on Safari]()
MS Edge
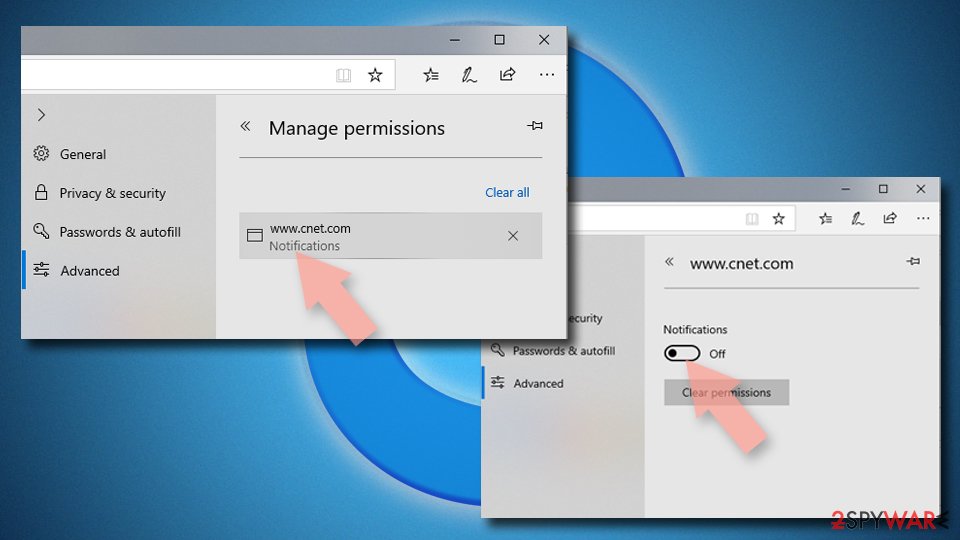
- Open Microsoft Edge, and click the Settings and more button (three horizontal dots) at the top-right of the window.
- Select Settings and then go to Advanced.
- Under Website permissions, pick Manage permissions and select the URL in question.
- Toggle the switch to the left to turn notifications off on Microsoft Edge.
![Stop notifications on Edge 2 Stop notifications on Edge 2]()
MS Edge (Chromium)
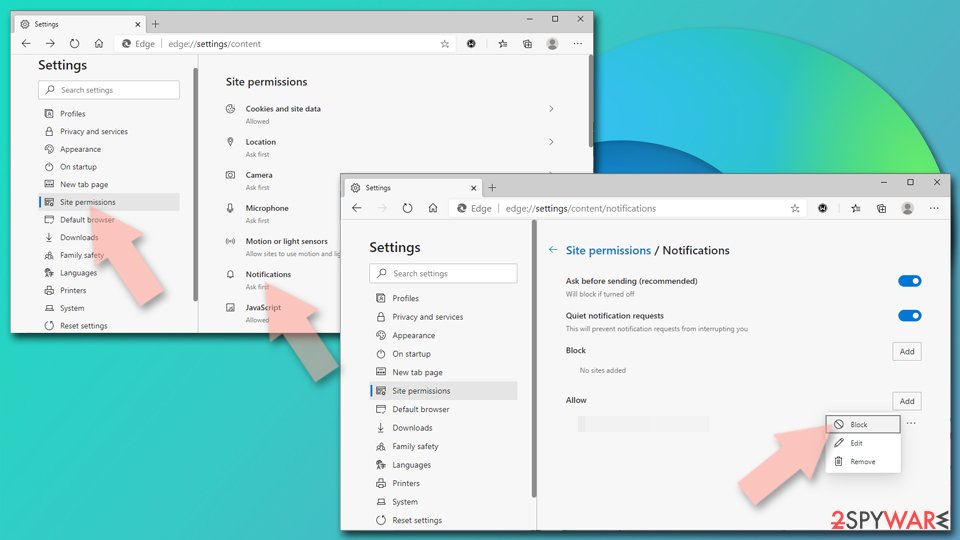
- Open Microsoft Edge, and go to Settings.
- Select Site permissions.
- Go to Notifications on the right.
- Under Allow, you will find the unwanted entry.
- Click on More actions and select Block.
![Stop notifications on Edge Chromium Stop notifications on Edge Chromium]()
Internet Explorer
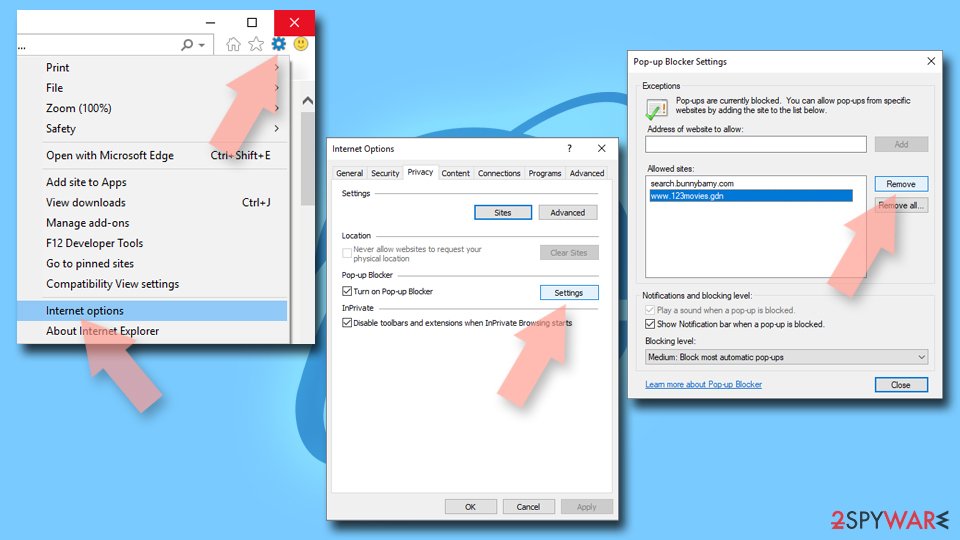
- Open Internet Explorer, and click on the Gear icon at the top-right of the window.
- Select Internet options and go to the Privacy tab.
- In the Pop-up Blocker section, click on Settings.
![Stop notifications on Internet Explorer Stop notifications on Internet Explorer]()
- Locate the web address in question under Allowed sites and pick Remove.
The important system checks to make
While you might have gotten rid of the annoying Ukentaspe.xyz push notifications by following the instructions shown above, your job is not yet finished if you want to secure your device properly. While security software can not remove push notifications, what it does well is finding and removing adware and other malicious software that could be hiding on your device.
Adware is a type of potentially unwanted program that can be running in the background without you even knowing anything about it. The reason for this is because of its distribution methods – it uses fake updates or deceptive freeware[2] bundle installers to spread. Also, if you have noticed that you have been forced to see more phishing material along with intrusive ads while you browse the web, checking the system is extremely important.
To do this, we recommend you run a scan with SpyHunter 5Combo Cleaner, Malwarebytes, or another powerful anti-malware software and then employ FortectIntego to clean browser caches for better privacy. Otherwise, trackers such as cookies[3] may remain on the browser for years, continuing user tracking activities. If you would rather perform adware elimination manually, use the instructions below.
Getting rid of Ukentaspe.xyz ads. Follow these steps
Uninstall from Windows
Instructions for Windows 10/8 machines:
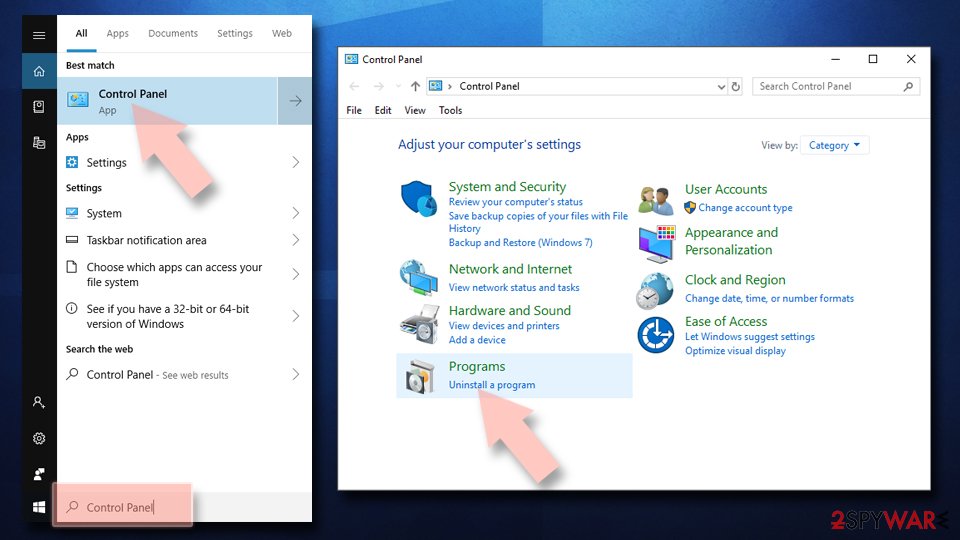
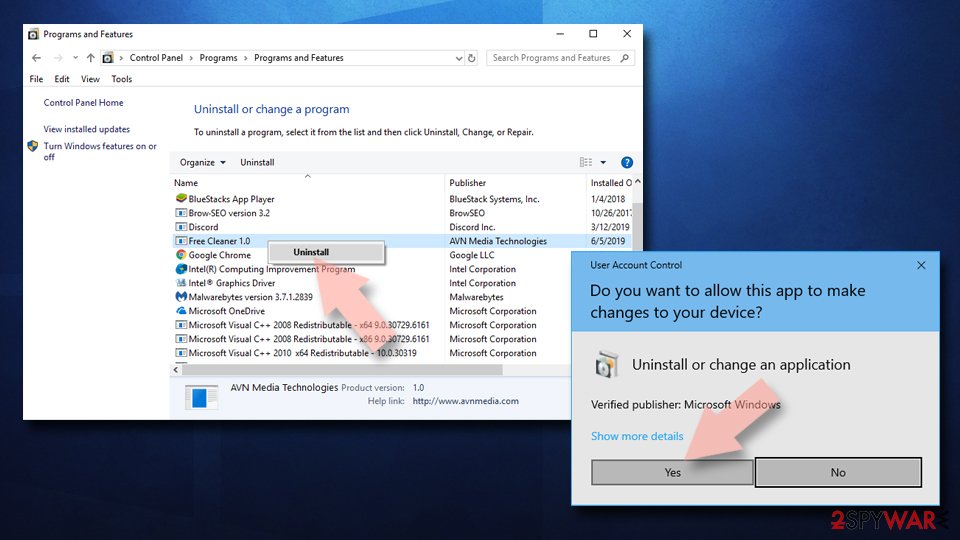
- Enter Control Panel into Windows search box and hit Enter or click on the search result.
- Under Programs, select Uninstall a program.

- From the list, find the entry of the suspicious program.
- Right-click on the application and select Uninstall.
- If User Account Control shows up, click Yes.
- Wait till uninstallation process is complete and click OK.

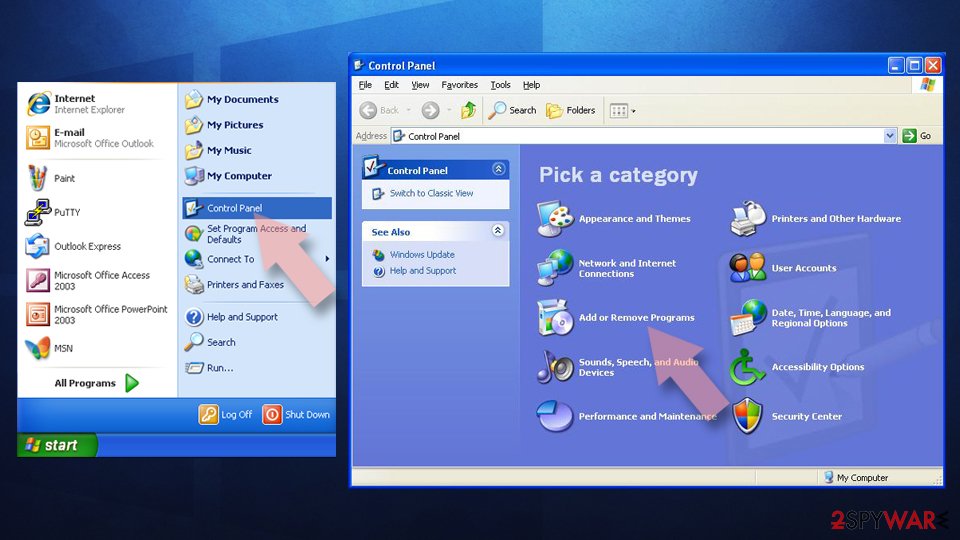
If you are Windows 7/XP user, proceed with the following instructions:
- Click on Windows Start > Control Panel located on the right pane (if you are Windows XP user, click on Add/Remove Programs).
- In Control Panel, select Programs > Uninstall a program.

- Pick the unwanted application by clicking on it once.
- At the top, click Uninstall/Change.
- In the confirmation prompt, pick Yes.
- Click OK once the removal process is finished.
Delete from macOS
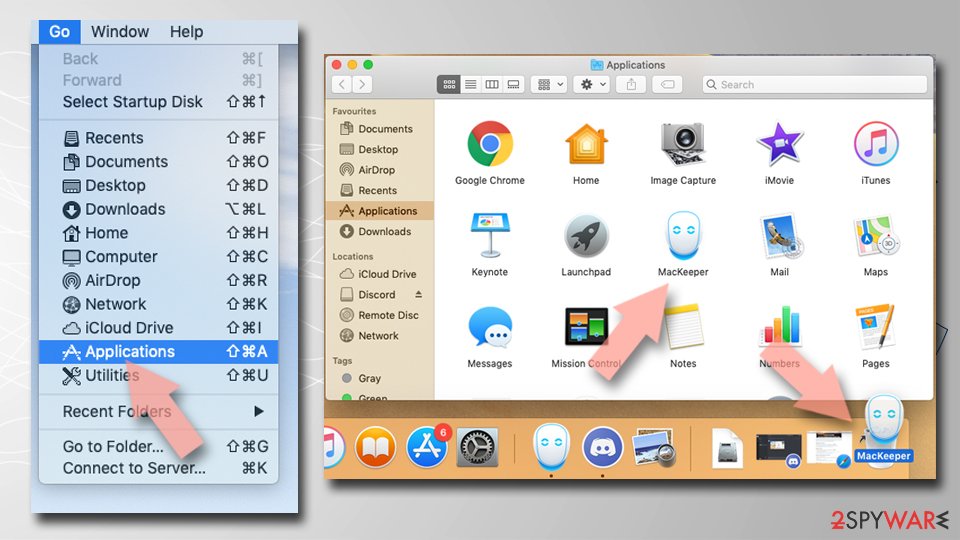
Remove items from Applications folder:
- From the menu bar, select Go > Applications.
- In the Applications folder, look for all related entries.
- Click on the app and drag it to Trash (or right-click and pick Move to Trash)

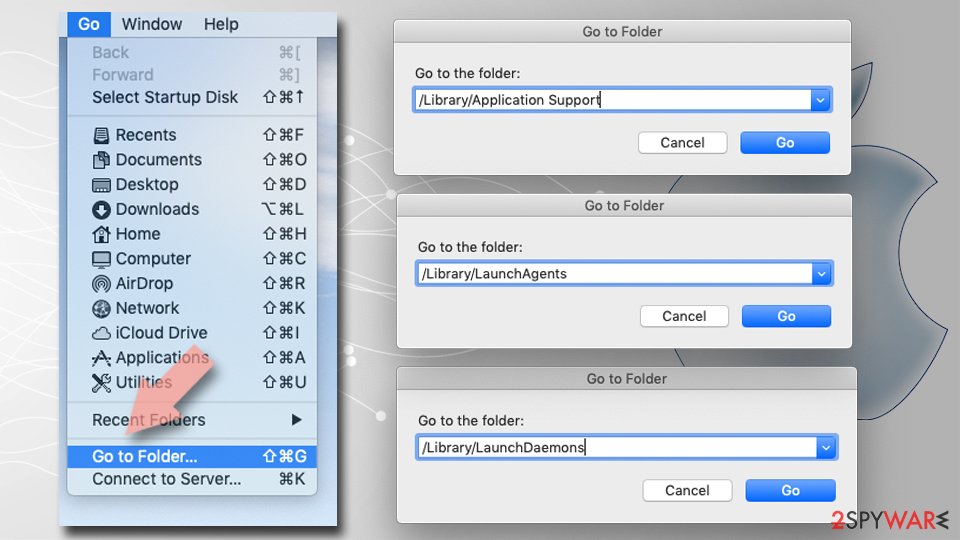
To fully remove an unwanted app, you need to access Application Support, LaunchAgents, and LaunchDaemons folders and delete relevant files:
- Select Go > Go to Folder.
- Enter /Library/Application Support and click Go or press Enter.
- In the Application Support folder, look for any dubious entries and then delete them.
- Now enter /Library/LaunchAgents and /Library/LaunchDaemons folders the same way and terminate all the related .plist files.

Remove from Google Chrome
Delete malicious extensions from Google Chrome:
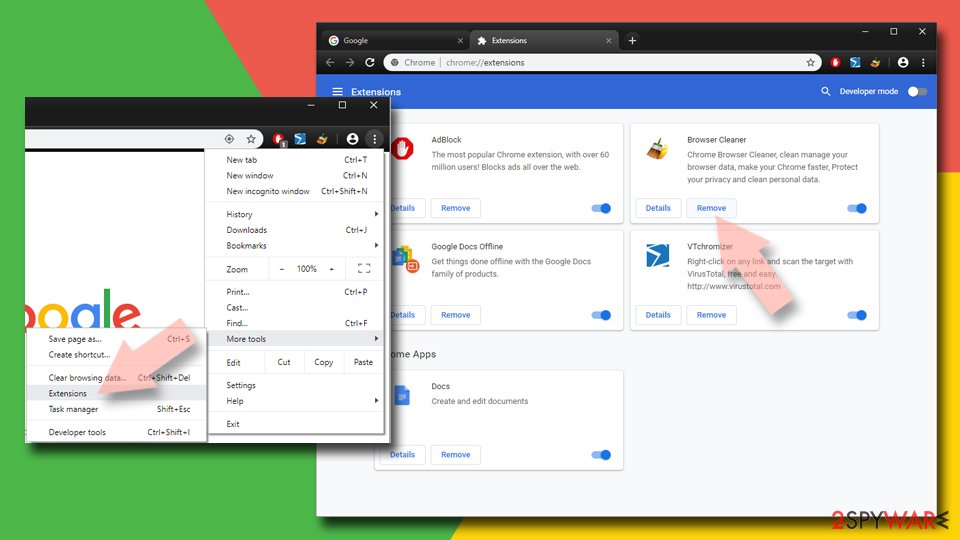
- Open Google Chrome, click on the Menu (three vertical dots at the top-right corner) and select More tools > Extensions.
- In the newly opened window, you will see all the installed extensions. Uninstall all the suspicious plugins that might be related to the unwanted program by clicking Remove.

Clear cache and web data from Chrome:
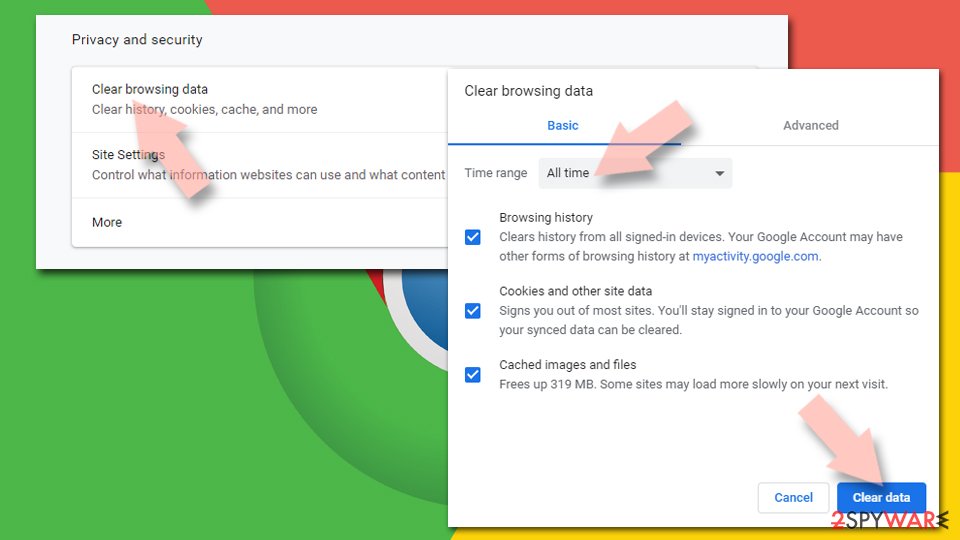
- Click on Menu and pick Settings.
- Under Privacy and security, select Clear browsing data.
- Select Browsing history, Cookies and other site data, as well as Cached images and files.
- Click Clear data.

Change your homepage:
- Click menu and choose Settings.
- Look for a suspicious site in the On startup section.
- Click on Open a specific or set of pages and click on three dots to find the Remove option.
Reset Google Chrome:
If the previous methods did not help you, reset Google Chrome to eliminate all the unwanted components:
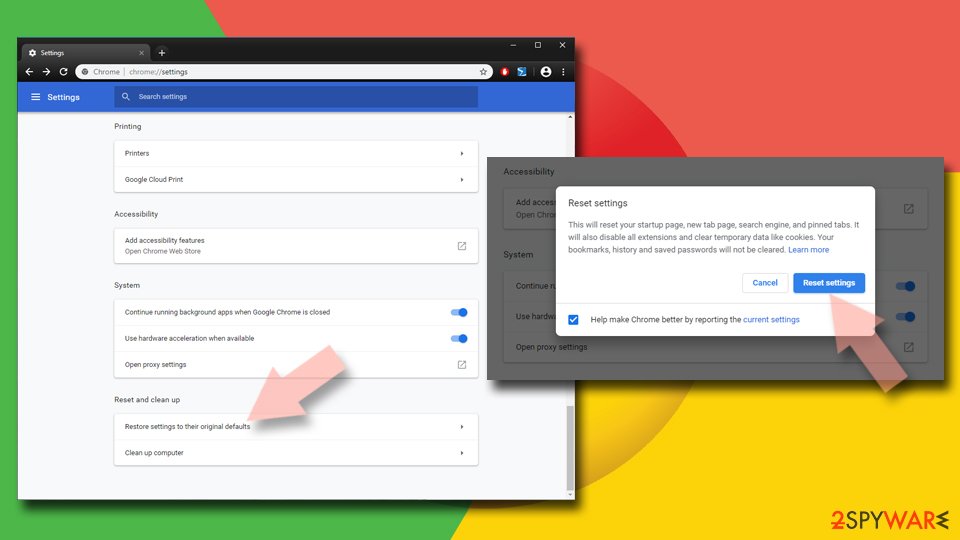
- Click on Menu and select Settings.
- In the Settings, scroll down and click Advanced.
- Scroll down and locate Reset and clean up section.
- Now click Restore settings to their original defaults.
- Confirm with Reset settings.

Remove from Microsoft Edge
Delete unwanted extensions from MS Edge:
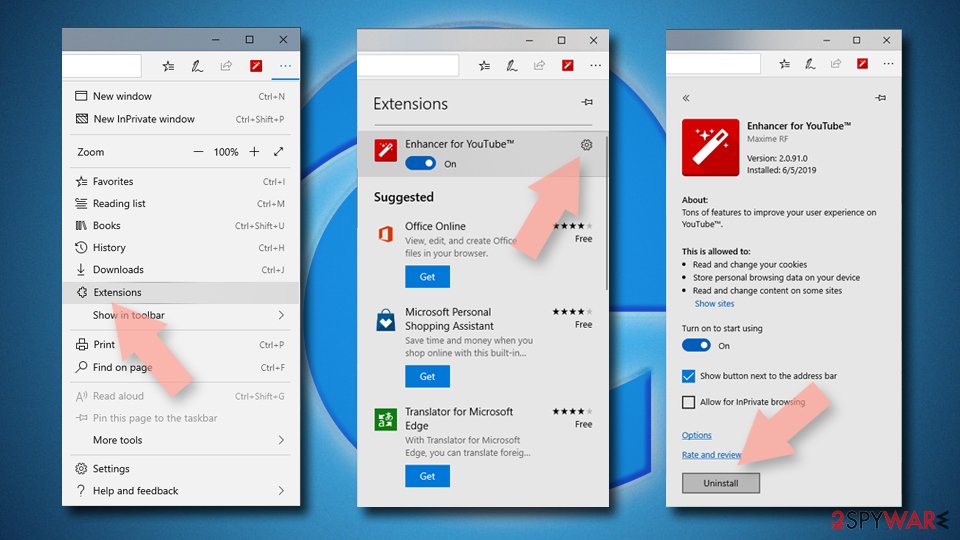
- Select Menu (three horizontal dots at the top-right of the browser window) and pick Extensions.
- From the list, pick the extension and click on the Gear icon.
- Click on Uninstall at the bottom.

Clear cookies and other browser data:
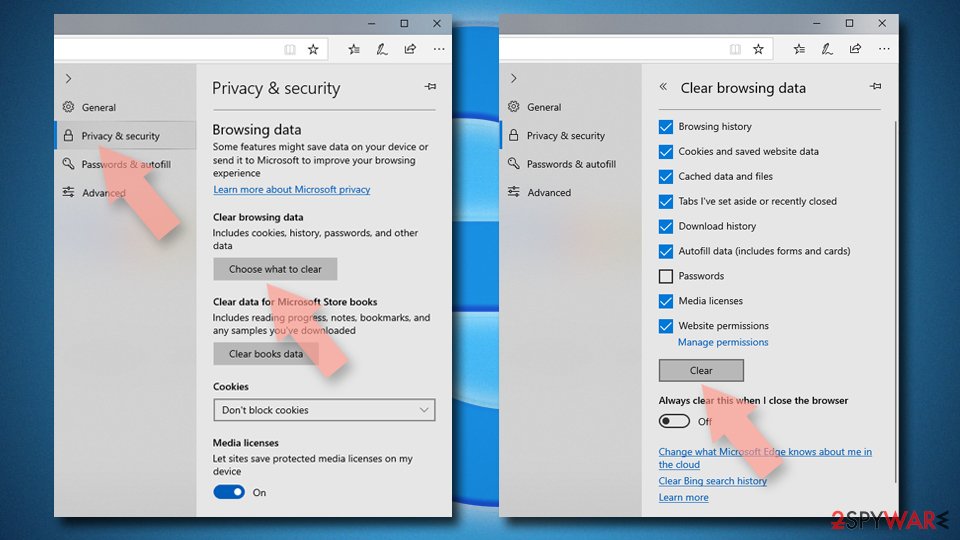
- Click on the Menu (three horizontal dots at the top-right of the browser window) and select Privacy & security.
- Under Clear browsing data, pick Choose what to clear.
- Select everything (apart from passwords, although you might want to include Media licenses as well, if applicable) and click on Clear.

Restore new tab and homepage settings:
- Click the menu icon and choose Settings.
- Then find On startup section.
- Click Disable if you found any suspicious domain.
Reset MS Edge if the above steps did not work:
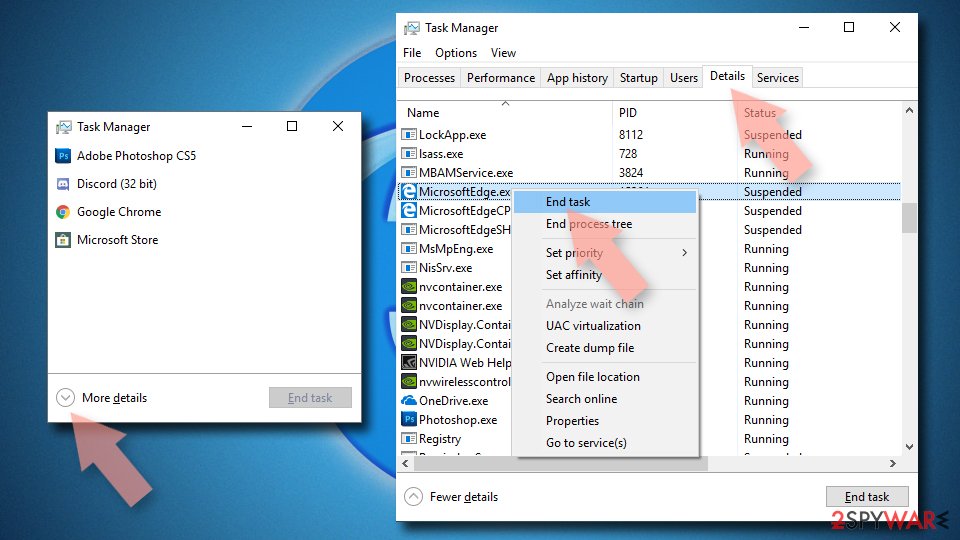
- Press on Ctrl + Shift + Esc to open Task Manager.
- Click on More details arrow at the bottom of the window.
- Select Details tab.
- Now scroll down and locate every entry with Microsoft Edge name in it. Right-click on each of them and select End Task to stop MS Edge from running.

If this solution failed to help you, you need to use an advanced Edge reset method. Note that you need to backup your data before proceeding.
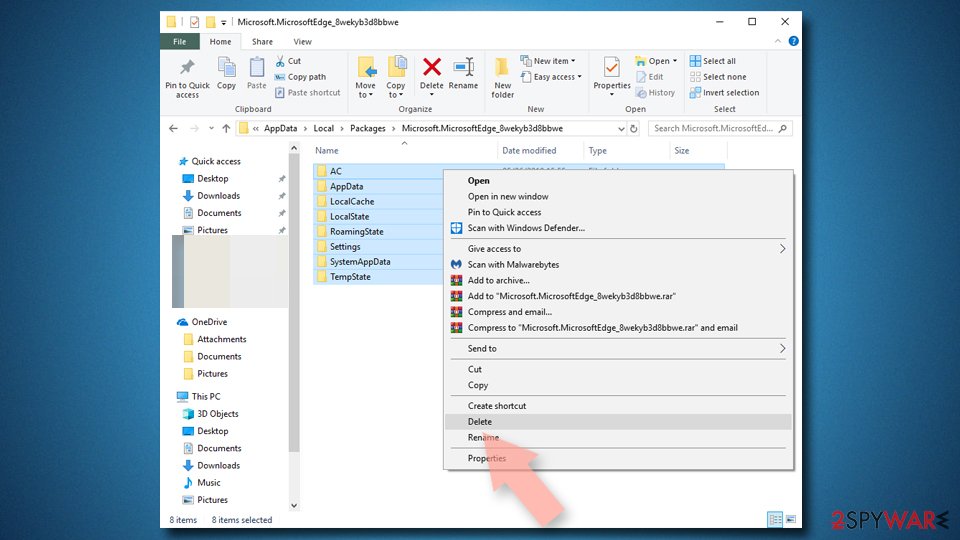
- Find the following folder on your computer: C:\\Users\\%username%\\AppData\\Local\\Packages\\Microsoft.MicrosoftEdge_8wekyb3d8bbwe.
- Press Ctrl + A on your keyboard to select all folders.
- Right-click on them and pick Delete

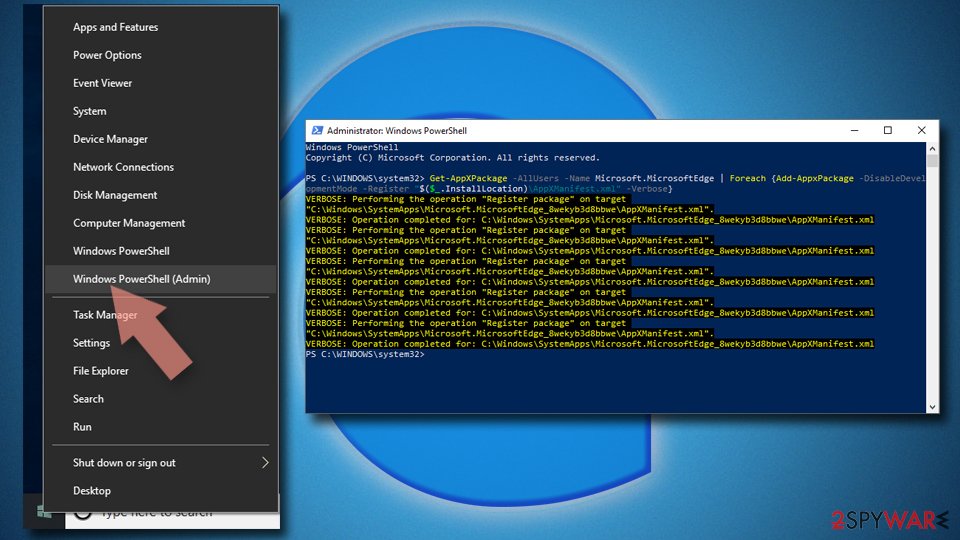
- Now right-click on the Start button and pick Windows PowerShell (Admin).
- When the new window opens, copy and paste the following command, and then press Enter:
Get-AppXPackage -AllUsers -Name Microsoft.MicrosoftEdge | Foreach {Add-AppxPackage -DisableDevelopmentMode -Register “$($_.InstallLocation)\\AppXManifest.xml” -Verbose

Instructions for Chromium-based Edge
Delete extensions from MS Edge (Chromium):
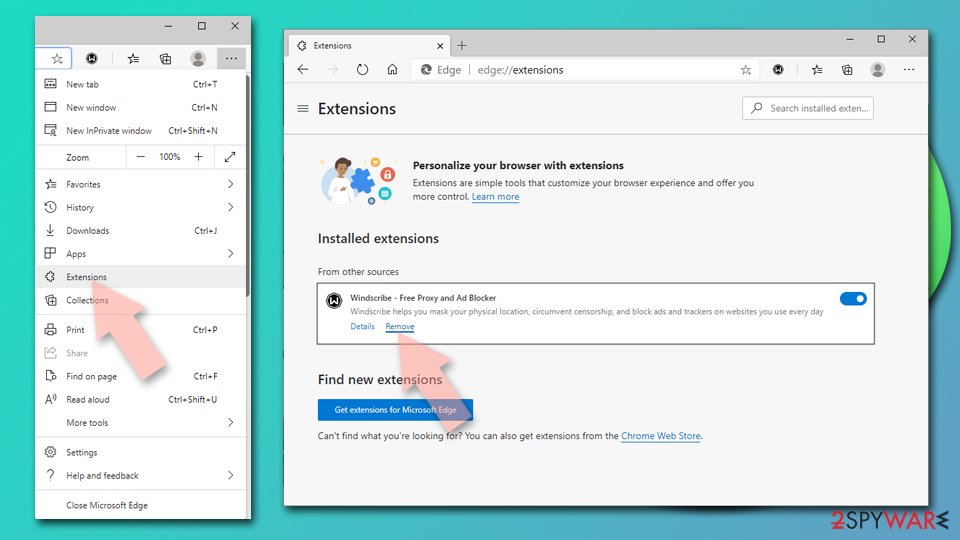
- Open Edge and click select Settings > Extensions.
- Delete unwanted extensions by clicking Remove.

Clear cache and site data:
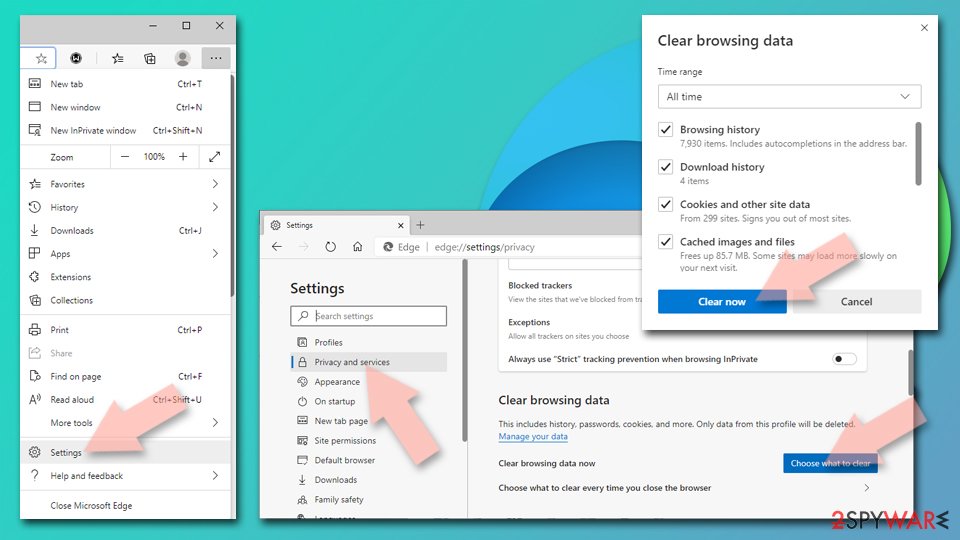
- Click on Menu and go to Settings.
- Select Privacy, search and services.
- Under Clear browsing data, pick Choose what to clear.
- Under Time range, pick All time.
- Select Clear now.

Reset Chromium-based MS Edge:
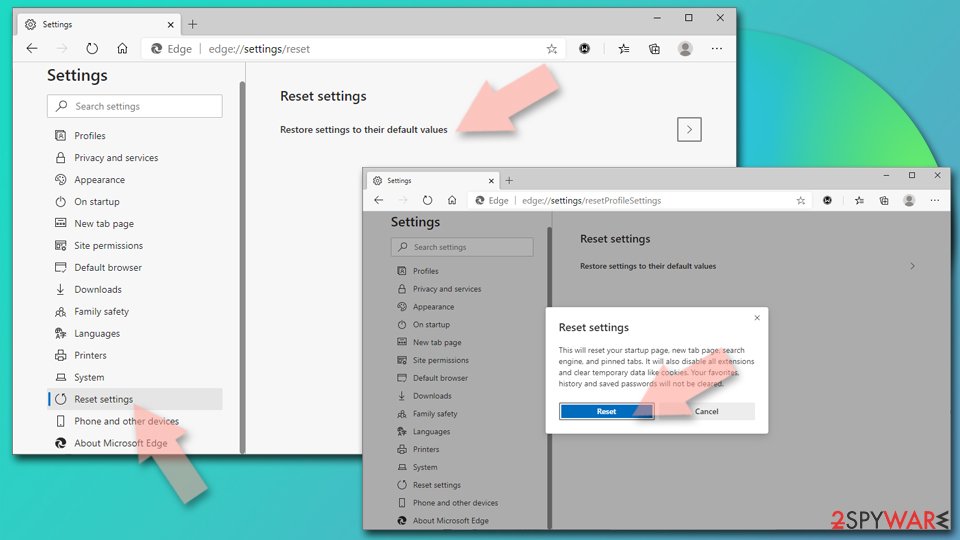
- Click on Menu and select Settings.
- On the left side, pick Reset settings.
- Select Restore settings to their default values.
- Confirm with Reset.

Remove from Mozilla Firefox (FF)
Remove dangerous extensions:
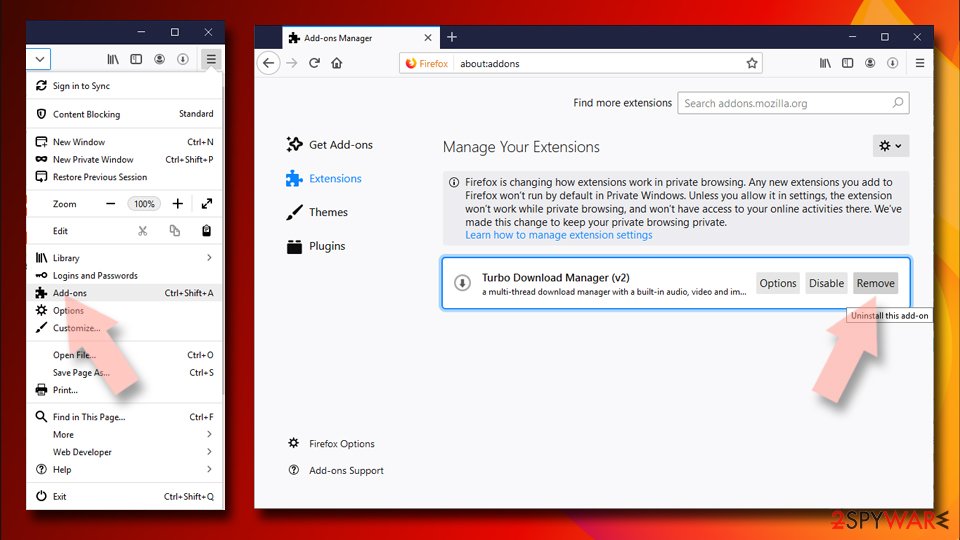
- Open Mozilla Firefox browser and click on the Menu (three horizontal lines at the top-right of the window).
- Select Add-ons.
- In here, select unwanted plugin and click Remove.

Reset the homepage:
- Click three horizontal lines at the top right corner to open the menu.
- Choose Options.
- Under Home options, enter your preferred site that will open every time you newly open the Mozilla Firefox.
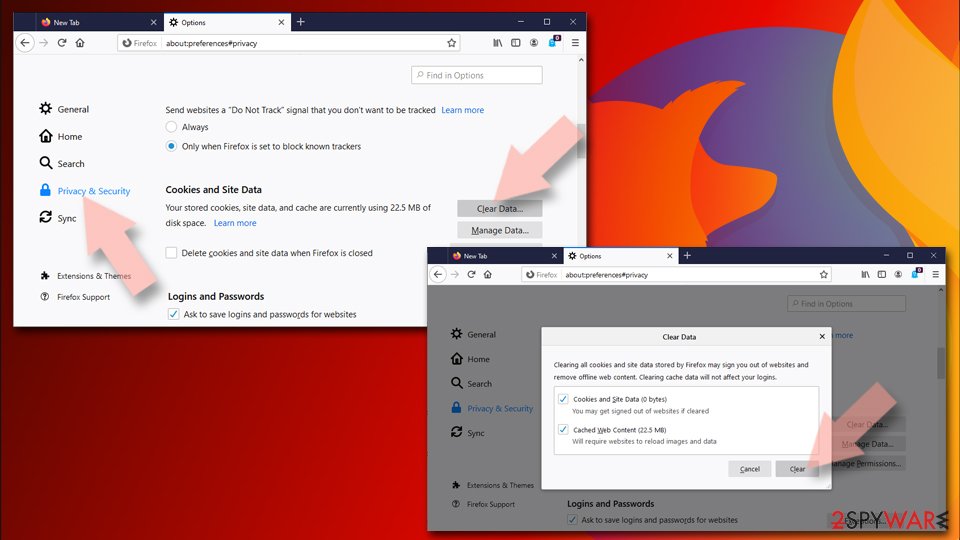
Clear cookies and site data:
- Click Menu and pick Settings.
- Go to Privacy & Security section.
- Scroll down to locate Cookies and Site Data.
- Click on Clear Data…
- Select Cookies and Site Data, as well as Cached Web Content and press Clear.

Reset Mozilla Firefox
If clearing the browser as explained above did not help, reset Mozilla Firefox:
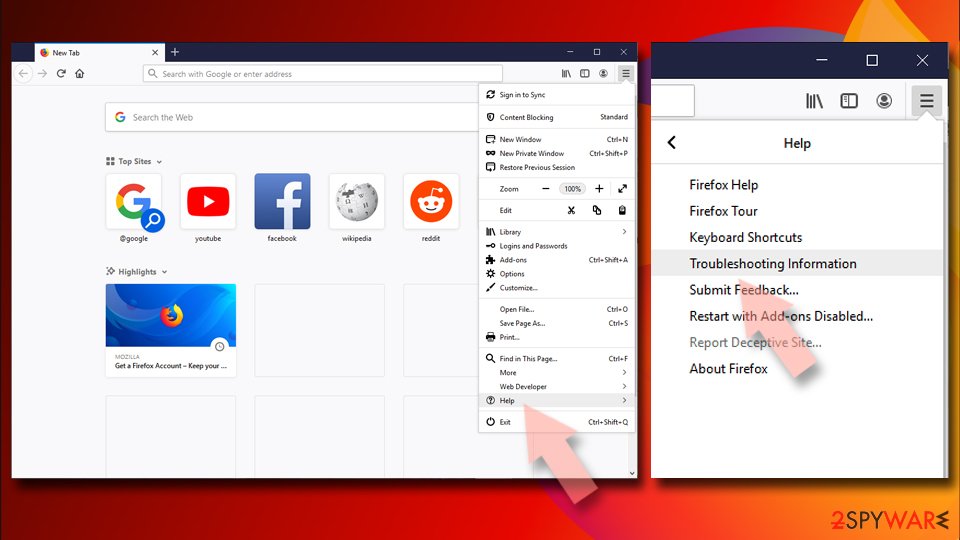
- Open Mozilla Firefox browser and click the Menu.
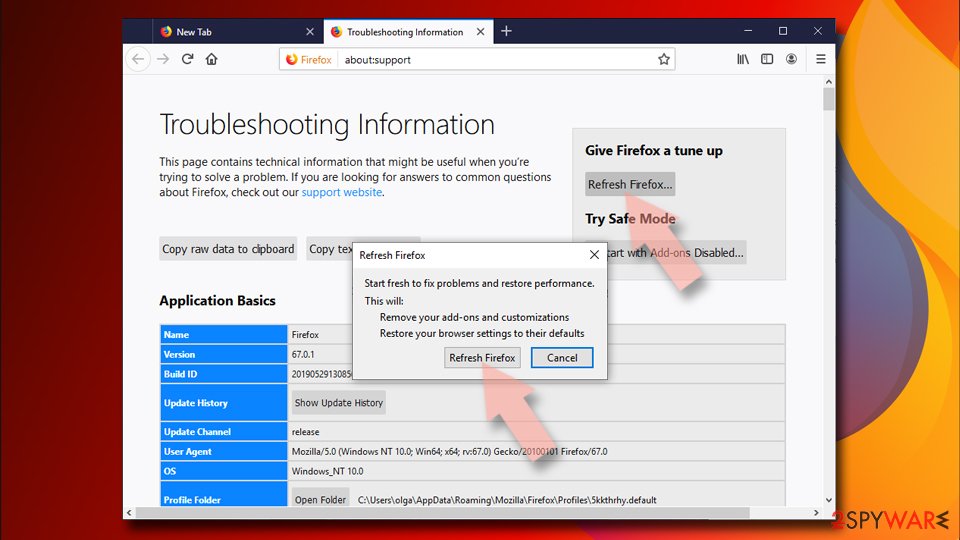
- Go to Help and then choose Troubleshooting Information.

- Under Give Firefox a tune up section, click on Refresh Firefox…
- Once the pop-up shows up, confirm the action by pressing on Refresh Firefox.

Delete from Safari
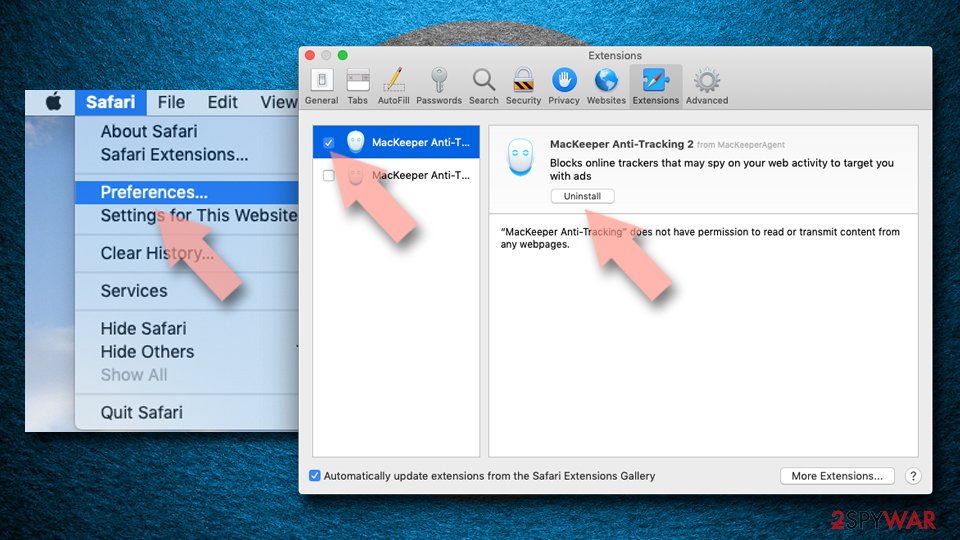
Remove unwanted extensions from Safari:
- Click Safari > Preferences…
- In the new window, pick Extensions.
- Select the unwanted extension and select Uninstall.

Clear cookies and other website data from Safari:
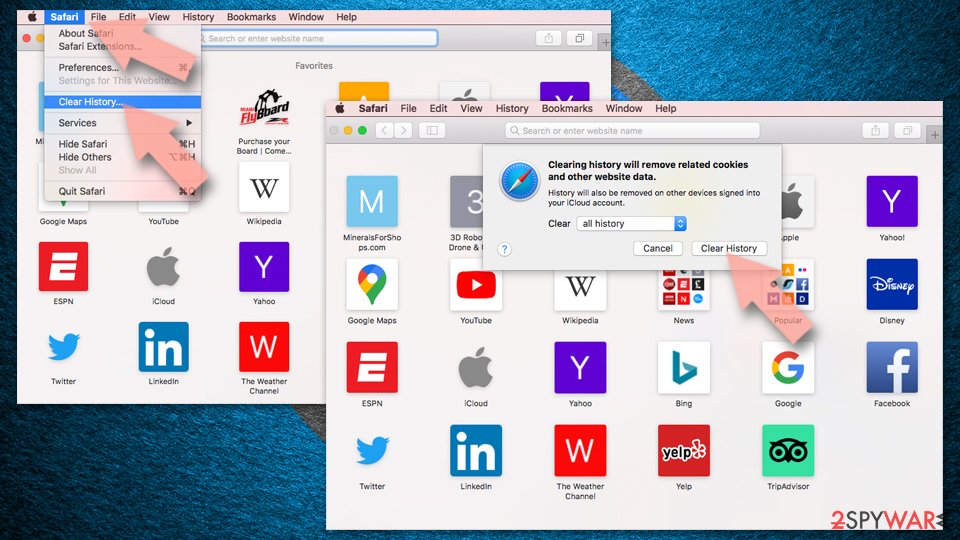
- Click Safari > Clear History…
- From the drop-down menu under Clear, pick all history.
- Confirm with Clear History.

Reset Safari if the above-mentioned steps did not help you:
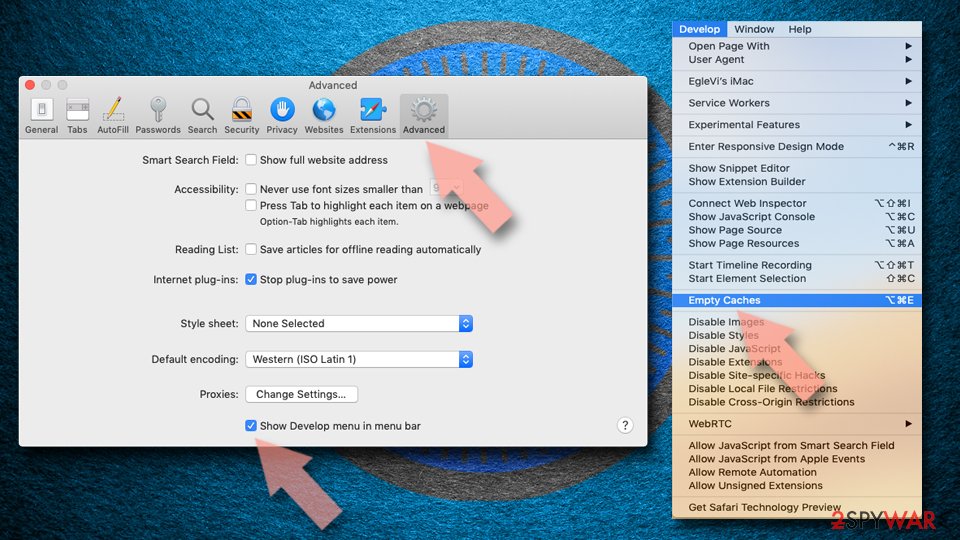
- Click Safari > Preferences…
- Go to Advanced tab.
- Tick the Show Develop menu in menu bar.
- From the menu bar, click Develop, and then select Empty Caches.

How to prevent from getting adware
Protect your privacy – employ a VPN
There are several ways how to make your online time more private – you can access an incognito tab. However, there is no secret that even in this mode, you are tracked for advertising purposes. There is a way to add an extra layer of protection and create a completely anonymous web browsing practice with the help of Private Internet Access VPN. This software reroutes traffic through different servers, thus leaving your IP address and geolocation in disguise. Besides, it is based on a strict no-log policy, meaning that no data will be recorded, leaked, and available for both first and third parties. The combination of a secure web browser and Private Internet Access VPN will let you browse the Internet without a feeling of being spied or targeted by criminals.
No backups? No problem. Use a data recovery tool
If you wonder how data loss can occur, you should not look any further for answers – human errors, malware attacks, hardware failures, power cuts, natural disasters, or even simple negligence. In some cases, lost files are extremely important, and many straight out panic when such an unfortunate course of events happen. Due to this, you should always ensure that you prepare proper data backups on a regular basis.
If you were caught by surprise and did not have any backups to restore your files from, not everything is lost. Data Recovery Pro is one of the leading file recovery solutions you can find on the market – it is likely to restore even lost emails or data located on an external device.
- ^ Social Engineering. Imperva. Application and data security.
- ^ What Is Freeware?. Lifewire. Tech News, Reviews, Help & How-Tos.
- ^ Cookies and Web Beacons. NTT. NTT Communications.
