

xVidly is an adware that generates excessive amount of commercial ads
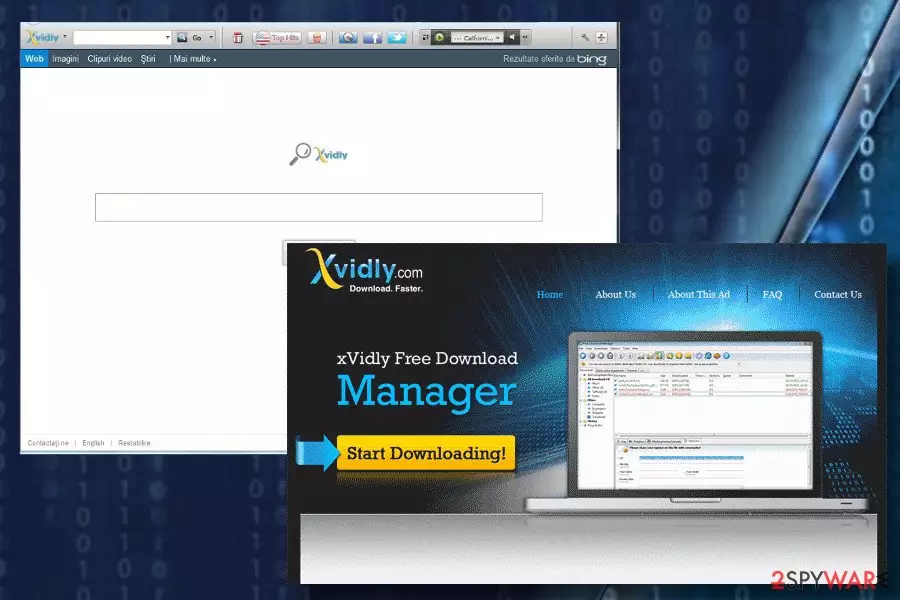
xVidly is a potentially unwanted program (PUP) and adware,[1] which is capable of installing on people's PCs via freeware and settling down on any web browser available. The tool was developed in 2013 by Jottix as a useful tool for customizing web browser's settings and making the process more convenient. However, it failed to meet people's expectations due to questionable behavior and primary focus on advertising. It turned out to display not only an excessive amount of commercial pop-ups but also continuously redirects people to a doubtful advertising platform, which is why it is often called a www.xvidly.com malware.
| Name | xVidly |
|---|---|
| Classification | Adware |
| Related files | xvidly.exe |
| Symptoms | Continuously emerging pop-up ads, banners, interstitial ads, full-page ads, web browser's redirects to doubtful domains, and similar. |
| Danger level | Low. The app is not malicious. However, it is involved in affiliate marketing and does not control the content delivered by its partners. |
| Elimination | Get rid of any malware with the help od FortectIntego. |
Even though this application may be presented as a useful tool, do not fall for believing that it's going to enhance your web browsing activities in any way. It has been developed with an intention to take advantage of less experienced PC users and initiate active advertising campaigns on their web browsers to gain advertising revenue.
To reach its goal, xVidly virus circulates on the Internet bundled with freeware and does not notify potential users about installation. This way, it evades detection and immediate removal. Up until 2015, this app did have an official website, but once security vendors started reporting it as PUP, the xvidly.com domain has been suspended. However, its distribution hasn't been stopped.
As soon as it enters a targeted system, serious havoc starts happening inside a web browser. The most noticeable thing following the xvidly.com xVidly attack is a constant flow of advertisements. They may occur in various forms, including but not limited to popups, banners, in-text ads, etc.
The problem is that those ads are not only annoying. Some of the xVidly ads can redirect web browser to unrelated websites filled with doubtful software installers or expensive items. In the worst case scenario, you may be tricked into visiting fake online shopping websites and disclose your credit card details to hackers.
Faravirus.hr[2] team claim that xVidly removal is a must. According to them, the reason is not only aggressive advertising but also the unauthorized usage of tracking cookies and inadmissible sharing of people's Search Data with third-parties. Despite the fact that Search Data refers to non-personal information about people's web browsing activities, cookies can gather IP address, email address, user's name, and similar information that most people disapprove of disclosing.

Last, but not least, people noticed that xVidly virus may sometimes customize web browser's settings. In other words, it may set Bing as a default search engine and www.xVidly.com as a search engine. Following such changes, people may notice sponsored links among search results. They may be used for driving traffic to the domains of its affiliates, so be cautious and bypass them.
We recommend using FortectIntego or similar security tool to remove xVidly adware from the system. Despite the fact it's not as half as dangerous as spyware or ransomware, it may inject multiple additional components to the target system to evade elimination. Besides, freeware bundle that you installed might include several PUPs that have to be removed as well. If, however, you prefer manual removal process, follow the tutorial provided below.
Be careful with freeware. They can deliver adware
Adware program can be downloaded from the official website, but not all of them have one. Besides, people seldom fall for downloading applications that are described obscurely and it's not clear what function do they have. Therefore, most of the adware-type programs are distributed in a bundle with other programs.
In most of the cases, you can find a list of unwanted components under Quick or Recommended installation setup of freeware. This applies to free tools promoted on infamous download sources in particular, but sometimes reliable sources can encourage software bundles[3] as well.
Therefore, experts encourage people to rely on Advanced or Custom installation of free programs as they disclose optional downloads and allow deselecting them. Thus, remove ticks marked next to the statements saying that you agree with the installation of additional tools.
Learn how to remove xVidly virus easily
If xVidly toolbar has appeared on your computer, keep in mind that some of its ads can be potentially dangerous and redirect you to suspicious domains. If you have already been dealing with continuous pop-up advertisements and warnings, you should check your computer with a reliable security tool to clean it from malware.
There's an alternative method to remove the xVidly virus. It can be performed manually with the help of instructions submitted below. However, keep in mind that this adware may accompany by other malware and leave one of them will keep initiating unwanted activities.
If, however, you want to learn more about xVidly removal, the instructions provided below should be helpful for you.
Uninstall from Windows
Uninstall from Windows 10/8:
- Type Control Panel into the Windows search box and open the result.
- Under Programs, select Uninstall a program.


Uninstall from Windows 7/XP:
- Click on Windows Start > Control Panel (Windows XP users should click on Add/Remove Programs).
- In Control Panel, select Programs > Uninstall a program.


Remove the unwanted program:
- In the Programs and Features window, look for any recently installed suspicious entries, select them, and click Uninstall.
- If User Account Control appears, click Yes to confirm, then complete the removal.


Delete from macOS
Remove the unwanted application:
- From the menu bar, select Go > Applications.
- In the Applications folder, look for any suspicious entries, then drag them to Trash (or right-click and pick Move to Trash).


Delete leftover files and folders:
- Select Go > Go to Folder.
- Enter /Library/Application Support and remove any suspicious folders related to the unwanted program.
- Repeat the same check in the /Library/LaunchAgents and /Library/LaunchDaemons folders, deleting any suspicious entries.

- Finally, empty the Trash to permanently remove the leftovers.

Reset Internet Explorer
Remove dangerous add-ons:
- Open Internet Explorer, click on the Gear icon (IE menu) on the top-right corner of the browser
- Pick Manage Add-ons.
- You will see a Manage Add-ons window. Here, look for suspicious plugins. Click on these entries and select Disable.


Change your homepage if it was altered:
- Open IE and click on the Gear icon.
- Select Internet Options.
- In the General tab, delete the Home page address and replace it by your preferred one (for example, Google.com).
- Click Apply and then select OK.


Delete temporary files:
- Press on the Gear icon and select Internet Options.
- Under Browsing history, click Delete...
- Select relevant fields and press Delete.


Reset Internet Explorer:
- Click on Gear icon > Internet options and select Advanced tab.
- Select Reset.
- In the new window, check Delete personal settings and select Reset.


Remove from Microsoft Edge
Delete unwanted extensions from MS Edge:
- Select Menu (three horizontal dots at the top-right of the browser window) and pick Extensions.
- From the list, pick the extension and click on the Gear icon.
- Click Remove.


Clear cookies and other browser data:
- Click on the Menu (three horizontal dots at the top-right of the browser window) and select Settings > Privacy, search, and services..
- Under Clear browsing data, pick Choose what to clear.
- Select Cookies and other site data and Cached images and files. (apart from passwords, although you might want to include Media licenses as well, if applicable) and click on Clear.


Restore new tab and homepage settings:
- Click the menu icon and choose Settings.
- Then find On startup section.
- Click Remove next to any suspicious startup page.
Reset MS Edge if the above steps did not work:
- Press on Ctrl + Shift + Esc to open Task Manager.
- Click on More details arrow at the bottom of the window.
- Select Details tab.
- Now scroll down and locate every entry with Microsoft Edge name in it. Right-click on each of them and select End Task to stop MS Edge from running.


Instructions for Chromium-based Edge
Delete extensions from MS Edge (Chromium):
- Open Edge and click select Settings > Extensions.
- Delete unwanted extensions by clicking Remove.


Clear cache and site data:
- Click on Menu and go to Settings.
- Select Privacy, search and services.
- Under Clear browsing data, pick Choose what to clear.
- Under Time range, pick All time.
- Select Clear now.


Reset Chromium-based MS Edge:
- Click on Menu and select Settings.
- On the left side, pick Reset settings.
- Select Restore settings to their default values.
- Confirm with Reset.
- This will disable extensions and reset startup pages but will not delete bookmarks, saved passwords, or browsing history.


Remove from Mozilla Firefox (FF)
Remove dangerous extensions:
- Open Mozilla Firefox browser and click on the Menu (three horizontal lines at the top-right of the window).
- Select Add-ons.
- In here, select the unwanted extension and click Remove.


Reset the homepage:
- Click three horizontal lines at the top right corner to open the menu.
- Choose Settings.
- Under Home, set your preferred homepage and new tab settings.
Clear cookies and site data:
- Click Menu and pick Settings.
- Go to Privacy & Security section.
- Scroll down to locate Cookies and Site Data.
- Click on Clear Data...
- Select Cookies and Site Data and Temporary cached files and pages, then click Clear.


Reset Mozilla Firefox
If clearing the browser as explained above did not help, reset Mozilla Firefox:
- Open Mozilla Firefox browser and click the Menu.
- Go to Help and then choose Troubleshooting Information.

- Under Give Firefox a tune up section, click on Refresh Firefox...
- Once the pop-up shows up, confirm the action by pressing on Refresh Firefox.



Remove from Google Chrome
Delete malicious extensions from Google Chrome:
- Open Google Chrome, click on the Menu (three vertical dots at the top-right corner) and select More tools > Extensions.
- In the newly opened window, you will see all the installed extensions. Uninstall all suspicious extensions related to the unwanted program by clicking Remove.


Clear cache and web data from Chrome:
- Click on Menu and pick Settings.
- Under Privacy and security, select Clear browsing data.
- Select Browsing history, Cookies and other site data, as well as Cached images and files.
- Click Clear data.


Change your homepage:
- Click menu and choose Settings.
- Look for a suspicious site in the On startup section.
- Click on Open a specific or set of pages and click on three dots to find the Remove option.
Reset Google Chrome:
If the previous methods did not help you, reset Google Chrome to eliminate all the unwanted components:
- Click on Menu and select Settings.
- In the Settings, scroll down and click Advanced.
- Scroll down and locate Reset and clean up section.
- Now click Restore settings to their original defaults.
- Confirm with Reset settings.


Delete from Safari
Remove dangerous extensions:
- Open Safari, click Safari in the menu at the top-left of the screen, and select Preferences.
- Go to the Extensions tab, look for any suspicious entries, and click Uninstall to remove them.


Clear history and website data:
- Click Safari in the menu and pick Clear History.
- Set Clear to all history and confirm with Clear History.


Reset Safari:
- Click Safari in the menu and select Preferences > Advanced.
- Enable Show Develop menu in menu bar.
- From the menu bar, click Develop and select Empty Caches.


Did this guide help?
2 comments
Justin
THANK YOU so much. I downloaded this thing and it made my cpu turn against me! Dont know what I would... You saved my life!
kelly naegele
i tried this it didnt work along with tons of other progrmas that said it would work the only thing that worked was superanti virus software