

The annoying behavior of Helpline-9.xyz scam
Helpline-9.xyz virus imitates Microsoft support help to deceive users into thinking that their computers have been severely infected. It is a common scaring technique among gearheads who expect credulous users into playing according to their scenario. The essence of such tech support scams is to convince you into calling a specific number [1]. Later on, you will be connected to a supposed Microsoft tech support expert. After all, you might be either charged with an enormous bill after such “technical assistance” or purchase completely futile applications. You can remove Helpline-9.xyz effectively with an anti-spyware tool FortectIntego.
It is likely you might come across this sort of virus while visiting web pages crammed with adware or other malignant elements. After this web site emerges, a female voice will inform you that your computer has been infected with spyware and viruses and you need to dial 1-844-257-9402 to have technician eliminate the infections for you. What is more, it also threatens users to call the number within 5 minutes; otherwise, their devices will be disabled. Luckily, in this case, Helpline-9.xyz malware acts more like adware. While mainly tech support scams are not severe threats, some ransomware threats include certain peculiarities of it [2]. Less experienced users might get puzzled identifying which is which. When 5 minutes pass, nothing happens. However, this malware has some screen locker’s features as you cannot simply exit the web page. You do not need to follow any extra guidelines to exit the virus web page, just click on “prevent this page from creating additional dialogues.”
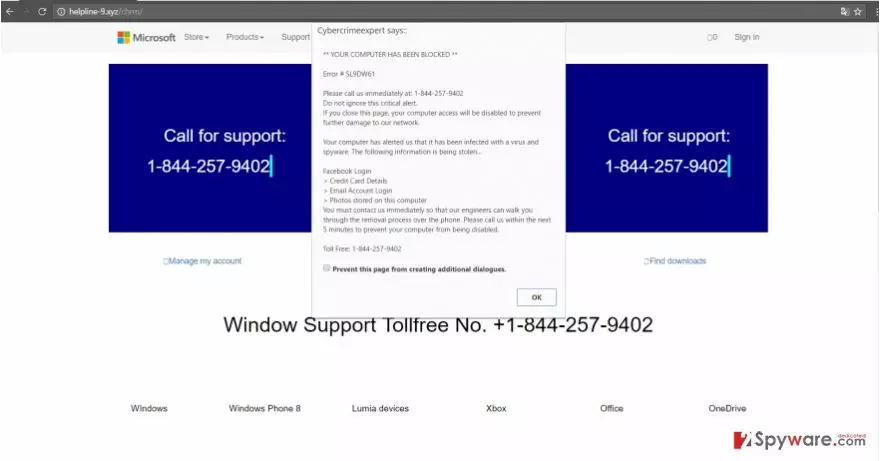
As common for such type of malware, the notification alerts that if you do not take the necessary measures, your Facebook login, credit card details, and other essential private information might leak to the supposed “cyber criminals.’ Verily, the Facebook topic is especially sensitive topic taking into account recent rampage of Locky ransomware on this social network [3]. If you, after all, call the scammers you might be either misguided through a series of “malware removal” steps. There are two scenarios: either the gearheads remove the very adware which causes these Helpline-9 fake alerts or persuades you into installing a useless or shady program which, on the contrary, might increase the number of system vulnerabilities. There have been hundreds of new scams appearing, so such increase attracted the attention of official institutions. So when Helpline-9.xyz redirect activates, ignore and exit the web page. Federal Trade Commission is determined to stop the hackers from earning millions of profits from such activity [4].
When did this malware occupy your device?
Some tech support scams disguise in corrupted domains. In order not to get assaulted by such infections, you should install an anti-spyware application which reduces the risk of getting entangled by Helpline-9.xyz hijack. Alternatively, if a tech support scam operates more like an adware-type application, then it is likely to disperse via free applications, specifically, file converters or image editing software. Specifically, unwanted elements are hidden under “Basic” installation mode. If you want to see all optional applications, choose “Advanced” settings. Likewise, you will spot potentially fraudulent application before they tiptoe on the device. Now let us move on to Helpline-9.xyz removal.
Eliminating Helpline-9.xyz
While in some cases tech support scammers crack up after getting exposed [5], other types of malware might wreak havoc in a way. Helpline-9.xyz virus does not inflict significant damage on your device, but you should not hesitate with its elimination. You can choose either automatic or manual termination or combine them both. Automatic Helpline-9.xyz removal happens faster if you install an anti-spyware application. Do not forget to update it. Alternatively, you may opt for manual guidelines. Carefully follow the steps to remove Helpline-9.xyz from the device.
Uninstall from Windows
Uninstall from Windows 10/8:
- Type Control Panel into the Windows search box and open the result.
- Under Programs, select Uninstall a program.


Uninstall from Windows 7/XP:
- Click on Windows Start > Control Panel (Windows XP users should click on Add/Remove Programs).
- In Control Panel, select Programs > Uninstall a program.


Remove the unwanted program:
- In the Programs and Features window, look for any recently installed suspicious entries, select them, and click Uninstall.
- If User Account Control appears, click Yes to confirm, then complete the removal.


Delete from macOS
Remove the unwanted application:
- From the menu bar, select Go > Applications.
- In the Applications folder, look for any suspicious entries, then drag them to Trash (or right-click and pick Move to Trash).


Delete leftover files and folders:
- Select Go > Go to Folder.
- Enter /Library/Application Support and remove any suspicious folders related to the unwanted program.
- Repeat the same check in the /Library/LaunchAgents and /Library/LaunchDaemons folders, deleting any suspicious entries.

- Finally, empty the Trash to permanently remove the leftovers.

Reset Internet Explorer
Remove dangerous add-ons:
- Open Internet Explorer, click on the Gear icon (IE menu) on the top-right corner of the browser
- Pick Manage Add-ons.
- You will see a Manage Add-ons window. Here, look for suspicious plugins. Click on these entries and select Disable.


Change your homepage if it was altered:
- Open IE and click on the Gear icon.
- Select Internet Options.
- In the General tab, delete the Home page address and replace it by your preferred one (for example, Google.com).
- Click Apply and then select OK.


Delete temporary files:
- Press on the Gear icon and select Internet Options.
- Under Browsing history, click Delete...
- Select relevant fields and press Delete.


Reset Internet Explorer:
- Click on Gear icon > Internet options and select Advanced tab.
- Select Reset.
- In the new window, check Delete personal settings and select Reset.


Remove from Microsoft Edge
Delete unwanted extensions from MS Edge:
- Select Menu (three horizontal dots at the top-right of the browser window) and pick Extensions.
- From the list, pick the extension and click on the Gear icon.
- Click Remove.


Clear cookies and other browser data:
- Click on the Menu (three horizontal dots at the top-right of the browser window) and select Settings > Privacy, search, and services..
- Under Clear browsing data, pick Choose what to clear.
- Select Cookies and other site data and Cached images and files. (apart from passwords, although you might want to include Media licenses as well, if applicable) and click on Clear.


Restore new tab and homepage settings:
- Click the menu icon and choose Settings.
- Then find On startup section.
- Click Remove next to any suspicious startup page.
Reset MS Edge if the above steps did not work:
- Press on Ctrl + Shift + Esc to open Task Manager.
- Click on More details arrow at the bottom of the window.
- Select Details tab.
- Now scroll down and locate every entry with Microsoft Edge name in it. Right-click on each of them and select End Task to stop MS Edge from running.


Instructions for Chromium-based Edge
Delete extensions from MS Edge (Chromium):
- Open Edge and click select Settings > Extensions.
- Delete unwanted extensions by clicking Remove.


Clear cache and site data:
- Click on Menu and go to Settings.
- Select Privacy, search and services.
- Under Clear browsing data, pick Choose what to clear.
- Under Time range, pick All time.
- Select Clear now.


Reset Chromium-based MS Edge:
- Click on Menu and select Settings.
- On the left side, pick Reset settings.
- Select Restore settings to their default values.
- Confirm with Reset.
- This will disable extensions and reset startup pages but will not delete bookmarks, saved passwords, or browsing history.


Remove from Mozilla Firefox (FF)
Remove dangerous extensions:
- Open Mozilla Firefox browser and click on the Menu (three horizontal lines at the top-right of the window).
- Select Add-ons.
- In here, select the unwanted extension and click Remove.


Reset the homepage:
- Click three horizontal lines at the top right corner to open the menu.
- Choose Settings.
- Under Home, set your preferred homepage and new tab settings.
Clear cookies and site data:
- Click Menu and pick Settings.
- Go to Privacy & Security section.
- Scroll down to locate Cookies and Site Data.
- Click on Clear Data...
- Select Cookies and Site Data and Temporary cached files and pages, then click Clear.


Reset Mozilla Firefox
If clearing the browser as explained above did not help, reset Mozilla Firefox:
- Open Mozilla Firefox browser and click the Menu.
- Go to Help and then choose Troubleshooting Information.

- Under Give Firefox a tune up section, click on Refresh Firefox...
- Once the pop-up shows up, confirm the action by pressing on Refresh Firefox.



Remove from Google Chrome
Delete malicious extensions from Google Chrome:
- Open Google Chrome, click on the Menu (three vertical dots at the top-right corner) and select More tools > Extensions.
- In the newly opened window, you will see all the installed extensions. Uninstall all suspicious extensions related to the unwanted program by clicking Remove.


Clear cache and web data from Chrome:
- Click on Menu and pick Settings.
- Under Privacy and security, select Clear browsing data.
- Select Browsing history, Cookies and other site data, as well as Cached images and files.
- Click Clear data.


Change your homepage:
- Click menu and choose Settings.
- Look for a suspicious site in the On startup section.
- Click on Open a specific or set of pages and click on three dots to find the Remove option.
Reset Google Chrome:
If the previous methods did not help you, reset Google Chrome to eliminate all the unwanted components:
- Click on Menu and select Settings.
- In the Settings, scroll down and click Advanced.
- Scroll down and locate Reset and clean up section.
- Now click Restore settings to their original defaults.
- Confirm with Reset settings.


Delete from Safari
Remove dangerous extensions:
- Open Safari, click Safari in the menu at the top-left of the screen, and select Preferences.
- Go to the Extensions tab, look for any suspicious entries, and click Uninstall to remove them.


Clear history and website data:
- Click Safari in the menu and pick Clear History.
- Set Clear to all history and confirm with Clear History.


Reset Safari:
- Click Safari in the menu and select Preferences > Advanced.
- Enable Show Develop menu in menu bar.
- From the menu bar, click Develop and select Empty Caches.


Did this guide help?
2 comments
pandaBrother8
For a moment I panicked when I couldnt exit the web page. Luckily that function "prevent from creating additional dialogues" helps...
SamL.4
In comparison, this scam is quite weak. Lucky us!