How iPrivate Multi Search benefits from the unsuspecting users?
iPrivate Multi Search virus is a tricky application that balances between a malware [1] and simply an annoying application. The program is promoted by the software distribution company called Ienjoyapps which is responsible for the release of a number of different applications. Unfortunately, most of them do not seem to be focusing much on benefitting the users, but rather bringing profit to the creators and their affiliates [2]. Like other apps of this company, iPrivate Multi Search malware generates revenue from advertising [3] which also allows the application to monetize itself. Sadly, this brings inconveniences to the users who are being forced to encounter ads, banners and all sorts of other online advertising [4] while using this service. While some users bring this burden on to themselves by voluntarily downloading this program, others are tricked into installing this application against their conscious will. Such unexpected system hijack only aggravates the inconveniences triggered by the virus and urges the users to reach to the experts for some iPrivate Multi Search removal advice. Luckily, our experts have prepared a couple of recommendations for you just below this article. You should also invest in anti-malware software, such as FortectIntego or SpyHunterCombo Cleaner that will protect you from similar malware attacks in the future.

Though iPrivate Multi Search is introduced as a reputable search engine that offers “a variety of unique features and search tools,” you probably already understand that it is actually a shady browser hijacker [5] that should not be trusted. And it’s not the annoying sponsored search results or the lack of promised unique features that cause most problems to the users. Due to the iPrivate Multi Search redirect and advertising issues, the web browser may operate much slower or even crash, progressively making the web search riskier, at the same time increasing the infected device’s vulnerability. The best way to solve these problems is to remove iPrivate Multi Search from the computer, cleaning all the web browsers from this malware and choosing an acknowledged and trustworthy search provider to take its place.
How did this program end up on your computer?
An aspect that tricks users into installing iPrivate Multi Search is that this application is distributed via legitimate software distribution site Chrome Web Store and scores a high rating on it as well. However, ratings can be easily rigged, and Google staff may take some time to eliminate such questionable programs from the search results. Thus, before installing any software, even if it comes from the trustworthy sources, you should check back with some security forums, etc. Besides, the program may appear on the computer even without your permission. Or so it may seem at first. In reality, iPrivate Multi Search usually receives permission to install on the computer when the users fail to properly read through the EULA and choose wrong installation settings that do not disclose the full list of software package components. To avoid this mistake, you should always choose advanced system installation option when and manually deselect components you do not wish to install on your computer.
Are you ready to remove iPrivate Multi Search? Here is what you have to do:
Basically, there are two ways to remove iPrivate Multi Search virus from the computer. You can either do it manually or find some reputable antivirus utility that will do it for you. Since this application has been categorized as a potentially unwanted program, antivirus utilities should be able to locate it and its files on your computer and remove them. Nevertheless, iPrivate Multi Search removal may run into a dead end if the software you own is outdated or its virus database does not contain the description of this particular virus yet. In such as case, you can trust the manual malware extermination recommendations we provide below the article.
Uninstall from Windows
Uninstall from Windows 10/8:
- Type Control Panel into the Windows search box and open the result.
- Under Programs, select Uninstall a program.


Uninstall from Windows 7/XP:
- Click on Windows Start > Control Panel (Windows XP users should click on Add/Remove Programs).
- In Control Panel, select Programs > Uninstall a program.


Remove the unwanted program:
- In the Programs and Features window, look for any recently installed suspicious entries, select them, and click Uninstall.
- If User Account Control appears, click Yes to confirm, then complete the removal.


Delete from macOS
Remove the unwanted application:
- From the menu bar, select Go > Applications.
- In the Applications folder, look for any suspicious entries, then drag them to Trash (or right-click and pick Move to Trash).


Delete leftover files and folders:
- Select Go > Go to Folder.
- Enter /Library/Application Support and remove any suspicious folders related to the unwanted program.
- Repeat the same check in the /Library/LaunchAgents and /Library/LaunchDaemons folders, deleting any suspicious entries.

- Finally, empty the Trash to permanently remove the leftovers.

Reset Internet Explorer
Remove dangerous add-ons:
- Open Internet Explorer, click on the Gear icon (IE menu) on the top-right corner of the browser
- Pick Manage Add-ons.
- You will see a Manage Add-ons window. Here, look for suspicious plugins. Click on these entries and select Disable.


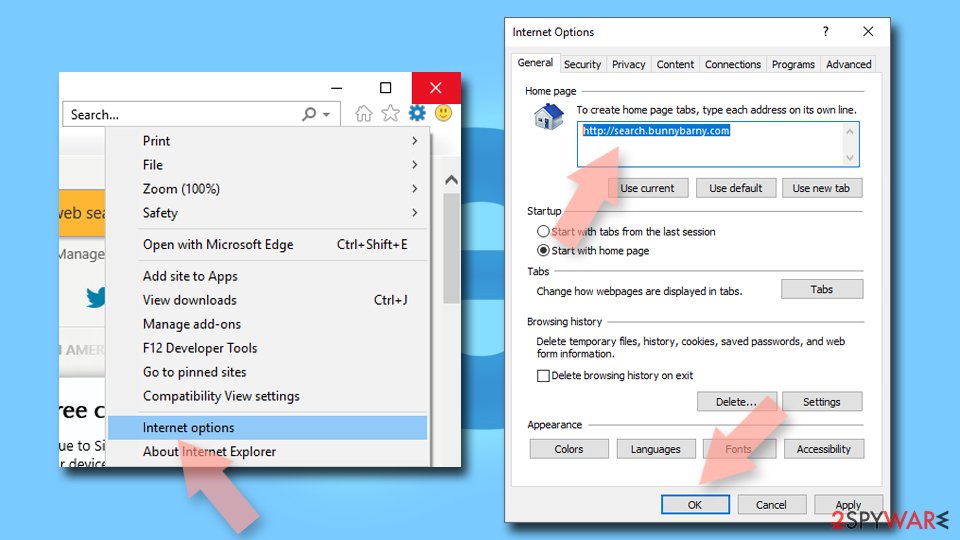
Change your homepage if it was altered:
- Open IE and click on the Gear icon.
- Select Internet Options.
- In the General tab, delete the Home page address and replace it by your preferred one (for example, Google.com).
- Click Apply and then select OK.

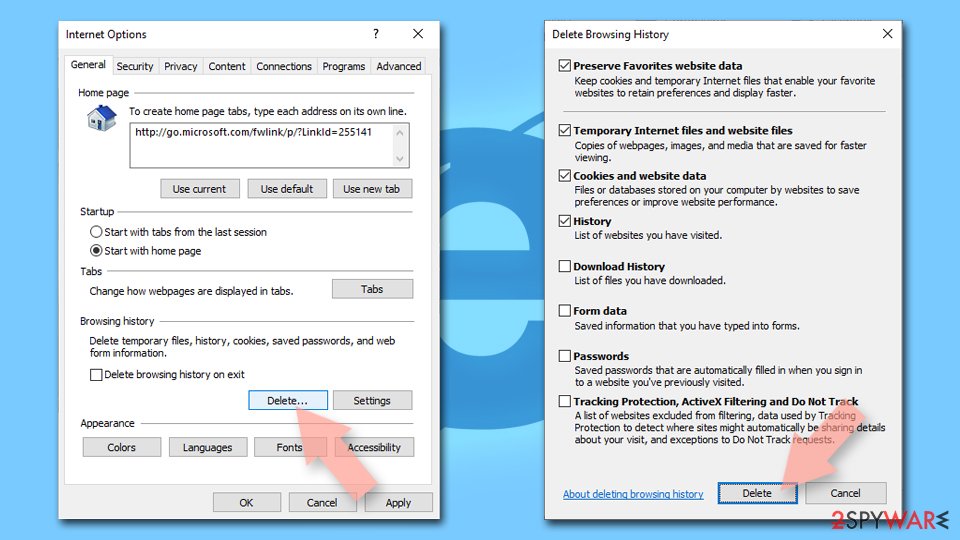
Delete temporary files:
- Press on the Gear icon and select Internet Options.
- Under Browsing history, click Delete...
- Select relevant fields and press Delete.

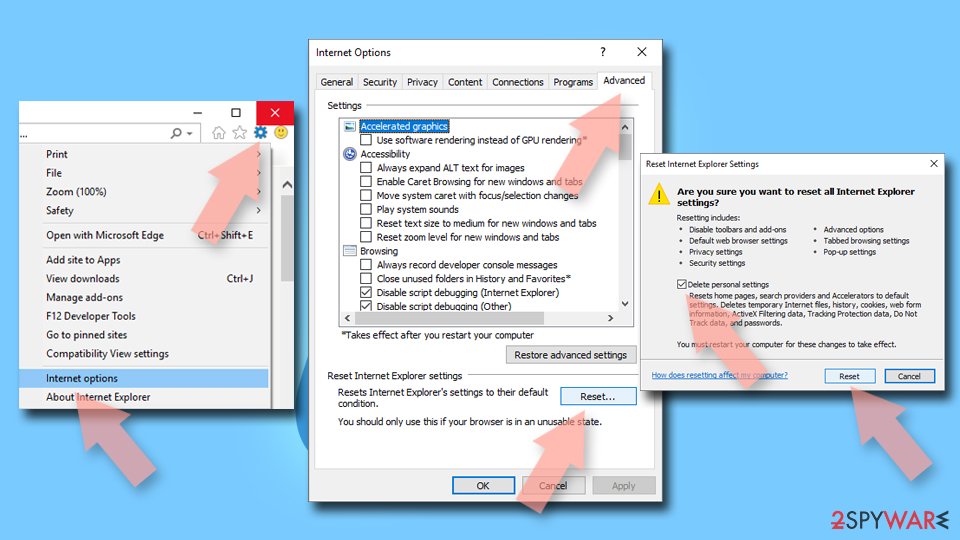
Reset Internet Explorer:
- Click on Gear icon > Internet options and select Advanced tab.
- Select Reset.
- In the new window, check Delete personal settings and select Reset.

Remove from Microsoft Edge
Delete unwanted extensions from MS Edge:
- Select Menu (three horizontal dots at the top-right of the browser window) and pick Extensions.
- From the list, pick the extension and click on the Gear icon.
- Click Remove.


Clear cookies and other browser data:
- Click on the Menu (three horizontal dots at the top-right of the browser window) and select Settings > Privacy, search, and services..
- Under Clear browsing data, pick Choose what to clear.
- Select Cookies and other site data and Cached images and files. (apart from passwords, although you might want to include Media licenses as well, if applicable) and click on Clear.


Restore new tab and homepage settings:
- Click the menu icon and choose Settings.
- Then find On startup section.
- Click Remove next to any suspicious startup page.
Reset MS Edge if the above steps did not work:
- Press on Ctrl + Shift + Esc to open Task Manager.
- Click on More details arrow at the bottom of the window.
- Select Details tab.
- Now scroll down and locate every entry with Microsoft Edge name in it. Right-click on each of them and select End Task to stop MS Edge from running.


Instructions for Chromium-based Edge
Delete extensions from MS Edge (Chromium):
- Open Edge and click select Settings > Extensions.
- Delete unwanted extensions by clicking Remove.


Clear cache and site data:
- Click on Menu and go to Settings.
- Select Privacy, search and services.
- Under Clear browsing data, pick Choose what to clear.
- Under Time range, pick All time.
- Select Clear now.


Reset Chromium-based MS Edge:
- Click on Menu and select Settings.
- On the left side, pick Reset settings.
- Select Restore settings to their default values.
- Confirm with Reset.
- This will disable extensions and reset startup pages but will not delete bookmarks, saved passwords, or browsing history.


Remove from Mozilla Firefox (FF)
Remove dangerous extensions:
- Open Mozilla Firefox browser and click on the Menu (three horizontal lines at the top-right of the window).
- Select Add-ons.
- In here, select the unwanted extension and click Remove.


Reset the homepage:
- Click three horizontal lines at the top right corner to open the menu.
- Choose Settings.
- Under Home, set your preferred homepage and new tab settings.
Clear cookies and site data:
- Click Menu and pick Settings.
- Go to Privacy & Security section.
- Scroll down to locate Cookies and Site Data.
- Click on Clear Data...
- Select Cookies and Site Data and Temporary cached files and pages, then click Clear.


Reset Mozilla Firefox
If clearing the browser as explained above did not help, reset Mozilla Firefox:
- Open Mozilla Firefox browser and click the Menu.
- Go to Help and then choose Troubleshooting Information.

- Under Give Firefox a tune up section, click on Refresh Firefox...
- Once the pop-up shows up, confirm the action by pressing on Refresh Firefox.


Remove from Google Chrome
Delete malicious extensions from Google Chrome:
- Open Google Chrome, click on the Menu (three vertical dots at the top-right corner) and select More tools > Extensions.
- In the newly opened window, you will see all the installed extensions. Uninstall all suspicious extensions related to the unwanted program by clicking Remove.


Clear cache and web data from Chrome:
- Click on Menu and pick Settings.
- Under Privacy and security, select Clear browsing data.
- Select Browsing history, Cookies and other site data, as well as Cached images and files.
- Click Clear data.


Change your homepage:
- Click menu and choose Settings.
- Look for a suspicious site in the On startup section.
- Click on Open a specific or set of pages and click on three dots to find the Remove option.
Reset Google Chrome:
If the previous methods did not help you, reset Google Chrome to eliminate all the unwanted components:
- Click on Menu and select Settings.
- In the Settings, scroll down and click Advanced.
- Scroll down and locate Reset and clean up section.
- Now click Restore settings to their original defaults.
- Confirm with Reset settings.


Delete from Safari
Remove dangerous extensions:
- Open Safari, click Safari in the menu at the top-left of the screen, and select Preferences.
- Go to the Extensions tab, look for any suspicious entries, and click Uninstall to remove them.


Clear history and website data:
- Click Safari in the menu and pick Clear History.
- Set Clear to all history and confirm with Clear History.


Reset Safari:
- Click Safari in the menu and select Preferences > Advanced.
- Enable Show Develop menu in menu bar.
- From the menu bar, click Develop and select Empty Caches.


Was this guide helpful?
Be the first to comment