

Netfind – a browser-hijacking app capable of compromising systems without authorization
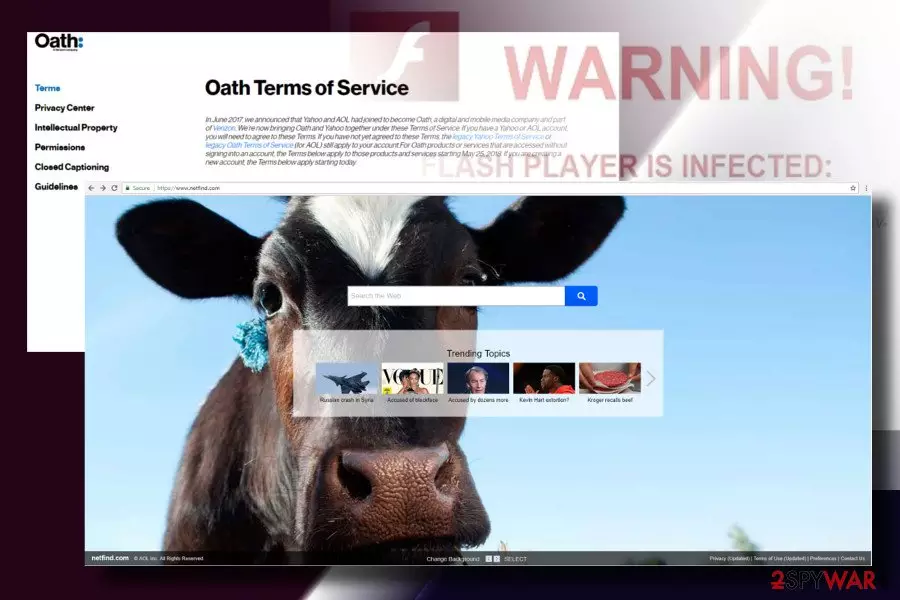
Netfind is a browser hijacker that was developed and maintained by AOL Inc.[1] From the initial inspection, it looks like a legitimate search site named Netfind.com with a search bar and some customization settings included on the startup page. However, reputable security vendors recognize it as a browser hijacker and potentially unwanted program (PUP). It is capable of installing on target PCs via freeware stacks and substituting the default startup page and search engine with Netfind.com URL. Remember, the fake search engine does not bring any true value as it usually provides misleading search results.
| Name | Netfind.com |
|---|---|
| Type of malware | Browser hijacker |
| Main dangers | Can redirect to malicious web domains, track personally non-identifiable data, generate intrusive ads |
| Main symptoms |
Corrupted web browser's settings, an excessive amount of pop-up ads, redirects to irrelevant websites |
| Danger level | Low |
| Browsers affected | Google Chrome, Mozilla Firefox, Internet Explorer, etc. |
| Elimination | Download FortectIntego and run a scan to get rid of PUPs. |
Netfind.com browser hijacker has been included in PUP database[2] since 2017 soon after cybersecurity experts found it spreading as an attachment of various free programs. Consequently, thousands of people installed it without even being aware of that. Upon installation, the Netfind virus seeks to take control over Chrome, Firefox, IE, Edge, Firefox or another web browser present on the system. Thus, it does the following changes:
- Disables confronting extensions;
- Replaces startup page and search provider;
- Changes a default URL address;
- Drops tracking cookies and monitors user's web browsing activities;
- Installs BHO (Browser Helper Objects) to evade Netfind.com removal;
- Displays excessive amounts of ads that belong to the affiliate parties;
- Provides altered search results that contain links to sponsored websites.
Although the PUP cannot harm the system on its own, it should not be used as equally as Google or Bing. Its purpose is to drive traffic to the websites of its partners and generate advertising revenue. You need to remove Netfind virus from your computer system before it causes any other unwanted consequences. For this case, download and install an anti-malware program such as FortectIntego. Feel free to use any other trusted tool if wanted.
The problem is that no one ensures the security of the partner's content. By using the provided fake search engine, you risk clicking on a link that is connected to a malicious or potentially malicious web domain that contains infected ads, fake updates, survey scams, and similar content. To avoid such possibilities, perform the Netfind removal as soon as you spot the browser modifications.

According to NoVirus.uk[3] analysis, this kind of potentially unwanted programs can also use cookies[4] and other tracking software without authorization. Netfind.com has an ability to collect data that is related to the user's browsing experience. Such details involve your IP address, saved bookmarks, pages and sites visited, photos viewed, and other similar components.
By the way, we would also like to mention that the Netfind.com virus is related to the infamous Yahoo search, which was discontinued a couple of years ago due to data leakage and other illicit activities. As pointed out, following Yahoo ban, AOL and Yahoo have been joined and become Oath.
In June 2017, we announced that Yahoo and AOL had joined to become Oath, a digital and mobile media company and part of Verizon. We’re now bringing Oath and Yahoo together under these Terms of Service.

Browser hijackers arrive in freeware bundles
To maximize the number of downloads, PUP developers append their products (add-ons, toolbars, extensions, etc.) to freeware and shareware as “optional components.” The whole freeware stack is installed without unfurling if the PC's user opts for Quick or Recommended installation option. Therefore, if you want to crack the bundle before installing it, you should choose Advanced installation option and check what the installation setup claims. If there's a point stating that clicking the Next button is treated as your consent to install all freeware components, unmark each additional component before hitting the Next.
Moreover, be careful while surfing the Internet as various PUPs and other serious infections might occur anywhere. Stay away from sites that are provided by secondary sources e.g. P2P networks[5]. Always be concentrated while proceeding various actions on the web. Furthermore, install an antivirus program that will detect various threats that your eye did not capture along the way.
Learn how to remove Netfind virus easily
Do not ignore abnormal activity of this browser hijacker. It's not only intrusive but can also expose your PC to various cyber threats and lead to malware infiltration. To restore your web browser's, such as Google Chrome, Mozilla Firefox, Internet Explorer, Safari, settings as they were before the Net Find attack, you'll have to remove Netfind virus first.
Although manual Netfind.com removal possibility exists, we would not recommend doing that. It's not clear how the program responsible for the hijack means, so you may need to initiate research on most of the apps installed on your PC to find out if it's malicious or not. However, you will be able to find manual elimination instructions below the article.
Instead of that, get rid of Netfind hijack with the help of a reputable anti-virus tool. Run a full system scan, and it will eliminate all PUPs in no time. Browsers such as Chrome, Firefox, Explorer, and others, will be able to function properly again as there will be no more active components that might have got thru the system during the infection.
Uninstall from Windows
Uninstall from Windows 10/8:
- Type Control Panel into the Windows search box and open the result.
- Under Programs, select Uninstall a program.


Uninstall from Windows 7/XP:
- Click on Windows Start > Control Panel (Windows XP users should click on Add/Remove Programs).
- In Control Panel, select Programs > Uninstall a program.


Remove the unwanted program:
- In the Programs and Features window, look for any recently installed suspicious entries, select them, and click Uninstall.
- If User Account Control appears, click Yes to confirm, then complete the removal.


Delete from macOS
Remove the unwanted application:
- From the menu bar, select Go > Applications.
- In the Applications folder, look for any suspicious entries, then drag them to Trash (or right-click and pick Move to Trash).


Delete leftover files and folders:
- Select Go > Go to Folder.
- Enter /Library/Application Support and remove any suspicious folders related to the unwanted program.
- Repeat the same check in the /Library/LaunchAgents and /Library/LaunchDaemons folders, deleting any suspicious entries.

- Finally, empty the Trash to permanently remove the leftovers.

Reset Internet Explorer
Remove dangerous add-ons:
- Open Internet Explorer, click on the Gear icon (IE menu) on the top-right corner of the browser
- Pick Manage Add-ons.
- You will see a Manage Add-ons window. Here, look for suspicious plugins. Click on these entries and select Disable.


Change your homepage if it was altered:
- Open IE and click on the Gear icon.
- Select Internet Options.
- In the General tab, delete the Home page address and replace it by your preferred one (for example, Google.com).
- Click Apply and then select OK.


Delete temporary files:
- Press on the Gear icon and select Internet Options.
- Under Browsing history, click Delete...
- Select relevant fields and press Delete.


Reset Internet Explorer:
- Click on Gear icon > Internet options and select Advanced tab.
- Select Reset.
- In the new window, check Delete personal settings and select Reset.


Remove from Microsoft Edge
Delete unwanted extensions from MS Edge:
- Select Menu (three horizontal dots at the top-right of the browser window) and pick Extensions.
- From the list, pick the extension and click on the Gear icon.
- Click Remove.


Clear cookies and other browser data:
- Click on the Menu (three horizontal dots at the top-right of the browser window) and select Settings > Privacy, search, and services..
- Under Clear browsing data, pick Choose what to clear.
- Select Cookies and other site data and Cached images and files. (apart from passwords, although you might want to include Media licenses as well, if applicable) and click on Clear.


Restore new tab and homepage settings:
- Click the menu icon and choose Settings.
- Then find On startup section.
- Click Remove next to any suspicious startup page.
Reset MS Edge if the above steps did not work:
- Press on Ctrl + Shift + Esc to open Task Manager.
- Click on More details arrow at the bottom of the window.
- Select Details tab.
- Now scroll down and locate every entry with Microsoft Edge name in it. Right-click on each of them and select End Task to stop MS Edge from running.


Instructions for Chromium-based Edge
Delete extensions from MS Edge (Chromium):
- Open Edge and click select Settings > Extensions.
- Delete unwanted extensions by clicking Remove.


Clear cache and site data:
- Click on Menu and go to Settings.
- Select Privacy, search and services.
- Under Clear browsing data, pick Choose what to clear.
- Under Time range, pick All time.
- Select Clear now.


Reset Chromium-based MS Edge:
- Click on Menu and select Settings.
- On the left side, pick Reset settings.
- Select Restore settings to their default values.
- Confirm with Reset.
- This will disable extensions and reset startup pages but will not delete bookmarks, saved passwords, or browsing history.


Remove from Mozilla Firefox (FF)
Remove dangerous extensions:
- Open Mozilla Firefox browser and click on the Menu (three horizontal lines at the top-right of the window).
- Select Add-ons.
- In here, select the unwanted extension and click Remove.


Reset the homepage:
- Click three horizontal lines at the top right corner to open the menu.
- Choose Settings.
- Under Home, set your preferred homepage and new tab settings.
Clear cookies and site data:
- Click Menu and pick Settings.
- Go to Privacy & Security section.
- Scroll down to locate Cookies and Site Data.
- Click on Clear Data...
- Select Cookies and Site Data and Temporary cached files and pages, then click Clear.


Reset Mozilla Firefox
If clearing the browser as explained above did not help, reset Mozilla Firefox:
- Open Mozilla Firefox browser and click the Menu.
- Go to Help and then choose Troubleshooting Information.

- Under Give Firefox a tune up section, click on Refresh Firefox...
- Once the pop-up shows up, confirm the action by pressing on Refresh Firefox.



Remove from Google Chrome
Delete malicious extensions from Google Chrome:
- Open Google Chrome, click on the Menu (three vertical dots at the top-right corner) and select More tools > Extensions.
- In the newly opened window, you will see all the installed extensions. Uninstall all suspicious extensions related to the unwanted program by clicking Remove.


Clear cache and web data from Chrome:
- Click on Menu and pick Settings.
- Under Privacy and security, select Clear browsing data.
- Select Browsing history, Cookies and other site data, as well as Cached images and files.
- Click Clear data.


Change your homepage:
- Click menu and choose Settings.
- Look for a suspicious site in the On startup section.
- Click on Open a specific or set of pages and click on three dots to find the Remove option.
Reset Google Chrome:
If the previous methods did not help you, reset Google Chrome to eliminate all the unwanted components:
- Click on Menu and select Settings.
- In the Settings, scroll down and click Advanced.
- Scroll down and locate Reset and clean up section.
- Now click Restore settings to their original defaults.
- Confirm with Reset settings.


Delete from Safari
Remove dangerous extensions:
- Open Safari, click Safari in the menu at the top-left of the screen, and select Preferences.
- Go to the Extensions tab, look for any suspicious entries, and click Uninstall to remove them.


Clear history and website data:
- Click Safari in the menu and pick Clear History.
- Set Clear to all history and confirm with Clear History.


Reset Safari:
- Click Safari in the menu and select Preferences > Advanced.
- Enable Show Develop menu in menu bar.
- From the menu bar, click Develop and select Empty Caches.


Did this guide help?
Be the first to comment