

The doubtful Search.anysearchmac.com search service is provided by Safe Finder
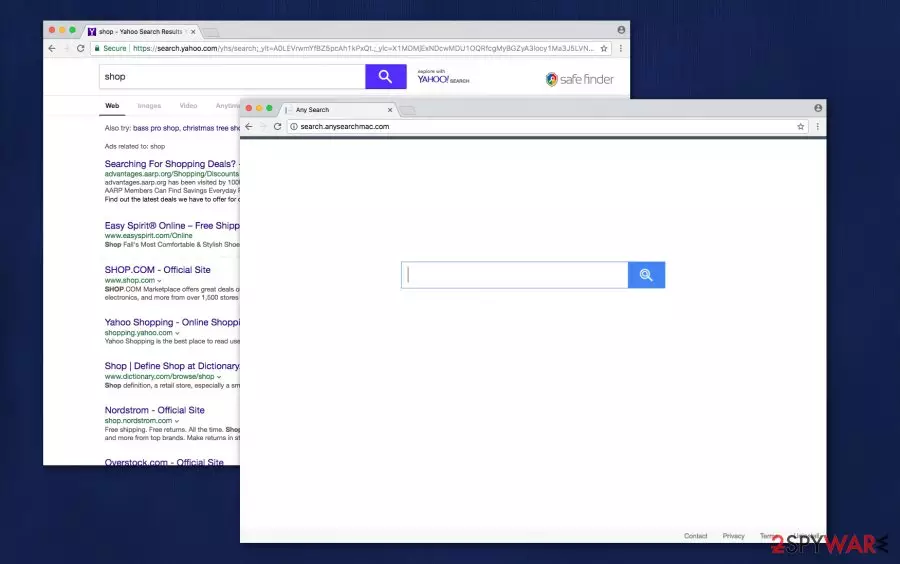
Search.anysearchmac.com is mostly known for its doubtful web search services. It is closely associated with Safe Finder virus (by Linkury Ltd.) which has been causing headache for computer users for years. Finding AnySearchMac homepage in your browser means that your computer has been infected with potentially unwanted programs (PUPs) that belong to browser hijackers category.
Surely, computer users are interested in improving their search results, and Search.anysearchmac.com virus promises it. Thus, inexperienced users might download this browser hijacker[1] which usually insists on using its services daily. It provides search results that contain various sponsored ads which are likely to contain hazardous links pointing to external Internet sites.
Don’t be deceived — even if the developers claim that they prioritize your interests, the primary goal is to lure as many people as they can into clicking on sponsored ads. As a result, AnySearchMac drives traffic to predetermined web pages and generates pay-per-click type revenue for its developers.
Besides, Any Search Mac is not responsible for the content of the advertisements it promotes. Therefore, there is a high possibility that if you click on the ad, you may be redirected[2] to vague websites which are explicitly designed to distribute computer infections stealthily. If you want to protect your system, we recommend you to avoid visiting suspicious sites or clicking on sponsored ads.
Moreover, AnySearchMac collects various information about the user’s browsing habits. This data might be misused if the user submits his/her personal details in the search bar. As a result, s/he may face some severe privacy issues or even identity theft. Thus, you should never provide your credit card details or any other information that can be personally identifiable.
Also, analysts noticed that it is impossible to reach pages of Privacy Policy or Terms of Use since the website’s server DNS address could not be found. It surely doesn’t increase AnySearchMac’s trustworthiness — the user should be informed about any secret activity this fake search engine might perform.
However, we want to emphasize that the hijacker is not a malicious virus. But it protects itself from quick and easy elimination. Thus, potentially unwanted programs (PUPs) or other plug-ins are programmed to automatically reassign new tab URL, homepage and default search engine to hxxps://search.anysearchmac.com, once the user attempts to change it to the previous stage. Novirus.uk team suggests that keeping such programs on the computer is simply a waste of disk's space.[3]
Some computer users might get frustrated by the process and continue to use fake search engine’s services. We have a solution for you — remove Search.anysearchmac.com using FortectIntego or any other reliable security software and protect your privacy.

You can find potentially unwanted programs in your daily downloads
Developers take advantage of people who are in a rush and bundle hijackers with third-party applications. Thus, the users who skip the majority of the installation steps can unconsciously agree to download and install the potentially unwanted program (PUP).
We recommend avoiding Quick or Recommended settings since they won't give you a chance to detect the hidden hijacker. Instead, you should opt for Advanced or Custom settings and carefully configure components of your download. Do not forget to read all of the statements provided in the expanded installer's window, especially ones written in fine print.
If you see a preselected options agreeing to modify your browser settings, immediately untick the boxes and scan your system for infections.
Remove Search.anysearchmac.com using proper instructions or software
You can start a Search.anysearchmac.com removal process by choosing a method you want to use — the automatic or manual one. Please do not ignore the existence of AnySearchMac as it seriously deteriorates your browsing experience and gives nothing but ads in return.
Our IT professionals suggest opting for automatic elimination since your computer might be infected with other high-risk infections. It is not enough to get rid of only one virus in order to protect your data. You should download a reliable antivirus system and run a full data scan.
However, if you still choose to remove search.anysearchmac.com virus manually, follow the detailed guide presented below.
Uninstall from Windows
Uninstall from Windows 10/8:
- Type Control Panel into the Windows search box and open the result.
- Under Programs, select Uninstall a program.


Uninstall from Windows 7/XP:
- Click on Windows Start > Control Panel (Windows XP users should click on Add/Remove Programs).
- In Control Panel, select Programs > Uninstall a program.


Remove the unwanted program:
- In the Programs and Features window, look for any recently installed suspicious entries, select them, and click Uninstall.
- If User Account Control appears, click Yes to confirm, then complete the removal.


Delete from macOS
Remove the unwanted application:
- From the menu bar, select Go > Applications.
- In the Applications folder, look for any suspicious entries, then drag them to Trash (or right-click and pick Move to Trash).


Delete leftover files and folders:
- Select Go > Go to Folder.
- Enter /Library/Application Support and remove any suspicious folders related to the unwanted program.
- Repeat the same check in the /Library/LaunchAgents and /Library/LaunchDaemons folders, deleting any suspicious entries.

- Finally, empty the Trash to permanently remove the leftovers.

Reset Internet Explorer
Remove dangerous add-ons:
- Open Internet Explorer, click on the Gear icon (IE menu) on the top-right corner of the browser
- Pick Manage Add-ons.
- You will see a Manage Add-ons window. Here, look for suspicious plugins. Click on these entries and select Disable.


Change your homepage if it was altered:
- Open IE and click on the Gear icon.
- Select Internet Options.
- In the General tab, delete the Home page address and replace it by your preferred one (for example, Google.com).
- Click Apply and then select OK.


Delete temporary files:
- Press on the Gear icon and select Internet Options.
- Under Browsing history, click Delete...
- Select relevant fields and press Delete.


Reset Internet Explorer:
- Click on Gear icon > Internet options and select Advanced tab.
- Select Reset.
- In the new window, check Delete personal settings and select Reset.


Remove from Microsoft Edge
Delete unwanted extensions from MS Edge:
- Select Menu (three horizontal dots at the top-right of the browser window) and pick Extensions.
- From the list, pick the extension and click on the Gear icon.
- Click Remove.


Clear cookies and other browser data:
- Click on the Menu (three horizontal dots at the top-right of the browser window) and select Settings > Privacy, search, and services..
- Under Clear browsing data, pick Choose what to clear.
- Select Cookies and other site data and Cached images and files. (apart from passwords, although you might want to include Media licenses as well, if applicable) and click on Clear.


Restore new tab and homepage settings:
- Click the menu icon and choose Settings.
- Then find On startup section.
- Click Remove next to any suspicious startup page.
Reset MS Edge if the above steps did not work:
- Press on Ctrl + Shift + Esc to open Task Manager.
- Click on More details arrow at the bottom of the window.
- Select Details tab.
- Now scroll down and locate every entry with Microsoft Edge name in it. Right-click on each of them and select End Task to stop MS Edge from running.


Instructions for Chromium-based Edge
Delete extensions from MS Edge (Chromium):
- Open Edge and click select Settings > Extensions.
- Delete unwanted extensions by clicking Remove.


Clear cache and site data:
- Click on Menu and go to Settings.
- Select Privacy, search and services.
- Under Clear browsing data, pick Choose what to clear.
- Under Time range, pick All time.
- Select Clear now.


Reset Chromium-based MS Edge:
- Click on Menu and select Settings.
- On the left side, pick Reset settings.
- Select Restore settings to their default values.
- Confirm with Reset.
- This will disable extensions and reset startup pages but will not delete bookmarks, saved passwords, or browsing history.


Remove from Mozilla Firefox (FF)
Remove dangerous extensions:
- Open Mozilla Firefox browser and click on the Menu (three horizontal lines at the top-right of the window).
- Select Add-ons.
- In here, select the unwanted extension and click Remove.


Reset the homepage:
- Click three horizontal lines at the top right corner to open the menu.
- Choose Settings.
- Under Home, set your preferred homepage and new tab settings.
Clear cookies and site data:
- Click Menu and pick Settings.
- Go to Privacy & Security section.
- Scroll down to locate Cookies and Site Data.
- Click on Clear Data...
- Select Cookies and Site Data and Temporary cached files and pages, then click Clear.


Reset Mozilla Firefox
If clearing the browser as explained above did not help, reset Mozilla Firefox:
- Open Mozilla Firefox browser and click the Menu.
- Go to Help and then choose Troubleshooting Information.

- Under Give Firefox a tune up section, click on Refresh Firefox...
- Once the pop-up shows up, confirm the action by pressing on Refresh Firefox.



Remove from Google Chrome
Delete malicious extensions from Google Chrome:
- Open Google Chrome, click on the Menu (three vertical dots at the top-right corner) and select More tools > Extensions.
- In the newly opened window, you will see all the installed extensions. Uninstall all suspicious extensions related to the unwanted program by clicking Remove.


Clear cache and web data from Chrome:
- Click on Menu and pick Settings.
- Under Privacy and security, select Clear browsing data.
- Select Browsing history, Cookies and other site data, as well as Cached images and files.
- Click Clear data.


Change your homepage:
- Click menu and choose Settings.
- Look for a suspicious site in the On startup section.
- Click on Open a specific or set of pages and click on three dots to find the Remove option.
Reset Google Chrome:
If the previous methods did not help you, reset Google Chrome to eliminate all the unwanted components:
- Click on Menu and select Settings.
- In the Settings, scroll down and click Advanced.
- Scroll down and locate Reset and clean up section.
- Now click Restore settings to their original defaults.
- Confirm with Reset settings.


Delete from Safari
Remove dangerous extensions:
- Open Safari, click Safari in the menu at the top-left of the screen, and select Preferences.
- Go to the Extensions tab, look for any suspicious entries, and click Uninstall to remove them.


Clear history and website data:
- Click Safari in the menu and pick Clear History.
- Set Clear to all history and confirm with Clear History.


Reset Safari:
- Click Safari in the menu and select Preferences > Advanced.
- Enable Show Develop menu in menu bar.
- From the menu bar, click Develop and select Empty Caches.


Did this guide help?
Be the first to comment