Reasons why you shouldn’t use Search.searchdirma.com
Search.searchdirma.com is a suspicious search engine, and you should stay away from it. Despite the fact this website looks like a regular search provider, it is classified as a potentially unwanted program (PUP)[1] and a browser hijacker[2] because of its negative features. First of all, Search.searchdirma.com virus gets inside computers bundled with other free software and hijacks all popular web browsers that are installed on the targeted computer. It replaces current homepage, default search engine, and new tab’s address with its domain. In this way, Search.searchdirma.com browser hijacker forces people to use its service. This suspicious search engine has been created to deliver sponsored content[3] and boost traffic to the promotional third-party websites. Whenever a user clicks on such false search result and gets redirected to any of the third-party sites, the developers of this PUP earn pay-per-click[4] revenue from its third-party sponsor. Unfortunately, these redirects may lead you to insecure web sources that might be infectious, so we do not recommend you to use this search engine. To avoid such suspicious redirects, remove Search.searchdirma.com as soon as you can and use a more reliable search engine instead of it. You can delete this hijacker with FortectIntego or another anti-spyware software of your choice.
Search.searchdirma.com redirect issues are the most worrying features of the browser hijacker. Compared with other cyber infections, browser hijackers are not hazardous and cannot cause huge damage to the computer. However, they can let you browse potentially dangerous places online[5] where you can encounter ransomware, malware or other online scams. Possibility to visit a malicious website after clicking on the search result or after being unexpectedly redirected to the third-party website is a pretty good reason to rush with Search.searchdirma.com removal. What is more, there’s always a possibility that this potentially unwanted application tracks your browsing history and habits. This activity allows delivering target ads and personalized commercial content. However, you can never be sure how aggregated information might be used.

When did hijack occur?
Potentially unwanted programs just like Search.searchdirma.com virus are spread via bundled software, so if you do not want to download and install this program without your knowledge, be careful whenever you download any free program from the Internet. There is a chance that it might be a bundled software, so you have to check whether it has some bonus apps added to it or not. You can do that by selecting Advanced or Custom installation option on the software’s setup menu. If your selected program has some extra apps added to it, you should see a list of them after configuring the installation settings. Deselect the suggestions to install them; the chances are high that these programs are untrustworthy ones. Besides, you should always read the Privacy Policy and License Agreement before installing new programs. These documents reveal an important information related to affiliates or data collection.
How to remove Search.searchdirma.com?
After Search.searchdirma.com hijack, you should not think about anything else but how to remove it from the computer. Sadly, you cannot just simply replace this domain with other homepage and search engine address. The hijacker is created in a way that it rejects all these changes. Hence, you have to put more effort. You have to remove Search.searchdirma.com from the computer first and only then, reset browser’s settings. Removal can be initiated in two ways – manual or automatic. The first method is more complicated and requires investigating computer’s system on your own. However, our prepared instructions should help you to complete Search.searchdirma.com removal successfully. However, if manual removal seems to be a complicated task, please go for automatic elimination. It’s a quick and effective to clean your computer.
Uninstall from Windows
Uninstall from Windows 10/8:
- Type Control Panel into the Windows search box and open the result.
- Under Programs, select Uninstall a program.


Uninstall from Windows 7/XP:
- Click on Windows Start > Control Panel (Windows XP users should click on Add/Remove Programs).
- In Control Panel, select Programs > Uninstall a program.


Remove the unwanted program:
- In the Programs and Features window, look for any recently installed suspicious entries, select them, and click Uninstall.
- If User Account Control appears, click Yes to confirm, then complete the removal.


Delete from macOS
Remove the unwanted application:
- From the menu bar, select Go > Applications.
- In the Applications folder, look for any suspicious entries, then drag them to Trash (or right-click and pick Move to Trash).


Delete leftover files and folders:
- Select Go > Go to Folder.
- Enter /Library/Application Support and remove any suspicious folders related to the unwanted program.
- Repeat the same check in the /Library/LaunchAgents and /Library/LaunchDaemons folders, deleting any suspicious entries.

- Finally, empty the Trash to permanently remove the leftovers.

Reset Internet Explorer
Remove dangerous add-ons:
- Open Internet Explorer, click on the Gear icon (IE menu) on the top-right corner of the browser
- Pick Manage Add-ons.
- You will see a Manage Add-ons window. Here, look for suspicious plugins. Click on these entries and select Disable.


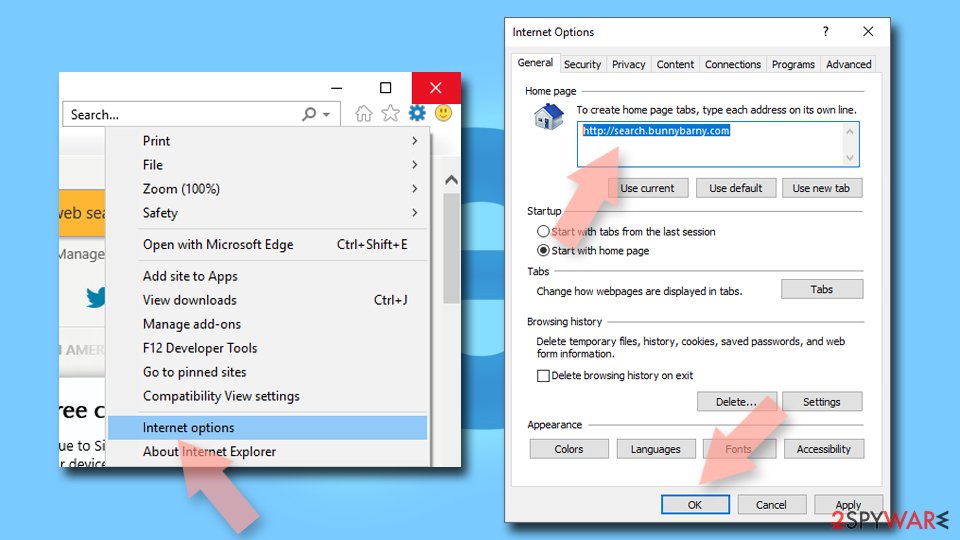
Change your homepage if it was altered:
- Open IE and click on the Gear icon.
- Select Internet Options.
- In the General tab, delete the Home page address and replace it by your preferred one (for example, Google.com).
- Click Apply and then select OK.

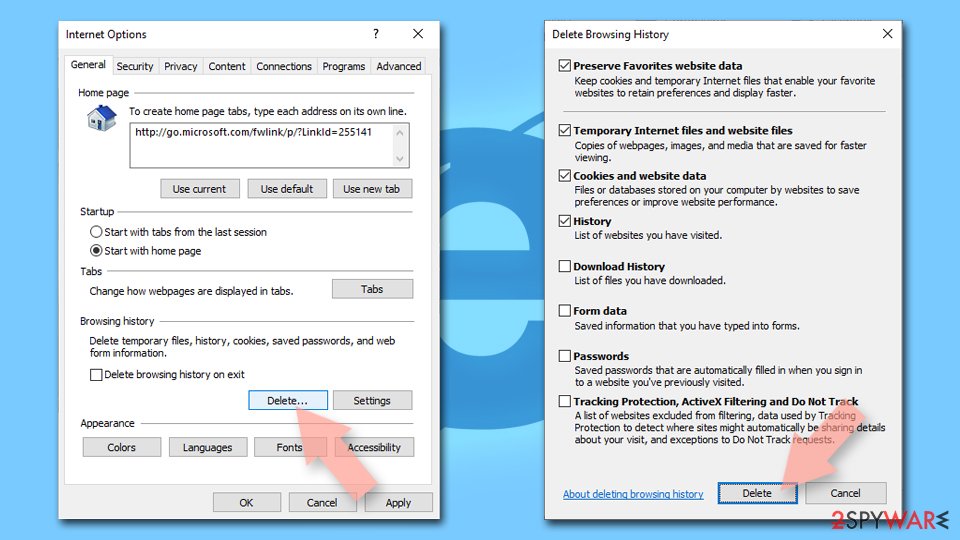
Delete temporary files:
- Press on the Gear icon and select Internet Options.
- Under Browsing history, click Delete...
- Select relevant fields and press Delete.

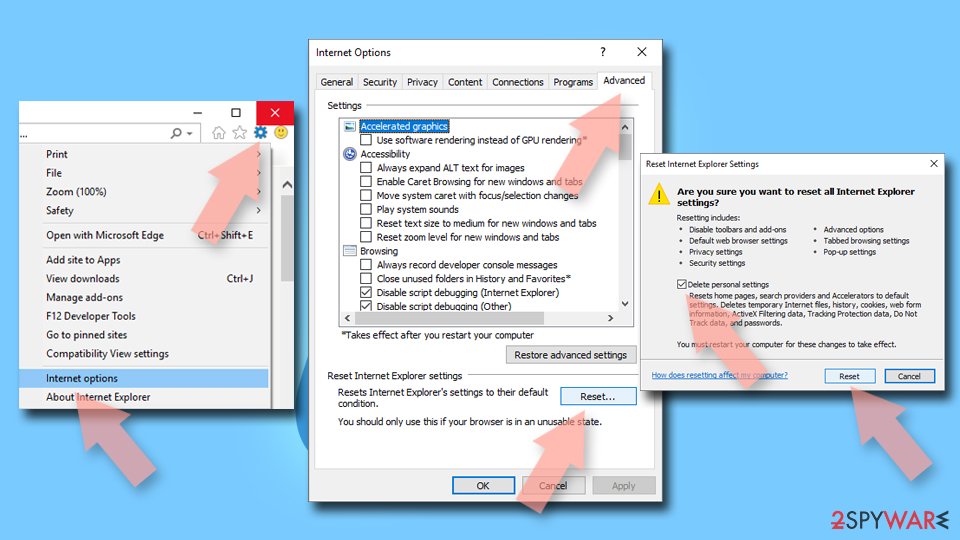
Reset Internet Explorer:
- Click on Gear icon > Internet options and select Advanced tab.
- Select Reset.
- In the new window, check Delete personal settings and select Reset.

Remove from Microsoft Edge
Delete unwanted extensions from MS Edge:
- Select Menu (three horizontal dots at the top-right of the browser window) and pick Extensions.
- From the list, pick the extension and click on the Gear icon.
- Click Remove.


Clear cookies and other browser data:
- Click on the Menu (three horizontal dots at the top-right of the browser window) and select Settings > Privacy, search, and services..
- Under Clear browsing data, pick Choose what to clear.
- Select Cookies and other site data and Cached images and files. (apart from passwords, although you might want to include Media licenses as well, if applicable) and click on Clear.


Restore new tab and homepage settings:
- Click the menu icon and choose Settings.
- Then find On startup section.
- Click Remove next to any suspicious startup page.
Reset MS Edge if the above steps did not work:
- Press on Ctrl + Shift + Esc to open Task Manager.
- Click on More details arrow at the bottom of the window.
- Select Details tab.
- Now scroll down and locate every entry with Microsoft Edge name in it. Right-click on each of them and select End Task to stop MS Edge from running.


Instructions for Chromium-based Edge
Delete extensions from MS Edge (Chromium):
- Open Edge and click select Settings > Extensions.
- Delete unwanted extensions by clicking Remove.


Clear cache and site data:
- Click on Menu and go to Settings.
- Select Privacy, search and services.
- Under Clear browsing data, pick Choose what to clear.
- Under Time range, pick All time.
- Select Clear now.


Reset Chromium-based MS Edge:
- Click on Menu and select Settings.
- On the left side, pick Reset settings.
- Select Restore settings to their default values.
- Confirm with Reset.
- This will disable extensions and reset startup pages but will not delete bookmarks, saved passwords, or browsing history.


Remove from Mozilla Firefox (FF)
Remove dangerous extensions:
- Open Mozilla Firefox browser and click on the Menu (three horizontal lines at the top-right of the window).
- Select Add-ons.
- In here, select the unwanted extension and click Remove.


Reset the homepage:
- Click three horizontal lines at the top right corner to open the menu.
- Choose Settings.
- Under Home, set your preferred homepage and new tab settings.
Clear cookies and site data:
- Click Menu and pick Settings.
- Go to Privacy & Security section.
- Scroll down to locate Cookies and Site Data.
- Click on Clear Data...
- Select Cookies and Site Data and Temporary cached files and pages, then click Clear.


Reset Mozilla Firefox
If clearing the browser as explained above did not help, reset Mozilla Firefox:
- Open Mozilla Firefox browser and click the Menu.
- Go to Help and then choose Troubleshooting Information.

- Under Give Firefox a tune up section, click on Refresh Firefox...
- Once the pop-up shows up, confirm the action by pressing on Refresh Firefox.


Remove from Google Chrome
Delete malicious extensions from Google Chrome:
- Open Google Chrome, click on the Menu (three vertical dots at the top-right corner) and select More tools > Extensions.
- In the newly opened window, you will see all the installed extensions. Uninstall all suspicious extensions related to the unwanted program by clicking Remove.


Clear cache and web data from Chrome:
- Click on Menu and pick Settings.
- Under Privacy and security, select Clear browsing data.
- Select Browsing history, Cookies and other site data, as well as Cached images and files.
- Click Clear data.


Change your homepage:
- Click menu and choose Settings.
- Look for a suspicious site in the On startup section.
- Click on Open a specific or set of pages and click on three dots to find the Remove option.
Reset Google Chrome:
If the previous methods did not help you, reset Google Chrome to eliminate all the unwanted components:
- Click on Menu and select Settings.
- In the Settings, scroll down and click Advanced.
- Scroll down and locate Reset and clean up section.
- Now click Restore settings to their original defaults.
- Confirm with Reset settings.


Delete from Safari
Remove dangerous extensions:
- Open Safari, click Safari in the menu at the top-left of the screen, and select Preferences.
- Go to the Extensions tab, look for any suspicious entries, and click Uninstall to remove them.


Clear history and website data:
- Click Safari in the menu and pick Clear History.
- Set Clear to all history and confirm with Clear History.


Reset Safari:
- Click Safari in the menu and select Preferences > Advanced.
- Enable Show Develop menu in menu bar.
- From the menu bar, click Develop and select Empty Caches.


Was this guide helpful?
3 comments