URL:Blacklist is the false positive malware detection notification that mainly alerts about possibly dangerous URL that you visited

| Name | URL:Blacklist |
|---|---|
| Type | The virus detection alert that can possibly be related to adware or more dangerous cyber threat. This is possibly a false positive notification[2] |
| Issues | Browser crashes out of nowhere and pop-ups, random redirects, advertising material |
| Distribution | Freeware installations processes, other potentially unwanted programs, or malicious sites can all lead to a threat infiltration |
| Elimination | You can remove URL:Blacklist if needed with a powerful anti-malware tool. System scan using the additional program to the one that you already use can help determine the particular issue with this detection alert |
| System repair | You might benefit from a program like FortectIntego that checks for affected files or virus damage, so your device starts running smoother |
This is the detection that occurs on the AVG program, so that might be false-positive and triggered by some site or stealthy intruder. It is best to check for any other approval from a separate anti-malware tool. It any of those cannot detect URL:Blacklist on the system, you should think about rerunning the scan using your primary tool or switching to another engine/ malware removal tool entirely.
The message from the antivirus detection engine states about aborted connection or malicious site, block URL or says nothing at all just that the URL:Blacklist virus got terminated, so your system is secure. The alert pop-up also shows a particular path to the file or the connection to the site.
You can determine if the site is an advertising service or shady website with commercial content delivery. If so, you can be sure that the alert is related to adware-type infection[3] or a rogue website that triggers additional issues with the system, so you can remove URL:Blacklist with the help of anti-malware tools, other security programs. Check the machine using SpyHunterCombo Cleaner or MalwarebytesMalwarebytes to know for sure.

Trust proper tools and check if the URL:Blacklist detection is showing up on more than one AVG tool. These warnings' frequent appearance can indicate many different things, but always pay attention to the site or file that triggers these issues.
URL:Blacklist removal can be quick if you start with a web browser resetting and checking the system fully with another anti-malware tool or similar software. There are some compatibility issues too that can trigger false positives. When you run a few anti-malware or security tools at the same time, you can suffer from such messages.
Try to disable one and run the other to see what happens then and if the detection about URL:Blacklist appears again. Also, once you get the pop-up – check the site or file that triggered the detection yourself. You might need to tackle file issues or virus damage, so run FortectIntego to find any problems and possibly fix them. 
PUP spreading ways
These questionable antivirus tool alerts about detection or malicious sites, files you visit or want to download can appear in various instances. Mostly, users claim that pop-ups, warnings, and threat indications show up on the machine when the site is accessed or file download starts.
These suspicious appearances can be related to threats or triggered by the adware-type intruder, for example. It is common, especially when you tend to visit advertising services and similar pages with shady purposes. You need to avoid rogue sites and PUP infiltrations during freeware installations.
Go for legitimate sources of applications and programs, so you can avoid software bundling. Or always rely on Advanced/ Custom options, so the control is in your hands only and you are the one that allows or denies the installation of a file.
You might need to get rid of this URL:Blacklist virus with proper AV tools
The first thing you need to know about URL:Blacklist removal is the diagnosis and further examination of a trustworthy anti-malware tool. It is better to use another tool, not the one that showed you these alerts. It is better for double-checking.
Run a tool that can possibly remove URL:Blacklist if needed and see if the issue is detected too. If not – you might want to change the antivirus security provider, or reinstall the software, ask for help from support. You can rely on the tips below and fully reset the web browser that received alerts, so the browser-based threat gets eliminated.
Uninstall from Windows
Uninstall from Windows 10/8:
- Type Control Panel into the Windows search box and open the result.
- Under Programs, select Uninstall a program.


Uninstall from Windows 7/XP:
- Click on Windows Start > Control Panel (Windows XP users should click on Add/Remove Programs).
- In Control Panel, select Programs > Uninstall a program.


Remove the unwanted program:
- In the Programs and Features window, look for any recently installed suspicious entries, select them, and click Uninstall.
- If User Account Control appears, click Yes to confirm, then complete the removal.


Delete from macOS
Remove the unwanted application:
- From the menu bar, select Go > Applications.
- In the Applications folder, look for any suspicious entries, then drag them to Trash (or right-click and pick Move to Trash).


Delete leftover files and folders:
- Select Go > Go to Folder.
- Enter /Library/Application Support and remove any suspicious folders related to the unwanted program.
- Repeat the same check in the /Library/LaunchAgents and /Library/LaunchDaemons folders, deleting any suspicious entries.

- Finally, empty the Trash to permanently remove the leftovers.

Reset Internet Explorer
Remove dangerous add-ons:
- Open Internet Explorer, click on the Gear icon (IE menu) on the top-right corner of the browser
- Pick Manage Add-ons.
- You will see a Manage Add-ons window. Here, look for suspicious plugins. Click on these entries and select Disable.


Change your homepage if it was altered:
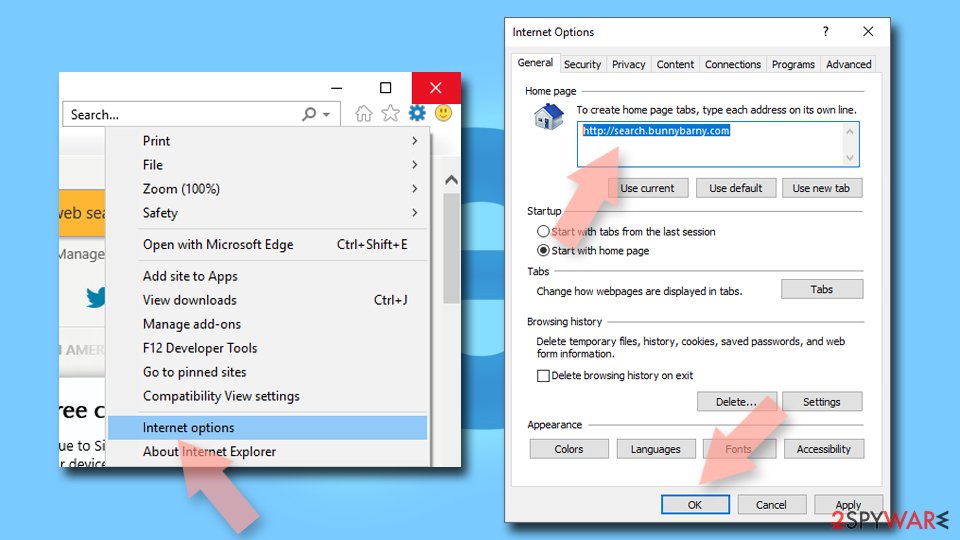
- Open IE and click on the Gear icon.
- Select Internet Options.
- In the General tab, delete the Home page address and replace it by your preferred one (for example, Google.com).
- Click Apply and then select OK.

Delete temporary files:
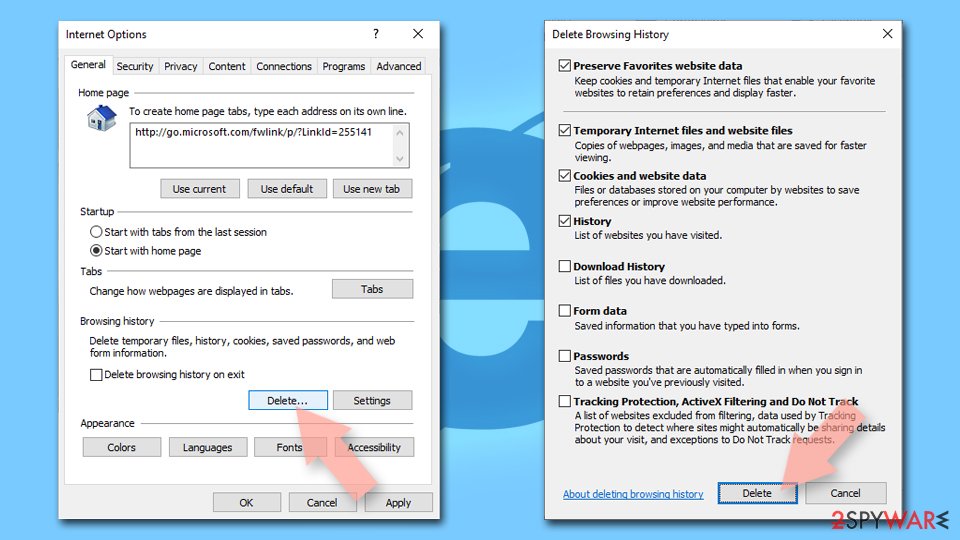
- Press on the Gear icon and select Internet Options.
- Under Browsing history, click Delete...
- Select relevant fields and press Delete.

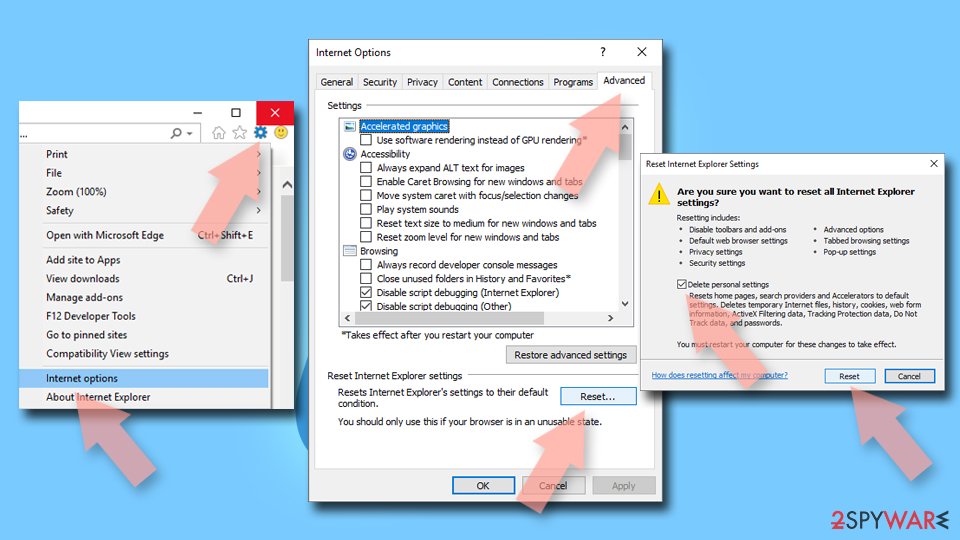
Reset Internet Explorer:
- Click on Gear icon > Internet options and select Advanced tab.
- Select Reset.
- In the new window, check Delete personal settings and select Reset.

Remove from Microsoft Edge
Delete unwanted extensions from MS Edge:
- Select Menu (three horizontal dots at the top-right of the browser window) and pick Extensions.
- From the list, pick the extension and click on the Gear icon.
- Click Remove.


Clear cookies and other browser data:
- Click on the Menu (three horizontal dots at the top-right of the browser window) and select Settings > Privacy, search, and services..
- Under Clear browsing data, pick Choose what to clear.
- Select Cookies and other site data and Cached images and files. (apart from passwords, although you might want to include Media licenses as well, if applicable) and click on Clear.


Restore new tab and homepage settings:
- Click the menu icon and choose Settings.
- Then find On startup section.
- Click Remove next to any suspicious startup page.
Reset MS Edge if the above steps did not work:
- Press on Ctrl + Shift + Esc to open Task Manager.
- Click on More details arrow at the bottom of the window.
- Select Details tab.
- Now scroll down and locate every entry with Microsoft Edge name in it. Right-click on each of them and select End Task to stop MS Edge from running.


Instructions for Chromium-based Edge
Delete extensions from MS Edge (Chromium):
- Open Edge and click select Settings > Extensions.
- Delete unwanted extensions by clicking Remove.


Clear cache and site data:
- Click on Menu and go to Settings.
- Select Privacy, search and services.
- Under Clear browsing data, pick Choose what to clear.
- Under Time range, pick All time.
- Select Clear now.


Reset Chromium-based MS Edge:
- Click on Menu and select Settings.
- On the left side, pick Reset settings.
- Select Restore settings to their default values.
- Confirm with Reset.
- This will disable extensions and reset startup pages but will not delete bookmarks, saved passwords, or browsing history.


Remove from Mozilla Firefox (FF)
Remove dangerous extensions:
- Open Mozilla Firefox browser and click on the Menu (three horizontal lines at the top-right of the window).
- Select Add-ons.
- In here, select the unwanted extension and click Remove.


Reset the homepage:
- Click three horizontal lines at the top right corner to open the menu.
- Choose Settings.
- Under Home, set your preferred homepage and new tab settings.
Clear cookies and site data:
- Click Menu and pick Settings.
- Go to Privacy & Security section.
- Scroll down to locate Cookies and Site Data.
- Click on Clear Data...
- Select Cookies and Site Data and Temporary cached files and pages, then click Clear.


Reset Mozilla Firefox
If clearing the browser as explained above did not help, reset Mozilla Firefox:
- Open Mozilla Firefox browser and click the Menu.
- Go to Help and then choose Troubleshooting Information.

- Under Give Firefox a tune up section, click on Refresh Firefox...
- Once the pop-up shows up, confirm the action by pressing on Refresh Firefox.


Remove from Google Chrome
Delete malicious extensions from Google Chrome:
- Open Google Chrome, click on the Menu (three vertical dots at the top-right corner) and select More tools > Extensions.
- In the newly opened window, you will see all the installed extensions. Uninstall all suspicious extensions related to the unwanted program by clicking Remove.


Clear cache and web data from Chrome:
- Click on Menu and pick Settings.
- Under Privacy and security, select Clear browsing data.
- Select Browsing history, Cookies and other site data, as well as Cached images and files.
- Click Clear data.


Change your homepage:
- Click menu and choose Settings.
- Look for a suspicious site in the On startup section.
- Click on Open a specific or set of pages and click on three dots to find the Remove option.
Reset Google Chrome:
If the previous methods did not help you, reset Google Chrome to eliminate all the unwanted components:
- Click on Menu and select Settings.
- In the Settings, scroll down and click Advanced.
- Scroll down and locate Reset and clean up section.
- Now click Restore settings to their original defaults.
- Confirm with Reset settings.


Delete from Safari
Remove dangerous extensions:
- Open Safari, click Safari in the menu at the top-left of the screen, and select Preferences.
- Go to the Extensions tab, look for any suspicious entries, and click Uninstall to remove them.


Clear history and website data:
- Click Safari in the menu and pick Clear History.
- Set Clear to all history and confirm with Clear History.


Reset Safari:
- Click Safari in the menu and select Preferences > Advanced.
- Enable Show Develop menu in menu bar.
- From the menu bar, click Develop and select Empty Caches.


Was this guide helpful?
Be the first to comment