

Hedsparthetretr.info is an unsafe site that is actively being promoted in adware campaigns

Hedsparthetretr.info is a push notification virus that disturbs users with intrusive advertisements on Mozilla Firefox, Google Chrome, Internet Explorer, Safari, Opera, and other browsers. The ads might show up in different forms, such as pop-ups, in-text links, banners, coupons, flashing windows even when the browser is turned off. For that reason, users are constantly being disturbed and are struggling to find relevant information during their web browser settings. Additionally, the advertisements Hedsparthetretr.info bring might sometimes be unsafe and lead to malware-laden or phishing sites.[1]
| Name | Hedsparthetretr.info |
| Type | Adware/PUP |
| Distribution | Software bundling, third-party sites |
| Risk factors | Money loss, installation of malware, sensitive information disclosure to unknown parties |
| Symptoms | Frequent redirects to suspicious domains, changes to web browser settings, including homepage or/and new tab address, intrusive pop-up ads showing up on all the websites, etc. |
| Termination | Use security software that focuses on PUPs or take advantage of our manual removal instructions below |
| Recovery | For a speedy recovery from Hedsparthetretr.info infection, use FortectIntego |
The reason why users see redirects to Hedsparthetretr.info is most likely due to adware[2] infection. These potentially unwanted programs are often included in software bundles, so manage to stay out of sight during the installation, as users fail to pick Advanced settings and remove Hedsparthetretr.info adware before it manages to get inside the computer.
If that happens, users are often linked to a variety of questionable domains, including Hedsparthetretr.info. Users are instantaneously asked to allow notifications to allegedly “continue”:
Hedsparthetretr.info wants to show Show notifications
Allow Block
Please tap the Allow button to continue
Those who allow notifications will be spammed with unwanted ads from Hedsparthetretr.info. On the other hand, pressing Block will not accomplish anything, as users will simply be redirected to the prompt repeatedly. The best way to handle the situation is to close down the browser or the tab.
Apart from suspicious redirecting tendencies, adware that exposes users to Hedsparthetretr.info virus can also collect a variety of information about them (with the help of such technologies as web beacons[3] or tracking cookies), including, but not limited to:
- IP address;
- Internet Service Provider;
- Technical details of the device;
- Links clicked;
- Websites visited;
- Duration of visited sites;
- Bookmarks added, etc.

The accumulated data is then used for targeted marketing campaigns to increase the visitor count of affiliated sites and artificially raise their rank. This scheme often operates a pay-per-click revenue-generating method, where adware authors receive money for every click that leads to affiliated sites. Unfortunately, when it comes to online safety, such behavior is not secure at all, as websites like Hedsparthetretr.info, Robotcaptcha.info, Hajoopteg.com, and others are promoted as legitimate (it's a scam).
Thus, hurry up and take care of Hajoopteg.com removal from your device. The easiest way is to use anti-virus software, although manual elimination is available as well – check for the instructions below. After the Hajoopteg.com virus termination, scan your device with FortectIntego to recover from the infection quickly.
Free software might result in your computer compromise – handle it with care
There are all sorts of free applications and, while some of them are entirely safe to use, others might straight out change the settings not only of the browser but also tamper with Windows registry or automatically install other malicious apps on Mac operating systems.
We are not saying that all apps that offer ads are dangerous – it is far from the truth. However, some ads are just safer than the others, and this factor highly depends on the developer of the program. Some simply do not care to check for the security of ads and include anything for the revenue. This is when the problems arise, as, while the app itself is not malicious, it might lead to compromised or malicious sites.
To avoid questionable applications that tamper with your browser settings, make sure you always opt for Advanced/Custom installation mode instead of Recommended one. In this way, you will be able to remove all the ticks from the boxes that offer additional apps.
Additionally, if you are dealing with the app you never encountered, make sure you read reviews online – they can often hint of something fishy immediately. Finally, install reputable security software that would keep malware away from your device.
Stop Hedsparthetretr.info redirects and notifications by eliminating the adware on your computer
If you are wondering how to remove Hedsparthetretr.info from your browser, there are two options: either use security software or terminate the threat manually with the help of our instructions below. The former is the best way to delete all unwanted applications from the computer with a straightforward press of a button. Nevertheless, you should be able to perform manual Hedsparthetretr.info removal without too many difficulties, especially if you did not click on any suspicious links or downloaded malicious programs while infected by adware.
If you allowed Hedsparthetretr.info virus to display notifications, you could stop them by either resetting each of the installed browsers or following these instructions:
Google Chrome
- Pick Menu and select Settings
- Go to Advanced
- Select Privacy and security > Content Settings > Notifications
- Locate Hedsparthetretr.info entry under Allow
- Click on More Actions and then pick Block
Mozilla Firefox:
- Go to Menu and choose Options
- select Privacy & Security > Notifications
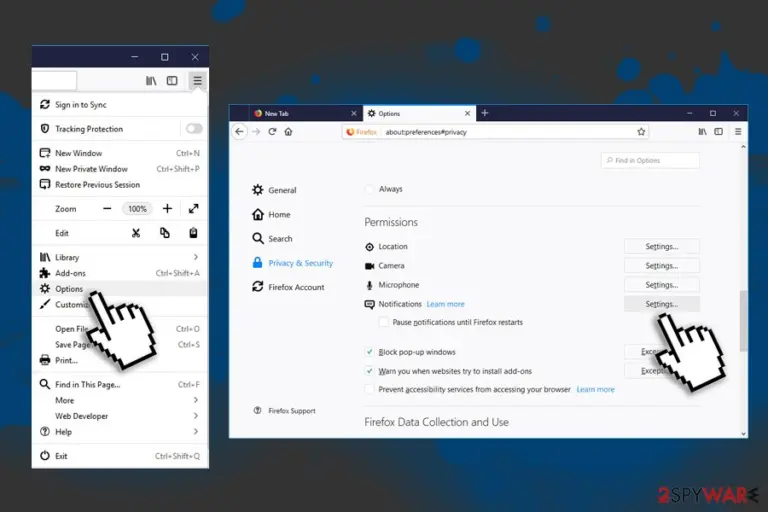
- Click on Settings and locate Hedsparthetretr.info
- Select Block from the drop-down menu to stop the unwanted notifications

Safari:
- Select Safari and then pick Preferences
- Go to Notifications
- Locate Hedsparthetretr.info entry and choose Deny
MS Edge:
- Select More and go to Settings
- Click on View advanced settings
- Turn off notifications from Hedsparthetretr.info
Uninstall from Windows
Uninstall from Windows 10/8:
- Type Control Panel into the Windows search box and open the result.
- Under Programs, select Uninstall a program.


Uninstall from Windows 7/XP:
- Click on Windows Start > Control Panel (Windows XP users should click on Add/Remove Programs).
- In Control Panel, select Programs > Uninstall a program.


Remove the unwanted program:
- In the Programs and Features window, look for any recently installed suspicious entries, select them, and click Uninstall.
- If User Account Control appears, click Yes to confirm, then complete the removal.


Delete from macOS
Remove the unwanted application:
- From the menu bar, select Go > Applications.
- In the Applications folder, look for any suspicious entries, then drag them to Trash (or right-click and pick Move to Trash).


Delete leftover files and folders:
- Select Go > Go to Folder.
- Enter /Library/Application Support and remove any suspicious folders related to the unwanted program.
- Repeat the same check in the /Library/LaunchAgents and /Library/LaunchDaemons folders, deleting any suspicious entries.

- Finally, empty the Trash to permanently remove the leftovers.

Reset Internet Explorer
Remove dangerous add-ons:
- Open Internet Explorer, click on the Gear icon (IE menu) on the top-right corner of the browser
- Pick Manage Add-ons.
- You will see a Manage Add-ons window. Here, look for suspicious plugins. Click on these entries and select Disable.


Change your homepage if it was altered:
- Open IE and click on the Gear icon.
- Select Internet Options.
- In the General tab, delete the Home page address and replace it by your preferred one (for example, Google.com).
- Click Apply and then select OK.


Delete temporary files:
- Press on the Gear icon and select Internet Options.
- Under Browsing history, click Delete...
- Select relevant fields and press Delete.


Reset Internet Explorer:
- Click on Gear icon > Internet options and select Advanced tab.
- Select Reset.
- In the new window, check Delete personal settings and select Reset.


Remove from Microsoft Edge
Delete unwanted extensions from MS Edge:
- Select Menu (three horizontal dots at the top-right of the browser window) and pick Extensions.
- From the list, pick the extension and click on the Gear icon.
- Click Remove.


Clear cookies and other browser data:
- Click on the Menu (three horizontal dots at the top-right of the browser window) and select Settings > Privacy, search, and services..
- Under Clear browsing data, pick Choose what to clear.
- Select Cookies and other site data and Cached images and files. (apart from passwords, although you might want to include Media licenses as well, if applicable) and click on Clear.


Restore new tab and homepage settings:
- Click the menu icon and choose Settings.
- Then find On startup section.
- Click Remove next to any suspicious startup page.
Reset MS Edge if the above steps did not work:
- Press on Ctrl + Shift + Esc to open Task Manager.
- Click on More details arrow at the bottom of the window.
- Select Details tab.
- Now scroll down and locate every entry with Microsoft Edge name in it. Right-click on each of them and select End Task to stop MS Edge from running.


Instructions for Chromium-based Edge
Delete extensions from MS Edge (Chromium):
- Open Edge and click select Settings > Extensions.
- Delete unwanted extensions by clicking Remove.


Clear cache and site data:
- Click on Menu and go to Settings.
- Select Privacy, search and services.
- Under Clear browsing data, pick Choose what to clear.
- Under Time range, pick All time.
- Select Clear now.


Reset Chromium-based MS Edge:
- Click on Menu and select Settings.
- On the left side, pick Reset settings.
- Select Restore settings to their default values.
- Confirm with Reset.
- This will disable extensions and reset startup pages but will not delete bookmarks, saved passwords, or browsing history.


Remove from Mozilla Firefox (FF)
Remove dangerous extensions:
- Open Mozilla Firefox browser and click on the Menu (three horizontal lines at the top-right of the window).
- Select Add-ons.
- In here, select the unwanted extension and click Remove.


Reset the homepage:
- Click three horizontal lines at the top right corner to open the menu.
- Choose Settings.
- Under Home, set your preferred homepage and new tab settings.
Clear cookies and site data:
- Click Menu and pick Settings.
- Go to Privacy & Security section.
- Scroll down to locate Cookies and Site Data.
- Click on Clear Data...
- Select Cookies and Site Data and Temporary cached files and pages, then click Clear.


Reset Mozilla Firefox
If clearing the browser as explained above did not help, reset Mozilla Firefox:
- Open Mozilla Firefox browser and click the Menu.
- Go to Help and then choose Troubleshooting Information.

- Under Give Firefox a tune up section, click on Refresh Firefox...
- Once the pop-up shows up, confirm the action by pressing on Refresh Firefox.



Remove from Google Chrome
Delete malicious extensions from Google Chrome:
- Open Google Chrome, click on the Menu (three vertical dots at the top-right corner) and select More tools > Extensions.
- In the newly opened window, you will see all the installed extensions. Uninstall all suspicious extensions related to the unwanted program by clicking Remove.


Clear cache and web data from Chrome:
- Click on Menu and pick Settings.
- Under Privacy and security, select Clear browsing data.
- Select Browsing history, Cookies and other site data, as well as Cached images and files.
- Click Clear data.


Change your homepage:
- Click menu and choose Settings.
- Look for a suspicious site in the On startup section.
- Click on Open a specific or set of pages and click on three dots to find the Remove option.
Reset Google Chrome:
If the previous methods did not help you, reset Google Chrome to eliminate all the unwanted components:
- Click on Menu and select Settings.
- In the Settings, scroll down and click Advanced.
- Scroll down and locate Reset and clean up section.
- Now click Restore settings to their original defaults.
- Confirm with Reset settings.


Delete from Safari
Remove dangerous extensions:
- Open Safari, click Safari in the menu at the top-left of the screen, and select Preferences.
- Go to the Extensions tab, look for any suspicious entries, and click Uninstall to remove them.


Clear history and website data:
- Click Safari in the menu and pick Clear History.
- Set Clear to all history and confirm with Clear History.


Reset Safari:
- Click Safari in the menu and select Preferences > Advanced.
- Enable Show Develop menu in menu bar.
- From the menu bar, click Develop and select Empty Caches.


Did this guide help?
Be the first to comment