

Outbyte PC Repair is a system optimizer that is approved by AppEsteem
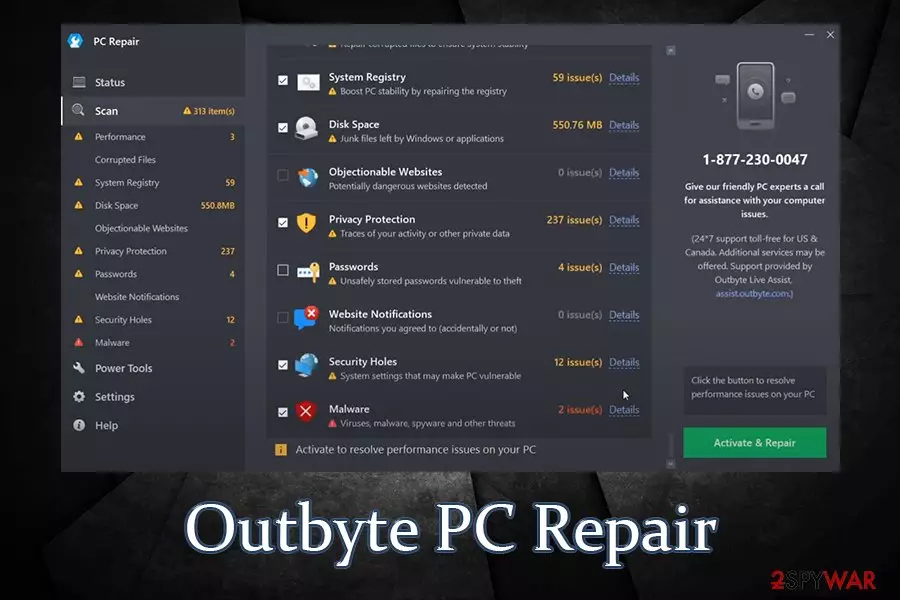
Outbyte PC Repair is a program that is designed to fix performance issues, protect privacy, report unsafe passwords, remove malware infections, etc. It is most commonly downloaded via the official website outbyte.com, although it can also be included as an optional component within a software bundle.
Although the app is just one of the hundreds of others that possess similar functionality, it is important to note that this app for Windows is an AppEsteem approved application and meets all the requirements of a certified app. Having that being said, some security applications might still mark it as a potentially unwanted program, as developers' affiliates used deceptive marketing practices. Currently, Outbyte PC Repair can be trusted, and it might be a good addition to computers of those who want to keep maintenance procedures automated.
| Name | Outbyte PC Repair |
| Type | PC optimizer |
| Distribution | Software bundles, official website |
| Developer | Outbyte Computing Pty Ltd. |
| Functionality | Looks for various computer issues (privacy issues, malware, registry errors, etc.) and fixes them |
| Process | PCRepair.exe is running in the background as soon as the app is launched |
| Detection | Program.Unwanted.4826, Hoax.Outbuy.a, A Variant Of Win32/Auslogics.AB Potentially Unwanted, PUP.Optional.Outbyte (Virus Total results) |
| Removal | You can uninstall the application via Control Panel – we provide the instructions below |
Since the application is flagged as a potentially unwanted program by some security vendors, you can choose to remove Outbyte PC Repair from your computer. We provide detailed instructions for this process below.
While many potentially unwanted programs typically collect a variety of data about users, this repair app seems to be doing well in this regard. Even though some limited amount of data is collected during the purchase of the product, this information is not shared with other parties, as explained in the Privacy Policy:
When you purchase Outbyte Computing Pty Ltd. products, you provide your personal contact, billing and shipping information to our payment processing partner, who retains the information needed for billing and shipping purposes, and information on your product licenses. Our payment processing partner shares with us the minimum information needed for us to provide service to you and handle your license. <…>
Outbyte Computing Pty Ltd. does not sell, rent or lease the collected information or part of it to any third party.
User privacy is very important in the day and age, where data breaches are a daily occurrence, and hackers are constantly trying to steal personal data for their own benefit. Therefore, Outbyte PC Repair can significantly improve ones' privacy – the app indicates which passwords are vulnerable to cyberattacks and also shows repeated passwords.
Keep in mind that using the same password for multiple accounts (regardless of how secure it is) is never safe. Once a website you have an account registered with gets breached, it instantly gets leaked and can later be used to brute force your other accounts. This is why the app can help you protect your privacy and prevent such negative consequences, such as monetary losses or even identity theft.

Besides privacy issues, the following sections are checked and repaired by Outbyte PC Repair:
- Performance
- Corrupted files
- System registry
- Disk space
- Objectionable websites
- Passwords
- Website notifications
- Security holes
- Malware
Possibly the biggest mess-up by the program was its distribution technique that was employed by rogue affiliates. In most cases, when users land on suspicious websites, they are shown a fake warning or a popup, which claims that something is outdated or that their computers are infected with viruses and need repairs.
The campaign that was used to distribute Outbyte PC Repair showed users system-like notifications that impersonated the Windows update window and also claimed that the system is missing cumulative updates. Indeed, fake updates for Windows and Flash Player are not adequate methods to advertise software. Luckily, the company behind the app fixed the past mistakes and apologized for the inadequate distribution practices, removing the rogue affiliate in the process.
For the threat or PUP removal, check the bottom section of this article. If you see any adverts after its termination, you should also reset the web browsers are explained below.

Pay attention to details to avoid bundling and PUP installations
While many potentially unwanted programs can be downloaded from their official websites, it is not mostly how users download them. Quite often, companies employ affiliates that run ads on specially crafted websites, and some of these websites can be less than secure.
Mostly, users are displayed fake messages about their computer health or that an update of particular software, as well as the operating system, is required. However, this is all scam to make them download and install the offered app – affiliates receive a commission for every of such downloads.
Therefore, it is in their best interest to make users download the software. In other words – a higher volume of downloads, higher payments from the app developers. Unfortunately, some of the programs distributed in such a way might be straight out malicious or serve as a backdoor for malware. Thus, it is important never to download anything that is offered through rogue messages claiming that the computer is infected with viruses.
Another marketing technique that is often employed by developers is software bundling. In most cases, software bundle packages are downloaded from third-party websites that offer freeware. Similarly, as in the scenario described above, website authors receive a commission for additional applications that are installed on users' systems. While this technique is by far more legitimate than fake update prompts, it is deceptive nevertheless.
During the installation process, users can often pre-ticked boxes, misleading offers, misplaced buttons, fine print text, and similar tricks. Besides, optional components are often hidden under Advanced/Custom settings, so if Recommended/Quick mode is chosen, users will install PUPs without noticing it in the first place.
Delete the suspicious Outbyte PC Repair app with AV tools
There should not be any difficulties when trying to perform Outbyte PC Repair removal. All you have to do is access the Control Panel and then reach the list of the installed apps – you can uninstall the program from there. If you need a detailed step-by-step guide on how to do that, please check the instructions below. For smooth termination, you should also shut down the running process PCRepair.exe via the Task Manager, which you can call up with Ctrl + Shift + Esc key combination.
If you are satisfied with the app and you did install it intentionally, you do not have to remove Outbyte PC Repair from your computer. In the end, it can remove certain issues and possibly make it more secure, increase disk space, etc. Nonetheless, you should also check what precisely is deleted manually by clicking “Details” next to scan results, as you don't want to delete something that you actually need.
Uninstall from Windows
Uninstall from Windows 10/8:
- Type Control Panel into the Windows search box and open the result.
- Under Programs, select Uninstall a program.


Uninstall from Windows 7/XP:
- Click on Windows Start > Control Panel (Windows XP users should click on Add/Remove Programs).
- In Control Panel, select Programs > Uninstall a program.


Remove the unwanted program:
- In the Programs and Features window, look for any recently installed suspicious entries, select them, and click Uninstall.
- If User Account Control appears, click Yes to confirm, then complete the removal.


Remove from Microsoft Edge
Delete unwanted extensions from MS Edge:
- Select Menu (three horizontal dots at the top-right of the browser window) and pick Extensions.
- From the list, pick the extension and click on the Gear icon.
- Click Remove.


Clear cookies and other browser data:
- Click on the Menu (three horizontal dots at the top-right of the browser window) and select Settings > Privacy, search, and services..
- Under Clear browsing data, pick Choose what to clear.
- Select Cookies and other site data and Cached images and files. (apart from passwords, although you might want to include Media licenses as well, if applicable) and click on Clear.


Restore new tab and homepage settings:
- Click the menu icon and choose Settings.
- Then find On startup section.
- Click Remove next to any suspicious startup page.
Reset MS Edge if the above steps did not work:
- Press on Ctrl + Shift + Esc to open Task Manager.
- Click on More details arrow at the bottom of the window.
- Select Details tab.
- Now scroll down and locate every entry with Microsoft Edge name in it. Right-click on each of them and select End Task to stop MS Edge from running.


Instructions for Chromium-based Edge
Delete extensions from MS Edge (Chromium):
- Open Edge and click select Settings > Extensions.
- Delete unwanted extensions by clicking Remove.


Clear cache and site data:
- Click on Menu and go to Settings.
- Select Privacy, search and services.
- Under Clear browsing data, pick Choose what to clear.
- Under Time range, pick All time.
- Select Clear now.


Reset Chromium-based MS Edge:
- Click on Menu and select Settings.
- On the left side, pick Reset settings.
- Select Restore settings to their default values.
- Confirm with Reset.
- This will disable extensions and reset startup pages but will not delete bookmarks, saved passwords, or browsing history.


Remove from Mozilla Firefox (FF)
Remove dangerous extensions:
- Open Mozilla Firefox browser and click on the Menu (three horizontal lines at the top-right of the window).
- Select Add-ons.
- In here, select the unwanted extension and click Remove.


Reset the homepage:
- Click three horizontal lines at the top right corner to open the menu.
- Choose Settings.
- Under Home, set your preferred homepage and new tab settings.
Clear cookies and site data:
- Click Menu and pick Settings.
- Go to Privacy & Security section.
- Scroll down to locate Cookies and Site Data.
- Click on Clear Data...
- Select Cookies and Site Data and Temporary cached files and pages, then click Clear.


Reset Mozilla Firefox
If clearing the browser as explained above did not help, reset Mozilla Firefox:
- Open Mozilla Firefox browser and click the Menu.
- Go to Help and then choose Troubleshooting Information.

- Under Give Firefox a tune up section, click on Refresh Firefox...
- Once the pop-up shows up, confirm the action by pressing on Refresh Firefox.



Remove from Google Chrome
Delete malicious extensions from Google Chrome:
- Open Google Chrome, click on the Menu (three vertical dots at the top-right corner) and select More tools > Extensions.
- In the newly opened window, you will see all the installed extensions. Uninstall all suspicious extensions related to the unwanted program by clicking Remove.


Clear cache and web data from Chrome:
- Click on Menu and pick Settings.
- Under Privacy and security, select Clear browsing data.
- Select Browsing history, Cookies and other site data, as well as Cached images and files.
- Click Clear data.


Change your homepage:
- Click menu and choose Settings.
- Look for a suspicious site in the On startup section.
- Click on Open a specific or set of pages and click on three dots to find the Remove option.
Reset Google Chrome:
If the previous methods did not help you, reset Google Chrome to eliminate all the unwanted components:
- Click on Menu and select Settings.
- In the Settings, scroll down and click Advanced.
- Scroll down and locate Reset and clean up section.
- Now click Restore settings to their original defaults.
- Confirm with Reset settings.


Delete from Safari
Remove dangerous extensions:
- Open Safari, click Safari in the menu at the top-left of the screen, and select Preferences.
- Go to the Extensions tab, look for any suspicious entries, and click Uninstall to remove them.


Clear history and website data:
- Click Safari in the menu and pick Clear History.
- Set Clear to all history and confirm with Clear History.


Reset Safari:
- Click Safari in the menu and select Preferences > Advanced.
- Enable Show Develop menu in menu bar.
- From the menu bar, click Develop and select Empty Caches.


Did this guide help?
Be the first to comment