
Querylead.com virus: what it is and how to remove it
Querylead.com redirect virus possesses a form of a website that redirects to a vast of suspicious pages and generates pop-ups. The computer might be infected with it due to the potentially unwanted programs (PUPs) .
Facts checked October 7, 2026. Removal steps tested on Windows 11 (26H2) and checked against Microsoft's and the browser makers' current documentation. Sections marked as our earlier report are the original text: they describe the threat as it was then and have not been reviewed since. The 2026 status, the removal steps and the questions are current.
Automatic
Get a free scan and check if your PC is infected.
Fortect finds malware, unwanted programs and the Windows damage they leave behind, and repairs it in one pass.
If querylead.com returns after you change the search engine back, a free scan can find the program that keeps setting it.
Do it yourself · free Remove Querylead.com virus yourself 5 steps, about 15 minutes, no software needed.
Start the steps
Querylead.com virus: summary
| Detection names | No Microsoft detection name is known |
|---|---|
| Distribution | Not recorded in the old report |
| Damage | Not recorded in the old report |
| Name | Querylead.com virus |
| Type | Fake search engine |
| Symptoms | A changed search engine |
| Removal | Scan the PC with security software to find and remove the malware and anything installed with it. Fortect scans Windows for malware and repairs the system files and settings it damaged. Remove it nowTo use the full-featured product, you have to purchase a license for Fortect. The scan is free. |
Show 5 more facts
| Evidence | 4 write-ups by security sites; details still limited |
|---|---|
| Search page | querylead.com |
| Browsers | Chrome, Edge and Firefox |
| First seen | 23 October 2017 |
| Facts checked | 7 October 2026 |
Is Querylead.com virus dangerous? What it collects
From our report of Oct 2017 · not reviewed since
You can kill Querylead.com redirect problem with the help of a security software
To remove Querylead.com virus, you can choose between automatic and manual elimination.
However, our IT technicians want to remind you that your computer might be infected with other variants of unwanted software you are not aware of.
Thus, to protect your computer, you should choose to remove the adware automatically with the help of a reliable security software. Be aware that scammers try to lure people into purchasing useless and expensive security systems - choose wisely.
The security program will quickly detect and start the Querylead.com removal.
If you opt to get rid of the adware manually, our team has prepared a step-by-step guide provided below. Carefully follow the steps to eliminate the ad-supported program.
From our report of Oct 2017 · not reviewed since
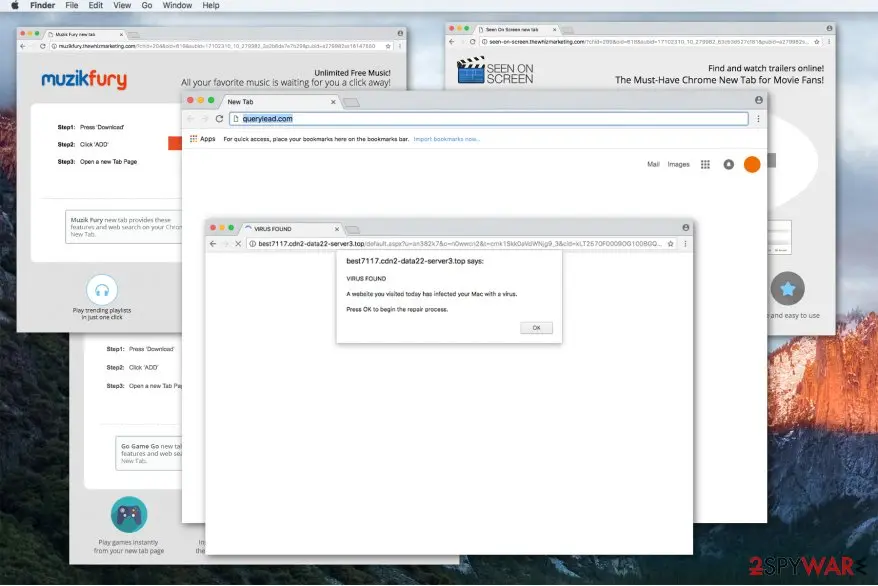
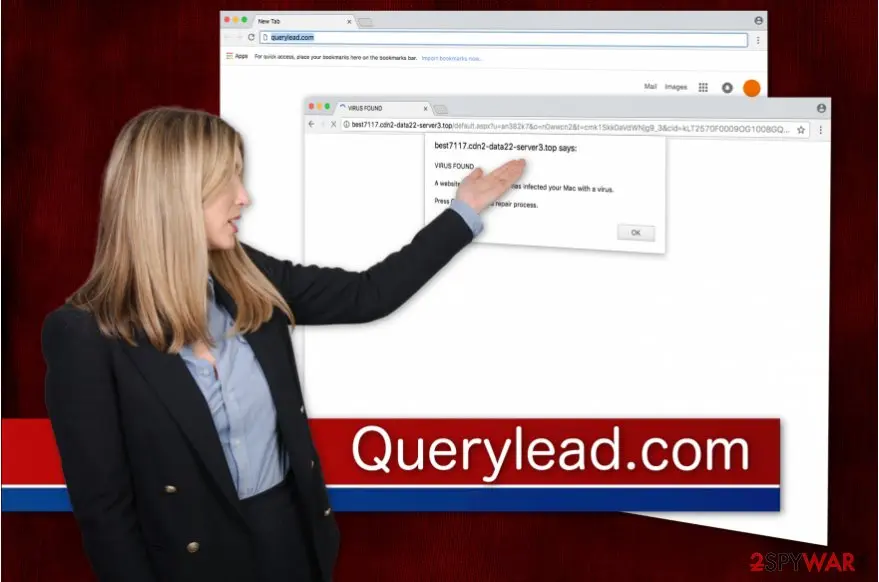
Querylead.com redirects to suspicious websites and increases the risk of getting infected with malware
Querylead.com redirect virus possesses a form of a website that redirects to a vast of suspicious pages and generates pop-ups.
The computer might be infected with it due to the potentially unwanted programs (PUPs) .
We want to notify you that PUPs usually collect browsing-related data. It might be personally identifiable and lead to serious privacy issues or even identity theft. The querylead.com removal might get complicated; hence we have prepared a detailed guide provided below on how to get rid of it.
If that is not enough to convince you, this vague website generates annoying ads, pop-ups, coupon offers, etc. The developers of them try their best to attract users to click on them. But you should be aware that once you click on the ad, QueryLead is not responsible for the content of sites you are redirected to.
Sites you are redirected to by the adware: 1. Offers to install "handy" tools; 2.
E-shops; 3. Fake malware alarms suggesting to install useless security software; 4. Gambling sites.
Therefore, cybercriminals often take advantage of naive computer users and tend to distribute high-risk computer infections via suspicious websites. And developers of QueryLead are interested in generating revenue rather than improving your browsing experience.
Thus, If you have noticed that your computer's performance significantly decreased and you are redirected to multiple sites promoting annoying ads, your system is compromised with this adware. Our IT specialists suggest you to remove Querylead.com using or any other reputable security software.
From our report of Oct 2017 · not reviewed since
The adware can be stealthily installed together with other free software
Developers of potentially unwanted programs (PUPs) use a popular marketing method to distribute the adware - they bundle it with regular applications.
Users rush to finish the download/installation process and are not able to un-tick the box permitting to install the virus.
You should never choose Quick or Recommended settings when installing an app. The information about the potentially unwanted programs usually hides in the "recommended downloads" section in the installer. You can detect the offered potentially unwanted program (PUP) only if you opt for Custom or Advanced installation options.
Moreover, VirusActivity experts say that deceptive ads also have a common feature to spread the adware or malware. Thus, we strongly recommend avoiding to click on ads even if they look legitimate. It is almost impossible to determine the origins of the intrusive advertisements and people get often deceived.
Also, you shouldn't download applications from unauthorized developers. The internet is full of cybercriminals who seek to detect your system vulnerabilities and infiltrate malware. Scan the files you download beforehand and check for malicious or spyware-related components.
Check your browser and PC
- Address:
querylead.com
How to remove Querylead.com virus
The search page is only the end point.
These steps remove what sends the browser there, then put the search engine back.
Step 1: Put the search engine back and delete querylead.com
Searches that pass through
querylead.commean the browser's default search engine was replaced. Chrome: Settings > Search engine > Manage search engines and site search, then Make default on Google, Bing or another engine you chose, and Delete on querylead.com.Edge has the same list under Manage search engines (search the Settings page for it), and Firefox under Settings > Search.
Look at On startup and the homepage settings too and remove the hijacker's address there. Nothing in this step differs between Windows 11 and Windows 10.
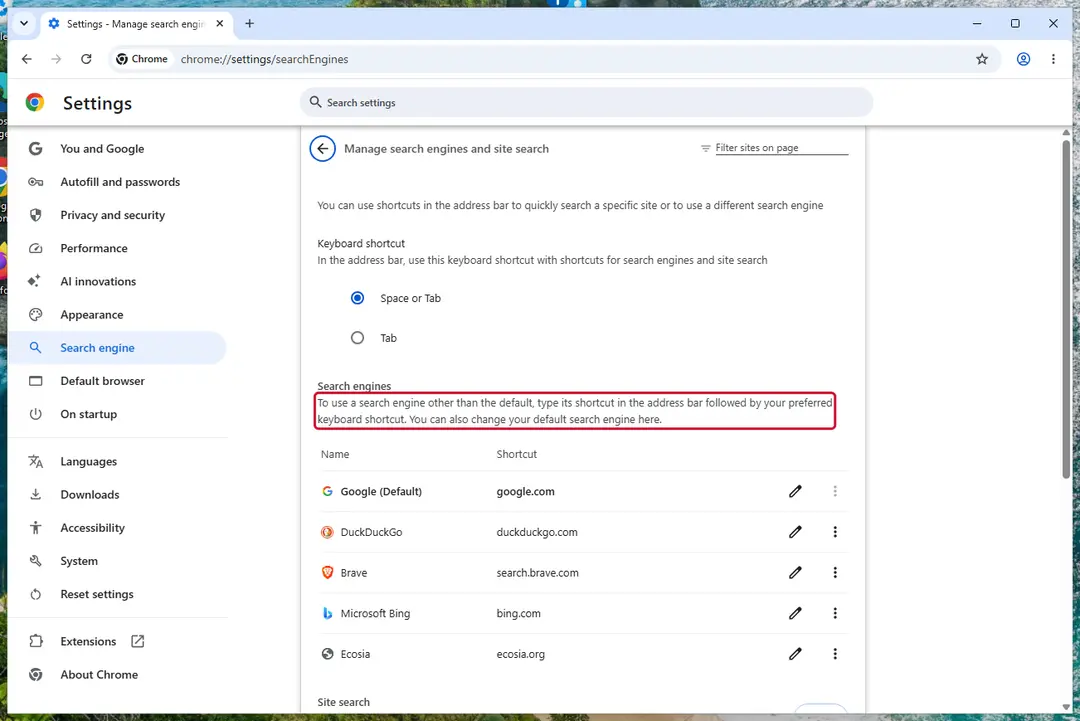
Chrome on Windows 11: check Search engine and On startup. Full procedure with screenshots: Reset a browser and fix a hijacked search engine
Step 2: Remove extensions you did not add
Querylead.com virus often works through an extension, so go through the extension list of each browser:
chrome://extensionsedge://extensions- Extensions and themes in Firefox
Switch suspicious extensions off one at a time and reload the page where the problem shows, then remove the one that stops it, and any other you did not add.
Remember the other browsers and profiles on the PC. If Remove is missing or greyed out, a policy forces the extension, which the policy step deals with. Windows 11 and Windows 10 show the same pages.
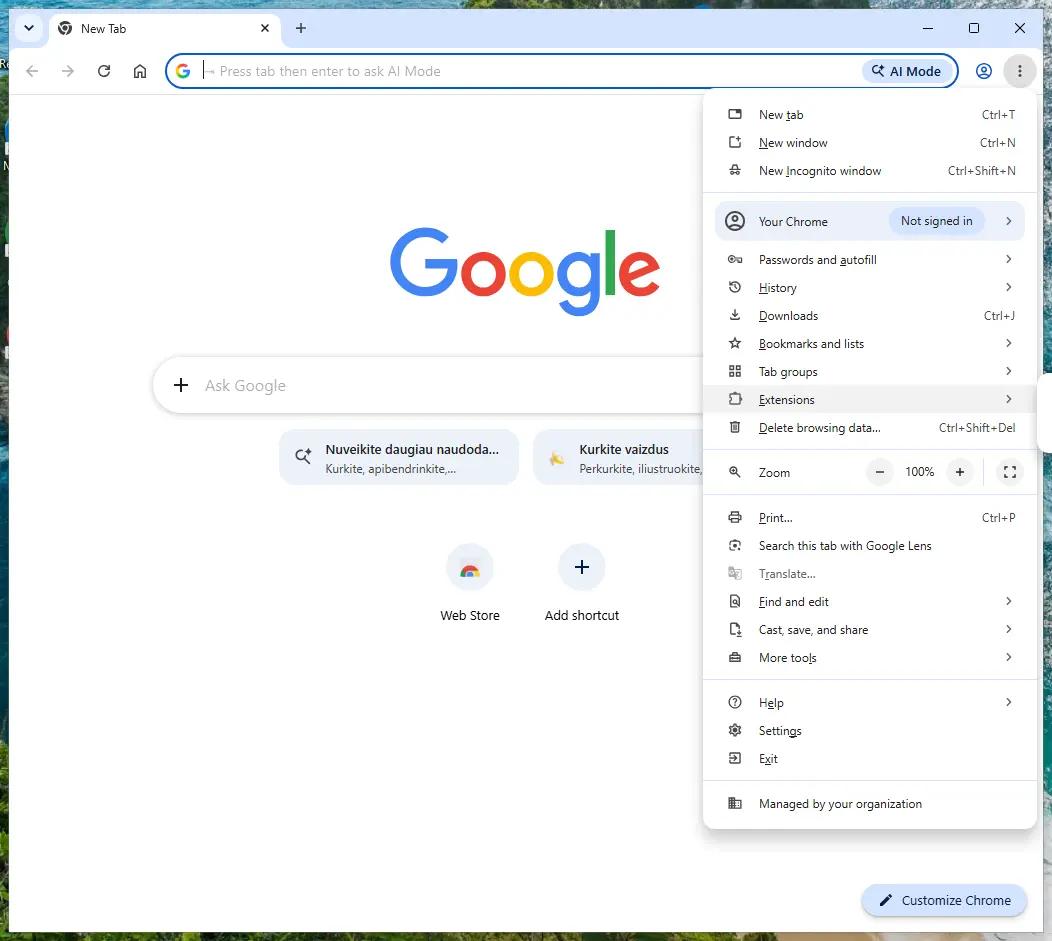
Chrome on Windows 11: More > Extensions > Manage extensions. Full procedure with screenshots: Remove a browser extension
Step 3: Uninstall programs you did not mean to install
Open Settings > Apps > Installed apps in Windows 11, or Settings > Apps > Apps & features in Windows 10, and sort the list by install date. Look at what appeared around the day the problem started and uninstall every program you do not recognise or did not choose.
Free converters, PDF and video tools, "system optimizers" and unknown browsers are the usual carriers of Querylead.com virus. If a name is unclear, search for it before you remove it, so you do not uninstall a driver or a Windows component.
Full procedure with screenshots: Uninstall a program or app in Windows On uGetFix
Step 4: Reset the browser
Finish the browser part with a reset, which puts the search engine, start page, new tab page and site permissions back to their defaults and switches extensions off. Chrome: Settings > Reset settings > Restore settings to their original defaults.
Edge: Settings > Reset settings. Firefox: Help > More troubleshooting information > Refresh Firefox, which also removes its extensions. Your bookmarks and saved passwords are kept, and the menus are the same on Windows 11 and Windows 10.
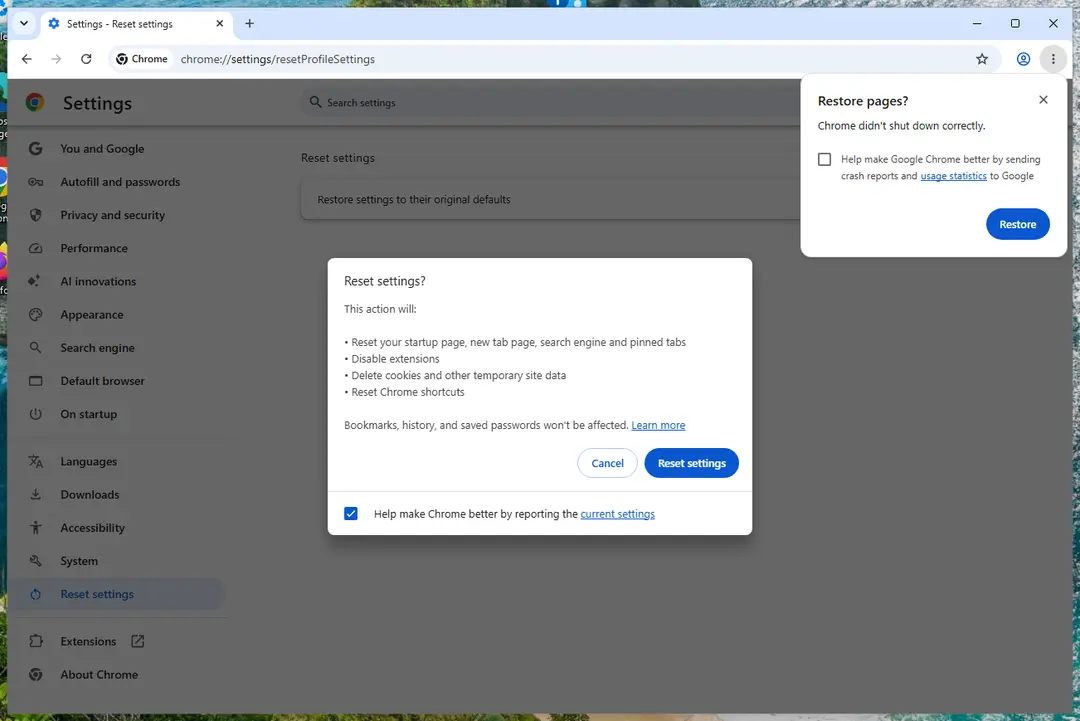
Chrome on Windows 11: Settings > Reset settings. Full procedure with screenshots: Reset a browser and fix a hijacked search engine
Step 5: Scan the PC, then run the offline scan
Open Windows Security > Virus & threat protection > Scan options, run a Full scan and remove everything it finds. Then select Microsoft Defender Antivirus (offline scan) and click Scan now: the PC restarts and scans before Windows loads, which finds files that hide while Windows runs.
Save your work first, because the offline scan takes about 15 minutes. Both scans are built into Windows 11 and Windows 10, and a second scanner from another vendor is a useful extra opinion.
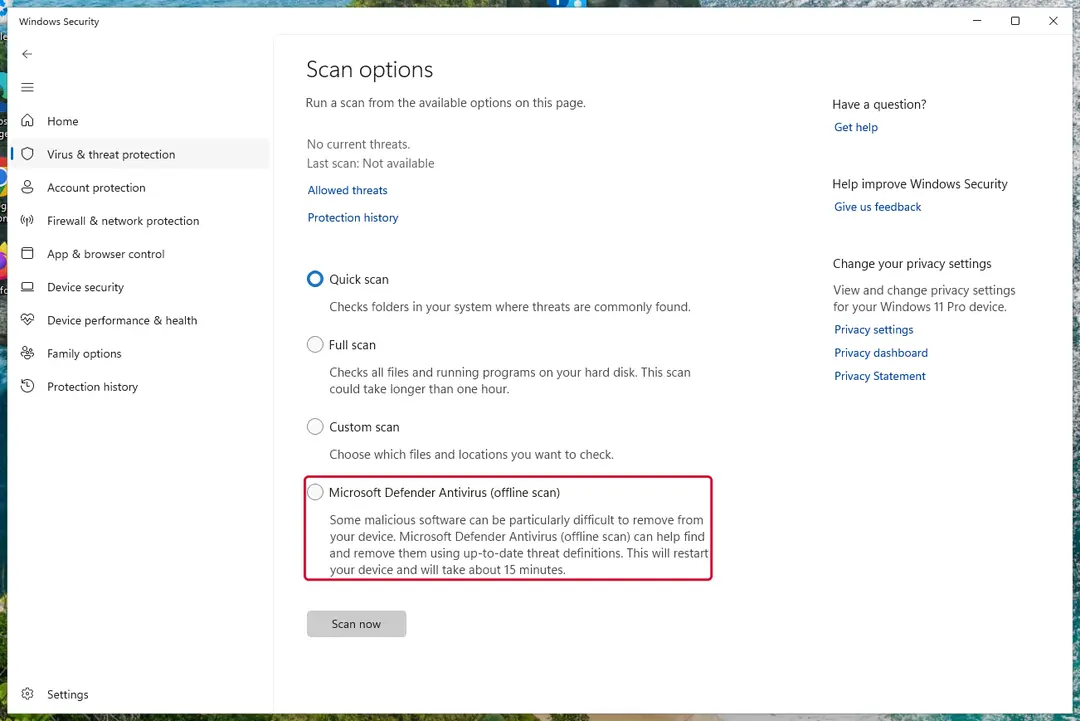
Windows 11: Windows Security > Virus & threat protection > Scan options. Full procedure with screenshots: Run a Microsoft Defender Offline scan
Instructions for each browser and system
The detailed steps for every browser and system this guide covers. Open the one you use.
Uninstall from Windows
To uninstall ad-supported programs, use the guide we provided below. It explains where to look for programs installed on your system and also helps to find modified settings in your browser's shortcuts.
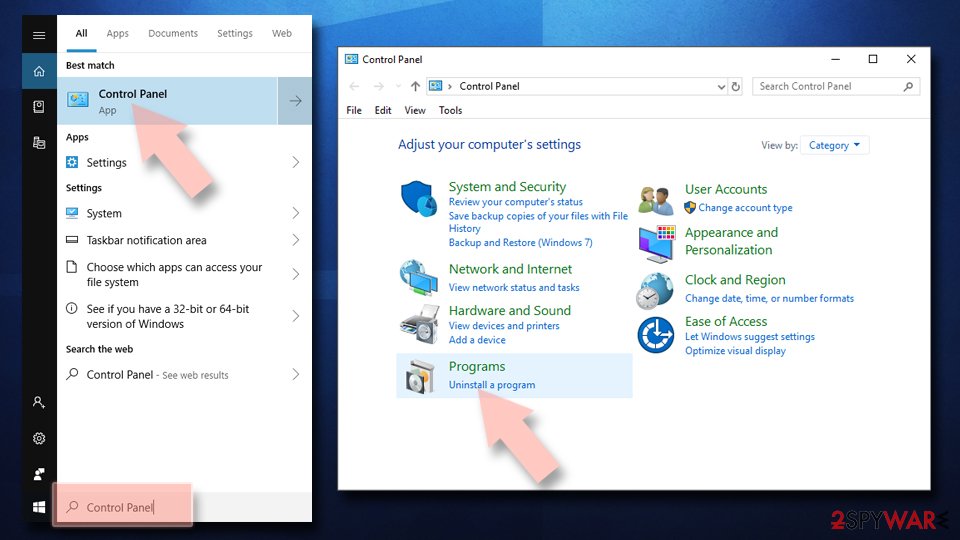
Uninstall from Windows 10/8:
- Type Control Panel into the Windows search box and open the result.
- Under Programs, select Uninstall a program.
Uninstall from Windows 7/XP:
- Click on Windows Start > Control Panel (Windows XP users should click on Add/Remove Programs).
- In Control Panel, select Programs > Uninstall a program.
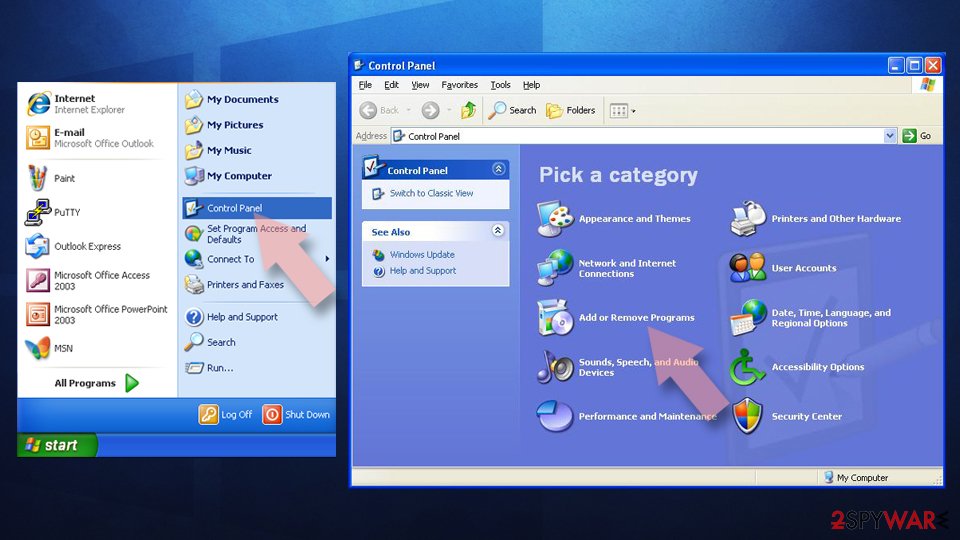
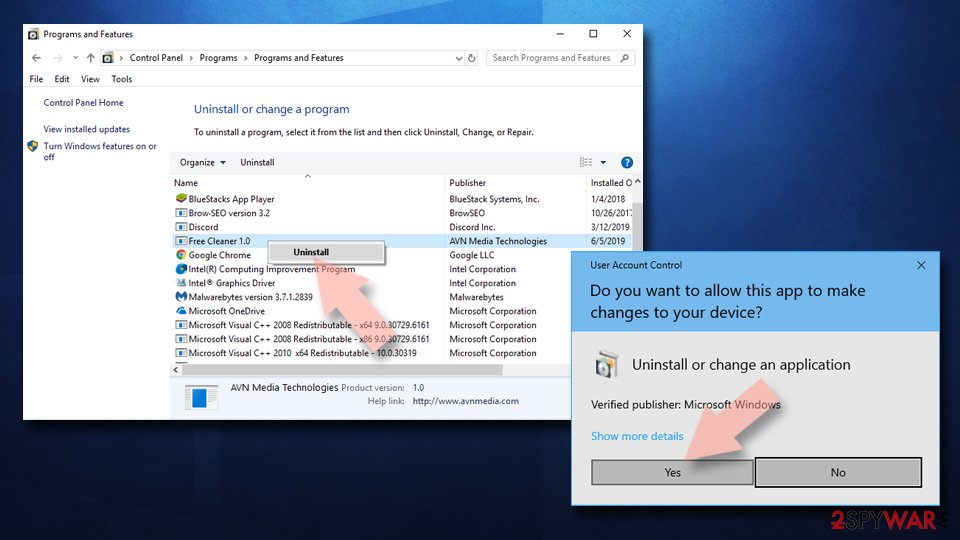
Remove the unwanted program:
- In the Programs and Features window, look for any recently installed suspicious entries, select them, and click Uninstall.
- If User Account Control appears, click Yes to confirm, then complete the removal.
Remove from Google Chrome
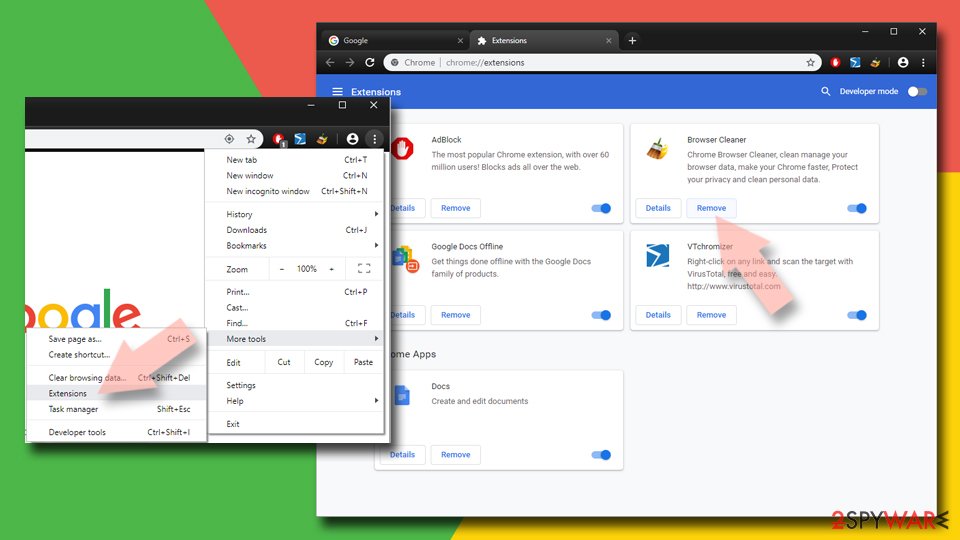
Go over the list of extensions in chrome://extensions page and delete the ones that look suspicious. One of them might be causing redirects that go through querylead.com page.
Delete malicious extensions from Google Chrome:
- Open Google Chrome, click on the Menu (three vertical dots at the top-right corner) and select More tools > Extensions.
- In the newly opened window, you will see all the installed extensions. Uninstall all suspicious extensions related to the unwanted program by clicking Remove.
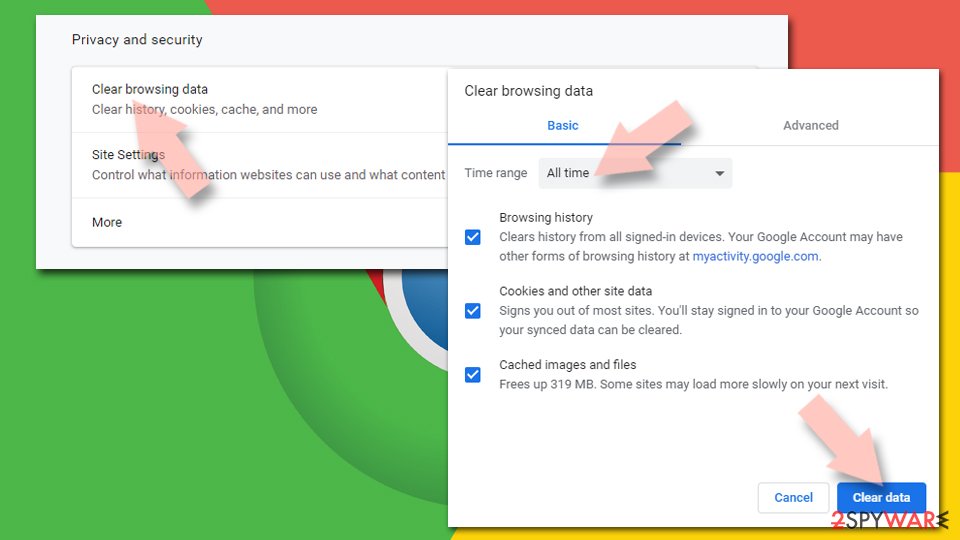
Clear cache and web data from Chrome:
- Click on Menu and pick Settings.
- Under Privacy and security, select Clear browsing data.
- Select Browsing history, Cookies and other site data, as well as Cached images and files.
- Click Clear data.
Change your homepage:
- Click menu and choose Settings.
- Look for a suspicious site in the On startup section.
- Click on Open a specific or set of pages and click on three dots to find the Remove option.
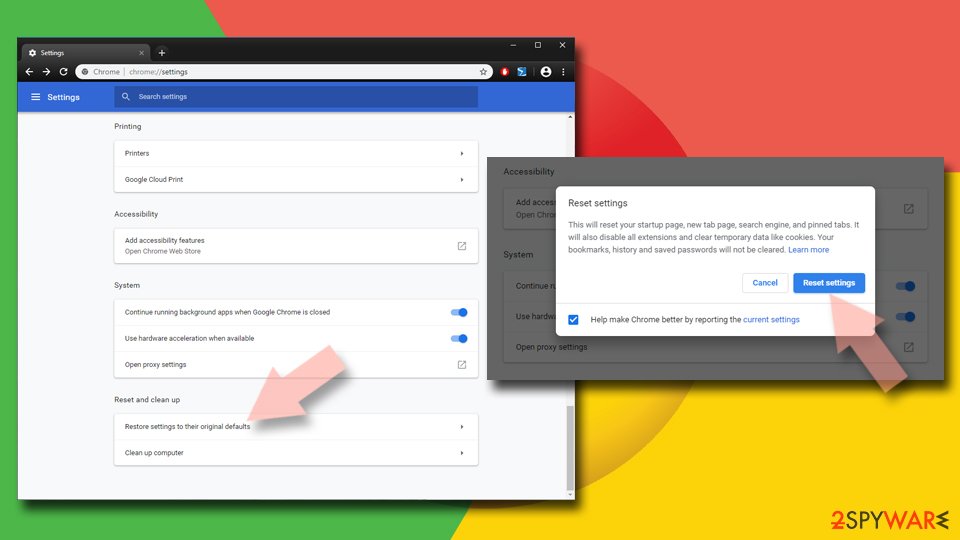
Reset Google Chrome:
If the previous methods did not help you, reset Google Chrome to eliminate all the unwanted components:
- Click on Menu and select Settings.
- In the Settings, scroll down and click Advanced.
- Scroll down and locate Reset and clean up section.
- Now click Restore settings to their original defaults.
- Confirm with Reset settings.
Remove from Microsoft Edge
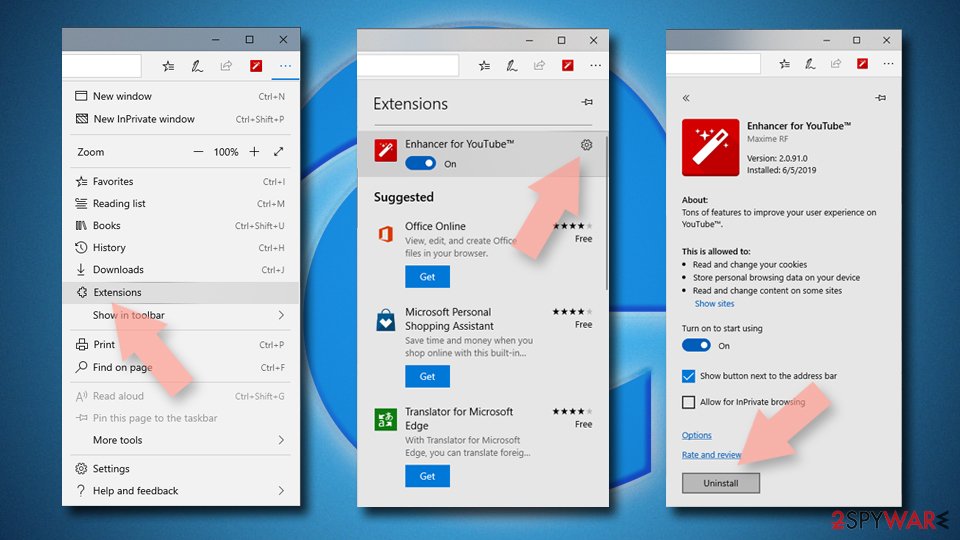
Delete unwanted extensions from MS Edge:
- Select Menu (three horizontal dots at the top-right of the browser window) and pick Extensions.
- From the list, pick the extension and click on the Gear icon.
- Click Remove.
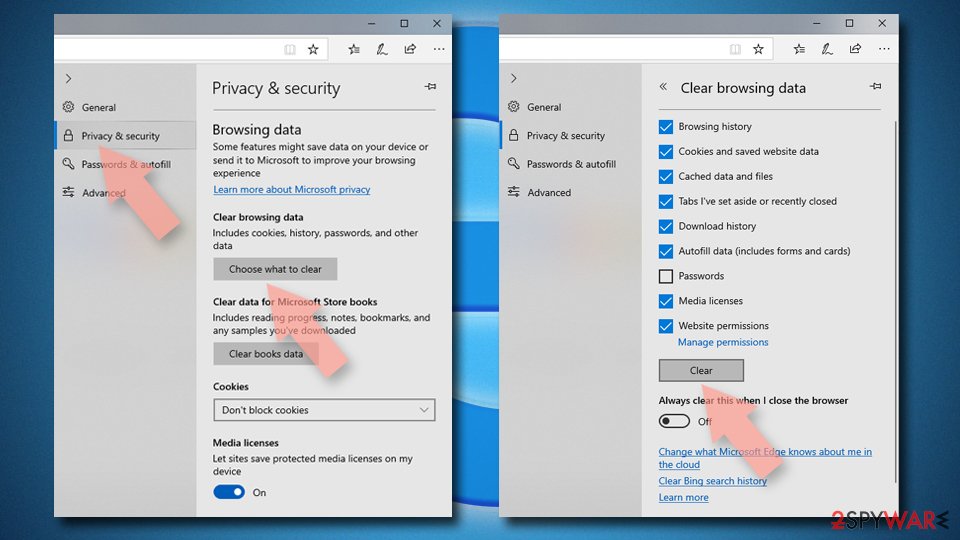
Clear cookies and other browser data:
- Click on the Menu (three horizontal dots at the top-right of the browser window) and select Settings > Privacy, search, and services..
- Under Clear browsing data, pick Choose what to clear.
- Select Cookies and other site data and Cached images and files. (apart from passwords, although you might want to include Media licenses as well, if applicable) and click on Clear.
Restore new tab and homepage settings:
- Click the menu icon and choose Settings.
- Then find On startup section.
- Click Remove next to any suspicious startup page.
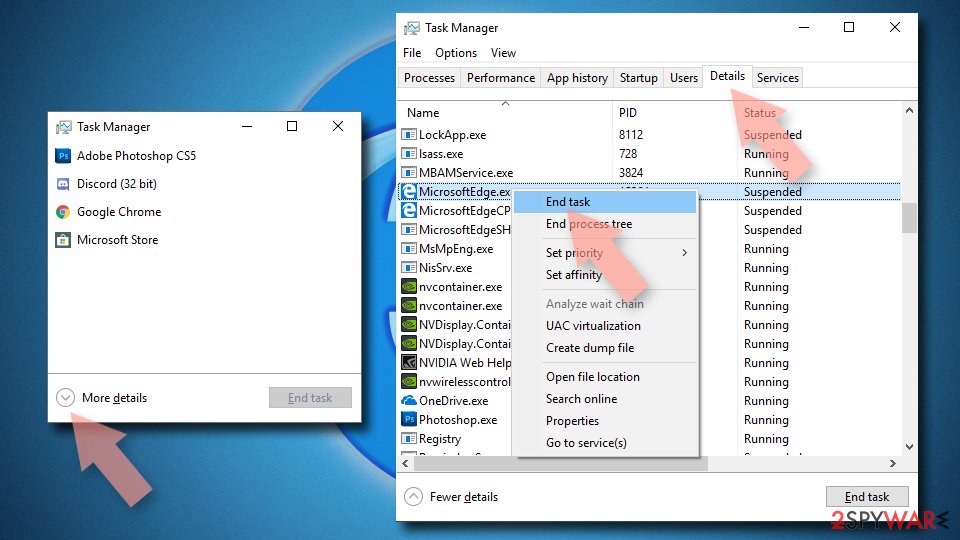
Reset MS Edge if the above steps did not work:
- Press on Ctrl + Shift + Esc to open Task Manager.
- Click on More details arrow at the bottom of the window.
- Select Details tab.
- Now scroll down and locate every entry with Microsoft Edge name in it. Right-click on each of them and select End Task to stop MS Edge from running.
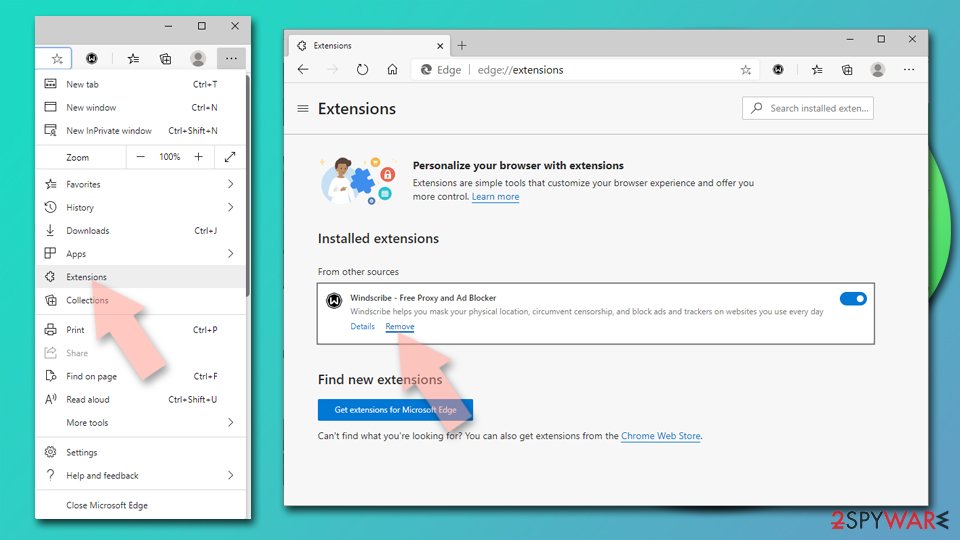
Delete extensions from MS Edge (Chromium):
- Open Edge and click select Settings > Extensions.
- Delete unwanted extensions by clicking Remove.
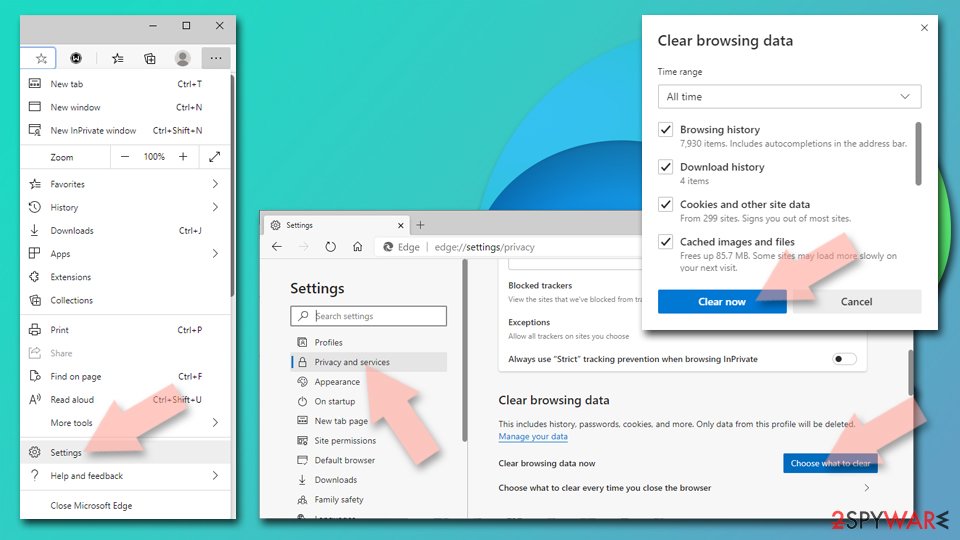
Clear cache and site data:
- Click on Menu and go to Settings.
- Select Privacy, search and services.
- Under Clear browsing data, pick Choose what to clear.
- Under Time range, pick All time.
- Select Clear now.
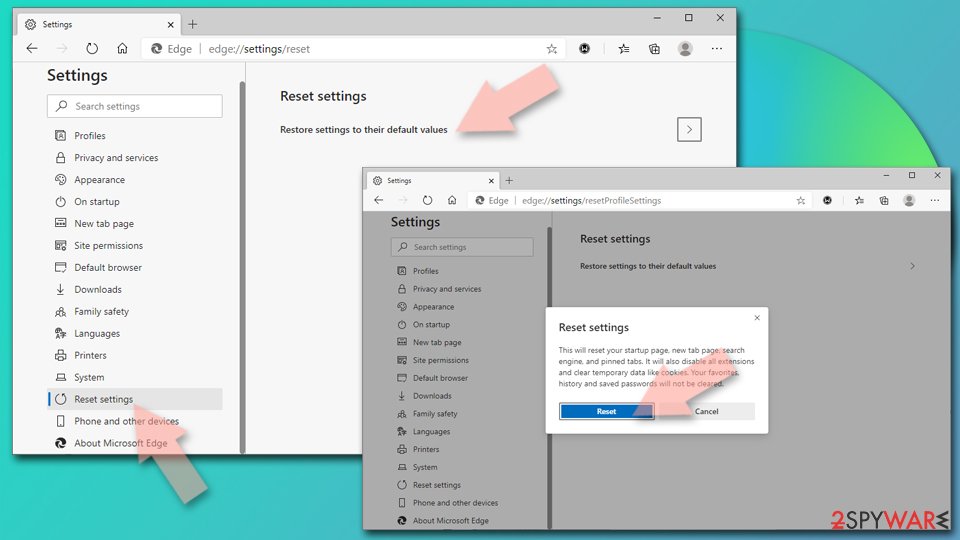
Reset Chromium-based MS Edge:
- Click on Menu and select Settings.
- On the left side, pick Reset settings.
- Select Restore settings to their default values.
- Confirm with Reset.
- This will disable extensions and reset startup pages but will not delete bookmarks, saved passwords, or browsing history.
Remove from Mozilla Firefox (FF)
The instructions provided here explain how to fix Firefox so that you wouldn't have to experience redirects through Querylead domain.
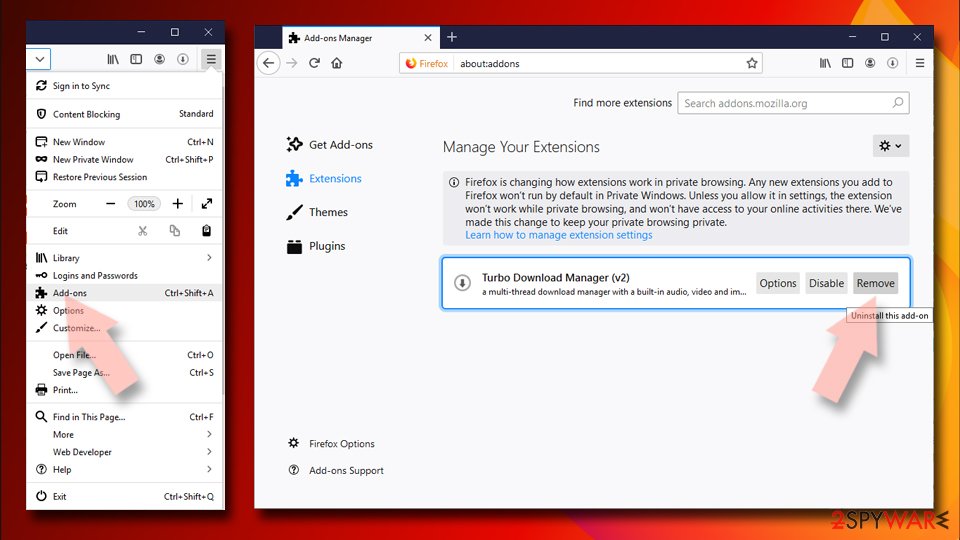
Remove dangerous extensions:
- Open Mozilla Firefox browser and click on the Menu (three horizontal lines at the top-right of the window).
- Select Add-ons.
- In here, select the unwanted extension and click Remove.
Reset the homepage:
- Click three horizontal lines at the top right corner to open the menu.
- Choose Settings.
- Under Home, set your preferred homepage and new tab settings.
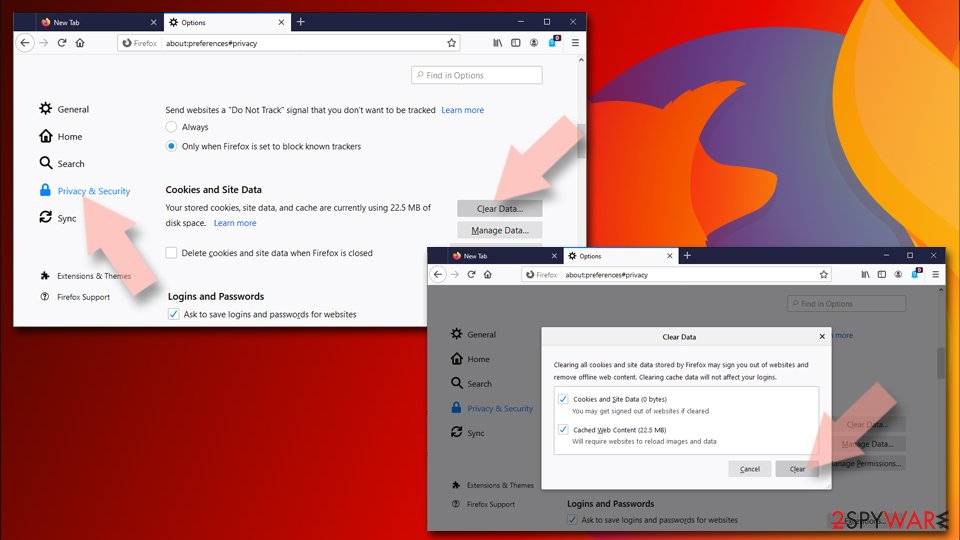
Clear cookies and site data:
- Click Menu and pick Settings.
- Go to Privacy & Security section.
- Scroll down to locate Cookies and Site Data.
- Click on Clear Data...
- Select Cookies and Site Data and Temporary cached files and pages, then click Clear.
Reset Mozilla Firefox
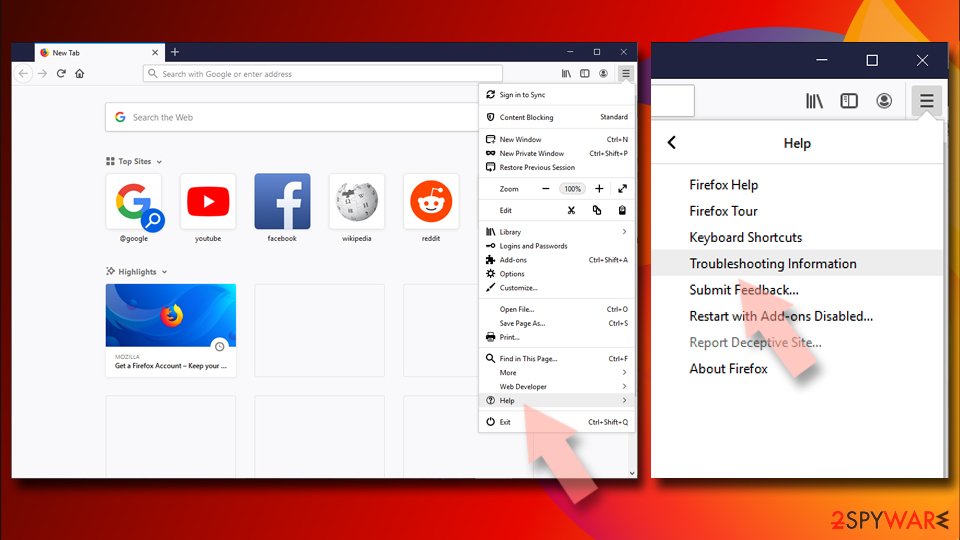
If clearing the browser as explained above did not help, reset Mozilla Firefox:
- Open Mozilla Firefox browser and click the Menu.
- Go to Help and then choose Troubleshooting Information.
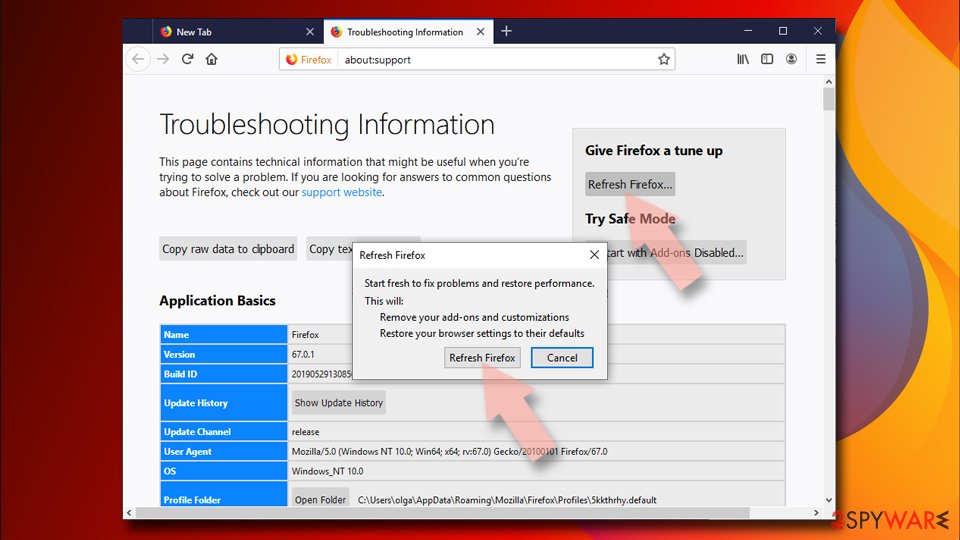
- Under Give Firefox a tune up section, click on Refresh Firefox...
- Once the pop-up shows up, confirm the action by pressing on Refresh Firefox.
Delete from Safari
Remove dangerous extensions:
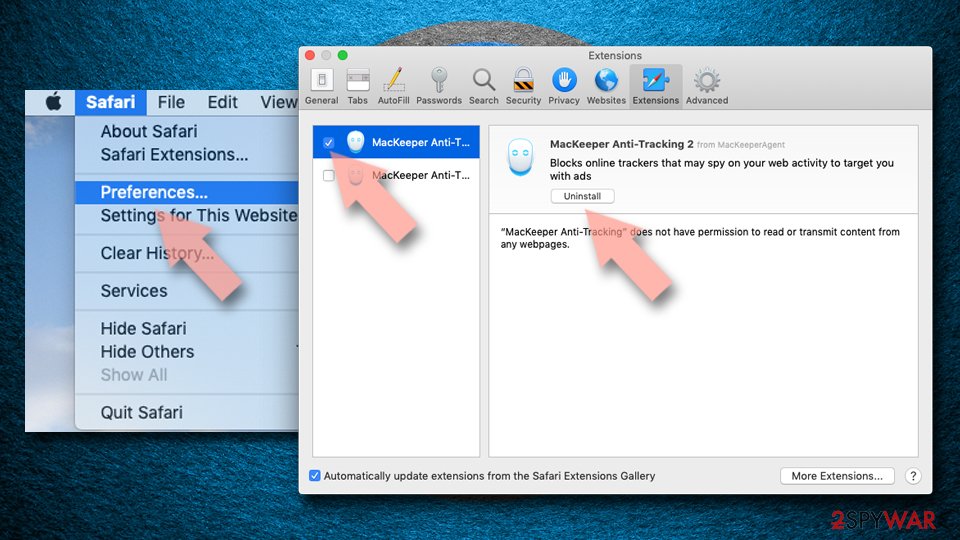
- Open Safari, click Safari in the menu at the top-left of the screen, and select Preferences.
- Go to the Extensions tab, look for any suspicious entries, and click Uninstall to remove them.
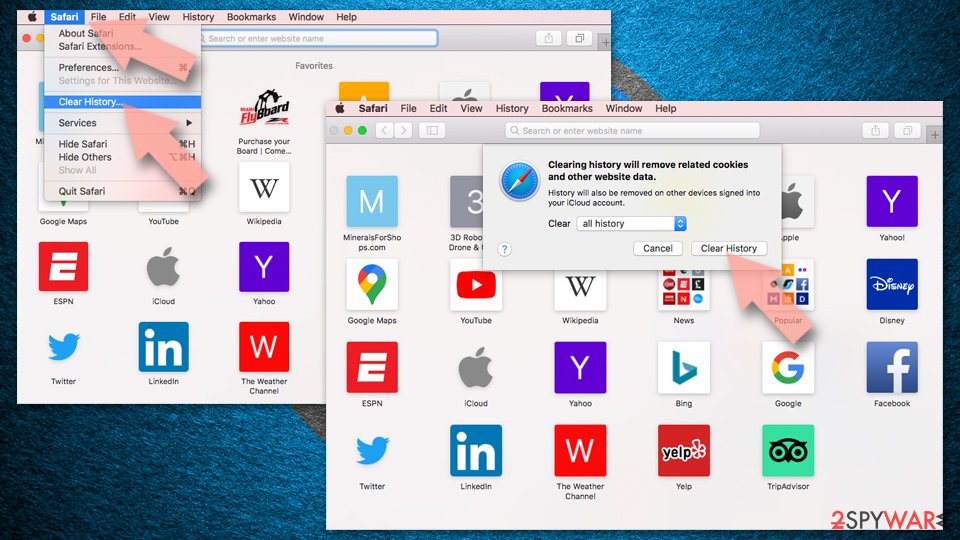
Clear history and website data:
- Click Safari in the menu and pick Clear History.
- Set Clear to all history and confirm with Clear History.
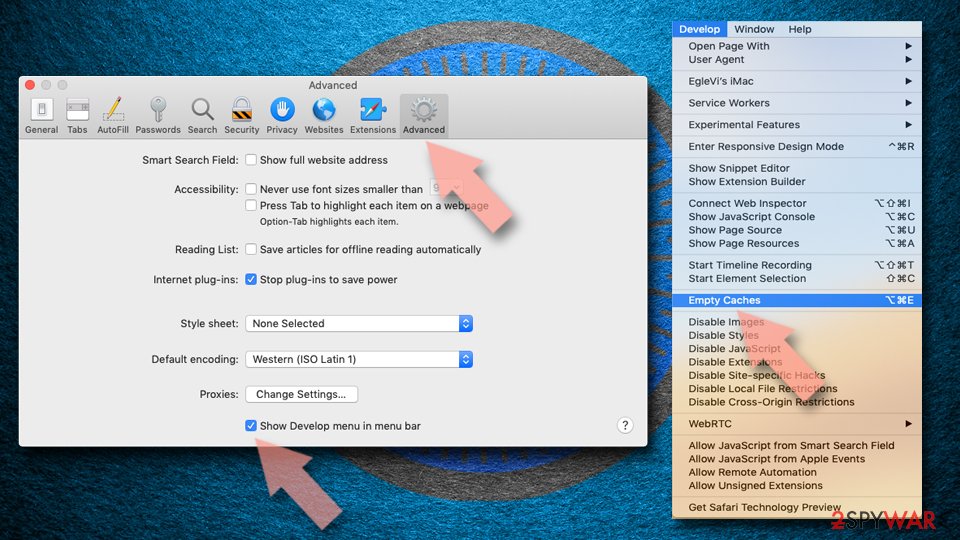
Reset Safari:
- Click Safari in the menu and select Preferences > Advanced.
- Enable Show Develop menu in menu bar.
- From the menu bar, click Develop and select Empty Caches.
Delete from macOS
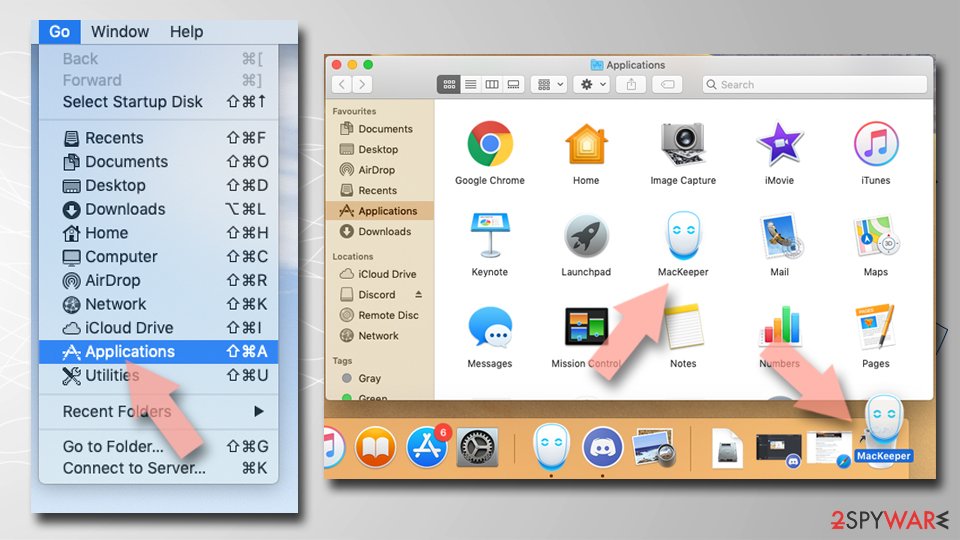
Remove the unwanted application:
- From the menu bar, select Go > Applications.
- In the Applications folder, look for any suspicious entries, then drag them to Trash (or right-click and pick Move to Trash).
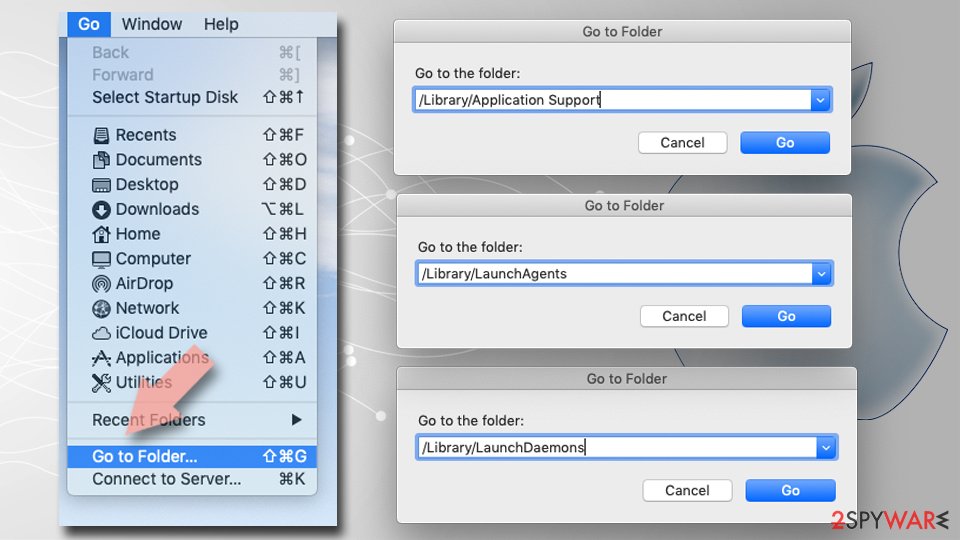
Delete leftover files and folders:
- Select Go > Go to Folder.
- Enter /Library/Application Support and remove any suspicious folders related to the unwanted program.
- Repeat the same check in the /Library/LaunchAgents and /Library/LaunchDaemons folders, deleting any suspicious entries.
- Finally, empty the Trash to permanently remove the leftovers.
Reset Internet Explorer
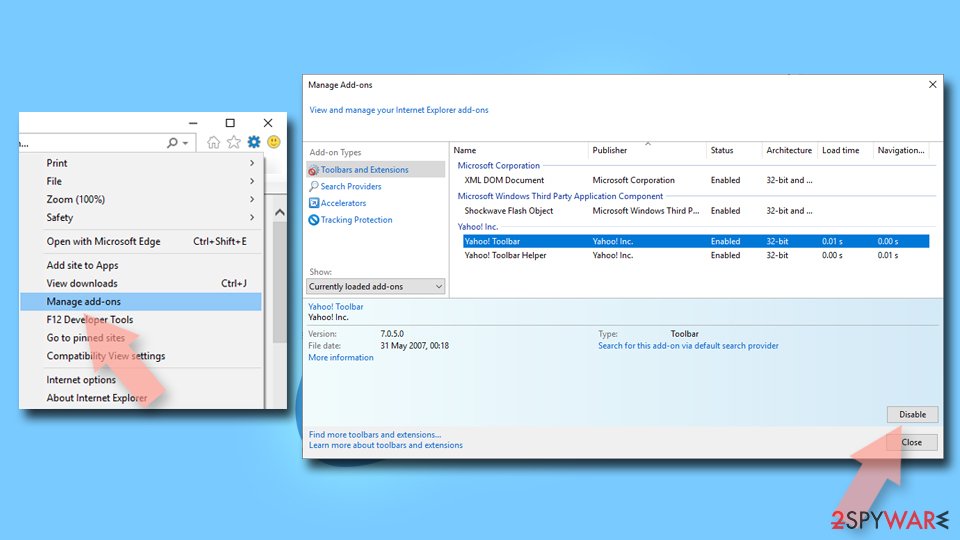
Remove dangerous add-ons:
- Open Internet Explorer, click on the Gear icon (IE menu) on the top-right corner of the browser
- Pick Manage Add-ons.
- You will see a Manage Add-ons window. Here, look for suspicious plugins. Click on these entries and select Disable.
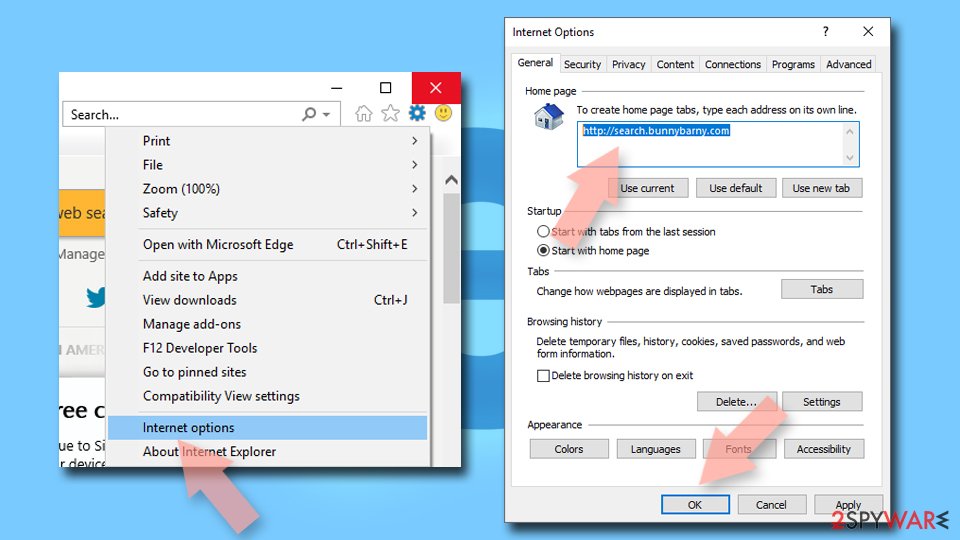
Change your homepage if it was altered:
- Open IE and click on the Gear icon.
- Select Internet Options.
- In the General tab, delete the Home page address and replace it by your preferred one (for example, Google.com).
- Click Apply and then select OK.
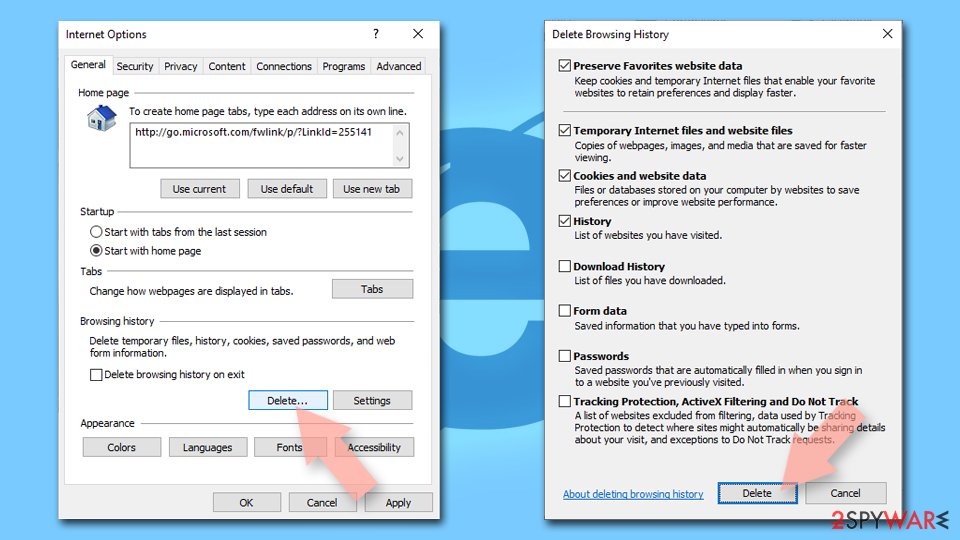
Delete temporary files:
- Press on the Gear icon and select Internet Options.
- Under Browsing history, click Delete...
- Select relevant fields and press Delete.
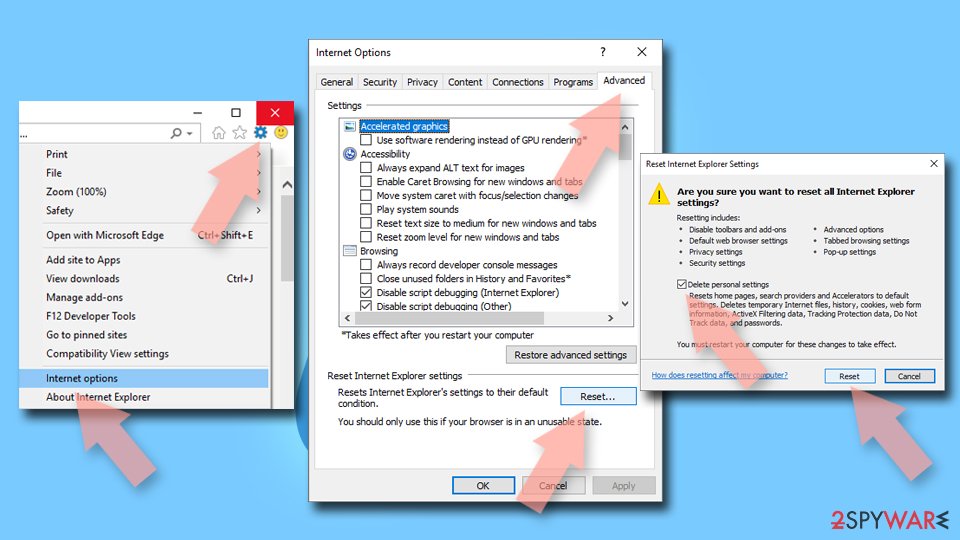
Reset Internet Explorer:
- Click on Gear icon > Internet options and select Advanced tab.
- Select Reset.
- In the new window, check Delete personal settings and select Reset.
Stream videos without limitations, no matter where you are
There are multiple parties that could find out almost anything about you by checking your online activity.
While this is highly unlikely, advertisers and tech companies are constantly tracking you online. The first step to privacy should be a secure browser that focuses on tracker reduction to a minimum.
Even if you employ a secure browser, you will not be able to access websites that are restricted due to local government laws or other reasons. In other words, you may not be able to stream Disney+ or US-based Netflix in some countries. To bypass these restrictions, you can employ a powerful VPN, which provides dedicated servers for torrenting and streaming, not slowing you down in the process.
Data backups are important - recover your lost files
Ransomware is one of the biggest threats to personal data.
Once it is executed on a machine, it launches a sophisticated encryption algorithm that locks all your files, although it does not destroy them. The most common misconception is that anti-malware software can return files to their previous states. This is not true, however, and data remains locked after the malicious payload is deleted.
While regular data backups are the only secure method to recover your files after a ransomware attack, tools such as can also be effective and restore at least some of your lost data.
Questions about Querylead.com virus
Why does my search engine keep changing to querylead.com?
Because something keeps setting it. An extension can change the search engine every time the browser starts, and an ad-supported program in Windows can do it for every browser and re-add the extension after you remove it. Some hijackers also add a policy that locks the setting.
Changing the search engine back only works once the source is gone. Remove extensions you do not recognise, uninstall programs installed around the time querylead.com first appeared, and then set the search engine again. If it still returns, check the browser for the Managed by your organization message and follow the policy steps in this guide.
Can querylead.com see my searches?
Yes. Every search typed into the address bar goes to querylead.com first, which is how it earns money. It can log the query, the time and an identifier for your browser, and some hijackers also collect the pages you visit through their extension.
The privacy policy of such sites usually allows sharing that data with partners. Once the hijacker is removed and your own search engine is set again, new searches no longer reach it. Searches already sent cannot be taken back, so avoid entering sensitive information until the clean-up is finished, and clear cookies afterwards.
Why do my searches go to querylead.com?
Because the browser's default search engine was changed to it. Querylead.com virus did that through an extension, a program or a browser policy, and as long as that source remains, the setting points to querylead.com.
The page then passes your query to a real search provider, so the results look almost normal, with extra sponsored links on top. Changing the search engine back on its own does not last, because the source resets it. Remove the extension or program first, then the policies if any, then set your own search engine.
Is it safe to keep searching with querylead.com?
We would not. Every query you type is logged by its operators and shared with their advertising partners, and the sponsored links at the top are chosen for payment, not relevance. Results that look like a download page or a support site may lead to scams.
The page will not damage Windows by itself, but there is no benefit in keeping it: the results come from another search engine anyway. Remove Querylead.com virus and use that search engine directly, by typing its address or choosing it in the browser settings.
Which browsers does Querylead.com virus affect?
We saw it in Chrome, Edge and Firefox. That does not mean the other browsers on your PC are safe: hijacker installers usually change every browser they find, and browser sync can carry an extension to other computers signed in to the same account.
Check the search engine, home page, new tab, extensions and policies in each browser you have, including ones you rarely open. Chrome and Edge profiles count separately, so switch to each profile and check it as well before you call the job done.
What does querylead.com know about me?
It knows what you searched for while it was your search engine, when, from which IP address and with which browser, and usually which results you opened. Tracking cookies let it connect those searches into a profile. It does not see your saved passwords or files.
After removing Querylead.com virus, delete the cookies and site data for querylead.com so the profile cannot be continued, and remove it from the browser's list of saved search engines. Signing out of important sites and back in also replaces session cookies.
I changed the search engine, but it switched back. Why?
The hijacker is still installed, and it rewrites the setting whenever the browser starts or the extension updates. Changing the setting is the last step, not the first. Find what controls it: the search settings page usually names the extension, and a greyed-out field means a policy.
Remove that source, restart the browser, then pick your search engine and delete the hijacker's entry from the list of saved search engines so it cannot be chosen by accident. Check again after a day, when extensions have had a chance to update.
Will resetting the browser remove Querylead.com virus?
A reset disables extensions, restores the default search engine, start page and new tab, and clears temporary data and cookies. It keeps bookmarks, history and saved passwords. For many hijackers that is enough.
It does not remove a program installed in Windows, policies in the registry, changes to the hosts file or DNS, or edited shortcuts, so Querylead.com virus can come back after a reset if one of those remains. Do the reset after removing the program and policies, not instead of it.
Should I just switch to another browser?
It may not help. Installers that add hijackers usually target every browser on the PC, and system-level changes such as the hosts file, DNS or proxy affect all browsers at once. A new browser also leaves the hijacker's program and extension in place, collecting data in the old one.
Remove Querylead.com virus properly first. After that, use whichever browser you prefer; Chrome, Edge and Firefox all let you set and protect your own search engine. Import your bookmarks only after the old browser is clean.
Will Fortect remove Querylead.com virus?
Fortect scans Windows for malware and unwanted programs and repairs the system files and settings they change, and its free scan shows what it finds on your PC before you decide anything.
For Querylead.com virus, follow the plan above as well: the browser steps take back permissions and settings that no scanner treats as a threat, and uninstalling the program that brought it removes the source.
Run Microsoft Defender's full scan and, if anything was found, its offline scan as a second opinion. If the symptoms are gone after the plan and both scans are clean, there is nothing more to do.
Sources
- ZDNet: Google: Unwanted bundled software is way more aggressive than malware (read October 7, 2026)
- VirusActivity: VirusActivity (read October 7, 2026)
- FTC: How to recognize, remove and avoid malware (read October 7, 2026)
- Microsoft Learn: Microsoft Defender Offline (read October 7, 2026)
- Microsoft Learn: How Microsoft names malware (read October 7, 2026)