“We couldn’t undo the changes” virus (Free Instructions)
“We couldn’t undo the changes” virus Removal Guide
What is “We couldn’t undo the changes” virus?
“We couldn’t undo the changes” virus. What actually happened to your PC?
Is your PC displaying a suspicious screen asking you to contact support 1-800-418-4202? If so, it is evident that your computer has been compromised by “We couldn’t undo the changes” virus. This malicious computer infection is meant to deliver deceitful messages for the victim – one the victim reboots the computer, this malware launches a lock screen that looks like a Windows Update screen, asking to “keep your PC on until this is done. Installing Update 5 of 7…” Later on, the virus changes the message into “We couldn’t complete the updates. Undoing changes.” Finally, it showcases such words:
Don’t turn off your computer
We couldn’t undo the changes
Contact Support 1-800-418-4202
Do not call the number provided, because you will be greeted by scammers who will try to deceive you by saying that your Windows license key is invalid and that you need a new one. Do not believe them – contrary to their statements, these scammers do not work for Microsoft – they are only shamming. They will try to sell you nothing for 99.99 USD stating that this is how much the new license key costs. Please do not believe what such Tech Support scammers say and if you have already called them and provided your credit card details to them, contact your back ASAP. Protect your bank account if you do not want to part with your money, and remove “We couldn’t undo the changes” virus from the computer then. Although this is not a ransomware, methods to remove such viruses are similar, so please look at “We couldn’t undo the changes” removal instructions that we have prepared for you – you will have to start your PC in Safe Mode with Networking to fix the issue. We strongly recommend using a trustworthy anti-malware software for this, and if you do not have one, we suggest using FortectIntego or SpyHunter 5Combo Cleaner. 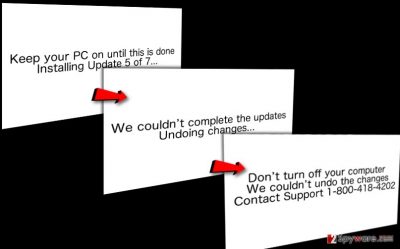
When did the virus enter your PC system?
It is enough to be a little careless when installing new programs to plant “We couldn’t undo the changes” malware on the system. Such parasite is distributed with the help of other suspicious programs that can be downloaded from file sharing networks. Be aware that such sites frequently do not filter software that user uploads, therefore, you can install a software package that contains several malicious programs without even realizing it. To protect your PC from malware attacks, choose only trustworthy download sources and rely on Advanced or Custom installation settings. These settings allow to drop off unwanted bundled components, while Default and Standard installation settings hide them. You can also install this malicious application after installing a fake software update from a third-party site. Remember that aggressive pop-ups urging you to update software or install a new one in order to access certain content are commonly filled with additional components that can pose a threat to your computer system.
“We couldn’t undo the changes” virus removal guide
It is highly recommended to use a reliable anti-malware software for “We couldn’t undo the changes” removal. However, as long as the lock screen is active, you will not be able to take any actions to remove “We couldn’t undo the changes” malware. Therefore, restart your PC into a Safe Mode with Networking and then delete the malware from the system. Detailed removal instructions are given below.
Getting rid of “We couldn’t undo the changes” virus. Follow these steps
Manual removal using Safe Mode
Important! →
Manual removal guide might be too complicated for regular computer users. It requires advanced IT knowledge to be performed correctly (if vital system files are removed or damaged, it might result in full Windows compromise), and it also might take hours to complete. Therefore, we highly advise using the automatic method provided above instead.
Step 1. Access Safe Mode with Networking
Manual malware removal should be best performed in the Safe Mode environment.
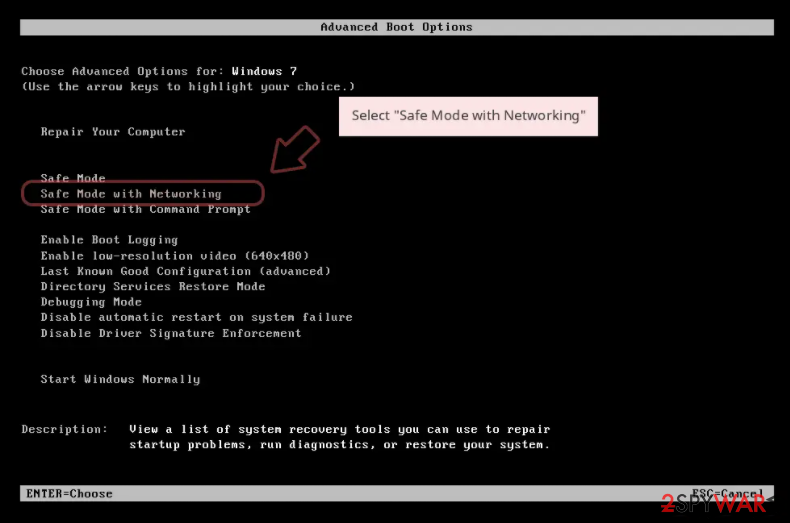
Windows 7 / Vista / XP
- Click Start > Shutdown > Restart > OK.
- When your computer becomes active, start pressing F8 button (if that does not work, try F2, F12, Del, etc. – it all depends on your motherboard model) multiple times until you see the Advanced Boot Options window.
- Select Safe Mode with Networking from the list.

Windows 10 / Windows 8
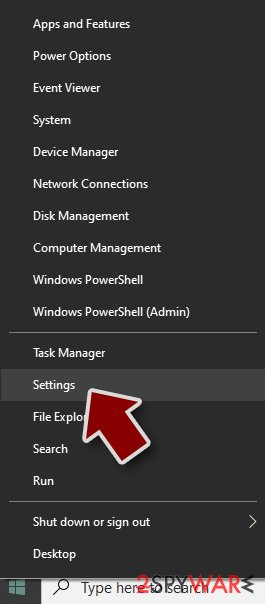
- Right-click on Start button and select Settings.

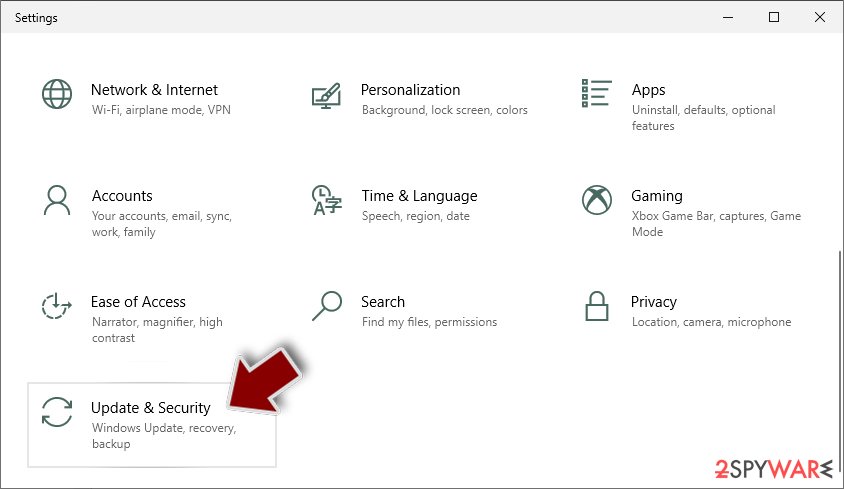
- Scroll down to pick Update & Security.

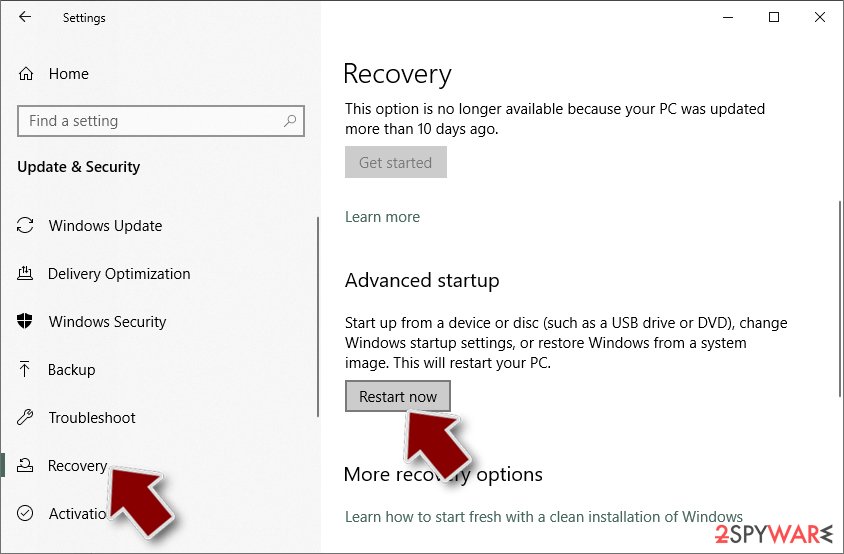
- On the left side of the window, pick Recovery.
- Now scroll down to find Advanced Startup section.
- Click Restart now.

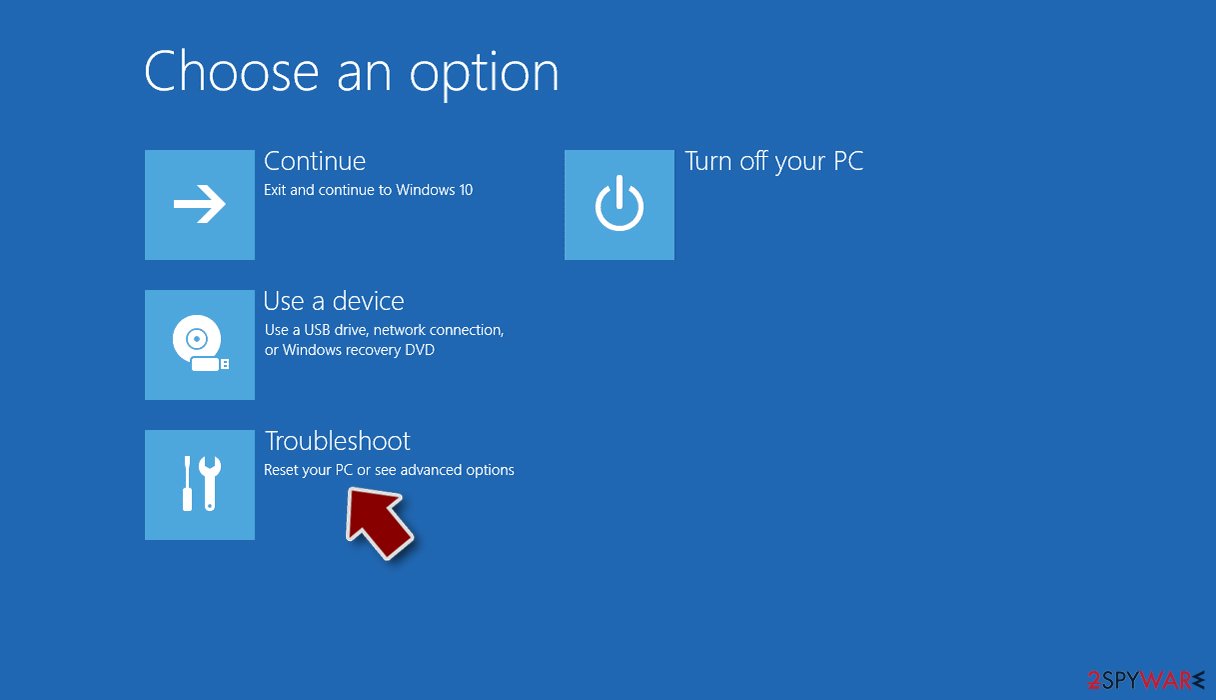
- Select Troubleshoot.

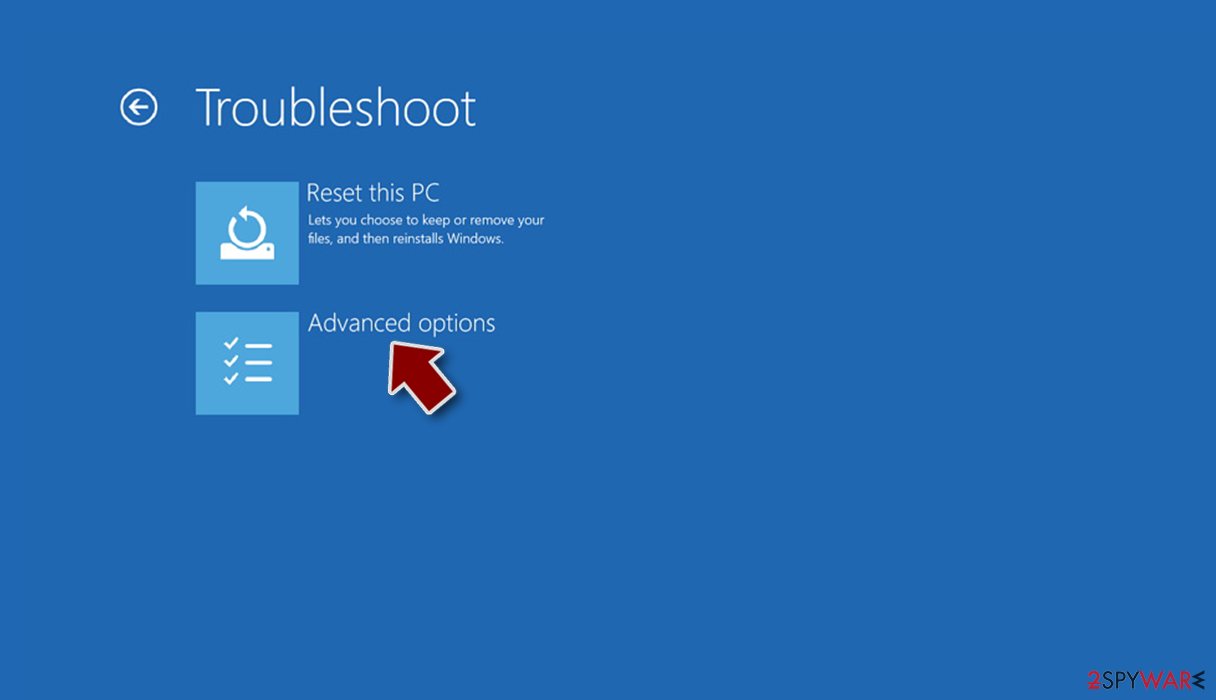
- Go to Advanced options.

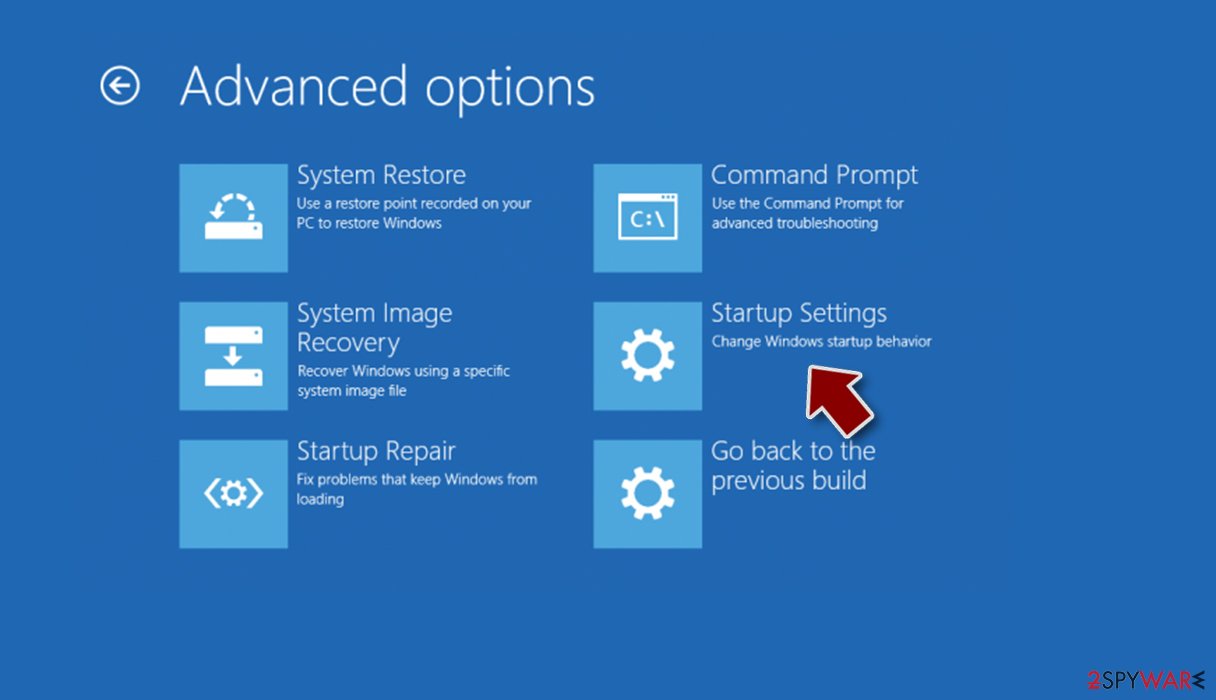
- Select Startup Settings.

- Press Restart.
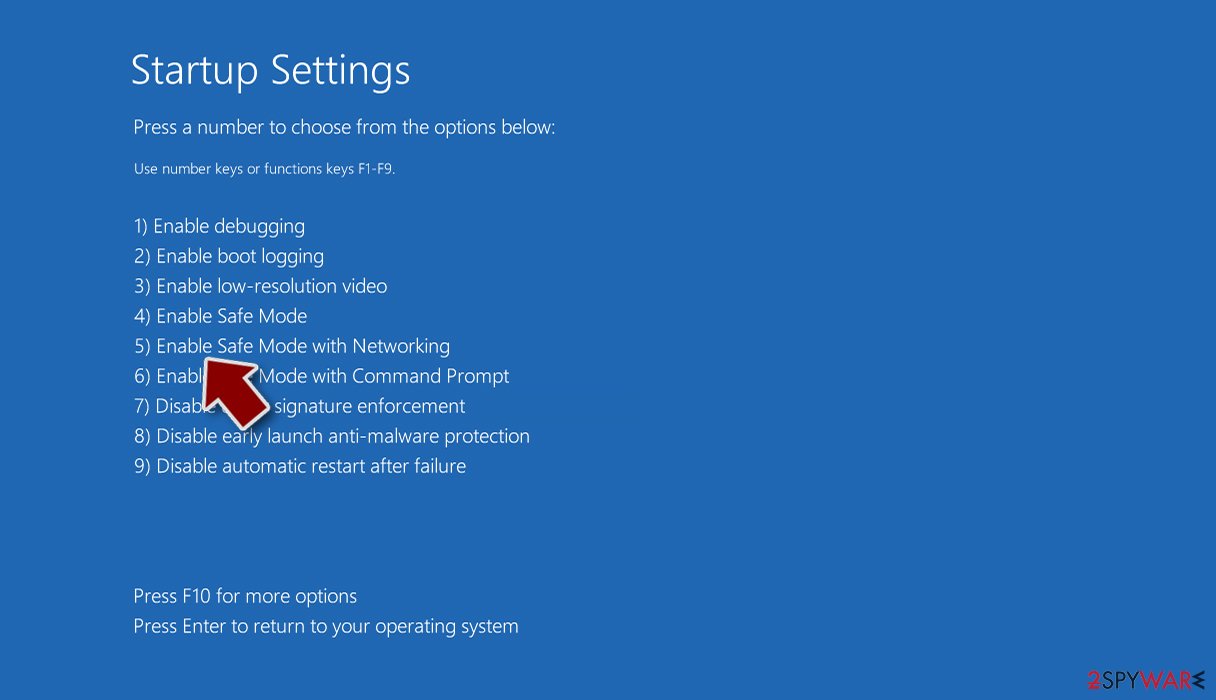
- Now press 5 or click 5) Enable Safe Mode with Networking.

Step 2. Shut down suspicious processes
Windows Task Manager is a useful tool that shows all the processes running in the background. If malware is running a process, you need to shut it down:
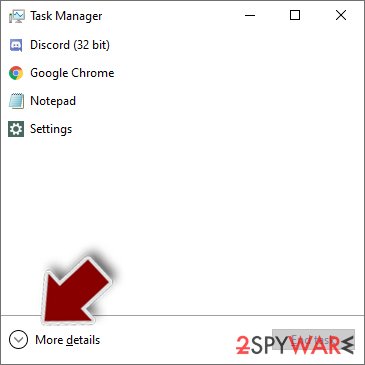
- Press Ctrl + Shift + Esc on your keyboard to open Windows Task Manager.
- Click on More details.

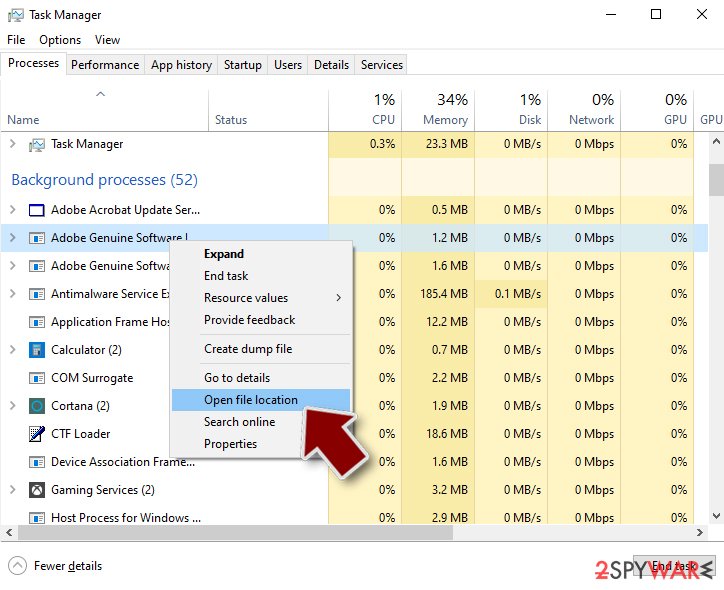
- Scroll down to Background processes section, and look for anything suspicious.
- Right-click and select Open file location.

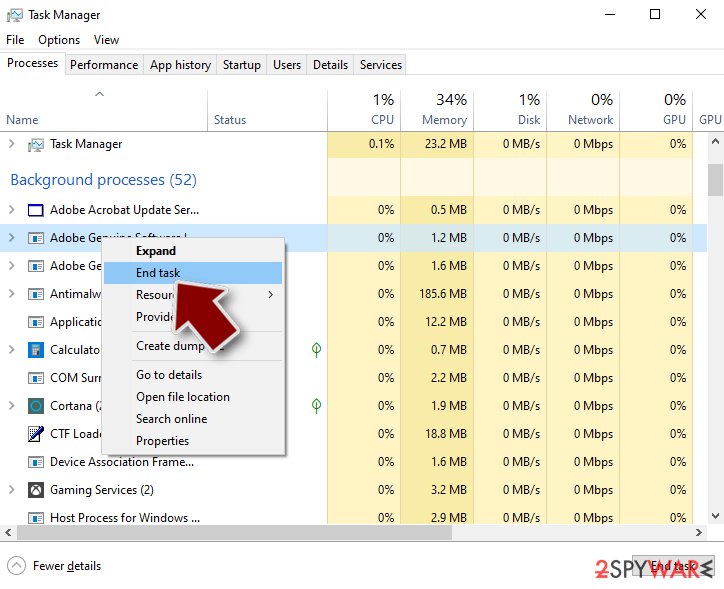
- Go back to the process, right-click and pick End Task.

- Delete the contents of the malicious folder.
Step 3. Check program Startup
- Press Ctrl + Shift + Esc on your keyboard to open Windows Task Manager.
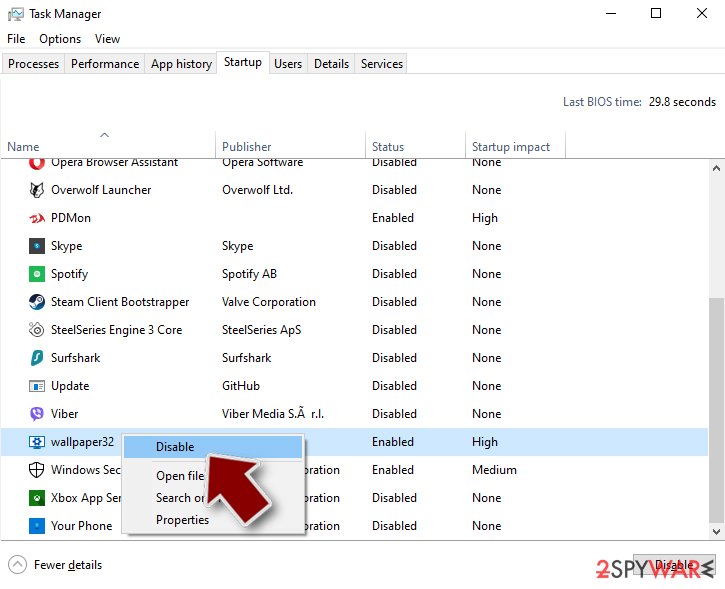
- Go to Startup tab.
- Right-click on the suspicious program and pick Disable.

Step 4. Delete virus files
Malware-related files can be found in various places within your computer. Here are instructions that could help you find them:
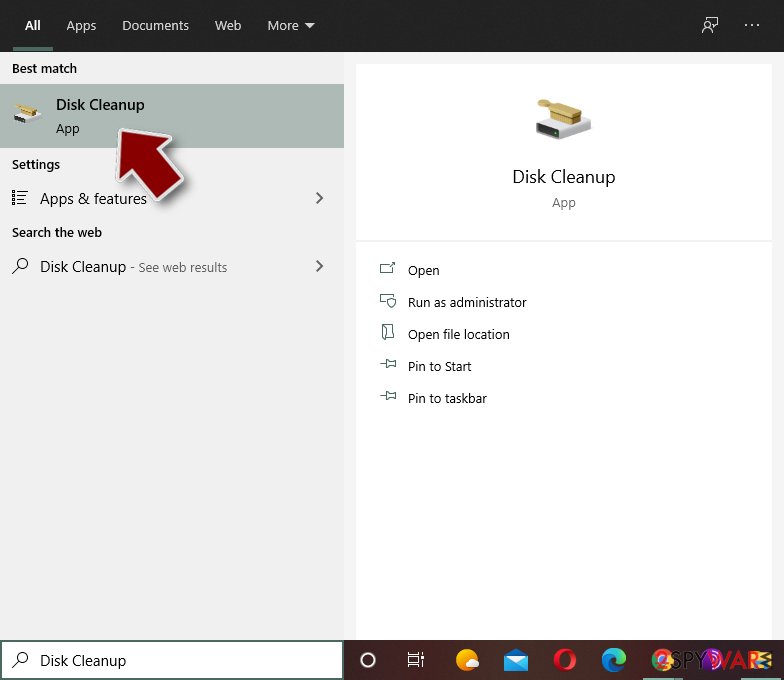
- Type in Disk Cleanup in Windows search and press Enter.

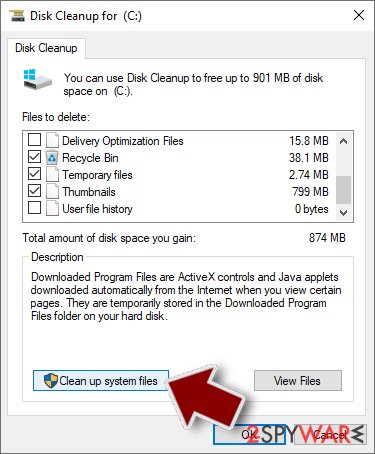
- Select the drive you want to clean (C: is your main drive by default and is likely to be the one that has malicious files in).
- Scroll through the Files to delete list and select the following:
Temporary Internet Files
Downloads
Recycle Bin
Temporary files - Pick Clean up system files.

- You can also look for other malicious files hidden in the following folders (type these entries in Windows Search and press Enter):
%AppData%
%LocalAppData%
%ProgramData%
%WinDir%
After you are finished, reboot the PC in normal mode.
Remove “We couldn’t undo the changes” using System Restore
-
Step 1: Reboot your computer to Safe Mode with Command Prompt
Windows 7 / Vista / XP- Click Start → Shutdown → Restart → OK.
- When your computer becomes active, start pressing F8 multiple times until you see the Advanced Boot Options window.
-
Select Command Prompt from the list

Windows 10 / Windows 8- Press the Power button at the Windows login screen. Now press and hold Shift, which is on your keyboard, and click Restart..
- Now select Troubleshoot → Advanced options → Startup Settings and finally press Restart.
-
Once your computer becomes active, select Enable Safe Mode with Command Prompt in Startup Settings window.

-
Step 2: Restore your system files and settings
-
Once the Command Prompt window shows up, enter cd restore and click Enter.

-
Now type rstrui.exe and press Enter again..

-
When a new window shows up, click Next and select your restore point that is prior the infiltration of “We couldn’t undo the changes”. After doing that, click Next.


-
Now click Yes to start system restore.

-
Once the Command Prompt window shows up, enter cd restore and click Enter.
Finally, you should always think about the protection of crypto-ransomwares. In order to protect your computer from “We couldn’t undo the changes” and other ransomwares, use a reputable anti-spyware, such as FortectIntego, SpyHunter 5Combo Cleaner or Malwarebytes
How to prevent from getting malware
Access your website securely from any location
When you work on the domain, site, blog, or different project that requires constant management, content creation, or coding, you may need to connect to the server and content management service more often. The best solution for creating a tighter network could be a dedicated/fixed IP address.
If you make your IP address static and set to your device, you can connect to the CMS from any location and do not create any additional issues for the server or network manager that needs to monitor connections and activities. VPN software providers like Private Internet Access can help you with such settings and offer the option to control the online reputation and manage projects easily from any part of the world.
Recover files after data-affecting malware attacks
While much of the data can be accidentally deleted due to various reasons, malware is one of the main culprits that can cause loss of pictures, documents, videos, and other important files. More serious malware infections lead to significant data loss when your documents, system files, and images get encrypted. In particular, ransomware is is a type of malware that focuses on such functions, so your files become useless without an ability to access them.
Even though there is little to no possibility to recover after file-locking threats, some applications have features for data recovery in the system. In some cases, Data Recovery Pro can also help to recover at least some portion of your data after data-locking virus infection or general cyber infection.
