
Vigua.A virus, PUA:Win32/Vigua.A: what it is and how to remove it
PUA:Win32/Vigua.A is an adware detection name for intrusive programs that display unwanted ads and track browsing data. These PUPs arrive through software bundles and fake Flash updates, persistent despite removal attempts.
Facts checked October 5, 2026. Removal steps tested on Windows 11 (26H2) and checked against Microsoft's and the browser makers' current documentation. Sections marked as our earlier report are the original text: they describe the threat as it was then and have not been reviewed since. The 2026 status, the removal steps and the questions are current.
Automatic
Get a free scan and check if your PC is infected.
Fortect finds malware, unwanted programs and the Windows damage they leave behind, and repairs it in one pass.
An automatic scan checks installed programs, startup items and browser extensions for anything that came with Vigua.A virus, PUA:Win32/Vigua.A.
Do it yourself · free Remove Vigua.A virus, PUA:Win32/Vigua.A yourself 4 steps, about 12 minutes, no software needed.
Start the steps
Vigua.A virus, PUA:Win32/Vigua.A: summary
| Distribution | Software bundle packages, fake updates, misleading advertisements, software cracks |
|---|---|
| Name | Vigua.A virus, PUA:Win32/Vigua.A |
| Type | Potentially unwanted application, adware |
| Danger level | Medium. It can infect any systems and populate advertisements on all the web browsers and track user data; it can also use persistence mechanisms that prevent easy elimination |
| Symptoms | Unexpected changes to the web browser's homepage and new tab address; intrusive advertisements; slow web browser; PUA:Win32/Vigua.A popup shows up despite the security software claiming it's been deleted |
| Detection names | No Microsoft detection name is known |
| Removal | Scan the PC with security software to find and remove the malware and anything installed with it. Fortect scans Windows for malware and repairs the system files and settings it damaged. Remove it nowTo use the full-featured product, you have to purchase a license for Fortect. The scan is free. |
Show 6 more facts
| Damage | Not recorded in the old report |
|---|---|
| Evidence | 4 write-ups by security sites; details still limited |
| Program | Vigua.A virus, PUA:Win32/Vigua.A |
| First seen | 9 September 2020 |
| Microsoft Defender name | PUA:Win32/Vigua.A |
| Facts checked | 5 October 2026 |
Is Vigua.A virus, PUA:Win32/Vigua.A dangerous?
From our report of Sep 2020 · not reviewed since
More from our earlier report on Vigua.A virus, PUA:Win32/Vigua.A
- To eliminate the infection, simply allow Windows Defender to move it to quarantine; in case the detection returns, perform scans with alternative security programs ( , , for example)
- In case the detection does not go away, and you are spammed by your security software, it might be a browser or Google account syncing problem.
- In such a case, reset your web browser and sync, and later perform a scan with for best results
Check your browser and PC
Microsoft Defender reports Vigua.A virus, PUA:Win32/Vigua.A as PUA:Win32/Vigua.A.
In a Defender name, the part before the colon is the category, the part after it is the platform, and the part after the slash is the family Microsoft assigned. A suffix after ! is an internal Microsoft marker, not a different threat.
Generic labels such as Agent, GenericKD or Malware.AI only say that a file looks malicious, not what it does; our guide to antivirus detection names shows how to read them.
How to remove Vigua.A virus, PUA:Win32/Vigua.A
How to remove the Vigua.A virus, PUA:Win32/Vigua.A extension
Do the browser steps in every browser and profile on the PC, then check Windows for the program that installed the extension.
Step 1: Remove extensions you did not add
Vigua.A virus, PUA:Win32/Vigua.A often works through an extension, so go through the extension list of each browser:
chrome://extensionsedge://extensions- Extensions and themes in Firefox
Switch suspicious extensions off one at a time and reload the page where the problem shows, then remove the one that stops it, and any other you did not add.
Remember the other browsers and profiles on the PC. If Remove is missing or greyed out, a policy forces the extension, which the policy step deals with. Windows 11 and Windows 10 show the same pages.
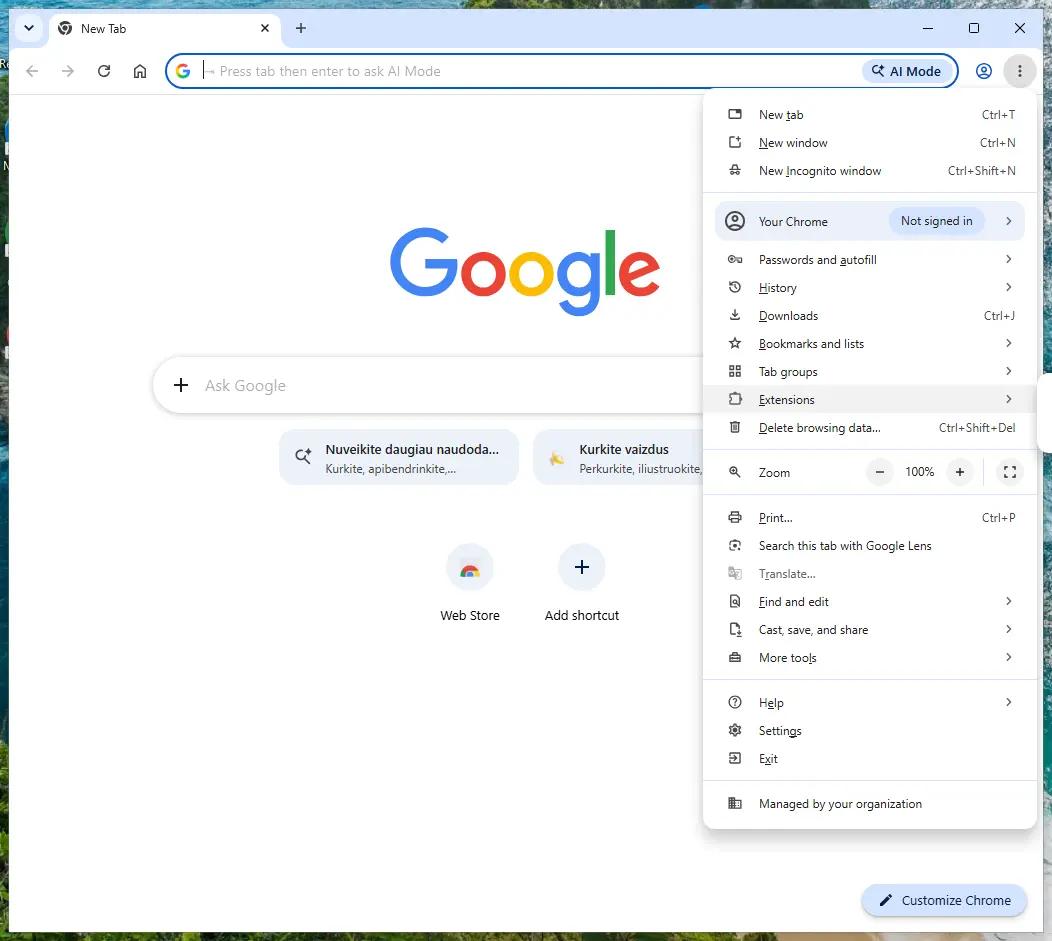
Chrome on Windows 11: More > Extensions > Manage extensions. Full procedure with screenshots: Remove a browser extension
Step 2: Uninstall Vigua.A virus, PUA:Win32/Vigua.A
Open Settings > Apps > Installed apps in Windows 11, or Settings > Apps > Apps & features in Windows 10.
Sort the list by install date and find Vigua.A virus, PUA:Win32/Vigua.A, then choose Uninstall from the three-dot menu next to it (in Windows 10, click the entry and then Uninstall).
Remove anything else installed on the same day that you do not recognise, because such programs usually arrive together in one installer. If the uninstaller opens a browser page with an offer or a survey, close it: the program is removed either way.
Full procedure with screenshots: Uninstall a program or app in Windows On uGetFix
Step 3: Reset the browser
Finish the browser part with a reset, which puts the search engine, start page, new tab page and site permissions back to their defaults and switches extensions off. Chrome: Settings > Reset settings > Restore settings to their original defaults.
Edge: Settings > Reset settings. Firefox: Help > More troubleshooting information > Refresh Firefox, which also removes its extensions. Your bookmarks and saved passwords are kept, and the menus are the same on Windows 11 and Windows 10.
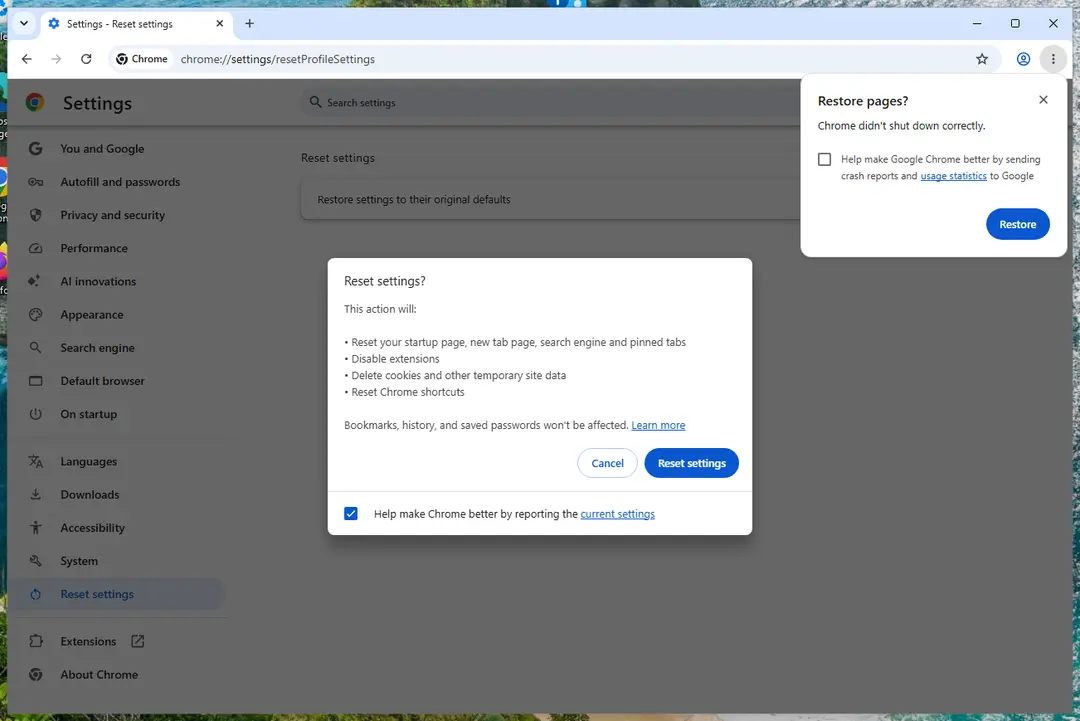
Chrome on Windows 11: Settings > Reset settings. Full procedure with screenshots: Reset a browser and fix a hijacked search engine
Step 4: Scan the PC, then run the offline scan
Open Windows Security > Virus & threat protection > Scan options, run a Full scan and remove everything it finds. Then select Microsoft Defender Antivirus (offline scan) and click Scan now: the PC restarts and scans before Windows loads, which finds files that hide while Windows runs.
Save your work first, because the offline scan takes about 15 minutes. Both scans are built into Windows 11 and Windows 10, and a second scanner from another vendor is a useful extra opinion.
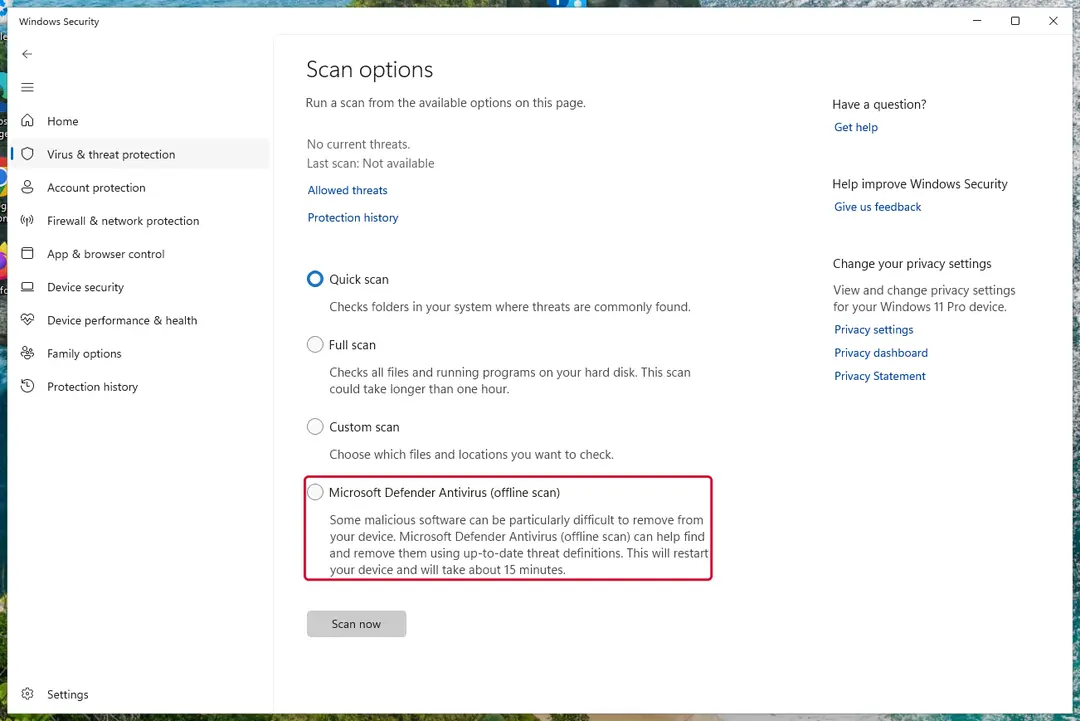
Windows 11: Windows Security > Virus & threat protection > Scan options. Full procedure with screenshots: Run a Microsoft Defender Offline scan
Instructions for each browser and system
The detailed steps for every browser and system this guide covers. Open the one you use.
Uninstall from Windows
To uninstall unwanted applications from Windows, proceed with these steps:
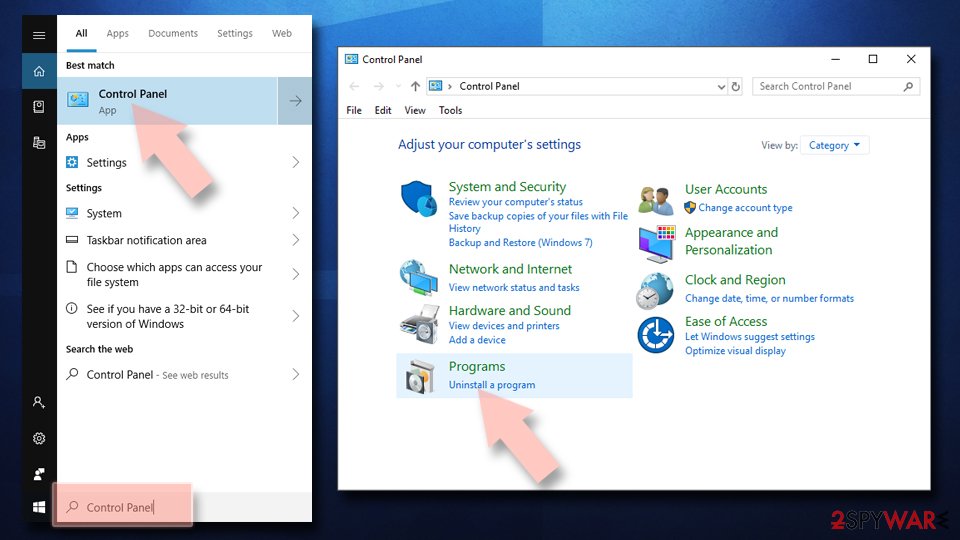
Uninstall from Windows 10/8:
- Type Control Panel into the Windows search box and open the result.
- Under Programs, select Uninstall a program.
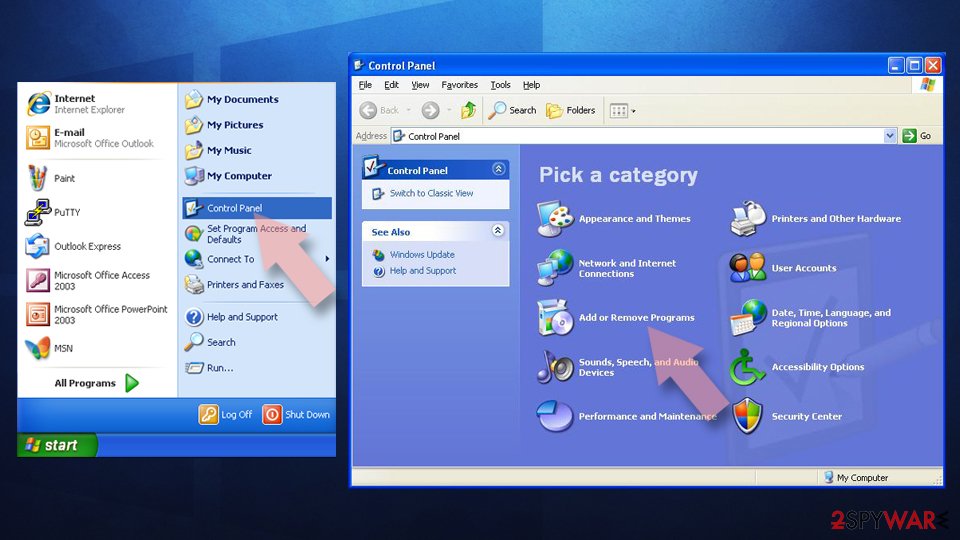
Uninstall from Windows 7/XP:
- Click on Windows Start > Control Panel (Windows XP users should click on Add/Remove Programs).
- In Control Panel, select Programs > Uninstall a program.
Remove the unwanted program:
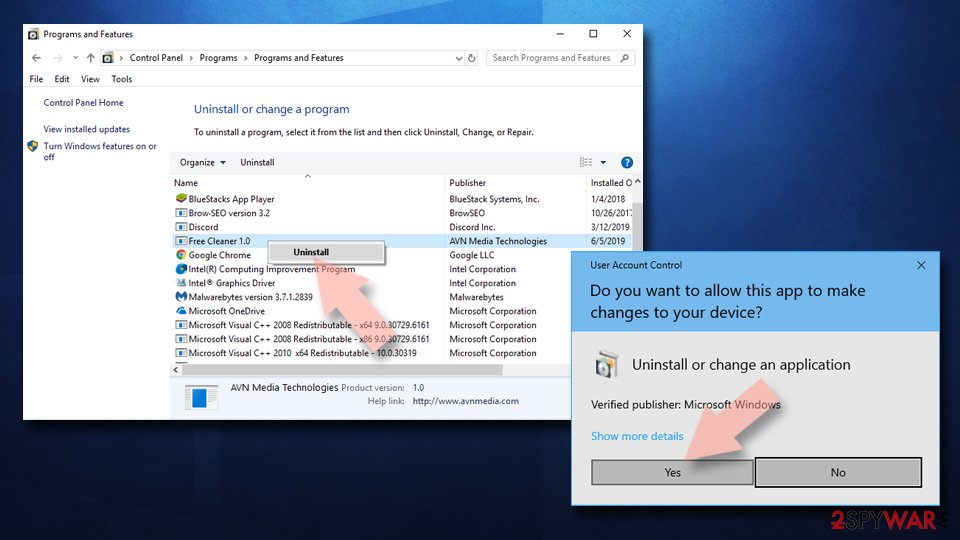
- In the Programs and Features window, look for any recently installed suspicious entries, select them, and click Uninstall.
- If User Account Control appears, click Yes to confirm, then complete the removal.
Remove from Google Chrome
Reset Google Chrome to get rid of PUA:Win32/Vigua.A detection after you reset Google Sync.
Delete malicious extensions from Google Chrome:
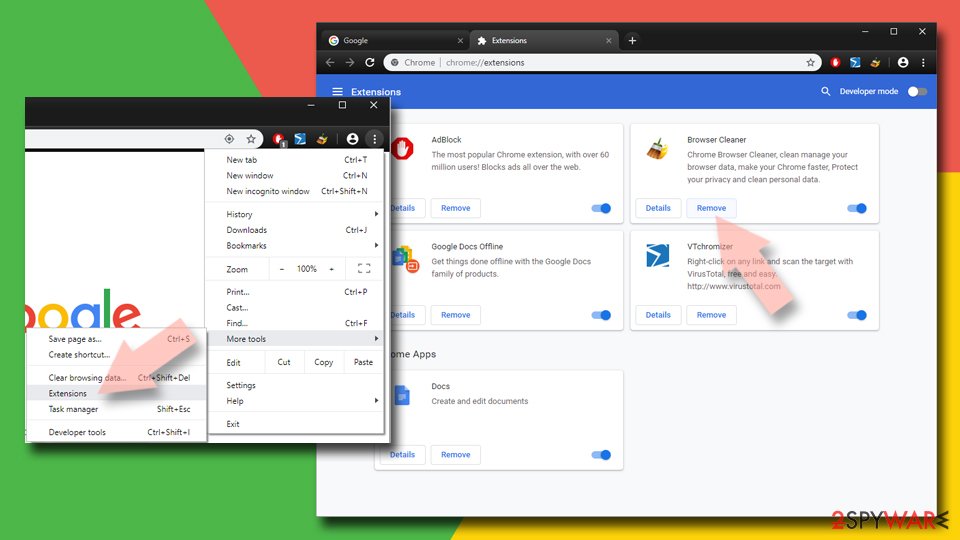
- Open Google Chrome, click on the Menu (three vertical dots at the top-right corner) and select More tools > Extensions.
- In the newly opened window, you will see all the installed extensions. Uninstall all suspicious extensions related to the unwanted program by clicking Remove.
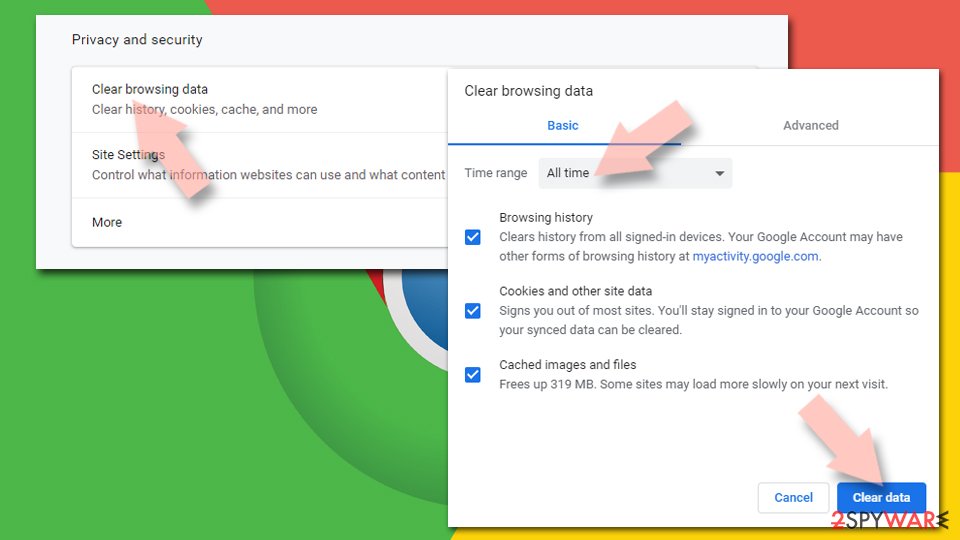
Clear cache and web data from Chrome:
- Click on Menu and pick Settings.
- Under Privacy and security, select Clear browsing data.
- Select Browsing history, Cookies and other site data, as well as Cached images and files.
- Click Clear data.
Change your homepage:
- Click menu and choose Settings.
- Look for a suspicious site in the On startup section.
- Click on Open a specific or set of pages and click on three dots to find the Remove option.
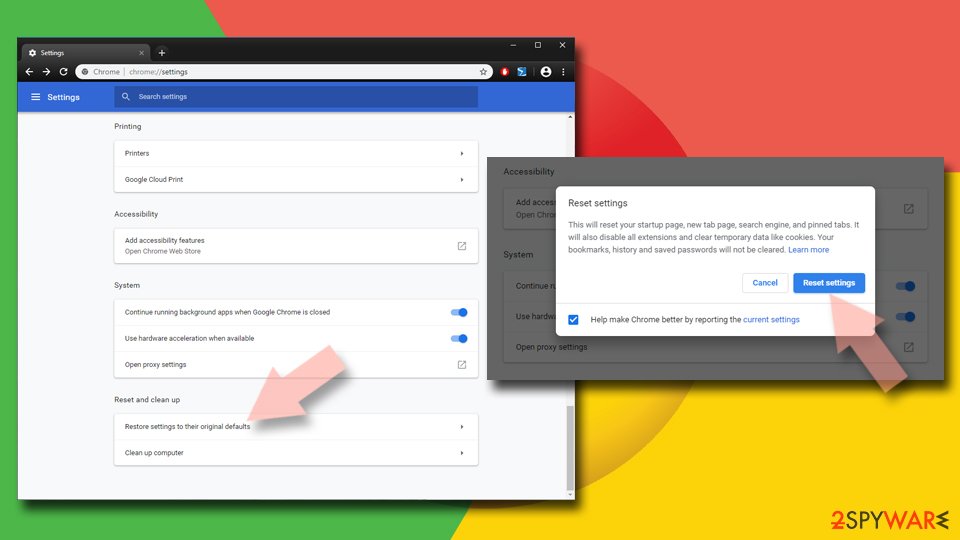
Reset Google Chrome:
If the previous methods did not help you, reset Google Chrome to eliminate all the unwanted components:
- Click on Menu and select Settings.
- In the Settings, scroll down and click Advanced.
- Scroll down and locate Reset and clean up section.
- Now click Restore settings to their original defaults.
- Confirm with Reset settings.
Remove from Microsoft Edge
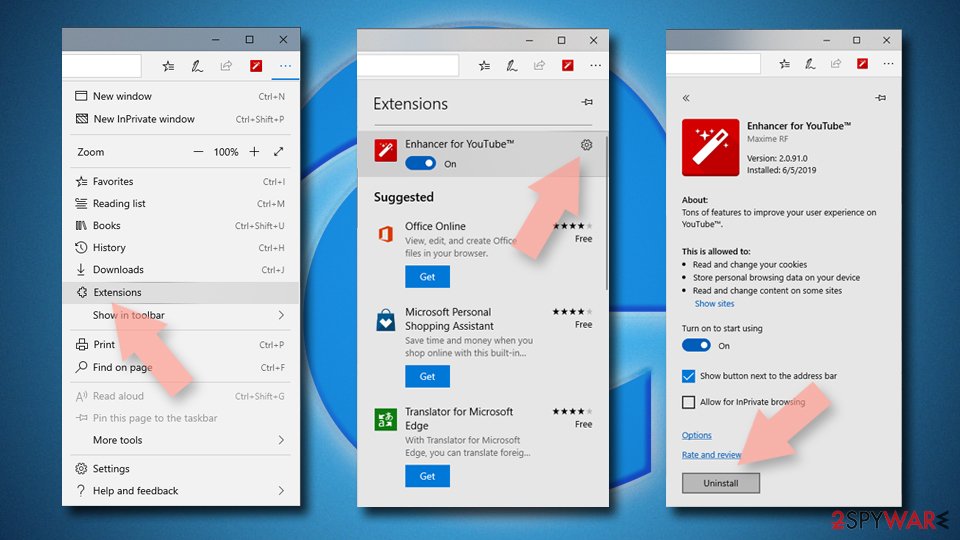
Delete unwanted extensions from MS Edge:
- Select Menu (three horizontal dots at the top-right of the browser window) and pick Extensions.
- From the list, pick the extension and click on the Gear icon.
- Click Remove.
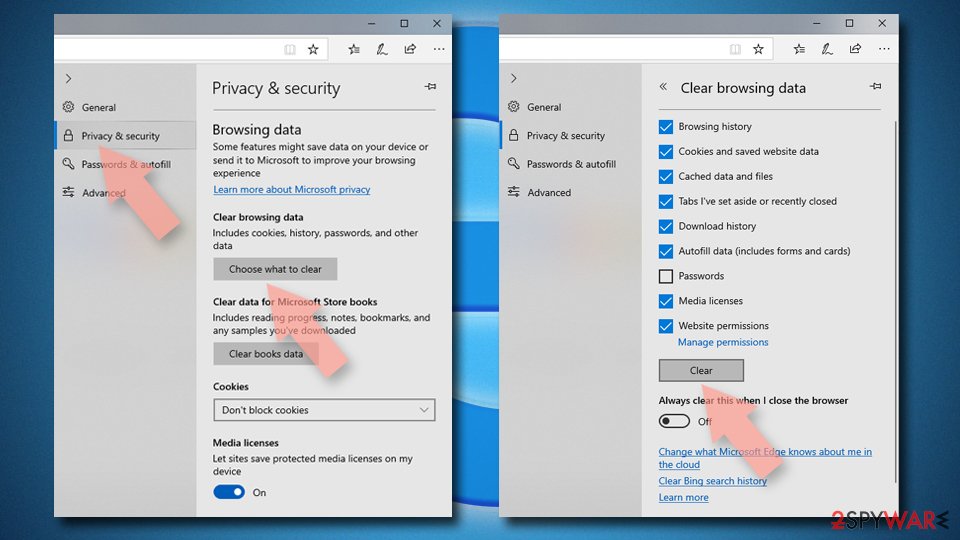
Clear cookies and other browser data:
- Click on the Menu (three horizontal dots at the top-right of the browser window) and select Settings > Privacy, search, and services..
- Under Clear browsing data, pick Choose what to clear.
- Select Cookies and other site data and Cached images and files. (apart from passwords, although you might want to include Media licenses as well, if applicable) and click on Clear.
Restore new tab and homepage settings:
- Click the menu icon and choose Settings.
- Then find On startup section.
- Click Remove next to any suspicious startup page.
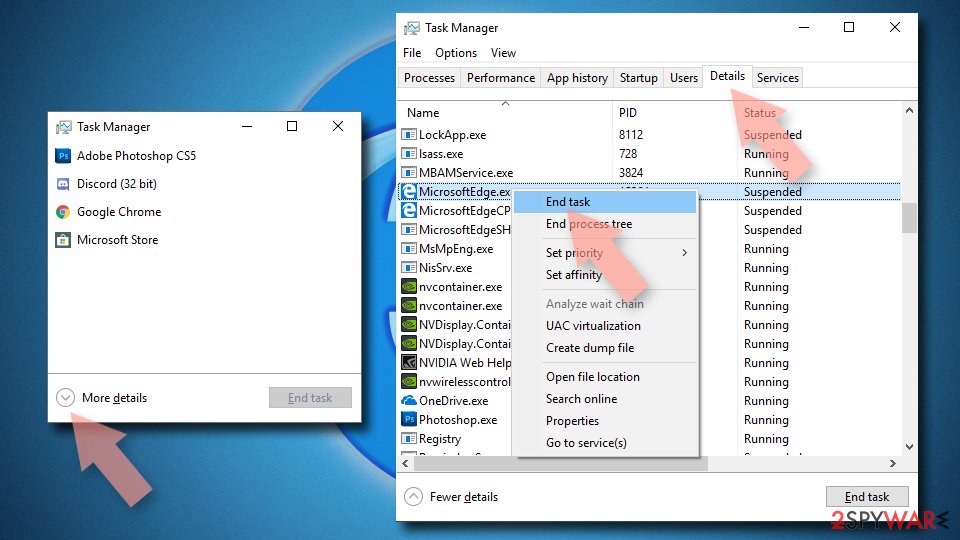
Reset MS Edge if the above steps did not work:
- Press on Ctrl + Shift + Esc to open Task Manager.
- Click on More details arrow at the bottom of the window.
- Select Details tab.
- Now scroll down and locate every entry with Microsoft Edge name in it. Right-click on each of them and select End Task to stop MS Edge from running.
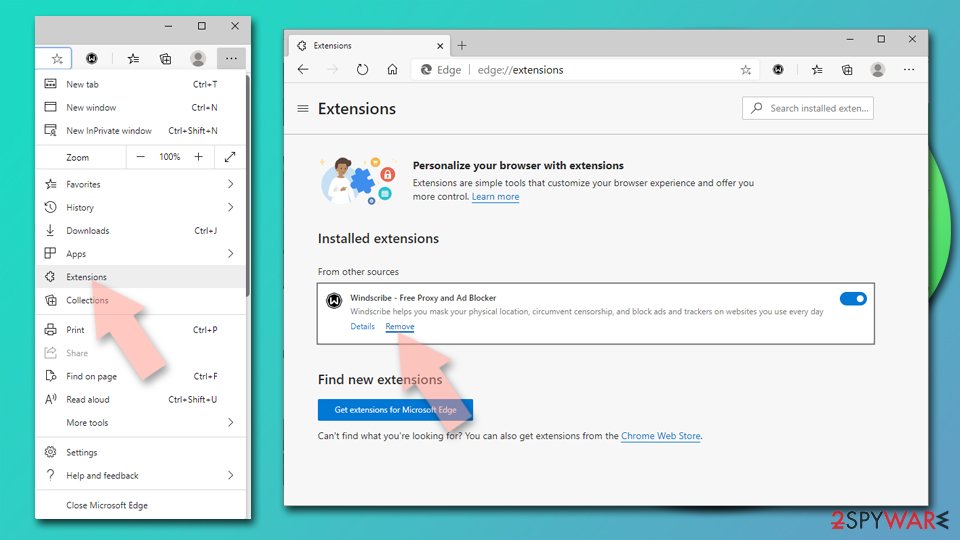
Delete extensions from MS Edge (Chromium):
- Open Edge and click select Settings > Extensions.
- Delete unwanted extensions by clicking Remove.
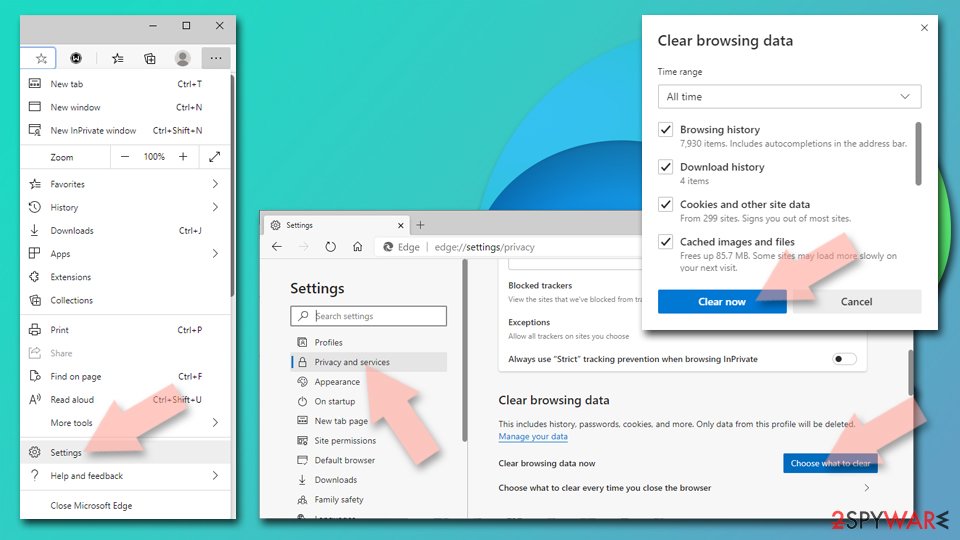
Clear cache and site data:
- Click on Menu and go to Settings.
- Select Privacy, search and services.
- Under Clear browsing data, pick Choose what to clear.
- Under Time range, pick All time.
- Select Clear now.
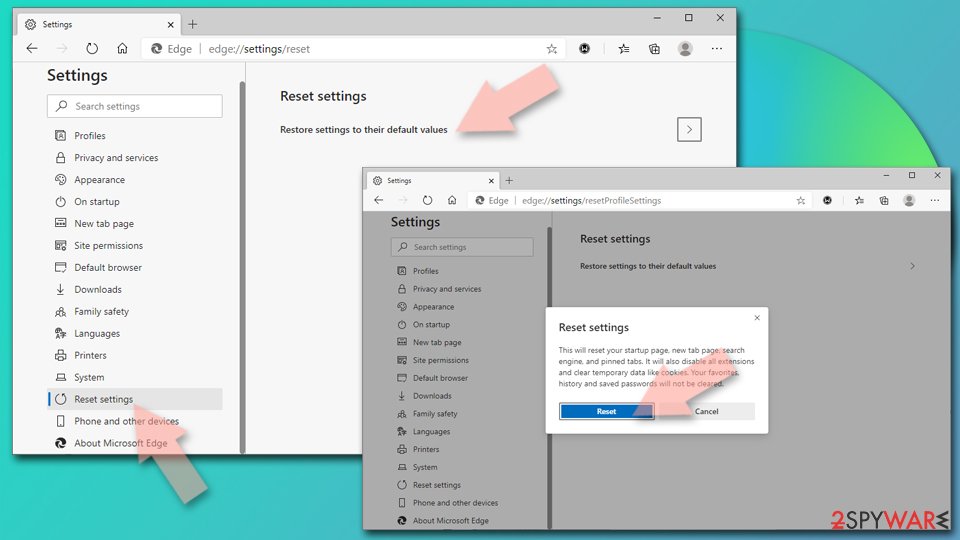
Reset Chromium-based MS Edge:
- Click on Menu and select Settings.
- On the left side, pick Reset settings.
- Select Restore settings to their default values.
- Confirm with Reset.
- This will disable extensions and reset startup pages but will not delete bookmarks, saved passwords, or browsing history.
Remove from Mozilla Firefox (FF)
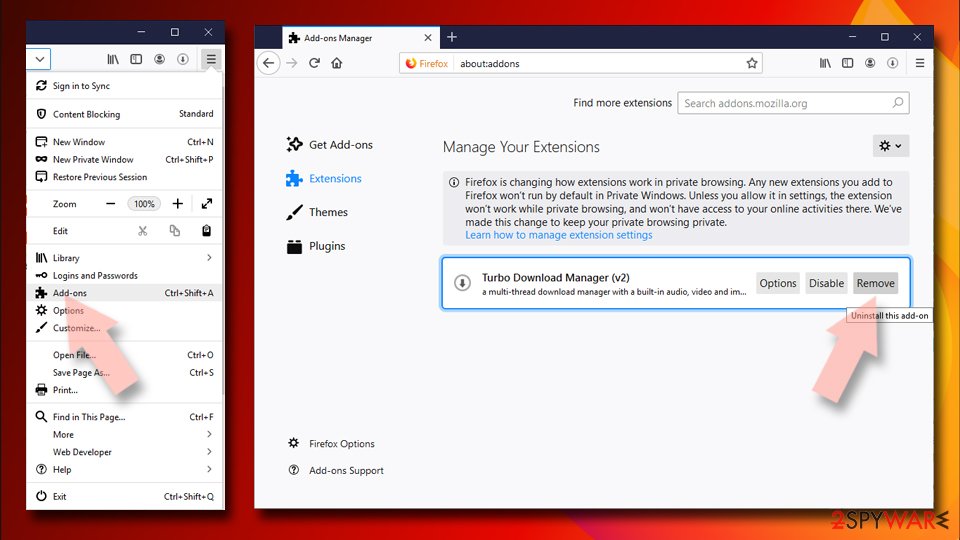
Remove dangerous extensions:
- Open Mozilla Firefox browser and click on the Menu (three horizontal lines at the top-right of the window).
- Select Add-ons.
- In here, select the unwanted extension and click Remove.
Reset the homepage:
- Click three horizontal lines at the top right corner to open the menu.
- Choose Settings.
- Under Home, set your preferred homepage and new tab settings.
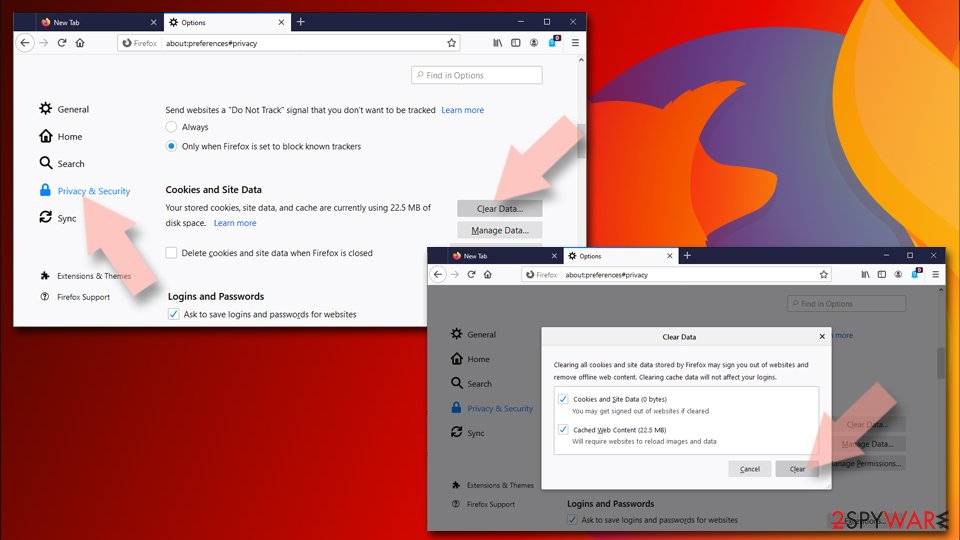
Clear cookies and site data:
- Click Menu and pick Settings.
- Go to Privacy & Security section.
- Scroll down to locate Cookies and Site Data.
- Click on Clear Data...
- Select Cookies and Site Data and Temporary cached files and pages, then click Clear.
Reset Mozilla Firefox
If clearing the browser as explained above did not help, reset Mozilla Firefox:
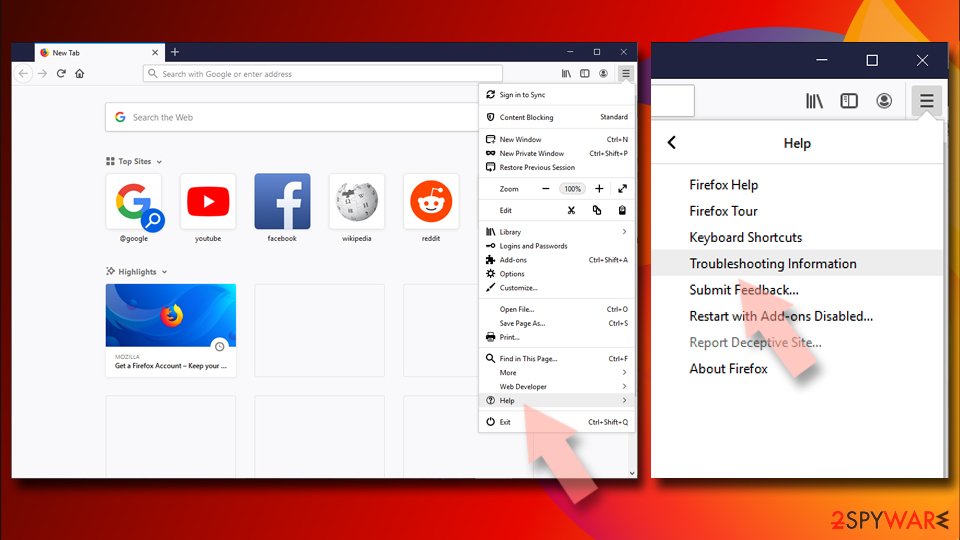
- Open Mozilla Firefox browser and click the Menu.
- Go to Help and then choose Troubleshooting Information.
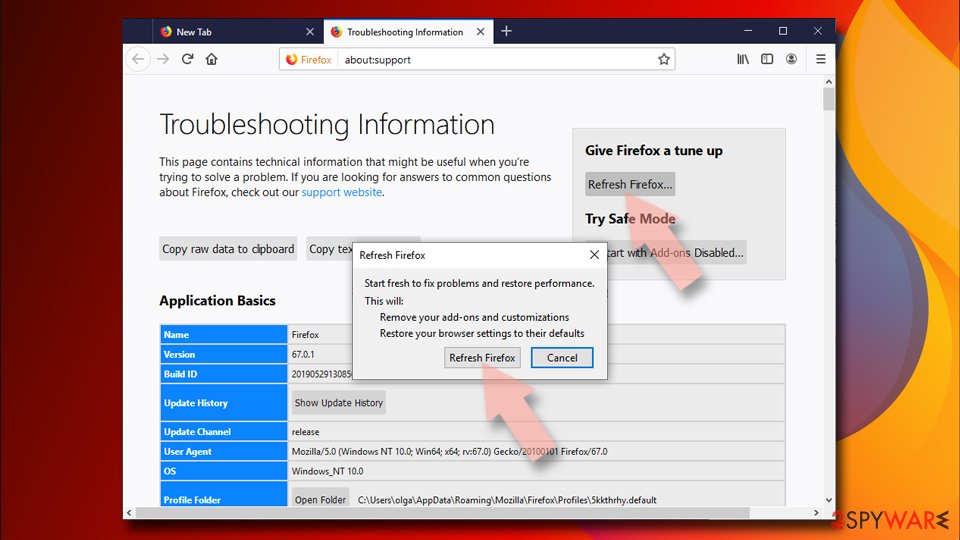
- Under Give Firefox a tune up section, click on Refresh Firefox...
- Once the pop-up shows up, confirm the action by pressing on Refresh Firefox.
Delete from Safari
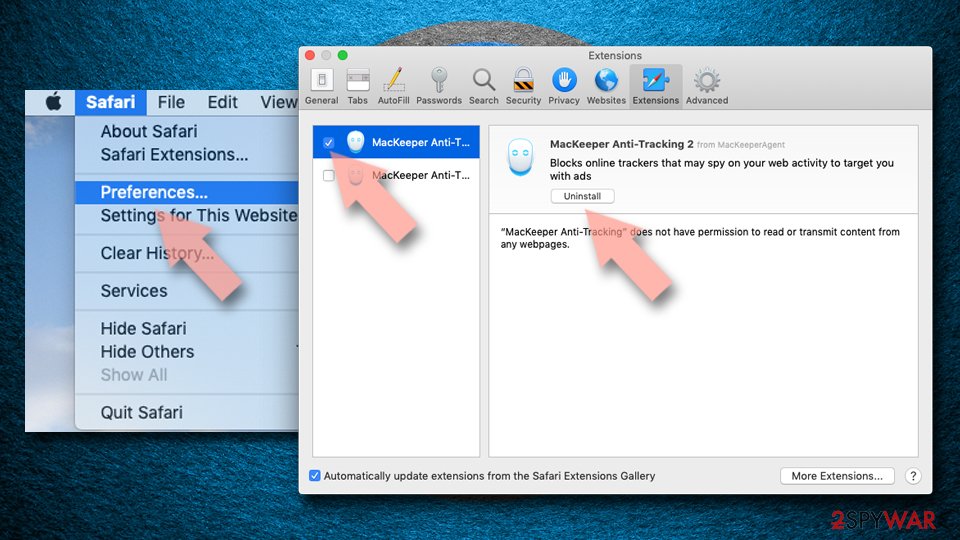
Remove dangerous extensions:
- Open Safari, click Safari in the menu at the top-left of the screen, and select Preferences.
- Go to the Extensions tab, look for any suspicious entries, and click Uninstall to remove them.
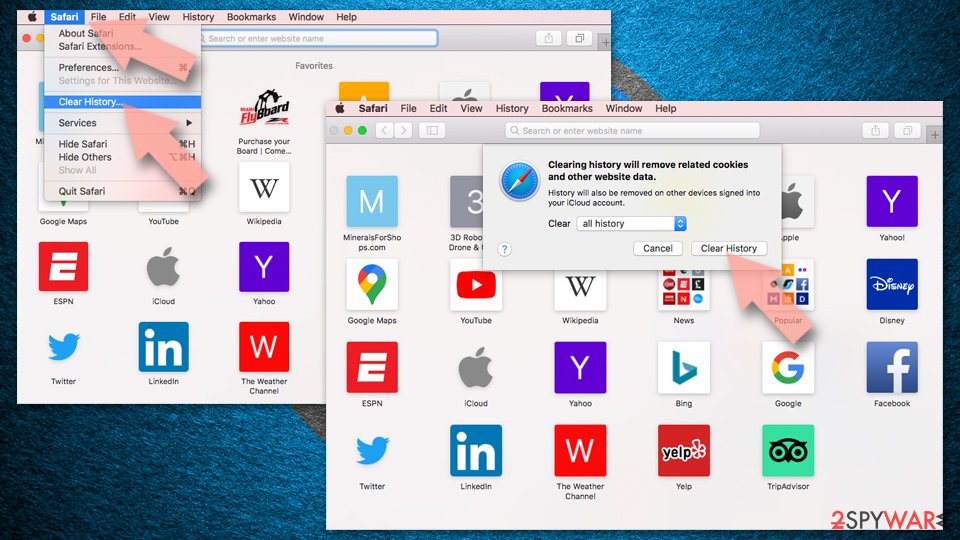
Clear history and website data:
- Click Safari in the menu and pick Clear History.
- Set Clear to all history and confirm with Clear History.
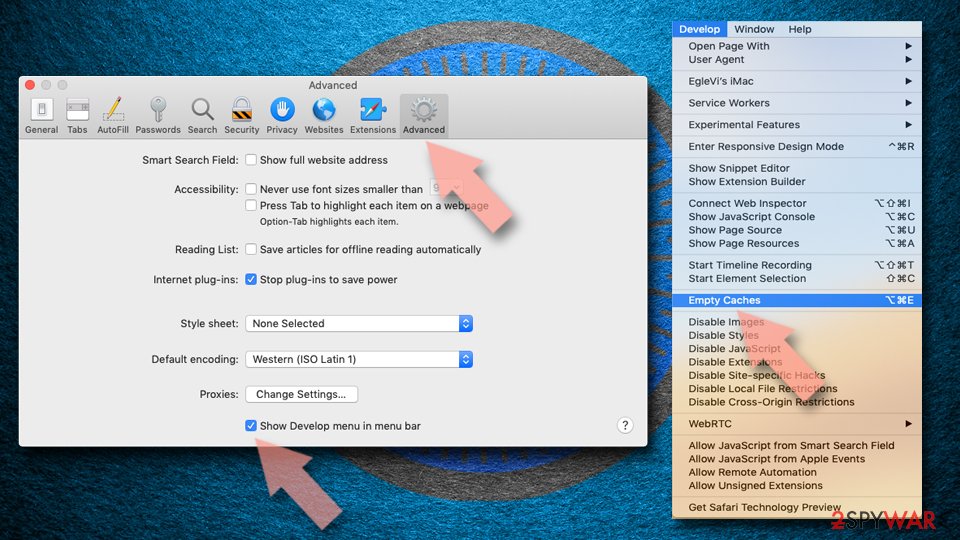
Reset Safari:
- Click Safari in the menu and select Preferences > Advanced.
- Enable Show Develop menu in menu bar.
- From the menu bar, click Develop and select Empty Caches.
Delete from macOS
macOS users should follow these instructions if they want to eliminate unwanted apps:
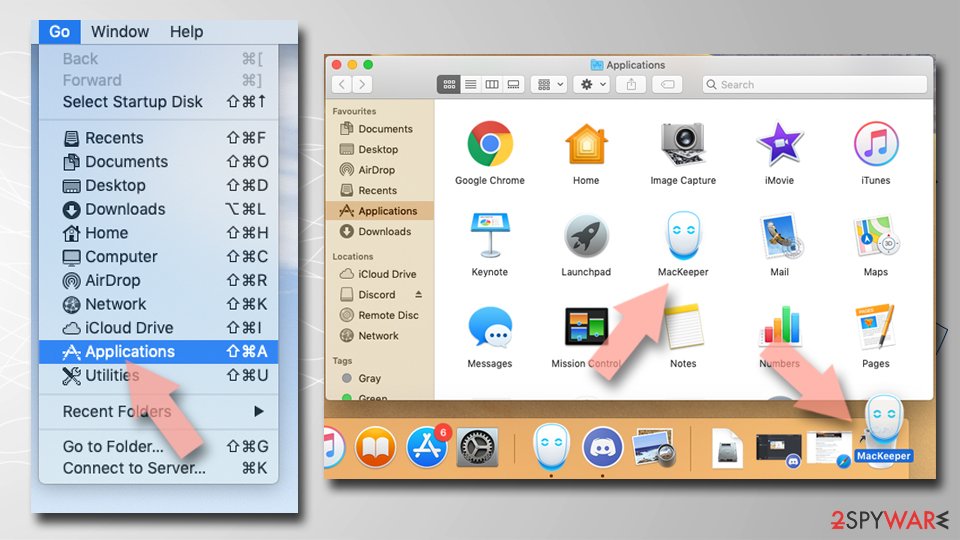
Remove the unwanted application:
- From the menu bar, select Go > Applications.
- In the Applications folder, look for any suspicious entries, then drag them to Trash (or right-click and pick Move to Trash).
Delete leftover files and folders:
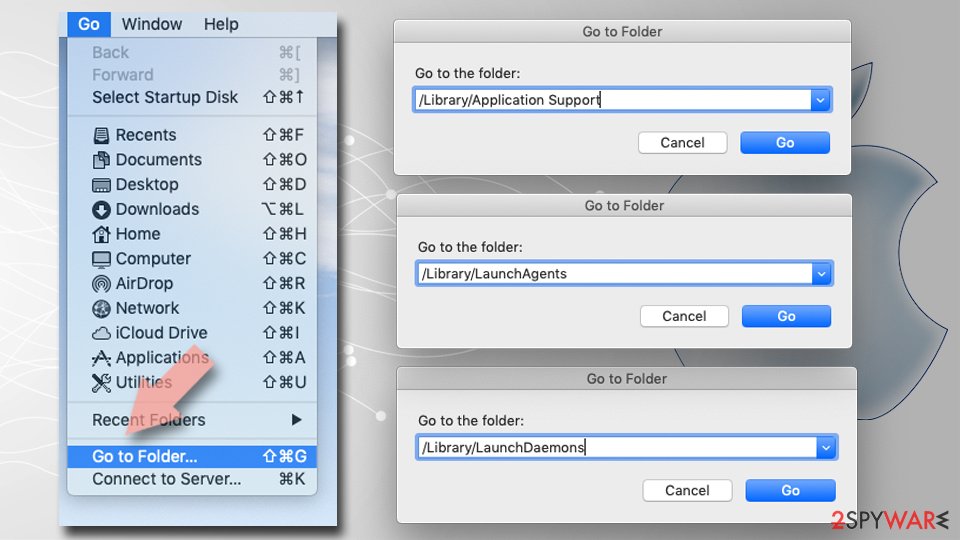
- Select Go > Go to Folder.
- Enter /Library/Application Support and remove any suspicious folders related to the unwanted program.
- Repeat the same check in the /Library/LaunchAgents and /Library/LaunchDaemons folders, deleting any suspicious entries.
- Finally, empty the Trash to permanently remove the leftovers.
Reset Internet Explorer
Remove dangerous add-ons:
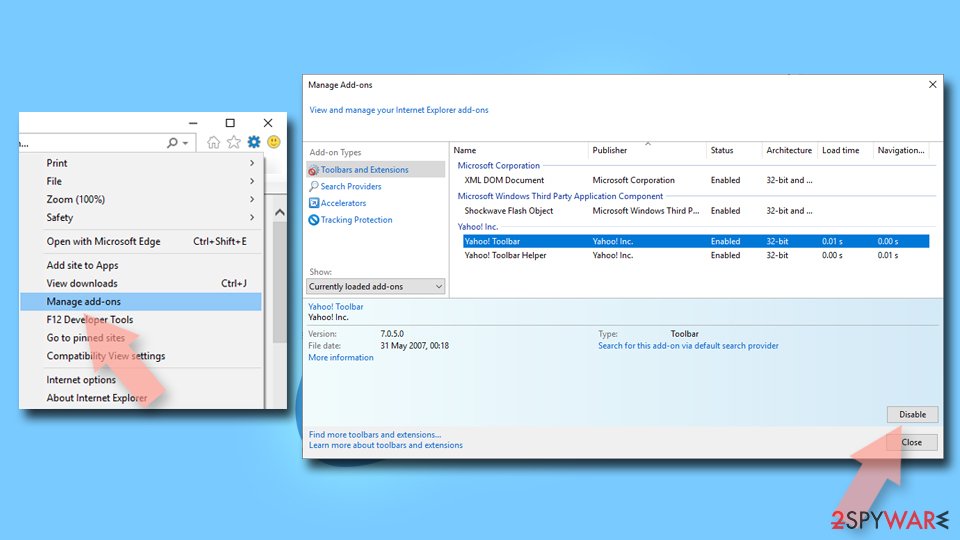
- Open Internet Explorer, click on the Gear icon (IE menu) on the top-right corner of the browser
- Pick Manage Add-ons.
- You will see a Manage Add-ons window. Here, look for suspicious plugins. Click on these entries and select Disable.
Change your homepage if it was altered:
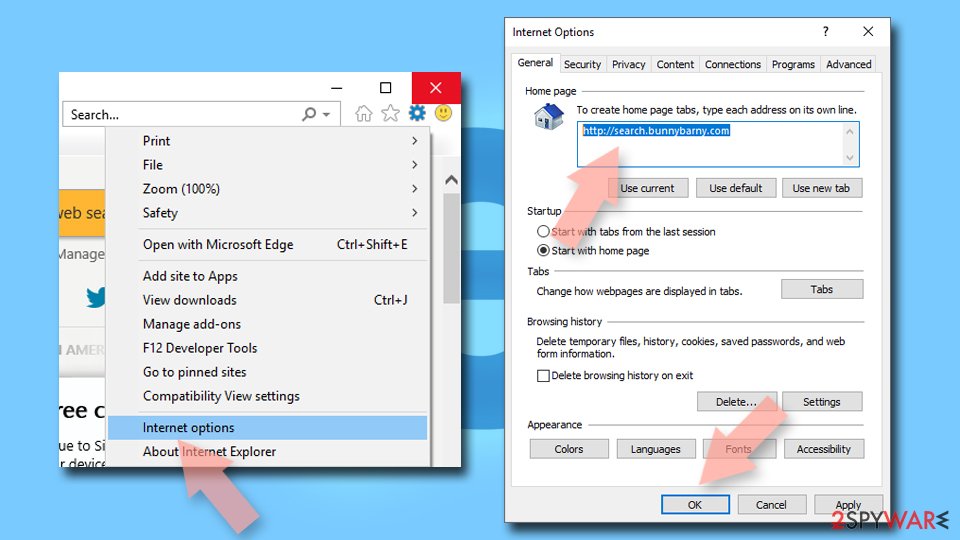
- Open IE and click on the Gear icon.
- Select Internet Options.
- In the General tab, delete the Home page address and replace it by your preferred one (for example, Google.com).
- Click Apply and then select OK.
Delete temporary files:
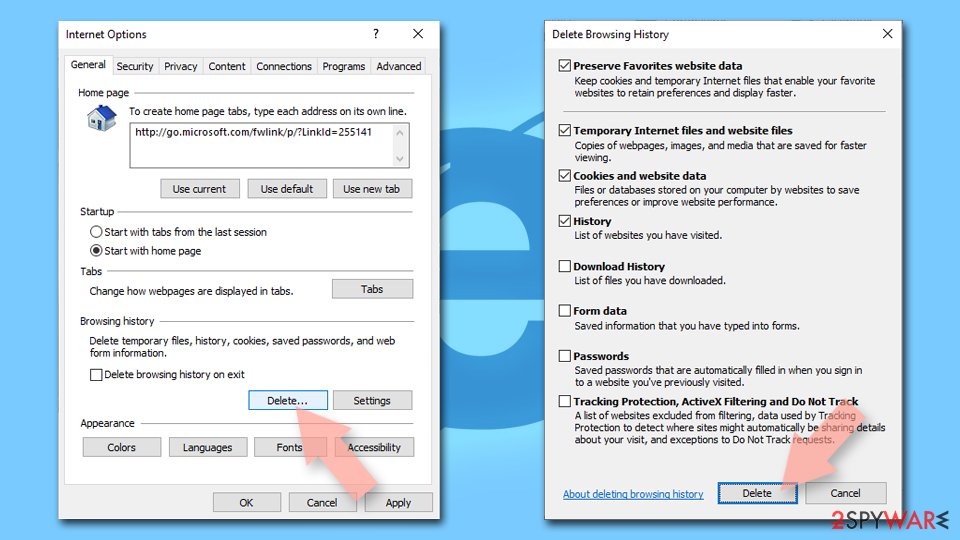
- Press on the Gear icon and select Internet Options.
- Under Browsing history, click Delete...
- Select relevant fields and press Delete.
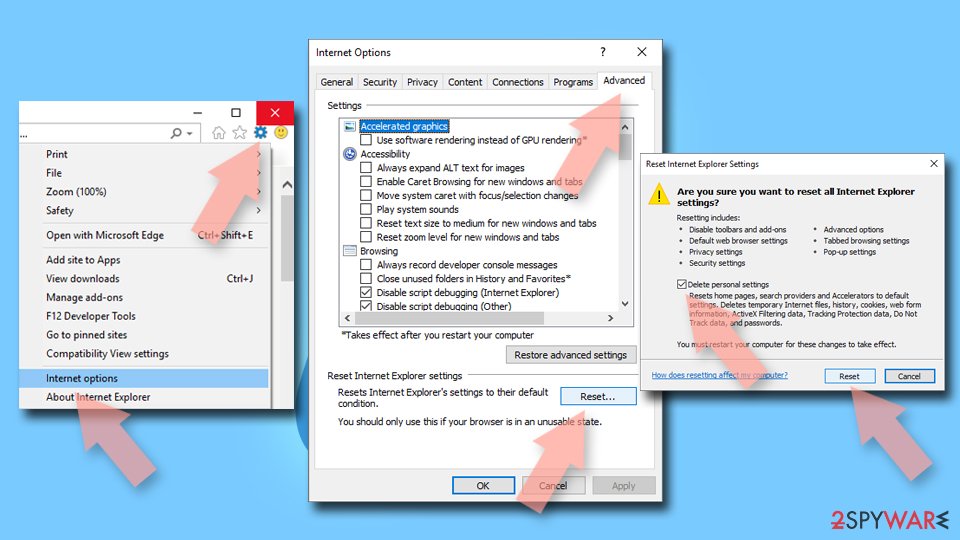
Reset Internet Explorer:
- Click on Gear icon > Internet options and select Advanced tab.
- Select Reset.
- In the new window, check Delete personal settings and select Reset.
Access your website securely from any location
When you work on the domain, site, blog, or different project that requires constant management, content creation, or coding, you may need to connect to the server and content management service more often. The best solution for creating a tighter network could be a dedicated/fixed IP address.
If you make your IP address static and set to your device, you can connect to the CMS from any location and do not create any additional issues for the server or network manager that needs to monitor connections and activities. VPN software providers like can help you with such settings and offer the option to control the online reputation and manage projects easily from any part of the world.
Recover files after data-affecting malware attacks
While much of the data can be accidentally deleted due to various reasons, malware is one of the main culprits that can cause loss of pictures, documents, videos, and other important files.
More serious malware infections lead to significant data loss when your documents, system files, and images get encrypted. In particular, ransomware is is a type of malware that focuses on such functions, so your files become useless without an ability to access them.
Even though there is little to no possibility to recover after file-locking threats, some applications have features for data recovery in the system. In some cases, can also help to recover at least some portion of your data after data-locking virus infection or general cyber infection.
From our report of Sep 2020 · outdated details corrected in October 2026
Vigua.A virus - an intrusive adware infection that users struggle to get rid of
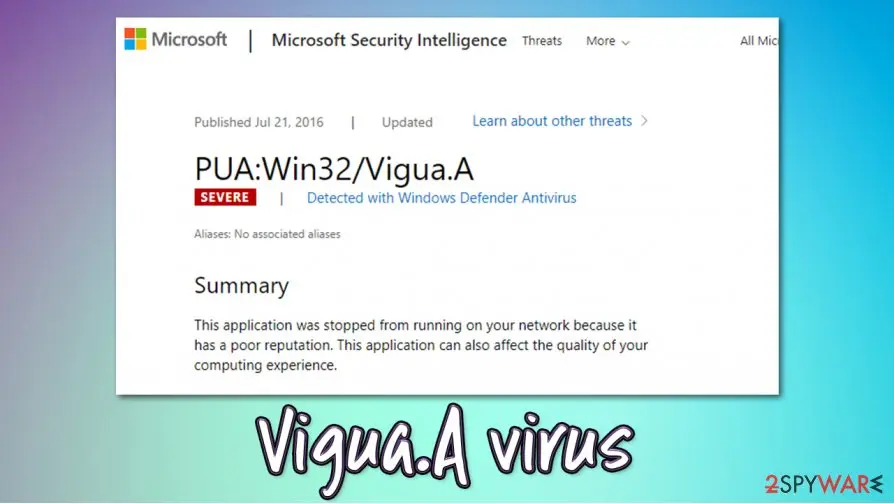
Vigua.A virus, otherwise known as PUA:Win32/Vigua.A, is a detection name used by Windows Defender security software to flag potentially unwanted programs.
These apps typically travel within software bundles or fake browser or codec update prompts, which results in unintentional installation from users' point of view.
Once inside the system, Vigua.A virus might perform a variety of system and browser modifications. For example, the homepage and new tab address might be changed to something else, and all the searchers might be redirected to Yahoo. Adware is typically compiled in a way that allows it to engage in intrusive ad campaigns.
Hence, the infected users are accustomed to popups, deals, offers, in-text links, auto-play, and similar advertisements that can greatly diminish the web browsing experience. In the background, Win32/Vigua.A might also track user information, which sometimes may include personal details.
Potentially unwanted programs are distributed in a way that typically results in an unintentional installation. The most commonly used method is software bundling, where several applications are compiled into a single installer and optional ones are deliberately hidden from careless users' sight. To avoid future encounters with Vigua.A virus, install applications carefully and never install programs offered via fake browser or codec update prompts.
Adware programs such as Vigua.A virus are designed to perform background activities in order to monetize users' clicks. For the purpose, authors of a potentially unwanted program employ a variety of methods that would allow for a maximum monetization:
Unfortunately, these are just a few traits that adware might possess. Some PUPs can be much more dangerous - they might set the "Managed by your organization" feature in order to prevent users from easy app termination. Others might straight out steal sensitive information such as banking details - Adload adware family does precisely that wit the help of extensions such as ExploreParameter, OperativeFraction, SectionBrowser, and many others.
To make matters more clear, PUA:Win32/Vigua.A is a heuristic detection, which indicates that it is not the name of the virus itself but rather a detection name given to apps the expose certain malicious behavior. Thus, there could be many different PUPs under the mantle of this name.
Usually, when an anti-malware detects something, it delivers the detection to quarantine, later to be removed automatically. Unfortunately, users who reported Vigua.A virus popups claimed that they come back on a regular basis. This behavior is typical to PUPs that use various persistence mechanisms in order to stay on the system as long as possible to deliver ads to users, earning profits in the process.
If you are one of such users, you should remove Vigua.A virus by scanning the device with alternative security software - experts recommend or , although other reputable tools should do the job as well.
In case scanning the machine with alternative software did not help, the issue might lie within Google account and its syncing problems. To find out more about how to reset Chrome sync, refer to the bottom section below.
- Distribute apps in various deceptive ways;
- Change web browser's homepage and new tab to some other URL;
- Redirect all searches to Yahoo or a dubious provider;
- Insert sponsored links into search results;
- Display intrusive ads on all visited websites;
- Redirect to malicious domains;
- Track users' browsing data to sell it to third-parties.
From our report of Sep 2020 · not reviewed since
Watch out for potentially unwanted programs - install software from third parties carefully
Potentially unwanted programs are typically installed behind users' backs with the help of various tricks employed by its authors or distributors.
Most commonly, software bundling is used, as it is very effective - users often rush through the installation steps of new software and don't pay attention to important clues that might sometimes not be so apparent.
First of all, you should install applications from official sources if possible - this would usually eliminate PUP infiltration altogether. The unwanted apps downloaded from official sources such as browser extensions are typically very easy to eliminate and do not cause any major dangers.
Third-party sites often use bundles as one of the main ways to monetize, which means that it is in their best interest to make as many users as possible to install additional software. Unfortunately, such apps are often useless, intrusive, and even malicious. To avoid installation of PUPs, always pay close attention to the installation process:
Also, many PUPs can be downloaded along with pirated software installers or software cracks. As a general rule, security experts recommend staying away from such high-risk websites, as downloading software from there might result in malware infection, such as Kasp ransomware.
- Pick Advanced/Custom settings instead of Recommended/Quick ones;
- Remove all ticks from checkboxes that offer additional programs;
- Watch out for misplaced buttons and misleading offers you could encounter on the way.
From our report of Sep 2020 · outdated details corrected in October 2026
A method that could help you remove Vigua.A virus popups once and for all
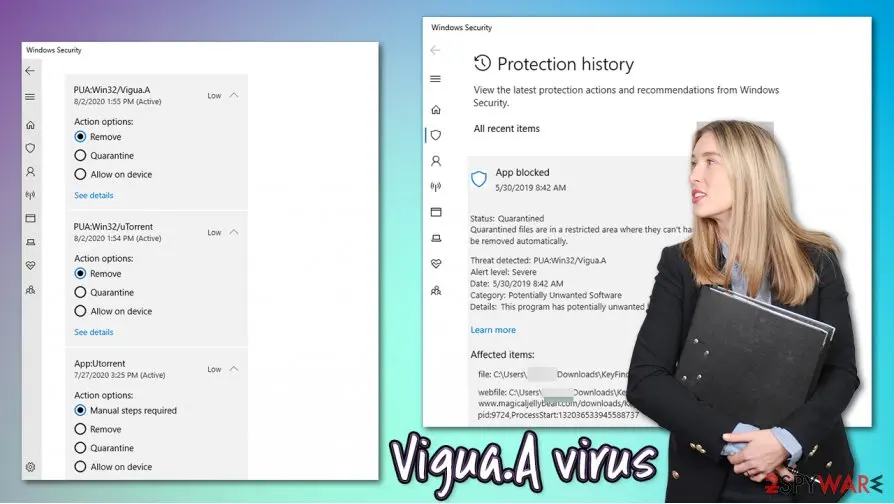
PUA:Win32/Vigua.A removal might be a real pain to many users, as Windows Defender often fails to eliminate it completely - or at least it might seem so.
Some users reported that they received the detection along with uTorrent client - this app is often used for illegal software installer downloads. Despite being legitimate, it has been bundled with potentially harmful software and is not recommended to use.
As previously mentioned, you can try to remove Vigua.A virus by scanning the machine with alternative security software. Unfortunately, many users claimed that, after trying other tools, the virus came back, and Windows Defender kept flagging the issue non-stop.
Vigua.A virus detection might sometimes be related to your Google account. Some synced items might remain on Google's servers, and no matter if your anti-malware removes malicious components that are placed on your system through your account, they will come back as soon as your use your browser again.
Therefore, the best solution is to reset your web browser, as well as Chrome Sync. For that, access the synced items page, and click "Reset Sync" at the bottom. Make sure you do this before you reset your browser.
Questions about Vigua.A virus, PUA:Win32/Vigua.A
What is PUA:Win32/Vigua.A?
PUA:Win32/Vigua.A is a detection name used by Windows Defender for potentially unwanted programs (PUPs) that display intrusive advertisements. This heuristic detection indicates the program exposes certain malicious behavior rather than identifying a specific virus, as different PUPs can operate under this name.
Vigua.A typically travels within software bundles or fake Flash Player update prompts, resulting in unintentional installation. Once inside systems, it performs various browser and system modifications including changing the homepage and new tab address to other URLs. The infected users experience pop-ups, deals, offers, in-text links, and auto-play advertisements significantly diminishing web browsing quality.
Is Vigua.A virus dangerous?
Vigua.A is primarily intrusive and annoying rather than immediately dangerous, but poses serious privacy risks. The adware can infect any system and populate advertisements across all web browsers while tracking user data that sometimes includes personal details. It uses persistence mechanisms preventing easy elimination even after attempted removal.
While not designed to steal banking information like some malware, it enables third-party data collection and targeting. The tracked information may include browsing habits, preferences, and social media activities used for personalized advertising. Some PUPs under this detection name might prove more dangerous, with certain adware families like Adload stealing sensitive banking information through extensions.
How does Vigua.A get installed?
Vigua.A typically arrives through software bundling where multiple applications are compiled into single installers with optional ones hidden from users. Fake Flash Player update prompts frequently deliver the PUP, with users believing they're updating legitimate software. Misleading advertisements and software cracks also distribute Vigua.A as additional bundled components.
The infection results from careless users rushing through installation steps without paying attention to important clues and checkboxes. During setup, users fail to uncheck boxes offering additional programs, automatically accepting unwanted software installation. Third-party download sites use software bundling as their primary monetization method, making malicious software inclusion very common.
How do I know if I have Vigua.A installed?
Windows Defender will alert you when detecting PUA:Win32/Vigua.A through security notifications. You might notice unexpected changes to your web browser's homepage and new tab address changed to unfamiliar URLs.
Search queries get redirected to Yahoo or dubious providers instead of your chosen search engine. Intrusive advertisements appear constantly across all visited websites including deals, pop-ups, and sponsored content. Your web browser may run slowly due to background tracking and advertisement processes.
Installed PUPs can set the "Managed by your organization" feature preventing easy app termination. If Windows Defender keeps flagging the detection repeatedly, the PUP likely persists through synchronization with your Google account.
Should I trust Windows Defender's Vigua.A detection?
Yes, Windows Defender's detection of PUA:Win32/Vigua.A is generally legitimate and warrants investigation. However, in some cases the detection might relate to Google account syncing problems where malicious components persist on their servers. You should allow Windows Defender to move the detected threat to quarantine immediately.
If the detection returns repeatedly despite quarantine, scan with alternative security programs for comprehensive removal. Some users report Windows Defender alone cannot fully eliminate all instances, requiring secondary scanning with tools like Malwarebytes or Kaspersky. If the detection persists after removing all identified threats, reset your web browser settings and Chrome Sync to eliminate any cloud-synchronized malicious components.
How do I remove Vigua.A virus?
Simply allow Windows Defender to quarantine the threat when detected, which should eliminate the infection in most cases. If the detection returns, perform scans with alternative security programs such as Malwarebytes, Kaspersky, or other reputable tools.
In persistent cases where detection continues despite quarantine, reset your web browser to factory settings and disable Chrome Sync. Access your Google account syncing page and click "Reset Sync" at the bottom to clear any malicious components persisting on Google's servers.
Do this before resetting your browser itself. For stubborn infections, perform scans in Safe Mode where background processes cannot interfere with detection and removal. Monitor your system after removal to ensure the threat doesn't return.
How can I prevent Vigua.A infection?
Always install applications carefully from official sources whenever possible, avoiding third-party download sites bundling unwanted software. Never click on fake Flash Player update prompts; instead, obtain Flash only from Adobe's official website if still needed.
Select Advanced or Custom installation options during setup, removing all checkmarks from boxes offering additional programs. Watch for misplaced buttons and misleading offers during installation that might automatically allow bundled software.
Download software only from official sources and developer websites, never from file-sharing platforms or P2P services. Stay away from software cracks, keygens, and illegal program installers which commonly include malware. Keep your operating system and all software updated to close vulnerabilities hackers exploit for malware distribution.
Do I need to remove Vigua.A if Windows Defender quarantined it?
If Windows Defender successfully moved the threat to quarantine, the infection should be eliminated and poses no further risk. However, if the detection continues appearing despite quarantine or if you notice ongoing suspicious symptoms, further action is necessary. Perform scans with alternative security software to ensure complete removal of all malicious components.
In cases where syncing with your Google account caused the persistent reappearance, resetting Chrome Sync is essential. Some users report temporary false positives where Windows Defender incorrectly flags legitimate processes, but this is less common with Vigua.A. Monitor your browser's homepage, new tab page, and search engine settings after quarantine to confirm nothing remains altered.
Will Fortect remove Vigua.A virus, PUA:Win32/Vigua.A?
Fortect scans Windows for malware and unwanted programs and repairs the system files and settings they change, and its free scan shows what it finds on your PC before you decide anything.
For Vigua.A virus, PUA:Win32/Vigua.A, follow the plan above as well: the browser steps take back permissions and settings that no scanner treats as a threat, and uninstalling the program that brought it removes the source.
Run Microsoft Defender's full scan and, if anything was found, its offline scan as a second opinion. If the symptoms are gone after the plan and both scans are clean, there is nothing more to do.
Sources
- Threat Post: Fake Adobe Flash Updates Hide Malicious Crypto Miners (read October 5, 2026)
- Usunwirusa: Usunwirusa (read October 5, 2026)
- Google Chrome Help: Use notifications to get alerts (no longer online) (read October 5, 2026)
- FTC: How to recognize, remove and avoid malware (read October 5, 2026)
- Microsoft Learn: Microsoft Defender Offline (read October 5, 2026)