Facebook Friend Request virus (Free Guide) - Updated
Facebook Friend Request virus Removal Guide
What is Facebook Friend Request virus?
Facebook Friend Request virus – a malicious activity that is typically related to account hijacking

Facebook Friend Request virus is a malicious [1] message that could arrive at any time on this social media platform. While this activity is not unusual when sent from somebody who actually wants to be friends, there are several friend requests that are sent out for malicious reasons. For example, users' personal information accessible to friends might be targeted and later used in a phishing scheme to infect them with malware or extort money.
Possibly the most prevalent issue that users encounter is that their accounts begin to send friend requests automatically. This typically means that your machine has been infected with the Friend Request virus and that several steps should be taken to recover your account and clear the device from malware.
Also, scammers might be using your public photos and posts to create a fake version of your account and use it to contact your real friends with the intention to swindle money[2] or personal information from them.
If this sending friend requests issue has been bothering you for a while, you have been involved in the malicious scam associated with these request messages. This phenomenon belongs to the malware category known as Facebook virus, and it is used to scam inattentive social media users by sending out friend requests without one's knowledge.
Friend Request virus can be associated with a variety of scams and malware. Threat actors typically use social engineering to make users give away their login credentials or make them click on malware-laden links. To sum it up, an unexpected friend request from somebody that might even know you might end up with a hijacked Facebook account, financial losses, malware infections, or even identity theft.
| Name | Facebook Friend Request virus |
|---|---|
| Type | Social media hoax |
| Belongs to | Facebook virus |
| Danger | Personal data can be accessed by questionable people |
| Intention | Get money or information from victims |
| Versions | Automatic Friend Request; Fake Facebook Friend Request |
| Active since | 2013 |
| Fix | Use FortectIntego to clean virus damage caused by malware on your PC |
The fake requests are bothering people for over a decade
The virus is spread through the Facebook social media platform by sending friend requests to a user's existing friends. Once the friend request is accepted, the virus can gain access to the infected user's personal information and can spread to other accounts by sending out new friend requests. These viruses can also spread through messages, links, or attachments, which, when clicked, can install malware on the user's device or redirect the user to a phishing website.
The Friend Request virus was first spotted making rounds in 2013 and improved over the years. Nonetheless, it is important to note that the principle of the scam remains the same – send friend requests for malicious purposes. Security experts[3] claim that threat actors create fake profiles and send friend requests to users in order to extort their personal information, infect them with malware, or make them targets of future phishing campaigns.
The viruses and scams associated with suspicious friend requests on this giant social media network can be divided into several categories. Let's review each of them to learn what to expect from them and how to avoid or remove the virus.
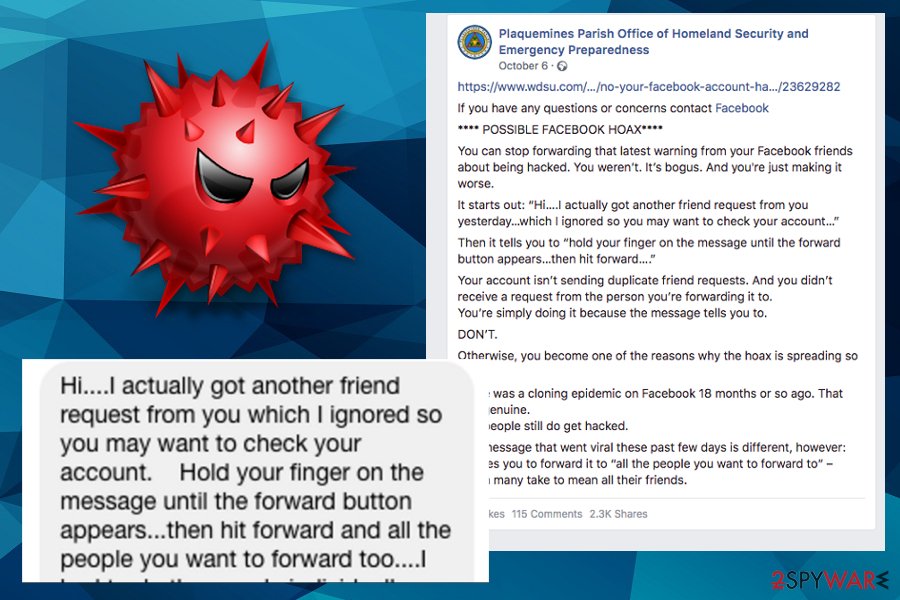
2020 came with more news[4] about this virus and a few other versions of this malware that include “Hi….I actually got another friend request from you yesterday…which I ignored, so you may want to check your account…” message. This particular October version even raised the attention of the officials of the Homeland Security and Emergency Preparedness Office[5].
The official post about this scam reads:
Your account isn’t sending duplicate friend requests. And you didn’t receive a request from the person you’re forwarding it to.
You’re simply doing it because the message tells you to.DON’T.
Otherwise, you become one of the reasons why the hoax is spreading so fast.
There was a cloning epidemic on Facebook 18 months or so ago. That was genuine.
And people still do get hacked.The message that went viral these past few days is different, however:
It urges you to forward it to “all the people you want to forward to” – which many take to mean all their friends.
Versions of the Friend Request virus
Facebook sending friend requests automatically
Is Facebook sending friend requests without your knowledge/permission? If yes, it is clear that your account is unprotected and someone has permission to add new friends on your behalf. In most cases, the culprit is a malicious app that asked for such permissions before you started using it. You may have given the app the permissions without actually reading them – it happens quite often.
If you are looking for a solution to “Facebook adding friends for me” problem, we can provide one. To stop the social network from adding friends for you, you must delete the app that has permission to add new friends to you. We provide a method that helps to revoke app permissions using the web, not a mobile app.
- Log into your account.
- Click on the small arrow in the top right corner of the screen on the blue toolbar. Select Settings.
- Now, look at the left side of the screen and find Apps section. Click on it. This will take you to App Settings.
- Here, you will see a list of apps below “Logged in with Facebook” section. Click Show all to expand the list. Hover your mouse over suspicious apps and click on X that appears next to them. You can also choose to delete all activities (including posts, photos, and videos created with or posted via the app). Click Remove to confirm.
- Repeat until all suspicious apps are gone.
Facebook Fake Friend Request virus
This deceitful technique relies on fake user accounts that are created using real photos of a certain user. Scammers track down a person that posts content publicly and steals private photos from him or her.
They create fake accounts and post pictures and even copy-paste original status messages posted by the victim. All of this is done in order to make an illusion of a real account, which scammers later use to mislead victims' friends and swindle money from them. Typically, scammers create software that sends out friend requests to all victim's friends and later on sends delusive messages asking to lend money.
What is more, such a Friend Request virus can send a malicious link to the victim's friends, asking them to click on it and see something interesting. This trickery is quite efficient because the victim's friends trust the real person and want to see what they share. However, clicking on such links is highly dangerous because these sites can be filled with malicious content.
Deceptive websites seek to force users to provide sensitive data or install harmful programs, so be careful! If your friend ever sends you a message with a link to a suspicious website, ask him or her if the website is trustworthy.
Typically, scammers do not reply, but even if they do, we suggest you check the profile of your friend – enter their name into the search and see if it finds one or two same profiles. The most obvious sign that you are dealing with malware is that the person who has just sent you a friend request already sends links inviting you to explore some suspicious websites or give money.
However, your computer can also be infected with such a virus if you click on a link sent by a stranger or even a friend whose account was compromised. Usually, such links lead to a website that suggests adding a browser extension or installing an update “in order to watch the content.”
Message forward hoax
This virus raised awareness again when the news came about suspicious messages and friend requests in the fall of 2018. Facebook Help Community even published a post about the version and warned about strange activities on the social platform. The more recently discovered campaign delivers hoax messages directly to users, and the profile gets affected this way.
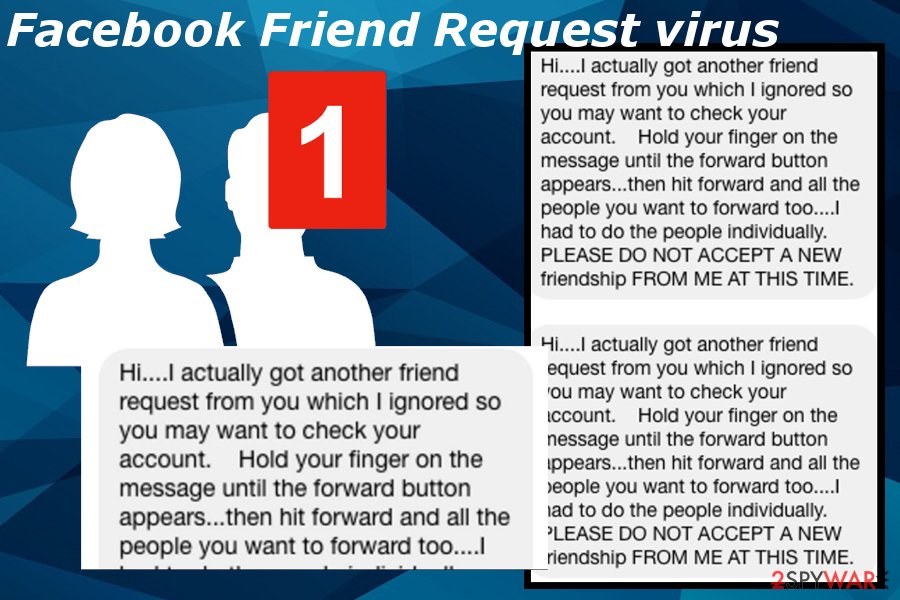
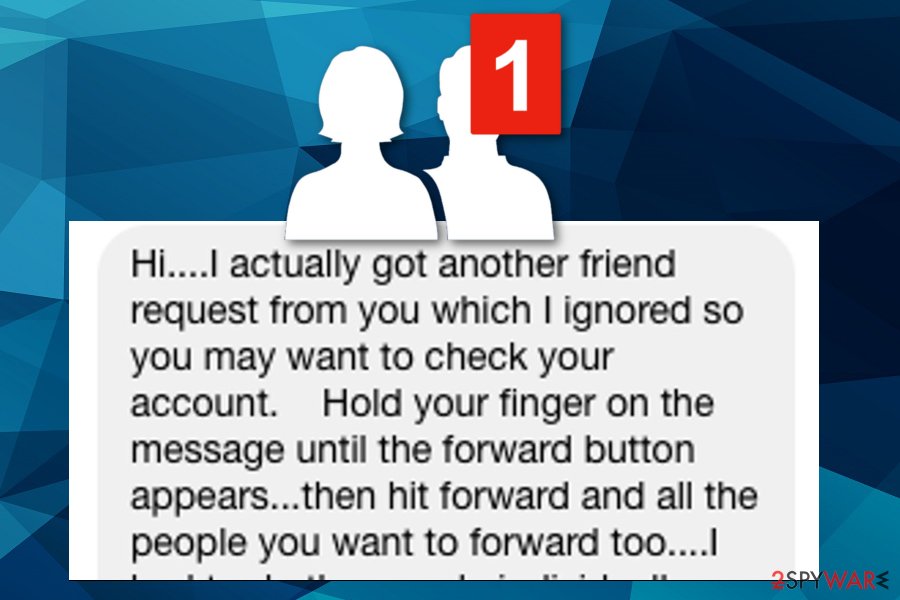
You may see the following message if your account is compromised:
Hi….I actually got another friend request from you yesterday…which I ignored so you may want to check your account. Hold your finger on the message until the forward button appears…then hit forward and all the people you want to forward too….I had to do the people individually. Good Luck! PLEASE DO NOT ACEPT A NEW ONE FROM ME AT THIS TIME
As a consequence, such malicious software can steal access to your social media account and use it to spread malicious messages to your friends and post deceptive posts on the timeline. In such a case, react if any of your friends report this to you. In addition to that, this type of virus can unblock contacts that you have blocked and add them to your friends again.
To fix this, scan the system with an anti-malware tool and remove Facebook Friend Request virus immediately. You can use different anti-malware software for its removal, for instance, SpyHunter 5Combo Cleaner. After that, remove unwanted contacts manually.
Spot a spoofer: avoid being tricked by online scam
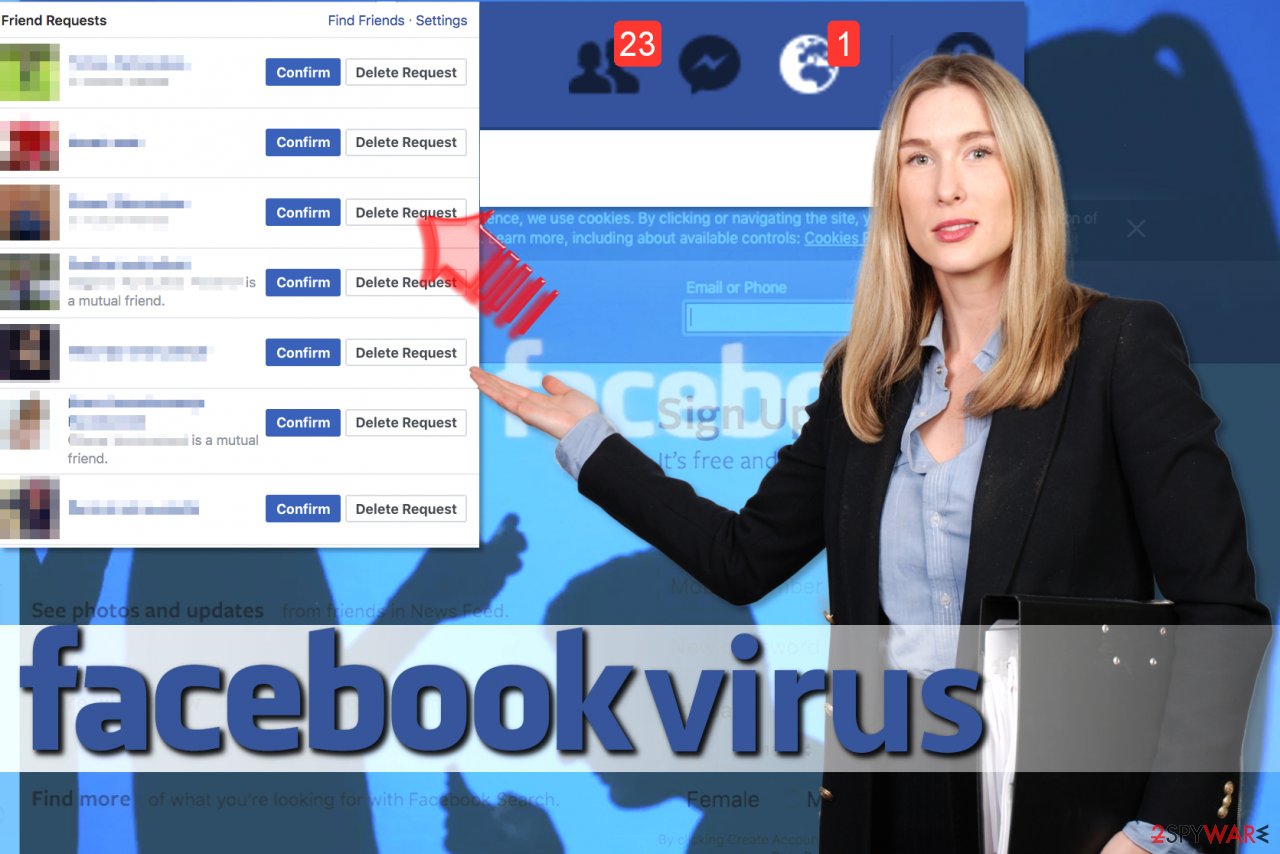
Social engineering[6] is a widely used practice among cybercriminals – they exploit people's minds to achieve their malicious deeds. By composing a message that would touch a sensitive subject, crooks manipulate users and make them click on links, provide personal information, or have Facebook or other social media account hijacked.
Luckily, there are several red flags that indicate deception – and they are definitely worth checking, even when the message seems only slightly odd or is coming from somebody you seemingly already know.
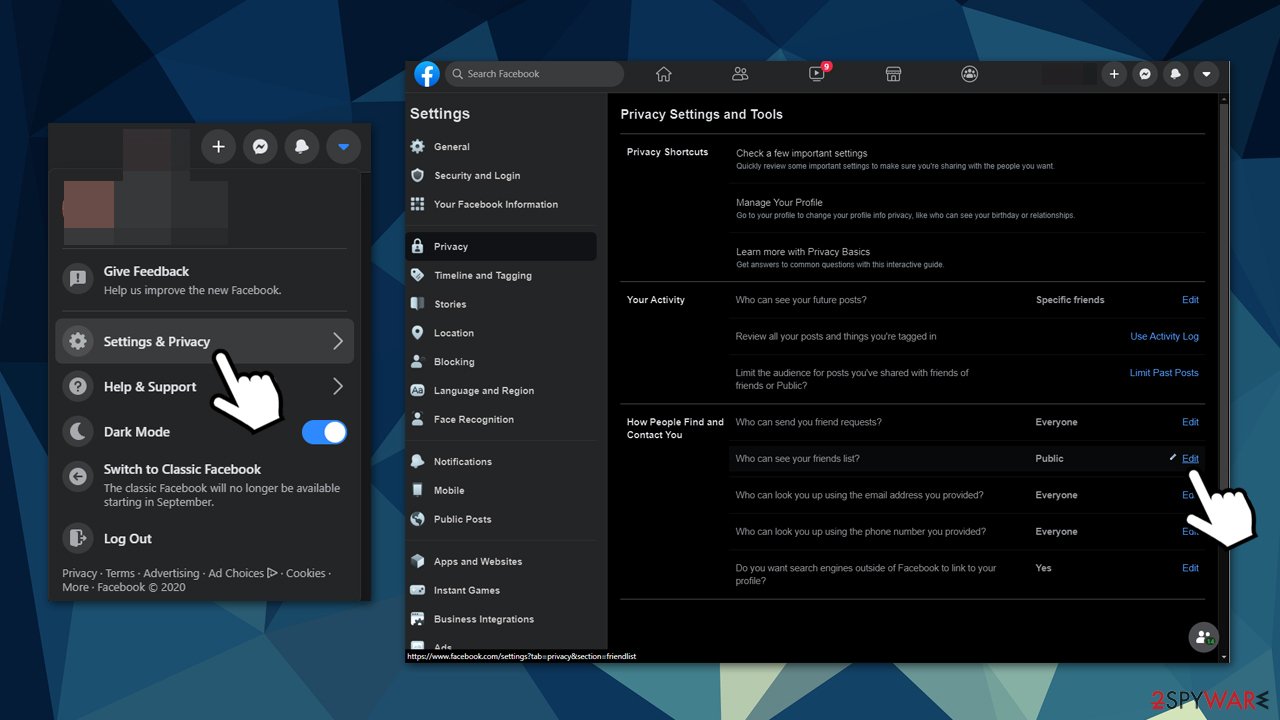
The previously described Facebook Fake Friend Requests are created with the help of publicly available pictures and other published information. To mitigate the threat, you should set your friend list not to be visible to everybody – the attacker will not be able to exploit public pictures of your friends to trick you. Here's how to prevent anyone from seeing your friend list:
- Log in to your account
- Go to Account > Settings & Privacy > Settings
- In the settings window, click on Privacy on the left
- In the How People Find and Contact You section, pick the Edit button (next to Who can see your friends list?)
- Select Only me from the drop-down menu and pick Close.
Additionally, you should always check the account that is sending you a friend request – a hoax account will typically have no posts. To protect yourself from malware infections after accidentally clicking on a malicious link, equip your computer with powerful anti-malware software – we recommend using SpyHunter 5Combo Cleaner or Malwarebytes.
Common distribution methods
The virus attacks Facebook's users via instant messaging. You may receive a misleading message that looks like it belongs to your friend and offers to click on a link in order to see a picture or watch a video.
Besides, clicking on every app you see may also lead you to the infiltration of this virus because they are hacked by cybercriminals quite often. Once the virus is activated, it starts sending requests to unfamiliar people and may also start accepting all pending friend requests that you ignored previously.
We also want to warn you that social media is not an entirely safe place, and there are some minor adjustments you can make to protect yourself and your friends. First of all, we strongly recommend you make your friends list private. If it is public, scammers can easily access it and send deceptive messages to them while pretending it is you. Besides, it is advisable to keep sensitive information private. If you can, make your photos accessible for friends only, too.
Frequently asked questions
Question: I think that Facebook is sending friend requests without my knowledge. How can I stop this? I used to delete the sent requests manually, but more and more appear every day. There must be a method to put an end to this!
Answer: Dear visitor, there are two things that you need to do to stop the social network from automatically sending friend requests and ensure that it never happens again. First of all, you must revoke permissions from malicious apps and then scan your computer for malware that you may have installed lately. Use the tutorial provided by us to secure your account and remove malware from your PC.
Question: I keep receiving random friend requests on Facebook – is that a virus? How can I know if my account is secure? Maybe my profile is included in target lists for scammers? Can you help me to figure this out? I once received a request from someone who was using my pictures!
Answer: Dear visitor, everyone receives random requests from time to time. You shouldn't worry too much about them – just ignore them or reject them. However, the fact that you received a friend request from a “fake” you indicates that your content is shared publicly and you need to take certain measures to protect it.
We highly recommend going to Facebook Settings > Privacy and change the Who can see my stuff? settings from “Public” to “Friends Only.” You can also limit the audience for posts that you have already shared.
Terminate the Friend Request virus
If you notice strange people popping up on your friend list out of nowhere, or if you see that something suspicious has been posted on your wall without your knowledge, it can be a sign of malware presence.
As we have already mentioned, you should revoke app permissions using the tutorial we provided and then check your system for malicious or spyware-type programs that might be illegally controlling your account.
Also, you must change your password. However, you should do this after Facebook Friend Request virus removal. Clean the system further using SpyHunter 5Combo Cleaner or Malwarebytes in case this malware adds other malicious or possibly dangerous programs or files to the system. Finish the process by running FortectIntego and fixing system damage. You can also rely on the manual elimination guide provided by our experts below.
Getting rid of Facebook Friend Request virus. Follow these steps
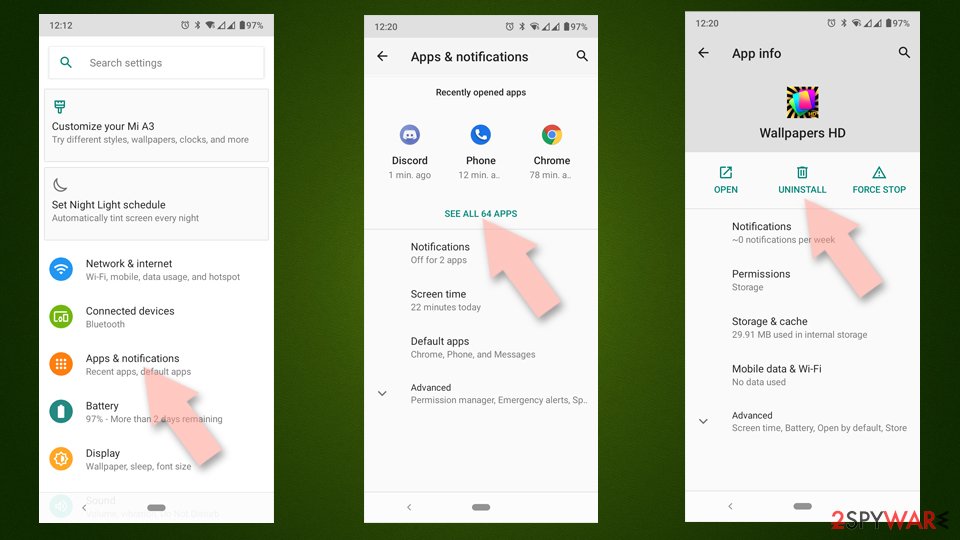
Uninstall from Android
Uninstall unwanted programs from Android device:
- Go to Settings -> Apps/Applications.
- Expand the full list of the installed apps.
- Scroll through the list and tap on a suspicious application once.
- Tap on it and select Uninstall.

- Reboot the device.
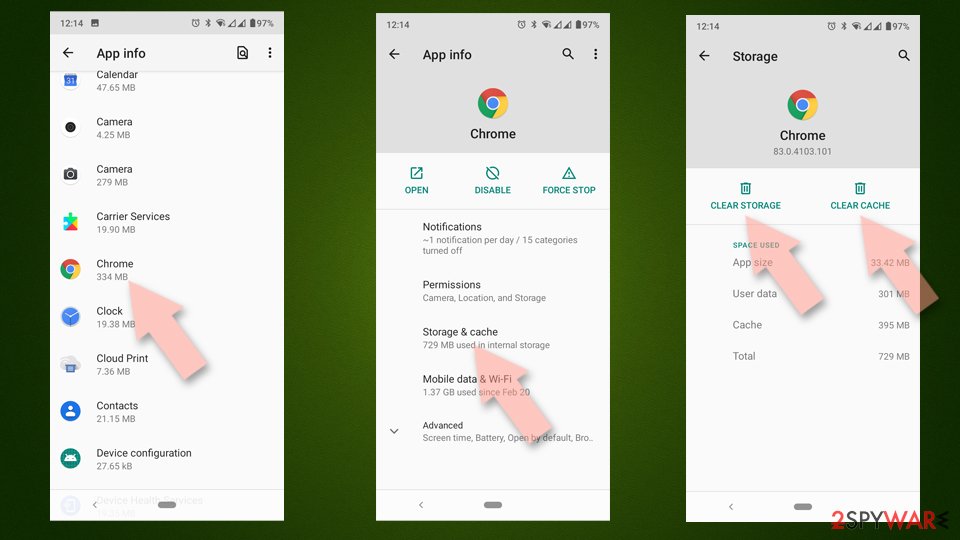
Clear Storage and data files on Android from Google Chrome or other apps:
- Go to Settings > Apps/Applications.
- Expand the full list of the installed apps.
- Tap on Chrome and select Storage & cache.
- Clear storage and clear cache of the app.

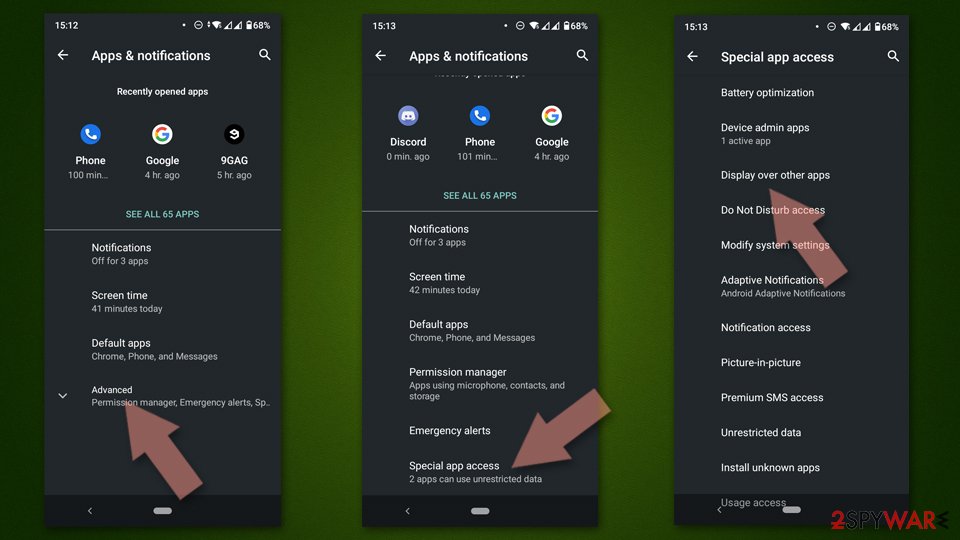
If you are seeing ads on top of other apps but are not sure what is causing it, perform the following steps:
- Go to Apps/Applications.
- Tap Advanced.
- Select Special App access.
- Tap on Display over other apps.

- Eliminate apps with these access rights enabled.
Uninstall from Windows
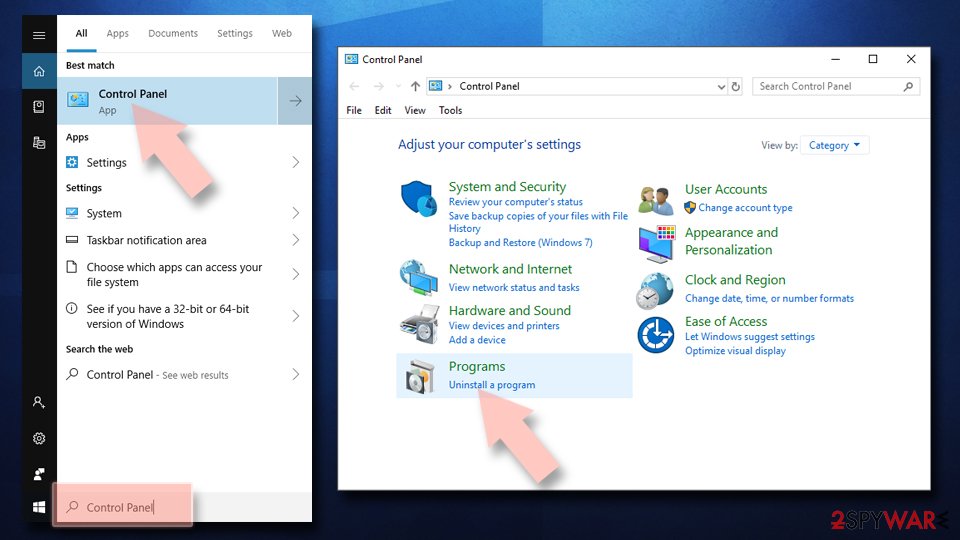
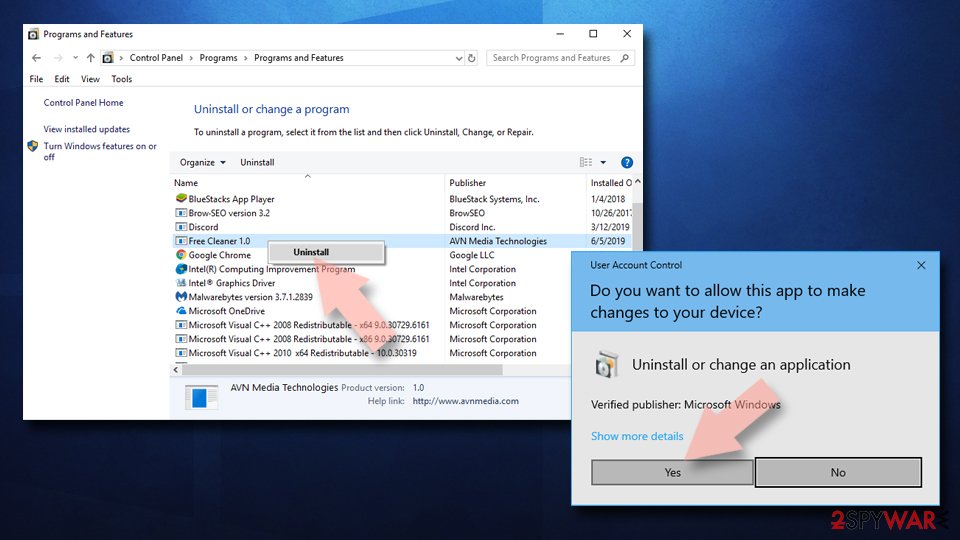
Instructions for Windows 10/8 machines:
- Enter Control Panel into Windows search box and hit Enter or click on the search result.
- Under Programs, select Uninstall a program.

- From the list, find the entry of the suspicious program.
- Right-click on the application and select Uninstall.
- If User Account Control shows up, click Yes.
- Wait till uninstallation process is complete and click OK.

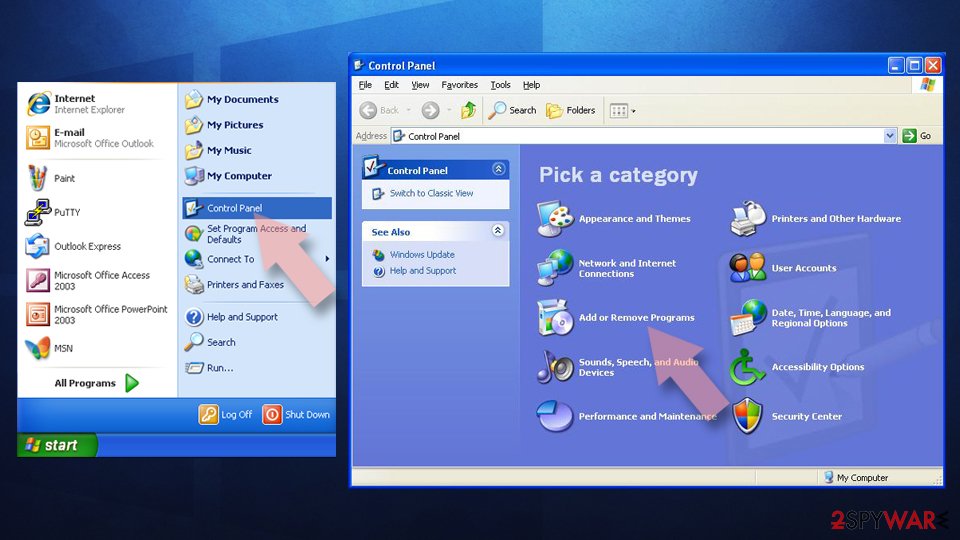
If you are Windows 7/XP user, proceed with the following instructions:
- Click on Windows Start > Control Panel located on the right pane (if you are Windows XP user, click on Add/Remove Programs).
- In Control Panel, select Programs > Uninstall a program.

- Pick the unwanted application by clicking on it once.
- At the top, click Uninstall/Change.
- In the confirmation prompt, pick Yes.
- Click OK once the removal process is finished.
Delete from macOS
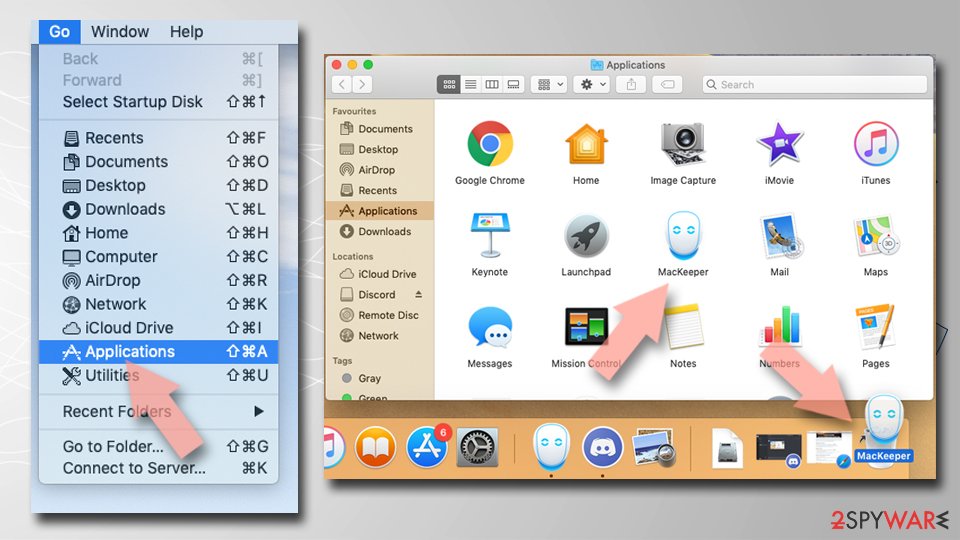
Remove items from Applications folder:
- From the menu bar, select Go > Applications.
- In the Applications folder, look for all related entries.
- Click on the app and drag it to Trash (or right-click and pick Move to Trash)

To fully remove an unwanted app, you need to access Application Support, LaunchAgents, and LaunchDaemons folders and delete relevant files:
- Select Go > Go to Folder.
- Enter /Library/Application Support and click Go or press Enter.
- In the Application Support folder, look for any dubious entries and then delete them.
- Now enter /Library/LaunchAgents and /Library/LaunchDaemons folders the same way and terminate all the related .plist files.

Remove from Microsoft Edge
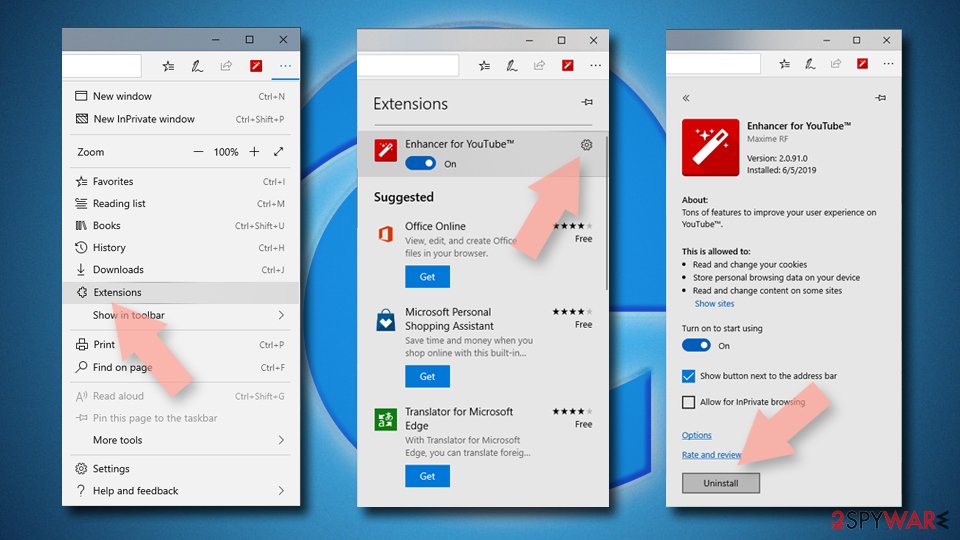
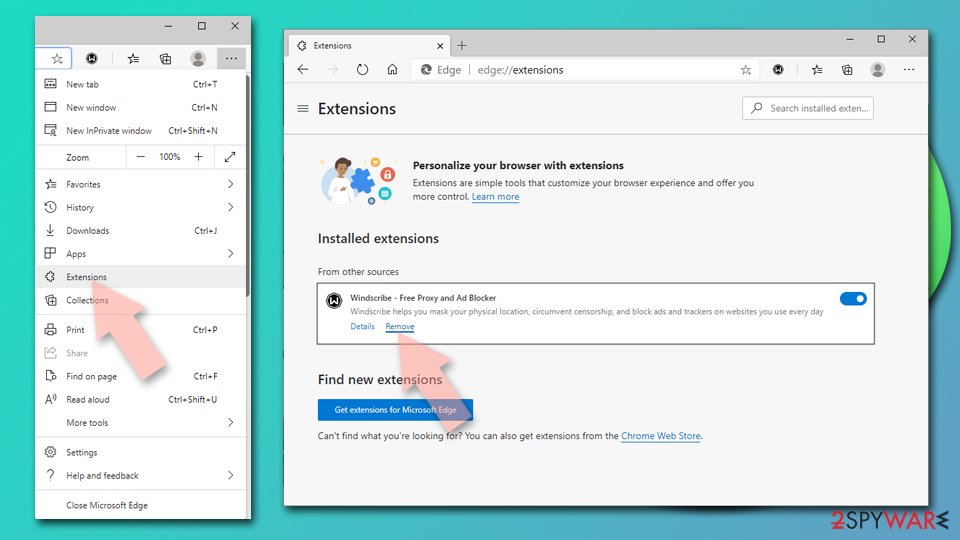
Delete unwanted extensions from MS Edge:
- Select Menu (three horizontal dots at the top-right of the browser window) and pick Extensions.
- From the list, pick the extension and click on the Gear icon.
- Click on Uninstall at the bottom.

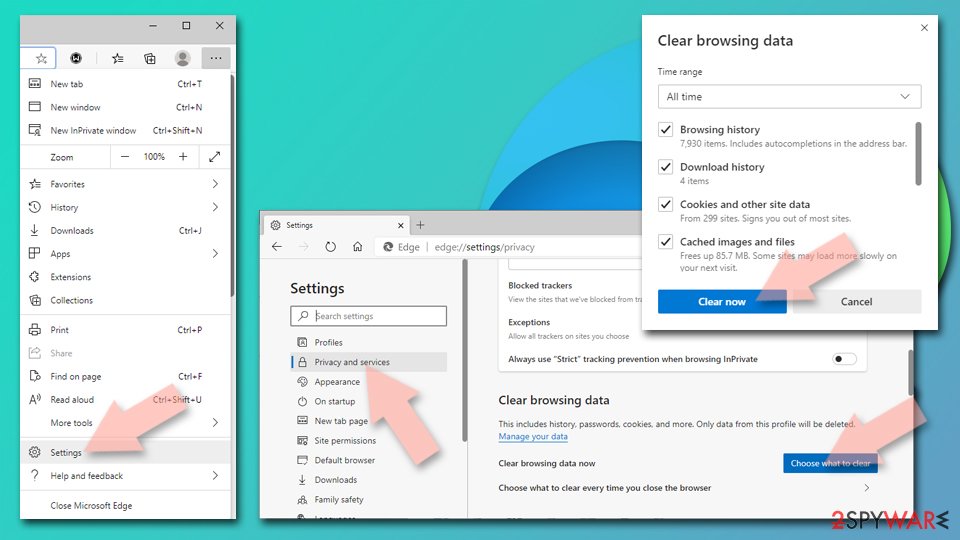
Clear cookies and other browser data:
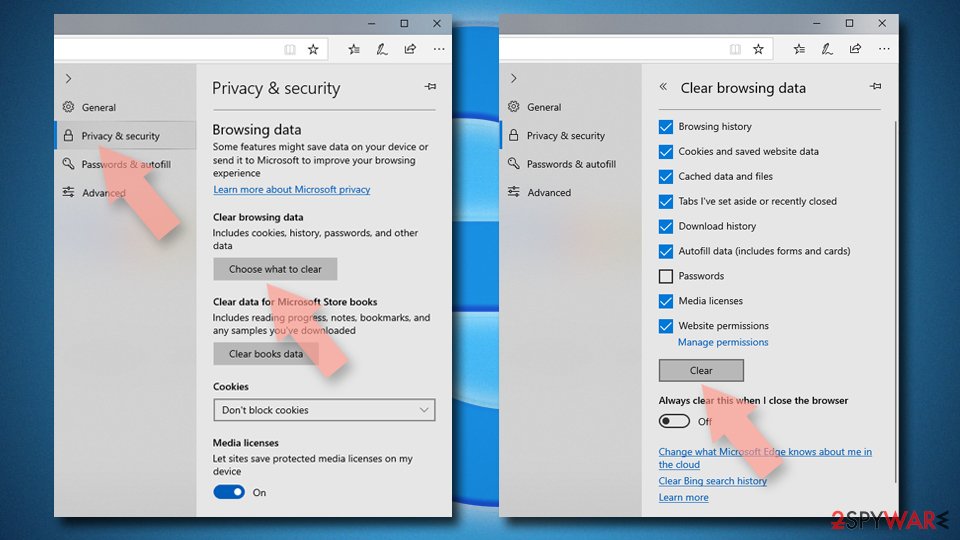
- Click on the Menu (three horizontal dots at the top-right of the browser window) and select Privacy & security.
- Under Clear browsing data, pick Choose what to clear.
- Select everything (apart from passwords, although you might want to include Media licenses as well, if applicable) and click on Clear.

Restore new tab and homepage settings:
- Click the menu icon and choose Settings.
- Then find On startup section.
- Click Disable if you found any suspicious domain.
Reset MS Edge if the above steps did not work:
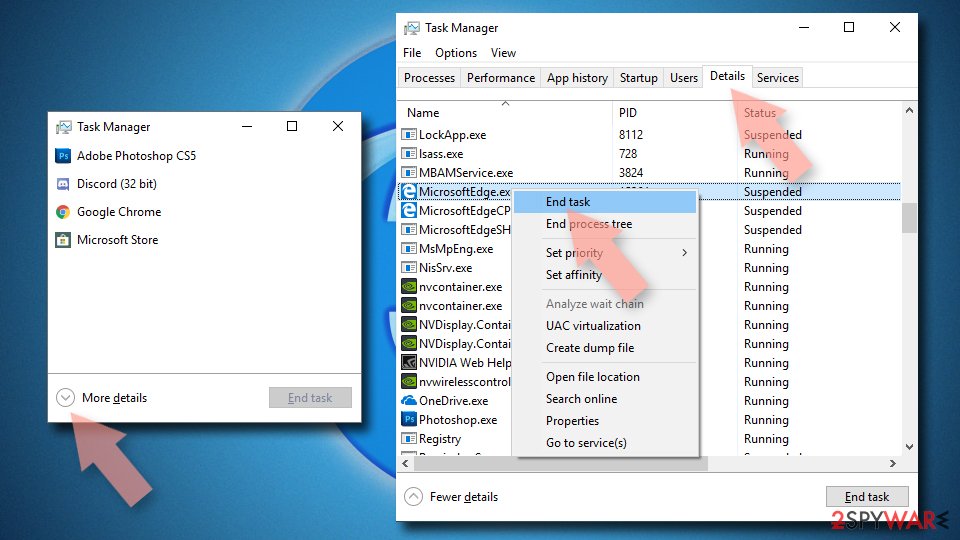
- Press on Ctrl + Shift + Esc to open Task Manager.
- Click on More details arrow at the bottom of the window.
- Select Details tab.
- Now scroll down and locate every entry with Microsoft Edge name in it. Right-click on each of them and select End Task to stop MS Edge from running.

If this solution failed to help you, you need to use an advanced Edge reset method. Note that you need to backup your data before proceeding.
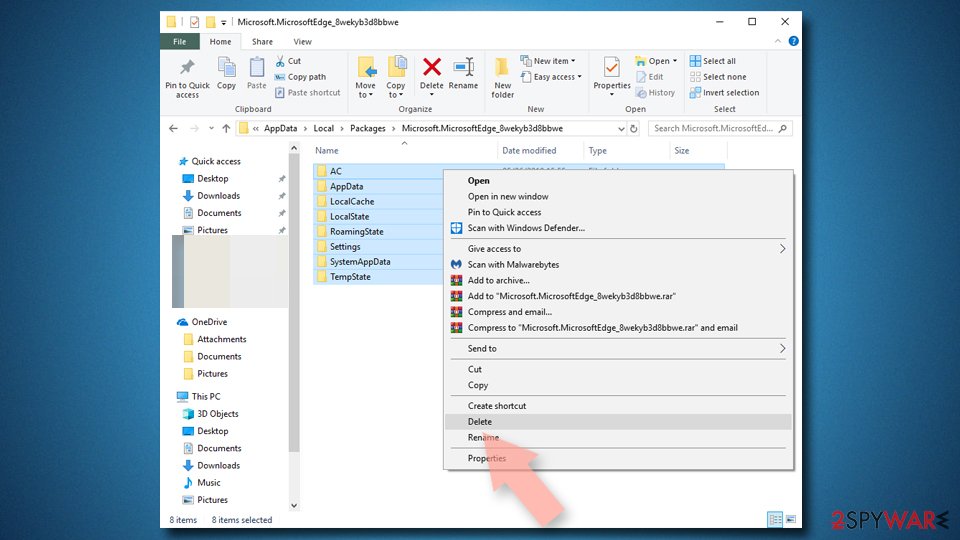
- Find the following folder on your computer: C:\\Users\\%username%\\AppData\\Local\\Packages\\Microsoft.MicrosoftEdge_8wekyb3d8bbwe.
- Press Ctrl + A on your keyboard to select all folders.
- Right-click on them and pick Delete

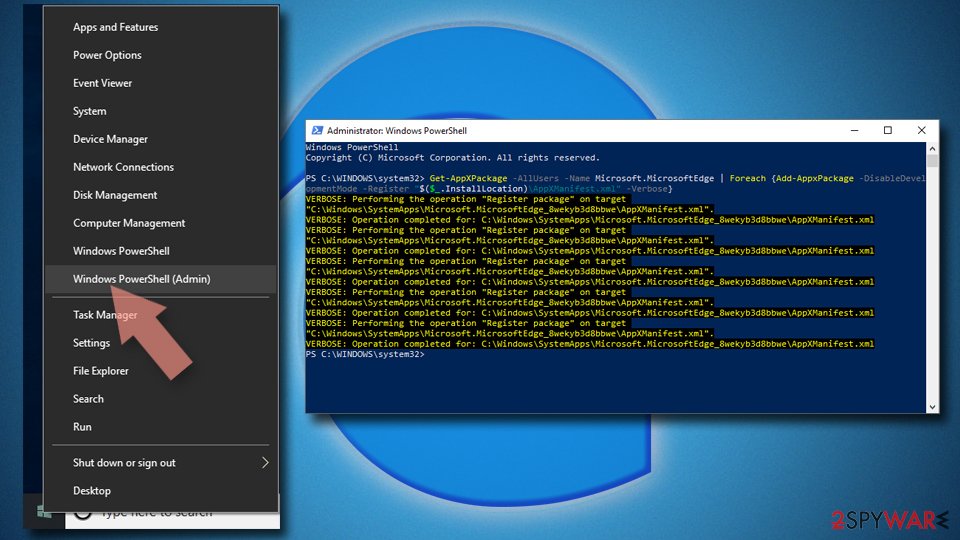
- Now right-click on the Start button and pick Windows PowerShell (Admin).
- When the new window opens, copy and paste the following command, and then press Enter:
Get-AppXPackage -AllUsers -Name Microsoft.MicrosoftEdge | Foreach {Add-AppxPackage -DisableDevelopmentMode -Register “$($_.InstallLocation)\\AppXManifest.xml” -Verbose

Instructions for Chromium-based Edge
Delete extensions from MS Edge (Chromium):
- Open Edge and click select Settings > Extensions.
- Delete unwanted extensions by clicking Remove.

Clear cache and site data:
- Click on Menu and go to Settings.
- Select Privacy, search and services.
- Under Clear browsing data, pick Choose what to clear.
- Under Time range, pick All time.
- Select Clear now.

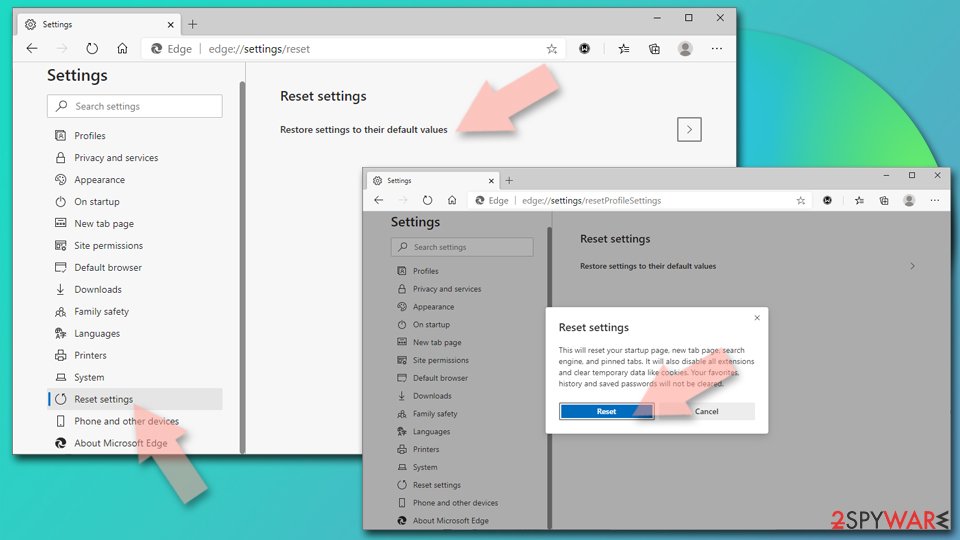
Reset Chromium-based MS Edge:
- Click on Menu and select Settings.
- On the left side, pick Reset settings.
- Select Restore settings to their default values.
- Confirm with Reset.

Remove from Mozilla Firefox (FF)
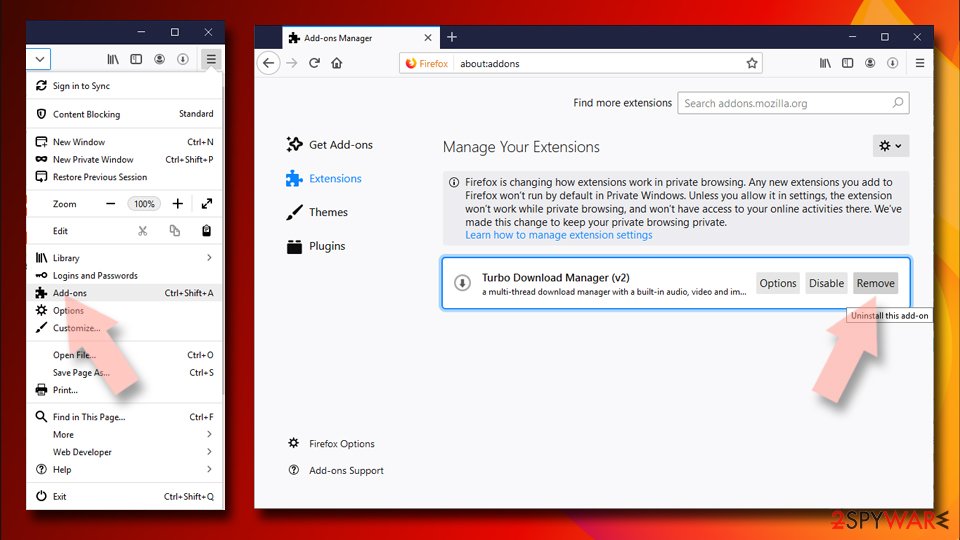
Remove dangerous extensions:
- Open Mozilla Firefox browser and click on the Menu (three horizontal lines at the top-right of the window).
- Select Add-ons.
- In here, select unwanted plugin and click Remove.

Reset the homepage:
- Click three horizontal lines at the top right corner to open the menu.
- Choose Options.
- Under Home options, enter your preferred site that will open every time you newly open the Mozilla Firefox.
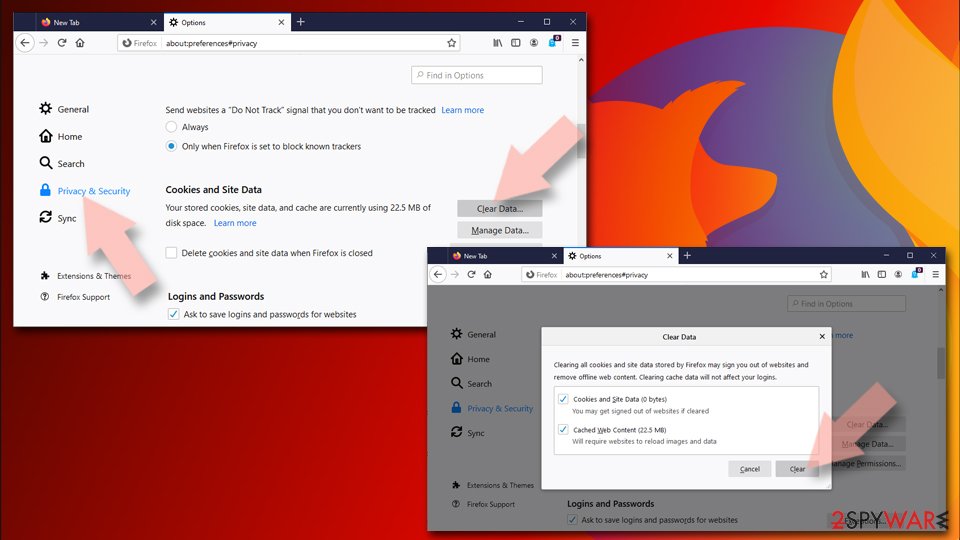
Clear cookies and site data:
- Click Menu and pick Settings.
- Go to Privacy & Security section.
- Scroll down to locate Cookies and Site Data.
- Click on Clear Data…
- Select Cookies and Site Data, as well as Cached Web Content and press Clear.

Reset Mozilla Firefox
If clearing the browser as explained above did not help, reset Mozilla Firefox:
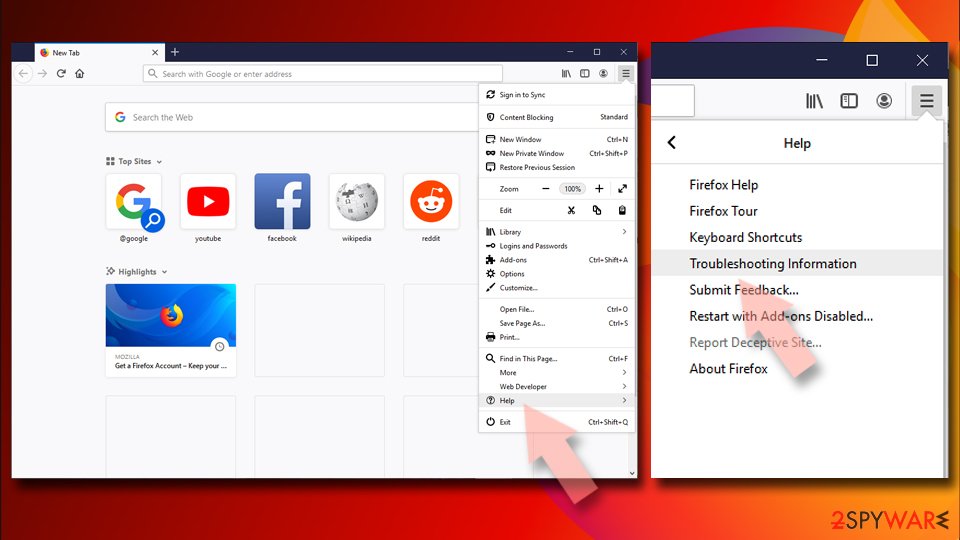
- Open Mozilla Firefox browser and click the Menu.
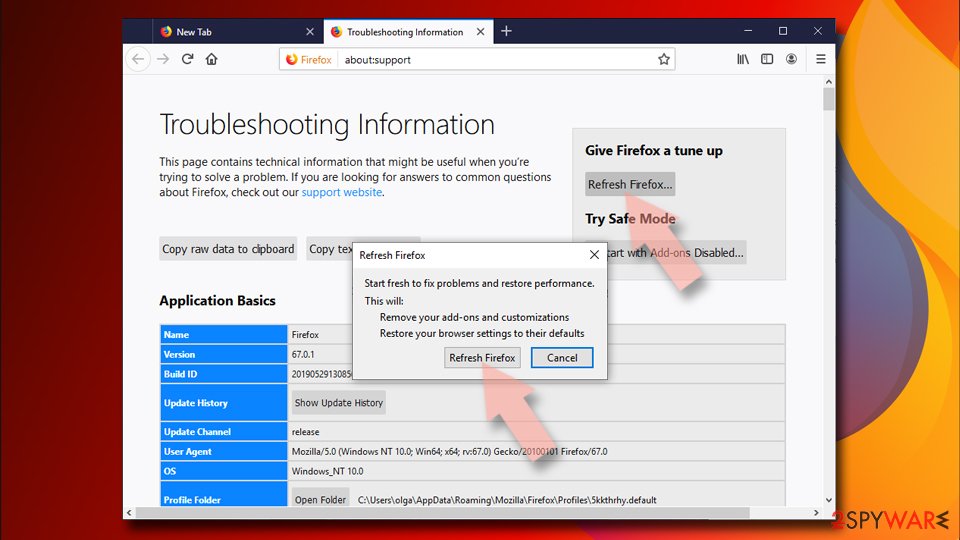
- Go to Help and then choose Troubleshooting Information.

- Under Give Firefox a tune up section, click on Refresh Firefox…
- Once the pop-up shows up, confirm the action by pressing on Refresh Firefox.

Remove from Google Chrome
Delete malicious extensions from Google Chrome:
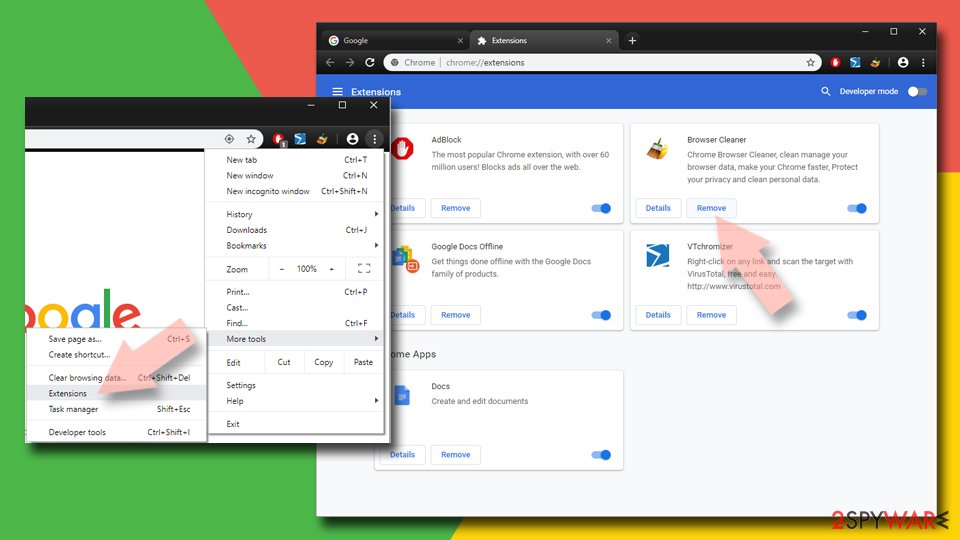
- Open Google Chrome, click on the Menu (three vertical dots at the top-right corner) and select More tools > Extensions.
- In the newly opened window, you will see all the installed extensions. Uninstall all the suspicious plugins that might be related to the unwanted program by clicking Remove.

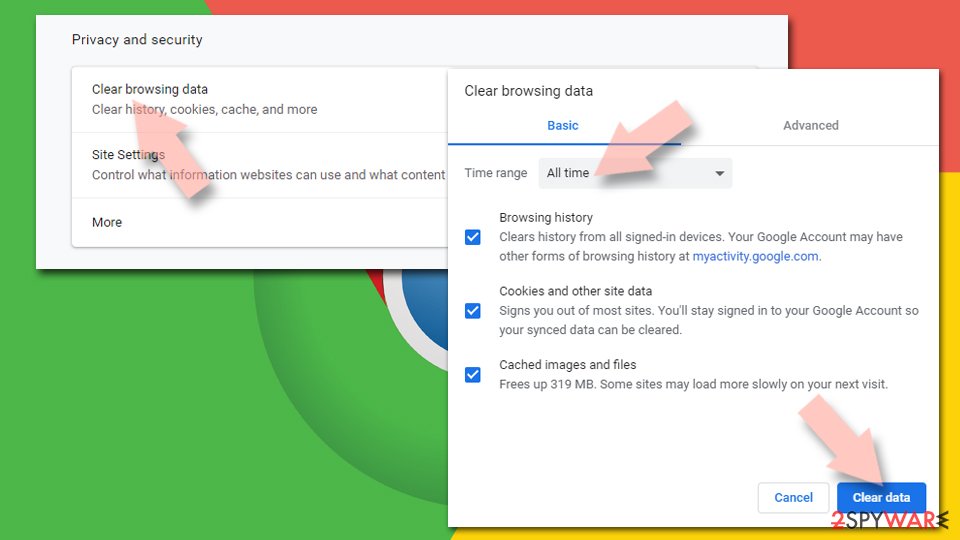
Clear cache and web data from Chrome:
- Click on Menu and pick Settings.
- Under Privacy and security, select Clear browsing data.
- Select Browsing history, Cookies and other site data, as well as Cached images and files.
- Click Clear data.

Change your homepage:
- Click menu and choose Settings.
- Look for a suspicious site in the On startup section.
- Click on Open a specific or set of pages and click on three dots to find the Remove option.
Reset Google Chrome:
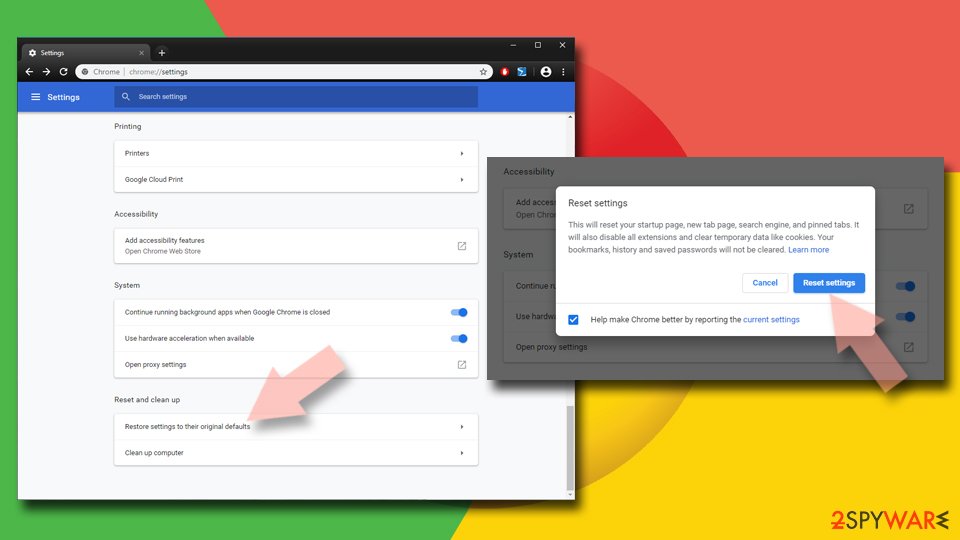
If the previous methods did not help you, reset Google Chrome to eliminate all the unwanted components:
- Click on Menu and select Settings.
- In the Settings, scroll down and click Advanced.
- Scroll down and locate Reset and clean up section.
- Now click Restore settings to their original defaults.
- Confirm with Reset settings.

Delete from Safari
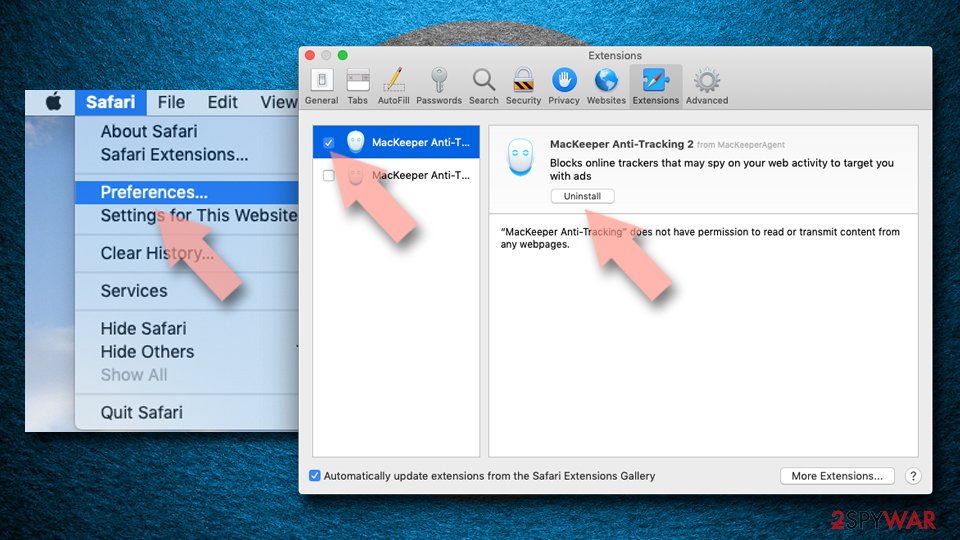
Remove unwanted extensions from Safari:
- Click Safari > Preferences…
- In the new window, pick Extensions.
- Select the unwanted extension and select Uninstall.

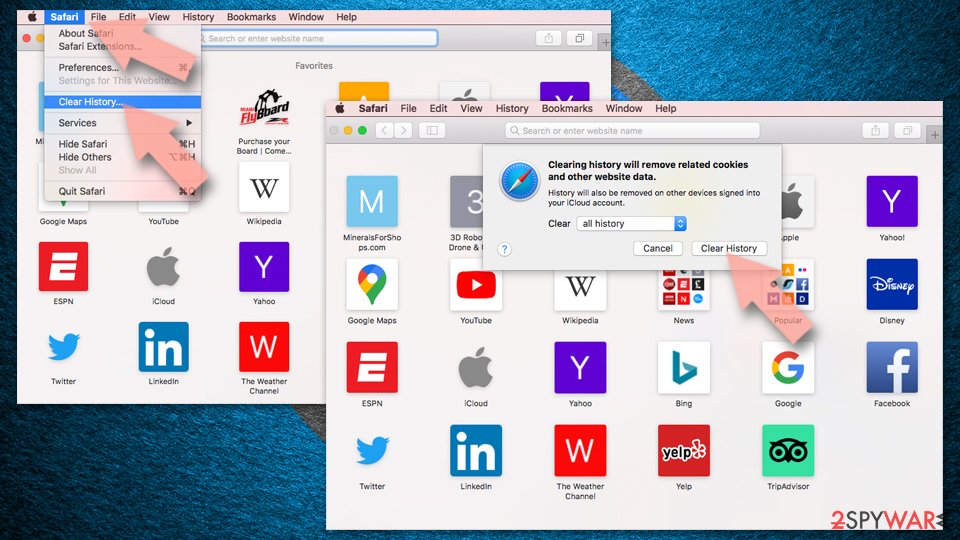
Clear cookies and other website data from Safari:
- Click Safari > Clear History…
- From the drop-down menu under Clear, pick all history.
- Confirm with Clear History.

Reset Safari if the above-mentioned steps did not help you:
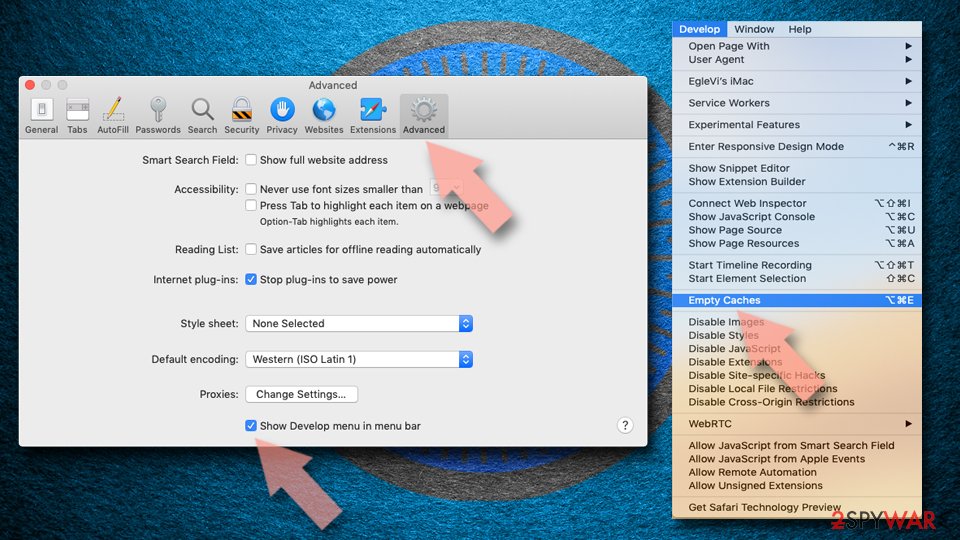
- Click Safari > Preferences…
- Go to Advanced tab.
- Tick the Show Develop menu in menu bar.
- From the menu bar, click Develop, and then select Empty Caches.

Scan your system with anti-malware
If you are a victim of ransomware, you should employ anti-malware software for its removal. Some ransomware can self-destruct after the file encryption process is finished. Even in such cases, malware might leave various data-stealing modules or could operate in conjunction with other malicious programs on your device.
SpyHunter 5Combo Cleaner or Malwarebytes can detect and eliminate all ransomware-related files, additional modules, along with other viruses that could be hiding on your system. The security software is really easy to use and does not require any prior IT knowledge to succeed in the malware removal process.
Repair damaged system components
Once a computer is infected with malware, its system is changed to operate differently. For example, an infection can alter the Windows registry database, damage vital bootup and other sections, delete or corrupt DLL files, etc. Once a system file is damaged by malware, antivirus software is not capable of doing anything about it, leaving it just the way it is. Consequently, users might experience performance, stability, and usability issues, to the point where a full Windows reinstall is required.
Therefore, we highly recommend using a one-of-a-kind, patented technology of FortectIntego repair. Not only can it fix virus damage after the infection, but it is also capable of removing malware that has already broken into the system thanks to several engines used by the program. Besides, the application is also capable of fixing various Windows-related issues that are not caused by malware infections, for example, Blue Screen errors, freezes, registry errors, damaged DLLs, etc.
- Download the application by clicking on the link above
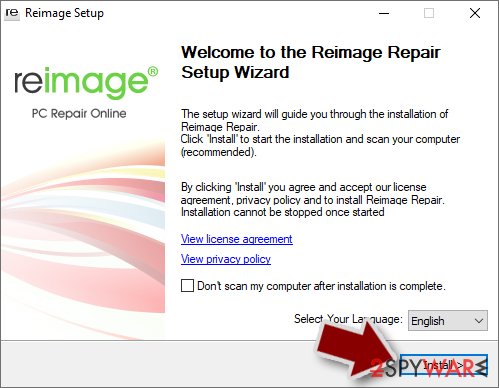
- Click on the ReimageRepair.exe

- If User Account Control (UAC) shows up, select Yes
- Press Install and wait till the program finishes the installation process

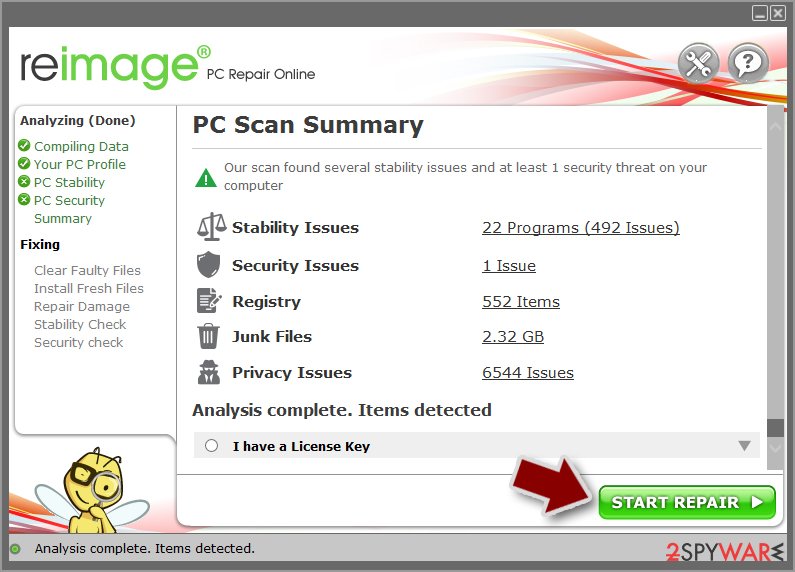
- The analysis of your machine will begin immediately

- Once complete, check the results – they will be listed in the Summary
- You can now click on each of the issues and fix them manually
- If you see many problems that you find difficult to fix, we recommend you purchase the license and fix them automatically.

By employing FortectIntego, you would not have to worry about future computer issues, as most of them could be fixed quickly by performing a full system scan at any time. Most importantly, you could avoid the tedious process of Windows reinstallation in case things go very wrong due to one reason or another.
Manual removal using Safe Mode
Important! →
Manual removal guide might be too complicated for regular computer users. It requires advanced IT knowledge to be performed correctly (if vital system files are removed or damaged, it might result in full Windows compromise), and it also might take hours to complete. Therefore, we highly advise using the automatic method provided above instead.
Step 1. Access Safe Mode with Networking
Manual malware removal should be best performed in the Safe Mode environment.
Windows 7 / Vista / XP
- Click Start > Shutdown > Restart > OK.
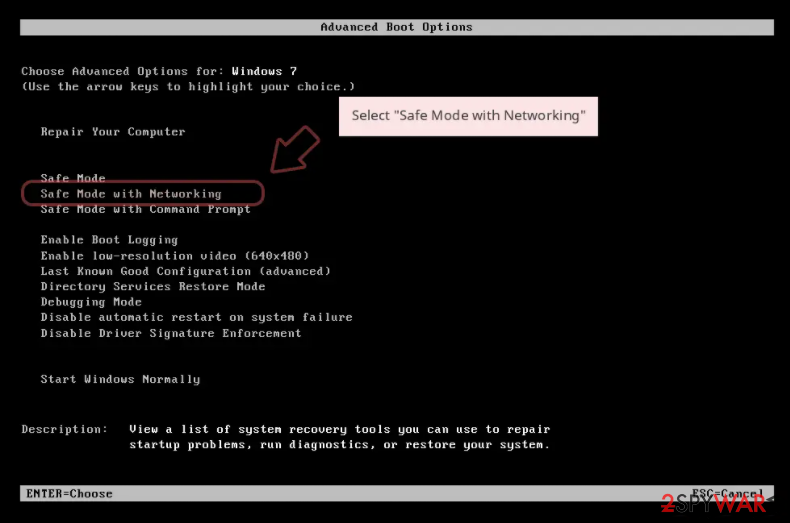
- When your computer becomes active, start pressing F8 button (if that does not work, try F2, F12, Del, etc. – it all depends on your motherboard model) multiple times until you see the Advanced Boot Options window.
- Select Safe Mode with Networking from the list.

Windows 10 / Windows 8
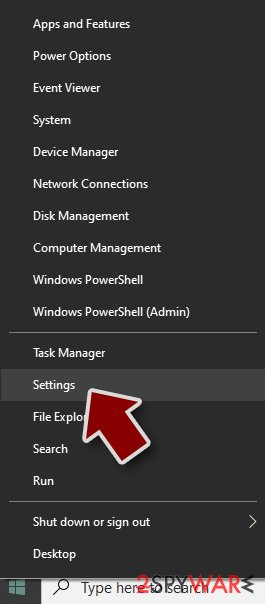
- Right-click on Start button and select Settings.

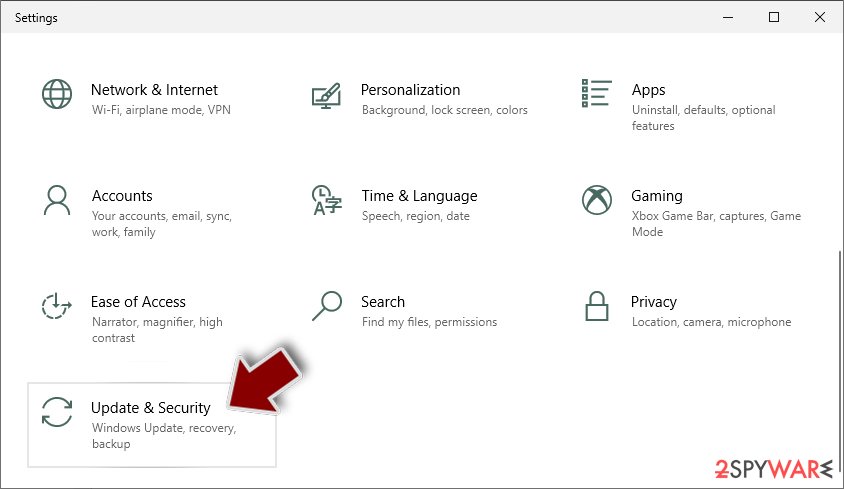
- Scroll down to pick Update & Security.

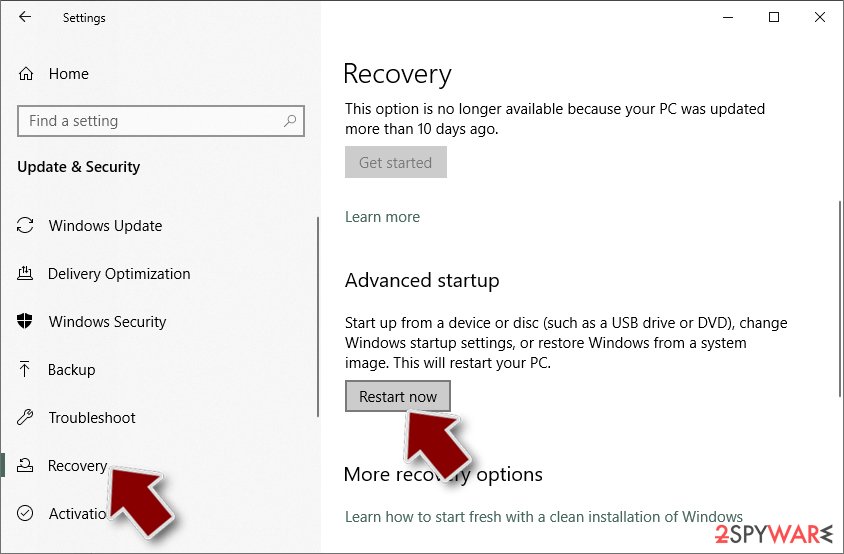
- On the left side of the window, pick Recovery.
- Now scroll down to find Advanced Startup section.
- Click Restart now.

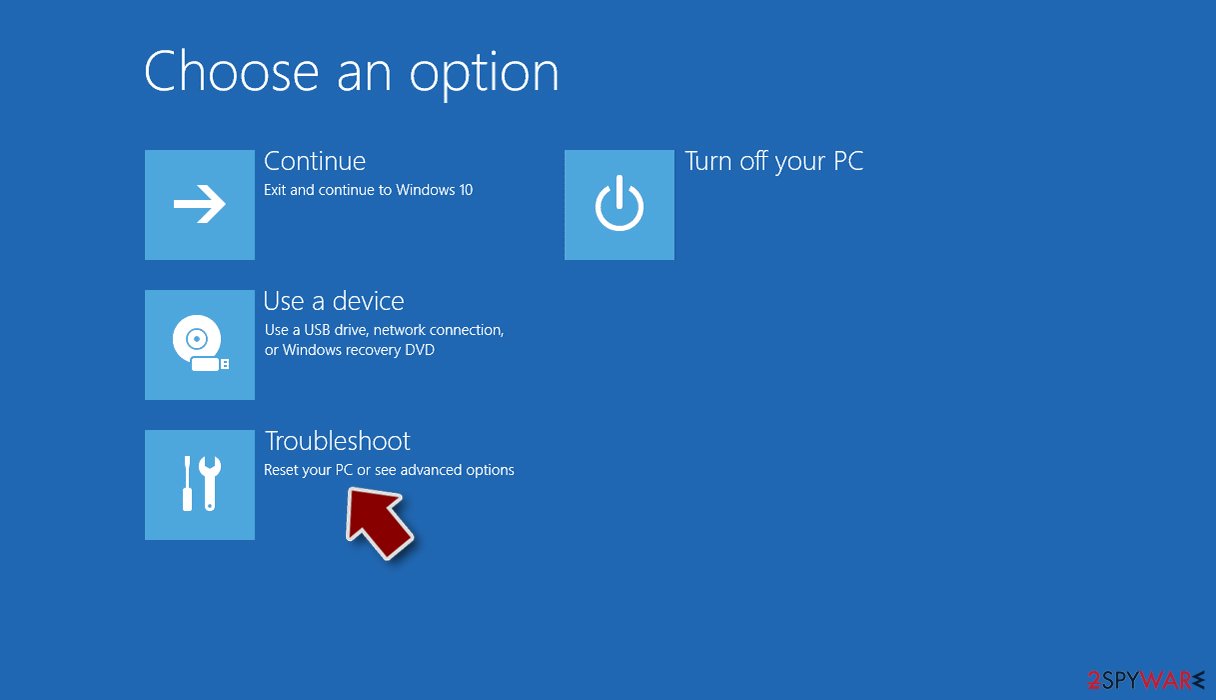
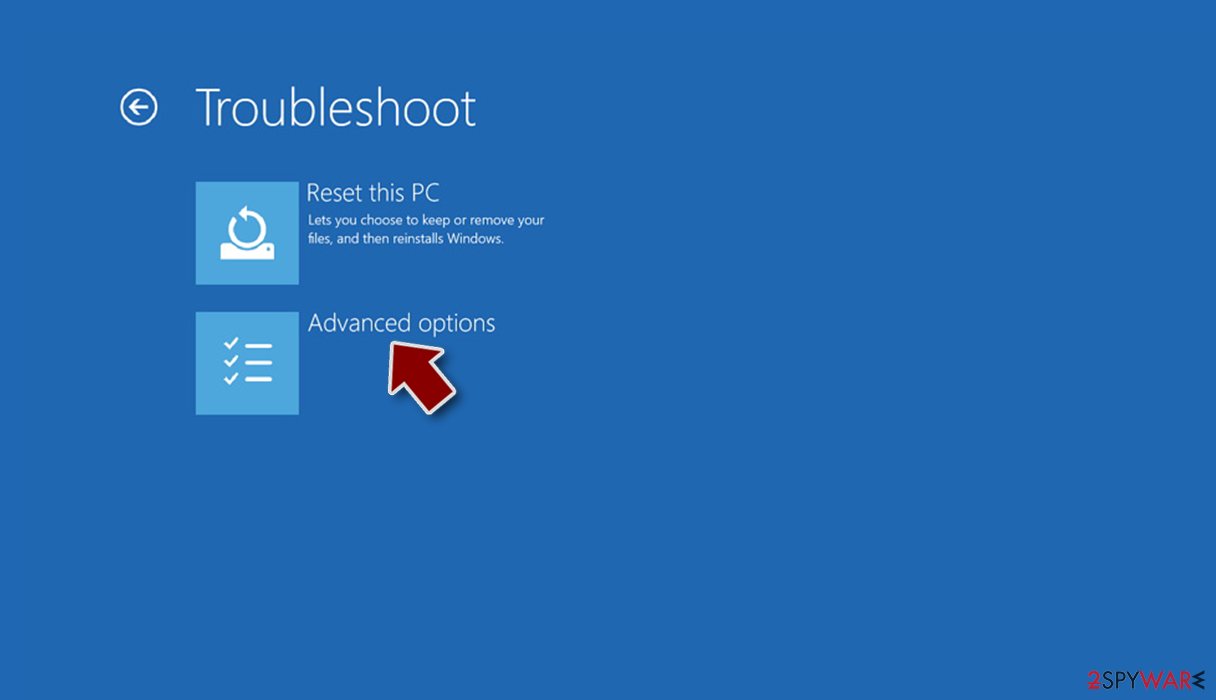
- Select Troubleshoot.

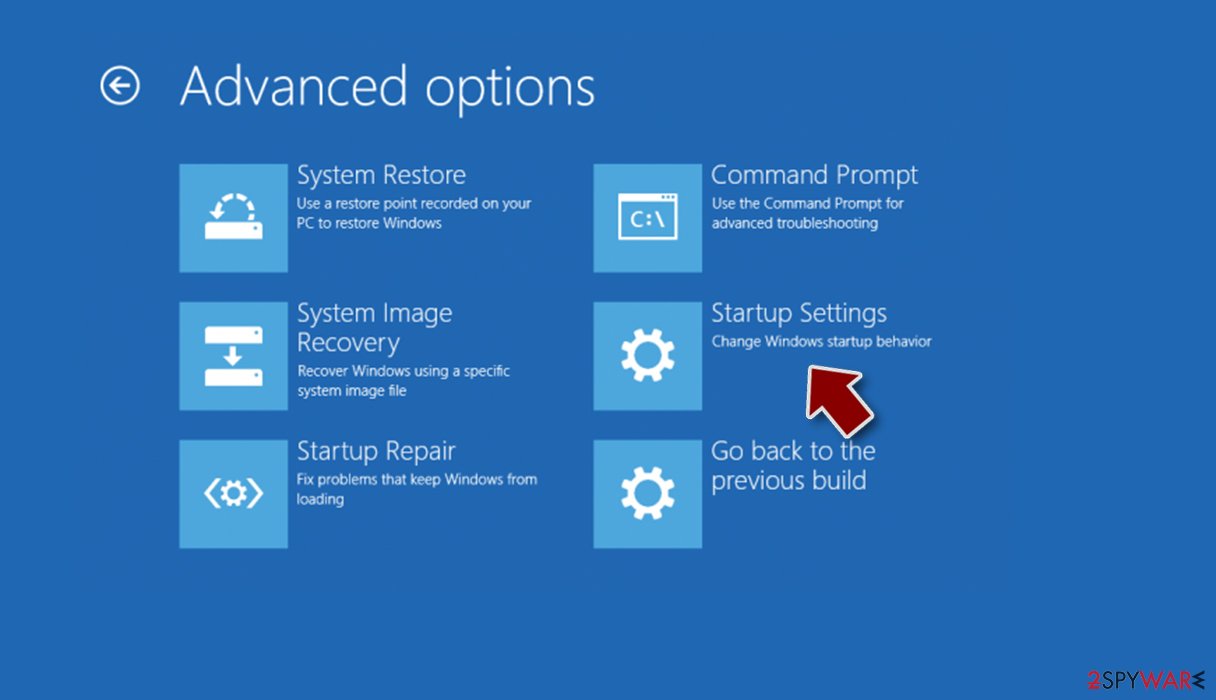
- Go to Advanced options.

- Select Startup Settings.

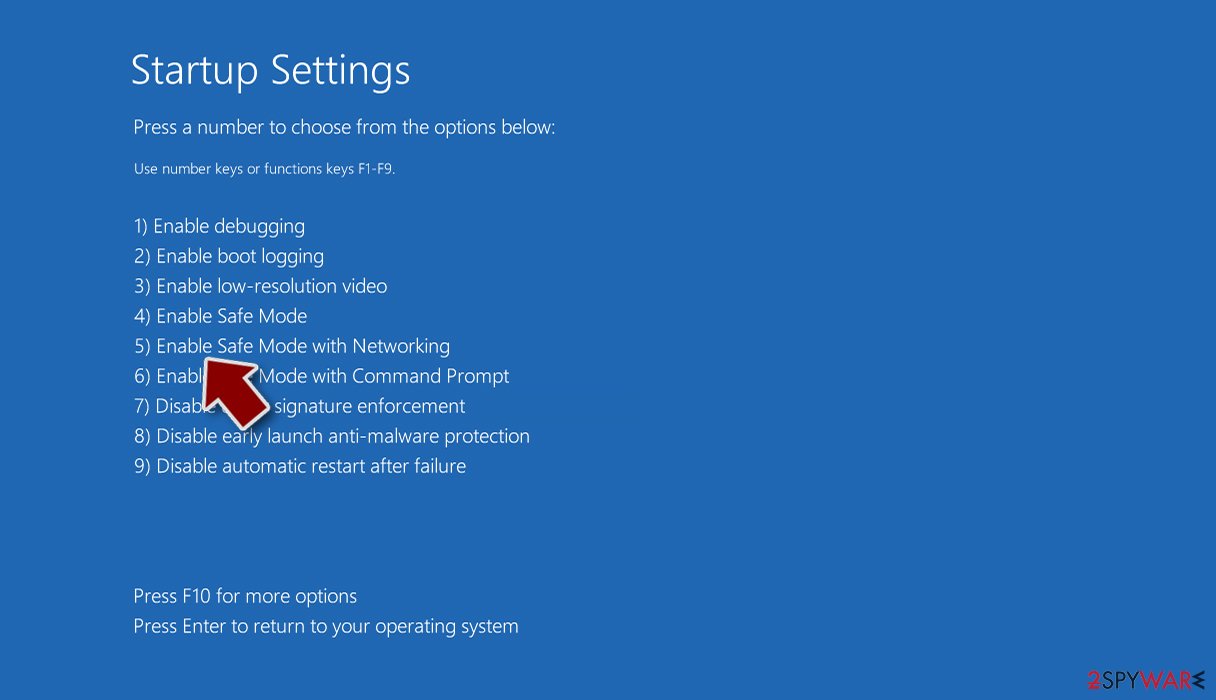
- Press Restart.
- Now press 5 or click 5) Enable Safe Mode with Networking.

Step 2. Shut down suspicious processes
Windows Task Manager is a useful tool that shows all the processes running in the background. If malware is running a process, you need to shut it down:
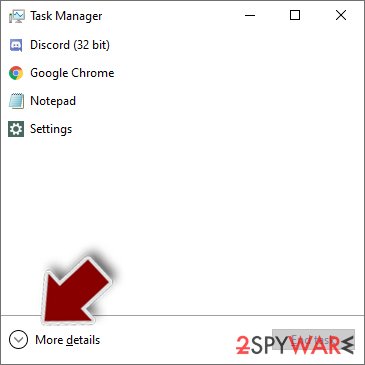
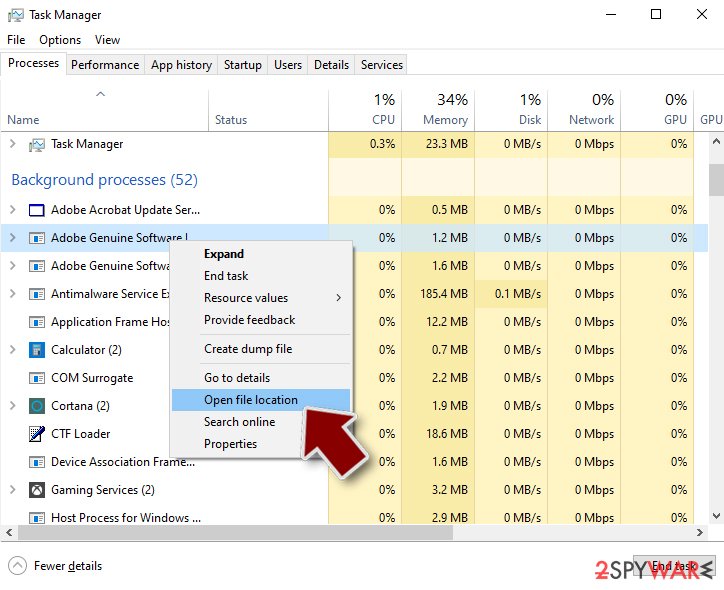
- Press Ctrl + Shift + Esc on your keyboard to open Windows Task Manager.
- Click on More details.

- Scroll down to Background processes section, and look for anything suspicious.
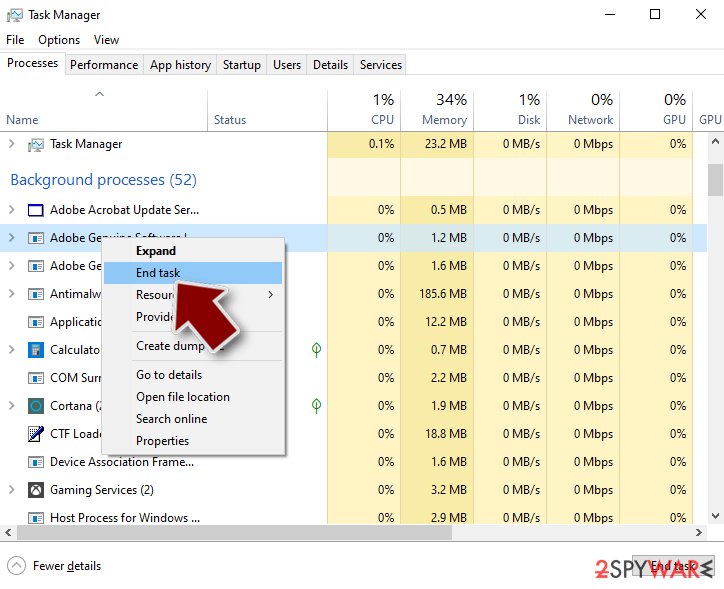
- Right-click and select Open file location.

- Go back to the process, right-click and pick End Task.

- Delete the contents of the malicious folder.
Step 3. Check program Startup
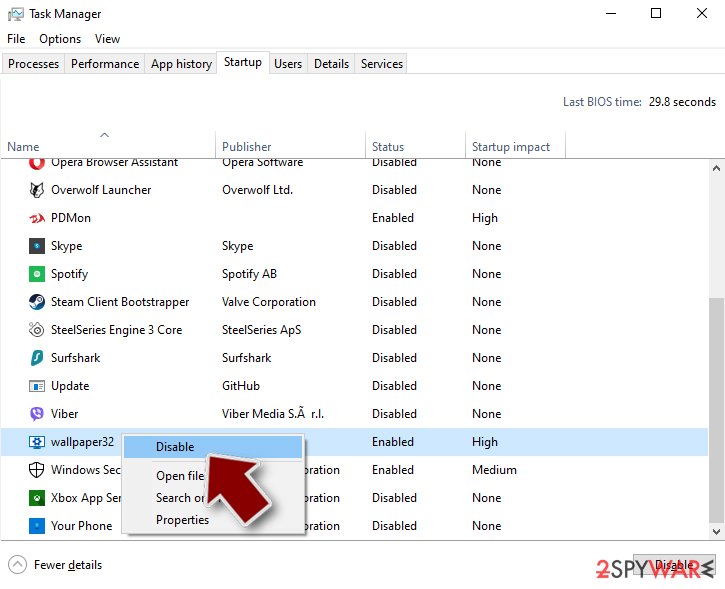
- Press Ctrl + Shift + Esc on your keyboard to open Windows Task Manager.
- Go to Startup tab.
- Right-click on the suspicious program and pick Disable.

Step 4. Delete virus files
Malware-related files can be found in various places within your computer. Here are instructions that could help you find them:
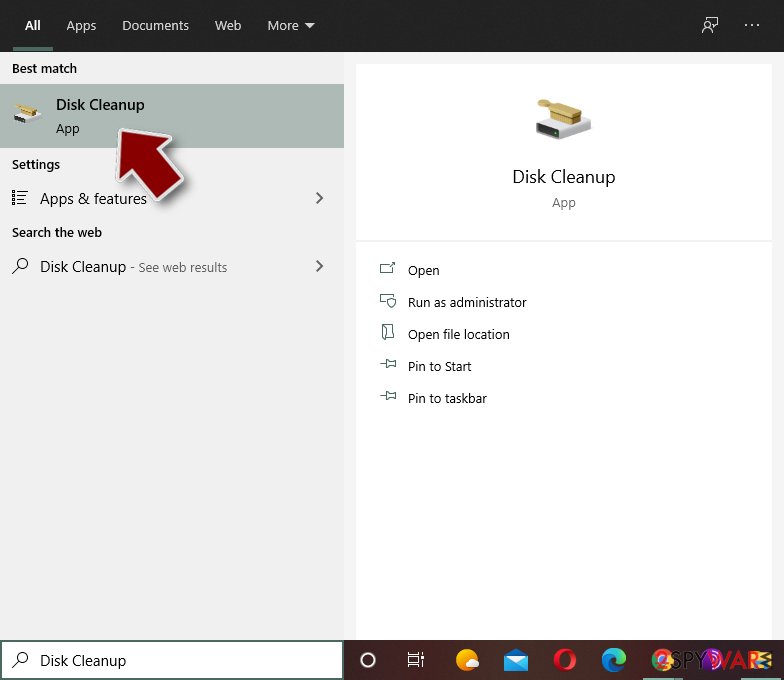
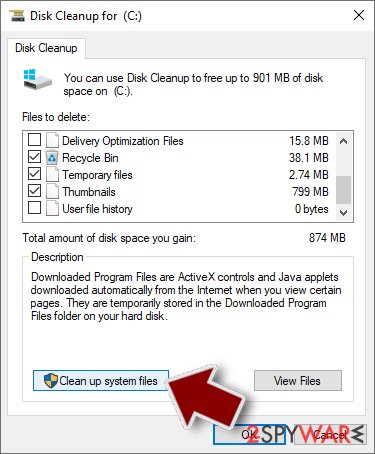
- Type in Disk Cleanup in Windows search and press Enter.

- Select the drive you want to clean (C: is your main drive by default and is likely to be the one that has malicious files in).
- Scroll through the Files to delete list and select the following:
Temporary Internet Files
Downloads
Recycle Bin
Temporary files - Pick Clean up system files.

- You can also look for other malicious files hidden in the following folders (type these entries in Windows Search and press Enter):
%AppData%
%LocalAppData%
%ProgramData%
%WinDir%
After you are finished, reboot the PC in normal mode.
How to prevent from getting malware
Choose a proper web browser and improve your safety with a VPN tool
Online spying has got momentum in recent years and people are getting more and more interested in how to protect their privacy online. One of the basic means to add a layer of security – choose the most private and secure web browser. Although web browsers can't grant full privacy protection and security, some of them are much better at sandboxing, HTTPS upgrading, active content blocking, tracking blocking, phishing protection, and similar privacy-oriented features. However, if you want true anonymity, we suggest you employ a powerful Private Internet Access VPN – it can encrypt all the traffic that comes and goes out of your computer, preventing tracking completely.
Lost your files? Use data recovery software
While some files located on any computer are replaceable or useless, others can be extremely valuable. Family photos, work documents, school projects – these are types of files that we don't want to lose. Unfortunately, there are many ways how unexpected data loss can occur: power cuts, Blue Screen of Death errors, hardware failures, crypto-malware attack, or even accidental deletion.
To ensure that all the files remain intact, you should prepare regular data backups. You can choose cloud-based or physical copies you could restore from later in case of a disaster. If your backups were lost as well or you never bothered to prepare any, Data Recovery Pro can be your only hope to retrieve your invaluable files.
- ^ Graham Cluley. I accepted a fake Facebook friend request, should I be afraid?. Sophos - Naked Security. Computer Security News, Opinion, Advice and Research.
- ^ Aaron Brown. This TERRIFYING new Facebook scam lets hackers clone your account and STEAL money. Express.co.uk. Latest UK and World News, Sport and Comment.
- ^ Usunwirusa. Usunwirusa. The latest virus news.
- ^ Viral Facebook hoax messages prompts warning from officials. CBSlocal. Baltimore news.
- ^ The official Facebook post. Facebook. Social media platform.
- ^ Social engineering (security). Wikipedia. The free encyclopedia.
