

Error Code: RNN7892 notifications are fake: never call the provided phone number
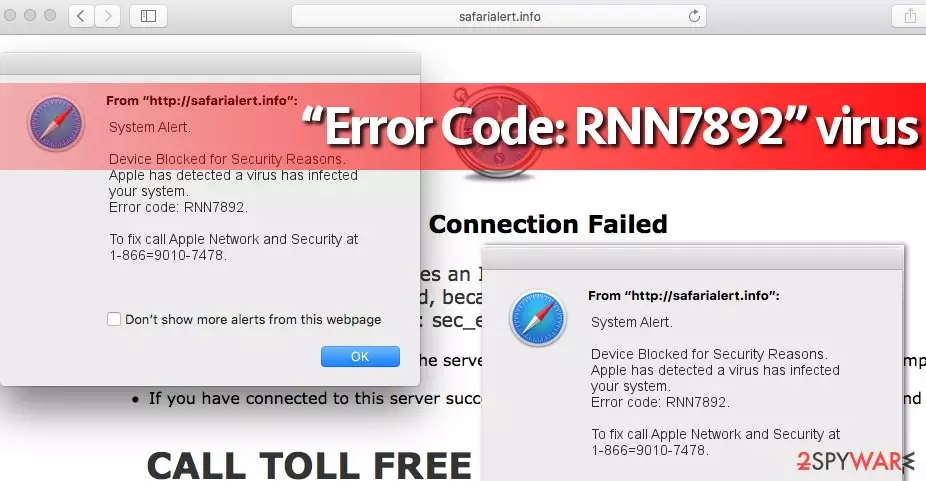
Error Code: RNN7892 virus operates as a tech support scam that attempts to deceive users and coax out money from them. If you are wondering what actually happened to your Windows device, there are two explanations – you either visited a malignant web page that redirected you to the “Error Code: RNN7892” phishing site or you have malware residing on your computer. By saying malware, we mean the program that sends you these bogus messages via your browser, but not viruses that these pop-up messages falsely inform you about.
| Name | Error Code: RNN7892 |
| Type | Scam, online fraud, rogue website, phishing |
| Distribution | Adware might be responsible for redirects to malicious websites |
| Operation | Shows a fake error message which claims about numerous virus infections and asks to call a tech support line in order to “resolve” the problem. Once victims call, crooks try to convince victims to purchase useless programs or demand paying for the alleged help provided |
| Removal | Do not call the provided phone number – leave the page and perform a full system scan with SpyHunterCombo Cleaner or another security tool |
| System fix | After the elimination of adware or malware, we highly recommend running a scan with FortectIntego repair software |
The fake alerts typically appear from websites that have shady domain names, for instance:
- Helpsupportsystemalert.net
- Intelli-support-assistant.com
- Live-online-support.info.
The notification uses various scare tactics to intimidate users and asks to call 1-855-591-2254 or 1-866-9010-7478 for help. Error Code: RNN7892 is a made-up code that does not represent any actual error. If you receive these messages, it means that your Windows or Mac operating system is contaminated with an adware program that wants to deceive you. Let us explain what is the purpose of such deceptive programs.
Once installed, such a type of virus starts displaying fake messages. The majority of them provide identical messages, such as:
System Alert.
Device Blocked for Security Reasons. Apple has detected a virus has infected your system. Error code: RNN7892.
To fix call Apple Network and Security at 1-866=9010-7478.
It is important to identify tech support scams and not fall for their tricks. If you call them, they typically want to get remote access to your computer to fix “issues” that ostensibly pose a risk to your computer’s safety.
On Windows computers, they start by running the Tree command in CMD.exe, which just displays all directories on the screen. Since the computer quickly shows all directories, an inexperienced user might start thinking that the computer system is being scanned and that it is safe to allow the “technician” to do it.
In general, scammers want to gain victim's trust and slowly convince him to obtain products or services from them. Later on, they ask the victim to enter a particular website and provide full name, address, and even credit card details to “purchase” certain services, software, or another absolutely useless product.
Keep in mind that scammers only want your money, so you should stay away from products they recommend buying! Instead, use reliable software, for instance, SpyHunterCombo Cleaner, and remove suspicious programs from your PC right away. To remove malware, scan the system and look through the list of detected files. Then remove all of them with a single click.
Escaping tech support scams
If you want some tips on avoiding being scammed online, try to improve your dangerous-content-online recognition skills. In some cases, it is enough to visit a malicious domain to be automatically redirected to a malicious site that displays such hideous pop-ups.
In such situations, it is enough to restart the browser by closing it and reopening it while holding the Shift key and reset the browser later on. However, many programs hijack the computer system, stay silent, and display annoying pop-ups whenever the user launches an affected web browser. They typically enter the computer system when the user installs a hazardous software package, opens a malicious email attachment, or agrees to install a fake software update.
To prevent malware attacks, don’t install programs using Default or Standard settings and use your common sense when browsing the Internet. Don’t click on ads that promise you to make you rich or that say that you have just won 1 billion dollars for nothing. Also, never open files that unknown people send to you via email. You can never know what hides in these attachments!
Remove the fake Error Code: RNN7892 alert and all its components
Already affected by this malware? In such a case, the computer needs to be cleaned from it. Such malware can consist of browser extensions, programs, registry keys, and other files that pose a threat to your computer’s security. It is essential to remove Error Code: RNN7892 virus and its related files at once without leaving any traces that they have ever existed.
Likewise, an automatic method might be a better option. It might often be difficult to determine which app is causing the unwanted browser redirects or ads – especially if you have plenty of apps installed on your system. Nevertheless, if you want to deal with it yourself, we provide detailed instructions on doing that below.
Uninstall from Windows
Uninstall from Windows 10/8:
- Type Control Panel into the Windows search box and open the result.
- Under Programs, select Uninstall a program.


Uninstall from Windows 7/XP:
- Click on Windows Start > Control Panel (Windows XP users should click on Add/Remove Programs).
- In Control Panel, select Programs > Uninstall a program.


Remove the unwanted program:
- In the Programs and Features window, look for any recently installed suspicious entries, select them, and click Uninstall.
- If User Account Control appears, click Yes to confirm, then complete the removal.


Delete from macOS
Remove the unwanted application:
- From the menu bar, select Go > Applications.
- In the Applications folder, look for any suspicious entries, then drag them to Trash (or right-click and pick Move to Trash).


Delete leftover files and folders:
- Select Go > Go to Folder.
- Enter /Library/Application Support and remove any suspicious folders related to the unwanted program.
- Repeat the same check in the /Library/LaunchAgents and /Library/LaunchDaemons folders, deleting any suspicious entries.

- Finally, empty the Trash to permanently remove the leftovers.

Remove from Microsoft Edge
Delete unwanted extensions from MS Edge:
- Select Menu (three horizontal dots at the top-right of the browser window) and pick Extensions.
- From the list, pick the extension and click on the Gear icon.
- Click Remove.


Clear cookies and other browser data:
- Click on the Menu (three horizontal dots at the top-right of the browser window) and select Settings > Privacy, search, and services..
- Under Clear browsing data, pick Choose what to clear.
- Select Cookies and other site data and Cached images and files. (apart from passwords, although you might want to include Media licenses as well, if applicable) and click on Clear.


Restore new tab and homepage settings:
- Click the menu icon and choose Settings.
- Then find On startup section.
- Click Remove next to any suspicious startup page.
Reset MS Edge if the above steps did not work:
- Press on Ctrl + Shift + Esc to open Task Manager.
- Click on More details arrow at the bottom of the window.
- Select Details tab.
- Now scroll down and locate every entry with Microsoft Edge name in it. Right-click on each of them and select End Task to stop MS Edge from running.


Instructions for Chromium-based Edge
Delete extensions from MS Edge (Chromium):
- Open Edge and click select Settings > Extensions.
- Delete unwanted extensions by clicking Remove.


Clear cache and site data:
- Click on Menu and go to Settings.
- Select Privacy, search and services.
- Under Clear browsing data, pick Choose what to clear.
- Under Time range, pick All time.
- Select Clear now.


Reset Chromium-based MS Edge:
- Click on Menu and select Settings.
- On the left side, pick Reset settings.
- Select Restore settings to their default values.
- Confirm with Reset.
- This will disable extensions and reset startup pages but will not delete bookmarks, saved passwords, or browsing history.


Remove from Mozilla Firefox (FF)
Remove dangerous extensions:
- Open Mozilla Firefox browser and click on the Menu (three horizontal lines at the top-right of the window).
- Select Add-ons.
- In here, select the unwanted extension and click Remove.


Reset the homepage:
- Click three horizontal lines at the top right corner to open the menu.
- Choose Settings.
- Under Home, set your preferred homepage and new tab settings.
Clear cookies and site data:
- Click Menu and pick Settings.
- Go to Privacy & Security section.
- Scroll down to locate Cookies and Site Data.
- Click on Clear Data...
- Select Cookies and Site Data and Temporary cached files and pages, then click Clear.


Reset Mozilla Firefox
If clearing the browser as explained above did not help, reset Mozilla Firefox:
- Open Mozilla Firefox browser and click the Menu.
- Go to Help and then choose Troubleshooting Information.

- Under Give Firefox a tune up section, click on Refresh Firefox...
- Once the pop-up shows up, confirm the action by pressing on Refresh Firefox.



Remove from Google Chrome
Delete malicious extensions from Google Chrome:
- Open Google Chrome, click on the Menu (three vertical dots at the top-right corner) and select More tools > Extensions.
- In the newly opened window, you will see all the installed extensions. Uninstall all suspicious extensions related to the unwanted program by clicking Remove.


Clear cache and web data from Chrome:
- Click on Menu and pick Settings.
- Under Privacy and security, select Clear browsing data.
- Select Browsing history, Cookies and other site data, as well as Cached images and files.
- Click Clear data.


Change your homepage:
- Click menu and choose Settings.
- Look for a suspicious site in the On startup section.
- Click on Open a specific or set of pages and click on three dots to find the Remove option.
Reset Google Chrome:
If the previous methods did not help you, reset Google Chrome to eliminate all the unwanted components:
- Click on Menu and select Settings.
- In the Settings, scroll down and click Advanced.
- Scroll down and locate Reset and clean up section.
- Now click Restore settings to their original defaults.
- Confirm with Reset settings.


Delete from Safari
Remove dangerous extensions:
- Open Safari, click Safari in the menu at the top-left of the screen, and select Preferences.
- Go to the Extensions tab, look for any suspicious entries, and click Uninstall to remove them.


Clear history and website data:
- Click Safari in the menu and pick Clear History.
- Set Clear to all history and confirm with Clear History.


Reset Safari:
- Click Safari in the menu and select Preferences > Advanced.
- Enable Show Develop menu in menu bar.
- From the menu bar, click Develop and select Empty Caches.


Did this guide help?
2 comments
Leonard
Yeah! Spread information about Error Code: RNN7892 virus! These filthy tech support scammers deceive innocent people everyday!
Lucas1984
My grandpa called these filthy fools and he got scared! I am so mad that I have called scammers myself today. I told them everything I think about them! These cowards hung up!